the next page
Read this first
Thank you for purchasing the HTC J butterfly HTV31
(simply called the 'HTV31' or the 'product' from here on).
Before you start using the product, read the Exemptions
and Safety precautions in the Basic Manual to ensure
you use it correctly and safely.
※
Names of companies and products noted in this document
are trademarks or registered trademarks of their respective
companies. The ® and TM symbols are not used in this document.
※The screen images in this document may be different from the actual
screen. Also note that a part of the screen images may be omitted.
※
This manual uses the abbreviation 'app' in place of 'application'.
May 2015, 2nd Edition
Sold by: KDDI CORPORATION •OKINAWA CELLULAR
TELEPHONE COMPANY
Imported by: HTC NIPPON Corporation
Manufactured by: HTC Corporation
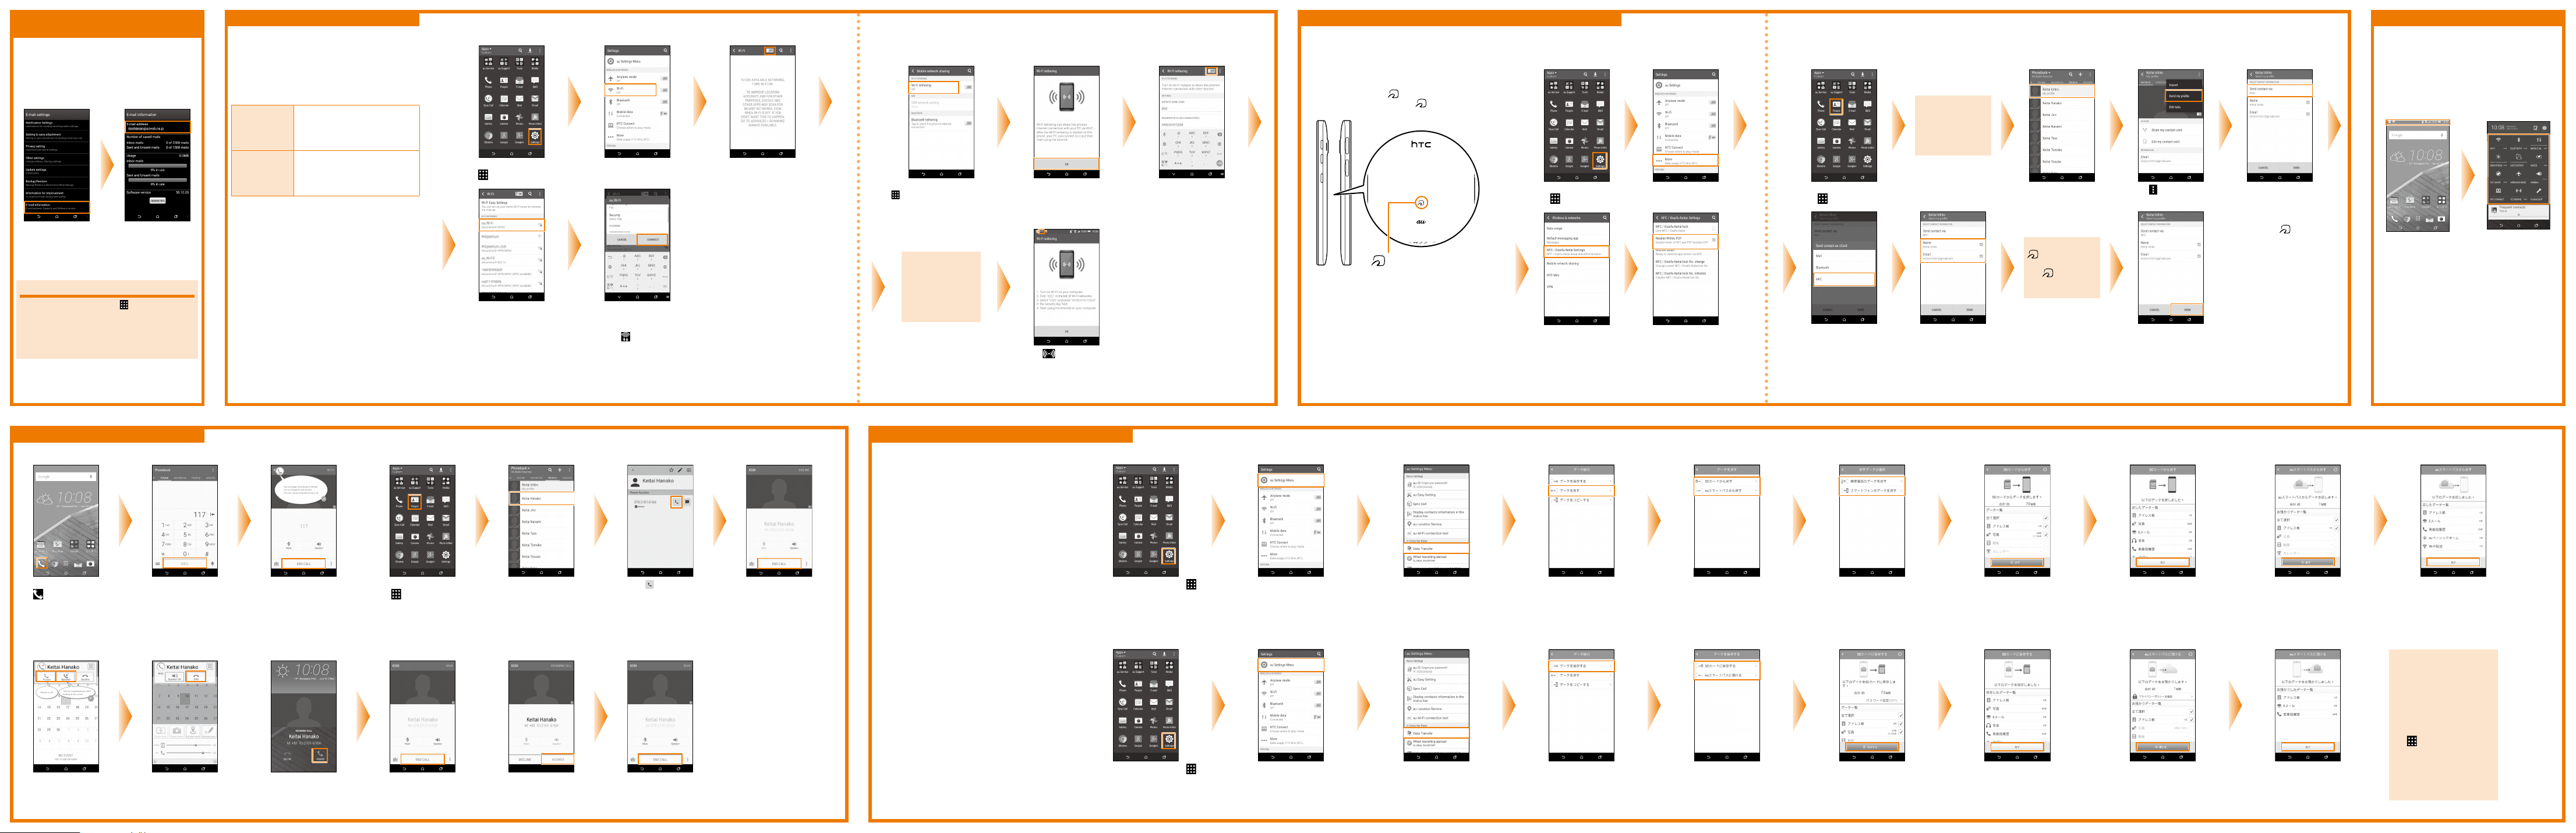
Basic operations Setup
■Basic operations of keys
Volume key
Adjust the volume of
other party’s voice and
ringtones.
Power key
Turn on the power.
Switch on/off
Sleep mode.
Display (touch panel)
Touch with your finger to
operate.
Back key
Go back to the
previous screen.
Home key
Return to the home screen.
Recently used apps
Display a history of
recently used apps.
■Turning on the power
Press and hold
for at least
two seconds until
the product vibrates,
and then release it
※After a while, the
lock screen appears.
On the lock screen,
slide upward or
sideways
Description of functions
This "Setting Guide" describes the main
basic operations and initial setup. For more
information on various functions, refer to the
"Basic Manual" that comes with this product,
and the "Instruction Manual Application" that
can be used on the product.
■Basic touch panel operations
Tap/double tap
Lightly touch an item on the
screen with your finger and
then release your finger.
Tapping the same position
twice consecutively is called
a double tap.
Long touch Slide Flick
(swipe)
Keep touching
an item with
your finger.
While your
finger is gently
touching the
screen, move it
in the desired
direction.
Operate the
screen by
quickly moving
(flicking) your
finger up, down,
right, or left.
■Inputting characters
The software keyboard can be used when an
app that requires character or numeric input is
started up, or when you touch a character input
area.
⑤
⑥
⑦
⑧
①When inputting characters, the characters
assigned to a key(⑩) are displayed in
reverse order.
②Moves the cursor left.
③Tap this key while inputting characters to
perform alphanumeric and Japanese Kana
conversion. Tap this key before inputting
characters to display a symbol/emoticon list.
④Changes the input mode.
⑤Deletes the character to the left of the cursor.
⑥Moves the cursor right.
⑦Inputs spaces.
⑧Inputs a carriage return and finalizes the
characters being input.
⑨Toggles between upper-case and lower-case
characters.
⑩Input characters.
⑪Inputs a ' , ', ' . ', symbol, or space.
This section explains the Setup (setup wizard)
when you turn on the power of the product in
its initial state.
■STEP 1: Setting the language
Select the language
being displayed
Select English
⇒
OK
⇒
START
Setup (continued)
■STEP 5: Setting up a Google account
Set up a Google account to use Google apps such as Gmail, Google Maps and Play Store, etc.
To create a new
Google account, tap Or
create a new account
※If you already have a
Google account, enter
your mail address.
Enter your first name
and last name ⇒NEXT
Enter your mail address
⇒NEXT
※You cannot use a mail
address that is already
being used by another
user.
Enter your password ⇒
NEXT Tap NEXT
※To register the phone
number later, tap Skip.
If a SMS transmission
screen appears to
verify your phone
number, tap VERIFY.
※Receive SMS. After
completing the initial
setup, confirm it.
Check the content ⇒
tap AGREE Check the created
account ⇒NEXT
Select Remind me later
⇒tap NEXT
※As necessary, select the
payment options, tap
NEXT and follow the on-
screen instructions.
■STEP 14: au Easy Setting
Read the content ⇒NEXT Read the content ⇒Next Select Register "au ID" ⇒
Next Tap au IDの設定・保存 (Set/
save au ID) Input your security number
⇒OK
※The initial value of a security
number is a four digit number
chosen by the customer and
noted on the application form.
Input your password ⇒設定
(Setting) Tap 終了 (Exit) Select Update ⇒Next Read the terms of service
⇒select Agree ⇒Next
※If a security confirmation
screen appears, tap Agree.
If you tap Agree, pre-
configuration of Lookout for
au is complete.
If a screen appears
prompting you to
select home apps,
select home apps to
use or the number of
times of usage.
About the setup wizard
To reset the initial setup, tap
on the home screen
⇒
Tools
⇒
Setup to launch the setup
wizard.
Check the content ⇒Agree
※If you select Disagree on
the Term of Use screen for
the Initial Settings, a caution
screen will appear. If you tap
OK, the exit screen of the au
Easy Setting will appear.
Check the content ⇒To use a
data backup app, select Turn
Auto Backup on ⇒Next
※If you do not want to use
Automatic Backup service, tap
Turn Auto Backup off ⇒Next.
Select the app to install ⇒
次へ (Next)
※If there is any app to restore,
an app restoration screen will
appear. Follow the on-screen
instructions to restore the app.
Check the content. ⇒To
use au Basic Home, select
Activate ⇒Next
※
If you do not want to use au
Basic Home, tap Skip activation
⇒
Next.
Check the content.
⇒
To use
Texting While Walking Alert
app, select Activate
⇒
Next
※If you do not want to use Texting
While Walking Alert app, tap
Skip activation ⇒Next.
Select the data to restore to
your terminal from among
those backed up in the au
Smart Pass ⇒次へ (Next)
※
If no data is selected, the screen
does not appear.
Confirm the content ⇒Finish
※If a different screen appears,
follow the on-screen instructions
to perform the operation.
■Setup of e-mail
Use of e-mail (@ezweb.ne.jp) requires an LTE NET subscription.
If you did not subscribe when you purchased your product, contact an au shop or Customer Service
Center.
The e-mail address is decided automatically when you do the initial settings.
On the home screen,
tap Confirm the content ⇒接
続する(Connect)
Check your e-mail
address
⇒
閉じる
(Close)
Select Agree ⇒Done Check the content ⇒
Close
※To see the detailed
information, tap Detail.
E-mail (@ezweb.ne.jp) settings ■Changing your e-mail address
You can change your e-mail address decided at the initial setup later.
《E-mail settings
screen》
On the home screen,
tap Tap Tap E-mail settings Tap Other settings Confirm the content ⇒
接続する (Connect)
Tap Eメールアドレスの
変更へ (Go to change
e-mail address)
Input your security
number ⇒送信 (Send) Confirm the content ⇒
承諾する (Accept) Input your e-mail
address ⇒送信 (Send)
Tap OK ⇒閉じる (Close)
■STEP 2:
Allowing HTC to collect usage data
Confirm the content ⇒
NEXT
※If you do not allow HTC
to collect usage data,
tap Change usage data
settings. to clear the
checkbox and tap SAVE.
■STEP 3:
Setting Internet connections
For information on how
to set the Wi-Fi network,
see 'Wi-Fi connection
settings' on the following
page.
Set the Wi-Fi
network to connect
⇒NEXT
■STEP 6:
Google location detection feature
Select whether to use
location information and
communication services
⇒NEXT
※If a confirmation screen
appears, tap AGREE.
■STEP 8: HTC Backup
Select whether to backup
settings and apps in your
Google drive every day
⇒NEXT
■STEP 4:Tap & Go
Tap & Go enables you
to transfer account data
using NFC function
(Android Beam). Make
sure that the NFC
function of your another
cell phone is turned on.
Tap SKIP
■STEP 7: HTC advantage
Tap Sign in later Tap Skip for now
■STEP 9: Setting an HTC account
Tap HTC Account
Sign in with email
⇒
follow
the on-screen instructions
※
To create an HTC account,
tap Sign up
⇒
Follow the
on-screen instructions to
complete the setup.
※If you do not use an HTC
account, go to STEP 10.
●Basic operations
This section explains the
basic operating procedures.
●Setup
This section explains the
settings to be made when
you turn on the power of the
product in its initial state.
●E-mail (@ezweb.ne.jp)
settings
E-mail is a service that
allows you to exchange
mail messages with mobile
phones that support e-mail
and with computers. The
e-mail address is decided
automatically when you do
the setup.You can change
your e-mail address decided
at the initial setup later.
●Network settings
Make these settings to
use Wi-Fi network or
Wi-Fi tethering.
●Sending and receiving
data with Android Beam
The product can exchange
data with another device
that has a NFC function.
●Saving power
You can save battery power
by turning off functions that
are not being used.
●Making and receiving
calls
You can also place phone
calls by using contacts.
●Moving data with au
Settings menu
You can back up or
restore data to the
product from your old
au phone by using a
microSD memory card or
au Smart Pass server.
au ID※Register your au phone number or any character string for au ID (user ID).
au ID password Register the password for the au ID.
※The same au ID as another user's cannot be registered.
The settings to use the convenient au functions and services are easy to do.
This section describes how to set up an au ID on the initial settings screen, which appears when you first turn on the power after purchasing the product.
The settings can be changed with the "au ID Settings" app.
■STEP 13:
HTC SENSE HOME personal
settings
Select whether to allow
HTC to collect information
on your current location
and usage data ⇒NEXT
■STEP 12:
Customizing your wallpaper
Confirm the content ⇒
NEXT
※To set up the wallpaper,
tap Choose Home
screen wallpaper, then
select a wallpaper and tap
APPLY.
Setting Guide
■STEP 10: Setting other services
To use other
services shown
on the screen,
tap a service,
do the setting,
and then tap
NEXT.
Tap other services
※In this example, a mail service is being set.
■STEP 11:
Securing your phone / setting
screen lock
Input your name ⇒NEXT
※Your Google account
name (part before @) set
in STEP 5 has already
been entered. If you did
not set a Google account,
'HTV31' has been entered.
※To set up screen lock, tap
Screen lock and follow
the on-screen instructions.