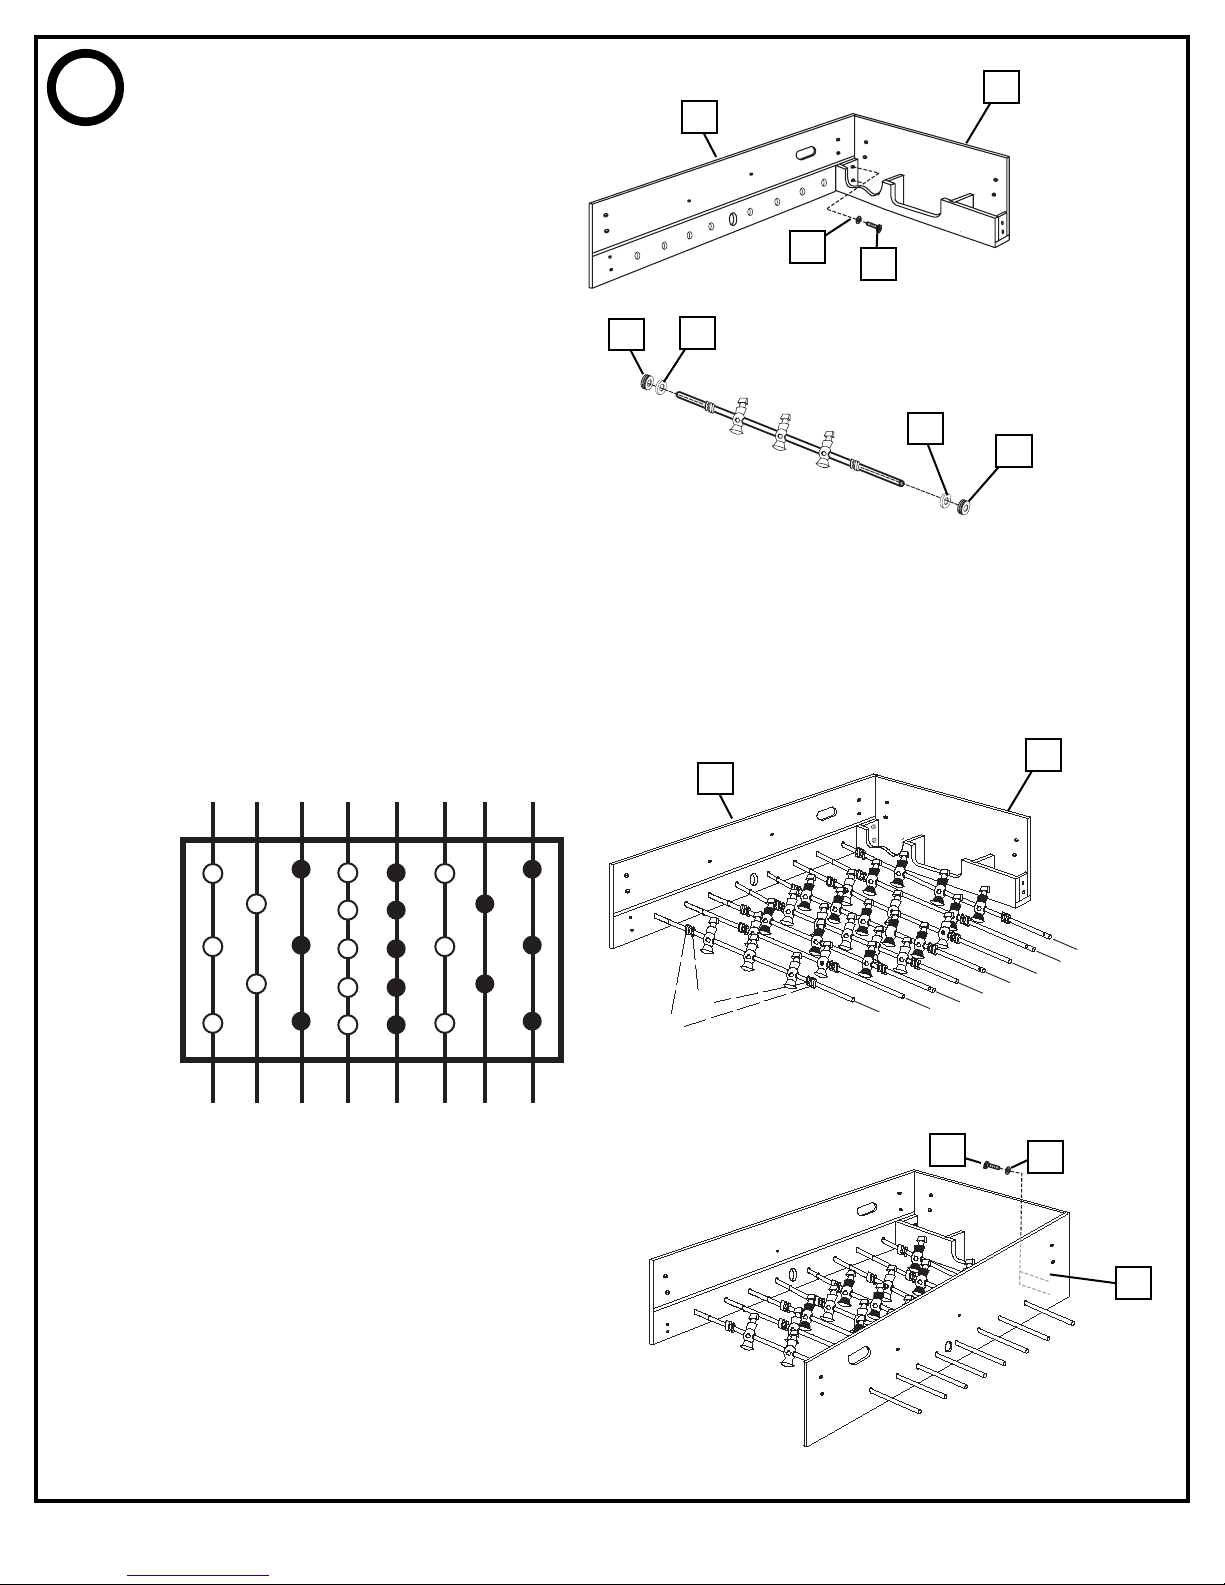
Huffy 211011 User manual

110/04 P/N 211011
© COPYRIGHT 2004 by HUFFY SPORTS
Toll-Free Customer Service Number for U.S: 1-800-558-5234
For Canada: 1-800-284-8339
For Europe: 00 800 555 85234 (Sweden: 009 555 85234)
For Australia: 1-800-333 061
READ AND UNDERSTAND
OPERATOR'S MANUAL
BEFORE USING THIS UNIT.
FAILURE TO FOLLOW
OPERATING
INSTRUCTIONS COULD
RESULT IN INJURY OR
DAMAGE TO PROPERTY.
WARNING!
Table Soccer Game
Owners Manual
Customer Service Center
• N53 W24700 South Corporate Circle • Sussex, WI 53089 • U.S.A.
A DIVISION OF RUSSELL CORPORATION
PLEASE DO NOT CALL Snap-on TOOLS FOR REPLACEMENT OR MISSING PARTS.

2
P/N 211011 10/04
Item #26
Item #18
Item #17
Item #25
Item #22
Item #21
Item #13 Item #14
Item #9 Item #10
Item #5 Item #6
Item #1
1/8" Flat Head Screw
4 Pcs 1/2" Round Head Screw
26 Pcs 3/4" Round Head Screw
18 Pcs Leg Bolt
24 Pcs
Leg Washer
24 Pcs 3/16" Bolt
4 Pcs 3/16" Washer
4 Pcs Barrel Nut
4 Pcs
Tool
1 Pcs Slide Scorer
2 Pcs Soccer Ball
2 Pcs Rod Cap
8 Pcs
Handle
8 Pcs Home 5-Player Rod
1 Pcs Home 3-Player Rod
2 Pcs Home 2-Player Rod
1 Pcs
Away 5-Player Rod
1 Pcs Away 3-Player Rod
2 Pcs Away 2-Player Rod
1 Pcs Rod Bushing
16 Pcs
Plastic Rod Washer
16 Pcs Slide Panel
2 Pcs End Panel
2 Pcs Playfield Support Brace
2 Pcs
Playfield
1 Pcs Leg
4 Pcs Plastic Goal Box
2 Pcs Plastic Ball Catcher
2 Pcs
Ball Runner
2 Pcs Ball Entry Cup
2 Pcs Drink Holder
2 Pcs Leg Leveler
4 Pcs
Item #2
Item #27
Item #24
Item #23
Item #19 Item #20
Item #15 Item #16
Item #11 Item #12
Item #7 Item #8
Item #3 Item #4
Item # 28
Item #32Item #31
Item #30
Item #29
TS-104 TABLE SOCCER PARTS LIST

10/04 P/N 211011
3
1.
A. Attach a side panel (22) to the end panel (23) by
using leg bolt (4) and leg washer (5).
B. Slide the plastic rod washer (21) and rod bushing
(20) onto each end of the player rods.
C. Follow the diagram and insert the player rods
(14, 15, 16, 17, 18, & 19) through the designated
holes in the side panel (22).
IMPORTANT: Make sure the small hole in the
end of the rods (17, 18, and 19) are through the
side panel
D. Slide the other ends of the player rods through
the other side panel (22) and attach to the end
panel (23) using the leg bolt (#4) and leg washer
(#5).
20 21
(15) Home 3-Player Rod
(16) Home 2-Player Rod
(18) Away 3-Player Rod
(14) Home 5-Player Rod
(17) Away 5-Player Rod
(15) Home 3-Player Rod
(19) Away 2-Player Rod
(18) Away 3-Player Rod
20
21 20
21
22 23
22 23
22
54
(15) Home 3-Player Rod
(16) Home 2-Player Rod
(18) Away 3-Player Rod
(14) Home 5-Player Rod
(17) Away 5-Player Rod
(15) Home 3-Player Rod
(19) Away 2-Player Rod
(18) Away 3-Player Rod
5
4

4
P/N 211011 10/04
2.
A. Slide the playfield (25) UPSIDE DOWN into the grooves in
the side (22) and end (23) panels as shown.
B. Affix the other end panel (23) to the side panels (22) using
leg bolt (4) and leg washer (5).
IMPORTANT: Make sure the playfield is resting in the
grooves in ALL panels.
Secure the playfield by placing the playfield support braces
(24) onto the playfield. Place the barrel nut (8) into the
support brace and insert the 3/16" bolt (6) and 3/16" washer
(7) through the side panel (22) and into the barrel nut.
C. Affix the plastic ball catcher (28) to the side panel (22) with
the 1/2" round head screw (2).
Affix the plastic goal box (27) to the end panel with the 1/2"
round head screw (2).
Connect the plastic ball catcher and plastic goal box with the
ball runner (29).
* Repeat for opposite corner
25
23
24
24
876
28
29
27
5
4
2
2
23
22
22 23

10/04 P/N 211011
5
3. A. Attach the legs (26) to the side (22) and end (23) panels with the leg bolt (4) and leg washer
(5). Screw the 3/4" round head screw (3) into the playfield in the pre-drilled holes near the goal.
B. Screw the leg levelers (32) into the bottom of the legs.
32
26
5
3
3
4
23
23
22
22

6
P/N 211011 10/04
4. A. CAREFULLY flip the table over. Attach the drink holders (31) to the end panels (23) with 1/2"
round-head screw (2).
B. Attach the slide scorer (10) to the top rail of both end panels by inserting the 1/8" flat-head
screw (1) through the pre-drilled holes.
C. Slide the handles (13) onto the ends of the player rods with the small holes in the end. Slide
the rod caps (12) onto the player rods opposite the handles.
D. Insert the ball entry cups (30) into the circular holes in the side panel (22) and secure with
the 1/2" round-head screw (2).
13
31
12
2
1
10
2
30
23 10
22
Other Huffy Board Game manuals