HumanTechnik freeTEL III User manual

GB
SE Bruksanvisning
ES Instrucciones de servicio
Sladdlös telefon med
ljudförstärkare
Cordless telephone
with amplifier
Teléfono sin hilos con
amplificador audiométrico
Página 70
Sida 36
Page 2
Operation Instructions
free
TEL III

2 English
In order to be able to operate and use your telephone safely, please read the following safety
instructions and the section on “Commissioning”.
• Position the base station on a non-slip surface.
• Lay the connecting cable accident-proof.
• Never expose the telephone to the following sources of inuence:
- heaters
- direct sunlight
- moisture
- other electrical devices
•
Protect your telephone from damp, dust, aggressive uids and vapors.
• Plug the connection cord into the corresponding jack.
• Only connect approved accessories.
• Never open the base station or handset yourself!
Safety instructions

English 3
Commissioning
Packaging content 5
Telephone connection 5
Batteries 6
Battery charge status display 6
Range 6
Paging the handset 6
Controls
Handset controls 7
Base station controls 8
Softkeys 9
Display 9
Date/Time setup 10
Using the telephone
Making calls 10
Terminate dialling 10
Answering calls 10
Using the handsfree
function during a call 11
Redial 11
Setting the speaker volume/
treble/bass control 11
Switch microphone
amplication on/off 11
Call length display 12
Switching the microphone on/off 12
Correction of wrong inputs 12
Phone book
Using the phone book 12
Button configuration 12
Save rst entry in phone book 13
Storing a name/number 13
Calling from the phone book 13
View name/number of a
contact entry 14
Changing the name/number
of an entry in the phone book 14
Storing a telephone number
from the redial 15
Delete name/number in
phone book 15
Delete all entries in phone book 15
Call number display
General 16
How it works 16
Reading and calling entries 17
Saving an entry in the phone book 17
Delete entry from the telephone
number list 17
Delete all entries from the
telephone number list 17
Various telephone number lists
Telephone number list of
incoming calls 18
Telephone number list of
outgoing calls 18
Answering machine settings
Recording an outgoing message 19
Listening to an outgoing message 19
Switching on the answering
machine (TAM) 20
Set remote query PIN 20
Messages
General 21
Playing a message 21
Deleting all old messages 21
Recording a memo 21
Contents page

4 English
Answering machine on
the go (remote control)
General 22
Start remote control 22
Listen to messages and manage 22
Listen to announcement 1 or
record again 23
Listen to announcement 2 or
record again 23
Recording a memo 23
Set answering machine mode 23
Melody/Handset ringer volume 24
Setup
Changing the menu language 24
Automatic call acceptance 24
Set contrast 25
Activate/deactivate key tones 25
Changing the handset name 25
Change menu colour 26
Activate/deactivate time 26
Change background colour of
splash screen 26
Change background colour of
menu lists 27
Register a handset 27
Register other handsets 28
Deleting a handset from
the base station 28
Dial pause setup 28
Flash time setup 29
Dial mode setup 29
Key lock 29
Disabling the permanent
RF radiation 30
Use several handsets
Internal calls 31
Transferring calls between
handsets 31
Bluetooth®
Activate/deactivate
Bluetooth®function 31
Couple Bluetooth® devices 32
Connecting special accessories 32
Troubleshooting 32
Resetting the telephone
to the factory settings 33
Important notice 33
Appendix
Maintenance and care 34
Warranty 34
Environmental note/
Waste disposal 34
Rechargeable batteries 34
Technical Data 35
CE symbol 35
continued:

Figure 3
Packaging content
Please check if all following components are included:
• Telephone (handset)
• Base station
• Power supply unit
• Telephone cable
• 3 batteries (NiMH)
• Operating instructions
• Warranty card
If any parts are missing, please immediately contact your dealer or the manufacturer
directly.
Telephone connection
1. Connect the power supply unit to the socket and to the jack on the base station.
(see
figure 1
)
.
2. Insert the plug of the telephone cable into the base station. (see figure 1).
3. Plug the telephone cable into the telephone socket for your telephone line. (see
figure 2).
4. Place the two batteries into the handset and replace the battery cover. (see gure 3).
Please ensure that the batteries are inserted properly!
5. Place the handset and keypad facing forward into the base station. (see gure 2). Once
the handset is correctly inserted, the battery display starts to ash on the tele-
phone display and the red charge LED lights on the base station.
Figure 1
Attention!
Don’t position the base station in close proximity to, for instance, televisions, VDUs, other
telephones, fans, etc. in order to minimize the risk of interference. Don’t expose the base
station to direct sunlight or position it close to a heater.
English 5
Commissioning
Figure 2

6 English
Batteries
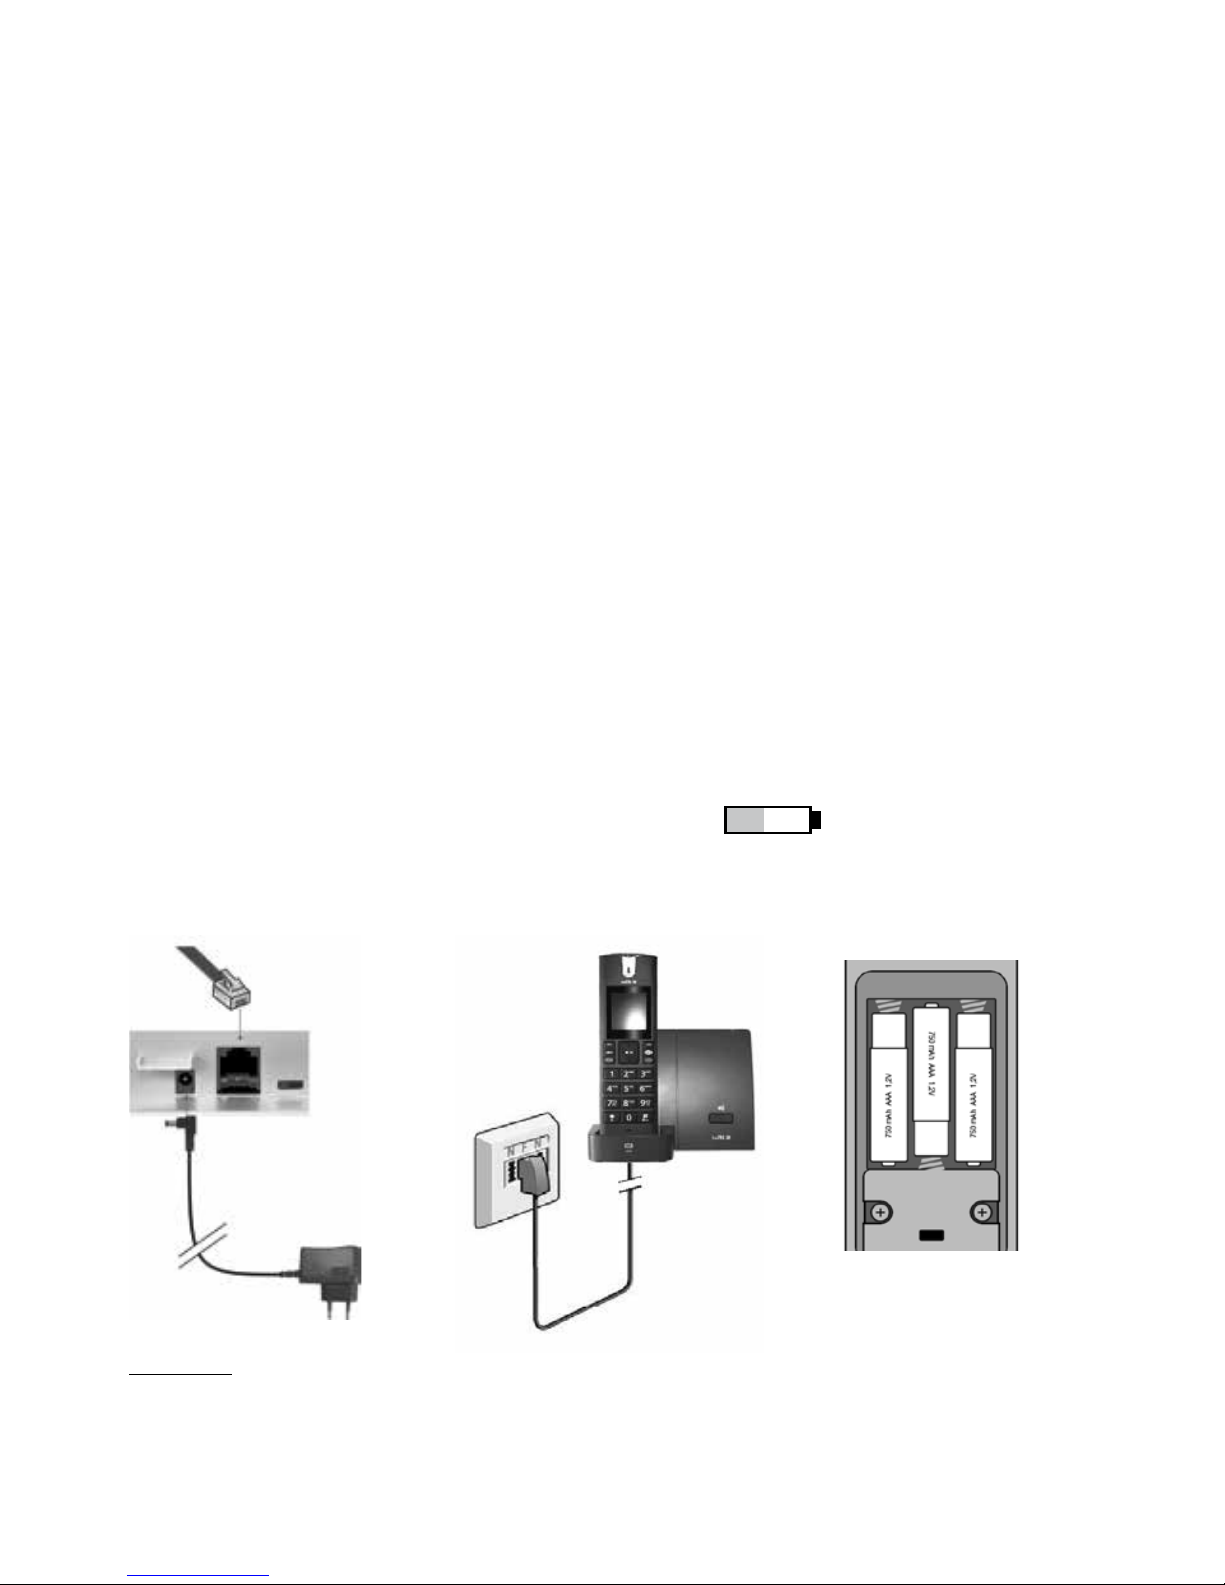
The telephone comes with NiMH batteries. If the batteries are correctly charged and dis-
charged, they will work for a long time. Fully charged batteries have a standby time of
approx. 100 hours or a maximum talk time of 10 hours. Discharged batteries take approx.
12 hours to recharge.
The battery charge status indicator ashes while the telephone is
being charged. Once charging is nished, the symbol
lights up on the display.
The telephone possesses automatic charging control, which prevents batteries from
becoming over-charged.
Attention!
The batteries have to be charged for 12 hours the rst time the telephone is connected.
Note:
Avoid leaving the batteries stowed in the handset if your telephone is out of use for a lengthy
period of time (more than 6 months).
Battery charge status display
When the batteries are virtually empty, the icon appears on the display of the
handset, and a warning signal is sounded. If the telephone is not charged now, the handset
switches off automatically due to low battery. Personal Preferences (phonebook, redial lists,
etc.) are preserved, even if the batteries are discharged or removed.
Range
The telephone‘s radio range can vary between 50 and 300 m. The radio signals for trans-
mission can be disrupted by a variety of factors. The maximum range is only achieved if
there are no obstacles between the telephone and the base station (under ideal conditions
the range is 300 m). The range is limited by walls inside a house or apartment. Ideally, the
base station should be placed in a slightly raised position. If the handset is taken outside
the range during a call, a warning signal sounds. If the handset can‘t be brought closer to
the base station, you may lose the call connection.
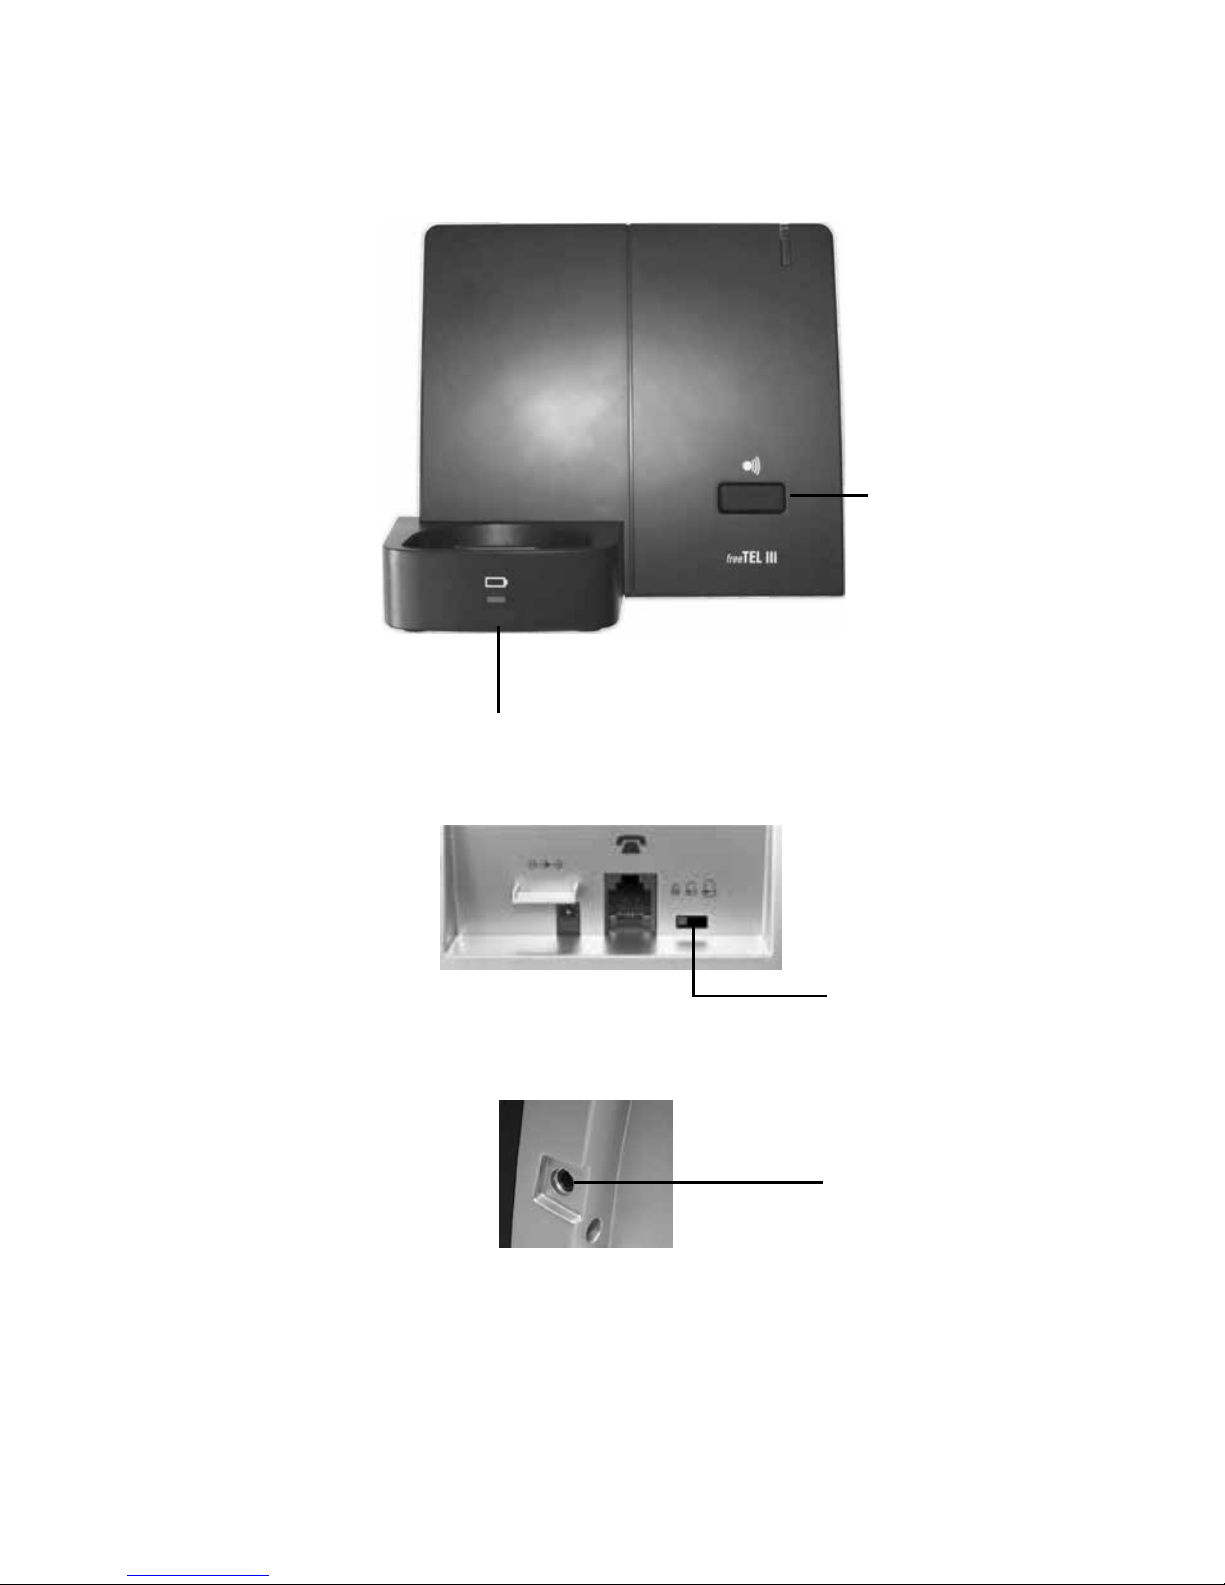
Paging the handset
If you have mislaid your handset again, please use the paging feature.
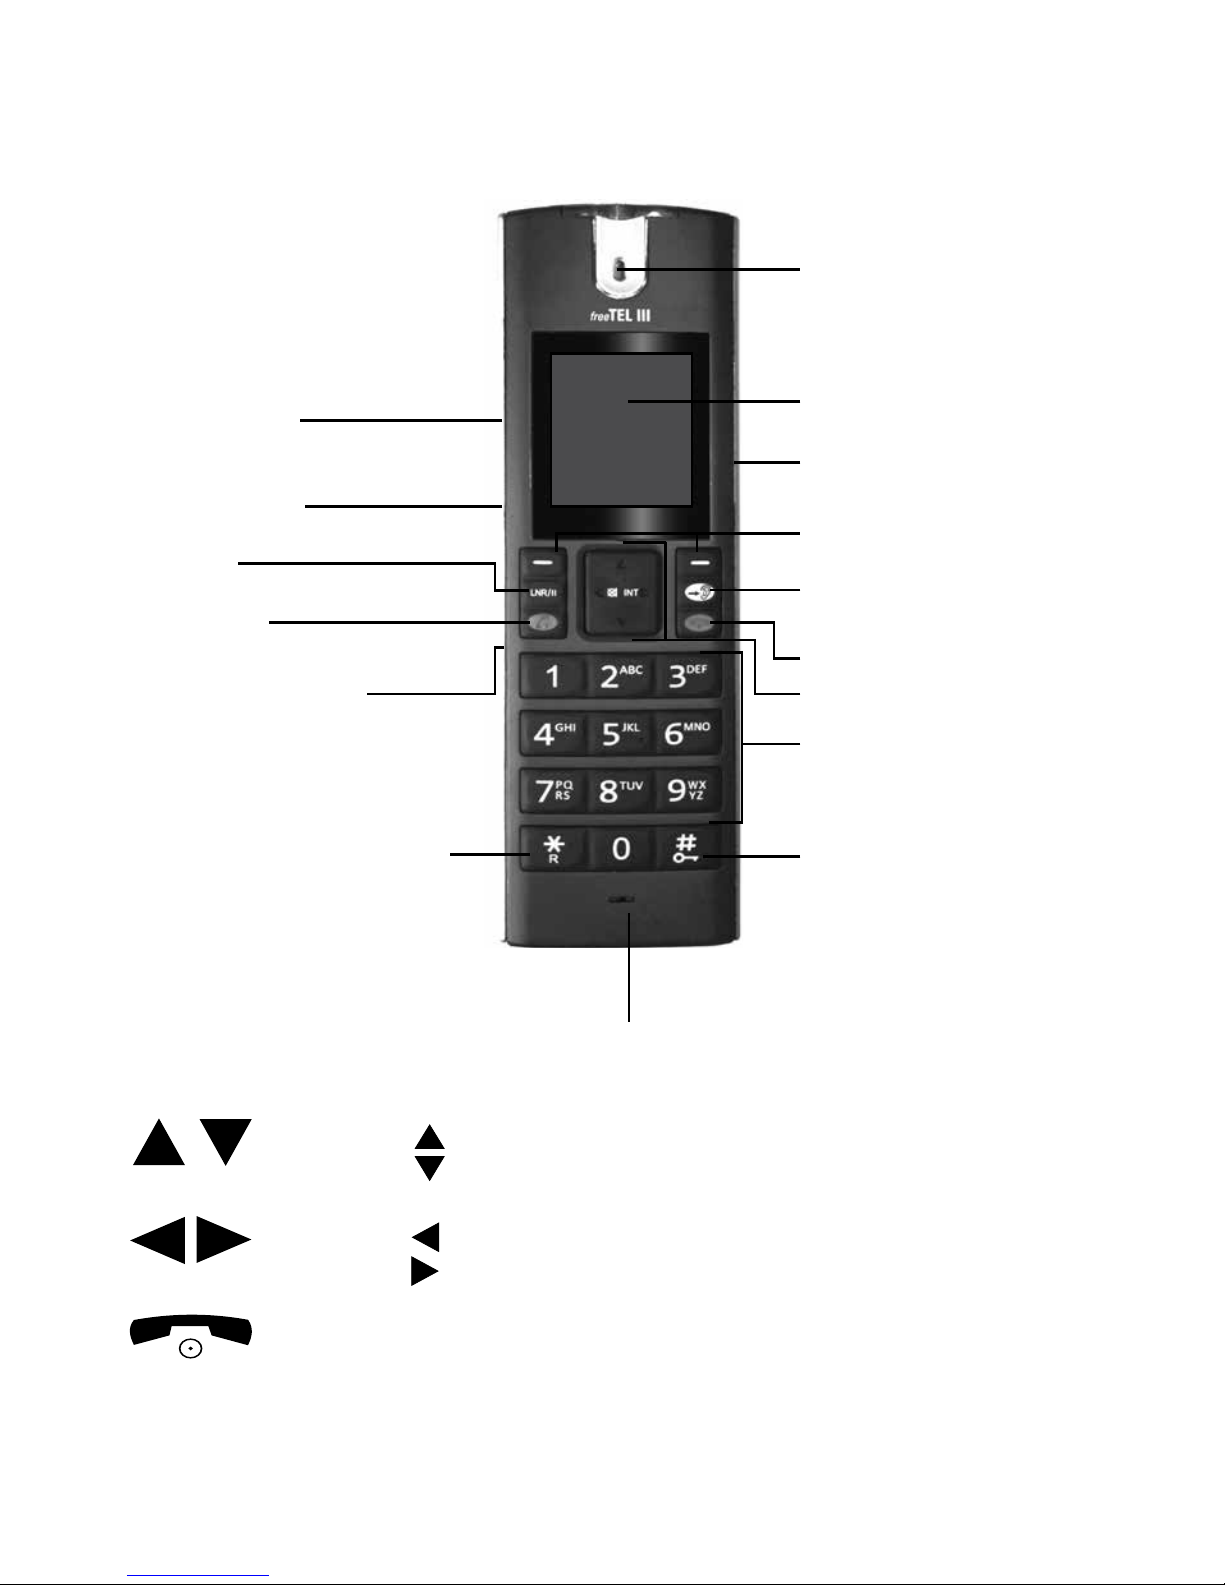
1. Press the button on the base station.
2. All the handsets which have been added are called.
3. The call ends when any key is pressed on one of the cordless phones being paged.

English 7
Controls
Handset controls
Loudspeaker
Vibrate mode
On/Off
Microphone
amplification
On/Off
Microphone
Treble/bass control
Connect
Display
Receiver inlet
amplication On/Off
Headphone jack,
Headset jack
Number keys
Softkeys
Control keys
Disconnect
Hash key
Keypad lock on/off - press
key long, see Page 29
Star key
Inquiry button (Flash) -
press key long,
see Page
29
Redial
10 : 50
Scroll: up / Message
down / Call number display
Scroll: left / Microphone On/Off
right / Internal calls
Return to the start menu in the event of an input error

8 English
Base station controls
Charge indicator
Ringer volume
setting
Paging
button
Connection socket for
special accessories:
vibrating pad or
modules

The two softkeys left and right from the control key are assigned with different func-
tions in different menus. In this user manual they are always named corresponding to the
texts in the display.
Button In stand-by mode In the menu
- Open main menu - Diverse functions
(left)
- Open phonebook - Diverse functions
(right)
English 9
Range
display Battery charge
indicator
Designation of
upper control key
Indication that speakerphone
is activated
Softkeys
Display
Menu
Names
Handset 1
Designation of the
left softkey
Designation of the
right softkey
10 : 50

10 English
Press
Menu
(left softkey) navigate to Date/Time using key
or Press
OK
(left softkey)
Enter day, month and year in 8 digits (e.g. 1 2 0 5 2 0 1 1 for
12.05.2011). You can jump between the entry fields using the
keys and . After nalizing the date entry the cursor auto-
matically jumps to the first digit of the time entry fields.
Enter hours and minutes in 4 digits (e.g. 0 9 2 5 for 09:25 hours). You can jump bet-
ween the entry fields using the keys and . Press
OK
(left softkey) to store your
settings or select with the keys the menu item Auto update. Now activate or
deactivate the automatic time adoption from the telephone line using the keys
or . Press
OK
(left softkey) to save your settings.
Making calls
1.
4
7
2
5
8
3
6
9
0
*
1
Enter the required telephone number (max. 20 digits). If you enter a wrong digit,
press to clear it.
2. Press . The number is dialed.
3. End the call by pressing the button again.
Terminate dialling
To terminate the dialling process, press the key or place the handset back into the base
station or desktop charger.
Answering calls
An incoming call is signalled several times at the handset:
- acoustically, with a ringtone
- visually, by means of a light signal at the phone and notication on the display
- mechanically by means of vibrations.
1. The telephone rings.
2.
Press
to answer the call.
3. End the call by pressing the button.
Date/Time setup
Using the telephone
OK
Back
Date/Time
12
6
93
4
7
2
5
8
3
6
9
0
*
1
4
7
2
5
8
3
6
9
0
*
1

English 11
Using the handsfree function during a call
1. Press the left softkey ( ) or the key to activate the hands-free mode during a
call.
2. To deactivate the hands-fee, press the left softkey ( ) or the key .
Note: If the speakerphone is switched on, will appear in the display.
Redial
Press LNR/II to display the last telephone numbers dialed.
1. Press the LNR/II button and then scroll to the number your require using the
buttons.
2. Press the button to dial the number.
Setting the speaker volume/treble/bass control
The speaker volume can be set during a telephone call using
the arrow buttons on the front of the handset.
The speaker volume can be increased or lowered in ve 4 dB
increments by pressing the buttons.
Press to activate additional amplication (key lights up in red)
and to activate tone control.
You can also raise treble or bass tones in increments of 10 dB using
the tone control (slide switch on the left side of the housing).
Press again to deactivate additional amplication and tone
control (key is no longer lit up).
Note:
The amplication switch only works when the receiver is activated.
Switch microphone amplification on/off
The »freeTEL III« is equipped with an additional microphone amplification, which can be
switched on as needed. This makes it possible for you to raise the volume of quiet sound
transmissions to enable the person on the other end to understand better. To switch on
microphone amplication, move the sliding switch Mto .
SPK
21956890
Pause

Call length display
The current call time is shown on the display during a call. After terminating the call
„Call
Ended“ as well as the duration of the call is displayed.
Switching the microphone on/off
You can switch the microphone on your handset on and off during a telephone call. Proce-
dure for switching off the microphone:
1. Press the button. The microphone is now deactivated and the symbol is shown
on the display.
2. Press the button again to switch the microphone back on.
- Navigate to the wrong entry using the keys and if a blinking cursor is shown on the
display.
- Use
Clear
(right softkey) to delete the character/digit left of the cursor.
- Insert new character/new digit left of the cursor.
- When entering date and time etc. overwrite character with dark background.
Using the phone book
Up to 100 entries can be stored with a name and telephone number
in the phone book. Once a telephone number has been stored, the
call can be placed by pressing just a few keys. Each name can be
up to 12 characters in length, and the number can be up to 20 digits
long.
Button configuration
Button Letter / Symbol
1 [Space] 1
2 A B C a b c 2 Å Ä Á À å ä á à ç
3 D E F d e f 3 Ë É È Ê ë é è ê
4 G H I g h i 4 í ì î
5 J K L j k l 5
Button Letter / Symbol
6 M N O m n o 6 Ö ö ó ò ô n n ñ
7 P Q R S p q r s 7 ß
8 T U V t u v 8 Ü Ú Ù Û ü ú ù û
9 W X Y Z w x y z 9 Ÿ Ý ÿ ý
0 0
12 English
Correction of wrong inputs
Phone book
OK
Back
Phone book
A
ó ò
nn

Save first entry in phone book
Press
Names
(right softkey)
4
7
2
5
8
3
6
9
0
*
1
Enter the required name (max. 12 digits).
Press the button.
4
7
2
5
8
3
6
9
0
*
1
Enter the required telephone number (max. 20 digits).
Press
OK
(left softkey).
Storing a name/number
Press
Menu
(left softkey) Phone book Press
OK
(left softkey).
Press the button. New entry Press
OK
(left softkey).
4
7
2
5
8
3
6
9
0
*
1
Enter the required name (max. 12 digits).
Press the button.
Enter the required telephone number (max. 20 digits).
Press
OK
(left softkey).
Calling from the phone book
You do have two possibilities, to make a call directly from the phone book:
1. Possibility:
1. Press
Names
(right softkey).
2. Select the desired entry using the keys or use the search function. If you are
looking for an entry starting with a W, for instance, press number 9 (»W«).
3. Press the key to retrieve the number of the desired contact.
Note:
At least one entry has to be stored in the telephone directory in order to select or call an
entry directly via
Names
(right softkey). If this is not the case you can now enter a contact
with name and number.
2. Possibility:
Press
Menu
(left softkey) Phone book
Press
OK
(left softkey)
Find Press
OK
(left softkey)
Select the desired entry using the keys or use the search function. If you are
looking for an entry starting with a W, for instance, press number 9 (»W«).
Press the key to retrieve the number of the desired contact.
Note:
You can abort the search process by pressing the
button.
English 13

14 English
View name/number of a contact entry
Press
Names
(right Softkey)
Select the desired entry with the keys .
Press
Option
(left softkey)
View Press
OK
(left softkey)
Name and telephone number are shown on the display.
Press
Back
(right softkey) to return to the contact list.
Select new entry with the keys .
or:
Press
button to abort the search process.
There is another possibility to view a phone book entry. Follow the procedure shown below:
Press
Menu
(left softkey) Phone book
Press
OK
(left softkey)
Find Press
OK
(left softkey)
Select the desired entry with the keys .
Press
Option
(left softkey) View Press
OK
(left softkey).
Changing the name/number of an entry in the phone book
Press
Names
(right Softkey)
Select the desired entry with the keys .
Press
Option
(left softkey).
Edit Press
OK
(left softkey).
Navigate to the desired position in the name using the keys and when the
blinking cursor is shown on the display.
Delete the character right of the cursor using
Clear
(left softkey) or insert a new
character using the keypad.
Press the button. Navigate to the desired position in the number using the
keys and .
Delete the digit left of the curser using
Clear
or insert a new digit using the keypad.
Press
OK
(left softkey) to save the changes.
There is another possibility to change a phone book entry. Follow the procedure shown
below:
Press
Menu
(left softkey). Phone book
Press
OK
(left softkey).
Find Press
OK
(left softkey).
Select the desired entry with the keys .
Press
Option
(left softkey). Edit Press
OK
(left softkey)

English 15
Storing a telephone number from the redial
Press the
LNR/II
key to view the redial list.
Select the desired entry with the keys .
Press
Option
(left softkey).
Store Press
OK
(left softkey)
4
7
2
5
8
3
6
9
0
*
1
Enter the required name (max. 12 digits).
Press button to navigate to the number.
or directly:
Press
OK
(left softkey) to save the entry.
Additionally you can select further functions:
LNR/II
Desired entry Press
Option
(left softkey).
Delete:
Delete desired entry
Delete all:
Delete all entries from the redial list.
Delete name/number in phone book
Press
Names
(right softkey).
Select the desired entry with the keys .
Press
Option
(left softkey). Delete
Press
OK
(left softkey).
?
appears on the display. Press
OK
(left softkey) to delete the entry.
There is another possibility to delete a phone book entry. Follow the procedure shown below:
Press
Menu
(left softkey) Phone book
Press
OK
(left softkey)
Find Press
OK
(left softkey)
Select the desired entry with the keys .
Press
Option
(left softkey). Delete Press
OK
(left softkey).
Delete all entries in phone book
Press
Names
(right softkey).
Press
Option
(left softkey). Delete all
Press
OK
(left softkey).
?
appears on the display. Press
OK
(left softkey) to delete all entries.

16 English
There is another possibility to delete all phone book entries. Follow the procedure shown
below:
Press
Menu
(left softkey) Phone book Press
OK
(left softkey)
Find Press
OK
(left softkey)
Press
Option
(left softkey). Delete all Press
OK
(left softkey)
?
appears on the display. Press
OK
(left softkey) to delete all entries.
General
During a call the number of the caller is shown on the display (caller ID) if the following
conditions are met:
1. Your network provider supports CLI and CLIP:
- CLI (Calling Line Identication):
The number of the caller is transmitted.
- CLIP (Calling Line Identication Presentation):
The number of the caller is displayed.
2. You have applied for CLIP at your network provider.
3. The caller has applied for CLI at his network provider.
How it works
During a call the number or, if stored in the telephone directory, the name of the caller is
shown on the display.
Conditions:
1. You have applied at your network provider for the transfer of the caller number
(CLIP) to your display.
2. The caller has applied at this network provider that his number is transmitted (CLI).
There will be “Unavailable”if the caller ID was not ordered by you or “Private”, the caller
ID is suppressed by the caller or if it was not ordered.
Note:
Not accepted calls will be shown as “New calls”on the display. This notification disappears
if all numbers in the call list are viewed.
Not accepted calls can be indicated by the ashing of the white LED on the handset (a
short ash every 8 seconds). This function is deactivated in default state.
Call number display

English 17
To activate this function, please proceed as follows:
Press softkey
Menu
Setup
Press softkey
OK
Handset
Press softkey
OK
Missed calls
Press softkey
OK
Use the and buttons to select “ON” or „OFF“
Press softkey
OK
to save your settings.
Reading and calling entries
Press the button. The last call will be shown at first entry in the call list.
Navigate through the entries using the keys .
Press the button to dial the number.
Note: Calls that have not been viewed yet are marked with „New call“ in the list.
Saving an entry in the phone book
Press the button. The last call will be shown at first entry in the call list.
Navigate through the entries using the keys .
Press
Option
(left softkey).
Store Press
OK
(left softkey).
4
7
2
5
8
3
6
9
0
*
1
Enter the required name (max. 12 digits).
Press the button to navigate to the number.
or directly:
Press
OK
(left softkey) to save the changes.
Delete entry from the telephone number list
Press the button. The last call will be shown at first entry in the call list.
Navigate through the entries using the keys .
Press
Option
(left softkey).
Delete Press
OK
(left softkey).
?
appears on the display.
Press
OK
(left softkey) to delete the entry.
Delete all entries from the telephone number list
Press the button. The last call will be shown at first entry in the call list.
Navigate through the entries using the keys .
Press
Option
(left softkey).
Delete all Press
OK
(left softkey).
?
appears on the display.
Press
OK
(left softkey) to delete all entries.

18 English
Various telephone number lists
The »freeTEL III« has a call list for incoming and outgoing calls.
In these lists incoming and outgoing numbers are saved that can subsequently be saved in
the telephone directory or deleted from the list.
Telephone number list of incoming calls
Press
Menu
(left softkey). Incoming call
Press
OK
(left softkey).
Navigate through the entries using the keys .
Press
Option
(left softkey) to get to the menu for more functions
(Store, Delete or Delete all).
or:
Press
Back
(right softkey) to return to the menu list.
Telephone number list of outgoing calls
Press
Menu
(left softkey) Outgoing call
Press
OK
(left softkey).
Navigate through the entries using the keys .
Press
Option
(left softkey) to get to the menu for more functions
(Store, Delete or Delete all).
or:
Press
Back
(right softkey) to return to the menu list.
OK
Back
Incoming call
OK
Back
Outgoing call

Recording an outgoing message
Attention:
Please speak loudly and clearly into the microphone when recording a message.
Press
Menu
(left softkey) TAM
Press
OK
(left softkey)
OGM Press
OK
(left softkey)
Select desired message (OGM 1 or OGM 2) using the keys .
Press
OK
(left softkey) Record
Press
OK
(left softkey)
The time and „Recording..“ are shown on the display and you can record your
message now (min. 3 seconds).
Press
Stop
(left softkey) to stop recording. After recording the message is played for
checking.
Note:
The recording is automatically terminated once the maximum recording duration of 2 min-
utes is reached.
Note:
The 1st outgoing message is only played in “Answer/Record“ mode, and the 2nd outgoing
message is only played in “OGM only“ mode.
Listening to an outgoing message OGM
Press
Menu
(left softkey) TAM
Press
OK
(left softkey)
OGM Press
OK
(left softkey)
Select desired message (OGM 1 or OGM 2) using the keys .
Press
OK
(left softkey) Play recording
Press
OK
(left softkey)
“Playback..” is shown on the display and you can listen to the recorded message.
Press
Stop
(right softkey) to terminate the playback early.
Note:
If you would like to listen to the message via the loudspeaker, press the left softkey during
playback.
English 19
Answering machine settings (TAM)

20 English
Switching on the answering machine (TAM)
Please note: An outgoing message must be recorded on the machine before you can
make one of these settings.
You have a choice of 6 different settings:
Answer off The answering machine is switched off. The telephone doesn’t
answer calls.
Announce Only The telephone only plays an outgoing message when it receives a
call. The caller is not able to leave a message.
Answer/2-ring The answering machine switches on after 2 rings and is ready to record
information.
Answer/4-ring The answering machine switches on after 4 rings.
Answer/6-ing The answering machine switches on after 6 rings.
Answer/8-ring The answering machine switches on after 6 rings.
Procedure for dening the “Answer/2-ring“ setting, for example:
Press
Menu
(left softkey) TAM
Press
OK
(left softkey)
Ans/Ring Press
OK
(left softkey)
Select desired function (“Answer/2-ring”) using the keys .
Press
OK
(left softkey) to save your settings.
Set remote query PIN
Press
Menu
(left softkey) TAM
Press
OK
(left softkey)
Remote PIN Press
OK
(left softkey)
4
7
2
5
8
3
6
9
0
*
1
Enter the desired PIN (max. 4 digits, other than 0000).
OK
Press
OK
(left softkey)
4
7
2
5
8
3
6
9
0
*
1
Re-enter the desired PIN (max. 4 digits).
Press
OK
(left softkey) to save the PIN entry.
Table of contents
Languages:
Other HumanTechnik Cordless Telephone manuals