GRACIAS
Apreciamos la confianza que ha depositado en Husky por la compra de este nivel Nos esforzamos
por crear continuamente productos de calidad diseñados para mejorar su hogar. Visítenos en internet
para ver nuestra línea completa de productos disponibles para sus necesidades de mejorar su hogar.
¡Gracias por preferir a Husky!
Garantía
Si en el plazo de un año a partir de la compra, este producto HUSKY® falla debido a un defecto en
materiales o mano de obra, llame de inmediato al Equipo de Servicio al Cliente al 1-888-HD-HUSKY.
Conserve una copia del recibo original de Home Depot para reclamos de la garantía. Esta garantía
excluye daños y fallos incidentales/consecuenciales debido al mal uso, abuso o desgaste normal por
el uso. Esta garantía le otorga derechos especícos y también puede tener otros derechos, los cuales
varían de un estado a otro. Por favor, vaya a una tienda o llame al 1-888-HD-HUSKY para más detalles.
Esta garantía sustituye a cualquier otra garantía, expresa o implícita.
¿Tiene preguntas, problemas o faltan piezas? Antes de regresar a la tienda,
llame a Servicio al Cliente de Husky de lunes a viernes entre 8 a.m. y 7 p.m., sábado de 9 a.m. a 6
p.m.,hora local del Este
1-888-HD-HUSKY
HUSKYTOOLS.COM
GUÍA DE USO Y CUIDADO
NIVEL DIGITAL DE 25.4 CM
¿Tiene preguntas, problemas o faltan piezas?
Antes de regresar a la tienda, llame a Servicio al
Cliente de Husky de lunes a viernes entre
8 a.m. y 7 p.m., sábado de 9 a.m. a 6 p.m.,hora local del Este
1-888-HD-HUSKY
HUSKYTOOLS.COM
Núm. de artículo 934 631
Información de seguridad
POR FAVOR, LEA Y GUARDE ESTAS INSTRUCCIONES.
PRECAUCIÓN: Lea, comprenda y siga
todas las reglas de seguridad e instrucciones
antes de usar esta herramienta. Estas
instrucciones de seguridad deben respetarse
en todo momento. No respetar estas
instrucciones de seguridad podría resultar en
lesiones a usted mismo o a otros. También,
no leer y respetar estas intstrucciones puede
causar daños a su equipo.
ADVERTENCIA: ASEGÚRESE DE leer y
comprender todas las instrucciones. No seguir
todas las instrucciones enumeradas antes
puede resultar en choque eléctrico, incendio
y/o graves lesiones personales.
ADVERTENCIA: Esta herramienta operada
por baterías usa únicamente baterías “AAA”. El
uso de cualquier otra batería puede crear un
riesgo de incendio.
ADVERTENCIA: Siga cuidadosamente todas
las instrucciones y adevertencias en la etiqueta
y empaque de la batería.
ADVERTENCIA: Retire las baterías agotadas
y elimínelas de acuerdo a su ordenanza local.
ADVERTENCIA: Inserte siempre
correctamente las baterías . La polaridad
(+ y -) está marcada en las baterías y en la
herramienta. NO:
Provoque un cortocircuito en las
terminales de las baterías.
Cargue las baterías
Mezcle baterías viejas con nuevas. Si
alguna o ambas baterías están débiles,
cambie ambas por dos baterías nuevas.
Estas baterías nuevas deben coincidir
entre sí en marca y tipo.
Deseche las baterías en el fuego.
ADVERTENCIA: Mantenga las baterías
fuera del alcance de los niños.
ADVERTENCIA: Retire las baterías si el
dispositivo no se va a usar durante varios días.
ADVERTENCIA: Use solo accesorios
recomendados por el fabricante para su
modelo. Los accesorios que pueden ser
adecuados para una herramienta podrían ser
peligrosos cuando se usan en otra herramienta.
DECLARACIÓN DE LA FCC
Este dispositivo cumple con la parte 15 de las reglas de
la FCC. El funcionamiento está sujeto a las siguientes dos
condiciones:
1. Este dispositivo no puede causar interferencia
dañina.
2. Este dispositivo debe aceptar toda interferencia
recibida, incluso la que puede causar un
funcionamiento indeseado.
Los cambios o las modicaciones a esta unidad que no
sean aprobados en forma expresa por la parte responsable
del cumplimiento, pueden invalidar el permiso del usuario
para operar el equipo.
AVISO: Este equipo ha sido probado y encontrado en
cumplimiento con los límites correspondientes a un
dispositivo digital de la Clase B, conforme a la Parte 15
de las Reglas de la FCC. Estos límites están diseñados
para brindar una protección razonable contra la
interferencia dañina en una instalación residencial.
Este equipo genera, usa y puede irradiar energía de
radiofrecuencia y, si no se instala y usa conforme a
las instrucciones, puede causar interferencia dañina
a las comunicaciones de radio. Sin embargo, no
existe garantía de que no ocurra interferencia en una
instalación en particular. Si este equipo efectivamente
causa interferencia dañina a la recepción de radio
o televisión, lo cual puede determinarse apagando
y encendiendo el equipo, se recomienda al usuario
que trate de corregir la interferencia realizando uno o
varios de los siguientes pasos: Cambiar de dirección o
de lugar la antena receptora. Aumentar la separación
entre el equipo y el receptor. Conectar el equipo en un
tomacorriente en un circuito diferente de donde esté
conectado el receptor. Consulte al concesionario o a un
técnico de radio/TV con experiencia para que le ayude.
de la última lectura.
Pre-Operación (Continuación)
3. – Úselo para convertir ángulos a unidades diferentes. Presione para cambiar las unidades de
visualización de grados (°), a pendiente (plg./pie), a inclinación (%). Las lecturas de pendiente están en
incrementos de 1/8 plg./pie. Los signos más y menos indican que la pendiente es ligeramente más (+) o menos
(-) que la pendiente mostrada en la pantalla.
4. Reset – Botón de conversión de ángulo absoluto/relativo Cuando el nivel está encendido, estará en modo de
ángulo absoluto. Para cambiar a ángulo relativo, presione el botón Reset. Si quiere usar otra vez el ángulo
absoluto, apague el nivel y enciéndalo de nuevo.
5. Pantalla LCD – La pantalla lee normalmente cuando el nivel está boca abajo. Una vez encienda la herramienta,
la primera visualización es la temperatura (en Fahrenheit). Después de cerca de dos segundos, mostrará
automáticamente el ángulo absoluto en grados.
6. Base de trabajo – Cuando coloque su nivel digital sobre una supercie plana, asegúrese de que la base de
trabajo esté colocada con rmeza en la supercie de trabajo.
7. Vial – Cuando use el nivel digital para revisar nivel o plomada de la supercie de trabajo, puede medir la
supercie observando si la burbuja del vial esté en el centro. Puede usar esta función sin baterías.
8. Compartimiento de las baterías – Acepta dos baterías AAA.
9. Agujero para colgar– Cuelgue la herramienta aquí para nes de almacenamiento.
ICONOS DE LA PANTALLA
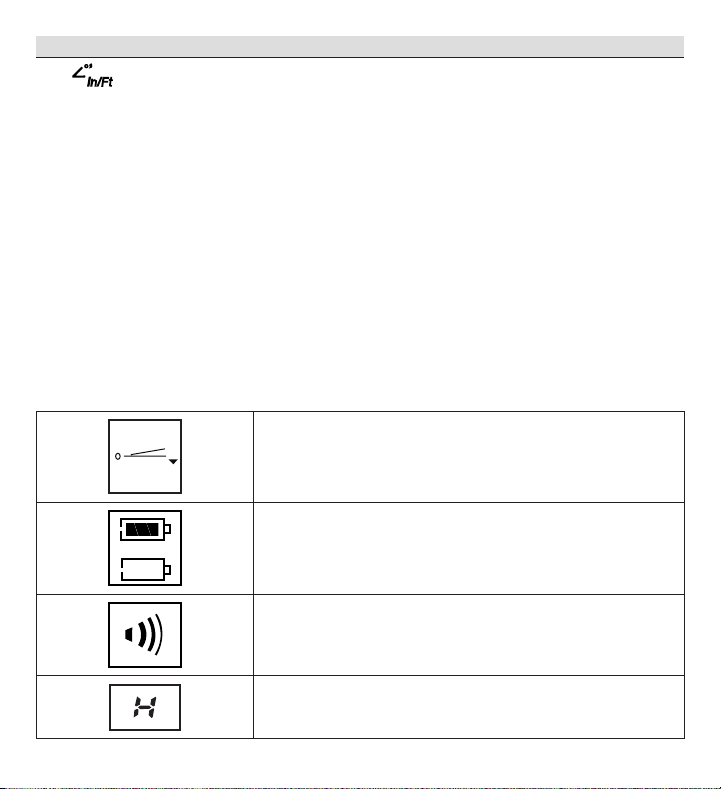
Indicador Up/Down – La línea cero (0°) siempre indica la posición
del nivel. La inclinación y la línea derecha indican arriba o abajo,
lejos del nivel (0°).
Icono de la capacidad de las baterías – Indica la energía residual
en las baterías. Cambie las baterías si la barra de energía negra
ha desaparecido.
Icono del bíper – Cuando está activa la función del bíper, este
icono aparecerá en la pantalla.
Operación
CAMBIO DE LAS UNIDADES DE
VISUALIZACIÓN
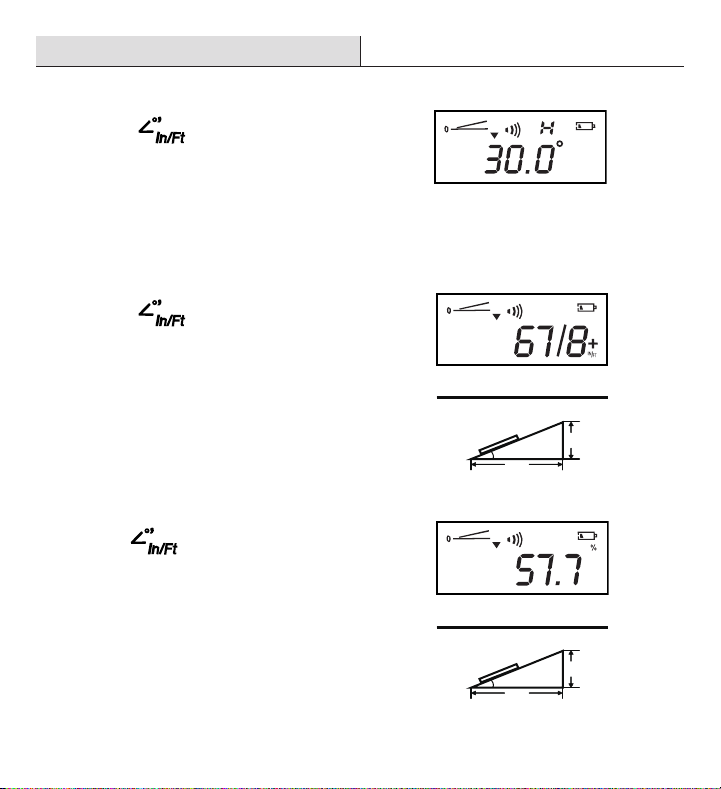
1. Presione el botón para convertir
las unidades de medición entre grados (°),
pendiente (plg/pie), e inclinación (%). La
Figura 2 muestra un ejemplo de la pantalla
LCD mostrando una medición en grados.
2. Presione el botón Hold para capturar la
lectura temporal.
3. Presione el botón para cambiar
a unidades de plg./pie. Las Figuras 3 y 4
muestran la pendiente H=67/8 pulgadas
(H=L*tan α, L=1 pie, α= 30.0°). Figura 3
H = L * tan
α
α
L
H
4. Presione de nuevo el botón para
obtener la inclinación de la supercie H=57.7cm
(H=L*tan α, L=100 cm, α=30.0°), como se
muestra en las Figuras 5 y 6.
Figura 5
H = L * tan
α
α
L
H
Icono Hold – Cuando la lectura de la pantalla está congelada, la
“H” parpadeará.
Operación (continuación)
Si el ángulo es mayor que 45° pero menor que
90°, la inclinación de la supercie es H=L / tan α
(ver Figura 7).
(45˚ < α < 90˚)
α
H = L / tanα
L
H
MEDICIÓN DE ÁNGULO ABSOLUTO
1. Coloque el nivel digital sobre una supercie, asegurándose de que la base asiente plana contra la supercie.
El nivel tiene dos imanes en el fondo para asegurarlo a supercies de acero. Si es necesario, puede poner el
nivel digital boca abajo durante la medición. La pantalla continuará leyendo normalmente.
2. Una vez encienda el nivel, la cifra de la pantalla indica el ángulo absoluto entre el nivel y la supercie de
trabajo.
3. Mientras el ángulo cambia, la inclinación en la pantalla muestra la tendencia a inclinarse de la herramienta
mientras la echa derecha apunta hacia arriba o hacia abajo.
4. Para activar el bíper, presione el botón On/ /Off . Para desactivarlo, presiónelo una vez más.
5. Para cambiar las unidades de la pantalla para el ángulo medido, vea Cambio de unidades de la pantalla en la
Sección Operación.
MEDICIÓN DE ÁNGULO RELATIVO
1. Coloque el nivel digital en la supercie.
2. Presione el botón Reset . La pantalla lee 0.0°, mientras que su esquina superior izquierda muestra la línea
cero. Muévalo a otra supercie de trabajo, y se mostrará el ángulo relativo entre las dos supercies de
trabajo.
3. Para cambiar las unidades de la pantalla para el ángulo medido, vea Cambio de unidades de la pantalla en la
Sección Operación.
4. Para regresar a medición de ángulo absoluto, apague el nivel y enciéndalo de nuevo.
Mantenimiento
El nivel digital ha sido diseñado para que sea una herramienta de bajo mantenimiento. Sin embargo,
para mantener su desempeño, debe siempre seguir estas instrucciones simples. El uso y mantenimiento
cuidadosos extenderá la vida útil del nivel digital y prolongará su precisión.
□Si el nivel es salpicado con mortero u otros residuos del sitio de construcción, simplemente
límpielo con un paño limpio y húmedo. NO sumerja el nivel en agua.
□Las supercies de aluminio se pueden limpiar con un polvo de limpieza no abrasivo.
□Guarde el nivel lejos de temperaturas extremas abajo de 20°F (-6°C) o arriba de 140°F (60°C).
□Su nivel es un instrumento de precisión y requiere cuidado y manejo razonables. Si el nivel se ha
caído o se ha agitado severamente, esto puede afectar seriamente la precisión del nivel.
□Cuando desaparece la barra de energía negra dentro del icono de la batería , apague la unidad y
cambie las baterías.
Resolución de fallas
Problema Solución
La pantalla no enciende cuando se
presiona el botón On/Off.
Abra el compartimiento de las baterías y revise para asegurarse de
que las baterías están insertadas correctamente.
Revise la capacidad de las baterías. Reemplace las baterías si es
necesario.
La pantalla LCD está dañada. Comuníquese con el departamento de
servicios para obtener ayuda.
Pre-Operación
APLICACIONES DEL PRODUCTO
Puede usar este nivel digital para las siguientes aplicaciones:
Medición de gradiente, nivel, vertical y revisión de piso, pared, techo en construcción, decoración.
Medición, revisión y mentenimiento en obras de irrigación, construcción de puentes y calzadas,
fabricación de máquinas o piezas, base plana industrial y otros.
Localización de antenas, equipo de comunicación y otros dispositivos.
ESPECIFICACIONES TÉCNICAS
Fuente de alimentación 2 baterías "AAA" de 1.5 voltios (no incluidas)
Rango de medición 0-360°
Temperatura óptima de funcionamiento 32° F a 104° F (0° C a 40° C)
Precisión de los viales ±0.029° (nivel o plomada)
Precisión de la pantalla digital
±0.1° (nivel o plomada), ±0.2° (todos los ángulos)
Vida estimada de las baterías 12 horas con baterías alcalinas
CARACTERÍSTICAS DEL NIVEL DIGITAL
Este nivel digital es una herramienta de nivelación manual que se puede usar dentro y fuera de la
horizontal (nivel), vertical (plomada) y proyectos de alineación a escuadra. Viene completamente
ensamblado (las baterías no están incluidas). Por favor, lea y comprenda todas las instrucciones en este
manual de instrucción antes de usar el producto.
La Figura 1 y la lista a continuación describen las características de este nivel.
5
6 249 9
1. On/ /Off – Presione y sostenga este botón durante dos segundos para encender el nivel. Apague el nivel
presionando y sosteniendo el botón durante cerca de dos segundos. El nivel se apagará automáticamente si se
deja inactivo durante cinco minutos. Cuando el nivel está encendido, presione el botón para activar y desactivar
el bíper. El bíper sonará a nivel, ángulo de 45°, plomada, y al último ángulo guardado en la memoria.
2. Hold – Presione para “congelar” y “descongelar” la lectura de la pantalla. También puede conservar un registro
2
de la última lectura.