HY-CLOR i2 User manual

Version 1.3
Version 1.3
Hy-Clor Australia PTY LIMITED
All Enquires:
AU: 1800 625 123 NZ: (09) 973 2477
Email: Help@hyclor.com.au
BATTERY
ROBOTIC POOL CLEANER
FLOOR ONLY
INSTALLATION & OPERATION MANUAL

Version 1.3
Version 1.3
Hy-Clor Australia PTY LIMITED
All Enquires:
AU: 1800 625 123 NZ: (09) 973 2477
Email: Help@hyclor.com.au

Version 1.3
Version 1.3
Hy-Clor Australia PTY LIMITED
All Enquires:
AU: 1800 625 123 NZ: (09) 973 2477
Email: Help@hyclor.com.au
Thank you for purchasing Hy-Clor i2 Robotic Pool Cleaner. If you have any questions or issues,
please contact your local dealer for customer service.
Table of Contents
Important Precautions.........................................................................................................................1
I. Introduction.................................................................................................................................2
II. Appearance characteristics & structure......................................................................................2
III. Specifications...............................................................................................................................3
IV. Packing list ...................................................................................................................................3
V. Operation instruction ..................................................................................................................4
VI. Troubleshooting.........................................................................................................................14
IIV. Warranty ....................................................................................................................................15


Version 1.3
1
Hy-Clor Australia PTY LIMITED
All Enquires:
AU: 1800 625 123 NZ: (09) 973 2477
Email: Help@hyclor.com.au
Important Precautions
1. Read the manual carefully and strictly follow all instructions provided for safe usage, including keeping
children away from the cleaner to prevent accidents or misuse as a toy.
2. Use only the accessories recommended or sold by Hy-Clor to ensure compatibility and safety.
3. The i2 Battery Cleaner is specifically designed for swimming pools with a flat floor and a maximum incline of
up to 20 degrees. However, 15 degrees is optimal. Please ensure your pool meets these requirements.
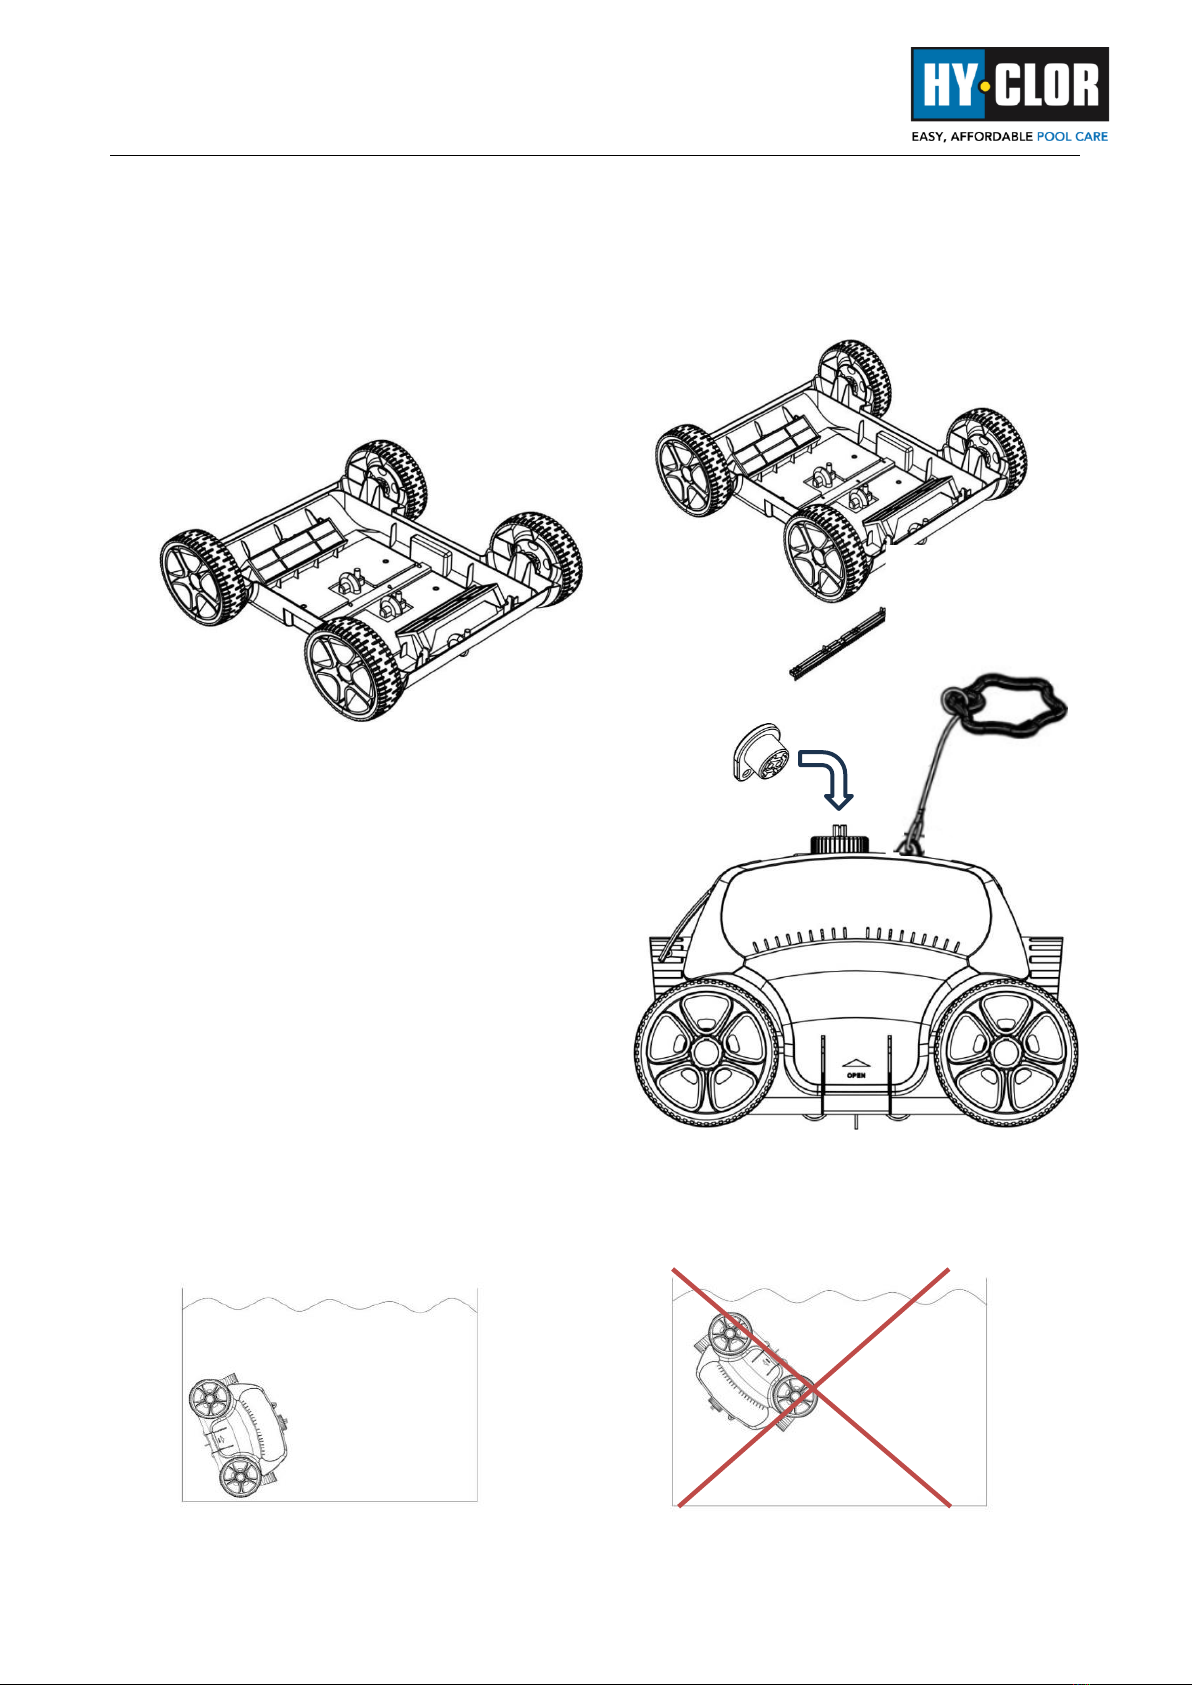
Additionally, do not attempt to power on the cleaner when it is out of the water, as it is designed for
underwater use only.
4. ALWAYS DRY THE CHARGING PORT BEFORE CHARGING THE i2 ROBOT CLEANER and make sure that the
protective cap is placed over the charging port before placing the robot in the pool.
5. NOTICE FOR VINYL LINER POOLS: Prior to the installation of your i2 cleaner, carefully inspect your vinyl pool
liner. If the vinyl liner is wrinkled, worn, aged, brittle or has bumps/roots/stones underneath the liner, do not
install the pool cleaner without first consulting a qualified Pool Professional to assess and/or perform
necessary replacement or repairs. Hy-Clor is not responsible for liner damage caused by a pool cleaner
6. Only use the original and authorized power charger provided with the cleaner to ensure proper charging and
to prevent damage.
7. If the power cable or charger gets damaged, contact Hy-Clor for advice or a replacement.
8. Always use a grounded and leakage-protected wall socket when recharging the device. Store the charger
away from heat sources.
9. Do not operate the cleaner while there are people or pets in the pool.
10. Ensure that the power is off when the cleaner is not in use or during maintenance.
11. Store the robot and charger in a cool, well-ventilated place away from direct sunlight.
12. After each use, thoroughly clean and wash the filter tray to maintain optimal performance. This will also help
prevent any blockages or damage to the cleaner.
13. Do not attempt to disassemble the sealed driving kit of the cleaner. This will void any warranty and could be
unsafe.
14. Removing the impeller covers is advised if debris has lodged in the impeller. Contact Hy-Clor for instructions
and guidance before attempting.
15. If the cleaner will be stored for a long time, it is advisable to charge and discharge it every three months. This
helps maintain battery life and performance.

Version 1.3
2
Hy-Clor Australia PTY LIMITED
All Enquires:
AU: 1800 625 123 NZ: (09) 973 2477
Email: Help@hyclor.com.au
I. Introduction
•The Hy-Clor ‘i2’ is a rechargeable, battery-driven automatic pool cleaner.
•It is designed for pools with a flat floor and a maximum incline of 15-20 degrees.
•The device has wheels, not rollers, so it will not clean all the way to the waterline.
•It can partially ascend curved boundaries between the floor and the walls of a pool but will not climb walls or
steps.
•When the battery runs out, the device will "self-beach" and rest beside the pool wall.
•The floating handle can be easily reached to pull the device out of the pool.
•It is important to read the manual carefully before using the device.
Please read this manual carefully before use.
II. Appearance characteristics & structure
Key Components:
1. Floating Handle: The floating handle is tied to the
chassis by a rope, allowing the device to be pulled out
of the water when necessary.
2. Protective Cap: to protect the charging port while the
robot is in the Pool or not in use.
3. Carry Handles: There is a carry handle on either side
of the robot.
4. Top Cover: The top cover can be easily removed by
gently pulling on the clips located at the sides of the
device. It is best to unclip both sides at the same time.
5. Swing Plate: The swing plate facilitates the movement
of water through the device while it is in motion.
6. Filter Tray: The filter tray is positioned between the
top cover and the chassis, providing a space for debris
to accumulate within the chassis.
7. Chassis: The chassis houses important elements such
as wheels, inlet slots, and debris collection tray.
8. Brush: The sweeping brush is attached to the
underside of the chassis.

Version 1.3
3
Hy-Clor Australia PTY LIMITED
All Enquires:
AU: 1800 625 123 NZ: (09) 973 2477
Email: Help@hyclor.com.au
III. Specifications
Product information:
Power Specifications:
Name: Hyclor i2
Power: 50W
Model: Hj1103
Working Voltage: 12.6V
Size: 400 (L) * 360 (W) 270 (H) mm
Input Voltage (adapter): 100Vac- 240Vac
Weight: 5.8kg
Input power of adapter: 47Hz-63Hz
Output current of adapter: 1.8A
Performance and Capacity:
Output voltage of adapter: 12.6V
Max. cleaning surface: 100m²
Battery capacity: 6600mAh
Filter capacity: approx. 10m³/h
Charging time: 5 to 6 hours
Filter capability: 180μm
Charging environment temperature: 0°-45°C
Climbing slope: 15°
Pool water temperature: 10°-35°C
Storage conditions:
Speed: approx. 16m/min
Alternate Names: Environmental Conditions
IP Grade: IPX8 (main body)
Short term (less than 1 month): -20°C to +60°C,
≤75%RH
Max. working depth: 2.0m
Max. working time: 120min
Medium-term (less than 3 months): -20°C to
+45°C, ≤ 75%RH
Long term (more than 3 months): -20°C to
+20°C, ≤75%RH
IV. Packing list
Item
Name
SKU
QTY (pc)
1
Cleaner body
HYCROBOTI2
1
2
Charger
SPROBOTi2CHAR
1
3
User manual
n/a
1
4
Brush
SPROBOTi2BRU
1
5
Handle rope
(2.15m)
n/a
1
6
Floating handle
SPROBOTi2FH
1

Version 1.3
4
Hy-Clor Australia PTY LIMITED
All Enquires:
AU: 1800 625 123 NZ: (09) 973 2477
Email: Help@hyclor.com.au
V. Operation instruction
Before Use:
•Install the brush before use to avoid
possible dirt leaks.
•The Sweeping brush Snaps into the
outside of the bottom of the i2 Robot.
•Tie the cord of the floating handle to the
tether area on top of the robot (the same
area that the charging port protector cap is
attached to).
•Make sure the Charging port protector cap
is tightly secured over the charging prongs.
1. Precautions
a. Place the robot in the pool with the wheels
towards the wall to avoid any possible scratches to the pool.
b. Do not throw the cleaner into the pool or put it in upside down. Place it gently in the pool.

Version 1.3
5
Hy-Clor Australia PTY LIMITED
All Enquires:
AU: 1800 625 123 NZ: (09) 973 2477
Email: Help@hyclor.com.au
c. Please ensure that the top cover of the cleaner is tightly assembled to its chassis.
d. Turn the power selector to off, once the cleaner has been removed from the pool.
e. To prevent damaging the pool surface, or the cleaner, avoid touching the wall when putting the
cleaner in, or taking the cleaner out, of the pool. This is particularly important on vinyl and fiberglass
pools.
f. When removing the cleaner from the pool, hold the cleaner on the water surface for 10-15
seconds allowing it to drain.
2. Before Use
1. Turn the switch knob OFF before charging.
2. Clean and dry the charging port before charging. (The Port must be dry before charging
the i2).
3. Charge the battery by plugging the charging port into the cleaner.
4. The i2 Robot takes approximately 5-6 hours to fully charge the battery. The indicator light
on the charger will change from red to green when it has charged.
5. Set the jet nozzles on the cleaner to the required angles (see next section).
Charger indicator (On Charger)
Status
Red
Battery is charging
Green
Charging is finished

Version 1.3
6
Hy-Clor Australia PTY LIMITED
All Enquires:
AU: 1800 625 123 NZ: (09) 973 2477
Email: Help@hyclor.com.au
Turning on the device
•There is a circular switch knob at the top of the
device.
•The arrow on the knob should be pointing in the
direction of the OFF position.
•To turn on the device, rotate the switch knob in an
anticlockwise direction by one-third of a turn, to
the “on” position.
•A blue indicator light will turn on, indicating that
the device is on.
•Once switched on, immediately place the robot
in the water.
•Remember to hold the floating cord and have it
unravel as you guide it toward the bottom.
Removing the device from the pool.
• When the robot runs out of battery power, it will
come to a stop near the pool wall.
• Grasp the floating handle and lift the robot from the pool floor.
• While lifting the robot to the surface, be careful to not bump the robot against the pool
wall. This could damage both the robot and the pool.
• Once the robot reaches the water's surface, hold it using one of the top handles and turn it
off by rotating the switch knob about one-third of a turn in a clockwise direction to the
“off” position.
• Keep the cleaner on the water's surface for approximately 10-15 seconds to allow it to
drain any water before removing it from the pool.
INDICATORS
Status
Indicator
Switch on:
Blue light is steady
Switch off:
Red light flashes once then powers off
The cleaner is out of water:
Blue light flashes rapidly
The cleaner is working in the pool:
Blue light flashes
The working cycle has finished (low battery):
Red light is steady
Faults:
Red light flashes
ON
OFF

Version 1.3
7
Hy-Clor Australia PTY LIMITED
All Enquires:
AU: 1800 625 123 NZ: (09) 973 2477
Email: Help@hyclor.com.au
3. Functions and adjustment of nozzles
There are two jet nozzles on the cleaner, one of them opens once the other closes. Water flows
out through the open nozzle to thrust the cleaner forward. Adjusting the nozzles controls the path
that the robot follows. Experimentation with different settings might be needed to find the
optimum coverage for your pool size and shape.
a. Setting nozzle angle and cleaner route
•The nozzles of the cleaner are marked with angles (0°-40°).
•The cleaner moves in an approximately straight line when the nozzle angle is 0°.
•The cleaner moves in a more curved line at a larger angle from 0°-40°.
•See the next few pages for basic nozzle adjustment solutions.
•The i2 is normally best set up on the shallow end and shortest side of the pool. With 0° on
one side and 20° on the other.
•Try to only adjust one side of the machine and keep the other at 0°

Version 1.3
8
Hy-Clor Australia PTY LIMITED
All Enquires:
AU: 1800 625 123 NZ: (09) 973 2477
Email: Help@hyclor.com.au
Setting 1:
Nozzle angle:
0°-20°, Default
setting for
most pools.
Running path:
(0)
When robot is
moving ➔ it
will move in a
straight line.
When moving
, it will
move in a
slight right-
hand arc.
Water Flow direction
(20)

Version 1.3
9
Hy-Clor Australia PTY LIMITED
All Enquires:
AU: 1800 625 123 NZ: (09) 973 2477
Email: Help@hyclor.com.au
Water Flow direction
(10)
Setting 2: 0°-10°, longer straight run required before turning (lap Pools would benefit the most)
Nozzle angle
0°-10°, for
longer
straighter run
Running path:
When robot is
moving ➔ it
will move in a
straight line.
When moving
, it will
move in a very
slight right-
hand arc.

Version 1.3
10
Hy-Clor Australia PTY LIMITED
All Enquires:
AU: 1800 625 123 NZ: (09) 973 2477
Email: Help@hyclor.com.au
Setting 3: 0°-40°, when setting 1 does not manage a full coverage of the pool.
Nozzle angle:
0°-40°, when
setting 1 does
not manage a
full coverage
of the pool.
Running path.
When robot is
moving ➔ it
will move in a
straight line.
When moving
, it will
move in a tight
right-hand arc.
Water Flow direction
(40)

Version 1.3
11
Hy-Clor Australia PTY LIMITED
All Enquires:
AU: 1800 625 123 NZ: (09) 973 2477
Email: Help@hyclor.com.au
Setting 4: 20°-20°, for round pools.
Nozzle angle:
20°-20°, for
round pools
Running path.
Robot moves
in a circle but
moves in the
opposite arc
when it
encounters an
obstruction.
Note: These are the recommended settings. Different settings may work better for your pool.

Version 1.3
12
Hy-Clor Australia PTY LIMITED
All Enquires:
AU: 1800 625 123 NZ: (09) 973 2477
Email: Help@hyclor.com.au
4. Clean the filter tray
a. Open the cleaner by gently pulling out the 2 side clips on the top cover.
b. Lift the filter tray off the chassis
c. Clean the filter tray and chassis
Pull outwards on both sides at
the same time to open it.

Version 1.3
13
Hy-Clor Australia PTY LIMITED
All Enquires:
AU: 1800 625 123 NZ: (09) 973 2477
Email: Help@hyclor.com.au
d. Reassemble the cleaner
e. Make sure that the top cover firmly attaches to the chassis and that the side clips clip into place.
Hold Both sides of the top cover near the clips
and gently pull clips outward + lower the top
cover over the chassis until it clips into place.

Version 1.3
14
Hy-Clor Australia PTY LIMITED
All Enquires:
AU: 1800 625 123 NZ: (09) 973 2477
Email: Help@hyclor.com.au
VI. Troubleshooting
Symptom
Possible reason
Solution
The cleaner does not work and the
red indicator light slowly flashes
Internal fault
Contact Hyclor
The cleaner does not work and the
blue indicator light flashes
Pump protection
Re-start the robot
The cleaner does not work and the
indicator light does not flash
Battery protection
Charge the robot and if that does not
work, contact Hy-Clor.
The charger indicator light does
not work
Charger damage
Contact Hy-Clor
The cleaner does not achieve full
coverage of the pool
Unsuitable nozzle angle
Adjust nozzle angle
Special pool shape
Adjust nozzle to increase angle of
deflection. Start robot in the difficult
to reach area
Pool water filtration system is
running
Turn off water filtration system

Version 1.3
15
Hy-Clor Australia PTY LIMITED
All Enquires:
AU: 1800 625 123 NZ: (09) 973 2477
Email: Help@hyclor.com.au
IIV. Warranty Terms and Conditions
Our goods come with guarantees that cannot be excluded under the Australian Consumer Law. You are entitled to a replacement or
a refund for a major failure and for compensation for any other reasonably foreseeable loss or damage.
Please read these warranty terms and conditions carefully. A failure to comply with these terms and conditions may affect any claim
on warranty you may have on a product.
The HYCLOR ‘i2’ Battery Robot Comes with 24 months warranty (BATTERY, BODY, and MOTOR ONLY)
Pool Water can be corrosive to parts of the robot if the robot is left in the pool for prolonged periods of time. The robot should
therefore only be left in the pool while working then removed, cleaned, and stored as soon as possible thereafter.
The warranty may be void if the robot is left in the pool.
Warranty may be void if the cleaner’s charging port cover has been left off or has been charged while the port is wet.
Damage to a Vinyl liner is not covered under warranty. It is up to the user to make sure the liner quality is of good quality and will
not be damaged using the ‘i2’ Pool cleaner.
WARRANTY GENERAL CONDITIONS
All products provided by HY-CLOR AUSTRALIA PTY LTD are warranted for defined periods of time (refer to the product table.
All mechanical swimming pool products supplied to consumers by HY-CLOR are to be installed or used in the manner they are
manufactured for only.
Warranty may be voided if the product or products claimed by the consumer under warranty have been used for purposes other
than their designed or manufactured purpose.
Where applicable, products supplied by HY-CLOR come with operation and installation manuals. All care must be taken to install
and operate the products according to these instructions. Failure to install or operate these products in accordance with these
instructions may void the warranty.
The chemical balance of the swimming pool water plays a significant part in the operational life of all swimming pool products, HY-
CLOR recommends regular water testing using an approved swimming pool test kit.
This warranty is valid for the original purchase and is not transferable. Keep your purchase docket, tax invoice, or receipt as proof of
purchase, and as proof of the date on which the purchase was made.
Modifications to any electrical product provided by HY-CLOR products are covered by a twelve-month warranty unless prior written
approval has been granted by HY-CLOR and has been carried out by one of its authorized agents. All electrical installations must be
carried out by a competent licensed professional.
All pool filtration equipment including filters, pumps, and salt chlorinators, must be kept in a dry well-ventilated area away from
direct sunlight and in an area that is free from flooding or rain. This warranty does not cover normal wear and tear to the products
or parts.
To make a claim please contact:
HY-CLOR AUSTRALIA PTY LTD
FREE CALL NUMBER 5 DAYS A WEEK 1800 625 123 (AU) or 09 973 2477 (NZ)
Other manuals for i2
1
This manual suits for next models
1
Table of contents
Other HY-CLOR Swimming Pool Vacuum manuals
Popular Swimming Pool Vacuum manuals by other brands

Intex
Intex Auto Cleaner owner's manual

Maytronics
Maytronics Dolphin Classic 12 User instructions

Aqua EZ
Aqua EZ APC493 installation manual

Steinbach
Steinbach Poolrunner Battery+ ORIGINAL OWNER'S MANUAL

baracuda
baracuda X7 Quattro owner's manual

Pool Blaster
Pool Blaster Hydro 500 26051SL quick start guide