HY-CLOR poseidon User manual

by
Automatic
For further information
call 1800 625 123
www.hyclor.com.au
Hy-Clor and Poseidon Trademarks of
HY-CLOR AUSTRALIA PTY LIMITED
ABN 81 000 655 381
Level 5, 15 Orion Road, Lane Cove NSW 2066, AUSTRALIA
help@hyclor.com.au
Installation
Operation Manual
Poseidon Auto Pool Cleaner Manual.indd 1Poseidon Auto Pool Cleaner Manual.indd 1 28/7/10 2:07:15 PM28/7/10 2:07:15 PM

Cngrlis rchng r POSEIDONTM Atm Swng P Clenr.
Your POSEIDONTM Automatic Swimming Pool Cleaner comes with all the parts needed to successfully install it into
your swimming pool using your existing swimming pool skimmer box and vacuum plate.
POSEIDONTM Automatic Swimming Pool Cleaners are economical pool cleaners which have been designed for most
swimming pool types.
To successfully install your POSEIDONTM Automatic Swimming Pool Cleaner you will need to follow the instructions
provided on the following pages carefully. The instructions come complete with photos of how to install the
POSEIDONTM Automatic Swimming Pool Cleaner correctly.
Should you have any difficulties in the installation process please contact HY-CLOR on our help desk number on
1800 625 123.
Thank you again for your purchase of this wonderful product and remember if you have any difficulties please call our
friendly team on the help desk number.
THE HY-CLOR TEAM
Poseidon Auto Pool Cleaner Manual.indd 3Poseidon Auto Pool Cleaner Manual.indd 3 28/7/10 2:07:41 PM28/7/10 2:07:41 PM

ASSEMBLY
The easiest way to assemble the POSEIDONTM Automatic Swimming Pool Cleaner is to follow this simple guide and
photos.
POSEIDONTM Automatic Swimming Pool Cleaners are not recommended for installation on swimming pools which
have
• Pool pumps smaller than .75hp in size
• Above ground pools with standard plumbing (refer to diagram below)
• Pools in areas where large amounts of debris such as leaves and sticks may fall into the pool water
• Where swimming pool pumps and filters are located more than 10 meters away from the skimmer box
• Where pool pump suction lines are smaller than 40mm in diameter
• In pools which have been installed with infloor cleaning outlets and drain
• In pools which have the water returns along the swimming pool floor
If you have any questions regarding the above recommendations please contact HY-CLOR on our help desk number
1800 625 123.
In pools where there is more than one skimmer box you will need to consider the following to ensure the POSEIDONTM
Automatic Swimming Pool Cleaner will work efficiently for you.
• Ensure you have the extra skimmer box vacuum plates and plugs to close off the extra suctions to the pool pump
• Use the skimmer box closest to the pool pump and filter for maximum water flow
Swimming pools which have wet edges and troughs may not be suitable for any suction style swimming pool
cleaners due to the water cascading over the edge along the length of the swimming pool. The water may push the
cleaner to the side where the water cascades.
DIAGRAM 1 DIAGRAM 2
Above ground pools where skimmer box and returns are side by side generally move the water in a circular motion
which pushes the cleaner in that direction which tends to make it hug the floor edge near the wall. It is better if the
returns are at one end of the pool and the skimmer box at the other end of the pool end to move the cleaner around
the pool as in the second diagram. If you have multi directional eye balls you may be successful in getting the cleaner
to work properly by adjusting the eyeball or eyeballs to change the water flow.
Poseidon Auto Pool Cleaner Manual.indd 4Poseidon Auto Pool Cleaner Manual.indd 4 28/7/10 2:07:42 PM28/7/10 2:07:42 PM

HINT
Some skimmer box vacuum plates are lower than other vacuum plates and therefore you may require
only one (1) of the soft plastic elbows supplied with the cleaner
BEGIN THE ASSEMBLY
Open the carton and check you have all the parts required to install the POSEIDONTM Automatic Swimming Pool
Cleaner.
Cleaner body assembly
complete
Cleaner foot pre
assembled
Baffle plate and hammer
pre installed
Cleaner pleated seal Ring and float assembly Bumper fin
Skimmer connection kit 9 female x male end
hoses (male end shown)
1x female x female hoses
(1 end shown only)
Poseidon Auto Pool Cleaner Manual.indd 5Poseidon Auto Pool Cleaner Manual.indd 5 28/7/10 2:07:43 PM28/7/10 2:07:43 PM

To assemble the entire cleaner body the following steps are to be taken.
• Hold the body assembly in an upside down position either placed on a table or firmly between your knees and slip
the pleated seal over the foot assembly. This may require a little effort to place over the foot however it will not
split if a little force is used. Ensure the pleated seal is the correct way up with the flat surface facing toward you
looking at it from the assembly position. The pleated seal is to be seated between the foot and round plastic part
of the cleaner body which is a recess. Another way to install the pleated seal is to slide it down over the top of the
cleaner which may be easier for some people.
• Turn the body around into the upright position to connect the ring float assembly.
• Place the ring float assembly over the cleaner body. The float faces toward the front of the cleaner with The ring
and float facing toward the top of the cleaner. Clip it into the body clip recess. The clip recess is a moving part
located just below the two clear tubes.
• Add the rear bumper fin to the cleaner into the two slots on the cleaner body. The bottom one is located at the
back of the cleaner body as shown below and the top slot is located on the back side of the rear clear tube where
it connects to the top chamber. The rear bumper fin must be placed outside of the ring float assembly as shown
in the photo below, and is to be inserted before connecting to the top slot. Insert the rear bumper fin from the
bottom slot first.
Connecting the hoses together requires the use of the silicon grease in the tube or tub provided with the POSEIDONTM
Automatic Swimming Pool Cleaner. Each male section of hose is to be lubricated to allow for easier connection.
Poseidon Auto Pool Cleaner Manual.indd 6Poseidon Auto Pool Cleaner Manual.indd 6 28/7/10 2:07:43 PM28/7/10 2:07:43 PM

HINT
The hose sections are to be firmly pushed together to ensure minimal air is sucked into the suction
line. If the cleaner hose sucks air into it, it will severely affect the performance of the cleaner. Use the
silicon lubricant on each joint to ensure the hose connects properly. Initially it may be difficult to join
the hoses together and it is best to twist the joins as well as pushing it together at the same time.
THE TIGHTER THE HOSES ARE JOINED TOGETHER THE BETTER THE PERFORMANCE OF THE
CLEANER.
• Hose weights need to be placed on the hose sections to balance the cleaner so it sits flat on the floor of the pool.
You can use the silicon grease provided to help with this process.
HINT
It is best to use one (1) hose weight to begin with which is placed on the first hose after the cleaner.
Slide the weight up and down to make the cleaner sit flat on the bottom of the pool floor. One (1) weight
is generally enough to operate the cleaner in a flat balanced manner.
• Connect the vacuum hose sections together by inserting the male end into the female end of each section of hose
using silicon lubricant
• Push the hoses together as far as you can to ensure the hoses are firmly connected.
• The female x female hose is to be the last hose connected and is to be used to connect to the skimmer box
fittings.
• Attach as many hoses as necessary to reach the corner or end that is furthest from the skimmer box. You may
need to purchase extra hoses to accomplish this.
• The last hose before the skimmer box is to be the female x female hose which there is only one (1) of.
NEVER USE HOT WATER TO SOFTEN THE HOSE ENDS TO JOIN TOGETHER
Put silicon lubricant here
Poseidon Auto Pool Cleaner Manual.indd 7Poseidon Auto Pool Cleaner Manual.indd 7 28/7/10 2:07:44 PM28/7/10 2:07:44 PM

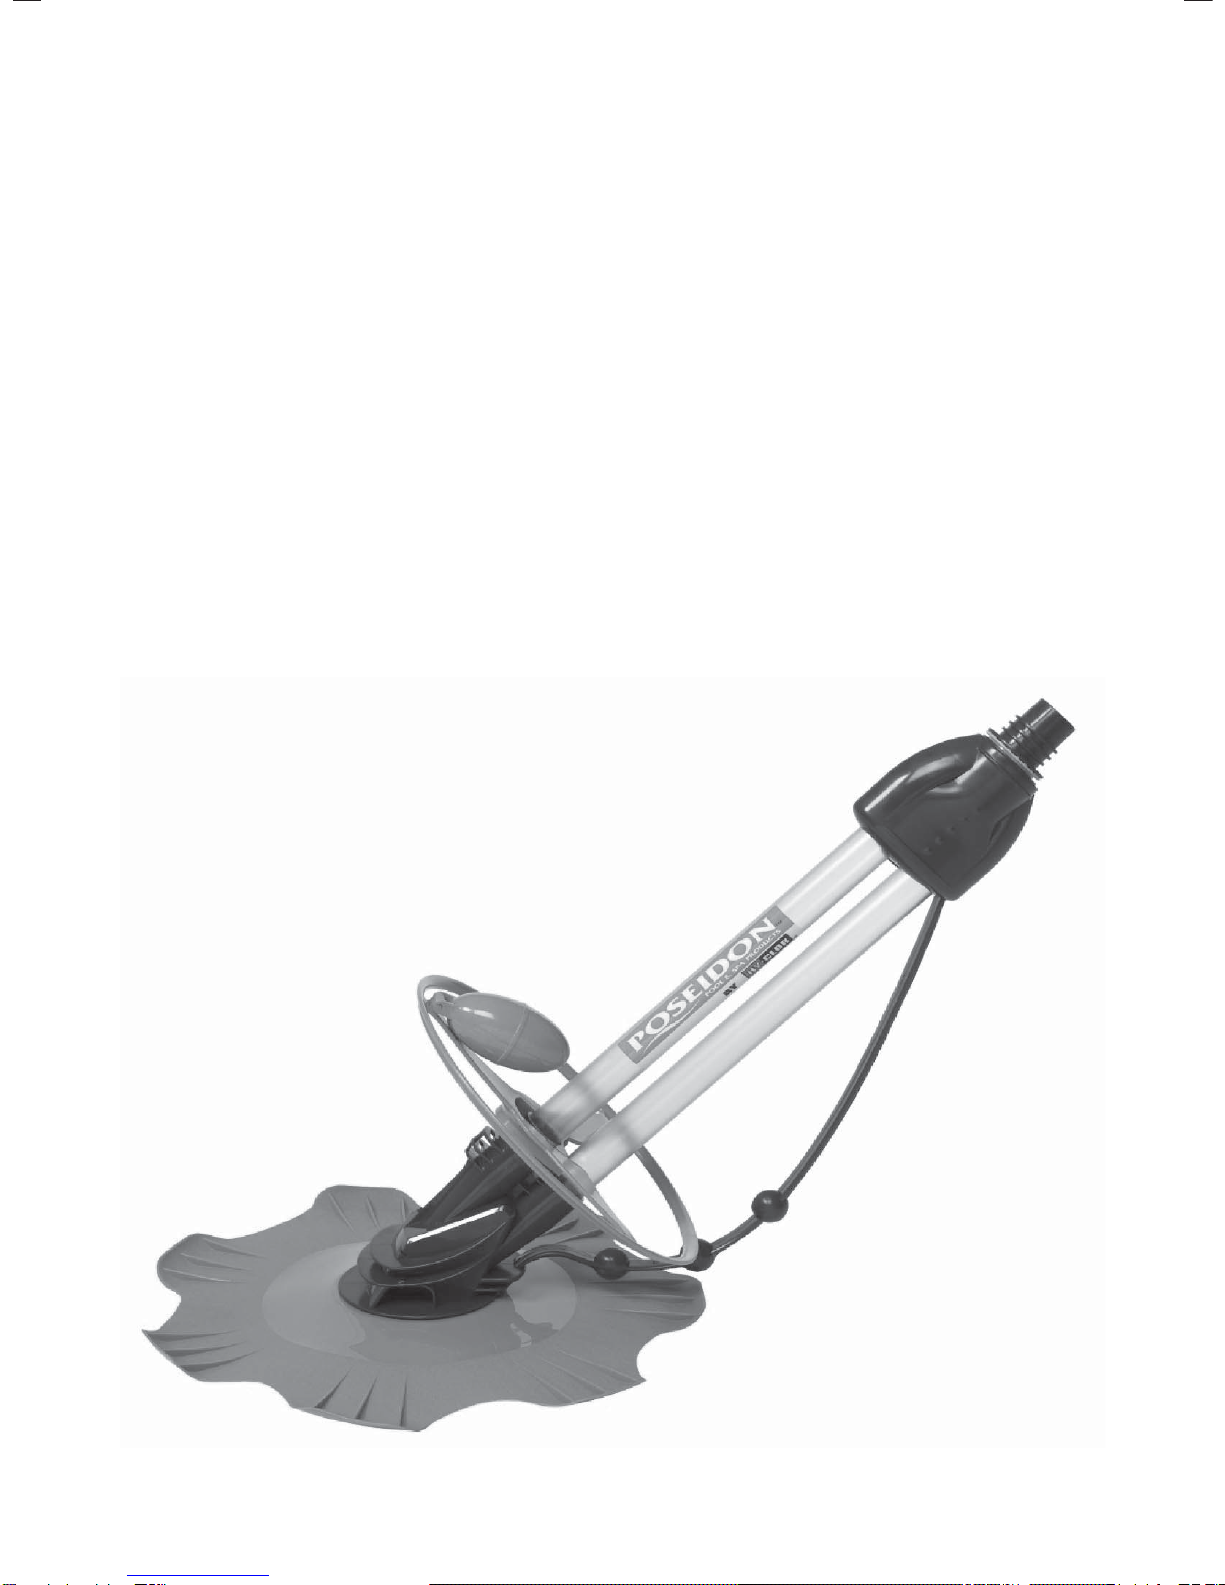
STARTING YOUR POSEIDONTM AUTOMATIC SWIMMING POOL CLEANER
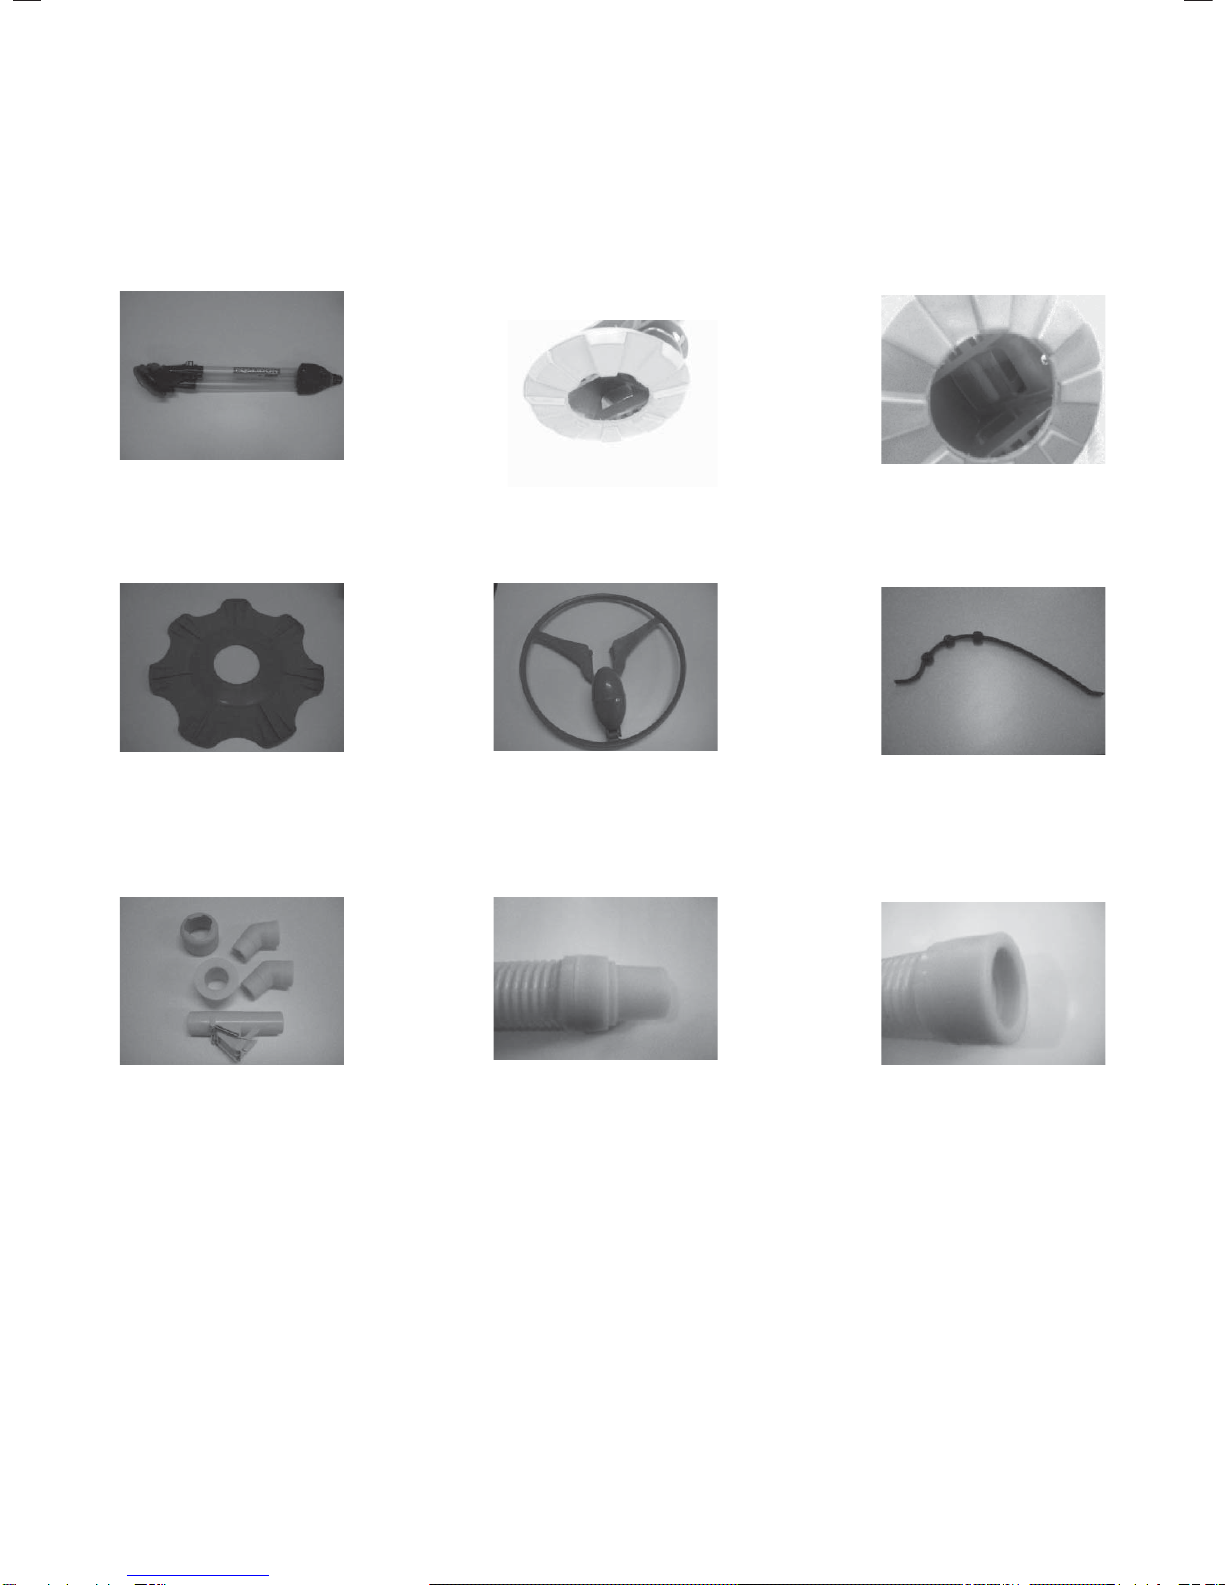
In the cleaner carton you have been supplied with two soft elbows, a speed control valve and a skimmer vacuum
plate cone which is tapered to fit most sized skimmer vacuum plates.
• Place the cone into the opening of your skimmer vacuum plate ensuring that it is facing toward the surface of the
swimming pool when you place it back into the skimmer box
• Add the elbows together - DO NOT PLACE INTO THE VACUUM CONE YET
• Attach the speed control valve to the last elbow ensuring the flap connected to the springs is facing downward.
• The speed control valve has an arrow moulded into its top to show the flow direction of the water. Ensure the
arrow is facing toward the skimmer vacuum plate
HINT
If the speed control flap is facing toward the water surface it will suck in air and stop the cleaner from
operating.
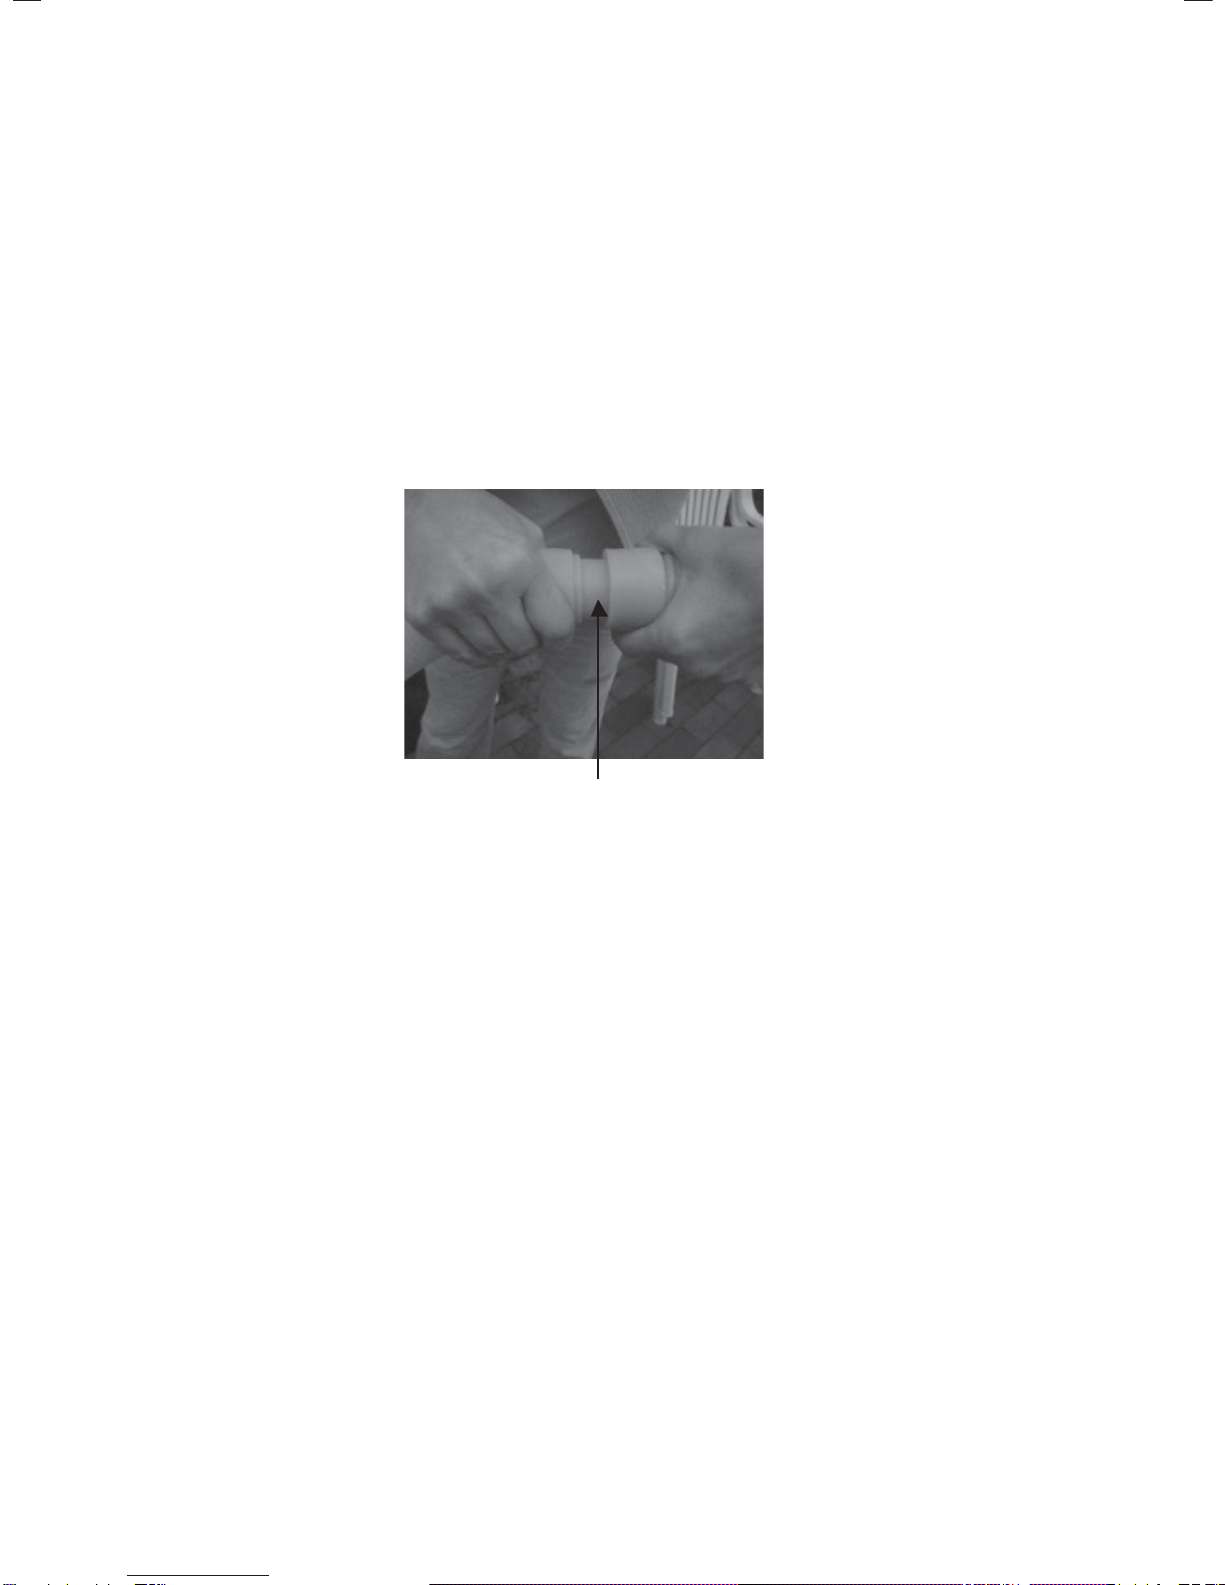
• Connect the female end of the cleaner hose to the speed control valve
• Connect hoses as required
• Place the end of the hose to the cleaner
• Place the cleaner into the swimming pool
HINT
You must remove the air from the vacuum hose before you connect the skimmer connections to the
skimmer vacuum plate and cone.
• Removing the air in the hose should done by sinking the hose manually but it is far easier and quicker to flood the
hose(recommended) with water from the return outlet of the pool water to flood the hose.
• Place the end of the hose to be connected to the skimmer box assembly over the eyeball water return and fill with
water (pump and filter must be running to do this).
• The cleaner will blow bubbles and possibly raise in the water
• Once the air has been purged from the vacuum hose you can now connect the cleaner to the speed control valve.
• Turn off the pump and filter
• Place the speed control valve and elbows through the skimmer box opening and connect it to the vacuum plate
cone placing it ready for normal vacuum operation
• Turn on the pump and filter ensuring the vacuum plate is firmly secured to the skimmer box
• The cleaner should then begin to operate in your swimming pool
• The cleaner may initially suck air and begin to stop and start momentarily
• After initially starting the cleaner it may be moving very rapidly along the pool floor. The speed control valve is
used to slow the cleaner down by allowing small amounts of air into the suction line
• The speed control valve has two (2) springs located on either side of its body which are connected to the flap
door by notches. By moving the springs up or down the notches you will either speed up the cleaner or slow it
down. The cleaner needs to run so that the end does not lift into the water whilst it is running. Ensure the notches
on the valve are the same on both sides at all times.
• Your POSEIDONTM Automatic Swimming Pool Cleaner is now up and running
Poseidon Auto Pool Cleaner Manual.indd 8Poseidon Auto Pool Cleaner Manual.indd 8 28/7/10 2:07:45 PM28/7/10 2:07:45 PM

Vacuum plate with cone inserted Cone, 2 elbows and speed control
valve (option 1)
Cone, 1 elbow and speed control
valve (option 2)
Vacuum plate, cone and 2 elbows
with speed control valve
(option 1)
Vacuum plate, cone and 1 elbow
with speed control valve
(option 2)
Vacuum plate configuration
Fitting the speed control valve Push hose firmly onto speed
control valve
Attach end to cleaner firmly
Adjusting the hose weight for
balance
Poseidon Auto Pool Cleaner Manual.indd 9Poseidon Auto Pool Cleaner Manual.indd 9 28/7/10 2:07:45 PM28/7/10 2:07:45 PM

CORRECT POSEIDONTM AUTOMATIC SWIMMING POOL CLEANER BALANCE DIAGRAM
1. Hose too light
2. Correct hose
balance
3. Hose too
heavy
HINT
Always put the cleaner hose through the skimmer box weir door as shown below.
HINT
The cleaner does not run in a forward direction it runs backwards. Your judgement is needed to
determine the speed required to run in your pool. Deep pools may require the cleaner to run faster.
WARRANTY IS VOID
DO NOT RUN THIS CLEANER UNDER POOL BLANKETS AS THE CHLORINE DOES NOT LEAVE THE POOL
EASILY AND WILL DESTROY THE HOSES AND OTHER COMPONENTS.
WARRANTY IS ALSO VOID IF CLEANER IS LEFT OUT IN DIRECT SUNLIGHT.
Poseidon Auto Pool Cleaner Manual.indd 10Poseidon Auto Pool Cleaner Manual.indd 10 28/7/10 2:07:46 PM28/7/10 2:07:46 PM

Please refer to the warranty card for further information.
FINE TUNING THE POSEIDONTM AUTOMATIC SWIMMING POOL CLEANER
Most swimming pools are a maximum of 1.83 meters (6ft) in depth and for this reason only one hose weight is
required to trim the cleaner successfully. If you have a deeper pool it may require an additional weight to trim the
cleaner so it sits flat on the bottom of the pool. To balance the cleaner to sit flat on the floor slide the weight up or
down as shown in the photo below
ALL SUCTION TYPE POOL CLEANERS allow air and water into the pump through various speed control valves
supplied by their respective manufacturers; this will generally not be a problem in operation if you observe the
following.
• Make sure the speed control valve is properly adjusted
• Make sure the speed control valve is facing downwards in the skimmer box
• Make sure the water level in the swimming pool is high enough not to suck air into it.
• Ensure all the hose joints are properly connected including the speed control valve, elbows and skimmer cone.
• Make sure the skimmer vacuum plate is firmly in the skimmer box
• If the skimmer vacuum plate does not have lock down capacity you should weigh down the vacuum plate to
ensure it does not come off every time the pump turns off
Hint
The pump hair and lint pot should have sufficient water in it to operate the cleaner properly! It is
common for air pockets or bubbles to be in the pump lid whilst cleaners are in operation.
All swimming pools have returns for the water coming from the filtration system, in some cases this can affect the
way cleaners operate around your swimming pool.
To overcome problems with the cleaner not reaching the shallow end or side where the water is returning you can:
• Adjust the eye balls to the side or downward to allow the cleaner to move into this area affected by changing the
water flow
• Shorten the length of hose taking kinks out to straighten the run of the cleaner
• Increase the speed of the unit by adjusting the speed controller valve
• Remove the hose from the pool and lay it out in a straight line in the sun for 2 hours maximum to stop the
hose curling. This is for hoses only please keep the cleaner out of the sunlight at all times when out of the pool.
Poseidon Auto Pool Cleaner Manual.indd 11Poseidon Auto Pool Cleaner Manual.indd 11 28/7/10 2:07:47 PM28/7/10 2:07:47 PM

HINT
Cleaner hoses create a memory as they adjust to your pool. It is required that you remove the hose
from the pool and lay it flat in the sun as above to prevent this from happening on a regular basis.
MAXIMUM TIME TO BE LEFT OUT IS 2 HOURS.
Automatic pool cleaners most often do not give you complete coverage of your swimming pool. It is normal for the
cleaner to climb the walls of some swimming pools but not others.
Steps are very often obstacles for suction cleaners. If your cleaner gets trapped in the step area of your swimming
pool you should:
• Shorten the hose length of the cleaner so it does not get to the step area
• Change the water direction using the eyeball returns so the hose does not go near the step area
• Decrease the speed of the cleaner using the speed controller valve
• Remove the rear bumper fin and run without it
Automatic pool cleaners are designed to clean your swimming pool in general circumstances BUT WILL NOT
CLEAN ALL AREAS OF YOUR POOL. Pool owners should be prepared to manually clean their swimming pools
to compensate for where the cleaner does not reach. Automatic pool cleaners such as our POSEIDONTM Automatic
Swimming Pool Cleaner should clean the vast majority of your swimming pool, eliminating much of your pool
maintenance time.
To help your Poseidon pool cleaner you should periodically:
• Brush off the step areas of you pool
• Brush down the pool walls
• Brush debris and dirt from the areas the POSEIDONTM Automatic Swimming Pool Cleaner does not reach into the
cleaners normal path
• Ensure the filtration system is regularly cleaned
The POSEIDONTM Automatic Swimming Pool Cleaner has only one moving part for its operation, this part is a
rubberized hammer located in the main body of the cleaner down near the foot. It is very important to regularly check
for blockages such as leaves and sticks to ensure the cleaner is operating to its full potential.
Check here for debris such as leaves and sticks
If the throat of the cleaner is blocked simply remove the baffle plate by unscrewing the
stainless steel screw and pull out the hammer to clean it out.
Poseidon Auto Pool Cleaner Manual.indd 12Poseidon Auto Pool Cleaner Manual.indd 12 28/7/10 2:07:47 PM28/7/10 2:07:47 PM

Removing the baffle plate and hammer to clear debris
HINT
Use a garden hose to clear the cleaner throat and clear pipes by running it down from the end that
connects the hose before replacing the hammer back into the cleaner.
The POSEIDONTM Automatic Swimming Pool Cleaner runs efficiently as long as it is free of debris such as sticks and
leaves. It is often not the fault of the cleaner when it stops operating in the swimming pool. Once you have initially
checked the cleaner for blockages and it does not work when you put it back into the pool you must look for the
following as a potential cause.
• Check the pumps mechanical seal for leakage – most often a small pool of crusty water deposits under the pump
itself is an indication of a leakage – leaking mechanical seals severely affect the power of the pump and will stop
the cleaner from operating – most pump seals should be replaced yearly to ensure its smooth operation
• Ensure the filter has been cleaned on a regular basis – swimming pool cleaners are very efficient at collecting dirt
from pools and as a result can block the filters more rapidly
• Ensure the pump lid is securely fastened to the pump
• Ensure a hose joint has not come loose
• Make sure the pump barrel unions are tightened correctly
• Make sure the skimmer vacuum plate has not cracked – vacuum plates do deteriate and can allow air into the
suction line
• Ensure the suction line is not blocked
• Make sure the cleaner hoses have not become brittle and developed cracks
• Make sure the cleaners baffle plate has not been cracked
• Ensure the speed control valve springs are still taut and have not lost their shape
HINT
Toys often block cleaners; make sure the kids have removed all toys and goggles from the pool after
play so the cleaner can do its job.
YOU MUST REMOVE THE POSEIDONTM AUTOMATIC SWIMMING POOL CLEANER FROM THE POOL
AND STORE IT OUT OF SUN LIGHT WHEN IT IS NOT IN USE.
If you have any further questions or are experiencing any difficulties please contact our friendly team on our free line.
HELP DESK NUMBER: 1800 625123
Poseidon Auto Pool Cleaner Manual.indd 13Poseidon Auto Pool Cleaner Manual.indd 13 28/7/10 2:07:47 PM28/7/10 2:07:47 PM

Notes
Poseidon Auto Pool Cleaner Manual.indd 14Poseidon Auto Pool Cleaner Manual.indd 14 28/7/10 2:07:48 PM28/7/10 2:07:48 PM

For further information
call 1800 625 123
www.hyclor.com.au
Hy-Clor and Poseidon Trademarks of
HY-CLOR AUSTRALIA PTY LIMITED
ABN 81 000 655 381
Level 5, 15 Orion Road, Lane Cove NSW 2066, AUSTRALIA
help@hyclor.com.au
Poseidon Auto Pool Cleaner Manual.indd 16Poseidon Auto Pool Cleaner Manual.indd 16 28/7/10 2:07:48 PM28/7/10 2:07:48 PM
Table of contents
Other HY-CLOR Swimming Pool Vacuum manuals