Hydrofarm Autopilot APCEM User manual

INSTRUCTIONS
APCEM
DESKTOP CO2MONITOR

www.Hydrofarm.com
2
INSTRUCTIONS
OVERVIEW
Thank you for selecng the APCEM desktop CO2 monitor. It is smart, compact and easy to use. In
addion to measuring CO2 concentraon, the APCEM can also measure ambient temperature and
relave humidity. This product was developed to detect the presence of CO2 in ambient air. The
APCEM can be used in greenhouses, grow rooms and other places where CO2 should be monitored to
assure that plants grow well.
FEATURES
• The built-in data logger can store 48 sets of CO2, temperature, and RH readings in the past 24
hours (one log per 30 minutes).
• Max/Min Mode records the maximum and minimum concentrations of CO2 since the device has
been last turned on.
• RCFS Mode can recover the original factory settings after the CO2 device has been recalibrated,
altered, or damaged.
1. Enter Buon 4. Mode Buon 7. Yellow LED Display (300-1300 ppm) 10. Power inlet
2. Down Buon 5. LCD display 8. Green LED Display (>1300 ppm) 11. RJ45 socket (only for factory use)
3. Up Buon 6. Red LED Display (<300 ppm) 9. Gas Entry Hole 12. Venlaon Slots
MODE FUNCTIONS
There are several modes which can be adjusted by user. These modes are ALTI Mode, OUTSIDE Mode,
CALI Mode, LOG Mode, MinMax Mode, and RcFS Mode.
ALTI
Compensates for pressure changes
with appropriate altude of
locaon when measured
OUTSIDE
Use this mode to modify the
outside CO
2
concentraon for
calculaon of the venlaon
rate
CALI
Calibrates the sensor when the
reading deviates from the actual
CO
2
concentraon
LOG
Shows the logged CO
2
,
Temperature and RH values
recorded in the past 24 hours
MaxMin
Shows the maximum and
minimum CO
2
reading before being
cleared or aer Power On
RcFS
Recovers the factory sengs
and purges customized
sengs
MUTE The beep alarm can be set on/off
under Mute Mode ALARM 1 For setting the user-
adjustable first alarm level

3
INSTRUCTIONS
ALARM 2 For setting the user-adjustable
second alarm level
SAFETY INSTRUCTIONS
WARNING: Your safety is very important to us. To ensure that you use the product correctly
and safely, please read the warnings and this enre instrucon booklet before using the product.
They contain important safety informaon which should be observed at all mes.
1. Please handle the devices carefully and do not subject it to impact or shock.
2. Do not immerse the product in water. Water can cause electric shock, re or malfuncon which
may result in damage.
3. Do not keep the product in a hot and moist environment. Keep the product away from heat
sources and contact with water.
4. Please use only the included power adapter. Improper power adapters or power sources can
cause serious damage to the product, and/or result in injuries to the user.
CARING FOR THE PRODUCT
To ensure you receive the maximum benet from using this product, please observe the following
guidelines:
1. Cleaning—Disconnect the power before cleaning. Use a damp cloth. Do not use chemical cleaning
agents such as benzene, thinners, or aerosols.
2. Repair—Do not aempt to repair the product or modify the circuitry by yourself. Please contact
the dealer or a qualied technician if the product needs servicing.
3. Air circulaon—The venlaon slots and Gas Entry Hole should never be blocked. The slots
facilitate air circulaon through the unit, and the Gas Entry Hole allows measurement of the
surrounding air’s CO2 concentraon.
CUSTOMIZE SETTINGS
When the power has been connected, the APCEM CO2 monitor will begin to work. In order to meet
your personal requirements, it is advisable to set up the customizing parameters.
Warm Up: The Warm Up period lasts approximately one minute before the WARM UP display
disappears, indicang it has ended. All MODE funcons are non-responsive during warm-up.
TEMPERATURE (ºC/ºF) RH AND VENTILATION RATE:
1. Press Up/Down to select the temperature, RH and venlaon rate modes.
2. When you press the Up buon, the LCD display sequence is Temp ºC -> Temp ºF -> Vent Rate lps
-> Vent Rate cfm/p. When you press the Down buon, the LCD display sequence is reversed.
NOTE: Temp ºC refers to temperature in Celsius; Temp ºF refers to temperature in Fahrenheit. Vent
Rate lps refers to Liter Per Second; Vent Rate cfm/p refers to cubic feet per minute.

www.Hydrofarm.com
4
INSTRUCTIONS
USING THE MUTE FUNCTION
1. Press Mode. The speaker icon ashes simultaneously.
2. Press Enter, then press Up or Down to select on or o.
3. Press Enter again to save the data.
NOTE: The default (factory) seng for the alarm is o. Set the alarm on/o under MUTE funcon
as described above.
USING THE ALTI MODE:
1. Press Mode. The ALTI icon will ash.
2. Press Enter. ALTI will show on the display. Press the Mode buon to choose between m (meters)
and (feet).
3. Adjust altude to match your locaon (step=100m/500) using the Up and Down buons.
4. Press Enter again to save the data.
SETTING THE ALARM 1 LEVEL
1. Press Mode. The ALARM 1 icon will ash.
2. Press Enter. Use Up/Down to set the parameter. The default ALARM 1 is 800 ppm.
3. Press Enter again to save the data.
NOTE: When CO2 Alarm level is ≥1,000 ppm, the interval is ±100ppm, and when the CO2Alarm level is
˂1,000 ppm, the interval is ±50 ppm. Aer seng a new alarm level parameter, the green LED will light
when CO2 concentraon is below the Alarm 1 level.

5
INSTRUCTIONS
SETTING THE ALARM 2 LEVEL
1. Press Mode. The ALARM 2 icon will ash.
2. Press Enter. Use Up/Down to set the parameter. The default ALARM 2 is 1200 ppm.
3. Press Enter again to save the data.
NOTE: As with Alarm 2, when CO2 Alarm level is ≥1,000 ppm, the interval is ±100ppm, when the CO2
Alarm level is ˂1,000 ppm, the interval is ±50 ppm. Aer seng a new alarm level parameter, the
green LED will light when CO2 concentraon is below the Alarm 1 level. The red LED will light when CO2
concentraon exceeds the Alarm 2 level, the yellow LED will light when CO2 concentraon is between
the Alarm 1 level and the Alarm 2 level.
USING THE OUTSIDE MODE:
1. Press Mode. The OUTSIDE icon will ash.
2. Press Enter. OUTSIDE, CO2 and ppm will ash. Press Up/Down to adjust the data.
3. Press Enter to save the seng. Aer the modicaon, the VENT Rate will change.
NOTE: Venlaon rate represents how much air is introduced into the indoor space from outside.
Low numbers indicate low venlaon rates and potenally poor air quality. High levels indicate
excessive venlaon and potenal excessive energy usage. To obtain an accurate measurement,
readings should be taken 2‒3 hours aer occupancy has stabilized in a space or at a peak in daily
CO2 concentraons. For indoor air quality control, CO2 value is an indicator of venlaon rate. 400
ppm (parts per million) is the default outdoor CO2 concentraon according to ASHRAE: American
Society of Heang, Refrigeraon and Air condioning Engineers.
USING THE CALI (CALIBRATION) MODE:

www.Hydrofarm.com
6
INSTRUCTIONS
1. Expose the unit to fresh air by bringing it outdoors. Avoid direct contact with automobile exhaust,
furnace exhaust, etc. DO NOT BREATHE ON THE UNIT DURING THE CALIBRATION PROCESS. Connect
the power supply.
2. Move away from the unit to allow the reading to stabilize for approximately 20 minutes.
3. Press Mode, and the CALI icon will ash.
4. Press Enter. The screen will show the CALI icon without ashing.
5. Press Mode for more than 10 seconds. CALIBRATING ashes. Calibraon will be done
automacally aer about 3 minutes and the LCD will display PASS or FAIL. If it shows FAIL, please try
again.
6. Aer calibraon is complete, disconnect the power supply for a few seconds.
USING THE LOG MODE:
1. Press Mode. LOG icon ashes.
2. Press Enter. CO2 reading and Temperature will show on the LCD.
3. Press Up/Down to page up/down in the log of readings.
NOTE: With the built-in data logger, the APCEM can provide the logged CO2, temperature and
RH readings from the past 24 hours. The log interval is 30 minutes per data. When the APCEM is
connected with power and used for the rst me, if the working me is more than 30 minutes, the
APCEM will have CO2, RH and temperature readings in the data logger. If the working me is less
than 30 minutes, the LCD will display “NULL” while using the LOG funcon.
USING THE MAX MIN MODE:
1. Press Mode. The MAX MIN icon will ash.
2. Press Enter. The MAX and MIN CO2 readings will ash alternately.
3. Press Down and “CLr” will ash on the LCD. Press Enter to CLEAR the MAX and MIN record.
NOTE: With the Built-in MAX MIN mode, the APCEM can provide the maximum and minimum CO2
readings since the device has last been turned on. If users press Up/Down to clear the MAX and
MIN CO2 reading record, the APCEM will provide the new MAX and MIN CO2reading from that
me.

7
TROUBLESHOOTING & SPECS
SPECIFICATIONS
CO
2
SPECIFICATION
Measurement Range 0‒3,000 ppm display
Display Resolution 1 ppm at 0‒1,000 ppm; 5 ppm at 1,001‒2,000 ppm; 10 ppm at 2,001‒3,000ppm
Accuracy 0‒2,000ppm: ±70 ppm or ±5% of reading, whichever is greater; over 2000 ppm:
+/-7%
Temperature Dependence Typ. ±0.2% of reading per °C or ±2 ppm per °C, whichever is greater, referenced
to 25°C
Pressure Dependence 0.13% of reading per mm Hg (corrected via user input for altitude)
Repeatability ±20 ppm @ 400 ppm Response Time
About 2 min for 63% of step
change
Warm-Up Time <60 seconds at 22°C Zone LED Display
Red: <300 ppm; Yellow 300‒1300
ppm; Green: >1300 ppm
TEMPERATURE SPECIFICATION
Temperature Range 0°C to 50°C (32°F to
122°F) display Display Resolution 0.1°C (0.1°F)
Display Options °C/°F Response Time 20-30 minutes (case must
equalize with environment)
Accuracy ±1°C ( ±2°F) When a fan blows on the device directly, the accuracy of temperature
is ±1.5°C
RH SPECIFICATION
Operating Conditions
Measurement Range 20%-90% RH Operating
Temperature 0°C to 50°C (32°F to 122°F)
Display Resolution 1% RH Humidity Range 0‒95% RH non-condensing
Accuracy ±5% RH@23°C Storage Conditions
Response Time <5 min for 63% of step
change
Storage
Temperature -20°C to 60°C (-4°F to 140°F)
POWER SUPPLY
Power Supply 100‒240 VAC 50/60 Hz 6 VDC from external AC/DC adapter which is included in
package (use specified AC adapter only)
FAULT CODES & TROUBLESHOOTING GUIDE
FAULT ICON DESCRIPTION OF THE FAULT SUGGESTED ACTIONS
The ambient temperature has exceeded the
operating temperature range of 0°C to 50°C
(32°F to 122°F)
This error will clear when the
temperature returns to the range
between 0°C to 50°C (32°F to 122°F).
EEPROM System problem
Please reconnect AC adapter to the
APCEM CO2 Monitor. If the “Err5,
Err6” still appears, please contact
the Service Department for further
assistance.
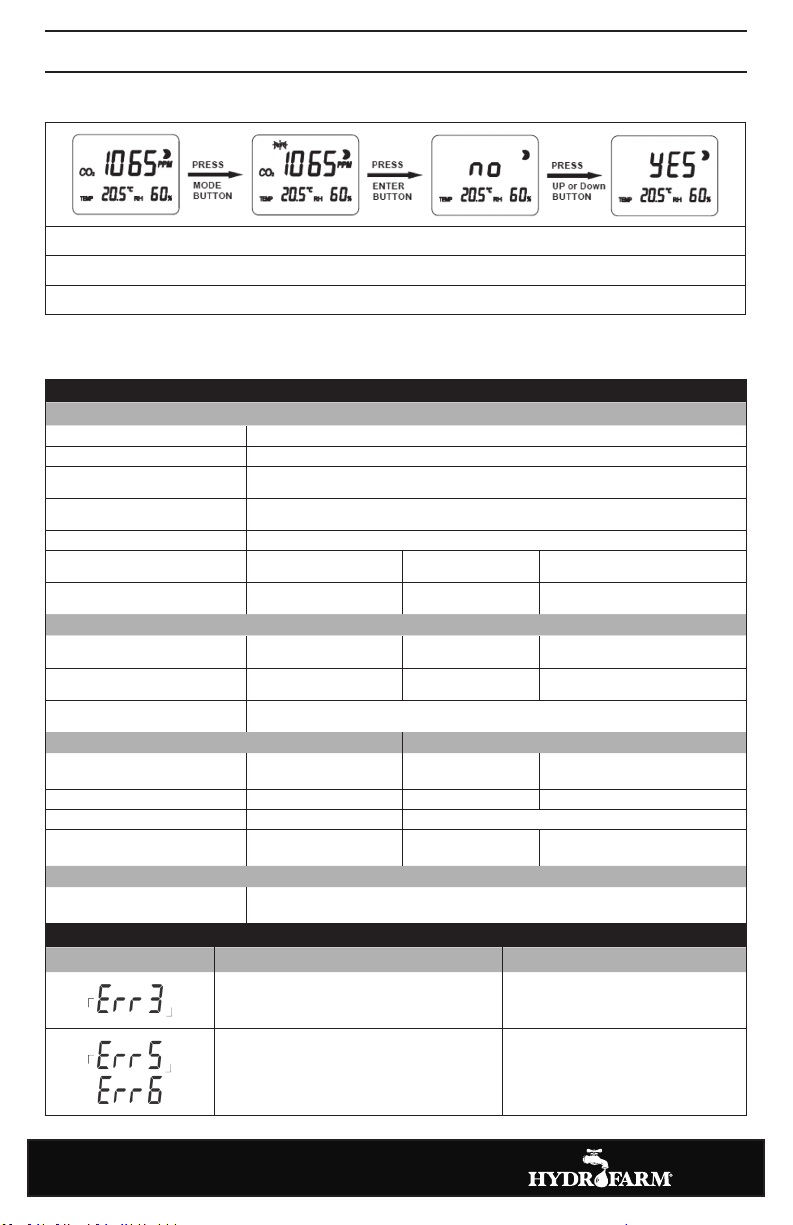
USING THE RCFS MODE:
1. Press Mode. The RcFS icon will ash.
2. Press Enter. The icon “no” will show on the LCD. Press Up/Down to select no/yes.
3. Aer selecng, press Enter to save the seng.
NOTE: If through an error incorrect data is set or the APCEM is calibrated incorrectly, use RcFS
(Recover the Factory Seng) to reset to the default factory sengs.

8
www.Hydrofarm.com
www.Hydrofarm.com
WARRANTY
LIMITED WARRANTY
Hydrofarm warrants the APCEM to be free from defects in materials and workmanship. The warranty
term is for one year beginning on the date of purchase. Misuse, abuse, or failure to follow instrucons
is not covered under this warranty. Hydrofarm will, at our discreon, repair or replace the APCEM
covered under this warranty if it is returned to the original place of purchase. To request warranty
service, please return the APCEM, with original sales receipt and original packaging, to your place of
purchase. The purchase date is based on your original sales receipt.
GARANTÍA LIMITADA
Hydrofarm garanza que APCEM no presenta defectos en los materiales ni la fabricación. La vigencia
de la garana es un año que comienza en la fecha de compra. Esta garana no cubre el uso erróneo,
el abuso o el incumplimiento de las instrucciones. Hydrofarm, según si criterio, reparará o sustuirá
APCEM incluido en esta garana si se devuelve al centro original de compra. Para solicitar el servicio
de garana, devuelva APCEM, con el que de compra y el embalaje originales, a su centro de compra.
La fecha de compra se basa en su que de compra original.
GARANTIE LIMITÉE
Hydrofarm garant que APCEM ne présente pas de défauts de matériel ni de fabricaon. La garane
est en vigueur un an à parr de la date d’achat. Cee garane ne couvre pas l’ulisaon incorrecte,
l’abus ou le non respect de la noce. Hydrofarm, selon ses critères, réparera ou remplacera APCEM
couvert par cee garane s’il est renvoyé au centre original d’achat. Pour demander le service de
garane, renvoyer APCEM, avec le cket d’achat et l’emballage originaux, au centre d’achat. La date
d’achat est indiquée sur le cket d’achat original.
BEGRENZTE GARANTIE
Hydrofarm gewährleistet, dass APCEM ohne Material- und Herstellungsmängel geliefert wird.
Die Garanedauer beträgt ein Jahr und beginnt zum Kaufdatum zu laufen. Schäden, die aufgrund
eines unsachgemäßen Gebrauchs oder der Nichteinhaltung der Anleitungen entstehen, sind von
der Garane nicht gedeckt. Hydrofarm wird den unter Garane stehenden APCEM nach eigenem
Ermessen entweder reparieren oder ersetzen, sofern die Rückgabe an der Verkaufsstelle, an der er
erworben wurde, erfolgt. Für die Beantragung der Garaneleistungen ist der APCEM mit der Quiung
und in der Originalverpackung an der Verkaufsstelle zurückzugeben. Als Kaufdatum gilt jenes Datum,
das dem Kauicket im Original zu entnehmen ist.
APCEM Instrucons - rev.01.11.2015
Table of contents
Other Hydrofarm Monitor manuals