hygena APP2440 User manual

How
to
uetthe
most
. .
fromyour
Chimney
Canopy
Extractor
APP2440
APP2442
APP2540
APP2542
APP2543

.,
CDIII.III.
Pa,1I
NI.
• 1 Contents
•
2&
3 Part Identification & Installation
• 4 &Ii Decorative Chimney
.• 6 & 1 .Alternative Methods Of Extraction
•
B·
Operating Your Extractor &Cleaning
.• 9 Electrical Connections
•
10
Not Working Properly?
•
11
12 Months Guarantee·

.2
p.nsIIlBRtilic.tiDR
On opening your box you will find the extractor hood, a telescopic decorative
chimney,'a bag offittings containing brackets and various screws, a ceiling fixing
bracket, a deflectorand, a wall fixing template drawing and
aducting
connector.
IIEIlEt:TIIII
llOR
RECIRCUlATION
ONl.Y1
---~-
CHIMNEYIMSE
CEIlINIJBRJlCKET
CHlMNEYTEUSC.PlCTBPSECR.N.
---
i
I
\ .
EI1IIIICT1JR
i'
You may find plastic ducting adaptors have been
supplied with yourextractor. Thesecan
be
usedon
the
extractoroutlet and ductingconnector.

-Extraction
Without
Intrusion
-3
The extractor is designed to giveyouthe option to extract air
by
ducting tothe outside
and away (via an exteriorwall). orto re-circulate airthrough charcoalfiltersto minimize
odours, steam and condensation.
The choice
is
yours to decide at installation, and both systems are explained
in
this
booklet.
We
recommendthatyou readthisbookletfromcovertocoverbeforeattemptingtoinstall
or operatethe extractor.
-Installation
THIS INSTRUCTION
MUST
BE
STRICTLY ADHERED
TO.
FAILURE
TO
COMPLY
COULD
RESULT
IN
OVERHEATING
AND
SERIOUS
DAMAGE
TO
YOUR
APPLI-
ANCE.
When installing your extractorabove a heat source. i.e., any electrical or
gas
hob,
grill,
cookeretc.,thefixing heightmust
NOT
BE
LESS
THAN
65cm
betweenthe hobandthe
bottom ofthe extractor.
Position
the extractor
and
markthrough
65mm
(Min)
onto thefixing
wall
via holes
A.
Usingthe appropriate wall
fi~ings,
drili
the two marked positions and insert
screws.
Place the extractor into position via
these fixings.
Two
furtherholes (8) are provided
in
therearoftheextractorforfixing. Whentheextrac-
toris
in
thecorrect position,
markthro~ugh
these holes and drillthesurfaceto which the
extractor
is
to
be
fitted. Use appropriate fixings for the type of wall.
You
may need to
purchase the correct fixings ifthe ones supplied are not adequate, if
in
doubt, consult
an expert.
NOTE: Adaptors
are
provided to connect a 125mm vent hose to the outlet
of
the
extractor
and
to the top vent ducting
COf;,mector.

.4
Dec.ratille
Chimnel
Whether you are planning to duct externally
or
recirculate you will need a purpose de-
signed ducting kit which is available from where you purchased your extractor, in both
cases you will need to fix the ceiling bracket.
Once yourextractoris in position on the wall, the bracket needsto be positioned directly
above the extractor outlet on the ceiling
or
otherappropriate
surfa<::e.
Use a spirit level
and a straight edge to ensure it is square to the extractor.
BIA6t
EXTERNAL EXTRACTIONSTAGES OFFITTING/REF. DlAG 2
2A) Extractor in position, ceiling bracket
in
place a{ld ducting work
completed.
28)
Fit the chimney parts together.
2C) Fit the chimney in position and secure topsection into the ceiling bracket.
BIA62·
II.
c.
B.

-5
Decorative
ChiDlney·ConL
...
RECIRCULATION
STAGES
OF
FITTING/
REF.
DIAG
3
2A) Slide deflector down into the bottom section of chimney, as shown. Secure using
screws supplied.
2B)
Fit
the chimney parts together. NOTE: The air vents will be at the bottom of the
chimney.
Secure top section into'the ceiling bracket and secure the bottom section onto the ex-
tractor via thefour fixing holes. Access to the four fixing holes
is
via the two clips.
BIAGa
A.
8.
-llectriclIl
Connection
Due tothe mains cable being situated inside
the
chimney ofthe extractor
We
strongly
recommend that a spuroutlet point
isfitted
within the chimney but controlled from a
separate switch situated outsidethis area. (See Electrical Connections).
Any cables connecting
the
switch
to
the outlet point must be protected from any heat
source
or
mechanical damageand it is preferred that it is sunk into the wall.

AltlJrnativlJ
·.MIJlhods
.6
Of
Extraction
• 1
ixtraction
.lIia
Ducting
lfig.
tl
Thevery best method ofcleaning the kitchen
of
unwantedodours is byconnecting the
appliancetoan exhaustductandventingtotheoutsideatmosphereviaan exteriorwall.
(Suitable ducting kits may
be
purchased from the store where you bought your
extractor). Ducting your extractor negates the need
for
a charcoal filter. (Fig. 1).
FIG. 1
DUCTING MODE
(NO CHARCOAL FILTER REQUIRED)
REMEMBER: Before drilling
or
chiselling the wall, checkforpipes and
powercables.
1:
Ensure the ducting tube is kept as short as possible and with the minimum of
bends
to
permit the smoothest airflow. (Maximum length 3 metres).
2..
Ductedairmust notbedischarged
intoa
fluewhich is
used
forexhausting fumes
from appliances supplied with energy otherthan electricity.
3.
Ensurethe requirements
of
the local authorities are adhered
to
concerning the·
discharge
of
exhaust air.
4. Ensure adequate room ventilation is provided when the extractor is used
in
the
same room as appliances supplied with energy otherthan electricity.
5.
Never duct into a hot
air
flow such
as
a central heating duct.
We strongly advise that all exterioroutlets be fitted with a
non
return
valve
or
louvredslatting.
·FIG.2
RECIRCULATING MODE
(CHARCOAL FILTERS REQUIRED)

•
2.
ThlJ
Re-cilculalion
Mode
Ifill
2.1
I'
When there is no easy access to an outside wall, the extractorcan easily be adapted
toclean
air
pollutedbycookingsmells,
by
usingacharcoalfilter whichcan
be
purchased
fromthestorewhereyouboughtyourextractor. Rememberthere-circulationmodecan
not
be
used without charcoalfilters.
•
The
Charcoalliller
Filters has a limited life.
We
adviseyou
to
change
it
when there is a noticeable drop in
performance. The intervals between changing the filter wilrdepend entirely upon the
amount
of
cooking you do, but on average theywillrast about 6 months.
Onceyouhave
removedthe
greasefilters, fittingthecharcoalfilteris
easy.
Theysimply
lockontothefan ateitherend byturning itin an anticlockwisedirection. Withthe filterin
place,
air
is thoroughly cleaned before passing
out
of
the unit via thetop outlet.
•
The
Grease
liller
Mal
The grease filter mat is
of
a metallic material and should
be
washed using a neutral
detergent. To gain access
tbthe
charcoalfilterthe grease filters must be removed.
IMPORTANT: You should
never
attemptto use the extractor without the grease filter
since grease build-up
could
preventthe
motor
working properly.
If
eitherfilter is not
changedregularly the risk
of
fire
will
be
increased. Alwaysswitch
off
the electricity
supply
or
pull
out
the
plug
beforechangingthe filters.
REMOVAL
OF
THE
GREASE
FIL
TERS:
This is carried outbypushing the respective
panel towards the.rear
of
the extractor and downwards until it dis911gages from the
supports. Proceed in reverse when re-fitting
the
filters. .
IMPORTANT: Before cleaningalways ensure that the extractoris switchedoff!

--
---
•
O/lerating
Yourlxtractor
.8
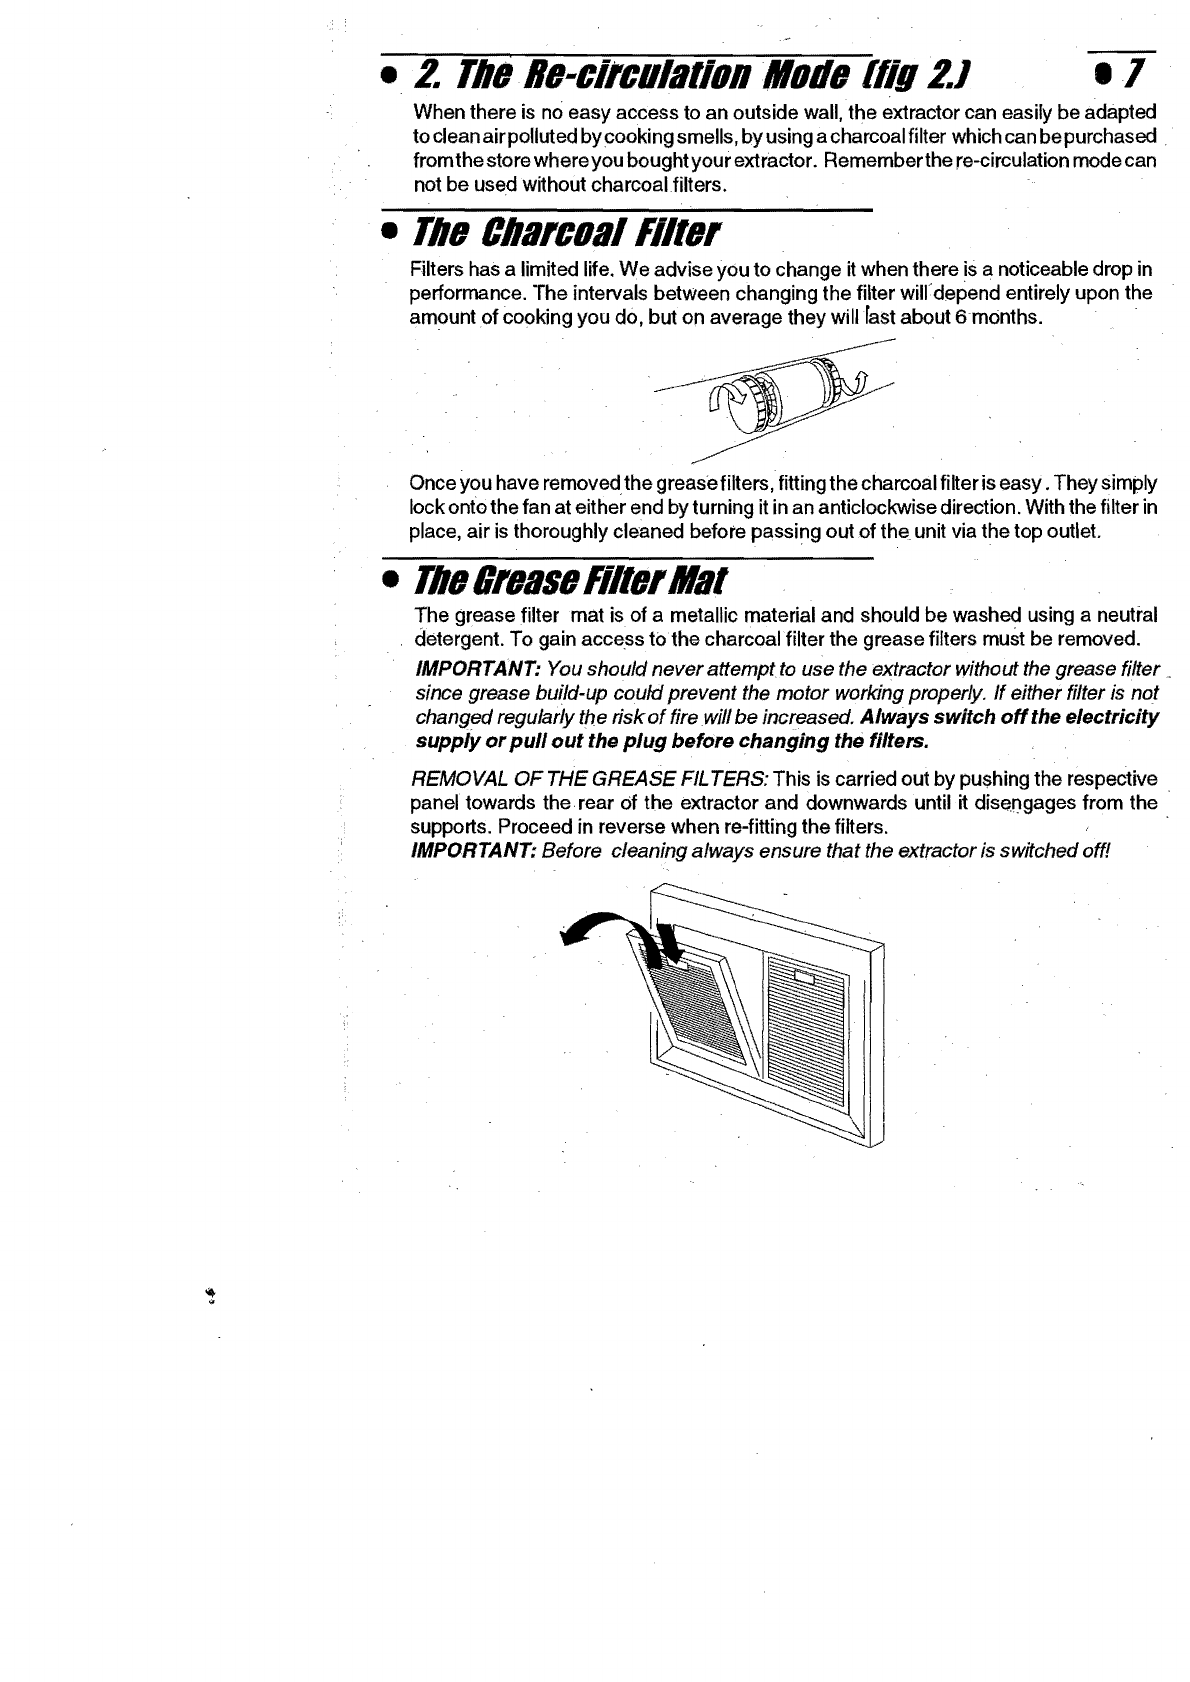
When the extractor is installed the relevant speed can be selected to suit the ,specific
requirements.
Press the relevant button
in
to operate the function, press again to turn off.
A=LIGHTSwrrCH
B =
FIRST
SPEED
MOTOR
ONI
OFF
SWITCH
(This
switch
must
a/ways
be
on
for
second
&
third
speeds to operate).
C=
SECOND
SPEED
SWITCH
D=
THIRD
SPEED
swrtcH
E
==
WARNING
LIGHT
(MOTOR
ON)
A.
B.
C.
D.
I.
66
6
•
Re/llacing
The
LightBulbs
Ensure that the power is switched off.
Remove the lamp lense, unscrew the faulty bulb and replace with
abulb
of the same wattage.
Replacement bulbs can be purchased at the store from which you bought the appliance.
NOTE:
BULB
REPLACEMENT IS NOT COVERED BY YOUR GUARANTEE.
• lor
Your
Safety
In
orderto protect yourappliance and minimisethe risk offire, don'tbarbecue food directlyunder .
the extractor. Similarly,
do
not
prepare
flame
dishes
immediatelyunderthe extractor. Ifyou use
a gas hob,
do
not
remove
pots
without
first
tu
rning
off
the
flame.
Your extractor
is
designed
. to draw gases up
and
away fram your hob. This means that exposed flames may behave
unpredictably in the vicinity ofthe appliance while it is switched on.
When
frying take particular
caretopreventthe oilfromcatchingfire and neverleave unattended. Themotorused
in
this hood
features asafety device (thermal cutout) that responds to temperature changes. For accidental
reasons or due to installation faults, this .device could engage and automatically shut off the
motor, thereby preventing serious damage to the equipment.
In
such cases, after allowing the
motor
to
cool down, the hood can be switched on again; the cause of the fault will nonetheless
haveto beremedied, ensuring installation hasbeencorrectlymadeandthatall instructions have
been complied with.
•
Cleaning
IMPORTANT:
Before attempting any cleaning or maintenance, ensure your extractor
is
disconnected from the power source.
GENERAL
CLEANING:Thorough servicing guarantees correct and long lasting operation.
Wipe the external surfaces of the appliance regularly using warm water and a mild detergent,
never use products containing abrasives.
Particularcare must bepaid to the grease filtering panels which mustbeperiodically cleaned
in
relation to use (at least once every two months). . .
Remove the grease filters and wash them using neutral detergent.

Electrical
Connections
.9
IMPORTANT:
ENSURE
THAT
THE
ELECTRICITYSUPPLY
IS
SWITCHED
OFF
BEFORE
CONNECTING.
Yourappliance mustbe connected to fixed wiring viathe use ofa double pole switched
fused
spur
outletwith at least
3mm
contact separation, and preferablywith a pilot lamp.
(See technical dataforfuserating). We strongly recommend theappliance is connected
by
a qualified electrician
who
is a member
of
the N.I.C.E.I.C or Corgi who will comply
with the
lEE
and
any
local regulations.
NOTE:
Theterminology "DOUSLE POLE" means
that both the live and neutral supplies are
switched and disconnected·at the same
time.
The terminations labelled SUPPLYare forthe
connection
for
the internal house wiring and
tile
terminations labelled LOAD are for con-
nection forthe appliance.
IMPORTANT
The
wires in this mains lead are coloured in
accordance
with thefollowing code:-
Blue Neutral
Brown Live
As
the colours
of
the wires in the mainslead
ofthisappliance
may
notcorrespondwiththe
colouredmarkingsidentifyingtheterminalsin
your
spur
box, proceed
as
follows;
The
wire which is coloured blue must be
connected to the terminal which
is
marked
with
the
letter'N'
or
coloured black.
THe
wire
whichiscolouredbrownmustbeconnected
to
theterminalwhich ismarkedwiththe letter'L'
orcoloured
red.
WARNiNG
Nietherwireshouldbeconnectedtothetermi-
nal marked with the letter E
or
by
the earth
symbol. .
©
EJ
()
BLUE
(NEUTRAL)
.
©
BROWN
(LIVE)
TECHNICAL DATA:
FUSE RATING: 3 AMP
WIRING
TO
THE MAINS
Theunitdoesnotcomewith a plug as
therearealternative
waY$
of
connect-
ing
itto
themainssupply(which should
.·be230-240v-50Hz). Ifyouareinany
doubtaboutelectricalconnectioncon-
sult a qualified electrician. ..

111
.10
r •
''1'
WIlking
"IIIIII",iI
Before you assume the
worst,check
this simple fault-finding guide to get to the root
of the problem:,
Light
bulb
doesn't
come
on
t
i
l Motoris
on
but
fan
doesn'tseem to
be
as efficientas
usual
Works normally
but
cooking smells
linger
Controls fail to
switch motor
on
Appliance does,not
work
at
all
Still
not
working? .
Call the service
agent.
A replacement is probably necessary, but check
first
that
the bulb is firmly screwed in to its holder. If the filament is
broken, remember that the light bulbs are not covered by
our guarantee. Remember fo disconnect power supply
before removing the bulb.
Check grease filter mat. If it hasn't been cleaned recently, it
might be clogged with grease. If filter mat is relatively
clean, check charcoal filter. If this hasn't been replaced for
morethan six months, remove and insert new one's. As .
time goes by, accumulated grease tends
to
stifle the
charcoal filters in just the same
way
as the grease filter
mat, thereby reducing the efficiency of both the fan and the
filteritself. .
If you're using the unit in re-circulation mode, change
charcoal filter. It is obvjously past its prime. '
Check plug, socket and fuses. If these are in order and
fault persists, it could be that an accumulation
of
grease
has impaired the efficiency of the switch mechanism. Try
rapidly moving switch on and off several times in succes-
sion to clear grease deposit. If fault continues, call service
agent.
Check your extractor is switched on at the mains. Next,
check for an unexpected power strike by switching on
adjacent lights etc.
If, having consu.lted the above diagnostic chart you are still
,unable to remedy the situation, please call the Free-phone
service No. (Back cover).

-12
Months
GualantlJlJ
-
11
~~
~<rc~~~~~~gg
1a:rf~r~Eo~~~~~fr~!:j~~;i;,e
original purchase.
{b}
The
unit musl be correcny installed
'and
operated in
accordance wilh the manufacturer's instructions and
used lor
normal
domestic purposes,
(ci
The guarantee
does
not
cO\ter
accidental damage.
·mlsuse
or
alterations
WhiCh
are
likely
to
aflect the units.
(d) The guarantee ls invalid If the unltis tampered
with.·
or repaired byany unauthorised person.
(e)
The guarantee in
no
way affects your statutory rights.
(1) Mainland
U.K
only.
-
PIOClJdUl1J
whlJn
IIJPoning
a
fault
1. Give full name, address including postcode, home telephone numberand
businesstelephonenumberifappropriate.
2. Quote sales receipt number, make and model numberoffaulty appliance.
This product's reference is as follows: APP2440
APP2442
APP2540
APP2542
APP2543
3. Give a summary ofthe problem.
-
TlJchnical
Data
PowerSupply:
230/240v-50Hz
Rating:
230
watts
Fuse Rating: 3 amp o
Code
Reference:-
HDOO1131
PRINIEDONRECYQ.ED
PAPER

DUCTING KIT APL 2806
CONTENTS
LIST:
1.
Gravity grill
2. 1.5M flexible hose
3.
Threaded hose adaptor
4.
Fixing kit including
foam strip (cut to suit)
1 2
3
FITTING
INSTRUCTIONS
1 Using a core drill cut apertures through wall.
2 Thread flexible hose from inside wall and fix to gravity grill spigot using 3 studs supplied.
(Take care not to damage hose on sharp edges
of
bricks).
3 Position outside gravity grill, mark 4 fixing positions, drill fixing holes, then fit grill using 4
screws and rawl plugs supplied. Stretch flexible hose from inside wall and ensuring flexible
hoseis as straight as possible, trim to length, fasten hose to threaded hose connector and push
onto extractor hood spigot. (NOTE: Do not kink hose as this could restrict airflow.)
NOTE
1: Extraction hood spigot diameters can vary slightly and the threaded hose connector may
not give a tight fit. Use
of
the adhesive fixing pads secured around the extractor spigot will allow the
threaded connector to fit finnly.
WARNING:
1.
DUCTED AIR
MUST
NOT
BE
DISCHARGED INTO A FLUEWHICH IS USED FOR
EXHAUSTING FUMES
FROM
APPLIANCES SUPPLIED WITH ENERGY OTHER
TIlAN
ELECTRICTIY.
2.
ENSURE
THE
REQUIREMENTS OF
THE
LOCAL AUTHORITIES ARE ADHERED
TO
CONCERNING
THE
DISCHARGE
OF
EXHAUST AIR.
3.
ENSURE ADEQUATE
ROOM
VENTILATION IS PROVIDED
WHEN
THE
EXTRACTOR
IS USED IN
THE
SAME
ROOM AS APPLIANCES SUPPLIED WITH ENERGY OTHERTHAN
ELECTRICTIY.
4. NEVER DUCT INTO A
HOT
AIR
FLOW
SUCH AS A CENTRAL HEATING DUCT.
5.
WHERE AN
AIR
EXTRACTION UNIT IS
FmED
IN A ROOM WITH AN OPEN FLAME
APPIANCE. AIR
BACK
FLOW
MUST
BE
PROVIDED
TO
AVOID
THE
REVERSAL OF FLUE
GASES.
IMPORTANT:
Grease vapours are mostly trapped
by
the grease filter mat in your
extractor hood and it is advisable to clean it regularly to ensure the efficient and hygienic
operation
of
your extraction system. The recommendations on replacement
of
filters is
detailed in the instruction manual for your specific extractor hood.
HYGENN2806
This manual suits for next models
4
Table of contents
Other hygena Ventilation Hood manuals
Popular Ventilation Hood manuals by other brands

AEG
AEG 860 D Instructions for installation and use

Faber
Faber TRATTO ISOLA/SP EG8 instruction manual

Omega
Omega K181V90 Instructions for installation and use

Parmco
Parmco T2-6-1 Installation and operating instructions

Zephyr
Zephyr Pyramid ZPY-E30S Use, care and installation guide

Amica
Amica OTP6253BG operating instructions