Hylio AgroDrone AG-110 User manual

AgroDrone Spray System
AG-110
Operations Manual V2.2

Hylio Agrodrone (AG-110) Operations Manual
©2020 Hylio Inc. All Rights Reserved 2
Contents
Spec Sheet 3
Accessory Hardware 4
GPS Tracker 4
Batteries/Charger 4
Remote Controller 5
Ground Control Station 6
System Capabilities 7
Features Overview 7
Lost Link Failsafe 10
Fly-Away Prevention 10
Obstacle Avoidance 11
System Operation 12
Spray Mission Workflow 12
Standard Flight Pattern 13
Preflight Checklist 14
Calibrations 15
UAS Spraying Tips 16
First Flight 18
Manual Flight & RC Takeover 19
Safety Guidelines 20
Flight Envelope 20
Field Marking 20
Mission Settings 21
Storage & Transport 21
UAS Operation 22
Battery Safety 22
Chemicals and Environment 23
Multi UAS Control 23
Hylio Inc. Support 24
Initial Training 24
Customer Support 24

Hylio Agrodrone (AG-110) Operations Manual
©2020 Hylio Inc. All Rights Reserved 3
Spec Sheet
Flight Parameters
Total Weight (without batteries)
23.0 lb
Max Recommended Takeoff
Weight
87.6 lb
Max Thrust
134.8 lb
Max Operating Speed
22 mph
Max Flight Speed
40 mph
Propulsion System
Motor KV
100 rpm/V
Foldable Propeller
30x9.0 in
Configuration
Quadcopter
Operating Voltage
12s
Battery
1 x 16000 mAh 12S (44.4V) LiPo Battery
10.3 lb/battery
Aircraft Frame
Wheelbase
51 in
Material
Carbon Fiber, Aluminum, Plastic
Dimensions
46x46x24 in (arms unfolded)
23x23x20 in (arms folded)
Spray System
Standard Payload
22lb, 2.65 gallon
Configuration
1 Pump, 1 Tank, 1 Flowmeter, 4 nozzles on 6ft boom
Nozzle
Nozzle body compatible with any Teejet spray tip
Pump Pressure
Diaphragm Pump, 65 PSI
Flow Rate (no nozzle max)
0.1 –1.1 Gal/min
Flow Rate (with recommended
nozzle TT11001)
0.5 Gal/min
Spray Width
10-20 feet
Flight Control
Flight Modes
Fully autonomous (no RC), position hold manual (with RC), Fully manual GPS
denied (with RC)
Operating Frequencies
902 –928 MHz, 2.4 GHz
Ground Station Control
Software
Hylio Agrosol
Max Transmission Range
~1 mile (5+ unobstructed)

Hylio Agrodrone (AG-110) Operations Manual
©2020 Hylio Inc. All Rights Reserved 4
Accessory Hardware
Refer to maintenance manual for UAS hardware information
GPS Tracker
- GPS Tracker unit is used for field survey and marking
- Tracker is NOT required to generate flags and obstacles in AgroSol
- Tracker is NOT required to create missions in AgroSol
- Tracker connects to ground station computer using a standard
micro-USB cable
- Tracker requires a 2-minute boot-up time to acquire satellites
Batteries/Charger
Dual charger unit shown
- Each charger comes with:
Two 12-pin balance cables
One AC power cord
- One 12s (50V) battery power UAS
- Be careful not to get the battery balance cables wet
or damage the battery structure, this will increase
risk of fire
22000Mah 12s Battery shown
- Press button to display current charge level
- Number of triangles lit up represent battery health,
more triangles mean battery total capacity is reduced
How to Charge Batteries
Steps
1. Plug Charger AC power cord into 120V outlet
2. Plug AS150-U and 12-pin balance cables from
battery into charger
3. Press on/off button to turn on charger
4. Turn knob to trickle, standard, or fast to select
desired charge speed
5. Wait 10 seconds OR press and hold charge
button to begin charge
6. Press and hold button again to stop charge.
7. Press and hold storage button to start storage charge
Tips
1. Try not to charge hot batteries. Wait for them to cool before charging
2. DO NOT discharge batteries below 10%. Avoid discharging below 15%
3. Storage charge batteries if they will not be used for over a week
4. Trickle charge batteries to improve longevity and performance

Hylio Agrodrone (AG-110) Operations Manual
©2020 Hylio Inc. All Rights Reserved 5
Remote Controller
*All switches are shown in the default position. The default position of the throttle stick is pulled down to the bottom
1
Back Switch 1
Not Used
2
Inside Switch 1
Flight Mode Switch: Position Hold (Top position)
RTL (Middle position)
Land (bottom position)
3
Outside Switch 1
Not Used
4
Knob 1
Not Used
5
Stick 1
Vertical Velocity: Move stick up and down control altitude
Control Yaw: Move stick left and right to yaw CCW and CW
6
Power Button
Hold power button 3s to turn RC on or off
7
Back Switch 2
Not Used
8
Inside Switch 2
Emergency Kill Switch Part 1: pull switch down to instantly kill motor
power. Must be used in conjunction with Knob 2 to kill motors.
9
Outside Switch 2
Not Used
10
Knob 2
Emergency Kill Switch Part 2: turn knob all the way clockwise to
instantly kill motor power. Must be used in conjunction with Inside
Switch 2 to kill motors.
11
Stick 2
Horizontal Velocity Left-Right: Move left-right to control UAS left-right
position
Horizontal Velocity Forward-Back: Move forward-back to control UAS
forward-back position
Safety Notice:
1. ALWAYS make sure throttle stick (Stick 1) is centered before switching drone into position
hold mode during an active mission.
2. ALWAYS be prepared to use the kill switch in the case of an extreme emergency. If the RC is
connected, this switch will power down the motors no matter the situation or aircraft status.

Hylio Agrodrone (AG-110) Operations Manual
©2020 Hylio Inc. All Rights Reserved 6
Ground Control Station
- Ground Station Includes:
Laptop/Tablet (not included with all kits)
RFD900 Radio Telemetry Unit and antenna (configured in AgroSol)
FTDI Cable (connect RFD900 to Laptop/Tablet)
Manual flight RC
- Ground station computer requirements:
Windows 10
I3 Processor or better
8GB Ram or better
- Manual flight RC NOT required for standard mission operation

Hylio Agrodrone (AG-110) Operations Manual
©2020 Hylio Inc. All Rights Reserved 7
System Capabilities
Features Overview
The AG-110 contains an array of features to both enhance safety and assure its ability to
effectively conduct the mission. Among these features are:
Ground Control Software System - Hylio Inc. and all AG-110 owners use a UAS ground
control software system known as Hylio AgroSol. Hylio Inc. developed AgroSol for the express
purpose of controlling Hylio Inc. agricultural drones. AgroSol has been used for ground station
control of all recorded flight hours on the AG-110.
Return-To-Launch (RTL) - The operator has access to an RTL command which they can use
to instantly stop the UAS and return it to the set landing point at a predetermined, safe altitude
Land - In the event that the primary and all backup land points have been compromised, the
UAS can be autonomously landed in any other safe location. This can be completed using the
ground control software without requiring manual RC control.
Emergency Pause - The operator has systems that can be used to instantly stop the UA during
the mission, where the drone will pause and hover in place, awaiting further commands. It can
then be manually moved to a new location, and forced to land at the alternate safe landing
location, or return to launch for landing.
Geofencing - The UAS’s flight controller is given GPS coordinates of a boundary that it cannot
leave, keeping the UAS from leaving the pre-determined and defined operations area. When
enabled, the UAS can “hit” the perimeter, but not fly past or through it. Manual or automatic
inputs commanding the UAS to break the geofence are ignored. In the event the geofence is
broken, the UAS will automatically enter RTL mode and return home to land.
Beacon - In the extremely unlikely event of a system malfunction that causes a crash, a beacon
attached to the UAS will help the PIC and ground crew quickly locate it, ensuring a quick
response to secure the equipment and surrounding area.
Redundant GPS - All UAS are equipped with redundant GPS units. Should the primary GPS
unit experience a failure, a second GPS unit will automatically takeover as a failsafe to ensure
accurate positioning and navigation is maintained. During regular operation, the GPS signals
are blended to improve position accuracy. The system offers full redundancy of GPS (2), IMU
(3), and Compass (3). If one or multiple units fail, the controller will switch in real-time between
the redundant compass, IMU, and GPS.
Telemetry - Should a telemetry link to the base station be lost, the UAS has all mission
parameters stored onboard, and can safely continue to execute a mission. The UAS will
automatically return to land with or without telemetry link when the tank or batteries are low. The
base station computer will alert the PIC when telemetry communication is lost, who may opt to
allow the UAS to continue its mission if it is safe to do so, or interrupt the mission and bring the
UAS back under RC control.

Hylio Agrodrone (AG-110) Operations Manual
©2020 Hylio Inc. All Rights Reserved 8
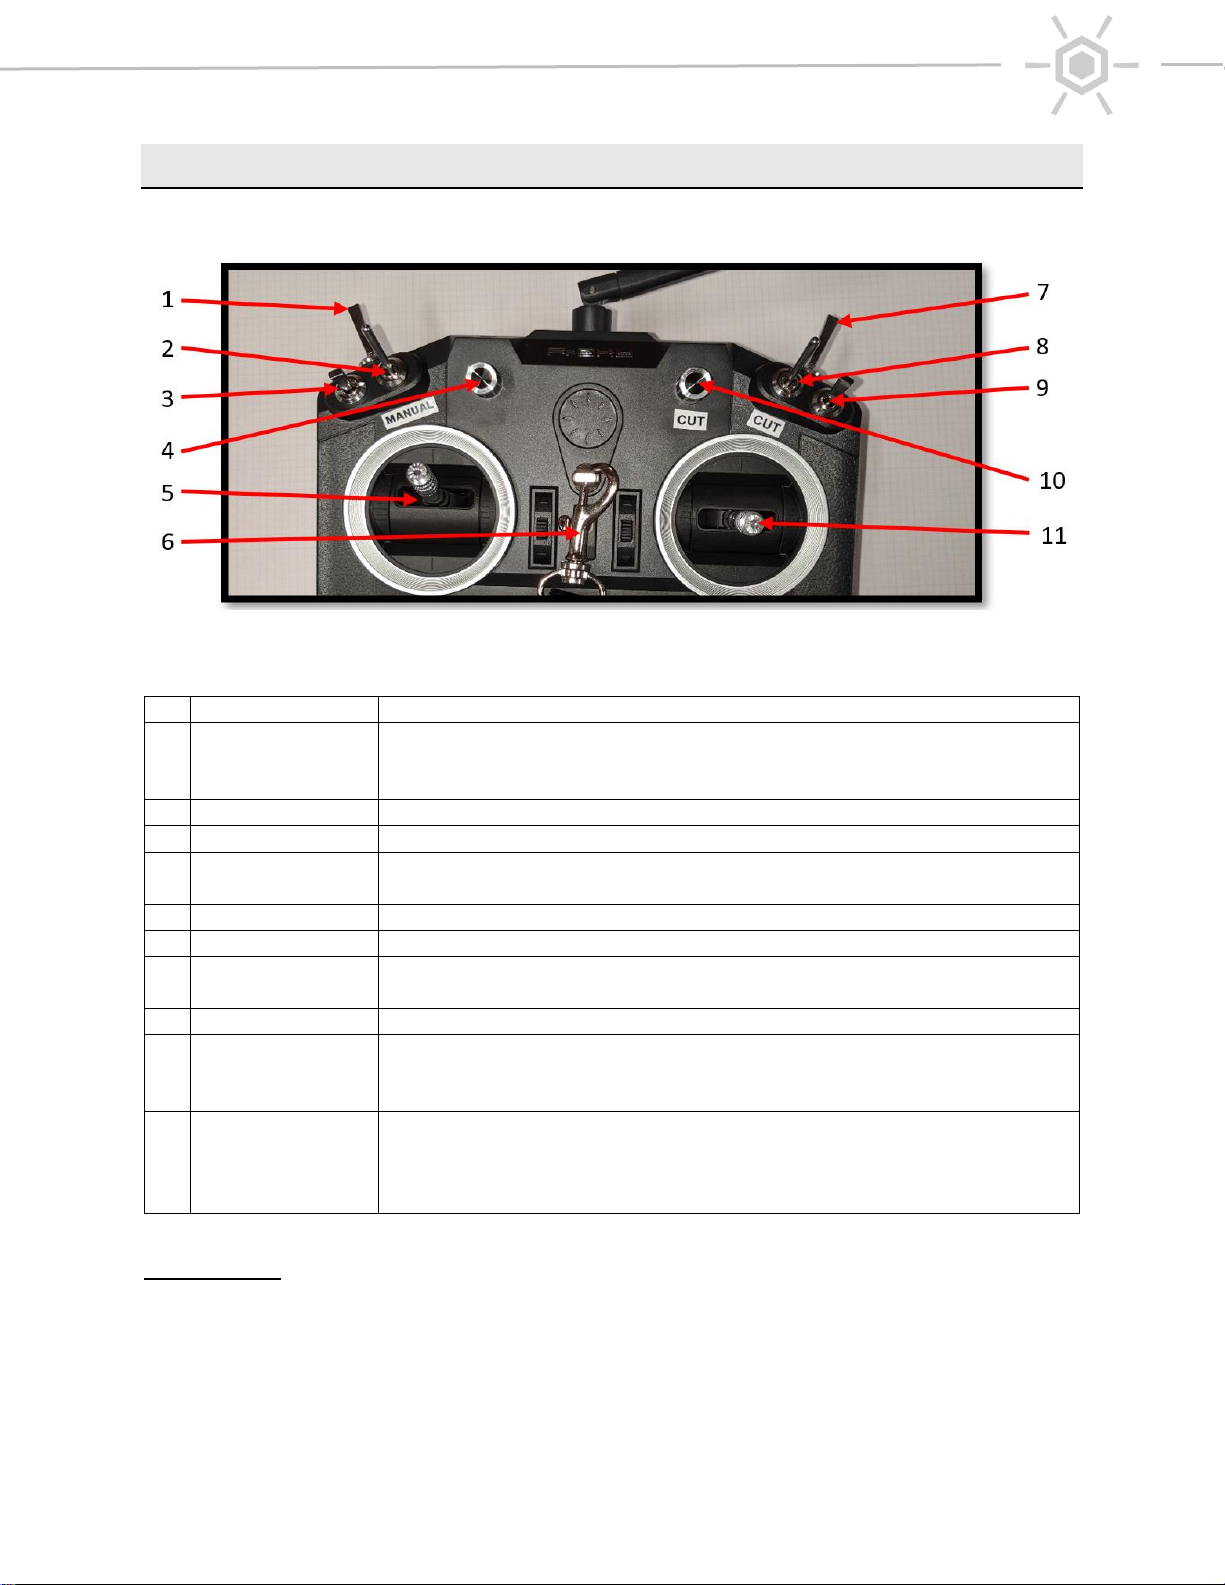
RC control - All missions occur with pre-programmed commands providing instructions to the
UAS. At all times the PIC has an RC remote located near the ground control station, with the
ability to override the current mission. The AG-110 offers an optional safety feature where in the
case that the RC connection is lost, the autopilot software will immediately end the mission and
return the UAS home launch location. In this case, the UAS ascends to an altitude set by the
PIC in advance of the mission and determined to be safe given the surrounding terrain. The
UAS then returns in a straight line to the launch location.
Emergency Kill Switch - An emergency "Kill Switch" allows the operator to instantly stop
motors in the event of an emergency. This kill switch is available through both the ground
control computer telemetry link and the RC.
Full Black Box Recording of All Flights - Flight data shows time stamped information of all
operator control input, GPS statuses and outputs, vibrations, battery voltage, accessory
voltages, IMU outputs, compass readings and all other sensor and flight information. All flight
information is automatically saved internally on the UAS. Any operator or system caused issues
can be easily identified with this information. Hylio’s ground control software offers analysis of
this log information to help predict potential future problems. As a supplement to routine
maintenance, these logs are analyzed daily to help protect the user from unforeseen issues.
This process can be completed locally on AgroSol without the need for internet access. If an
operator feels there may be an issue, logs from the last flight can be analyzed using AgroSol in
minutes without leaving the field.
Obstacle Detection and Avoidance - The AG-110 uses two radars facing forward and back to
detect obstacles around the drone. In the event that an obstacle is detected, the UA will
immediately pause the mission and wait for command. To ensure operational safety, this feature
is optional and can be turned on/off in AgroSol.
Safety parameters - Max altitude, distance from home, horizontal speed and vertical speed
defaults are set by Hylio Inc., and the customer can set these as well based on location and
operating restrictions. The AG-110 uses multiple sensor types to ensure maximum altitude is
respected in the event of primary altimeter sensor failure.
Aviation Lighting - All AG-110 come with mounted navigation lights in a standard configuration
to indicate orientation and health. Hylio offers optional Long-range visible, high intensity LED
strobes. Back 2 are white. Front right is green. Front left is red.
Intelligent Assisted Launch and Landing - Aircraft uses GPS and IMU data to determine
when the craft is fully on the ground, meaning the craft will not shut rotors off until firmly on the
ground. Aircraft also uses IMU data to safely and smoothly handle “In Ground Effect” caused by
the rotor downwash, which lessens stress and accident likelihood for operator.
Flight Stall Prevention - The flight controller prevents accidental 'throttle zero' motor stall while
in the air. In an emergency, the operator can switch instantly to 'manual' mode to activate rotor
kill, providing complete system override by the pilot during an in-flight emergency. This override
is also available through the ground control station computer over the telemetry link.
5-second auto-lock rotors - Automatically locks rotor from accidental turning after initial power
connected and again five seconds after rotors stop.
Change of Flight Parameters - Ability to change certain parameters in real-time (during flight).

Hylio Agrodrone (AG-110) Operations Manual
©2020 Hylio Inc. All Rights Reserved 9
Flight Controller Modifications - Ability to program, calibrate, debug, and modify flight
controller information without power to rotors: allows safe physical interaction with UAS while
performing maintenance and servicing.
GPS Signals - For UAS operations where GPS signal is necessary to safely operate the
aircraft, the PIC must immediately recover/land the UAS upon loss of GPS signal. Without a
GPS signal, the drone is unable to maintain its location within the fenced spray location.
Therefore, the drone immediately enters land mode, unless the PIC takes over manual control.
Altitude Sensing Redundancies - The AG-110 uses 3 different sensors to determine altitude.
Radar, barometer, and GPS. The radar is the primary source of altitude. If the radar fails, the
drone will automatically RTL using barometer altitudes. If the radar fails, the Geofence will also
be maintained using the barometer altitude to ensure the UAS does not exit the geofenced area.
Lost Link - If the PIC loses command or control link for a designated length of time, the aircraft
will follow a predetermined route to finish the mission, reestablish link, or immediately return to
land if the first two options are not possible. The UAS will automatically return when for low
battery, or fluid in the tank, even when the link is lost. To ensure operational safety, this feature
is optional and can be turned on/off in AgroSol. All safety features including automatic obstacle
detection and avoidance remain in effect in the event of a lost link.
Operational Analysis - The AG110 flight controller firmware automatically logs flight hours on
the UAS. These flight hours are tracked and displayed in AgroSol. This automatic flight hour
tracking is used to ensure strict adherence to maintenance procedures.

Hylio Agrodrone (AG-110) Operations Manual
©2020 Hylio Inc. All Rights Reserved 10
Lost Link Failsafe
Activation Criteria
- The lost link failsafe can be turned on and off in AgroSol.
- When it is turned on, the failsafe will activate when there is a complete loss of connection
with the ground control station via the telemetry link for a sustained 10 seconds.
Activation Actions
- Upon Lost Link Failsafe activation, the drone immediately enters RTL mode.
- When the drone enters RTL mode, Land mode, Pause mode, or any other failsafe mode:
The pump immediately turns off.
- Immediately upon activation, obstacle avoidance is automatically enabled.
- In RTL mode, the drone first climbs to the set cruise altitude, then proceeds directly to the
designated safe landing point and lands.
- When connection is regained with the ground station, the drone will not return to continue
the mission. The drone will continue on to RTL and land, unless another command is sent.
Recommended Conditions to Enable/Disable
- Lost link failsafe is ALWAYS recommended to enable if the mission is possible to complete
with this failsafe enabled.
- Only disable this failsafe if it can be confirmed that the airspace will be clear throughout the
flight. Use a visual observer who is carrying the RC if possible.
Fly-Away Prevention
History
The Fly-Away has been a common problem with commercial UAS brands since their early
adoption, particularly DJI. In 20,000+ flights across all Hylio UAS from 2015-2020, no Hylio Inc.
Drone has ever experienced a Fly-Away event.
Prevention Measures
Hylio UAS are assembled in the USA of the highest quality components from across the world,
and go through an intensive QA process before delivery. All Hylio missions are geo-fenced and
saved internally on the UAS, to ensure there is no possibility of a Fly-Away in the event of a
communications hardware failure. Hylio AgroSol reads back each mission after it is uploaded to
confirm there was no mission data corruption during transmission. These steps ensure the UAS
only follow missions as intended by the operator.
Fly-Away Procedures
Given the prevention measures above, the only cause for a Fly-Away would be a GPS system
failure of both the primary and secondary GPS. In the event of such a failure, the drone
immediately enters land mode. Given that the drone is no longer capable determining its
location to maintain the integrity of its geofence, it was determined that an emergency land in
the current location would be the safest course of action.

Hylio Agrodrone (AG-110) Operations Manual
©2020 Hylio Inc. All Rights Reserved 11
Obstacle Avoidance
Activation Criteria
- The front and rear radars constantly search for obstacles around the drone. The lidar
tracks and monitors objects within 30 meters of the UAS. Once a tracked obstacle comes
within 10 meters of the UAS, avoidance action is initiated. 10 Meters is a default value that
can be changed.
Activation Actions
- If the drone sees an obstacle beyond the setting value (default 10 meters) then it will slow
down so that it will be able to stop before coming within 10 meters of the obstacle. It will
continue following the mission but will slow enough to ensure it can stop in time to maintain
the minimum obstacle distance.
- When the drone flies up to the 10 meter obstacle distance, it will stop in place. If in an auto
mission the drone will pause and wait for further command. If it is in manual flight mode the
drone will not allow you to fly closer than the OA range set distance. This distance can be
set in the drone settings on the planning tab.
Conditions to Enable/Disable
- Obstacle Avoidance is ALWAYS recommended to enable if the mission is possible to
complete with this failsafe enabled.
- It may increase operational safety to disable obstacle avoidance only when a crop being
treated gives many false obstacle positives. This can sometimes happen with very uneven
crop heights. This can greatly reduce efficiency and increase risk by causing the drone to
frequently deviate from its predetermined flight plan. First, attempt to increase the spray
altitude to reduce false positives. If false positives continue, you may disable avoidance.
- Only disable this failsafe if it can be confirmed that the airspace will be clear throughout the
flight. Use a visual observer who is carrying the RC if possible.
- The PIC must understand that without enabling obstacle avoidance, the drone may collide
with any obstacle in the mission area. The mission area must be THOROUGHLY surveyed
for potential obstacles before proceeding with avoidance disabled.

Hylio Agrodrone (AG-110) Operations Manual
©2020 Hylio Inc. All Rights Reserved 12
System Operation
Spray Mission Workflow
Step 1: Survey
1. Travel to mission area before scheduled application.
2. Locate all fields to be treated.
3. Survey fields for dangerous topography, obstacles, nearby residences, and any other
criteria that may disqualify a field for UAS application.
4. Use GPS Tracker to safely mark flags and obstacles on all application areas. (This step
not required if field is previously marked or an imported shapefile is deemed safe).
5. Confirm that all obstacles within the application area are safely marked.
6. Determine chemical and rate for application on these properties.
Step 2: Pre-Mission Preparation
1. Draw mission shape files in AgroSol. Follow all mission planning safety guidelines.
2. Calculate chemical ratio that will be used for the application.
3. Select safe mission speed and altitudes for this area. Follow all safety guidelines.
4. Charge all flight batteries.
5. Confirm all required operational equipment is accounted for and in good condition.
Step 3: Spray Missions
1. Travel to spray area. Unload drone in a safe location as close as possible to application
area. This will reduce ferry time and improve efficiency.
2. Notify property owner that UAS operations will commence.
3. Begin spray procedures. Follow all preflight checks. Follow all UAS and chemical safety
guidelines.
4. After completion, notify property owner. Rinse spray system and pack up. Follow safety
guidelines for equipment transportation.
Step 4: Daily Maintenance
1. Follow Daily Maintenance Checklist.
2. Upload flight logs whenever possible.
3. Ensure equipment is stored safely. Follow storage safety guidelines.

Hylio Agrodrone (AG-110) Operations Manual
©2020 Hylio Inc. All Rights Reserved 13
Standard Flight Pattern
AgroDrone spray missions follow a standard flight pattern, as outlined by the 8 steps below.
1. Arm Motors. Take Off. Climb to Cruise Altitude
2. Reach Cruise Altitude. Fly to Mission Spray Area at Flight Speed
3. Reach Mission Spray Area. Descend to Spray Altitude
4. Reach Spray Altitude. Follow Mission Path & Spray Field
5. Area Completed, Battery Depleted, Tank Empty, or Mission Paused by Operator: Stop,
Climb to Cruise Altitude
6. Reach Cruise Altitude. Fly to Land Point.
7. Reach Land Point. Descend to Land.
8. Land. Motors Disarm.
Cruise Altitude (ft): UAS Altitude during flight to area, RTL (return to land), and Pause mode
Spray Altitude (ft): UAS Altitude
Flight Speed (mph): UAS Speed during the entire mission

Hylio Agrodrone (AG-110) Operations Manual
©2020 Hylio Inc. All Rights Reserved 14
AgroDrone: Pre-Flight Checklist
PIC ____________________________________ VO ____________________________________
Date ____________________________________ Drone ___________________________________
STEP 1: DRONE
1: Arm
All 4 arm elbow connectors screwed on tight
2: Propeller
Remove bands/foam holders. Propellers tight and straight, inspect all 4 for
cracks and chips
3: Spray
Spray bars tightly secured; All tubes connected; No leaks;
Nozzles firmly attached in correct orientation. Correct tips on nozzles
4: Antenna
External RFD Antenna screwed on
5: Battery
Battery fully charged and undamaged, battery plug connected firmly and
completely into drone connector. Battery strapped in tight and loose extra strap
tied off secure
STEP 2: AGROSOL
1: Connect
Plug in RFD to computer, connect to drone
2: Pump
Arm Pump; Test pump
2: Radar
Radar Altimeter shows good reading
3: Battery
Full battery reading on AgroSol readout: 49.0 –50.5 V
4: Mission
Settings
A. Safe Spray Altitude
B. Safe Minimum RTL Altitude
C. Mission Land Point at drone location
D. Mission & RTL lines do not cross obstacles
E. Upload Mission
5: Drone
Settings
A. Safe Drone RTL Altitude set below mission minimum
B. Check following are set as desired:
Empty tank RTL, Area RTL, Obstacle Detection, GCS Failsafe,
Minimum Flowrate
STEP 3: LOCATION
1: Takeoff &
Land Area
A. Ground is flat and level
B. No people or obstacles near drone
2: Spray Area
A. No high-tension power lines within 100 ft of spray area
(High-Tension lines: 68kv-1mkv, system interference risk)
B. No visible unmarked obstacles in spray area
3: Weather
Follow flight envelope
STEP 4: ARM MOTORS & TAKEOFF
1: Arm Motors
A. Arm Motors
B. Wait for all 4 motors to spin up
C. No errors in AgroSol
2: Takeoff
A. Click Take Off
B. Drone climbs to correct RTL altitude
C. Drone flying smooth and stable
D. No strange noises from motors
STEP 5: LAND
1: Monitor
Landing
Monitor drone as it descends to land, be ready to pause drone and adjust
landing location if necessary

Hylio Agrodrone (AG-110) Operations Manual
©2020 Hylio Inc. All Rights Reserved 15
Calibrations
Note: ONLY the compass calibration is required before first flight. All other calibrations
are completed in the factory. Accelerometer, level, and voltage may never be required by
the user. Flowmeter calibration may be periodically required to improve accuracy.
Compass
1. Connect to drone. Go to maintenance tab and click “Calibration > Compass”
2. Grab the drone and lift it up. Hold the drone level:
By taking small steps, spin in place for a total of 360 degrees in the clock-wise
direction. You should end up facing the same direction that you started.
3. Repeat step 2 while holding the drone with its right side down, left side down, on its
back, nose facing up, and nose facing down.
4. The calibration is complete when both GPS status bars reach 100%. Restart the drone
before flight. If the calibration fails, restart the drone and try again.
Accelerometer
1. Connect to drone. Go to maintenance tab and click “Calibration > Accelerometer”.
2. Place the drone on an extremely flat and level surface. Click “Next” on AgroSol.
3. AgroSol will prompt you with “Left”, “Right”, “Nose Up”, “Nose Down”, and “Back”. Hold
the drone with the prompted direction facing down to the ground. Hold it very
steady and click next until the new direction is prompted by AgroSol. Continue
until each orientation has been calibrated.
4. AgroSol will notify you when the calibration is complete. Restart the drone before flight.
Level
1. Connect to drone.
2. Place the drone on an extremely flat and level surface.
3. Go to maintenance tab and click “Calibration > Level”.
4. Restart the drone before flight
5. Do the Level Calibration BEFORE the Accelerometer Calibration
Voltage
1. Locate voltmeter, set to measure voltage to 0-100 volts.
2. Measure voltage of two UAS batteries, add together voltage.
3. Power on drone using these batteries.
4. Connect to drone.
5. Go to maintenance tab and click “Calibration > Voltage”.
6. Type in the measured voltage sum and press OK.
7. Check the AgroSol voltage readout matches the measured voltage sum.
8. Repeat if the voltages do not match.

Hylio Agrodrone (AG-110) Operations Manual
©2020 Hylio Inc. All Rights Reserved 16
Flowmeter
1. Connect to drone. Go to maintenance tab and arm the pump.
2. Connect the spray booms normally as for a spray mission.
3. Use a graduated cylinder to measure out a precise volume of water. The greater the
volume of water, the more precise this calibration will be. Use at least 0.5 gallons.
4. Make sure the tank is completely empty. Pour the water into the tank. Do not forget the
exact volume of water.
5. DO NOT rely on the markings on the side of the tank to indicate volume of liquid. This is
not precise enough, use a graduated measuring container.
6. Select “Calibration > Flowmeter”.
7. Type in the amount of water poured into the tank. Press Next.
8. Make sure the drone is in a place where it can spray out all of the fluid in the tank. Press
Next.
9. The drone will now spray out all of the tank in the fluid. Wait for it to finish. The pump will
stop on its own.
10. AgroSol will notify you when the calibration is complete. Press Next.
11. Repeat if performance does not improve. Make sure to measure accurately.
UAS Spraying Tips
Nozzle Selection
Proper nozzle selection is important to
high quality spray performance with the
AgroDrone.
Select a nozzle based on your desired
particle size, flowrate, and spray profile.
The TeeJet nozzles listed are
commonly used by Hylio pilots around
the world, and have proven to fit well
with the AgroDrone’s nominal pump
pressures and flight speeds.
Drone is shipped with TT11001. This
nozzle is recommended for a broad range of applications.

Hylio Agrodrone (AG-110) Operations Manual
©2020 Hylio Inc. All Rights Reserved 17
How to choose spray settings
1. Determine required Gal/ac of chemical that is to be applied
2. Dilute solution with water to the strongest acceptable concentration (stronger
concentrations are best for low volume applications using drones)
3. Use water dilution ratio and required chemical Gal/ac to calculate Gal/ac required for
dilution
4. Test maximum flowrate through pump with this chemical dilution and your selected
nozzles. This can be done in the maintenance tab spray controls section.
5. Use the speed calculator application in the AgroSol maintenance tab toolbox to
determine your maximum flight speed given the maximum spray flowrate, and spray
swath width. Always try to fly at the highest speed safely possible to increase efficiency
and keep your pump output to maximum.
6. Create your spray mission with the calculated speed, dynamic flowrate, and swath width
Flight Parameters and Terrain Considerations
Flight Speed
Whenever possible, use the toolbox speed calculator to determine flight
speed as described
Cruise Altitude
The cruise altitude is used when ferrying to and from the spray area. Set
this altitude higher than any obstacles nearby the field, such as fences trees
or vehicles. The drone WILL fly outside the marked spray area when at this
altitude for takeoff, RTL, and pause control. This altitude should be set as
low as possible to reduce battery drain while remaining above obstacles
Spray Altitude
The spray altitude is used during the spray portion of the mission. This
should be selected based on crop height. Start with a high value, and
decrease the altitude as you observe the flight response to your selected
altitude value. You should spray 10 ft above most crops
Swath Width
This value will almost always be 15 ft when using normal spray settings (1-2
gal/acre). The width will shrink and the pattern will increase in variance as
you go over 15 mph.
Spray Angle
Select a spray angle to maximize straight lines in the mission, or to match
crop rows. Longer straight lines will improve efficiency
Terrain
Considerations
For terrain with many obstacles or variable topography, fly higher and
slower. You can decrease altitude and increase speed as you observe the
drone’s response to terrain variations.
Fly along hillsides whenever possible as opposed to up and down hillsides.
This is much more efficient and keeps the drone from constantly climbing up
and down hills.

Hylio Agrodrone (AG-110) Operations Manual
©2020 Hylio Inc. All Rights Reserved 18
First Flight
It is recommended to perform the first flights alongside a Hylio representative until the new
owner is an adequately competent pilot. Follow this checklist, followed by the preflight checklist
to ensure a safe and smooth first solo flight.
Environment
1
Bring the drone and all tools to a safe and controlled environment
2
The location should be an open field with NO OBSTACLES anywhere nearby, in case of
an unexpected mistake in control
3
No people should be present except the pilot and any person directly involved with
assisting the operation
4
Move all vehicles well clear of the operation area
5
Make sure the weather is clear with low winds and will stay that way for the extent of the
operation
Initial Setup
1
Set up a table and chair for the ground station computer
2
Make sure you have power available for the ground station computer in case it runs low
on battery. Take out the RC and set it on the table in case of emergency
3
Set the drone up at least 20 yards away from the ground station
4
Make sure the drone is on level ground and the surrounding area is relatively level in
case landing is not in exactly the same spot
5
Set up the arms and straighten out the propellers. Make sure the propellers are as
straight as possible, this will reduce vibration on takeoff
6
Load the tanks. Do not fill the tanks all the way, start off with just 1 gallon of water in
each tank.
7
Place the batteries in the frame and connect them to the drone
Mission
1
Use the tracker to mark off a small area (around ½ acre) in the field far from any obstacle
2
Draw the mission boundary in AgroSol. Choose all mission settings carefully. Pay
particular attention to altitude selections. Make sure the pump is enabled in the mission.
3
Proceed to follow the preflight checklist VERY CAREFULLY through takeoff
4
Fly many missions to gain practice and comfort with the system before you begin using
the drone to spray chemicals.

Hylio Agrodrone (AG-110) Operations Manual
©2020 Hylio Inc. All Rights Reserved 19
Manual Flight & RC Takeover
It is NOT recommended to fly the UAS manually. However, the drone can be flown manually
from takeoff to landing if necessary. In the case of an emergency, the RC can also be used to
take over manual control of the drone. Follow these checklists to ensure safety of manual flight.
Fully Manual Flight
1
Memorize the RC instructions on page 7 of this document
2
The drone must be in Position Hold Flight Mode for manual flight
3
To arm the drone, hold the throttle stick in the bottom right corner for 3 seconds. This will
have the same effect as pressing “ARM” in AgroSol. The motors will begin to idle. If you
do not proceed to takeoff in 10 seconds the drone will disarm itself
4
Once the motors are armed, raise the throttle stick above the center to around 75% of
maximum. The drone will throttle up the motor speed to take off and continue climbing
until the throttle stick is returned to 50%, where it will maintain altitude
5
There is no pump control on the RC, to spray while flying manually, go to the maintenance
tab in AgroSol and use the pump tester to control the pump
6
To land, make sure you are bringing the drone down over a level area. Slowly bring the
throttle down below 50% and the drone will descend. Slowly descend until the drone is on
the ground. Once the drone is on the ground, bring the throttle down to 0%
7
If you have trouble landing, you can always press “LAND” in AgroSol and the autopilot will
take over and autonomously land in the current location
8
To disarm the drone, hold the throttle stick in the bottom left corner for 3 seconds. Until
you disarm, the motors will continue to idle as the drone sits on the ground
Manual Takeover During Autonomous Flight
1
To take over during manual flight, power on the RC. The RC will remind you to set your
flight sticks and switches to the default positions (default positions on page 7)
2
FIRST take the throttle stick and put it to the 50% middle position. THIS STEP IS
EXTREMELY IMPORTANT. If you leave the stick down at 0%, the drone will immediately
begin descent as soon as you manually take over
3
Take the flight mode switch and flip it down to RTL and back up to Position Hold 2 times.
Leave the switch in Position Hold Flight Mode
4
If you have successfully taken over, the drone will immediately stop and wait for your
manual commands. If the drone continues, try flipping the flight mode switch again.
5
This switch can be used in case the connection to the ground station has been
compromised to command the drone to autonomously LAND or RTL
6
Once you have manually taken over, the mission cannot be resumed. You must proceed
land and reupload a mission.
7
At any time during manual control, AgroSol can be used to take back over and command
a PAUSE, RTL, or LAND using the telemetry link.

Hylio Agrodrone (AG-110) Operations Manual
©2020 Hylio Inc. All Rights Reserved 20
Safety Guidelines
Large Agricultural UAS can be extremely dangerous if used improperly. The following guidelines
and limitations must be followed to ensure safe and effective operation of the AG-110.
Flight Envelope
Altitude
0 –100 ft AGL
Speed
0 –25 mph
Precipitation
None –Light Rain
Temperature
40 –100 deg F
Wind
0 –20 mph
Load
0 –25 lbs
Battery Voltage
50.4 V: Fully Charged
42.6 V: Initiate Automatic RTL
41.0 V: Initiate Emergency Land
40.0 V: Motor Power Cut
Field Marking
1
All Flags must be placed 6 ft within the active application area.
The GPS Tracker drops “Flag” markers in AgroSol to reference when manually drawing
application area polygons. These flags must be marked 7 ft within the application area to
account for possible GPS inaccuracy.
2
All obstacles must be marked 10 ft larger than actual size.
The GPS Tracker drops “Obstacle” markers in AgroSol that force the flight path to avoid
that area. AgroSol allows the user to select an obstacle radius. This radius must be set 10
ft larger than the radius of the obstacle.
3
Drop boundary-flags every 100 ft when marking along a straight field edge.
4
Drop boundary-flags every 25 ft when marking along a curved field edge.
5
Always mark ALL obstacles within a field. Do not rely on obstacle avoidance.
6
Always mark field edges when spraying a field with many trees, power lines, or other
obstacles near the field edge.
Other manuals for AgroDrone AG-110
1
Table of contents
Other Hylio Paint Sprayer manuals