manuals.online logo
Brands
  1. Home
  2. •
  3. Brands
  4. •
  5. Hyundai
  6. •
  7. Automobile
  8. •
  9. Hyundai 2005 Accent User manual

Hyundai 2005 Accent User manual

Other manuals for 2005 Accent

1

Other Hyundai Automobile manuals

Hyundai SONATA HYBRID 2018 User manual

Hyundai

Hyundai SONATA HYBRID 2018 User manual

Hyundai ELANTRA User manual

Hyundai

Hyundai ELANTRA User manual

Hyundai ACCENT User manual

Hyundai

Hyundai ACCENT User manual

Hyundai Veloster N 2021 User manual

Hyundai

Hyundai Veloster N 2021 User manual

Hyundai Tucson User manual

Hyundai

Hyundai Tucson User manual

Hyundai 2010 ELANTRA TOURING User manual

Hyundai

Hyundai 2010 ELANTRA TOURING User manual

Hyundai H-1 User manual

Hyundai

Hyundai H-1 User manual

Hyundai Ioniq EV 2020 User manual

Hyundai

Hyundai Ioniq EV 2020 User manual

Hyundai Kona Electric 2018 User manual

Hyundai

Hyundai Kona Electric 2018 User manual

Hyundai IONIQ Plug-in Hybrid 2019 User manual

Hyundai

Hyundai IONIQ Plug-in Hybrid 2019 User manual

Hyundai SantaFe User manual

Hyundai

Hyundai SantaFe User manual

Hyundai Creta 2019 User manual

Hyundai

Hyundai Creta 2019 User manual

Hyundai 2010 Genesis User manual

Hyundai

Hyundai 2010 Genesis User manual

Hyundai 2005 Santa Fe User manual

Hyundai

Hyundai 2005 Santa Fe User manual

Hyundai Equus 2014 User manual

Hyundai

Hyundai Equus 2014 User manual

Hyundai KONA N 2022 User manual

Hyundai

Hyundai KONA N 2022 User manual

Hyundai 2006 Tiburon User manual

Hyundai

Hyundai 2006 Tiburon User manual

Hyundai 2017 Genesis G90 Instruction Manual

Hyundai

Hyundai 2017 Genesis G90 Instruction Manual

Hyundai Santa Fe User manual

Hyundai

Hyundai Santa Fe User manual

Hyundai 2009 Accent User manual

Hyundai

Hyundai 2009 Accent User manual

Hyundai VEHICLE 2013 User guide

Hyundai

Hyundai VEHICLE 2013 User guide

Hyundai Sonata 2015 User manual

Hyundai

Hyundai Sonata 2015 User manual

Hyundai GENESIS User manual

Hyundai

Hyundai GENESIS User manual

Hyundai SantaFe User manual

Hyundai

Hyundai SantaFe User manual

Popular Automobile manuals by other brands

Jeep Compass user guide

Jeep

Jeep Compass user guide

Mitsubishi 3000GT Service manual

Mitsubishi

Mitsubishi 3000GT Service manual

Chevrolet Traverse 2012 owner's manual

Chevrolet

Chevrolet Traverse 2012 owner's manual

Oldsmobile 1996 Achieva owner's manual

Oldsmobile

Oldsmobile 1996 Achieva owner's manual

Cadillac 2005 CTS Personalization guide

Cadillac

Cadillac 2005 CTS Personalization guide

Toyota AVALON HYBRID Warranty & maintenance guide

Toyota

Toyota AVALON HYBRID Warranty & maintenance guide

Toyota HILUX Owner's manual supplement

Toyota

Toyota HILUX Owner's manual supplement

Lincoln 2015 NAVIGATOR owner's manual

Lincoln

Lincoln 2015 NAVIGATOR owner's manual

Toyota Corolla 2002 owner's manual

Toyota

Toyota Corolla 2002 owner's manual

Toyota 2002 MR2 Spyder owner's manual

Toyota

Toyota 2002 MR2 Spyder owner's manual

Toyota Camry Hybrid 2012 Warranty & maintenance guide

Toyota

Toyota Camry Hybrid 2012 Warranty & maintenance guide

Mazda 323 Protege owner's manual

Mazda

Mazda 323 Protege owner's manual

Subaru 2014 Forester Quick manual

Subaru

Subaru 2014 Forester Quick manual

Toyota Avensis ZZT251 2003 Service and repair manual

Toyota

Toyota Avensis ZZT251 2003 Service and repair manual

Mercedes-Benz 2013 SL Operator's manual

Mercedes-Benz

Mercedes-Benz 2013 SL Operator's manual

Chrysler 300 2013 Product highlights

Chrysler

Chrysler 300 2013 Product highlights

Toyota Corolla 2008 owner's manual

Toyota

Toyota Corolla 2008 owner's manual

Volkswagen california d3519cdb02a9dab29cd827771f7c11a

Volkswagen

Volkswagen california d3519cdb02a9dab29cd827771f7c11a

manuals.online logo
manuals.online logoBrands
  • About & Mission
  • Contact us
  • Privacy Policy
  • Terms and Conditions

Copyright 2025 Manuals.Online. All Rights Reserved.

Windshield Defogging
Windshield Wiper
NOTE: You can lengthen the life of your wiper
blades by gently wiping the rubber inserts with
an alcohol soaked rag to remove grime and
road debris.
To remove fog or frost on the windshield:
·Set the airflow control to the defrost ( )
position. (The A/C will turn on automatically and
"Fresh" mode will be activated.)
·Set the temperature control to the desired setting.
·Set the fan speed control to position "3" or "4"
Rear Window Wiper (3-door)
L
R
L
R
1. When the " " position is depressed, the rear
window wiper starts to operate continuously.
2. Depressing the " " button will operate the
rear wiper several times after the washer fluid
sprays onto the rear window.
3. When the " " position is depressed, the
interval between wipes is approximately five
seconds.
Power Window Lock Switch
Press the lock switch to deactivate the passen-
ger power window switches (4-door only).
Seats
Lumbar Support Control, Driver's seat only
(If Installed)
To adjust the lumbar support, move the lever
on the outboard or left side of the seat.
Seat Cushion Height Adjustment, Driver's Seat
only (If Installed)
• To raise or lower the front part of the seat
cushion, turn the front knob forward or rearward.
• To raise or lower the rear part of the seat
cushion, turn the rear knob forward or rearward.
Bottle Holder (if equipped)
The bottle holder is
located on the forward
portion of the front
door panels on some
models and may be
used for holding bev-
erage bottles or cans.
L
R
Wipe/Wash Wiper Speed
Intermittent
Fuel Cap
After adding fuel, always reinstall
the fuel cap fully and make sure it
clicks at least 3 times. Failure to do
this may result in the "Check
Engine Light" illuminating.
Accent Final for Printl Doc.qxd 10/15/2004 4:30 PM Page 1
Maintenance
Air cleaner filter
Automatic transaxle
fluid and filter
Brake pads, calipers
and rotors
Driveshafts and boots
Engine oil and Filter
Manual Transaxle oil
Rear brake drums/linings,
parking brake
Timing belt
Brake fluid
Brake hoses and lines
Drive belt
Fuel lines, fuel hoses and
connections
Fuel vapor hoses and fuel
filler cap
Power steering pump, belt
and hoses
Spark Plugs
Severe UsageNormal Usage
Replace
Inspect
Replace
Inspect
Inspect
Replace
Inspect
Inspect
Inspect
Replace
Inspect
Inspect
Inspect
Inspect
Inspect
Inspect
Replace
30K
15K
105K
15K
15K
7.5K
30K
30K
30K
60K
30K
15K
30K
30K
30K
30K
30K
Replace
Inspect
Replace
Inspect
Inspect
Replace
Replace
Inspect
Inspect
Replace
More frequently
30K
More frequently
7.5K
3K
60K
More frequently
20K
40K
All units are displayed in miles.
For additional service intervals, severe maintenance
schedule, and complete details, see Owner's Manual.
Tire Inflation
Check tire pressure at least once a month when the
tires are cold. Refer to the tire pressure label located
in the glove box for correct pressure.
Detailed Information
Basic Safety Precaution
•Whenever operating the vehicle, make sure that
you and your occupants are properly wearing your
seat belts.
•Small children should always ride in the rear seat
in the appropriate child restraint system (see
Owner’s Manual for child safety details).
•Never place children under thirteen years old in
the front seats to avoid injury that may result from
air bag deployment.
•Always refer to the Owner’s Manual for complete
safety precaution information.
•This Quick Reference Guide does not replace your
vehicle’s Owner’s Manual.
•If you require additional information or are unsure
of a specific issue, you should always refer to the
vehicle’s Owner’s Manual or contact your dealer.
HYUNDAI ROADSIDE BENEFITS INCLUDE*:
• Towing to the nearest Hyundai Dealership or authorized Service
Facility if your vehicle is inoperable,including non-warrantable
related tows such as accidents. Coverage period is 60
months/unlimited miles.
•Emergency Roadside Assistance.
•National Dealer Locator Service.
•Trip Interruption Benefit if Warrantable Mechanical
Disablement occurs more that 150 miles from home.
Limit to $100/day, 3 day maximum. (800) 243-7766
*Please refer to your Owner’s Manual Kit for specific coverage and limitations.
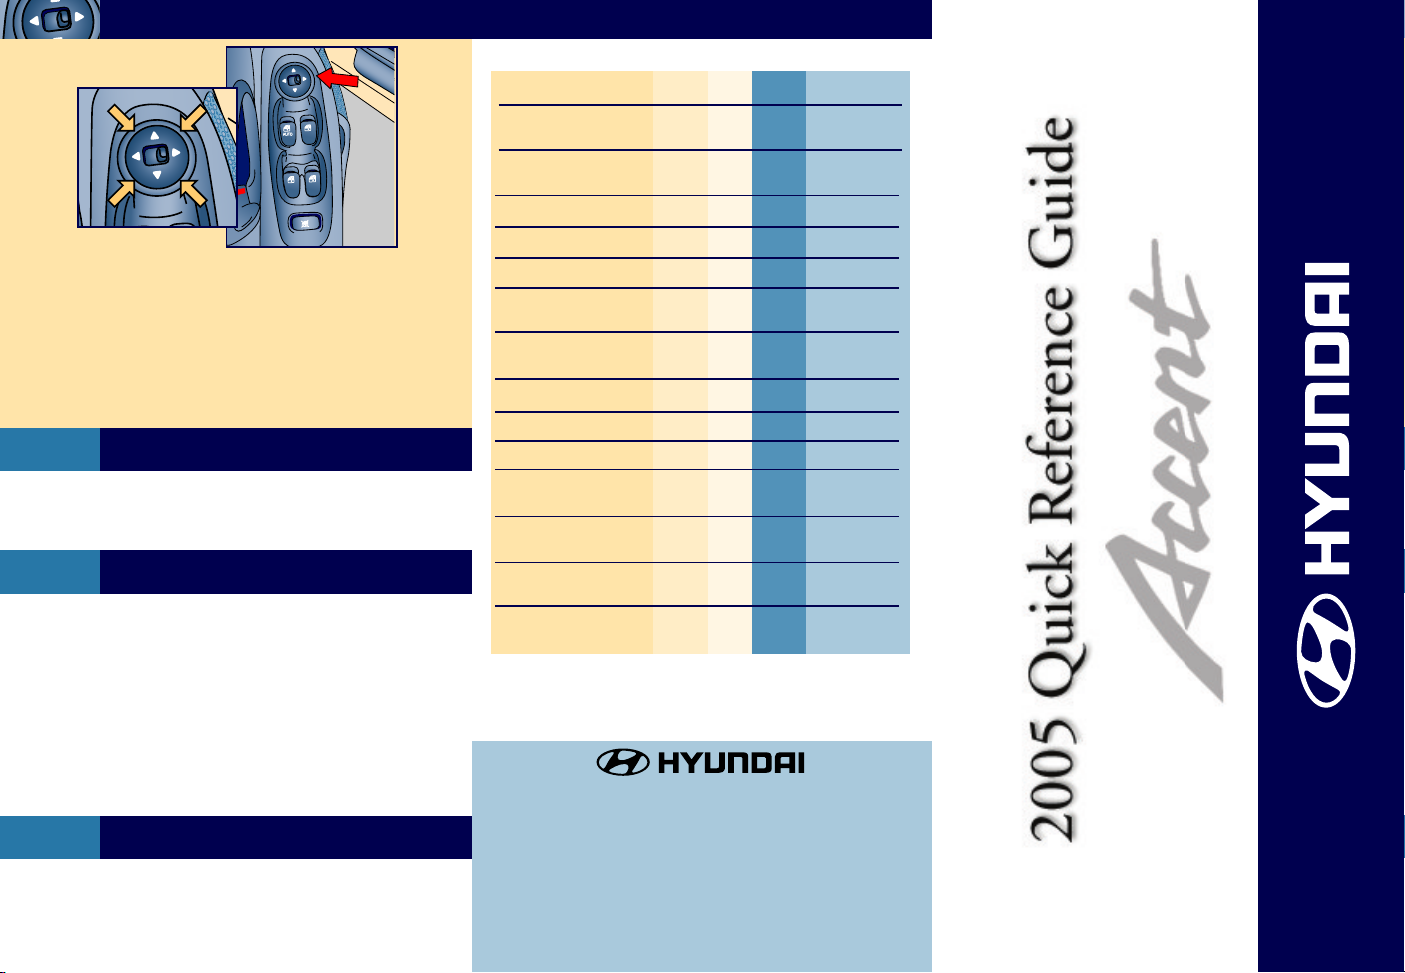
1. Move the select switch to the right or left to
activate the corresponding door mirror.
2. Adjust the mirror angle by depressing the
appropriate perimeter switch as illustrated.
3. Place the selecting switch in the middle
position to deactivate the perimeter switch.
Outside Door Mirrors (if equipped)
L
R
L
R
L
R
Accent Final for Printl Doc.qxd 10/15/2004 4:30 PM Page 2