manuals.online logo
Brands
  1. Home
  2. •
  3. Brands
  4. •
  5. Hyundai
  6. •
  7. Automobile
  8. •
  9. Hyundai ELANTRA 2020 User manual

Hyundai ELANTRA 2020 User manual

Looking for more detailed information? This Quick Reference Guide does not replace your
vehicle’s Owner’s Manual. If you require additional information or are unsure of a specific
issue,we recommend that you always refer to the vehicle’s Owner’s Manual or contact your
authorized Hyundai dealer. The information contained in this Quick Reference Guide is correct at
the time of printing; however, specifications and equipment can change without notice. No
warranty or guarantee is being extended in this Quick Reference Guide, and Hyundai reserves the
right to change product specifications and equipment at any time without incurring obligations.
Some vehicles are shown with optional equipment.
MAINTENANCE
Scheduled Maintenance 2.0L 1.4T/1.6T
Engine Oil and Filter* Replace 7,500 or 12 mos. Replace 6,000 or 12 mos.
Fuel Additive* Add 7,500 or 12 mos. Add 6,000 or 12 mos.
Tire Rotation Perform 7,500 Perform 6,000
Air Cleaner Filter Inspect
Replace
7,500
30,000
Inspect
Replace
6,000
24,000
Vacuum Hose Inspect 7,500 Inspect 6,000
Climate Control Air Filter
(for Evaporator and Blower Unit) Replace 12 mos Replace 12 mos
Air Conditioning Refrigerant Inspect 7,500 Inspect 6,000
Brake Hoses & Lines Inspect 7,500 Inspect 6,000
Drive Shafts & Boots Inspect 7,500 Inspect 6,000
Exhaust Pipe & Mufer Inspect 7,500 Inspect 6,000
Disc Brake Pads, Calipers Inspect 7,500 Inspect 6,000
Rear Brake Drum / Linings Inspect 7,500 Inspect 6,000
Steering Gear Box, Linkage & Boots /
Lower Arm Ball Joint, Upper Arm Ball Joint Inspect 7,500 Inspect 6,000
Suspension Mounting Bolts Inspect 7,500 Inspect 6,000
Brake / Clutch Fluid Inspect 15,000 Inspect 12,000
Crankcase Ventilation Hose Inspect 15,000 Inspect 12,000
Fuel Filter Inspect 15,000 Inspect 12,000
Fuel Lines, Fuel Hoses and Connections Inspect 30,000 Inspect 24,000
Fuel Tank Air Filter Inspect 15,000 Inspect 12,000
Parking Brake Inspect 15,000 Inspect 12,000
Vapor Hose, Fuel Tank & Fuel Filler Cap Inspect 15,000 Inspect 12,000
Spark Plugs Replace 97,500 Replace 42,000
Drive Belt (Alt, A / C) 1st Inspect 60,000 or 72 mos.
Add’l Inspect 15,000 or 24 mos.
1st Inspect 60,000 or 72 mos.
Add’l Inspect 12,000 or 24 mos.
Coolant 1st Replace 120,000 or 120 mos.
Add’l Replace 30,000 or 24 mos.
1st Replace 120,000 or 120 mos.
Add’l Replace 30,000 or 24 mos.
Dual Clutch Transmission - Inspect 24,000
Intelligent Variable Transmission Fluid No check, No service required
-
Intercooler, In / Out Hose, Air Intake Hose
(1.4T/1.6T) - - Inspect 6,000
*Check the engine oil regularly between recommended oil change. Hyundai recommends Quaker State oil.
*1 If TOP TIER Detergent Gasoline is not available, one bottle of additive is recommended. Additives are available
from your authorized Hyundai dearler along with information on how to use them. Do not mix other additives.
*See Owner’s Manual for details.
NP150-82021-Q
(Rev 10/01/20)
Printing 10/04/20
☐ BLUE LINK
- Assist with creating MyHyundai.com account
- Assist with Blue Link enrollment
-
Encourage customer to download the MyHyundai with Blue Link app
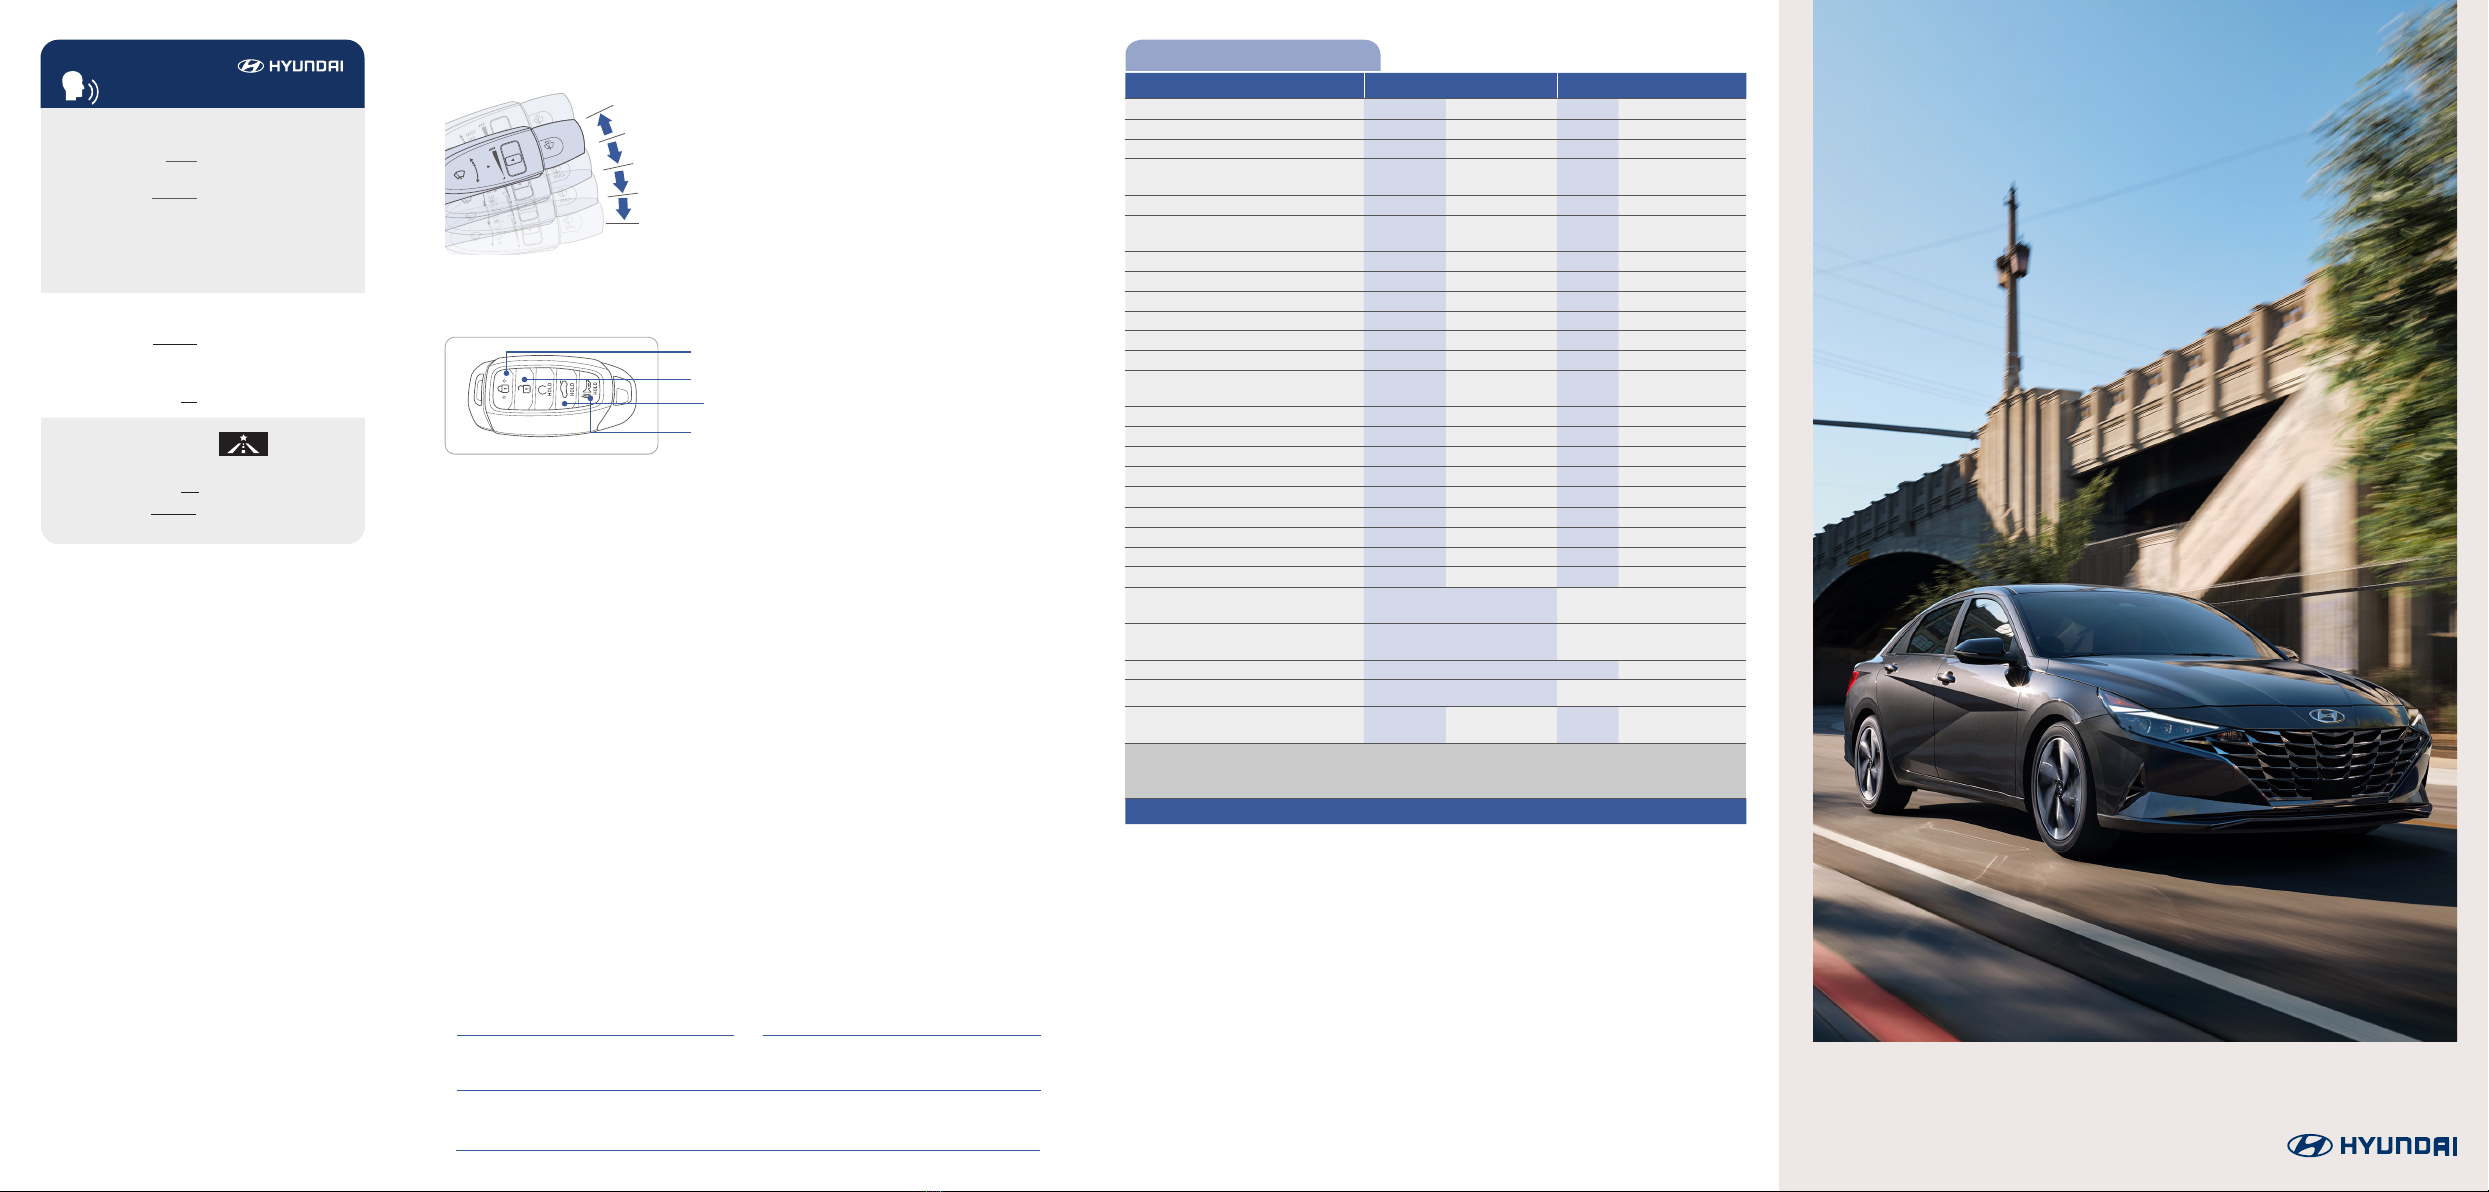
• To activate wipers, move the speed
control switch down to one of the three
positions (INT, LO, HI)
• To adjust “INT” speed, move the
speed control switch.
• To spray the washer fluid, pull the
lever towards you
• Push the lever up for a single wiper pass
☐ WINDSHIELD WIPER / WASHER - page 10
☐UNLOCKING VEHICLE - page 01
UNLOCK
TRUNK OPEN
LOCK
ALARM
Roadside Assistance: 1-800-243-7766
Consumer Affairs: 1-800-633-5151
Sirius XM®Radio: 1-800-967-2346
Blue Link: 1-855-2BLUELINK
(1-855-225-8354)
Sales Consultant Date Sales Manager Date
Customer Date
Email
☐
INTRODUCTION AND LOCATION OF THE SERVICE DEPARTMENT
☐
SET FIRST SERVICE APPOINTMENT
☐
REVIEW FACTORY RECOMMENDED MAINTENANCE SCHEDULE
☐
WAS THE CONDITION OF YOUR VEHICLE (AT DELIVERY) TO YOUR
SATISFACTION?
VOICE
RECOGNITION TIPS
Command Example
BLUETOOTH®
Dial <Phone #>
Call <Name>
“Dial
7-1-4-9-6-5-3-0-0-0”
“Call John Smith”
Command
(If equipped)
Example
NAVIGATION
Find Address
<House #, Street,
City, State>
“1-2-3-4-5 1st Street,
Fountain Valley”
Command Example
Located on Rearview Mirror
LOCAL SEARCH
Find <POI Name>
<POI Name>
“Find Lowe’s® near me”
“Starbucks®”
Improving how you store your contacts can optimize your
Bluetooth® Voice Recognition performance:
• Use full names instead of short or single-syllable names
(“John or Dad”)
• Avoid using special characters/emojis or abbreviations
(“Dr.”) when saving contacts
Find <POI Name> “Find McDonald’s®”
The
Hyundai
ELANTRA
Quick Reference Guide
MIST
OFF
INT
LO
HI
MIST
OFF
INT
LO
HI PULL
MIST
OFF
INT
LO
HI PULL
MIST
OFF
INT
LO
HI PULL
MIST
OFF
INT
LO
HI PULL
MIST
OFF
INT
LO
HI PULL
MIST
OFF
INT
LO
HI PULL
HYUNDAI VEHICLE OWNER PRIVACY POLICY
Your Hyundai vehicle may be equipped with technologies and services
that use information collected, generated, recorded or stored by the
vehicle. Hyundai has created a Vehicle Owner Privacy Policy to explain
how these technologies and services collect, use, and share this
information.
You may read our Vehicle Owner Privacy Policy on the Hyundaiusa.com
website at https://www.hyundaiusa.com/owner-privacy-policy.aspx
If you would like to receive a hard copy of our Vehicle Owner Privacy
Policy, please contact our Customer Connect Center at:
Hyundai Motor America
Hyundai Customer Connect Center
P.O. Box 20850
Fountain Valley, CA 92728-0850
800-633-5151 consumeraffair[email protected]
Hyundai's Customer Connect Center representatives are available
Monday through Friday, between the hours of 5:00 AM and 7:00 PM PST
and Saturday and Sunday between 6:30 AM and 3:00 PM PST (English).
For Customer Connect Center assistance in Spanish or Korean,
representatives are available Monday through Friday between
6:30 AM and 3:00 PM PST.
MIST
OFF
INT
LO
HI PULL
MODE
Steering wheel
adjustment
Page 02
Instrument
cluster
Page 11
Head lights
Page 09
Electric
Parking Brake
(EPB)
Page 46
Wiper and
washer
Page 10
Cruise control/
smart cruise
control
Page 43
Navigation
Page 23
Climate
control
Page 15
USB data/
Smartphone
port
Page 24
WARNING!
To reduce the risk of serious injury to yourself and others,
read and understand the important SAFETY
INFORMATION in your Owner’s Manual.
Use this Quick Reference Guide to learn
about the features that will enhance your
enjoyment of your Hyundai. More
detailed information about these features
are available in your Owner’s Manual.
* Some vehicles may not be equipped
with all the listed features.
FEATURES AND CONTROLS
Climate control 15
Driver's main controls 02
Fuel filler door 06
Headlights 09
Instrument cluster 11
Instrument panel illumination 1 4
Interior lights 08
LCD display control 13
LCD display modes 13
Sunroof 07
Remote & Smart key 01
Seat-Front seat adjustment 03
Seat-Headrest adjustment 04
Seat-Seat belt adjustment 04
Seat-Seat warmer 04
Steering wheel adjustment 02
Trunk-Smart trunk 06
Trunk-Trunk opening 05
Warnings and indicators 14
Wipers and washer 10
INFOTAINMENT
Android Auto™ 27
Android Auto™ wireless 29
Apple CarPlay™ 31
Apple CarPlay™ wireless 35
Audio mode 21
Bluetooth operational tips 20
Bluetooth phone operation 19
Bluetooth phone pairing 19
FM radio 22
Homelink wireless control system 25
Navigation 23
Steering wheel audio control 22
USB data/Smartphone port 24
Wireless cellular phone charging system 24
DRIVING
Auto Hold 46
Blind-Spot Collision-Avoidance Assist(BCA)38
Cruise control / Smart cruise control 43
Digital key pairing 47
Drive mode 41
Electric Parking Brake (EPB) 46
Forward Collision-Avoidance Assist (FCA) 38
Highway Driving Assist (HDA) 44
Idle Stop and Go (ISG) 40
Intelligent variable transmission (IVT) 45
Lane Following Assist (LFA) 37
Lane Keeping Assist System (LKAS) 37
Leading vehicle departure alert 44
Near field communication (NFC) 48
Rear Cross-traffic Collision-Avoidance Assist (RCCA)
45
Rear Occupant Alert (ROA) 39
Tire Pressure Monitoring System (TPMS) 42
Quick Reference Guide I 02
01 I Quick Reference Guide
ELANTRAHYUNDAI
FEATURE AND CONTROLS
Driver’s door Lock / Unlock
· Touch :
One time - Unlock driver door
Two Times - Unlock all door
· To Lock :
Press the touch sensor on the outside of the handle to lock.
· To Disable/Enable 2 Press Unlock Function :
Vehicle must be in
P(park) and OFF. Press and hold both door lock and door unlock button
simultaneously on the key fob until the warning hazard lights blink.
NOTE:
User selectable option:
Please see section 5 from Owner’s
Manual for more details.
Removing the mechanical key
Slide and hold the release button
A
to remove the mechanical key.
To unfold the mechanical key, press
the release button on the remote.
* CAUTION
· If you locked the door with the touch sensor on the door handle,
the doors cannot be unlocked with the sensor within 3 seconds.
· If you unlocked the door with the touch sensor on the door handle,
the doors cannot be locked with the sensor within 2 seconds.
REMOTE & SMART KEY
Lock
Unlock
Engine remote
start button
Trunk Unlock
Panic
A
NOTE:
To start the vehicle remotely, press and hold the remote start
button for over 2 seconds within 4 seconds after locking the doors.
STEERING WHEEL ADJUSTMENTS
1. Pull the lever
1
down.
2. Set the angle
2
and distance
3
.
3. Pull the lever
1
up to lock
position.
NOTE:
Do not adjust while driving.
1
2
3
Move the lever towards L (left) or R
(right) on the switch.Then adjust the
mirror by using the mirror adjustment
control switch.
DRIVER'S MAIN CONTROLS
Outside Rearview Mirror
Power window lock button
Disables the power window switches
on the rear passenger doors.
Door Lock
Locks/unlocks all doors.
Press past detent to fully open/close
window.
Window Auto down/up (if equipped)
Quick Reference Guide I 04
03 I Quick Reference Guide
ELANTRAHYUNDAI
FEATURE AND CONTROLS
2
3
FRONT SEAT ADJUSTMENT Manual
Forward and Backward
1
Seat Height
2
Seatback Angle
3
- Push down on the lever several times to
lower the seat cushion.
- Pull up on the lever several times to raise it.
FRONT SEAT ADJUSTMENT Power,forthe Driver's Seat
Forward and Backward
1
Seat Height
Lumbar Support (driver's seat only)
3
Seatback Angle
2
123
1
Seat Warmer
OFF LOW ( )MED ( ) HIGH ( )
Press the button
A
to increase heat
HEADREST ADJUSTMENT
To Raise Headrest:
Pull headrest up.
To Lower Headrest:
Press lock button while pressing
down on headrest.
MIST
OFF
INT
LO
HI PULL
MODE
SEAT BELT ADJUSTMENT (Front seat)
Pull up to raise.
Press button and
push down to
lower.
SEAT WARMER
HIGH
MEDIUM
LOW
A
Quick Reference Guide I 06
05 I Quick Reference Guide
ELANTRAHYUNDAI
FEATURE AND CONTROLS
Key FOB / Smart Key
Press and hold the trunk
unlock button on the remote
key FOB or Smart Key for
about 1.5 seconds
Trunk Release Lever
From inside the vehicle,
pull the trunk release lever
located inside the vehicle.
TRUNK OPENING
Opening the trunk
The trunk can be opened using the key FOB
or Smart Key, by pressing the trunk release
button under the emblem, or by pulling the
trunk release lever inside the vehicle.
SMART TRUNK
FUEL FILLER DOOR
Smart Trunk
Trunk will slightly open automatically
when detecting smart key within range
near the trunk for more than 3 seconds.
To open fuel filler door :
The fuel ller door must be opened from inside the vehicle by pulling up
the fuel ller door opener.
1. Turn the engine off.
2. Pull up the fuel ller door opener.
To enable Smart Trunk function:
Vehicle must be in P (Park) to adjust
settings in the User Setting mode.
1. Select "Door/Trunk" in the User
Settings in the instrument cluster.
2. Check "Smart Trunk".
NOTE: Function is active after 15 seconds when all doors are closed and
locked and key is not detected. The vehicle will also provide an audible and
visual alarm while activating. For more details, refer to Owner's Manual.
Quick Reference Guide I 08
07 I Quick Reference Guide
ELANTRAHYUNDAI
FEATURE AND CONTROLS
INTERIOR LIGHTS
SUNROOF
Sunshade
The sunshade will open automatically
with the sunroof when the glass panel
moves. If you want it closed, move the
sunshade manually.
Sliding the sunroof
Pull the sunroof control lever
backward to open the sunroof.
(This operation will also open
the Sunshade, if it is not in the
open position.)
Push the sunroof control lever
forward to close the sunroof.
Tilting the sunroof
Push the sunroof control lever upward
to open the sunroof to the tilt position.
(This operation will also open the
Sunshade, if it is not in the open
position.)
Push again the sunroof control lever
upward to close the sunroof from the
tilt position.
Map Lamp (Lens Switch)
1 1
2
33
Master Switch
1
Room Lamp Switch ( )
4
Push the switch to turn the map
lamp
3
and room lamp
4
on or off.
When the Master Switch
1
is
pushed, the other switches
3
,
4
do
not operate.
Door Mode Switch ( )
When the Door Mode Switch
2
is pushed, map lamp
3
and
room lamp
4
turn on if any door
is opened and will turn off after
all doors are closed.
2
Press the lens to turn on and off
for each side of map lamp.
Press the switch to turn on and
off the room lamp.
When this switch is pushed,
master switch can’t control room
lamp
3
Room Lamp (Rear)
4
4
Quick Reference Guide I 10
09 I Quick Reference Guide
ELANTRAHYUNDAI
FEATURE AND CONTROLS
WIPERS AND WASHER
Intermittent Wipe Time Adjustment
Move the control switch.
Windshield Washer
Pull the lever gently toward you to
spray washer fluid on the windshield
and to run the wipers 1-3 cycles.
MIST
OFF
INT
LO
HI PULL
MIST
OFF
INT
LO
HI PULL
Fastest wiper speed
Slowest wiper speed
MIST
OFF
INT
LO
HI PULL
MIST
OFF
INT
LO
HI PULL
MIST
OFF
INT
LO
HI PULL
MIST
OFF
INT
LO
HI PULL
MIST
OFF
INT
LO
HI PULL
MIST
OFF
INT
LO
HI PULL
MIST -Single wipe
INT - Intermittent wipe
LO -Low wiper speed
HI -High wiper speed
OFF
PULL
HEADLIGHTS
Parking light
OFF
Auto light
Headlight
Headlight Delay
Headlights may stay on for 15 seconds after exiting and locking
vehicle. Press remote lock button twice to turn headlights off.
Turn signals and lane change
signals
Flashing headlights
PULL
High beam
PUSH
High Beam Assist
PUSH
NOTE:
To turn off high beam,
pull the lever towards
you.
High Beam Assist
1. Select AUTO position on lever.
2. Turn on the high beam by pushing the lever
away from you. High Beam Assist
Indicator will illuminate
3. High Beam Assist system will turn on when
vehicle speed is above 25 mph.
4. To turn off high beam assist, push the lever
forward.
Quick Reference Guide I 12
11 I Quick Reference Guide
ELANTRAHYUNDAI
FEATURE AND CONTROLS
Type B (LCD display)
1
Tachometer
2
Speedometer
3
Engine Coolant Temperature Gauge
4
Fuel Gauge
5
Warning and Indicator Lights
6
LCD Display (including trip computer)
3
4
1
2
5
6
3
4
1
2
5
5
6
Type A
INSTRUMENT CLUSTER
Quick Reference Guide I 14
13 I Quick Reference Guide
ELANTRAHYUNDAI
FEATURE AND CONTROLS
MODE
OK
MODE
OK
LCD DISPLAY MODES
LCD DISPLAY CONTROL
Modes Symbol Explanation
Trip Computer This mode displays driving information like
the tripmeter, fuel economy, and so on.
Turn By Turn (TBT)
(if equipped)
This mode displays the state of the
navigation.
Assist
- Smart Cruise Control (SCC)
- Lane Keeping Assist (LKA)
- Lane Following Assist (LFA)
- Driver Attention Warning (DAW)
- Tire pressure
Drive Assist
(if equipped)
This mode displays the state of:
- Smart Cruise Control system
Lane Keeping Assist
Lane Following Assist
- Driver Attention Warning
- Tire pressure
User Settings Displays service interval and warning
messages. Changes settings.
Warning Displays service interval and warning
messages.
MODE
OK
MODE
OK
1
23
1
: MODE button for changing
modes
2
: MOVE switch for changing
items
3
: SELECT/RESET button for
setting or resetting the
selected item
WARNINGSAND INDICATORS
Air bag warning light
Electric Power Steering
(EPS) warning light
Seat belt
warning light
Parking brake & Brake
fluid warning light
Electronic Brake Force Distribution (EBD)
system warning light
Low tire pressure
warning indicator/TPMS
malfuction lamp
Low fuel level
warning light
Low beam indicator
Smart high beam
indicator
Light ON indicator
Forward Collision-
Avoidance Assist
Lane Follow Assist
Icy Road
Warning Light
Headlamp Warning
Light
Anti-lock Brake System
(ABS) warning light
High beam indicator
Electronic Stability
Control (ESC) indicator
Master warning light
Electric Parking Brake
(EPB) warning light
Engine oil pressure
warning light
Charging system
warning light
Immobilizer indicator
Malfunction Indicator
Lamp (MIL)
Electronic Stability Control
(ESC) OFF indicator
Cruise indicator
Lane Keep Assist
Indicator
SPORT mode
indicator
AUTO HOLD indicator
Turn signal indicator
Engine coolant
temperature warning light
INSTRUMENT PANEL ILLUMINATION
Press - or + to adjust instrument
cluster illumination brightness.
Quick Reference Guide I 16
15 I Quick Reference Guide
ELANTRAHYUNDAI
FEATURE AND CONTROLS
5
Rear Window Defroster Button
6
Air intake control button
7
A/C (Air conditioning) button
1
Fan Speed Control Knob
2
Temperature control knob
3
Mode selection knob
4
Front windshield defroster position
MANUAL CLIMATE CONTROL
+
0
+
0
+
0
3
4
1
56 67
2
3. Set the fan speed to
the medium speed.
2. Select the warmest
temperature.
+
0
+
0
+
0
+
0
+
0
+
0
+
0
+
0
+
0
+
0
+
0
+
0
1. Select the Front
Windshield Defrost
Mode.
Face-Level
Bi-Level
Floor-Level
Floor & Defrost-Level
Defrost-Level
Changes the direction of
the air flow as following:
NOTE:
To reduce the tendency of the glass fogging and also to improve visibility,
keep the interior surface of the windshield clean by wiping it with a clean
cloth and glass cleaner. In addition, select air intake control to the
outside (fresh) air position whenever possible while operating the vehicle.
Outside (fresh) air
position
Recirculated air
position
+
0
+
0
+
0
Press to activate/deactivate
the rear defroster.
MAX A/C mode
Rear Window Defroster
MAX A/C Mode
automatically engages
Recirculated air position
and air conditioning.
Return to normal A/C
mode after the vehicle
interior has cooled
sufficiently.
Mode selection
Defogging / Defrosting Air intake control
Quick Reference Guide I 18
17 I Quick Reference Guide
ELANTRAHYUNDAI
FEATURE AND CONTROLS
HIGH
MEDIUM
LOW
HIGH
MEDIUM
LOW
HIGH
MEDIUM
LOW
AUTOMATIC CLIMATE CONTROL
Air intake control
HIGH
MEDIUM
LOW
HIGH
MEDIUM
LOW
HIGH
MEDIUM
LOW
Automatic heating /
Air conditioning
Auto fan speed control
HIGH
MEDIUM
LOW
HIGH
MEDIUM
LOW
HIGH
MEDIUM
LOW
Changing the direction of the air flow as follow.
Mode selection
Outside (fresh) air position
(LED OFF)
Recirculated air
position (LED ON)
Defogging / Defrosting
3. Set the fan speed to
the highest speed.
2. Select warmest
temperature.
HIGH
MEDIUM
LOW
HIGH
MEDIUM
LOW
HIGH
MEDIUM
LOW
HIGH
MEDIUM
LOW
HIGH
MEDIUM
LOW
HIGH
MEDIUM
LOW
HIGH
MEDIUM
LOW
HIGH
MEDIUM
LOW
HIGH
MEDIUM
LOW
1. Press the defrost
button.
System off
Pressing the OFF button will
place the system in the OFF
mode.
1. The fan speed is controlled automatically
in 3 available settings.
2. Pressing the AUTO button will activate
the AUTO function and change the
AUTO fan speed setting
3. Settings: HIGH → MEDIUM → LOW
4. If the temperature is set to either ‘HI’ or
‘LO’, the fan speed setting will be ‘HIGH’.
* For detailed precautions and instructions,
see the Owner’s Manual.
• Climate control fan will turn off.
• Outside (fresh) air position will
be selected.
• Vented air will be at last set
temperature.
NOTE:
To reduce tendency of the glass fogging and also to improve
visibility, keep the interior surface of the windshield clean by wiping it
with a clean cloth and glass cleaner. In addition, select air intake
control to the outside (fresh) air position whenever possible while
operating the vehicle.
12
7
4
6
3
2
5 10
8 89
11
1
1
Driver’s temperature control knob
2
Passenger’s temperature control knob
3
AUTO (automatic control) button
4
SYNC button
5
OFF button
6
Front windshield defroster button
7
Air conditioning button
8
Air intake control button
9
Rear window defroster button
10
Fan speed control button
11
Mode selection button
12
Climate control information screen
Quick Reference Guide I 20
19 I Quick Reference Guide
ELANTRAHYUNDAI
INFOTAINMENT
Making a call using voice recognition:
The menu tree identies available voice recognition Bluetooth®functions.
Calling by Name:
1. P
ress button.
2. Say the following command:
• “Call <John Smith>”: Connects the call to John.
• “Call <John Smith> on <on Mobile/at Work/at Home>: Connects the
call to John’s Mobile, Home, or Work phone number.
Dialing by Number:
1. Press button.
2. Say “Dial Number”.
3. Say desired phone number.
For complete list of commands, refer to your Owner’s Manual.
To Answer a Call: • Press button on the steering wheel.
To Reject a Call: • Press button on the steering wheel.
To Adjust Ring Volume: • Use the VOLUME buttons on the steering wheel.
To Transfer a Call to the Phone
(Private call on handset – do not use while driving):
•Press and hold button on the steering wheel until the audio system
transfers a call to the phone.
To Finish a Call: • Press button on the steering wheel.
BLUETOOTH®OPERATIONAL TIPS
In the following situations you or the other party may have difficulty
hearing each other:
1. Keep the Bluetooth®volume to a low level. High level volume may result in
distortion and echo.
2. When driving on a rough road, high speeds and/or with the window open.
3. When the air conditioning vents are facing the microphone and/or when
the air conditioning fan is at the max speed.
Steering wheel bluetooth® control
MODE
MODE
1
TALK
Activates voice recognition.
2
CALL
Places and transfers calls.
3
END
Ends calls or cancels functions.
2 3
1
Pairing tutorials, phone compatibility and
operational tips can be found through the
Smart QR code using the QR reader
application on your Smartphone.
BLUETOOTH PHONE PAIRING
BLUETOOTH PHONE OPERATION
Phone setup (pairing phone)
2.
Select the car name shown on your mobile phone to pair.
3. Enter the passkey or accept the authorization popup on your phone.
(The default passkey is 0000.)
4. Bluetooth is connected.
1. Turn Bluetooth® on from your mobile phone. : All Menus > Setup >
Device Connections > Bluetooth > Bluetooth Connections > Add New.
MODE
NOTE:
Vehicle must be parked to complete pairing process.
Note:
Vehicles without Navigation require a compatible Apple or
Android phone connected to the USB port to use the Voice recognition
button on the steering wheel.
- If connected via Bluetooth you cannot place a call using VR, you can
only accept and end a call.
MAP
NAV
Quick Reference Guide I 22
21 I Quick Reference Guide
ELANTRAHYUNDAI
INFOTAINMENT
Press POWER button
A
to turn radio on.
•
TUNING/LISTENING TO CHANNELS
1. Press the RADIO button
B
.
2. Press the search backward button SEEK
C
or the search forward
button TRACK to desired channel.
NOTE:
A clear view of the southern sky is recommended to ensure SXM®
radio reception.
•
SETTING PRESET MEMORY BUTTONS (FM/AM/SXM
®
)
Press and hold any preset button
D
until an audible beep is
heard to store current channel.
•
ADJUSTING THE SOUND CONTROL
1. Press SETUP button .
2. Select Sound button on screen.
3. Touch on-screen arrows to adjust
desired setting.
MAP
NAV
AUDIO MODE
A
A
B
B
C
E
D
MODE
MODE
MODE
MODE
MODE
MODE
STEERING WHEEL AUDIO CONTROL
FM RADIO
MODE
MODE
MODE
MODE
MODE
MODE
2
2
3
3
1
1
1
VOLUME
Raises or lowers speaker volume.
2
SEEK/PRESET
Change station.
3
MODE
Change the audio source.
RADIO NOISE CONTROL MODE
1. Press the AMenu button
2. Press the BFM Radio Noise Control button
3. Select Radio Noise Control Mode
1
,
2
,
3
as your preference.
※
Default :
2
Minimum Noise Reduction
NOTE:
1. Users can set the volume level of each source (FM, AM, SXM, USB,
BT and etc.) individually by adjusting the “A” knob.
2. When the volume of a source is adjusted to the desired level, it will
be automatically saved at that setting. Thus, when the user
changes source and reverts back, the volume will be set at the last
desired level.
WIRELESS CELLULAR PHONE CHARGING SYSTEM
There is a wireless cellular phone
charging system inside the front
console. The system will operate
when all doors are closed, and the
ignition switch is in the ACC/ON
position. The wireless charging
pad is equipped with a cooling
fan to help prevent overheating
while charging.
NOTE:
The wireless cellular phone charging system supports only the
Qi-enabled cellular phones ( ).
NOTE:
Do not place any metallic items such as coins, keys on the
charger. Avoid putting credit cards, etc. on the charger as they
might get damaged by the magnetic field.
The USB data port can be used to
connect an external audio device
and listen to it through the audio
system in your vehicle.
The USB data port can also be used
to access Android Auto or Apple Car
Play with your compatible phone.
USB DATA/SMARTPHONE PORT
Quick Reference Guide I 24
23 I Quick Reference Guide
ELANTRAHYUNDAI
INFOTAINMENT
NAVIGATION
Basic features on the map screen
1
Displays the Home screen.
2
Used to change the map display mode.
3
You can adjust the volume of
navigation or GPS warning sound.
4
Zoom in the map
5
The scale of the map automatically
changes.
6
Zoom out the map
7
Guides the point to change the driving
direction.
1
13
14
8
9
10 11 12
2
3
4
5
6
7
Destination search screen
Press [NAV] button in the navigation
head unit, and finds a destination by
using the [Destination] menu.
273
8
4
9
1
6
5
10
1
Returns to the previous step.
2
Search for a location by entering
various types of keywords such as
place name and address.
3
Select any of previous destinations to
set as a destination.
4
Register the location or use the
address book for setting a destination.
5
Search for POIs by category to set as a
destination.
6
You can cancel guidance to the
destination.
7
You can edit the current route so that
you can travel via waypoints on the
way to the destination.
8
You can easily search for restaurants.
9
You can set a destination after
searching for gas stations.
10
You can easily search for emergency
services.
11
You can change the route search
criteria to resume routing.
12
You can see the entire route
information to the destination.
13
You can register your home, office, or
other frequently visited place as a
favorite for ease of search.
14
The list of menu items appears.
8
Guides the next point to change the
driving direction.
9
Displays the lanes in different colors.
10
Displays quick menu items that can
be used during a guidance.
11
Displays the remaining distance to
the destination and the estimated
time of arrival. For more details, touch
the information item.
12
Pause route button to temporarily
pause route guidance.
13
Displays or hides the detailed
guidance.
14
Displays system information on the map.
13
11 12
14
NOTE:
Press and hold button to
CANCEL route guidance.
Quick Reference Guide I 26
25 I Quick Reference Guide
ELANTRAHYUNDAI
INFOTAINMENT
HOMELINK WIRELESS CONTROL SYSTEM
1. Press and release
1
,
2
or
3
button.
• If the indicator
7
is turned ON in Orange, go to Step 3
(programming mode)
• If the indicator
7
is continuously turned ON or ashes in Green
rapidly several times, go to Step 2 (erasing mode)
2. Press and hold the button you wish to program for approximately
15- 25 seconds until the LED ashes in Orange for several times.
3. Hold the Garage Door Opener Original Transmitter near the
HomeLink Mirror.
4. Press the Original Transmitter button until the indicator
7
is
turned continuously ON or ashes in Green for approximately 10
seconds and it indicates the programing is completed.
NOTE:
If the indicator
7
ashes in Green continuously, but if the
garage door opener does not operate, please continue to follow
Rolling Code Programming steps below.
Indicator
4
&
6
:
Flashes in orange → “Closing” & “Opening”
Solid Green → “Closed” & “Opened”
123
4
4
5
7
6
6
Rolling Code Programming
•You may need a ladder to access your garage door opener.
•You may need help from a second person.
•Be prepared some of the steps are time sensitive.
1. Firmly press and release the “Learn”, Smart”, or “ Program” button
of garage door opener on the ceiling while the indicator
7
ashes
in Green. Once the button is pressed, you have approximately 30
seconds to initiate the next step.
2. Return to the vehicle and rmly press the HomeLink button, hold
for two seconds and release the button up to three times. Do not
press the HomeLink button rapidly. At this point programming is
complete and your device should operate.
For more detailed information, please refer to your Owner’s manual
or visit www.homelink.com or call (800) 355-3515
Two Way Communication
Some new garage door openers come equipped with a two-way
communication feature. If your garage door opener has this feature,
please also continue to follow the Rolling Code Programming steps
below. For more information and programming tips on two-way
communication please visit www. homelink.com/compatible/two-
waycommunication or call (800)-355-3515.
NOTE: If your garage door opener has Two-Way Communication
functionality, it is possible for HomeLink to stop functioning the garage
door shortly after initial programming, if the Two-Way Communication
Programming wasn’t properly completed. If you experience this,
completing the “Programming a New HomeLink Button” and “Two-
Way Communication Programming” will restore door operation.
Quick Reference Guide I 28
27 I Quick Reference Guide
ELANTRAHYUNDAI
INFOTAINMENT
CAR SETUP
1. Press the SETUP button on the radio.
2. Touch the “Device Connections” icon on screen.
3. Select Android Auto
4. Select Enable Android Auto
5. Connect your Android phone to the vehicle USB port. Agree to the
notification and disclaimers on your phone then the “Android Auto”
icon will appear confirming the setup.
For more detailed information on how to operate Android Auto, please
refer to your display audio or navigation manual.
For additional Android Auto support, please refer to the Android Auto
Support Website
https://support.google.com/androidauto/
Android Auto, Google Play, Android, and other marks are trademarks
of Google Inc.
PHONE SETUP
Turn on Bluetooth®on your phone and connect the micro USB cable to
your phone and the USB port on the vehicle.
Phone will prompt you to download the Android Auto app and update
other needed apps (e.g. Google Maps™, Google Play Music™, Google
Now™).
NOTE:
Vehicle must be parked.
- Location mode setting should be set to High accuracy.
- Car and phone setup should be completed in one sitting. If phone
setup needs to be resumed, recommend to Force Stop the Android
Auto app on the Phone then reopen the app and accept the
Disclaimer notifications.
REQUIREMENTS:
- USB cable
- OS Android™ 5.0 or higher
- Compatible Android Phone
- Data and wireless plan for applicable features
BEFORE YOU BEGIN:
- Android Auto features may operate differently than on your phone.
- Message and data charges may apply when using Android Auto.
- Android Auto relies on the performance of your phone. If you
experience performance issues:
- Close all apps and then restart them
- Disconnect and then reconnect your phone
- Using the USB cable that was provided with your phone is
recommended.
- When Android Auto is active, your in-vehicle voice recognition
system is disabled and you will be using talk to Google™ to make
your requests.
ANDROID AUTO SUPPORT
https://support.google.com/androidauto/
ANDROID AUTO ™
Quick Reference Guide I 30
29 I Quick Reference Guide
ELANTRAHYUNDAI
INFOTAINMENT
ON YOUR SMARTPHONE
- Activate Bluetooth and Wifi
- Search for your vehicle on Bluetooth device list
- Select your Vehicle
- Confirm Bluetooth passkeys match the touch
screen display
- Read and accept prompts from the touch
screen display
PHONE SETUP
- Turn on Bluetooth and Wifi on your phone
- Download Android Auto App, and update other needed apps (e.g.
Google Maps, Google Play Music, Google Now)
REQUIREMENTS:
- Compatible Android Phone that supports Android Auto Wireless
- Data and wireless plan for applicable features
- Bluetooth & Wifi must be enabled
BEFORE YOU BEGIN:
- Android Auto can be set up and utilized with both the Wi-Fi and
USB Chord
CAR SETUP
Activate Wireless Connectivity
On the Home Screen, select the following:
All Menus > Setup > Wi-Fi > Use Wi-fi
Connection
Connect to Android Auto
On the Home Screen, select the following:
All Menus > Android Auto
Pairing Smartphone With Phone Projection
On the Home Screen, select the following:
All Menus > Setup > Device Connections >
Phone Projection > Add New
NOTE:
If the smartphone has been added to the
system’s Bluetooth device list, first delete the
smartphone from the Bluetooth list, and add it to
the phone projection list. Smartphone will also be
registered to Bluetooth after registering to Phone
Projection.
ANDROID AUTO ™ WIRELESS IF EQUIPPED
Quick Reference Guide I 32
31 I Quick Reference Guide
ELANTRAHYUNDAI
INFOTAINMENT
CAR SETUP
1. Press the SETUP button.
2. Touch the “Device Connections” icon on the screen.
3. Touch Apple CarPlay.
4. Touch Enable Apple CarPlay.
5. Connect your Apple iPhone to the vehicle USB port then touch ‘OK’
when the pop-up message appears. The Apple CarPlay icon will
now appear on the vehicle Home screen confirming the setup.
Apple CarPlay, Apple, and other marks are trademarks of Apple Inc.
REQUIREMENTS
- Apple Lightning®cable (Apple-certified cable)
- Latest iOS
- iPhone®5 or above
- Data and wireless plan for applicable features
BEFORE YOU BEGIN
- Apple®CarPlay features may operate differently than on your phone.
- Message and data charges may apply when using Apple CarPlay.
- Apple CarPlay relies on the performance of your phone. If you
experience performance issues:
- Close all apps and then restart them
- Disconnect and then reconnect your phone
- Using the Apple Lightning cable that was provided with your phone
is recommended.
- When Apple CarPlay is active, your voice recognition system is
disabled and you will be using Siri®to make your requests.
APPLE CARPLAY ™
PHONE SETUP
On your phone, go to Settings >
General > CarPlay to allow CarPlay
access.
On your phone, go to Settings > Siri
and ensure Siri is turned ON.
Quick Reference Guide I 34
33 I Quick Reference Guide
ELANTRAHYUNDAI
INFOTAINMENT
PHONE
Touch the PHONE
5
icon to access the Phone screen. Siri will
automatically ask ‘Who would you like to call’ when the PHONE
5
icon is selected.
NOTE:
Phone call sound quality is dependent on the wired connection.
Using the Lightning cable that came with the phone is recommended.
APPLE MUSIC
Touch the APPLE MUSIC
6
icon to access the Apple Music screen.
APPLE MAPS
Touch the APPLE MAPS
7
icon to access the Apple Map screen.
MESSAGES
Touch the MESSAGES
8
icon to access the Message screen. Siri will
automatically ask ‘To hear unread messages or create a new one’
when the MESSAGE icon is selected.
3rd PARTY APPS
Supported CarPlay apps that are downloaded on your phone will
appear on the CarPlay screen. Touch the apps icons to access those
supported apps.
NOTE:
A list of the supported CarPlay supported apps can be found at
http://www.apple.com/ios/carplay/
Ensure phone has latest version of the 3rd Party Apps.
Apple CarPlay uses Siri to perform many actions like sending
messages, placing calls, and looking up/setting POI/Destinations. A
Siri session can be initiated on any screen by:
1. Touch and holding the HOME icon
1
on the CarPlay screen or
2. Press the steering wheel VOICE RECOGNITION
13
button.
Note: Ensure Siri feature is set to ON in your phone (Go to Settings >
General > Siri).
3. Say any of the following commands;
•“Text <John Smith> ‘Call you later’” to send a text message.
•“Read text messages” to read available text message.
•“Call <John Smith>” to make a phone call.
•“Find <POI/Destination>” to locate a POI/Destination.
CarPlay Home Screen
SIRI
1
HOME ICON
2
WIRELESS CONNECTIVTY
3
CELLULAR SIGNAL
4
PHONE TIME
5
PHONE
6
APPLE MUSIC™
7
APPLE MAPS
8
MESSAGES
9
3RD PARTY APPS
10
SCREEN PAGE INDICATOR
11
EXIT TO HYUNDAI
12
CURRENT CARPLAY AUDIO PLAYING
13
VOICE RECOGNITION TIPS
MODE
MODE
MODE
MODE
MODE
MODE
MODE
MODE
13
2
3
4
1
5 6 7 8
9
10
11
12

Other Hyundai Automobile manuals

Hyundai Palisade 2020 User manual

Hyundai

Hyundai Palisade 2020 User manual

Hyundai SANTA FE 2017 User manual

Hyundai

Hyundai SANTA FE 2017 User manual

Hyundai 2010 ELANTRA TOURING User manual

Hyundai

Hyundai 2010 ELANTRA TOURING User manual

Hyundai Grand i10 NIOS User manual

Hyundai

Hyundai Grand i10 NIOS User manual

Hyundai Tucson User manual

Hyundai

Hyundai Tucson User manual

Hyundai 2010 Azera User manual

Hyundai

Hyundai 2010 Azera User manual

Hyundai 2012 Santa Fe Sport User manual

Hyundai

Hyundai 2012 Santa Fe Sport User manual

Hyundai 2002 Santa Fe User manual

Hyundai

Hyundai 2002 Santa Fe User manual

Hyundai Sonata 2016 User manual

Hyundai

Hyundai Sonata 2016 User manual

Hyundai ELANTRA TOURING User manual

Hyundai

Hyundai ELANTRA TOURING User manual

Hyundai 2004 Elantra User manual

Hyundai

Hyundai 2004 Elantra User manual

Hyundai Ioniq Hybrid 2020 User manual

Hyundai

Hyundai Ioniq Hybrid 2020 User manual

Hyundai Equus 2014 User manual

Hyundai

Hyundai Equus 2014 User manual

Hyundai Equus 2012 User manual

Hyundai

Hyundai Equus 2012 User manual

Hyundai Grand i10 NIOS User manual

Hyundai

Hyundai Grand i10 NIOS User manual

Hyundai SONATA User manual

Hyundai

Hyundai SONATA User manual

Hyundai ACCENT User manual

Hyundai

Hyundai ACCENT User manual

Hyundai Veloster User manual

Hyundai

Hyundai Veloster User manual

Hyundai SantaFe User manual

Hyundai

Hyundai SantaFe User manual

Hyundai IONIQ ELECTRIC User manual

Hyundai

Hyundai IONIQ ELECTRIC User manual

Hyundai SONATA 2019 User manual

Hyundai

Hyundai SONATA 2019 User manual

Hyundai 2013 Azera User manual

Hyundai

Hyundai 2013 Azera User manual

Hyundai VELOSTER N 2020 User manual

Hyundai

Hyundai VELOSTER N 2020 User manual

Hyundai 2006 Santa Fe User manual

Hyundai

Hyundai 2006 Santa Fe User manual

Popular Automobile manuals by other brands

Volvo C70 owner's manual

Volvo

Volvo C70 owner's manual

Mercury 2005 Quick reference guide

Mercury

Mercury 2005 Quick reference guide

Dodge 2014 Durango user guide

Dodge

Dodge 2014 Durango user guide

Jeep Compass overview

Jeep

Jeep Compass overview

Volvo 2011 S80 owner's manual

Volvo

Volvo 2011 S80 owner's manual

Toyota 4RUNNER 2013 Quick reference guide

Toyota

Toyota 4RUNNER 2013 Quick reference guide

Buick 2011 Lucerne owner's manual

Buick

Buick 2011 Lucerne owner's manual

Rolls-Royce T Series Workshop manual

Rolls-Royce

Rolls-Royce T Series Workshop manual

Mercedes-Benz 2006 CLK-Class Coupe Operator's manual

Mercedes-Benz

Mercedes-Benz 2006 CLK-Class Coupe Operator's manual

Cadillac CRUZE release note

Cadillac

Cadillac CRUZE release note

Lexus KMA10 Series Dismantling manual

Lexus

Lexus KMA10 Series Dismantling manual

Toyota Avalon 2001 operating manual

Toyota

Toyota Avalon 2001 operating manual

Lincoln 2005 LS Quick reference guide

Lincoln

Lincoln 2005 LS Quick reference guide

Volvo V70 SPORT owner's manual

Volvo

Volvo V70 SPORT owner's manual

McLaren Ultimate Series Owner's handbook

McLaren

McLaren Ultimate Series Owner's handbook

Tesla MODEL S owner's manual

Tesla

Tesla MODEL S owner's manual

Toyota Highlander  guide Pocket reference guide

Toyota

Toyota Highlander guide Pocket reference guide

Lexus LS 460 user manual

Lexus

Lexus LS 460 user manual

manuals.online logo
manuals.online logoBrands
  • About & Mission
  • Contact us
  • Privacy Policy
  • Terms and Conditions

Copyright 2025 Manuals.Online. All Rights Reserved.