I-Data 90 User manual


Table of Contents
1 Introduction ................................................................................ 1
1.1Appearance of iData 90 .............................................................................................................1
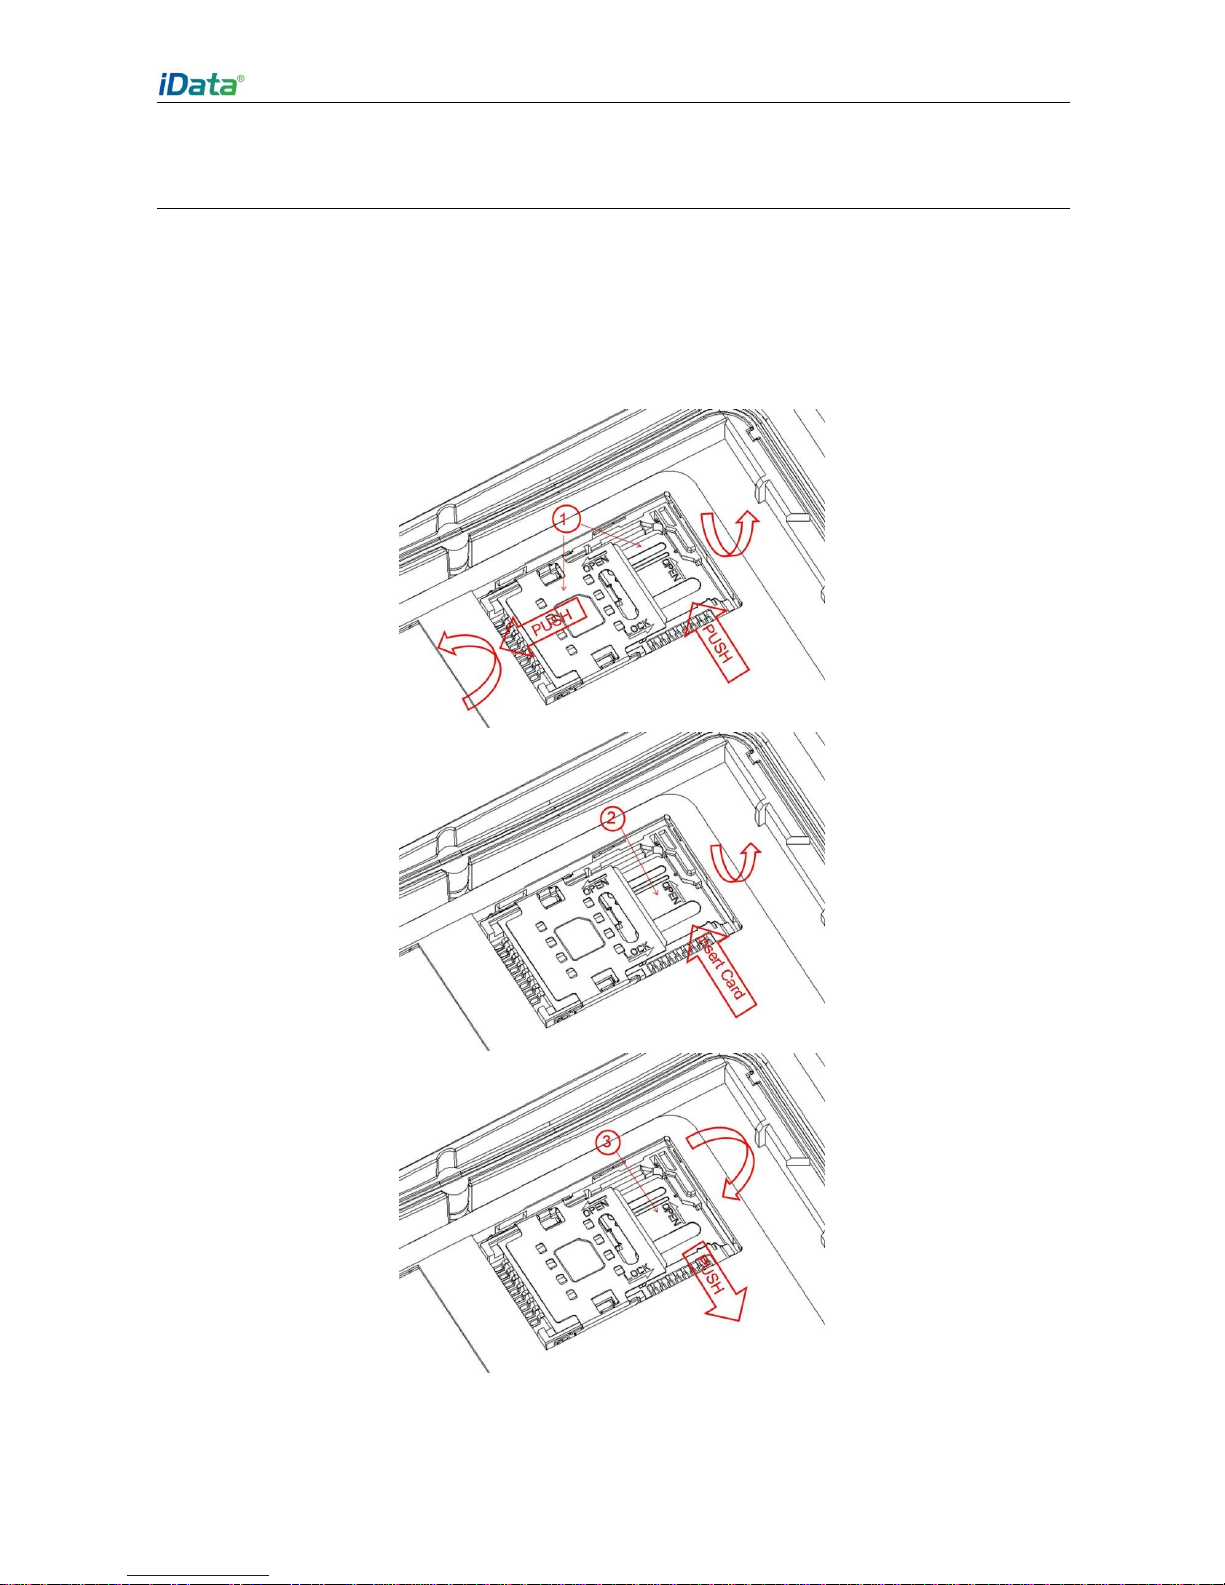
1.2 Installing anSD Card .................................................................................................................2
1.4 Installing a Battery......................................................................................................................3
1.5 Disassembling the BatteryCover.............................................................................................3
1.6 Charging.......................................................................................................................................4
1.7 Power-on......................................................................................................................................5
2 Instructions on iData 90............................................................. 6
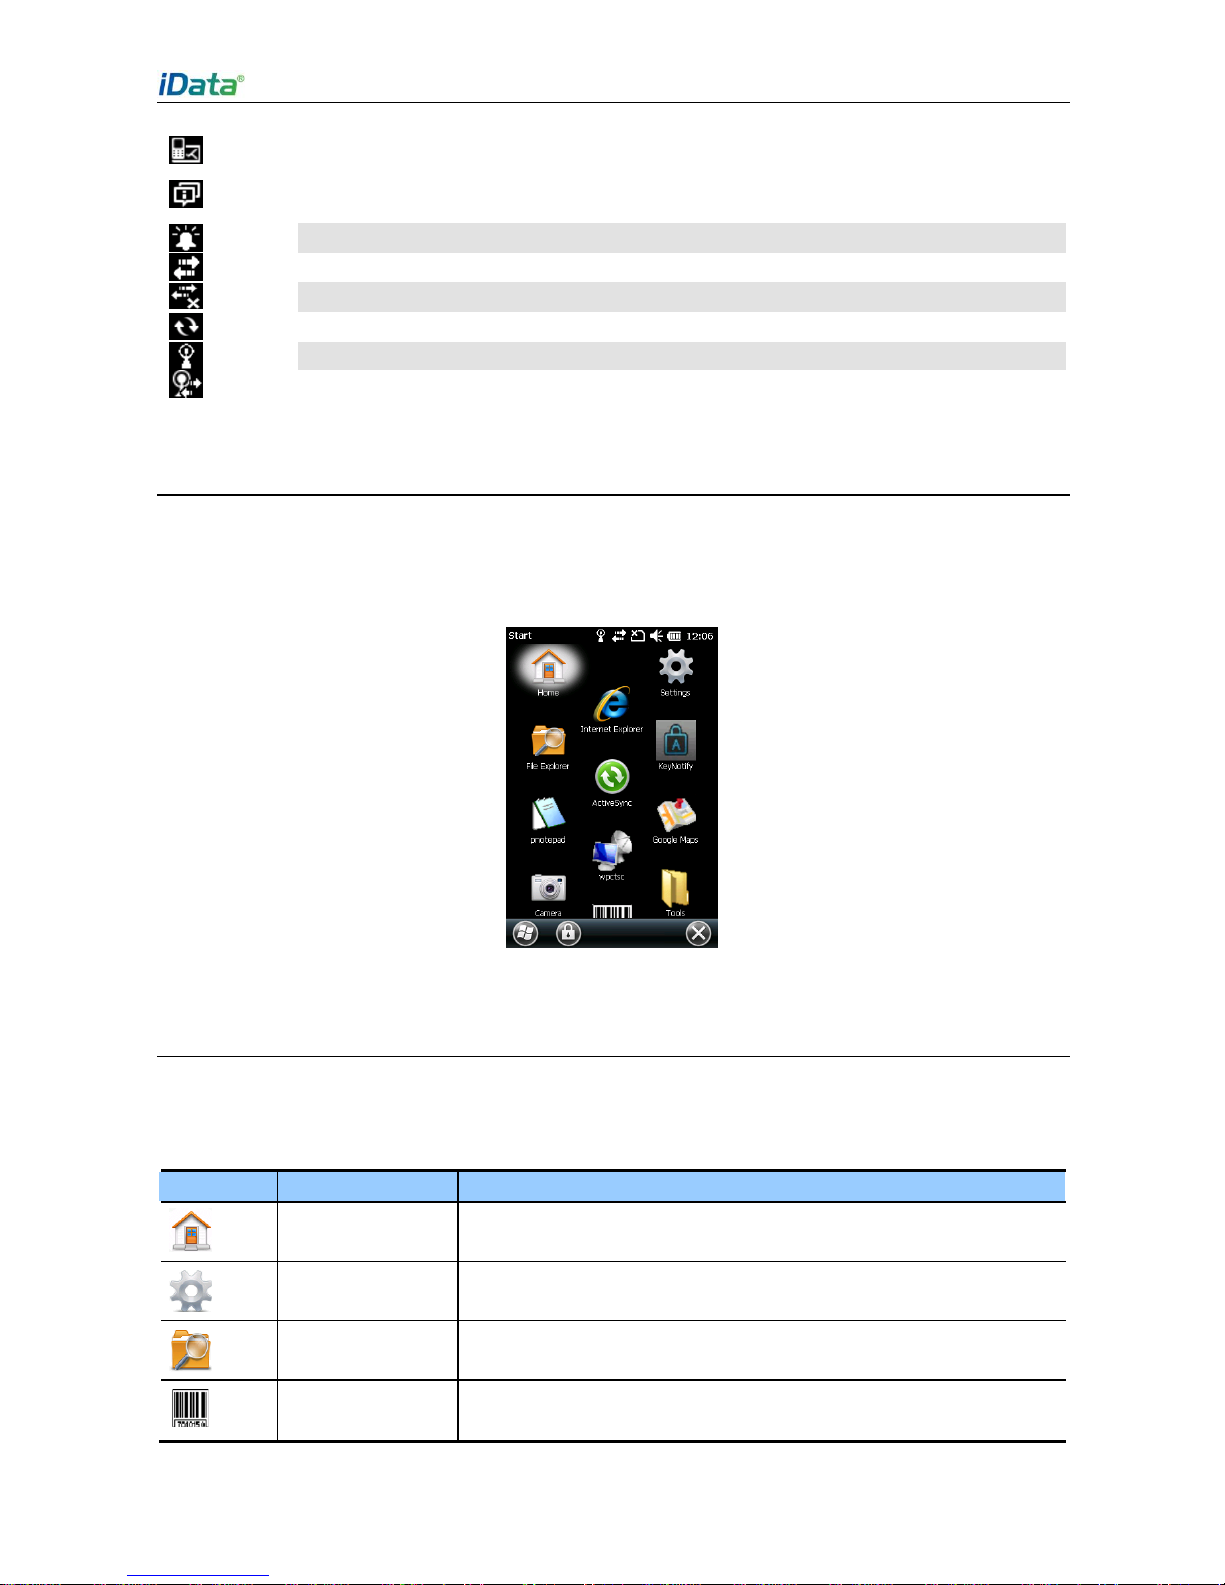
2.1 Home ............................................................................................................................................6
2.2 Status Icons.................................................................................................................................6
2.3Applications Window..................................................................................................................7
2.4 Icons ofApplications ..................................................................................................................7
2.5 Keypad Operations................................................................................................................... 11
2.6Adjusting Volume ......................................................................................................................12
2.7 Date and Time...........................................................................................................................13
2.8 Setting Ringtone .......................................................................................................................13
2.9 Setting Screen...........................................................................................................................13
3 E-mail ........................................................................................ 14
4 Connection and Synchronization ........................................... 16
4.1.1 Wi-Fi Network Connection...................................................................................................16
4.1.2 iData Wi-Fi Optimization.......................................................................................................17
4.2 Connecting to a PC through USB ..........................................................................................18
4.3 Synchronization ........................................................................................................................18
5 Introduction to iScan ............................................................... 20
5.1 Starting iScan ............................................................................................................................20
5.2 Using iScan................................................................................................................................20
5.3 Descriptionof iScan Menu......................................................................................................20
5.4 RFID Reading............................................................................................................................21
6 Managing iData 90....................................................................23
6.1 Installing Software ....................................................................................................................23
6.2 Removing Installed Programs.................................................................................................23
6.3 Using Task Manager.................................................................................................................23
6.4 Using File Explorer...................................................................................................................24
6.5 Restoring FactorySettings......................................................................................................24
7 Precautions and Troubleshooting .......................................... 29

7.1 Precautions................................................................................................................................29
7.2 Troubleshooting ........................................................................................................................30
Appendix......................................................................................33

iData 90 User Manual
- 1 -
1 Introduction
1.1 Appearance of iData 90
Figure 1-1 Front view ofiData 90
Figure 1-2 Rear view of iData 90

iData 90 User Manual
- 2 -
1.2 Installing an SD Card
To install an SD card, do as follows:
1. Push the card cover along the directionmarked on the cover and open the cover.
2. Insert an SD card.
3. Press the SD card downward and lock the card along the IN direction marked on the
cover.
Figure 1-3 Inserting an SD card

iData 90 User Manual
- 3 -
1.4 Installing a Battery
To install a battery, do as follows:
1. Push the batteryto the bottom of the battery compartment.
2. Press the top of the battery downward to tighten the battery.
3. Push the joint at the bottom of the batterycover into the back shell.
4. Push the lock to the left and press the batterycover downward until the lock
automatically returns to the location on the right.
1
2
1
22
Figure 1-5 Installing a battery
1.5 Disassembling the Battery Cover
To disassemble the battery cover, do as follows:
1. Insert your left forefinger into the upper left part of the batterycover and push the lock to
the left by using the thumb.
2. Pull out the battery cover.

iData 90 User Manual
- 4 -
Figure 1-6 Disassembling the batterycover
1.6 Charging
Youcan charge a battery in the following ways:
1. Charge the iData 90 by using a charger.
2. Connect the iData 90 to a PC by using a USB cable to charge the iData 90.
In the charging status, the LED is red. When the LED becomes blue, charging is complete.
If you charge the battery when the iData 90 is powered on, the battery icon on the upper
right part of the screenchanges, indicating that charging starts.
When the battery volume is low, an alarm is generated on the screen of the iData 90 and
the battery volume becomes .
When the battery volume is too low, the iData 90 is automatically powered off.
★Caution
The battery can be charged for more than or less than three hours. The battery will not be
damaged if charging is interrupted. The duration of the battery depends on different
applications of the iData 90, for example, selected functions of iData 90, usage mode, and
data transmission.
Tips
To ensure a longer standby time of the iData 90, follow the following tips:
Always connect the iData 90 to the AC power supply when youdo not use it.
In the power supplysetting, set the iData 90 to make it automaticallyclosed after being
idle for a short time.
Set the backlight to make it automatically closed after being idle for a short time.
Stop all wireless activities when youdo not use the iData 90.

iData 90 User Manual
- 5 -
1.7 Power-on
After installing a SIM card and a battery and charging the iData 90 completely, you can use
the iData 90.
1. Press and hold the On/Off key for several seconds.
2. The power-onpage is displayed, and the iData 90 enters the Windows Mobile operating
system after the boot process is complete.
When you power on the iData 90 for the first time, the iData 90 initializes the file system of
the flash memory. During the period, the initial page remains for about one minute. Then
some basic settings suchas screen calibration, date and time, and Email setting appear. If
youdo not want to set these items, directlyskip them.

iData 90 User Manual
- 6 -
2 Instructions on iData 90
2.1 Home
Home is the start page of the iData 90 and displays important information such as
upcoming appointments and tasks.At Home, youcanadd items or change the background
byselecting Start > Settings > Home. Click a program at Home to open it.
The default page of the iData 90 is Home. If the iData 90 is not at Home, select Start >
Home to switch to Home.
Figure 2-1 Home
★Caution
When the iData 90 is switched to Home, some applications may still run in the background.
If you do not wish the applications to run in the background, close the opened applications
through the task manager.
2.2 Status Icons
Status icons are in the status bar at the upper part of the screen and show device status
and notifications.
Table 2-1 Status icons
Sound on
Sound off
Vibration mode
Charging battery
Battery volume
The battery volume is lowor too low.
Current time

iData 90 User Manual
- 7 -
Notification that one or more emails or short messages are received
There are multiple notification icons, which are beyond the scope of display. Click it to
display remaining icons.
Reminder that one calendar event will happen
Valid connection
Invalid connection
Synchronizing
Detected that Wi-Fi network is available
Using Wi-Fi
2.3 Applications Window
Click Start. The applications window is displayed, where icons of applications are placed.
You can drag the icons of applications to sequence applications according to your habits.
Click the icon of an application to open the application.
Figure 2-2 Applications window
2.4 Icons of Applications
Icons of Applications
Table 2-2 Icons in the applications window
Icon
Name
Description
Home
Turns to the start page of the iData 90.
Settings
Manages the iData 90.
File Explorer
Organizes and manages files on the iData 90.
iScan
Scans and reads barcodes.

iData 90 User Manual
- 8 -
Icon
Name
Description
Notepad
Creates, views and edits files.
Internet Explorer
Browses web pages and WAP websites and downloads new
programs and files from the Internet.
ActiveSync
Synchronizes information between the iData 90 and the host or
Exchange Server.
Camera
Shoots photos or videos.
wpctsc
Logs in to a remote computer and uses available programs in the
remote computer through the iData 90 after starting the remote
desktop.
Google Maps
Views the geographical location of a target, obtains the satellite
map and life information, and performs GPS-based positioning and
vehicle navigation.
E-mail
Sends or receives emails and text messages.
Calendar
Views dates, tracks appointments and creates appointments.
Alarms
Views and sets time/date and sets alarms.
Pictures & Videos
Views and manages pictures, cartoons and video files.
Calculator
Performs basic arithmetic operations such as add, subtract,
multiply and divide.
Windows Media
Plays audio and video files.
Notes
Creates notes, drawings and recordings by writing or typing.
Tasks
Tracks execution of tasks.
Internet
Connects a laptop computer to the Internet through the data
connection of the iData 90.
Task Manager
Views ongoing processes and allocation of the memory and CPU
and stops processes.
Help
Views the help information about the current screen or program.
Setting Icons
Table 2-3 lists the control applications that are preinstalled on the iData 90. Select Start >
Settings. The Settings window is displayed.

iData 90 User Manual
- 9 -
Table 2-3 Setting icons in the Settings window
Icon
Name
Description
Personal tab
Buttons
Allocates keys to a program.
Owner
Information
Enters personal information onto the iData 90.
Phone
Sets call security, services, network, band and ringtone.
System tab
GPS Setting
Sets GPS and views GPS logs and satellite status.
About
Views the basic information about the iData 90, for example,
operating system version, processor type, memory, and device
information.
Encryption
Encrypts files on the memory. You can read encrypted files only on
your device.
Customer
Feedback
Submits a feedback about Windows Mobile.
Task Manager
Views the memory and CPU allocation and stops processes.
Memory
Checks memory allocation and information about the memory card.
Regional Settings
Sets the zone configurations to be used, including numbers,
currencies, date and time formats displayed on the iData 90.
Full screen Mode
Sets the screen display mode.
Remove
Programs
Removes programs installed on the iData 90.
External GPS
Sets an appropriate GPS communication port if required. If a
program needs to access GPS data or you have connected the
GPS receiver to the iData 90, thisoperation is needed.
Restore Factory
Defaults
Restores factory settings.
Managed
Programs
Lists the programs installed by the system administrator remotely.

iData 90 User Manual
- 10 -
Icon
Name
Description
Device
Information
Displays the device version, hardware and features.
Error Reporting
Enables or disables the error report function of the iData 90.
Screen
Changes the screen direction, recalibrates the screen, and
changes the text size and font.
Power
Views the battery volume and sets the interval for closing the
display after the iData 90 becomes idle in different cases.
Alarm Setting
Sets the automatic power-on and power-off time every day.
Certificates
Views the certificates installed on the iData 90.
KeyLock
Selects the mode for locking the keypad when the iData 90 is
closed.
Backlight
Sets the duration for closing the backlight when the iData 90 is
powered by a battery or external power supply and the iData 90 is
idle and adjusts the screen brightness.
Phone Record
Sets the storage location of call recordings.
Connections tab
Wi-Fi
Sets wireless network connections and customizes settings.
Wireless
Manager
Enables or disables wireless communication of the iData 90 and
customizes the WLAN and phone settings.
Domain Enroll
Registers the iData 90 as a member in the AD domain for device
management and security purposes.
USB to PC
Enables or disables enhanced network connection.
Beam
Sets the IrDAlight beam received by the iData 90.
Connections
Sets one or more modem connections such as dial-up, GPRS so
that the iData 90 can be connected to the Internet or a dedicated
local network.

iData 90 User Manual
- 11 -
2.5 Keypad Operations
The iData 90 provides two keypads: screenkeypad and physical keypad.
Using Screen Keypad
When you start an application or choose to enter text or numbers, the screen keypad is
displayed.
Figure 2-3 Screen keypad
Displaying Screen Keypad
Click anyplace where text can be entered. The screenkeypad is displayed.
Hiding Screen Keypad
In the text state, click to hide the screenkeypad.
To display the hidden screenkeypad again, click again.
Using Physical Keypad
Figure 2-4 shows the physical keypad, which has 26 keys in total. In terms of function, the
keys are divided into numeric/letter/symbolic keys, directionkeys, and scan keys.
Figure 2-4 Key layout on the physical keypad
Installing the Notification Program of Physical Keypad

iData 90 User Manual
- 12 -
MC90KEY_Notify.CAB is the notificationprogram of the physical keypad provided by Wuxi
iData Technology CompanyLtd.
1. CopyMC90KEY_Notify.CAB to My Device\Program Files\SetupNotify (if the
SetupNotify directorydoes not exist, create the directory).
2. Run MC90KEY_Notify.CAB.
3. After the MC90KEY_Notify.CAB program is installed, the iData 90 automatically
restarts.
4. Select Start > Tools and click to run the program.
After the program is run, youcansee the new icon in the status bar on the screen.
★Note
When you press Shift on the physical keypad to switch the input mode, the icon of the
physical keypad mode in the status bar also changes.
: The physical keypad is in the numeric input mode.
: The physical keypad is in the lowercase input mode.
: The physical keypad is in the uppercase input mode.
2.6 Adjusting Volume
Adjust the system volume or phone volume by clicking the icon of speaker in the
status bar.
1. Click the status bar.A drop-down list box is displayed.
2. Click the icon of speaker. The volume dialog box is displayed.
3. Click and move the scroll bar to adjust the system volume and phone volume.
Select On, Off, or Vibrate to open or close volume or enter the vibration mode.
Youcanset the system volume inthe Sounds & Notifications window byselecting Start >
Settings > Sounds & Notifications.
Figure 2-5 Speaker Figure 2-6 Volume dialog box

iData 90 User Manual
- 13 -
2.7 Date and Time
To change the date and time in the iData 90, do as follows:
1. Select Start > Settings > Clock & Alarm. The Clock & Alarm window is displayed.
2. Click Time Zone, Date, and Time to set the items.
3. Click OK to exit the window.
Youcanalso click the iconof clock at Home or the icon of alarm inthe applications window.
2.8 Setting Ringtone
To change the ringtone of the iData 90, do as follows:
1. Select Start > Settings > Sounds & Notifications. The Sounds & Notifications
window is displayed.
2. In the Sounds tab, enable or disable sound for anevent. You can also click Screen
taps and Hardware buttons to enable or disable sound.
3. In the Notifications tab, select anevent, a ringtone type, and a ringtone.
2.9 Setting Screen
To set the screen, do as follows:
1. Select Start > Settings > System > Screen.
2. In the General tab, set the screen direction to adjust the screen.
3. In the ClearType tab, set the screen font.
4. In the Text Size tab, adjust the font size.
5. Click OK to exit the window.
To adjust the screen brightness, do as follows:
1. Select Start > Settings > System > Backlight.
2. In the Battery Power tab, move the sliding block to adjust the screen brightness and
select the Turn off backlight check box to set the duration for closing the screen when
the screenis idle.
3. In the External Power tab, move the sliding block to adjust the screen brightness and
select the Turn off backlight check box to set the duration for closing the screen when
the screenis idle.
4. Click OK to exit the window.

iData 90 User Manual
- 14 -
3 E-mail
You can send and receive Emails through the Email account your often use by using the
iData 90.
Setting Email Account
1. Select Start > Tools > Email.
2. Click Setup E-mail and enter your Email account and password.
3. Select Try to get e-mail settings automatically from the Internet and click Next.
4. Click Next to complete the setting and download Emails.
5. Enter your name and click Next.
6. Enter a user name and click Next.
7. Select the time for Automatic Send&Receive and click Finish.
★Caution
Before setting an Email connection, ensure that the network connection is correct. If the
setting of your Email account cannot be completed automatically, you can enter your Email
account setting manually. Before entering the Email account setting, contact your Email
service provider to obtainthe correct Email account setting. For example, you need to know
whether the type of your Email account is POP3 or IMAP.
Deleting an Email Account
1. Select Start > Tools > Email.
2. Select an Email account.
3. Select Menu > Delete.
4. Click Yes.
Creating and Sending an Email
1. Select Start > Tools > Email.
2. Select an Email account and click it to open the account.
3. Select Menu > New.
4. Enter the address of the recipient and the subject and edit the content.
5. Click Send .
Receiving and Opening Email
1. Select Start > Tools > Email.
2. Select an Email account and open the Email box.
3. Click in the upper left corner and select Inbox.
4. Click Email to openand read the Email.

iData 90 User Manual
- 15 -
Deleting an Email
1. Select Start > Tools > Email.
2. Select anEmail account and open the Email box.
3. Click in the upper left corner and select Inbox.
4. Select the Email to be deleted.
5. Click inthe lower left part.
6. Click Yes.

iData 90 User Manual
- 16 -
4 Connection and Synchronization
4.1.1 Wi-Fi Network Connection
Youcan access the Internet on the iData 90 by using Wi-Fi.
When you connect to the Internet using Wi-Fi, you need to search and connect to an
available Wi-Fi network before youcanaccess the Internet.
Enabling and Setting Wi-Fi
1. At Home, click Wireless Manager.
2. Click Wi-Fi to enable Wi-Fi.
3. Select Menu > Wi-Fi Settings.
4. Confirm the IP address. In the Network Adapters tab, select Marvell SDIO8686
Wireless Card and click Edit. The IP Address setting page is displayed. Ask your
network administrator which IP address should be entered. If IP addresses are assigned
over DHCP, select Use server-assigned IP address.
Figure 4-3 Wi-Fi connection setting
5. After setting the IP address,click the Wireless tab. The iData 90 searches for and
displays available Wi-Fi networks, whichare open or secure networks.
6. Select one Wi-Fi network to connect to the network. If you intend to connect to a secure
Wi-Fi network, youare required to enter the password of the network.After you connect
to the network, the network displays Connected.
★Caution
The iData 90 memorizes the connected Wi-Fi network. Next time when you need to access
and connect to the Wi-Fi network, the iData 90 automaticallyconnects to the network.

iData 90 User Manual
- 17 -
4.1.2 iData Wi-Fi Optimization
The Wi-Fi optimization tool helps users adjust different values based on the usage
environment to achieve the optimal setting.
To open the iData Wi-Fi optimization tool iDataWiFiConfig, do as follows:
1. Install the iScanof the latest version.
2. Select Program Files -> iData, open the Addons folder, and open the iDataWiFiConfig
tool.
Figure 4-4 Path for storing the iDataWiFiConfig tool
Parameter settings
1. It is recommended to retain the value of Associate Retry Times.
2. It is recommended to retain the value of Power mode.
3. The value of Roaming mode ranges from 1 to 4. Roaming mode must be set to 4.
4. The value of RoamSignalStrengthThreshold ranges from -100 to 0.According to the
actual usage environment, set the optimal value. The empirical value ranges from -80 to
-60 (dB).
5. The value of Roam Diff RSSI Threshold ranges from 1 to 50. According to the actual
usage environment, set the optimal value. The empirical value ranges from 10 to 15
(dB).
Table of contents
Other I-Data PDA manuals