I WARM MCS 300 User manual

Mobile Comfort System
Technical Certificate. User Manual
Thermostat MCS 300

CONTENTS:
Introduction................................................................................................... 3
1.
Control and indication.................................................................... 8
2.
Installation guide.................................................................................9
Floor temperature sensor installation...........................................................9
Thermostat mounting................................................................................. 11
Thermostat installation............................................................................... 13
3.
Technical specification..................................................................... 16
4.
Your safety.................................................................................................17
5.
arranty obligations.........................................................................18
arranty Certificate..................................................................................19
РЭА.00065.01П(ИП)
РОСС RU.AB87.B03861
Good for printing 16.07.2013.

Introduction
3
INTRO UCTION
Thermostat MCS 300 is a brand new i-Fi device, which will make your
life
even more warm, cozy and comfortable. MCS 300 is designed to
control
indoor electric heating systems (heating mats, film heaters or
heating
cable sections). Thermostat automatically maintains a preset
temperature of the heated surface using readings from the floor
temperature sensor (included in the delivery set).
Remote control is carried out directly by the i-Fi network of
the
smartphone or through the router.
There is a possibility of connecting several (from 1 to 32) thermostats
MCS 300 to your home network.
Thermostat MCS 300 is mounted into the wall in close proximity from
the installation wire of the heating cable (fig. 3).
Installation of a thermostat of other series or producers instead of
used thermostats may be allowed. The parameters of the used
temperature sensor must match the sensor parameters of the
thermostat
MCS 300.

4Introduction
To begin the thermostat operation it is required to perform a
few
simple procedures:
1.
Install thermostat MCS 300 as described in the installation guide
below.

Introduction
5
2.
Download the free app for your iPhone in AppStore
by
entering MCS 300 in search. You may also find a reference to this app
on
the website www.ses-pro.ru or on the QR code, printed in the end
of
the manual on its cover.

6Introduction
3.
Connect the MCS 300 thermostat to your home i-Fi* network by
PS or manually.
Smartphone MCS thermostat
i-Fi router
for remote access via Internet
* — If you do not have a i-Fi router, you can control the thermostat
MCS 300 directly. In that case the thermostat acts as an access point.
Control would be possible only with one thermostat at a time.
Thermostat is ready for operation. By running the application you will
have full access to your warm floor system. You may set operation
modes, heating temperature, change all settings of your thermostat.
You can download the detailed manual on thermostat operation on
our
website http://www.ses-pro.ru/production/wi-fi-thermostats/mcs-
300.

Introduction
7
elivery set of the thermostat MCS 300 includes:
1.
Thermostat MCS 300 1 pcs.
2.
Remote floor temperature sensor TST02
1 pcs.
3.
Technical Certificate, Installation Manual
1 pcs.
4.
Packing box 1 pcs.
Fig. 1. Outside view of MCS 300 thermostat

CONTROLS AN IN ICATION
1
The front cover does not have any LED signals or buttons (see fig. 1). If
the
cover is open, as it is shown on fig. 6, there are LED signals and
control
buttons under it (see fig. 2).
1.
«green» — indication of the power supply and
presence
of i-Fi connection
2. «red» — indication of heating turned on and sensor failure
3.
«default» — thermostat switch ON/OFF, control of the modes of
the
network connection
4.
« PS» — setting PS connection.
1
3
2
4

Introduction
9
Fig. 2. Thermostat MCS 300 with o ened front cover
8 Controls and indication

10
Installation
guide
INSTALLATION GUI E
2
Installation of the floor temperature
sensor
Mounting the floor temperature sensor is carried out at the stage of the
heating element installation. The floor temperature sensor should
be placed inside the corrugated tube (see fig. 3), the end of the tube
should be closed with sealing blank cover to prevent concrete mixture
or
tile adhesive glue penetration at the warm floor system
installation.
The corrugated tube with the sensor inside should be
placed at the
same level as the heating cable, between the loops at
equal distances
from them. The other end of the corrugated tube with
the sensor
installation wire inside should be laid in the prepared groove
(chase) in
the floor and lead to the installation place of the
thermostat or the
junction box. Excess of the tube and connection
wire should be cut as
applicable.
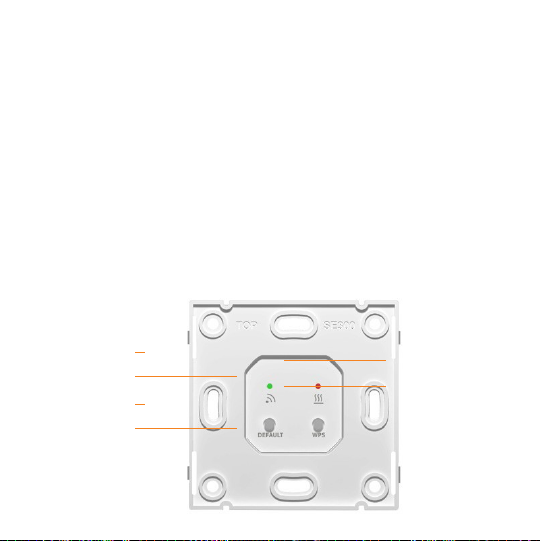
De-energize the wiring system before you connect the
thermostat or
disconnect it to check or replace.
A qualified electrician is to perform the electrical connections
and power networking.
The warranty does not cover any thermostat defects caused
by
inadequate installation.
IMPORTANT Please read this manual carefully before you start
operation.

50–60
cm
Installation guide 9
Fig 3. Thermostat and heating cable section installation
Tools and materials necessary for installation:
1.
Corrugated plastic tube with the diameter at least 16 mm
(length
of the tube depends on the place where the module will be installed);
2.
Standard plastic junction box;
3.
Flat blade and crosshead screwdrivers;
4.
Phase indicator to locate voltage wire.

12
Installation
guide
Thermostat mounting
Preparation of electrical
connections
Install junction box or terminal box. Approach the power line cables,
installation wires of the heating mat or section and floor t emperature
sensor installation wire to the junction box. Apply voltage to the
power line cable, determine phase and neutral cores by the phase
indicator and mark them accordingly.
Disconnect
supply
voltage.
Please carry out all connecting procedures
only under disconnected power supply. Connect all wires to the device
screw terminals.
If you have a two-conductor supply network (without an earthing
conductor), connection diagram is presented on fig. 4. The cold lead
screen wire of the heating section is connected to the neutral (N)
conductor of the power network, to terminal 5.
If you have a three-conductor supply network (with a separate
earthing conductor), the connection diagram is presented on fig. 5.
The cold lead screen wire of the heating section is connected to the
earthing conductor of the power network via an external screw terminal
(included in the delivery kit).

Installation guide 11
temperature
sensor
N L
220VA
C
temperature
sensor
N L
220VAC
Single-core heating cable Double-core heating cable
Fig. 4. Connection diagram of heating section and
mats
to two-conductor ower network
network
earthing
conductor network
earthing
conductor
temperature
sensor
N L
220VA
C
external
screw terminal
temperature
sensor
N L
220VAC
external
screw terminal
Single-core heating
cable
Double-core heating cable

14
Installation
guide
Fig. 5. Connection diagram of heating sections and
mats
to three-conductor ower network

Installation guide
13
Thermostat
installation
The thermostat needs to be disassembled before installation. Remove
the front cover of the device. To do so, unlock the cover by inserting a
flat blade screwdriver into the locking grooves located on both sides
of the front cover (fig. 6). Remove the cover (fig. 7).
Locking
groove Locking
groove Locking
groove
Fig. 6. Front cover removing

14
Installation
guide
Fig. 7. Thermostat without cover

ТЕХНИЧЕСКИЕ ХАРАКТЕРИСТИКИ
Installation guide
15
Mount the device into the junction box and fix it with at least two
screws located along its horizontal axis (fig. 8).
Assembly of the thermostat is carried out in reverse order. Carefully
install the front cover of the thermostat back to its place, pressing by
hand till both clamps click. Make sure that the front cover is securely
fixed.
Front
cover Fixing clamp
Fixing
clamp
Juncon box
Fig. 8. Assembly/disassembly diagram of thermostat

16
Installation
guide
Thermostat MCS 300 has a removable frame. If it is necessary you may
remove it and install the thermostat into the junction box without the
frame. You may also use standard stopper plugs of some
manufacturers of electric equipment. They may be installed instead of
the MCS 300
frame and attached to the terminal box by screws.
To remove the frame of the device press the four fixing clamps,
located on the upper and bottom sides of the thermostat, with the flat
blade screwdriver (fig. 9) pulling the frame out.
Clam s
Clam s
Fig. 9. Dismantling the removable frame

Installation guide
17
TECHNICAL SPECIFICATIONS
3
THERMO
ST
AT MCS
Suppl
y
220 V
Maxi
mum
16 А
P we
r
2 W
Weig
ht
100 g
Dime
nsi n
83×83
×48
St re
set+n
12
mont
IP
ra+ng
IP21
Pr te
c+ n
II
Fl r
temp
TST02
Sens
r
2 m
Opera
+ng
from
+5 С
Permi
ssible
80 %
Maint
ained
от +5
С до
Fact
+28
16 Technical specifications

YOUR SAFETY
4
All operations for installation and connection of the thermostat
must be carried out by a qualified electrician who has carefuly
studied
this manual!
Do not attempt to carry out the procedures on installation and repair
of the thermostat without disconnecting the power supply.
Do not attempt to make any changes in the design of the
thermostat.
Do not expose the thermostat to mechanicals impacts
(shocks, falls
and etc.).
Do not expose the thermostat to water.
Do not expose any parts of the thermostat to any liquids containing
acids, alkalis, oils and etc.
Use dry, soft pieces of clothes to clean the thermostat.
hile operating and maintaining it is necessary to follow the require-
ments of GOST 12.3.019-80, “Regulations for Operation of Consumer
Elec-
trical Installations” and “Safety Rules for Operation of Customers’
Electric
Installations”.
Breach of any stated requirements may result in the failure of the
thermostat. In this case the warranty obligations are not
supported.
Table of contents
Other I WARM Thermostat manuals
Popular Thermostat manuals by other brands

REMKO
REMKO ATR-4 operating instructions

Neptronic
Neptronic TMA54-EXT1 Specification & installation instructions

Sinope
Sinope TH1500WF installation guide

Honeywell Home
Honeywell Home Resideo T5+ RCHT8612WF2005 Quick install guide

Carrier
Carrier Aquazone 50QE900 owner's manual

White Rodgers
White Rodgers 1F62-21 Installation and operating manual