IBEA Mulching User manual

Mulching
MANUALE D’ISTRUZIONE
OWNER’S MANUAL
MANUEL D’INSTRUCTION
GEBRAUCHSANWEISUNG
BRUKSANVISNING

2
ITALIANO
Carocliente,laringraziamovivamenteperaversceltounprodottodiqualitàdelladittaIBEA.
Per un corretto impiego della macchina e per evitare incidenti, non iniziate il lavoro senza aver letto
questomanualeconattenzione.Troveretesuquestomanuale le spiegazioni di funzionamento deivari
componentieleistruzioniper i necessari controlli e per la manutenzione.
N.B. : Lacasaproduttricesiriservalapossibilitàdiapportareeventualimodificheinqualsiasimomen-
toesenza preavviso.
(INDICE PAG .3)
INTRODUZIONE
INTRODUCTION
Dear customer, thank you very much for having chosen a quality product of the company IBEA.
Forproperuse of brush-saws and to avoidaccidents,donotstartwork without having read the manual
carefully.You’llfind this guide on the explanations of operation of variouscomponentsand instructions
forthenecessary inspections andmaintenance.
N.B. : Themanufacturerreservesthe right to make changesatanytimewithout notice.
(CONTENTS PAG .12)
Cher client, je vous remercie beaucoup d’avoir choisi un produit de qualité de la société IBEA.
Pourunbon usage de la brosse-sciesetpouréviterles accidents, il ne fautpascommenceràtravailler
sansavoirlulemanuelattentivement.Vous trouverezce guidesur lesexplications dufonctionnement de
diverscomposantsetdesinstructionspourlesinspectionsnécessairesetdel’entretien.
N.B. : Le fabricant se réservele droit d’apporter deschangements à tout moment sanspréavis.
(INDEX PAG .21)
INTRODUCTION
GeehrterKunde,wir danken Ihnen, dassSieeinQualitätsproduktderFirma IBEA gewählthaben.
ZurkorrektenVerwendung derHeckenschereundzurVermeidungvonUnfällen muss vor demBeginn
der Arbeiten diese Gebrauchsanweisung aufmerksam durchgelesen werden. In dieser
Gebrauchsanweisung finden Sie die Erklärungen für den Betrieb der verschiedenen Bauteile und die
Anweisungenfür dieerforderlichenKontrollenund Wartungsarbeiten.
ANMERKUNG: Der Hersteller behält sich das Rech vor, jederzeit und ohne Vorankündigungen
irgendwelcheÄnderungenvorzunehmen.
(INHALTSVERZEICHNIS S.30)
EINLEITUNG
INLEDNING
BästeKund,tack för att Du har valtenkvalitetsproduktfrånföretagetIBEA.
Förattkunnaanvända busktrimmernpåettkorrektsätt ochförhindraolyckorärdet viktigtattdenintetas
i bruk förrän du noggrant har läst igenom denna handbok. I handboken finns förklaringar till de olika
komponenternasfunktioner ochinstruktionernaförde nödvändigakontrollernaoch förunderhållet.
OBS!Tillverkarenförbehållersigrättenattgöraändringarpåproduktenutanattfrångångtillgånganpassa
innehålleti handboken.
(INNEHÅLLSFÖRTECKNING SIDA.39)

ITALIANO
3
INDICE
1. Spiegazione simboli.....................................................................Pag. 3
2. Per la vostra sicurezza........................................................................3
3. Descrizione delle parti.......................................................................4-5
4. Messa in funzione...............................................................................6
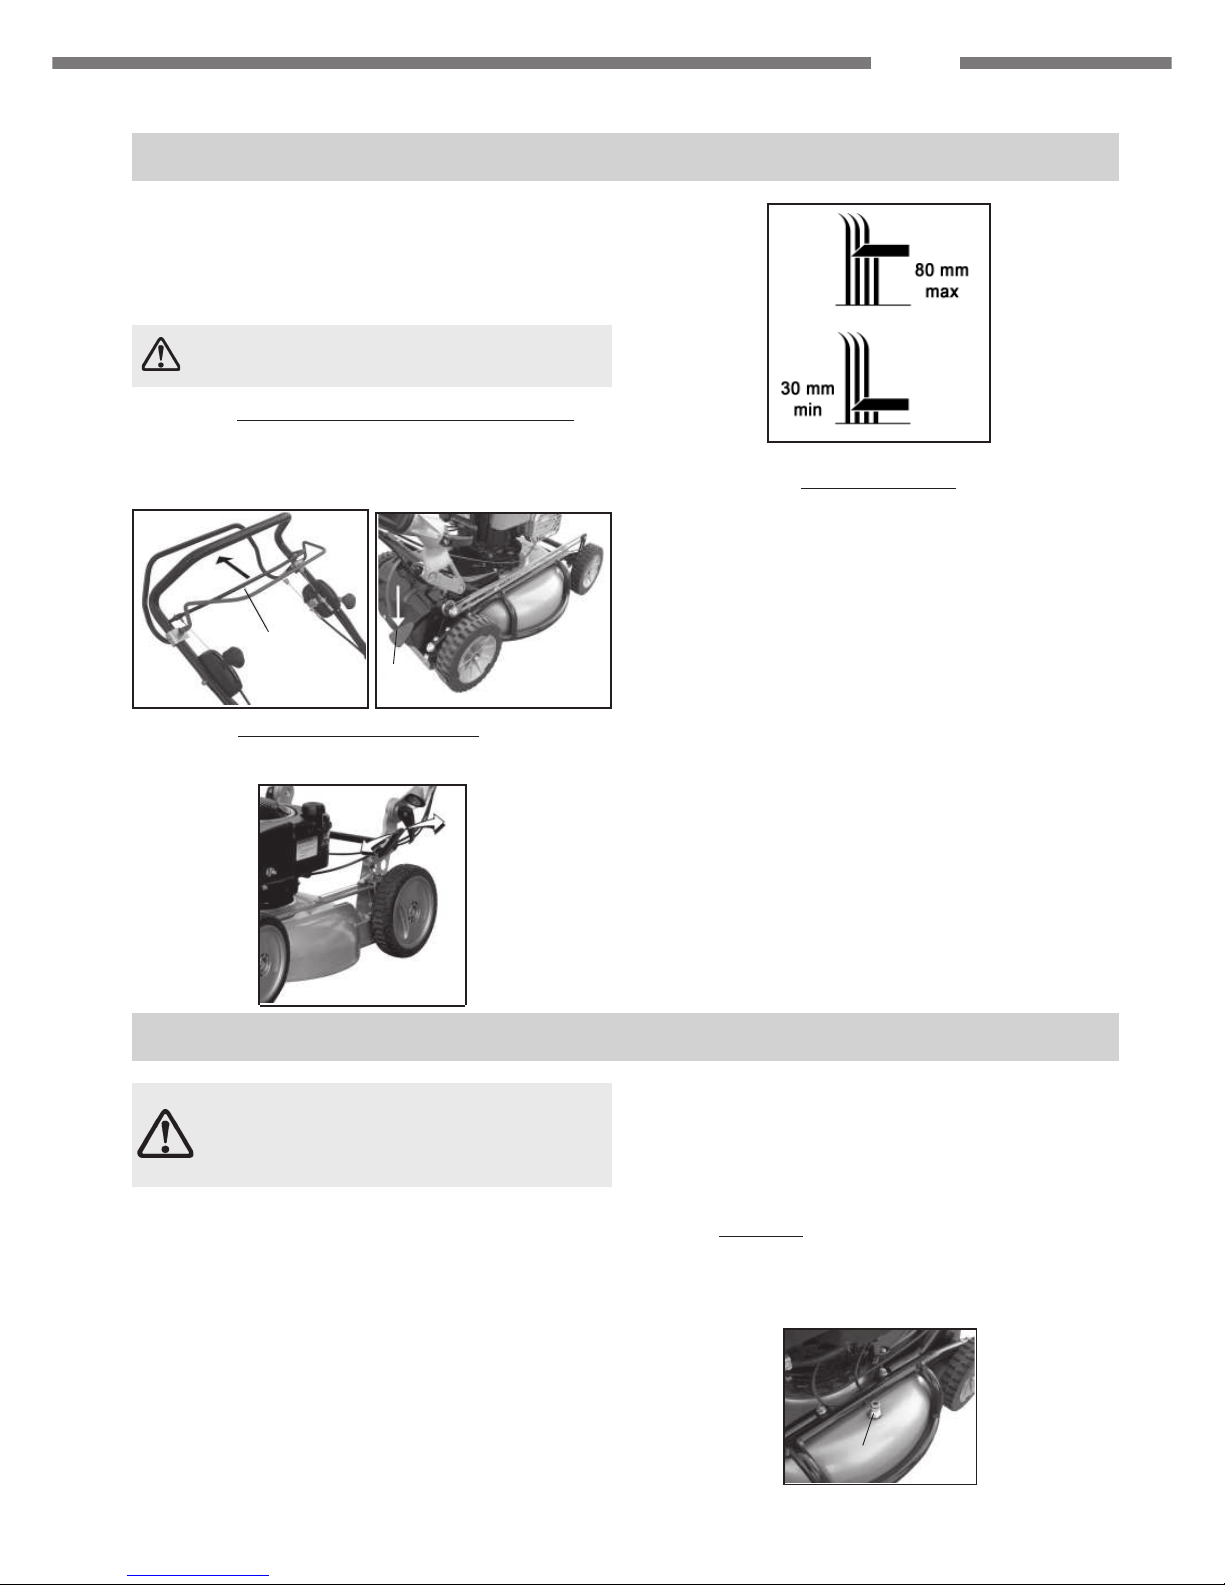
5. Regolazione altezza di taglio................................................................7
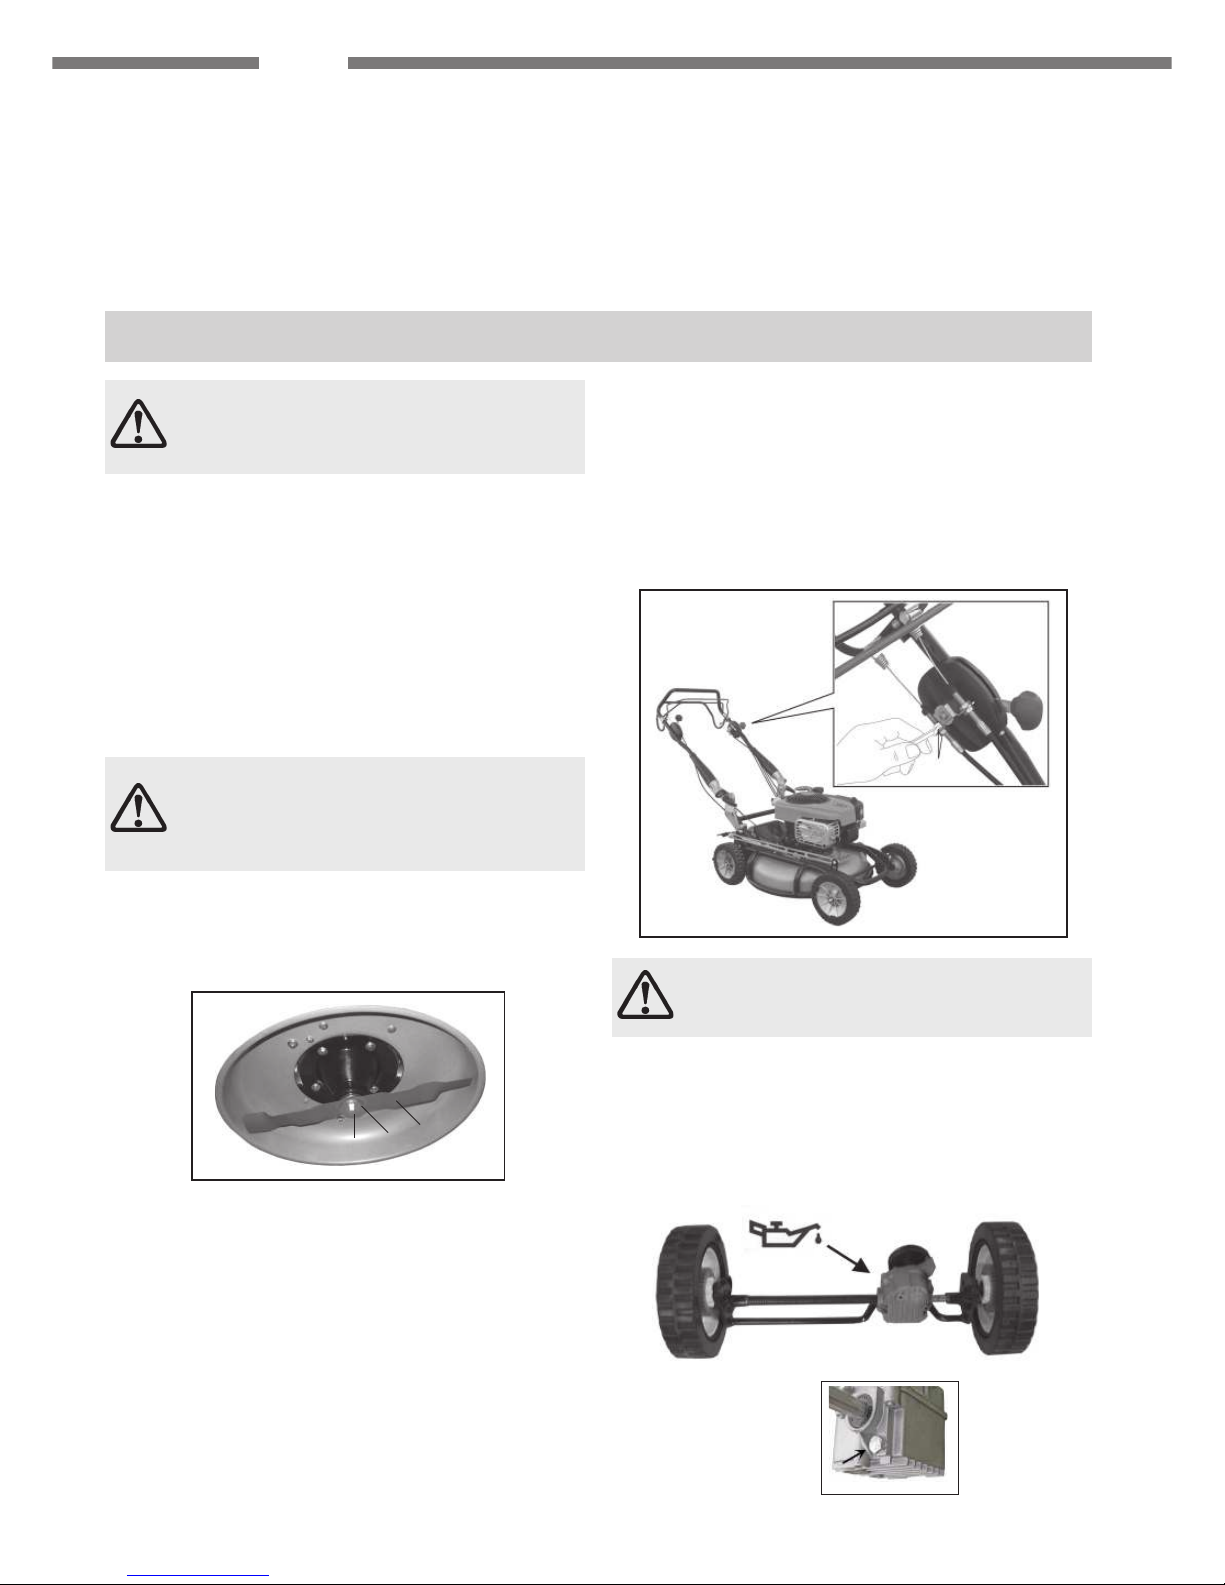
6. Manutenzione.....................................................................................7
7. Controlli e regolazioni..........................................................................8
8. Immagazzinamento invernale................................................................9
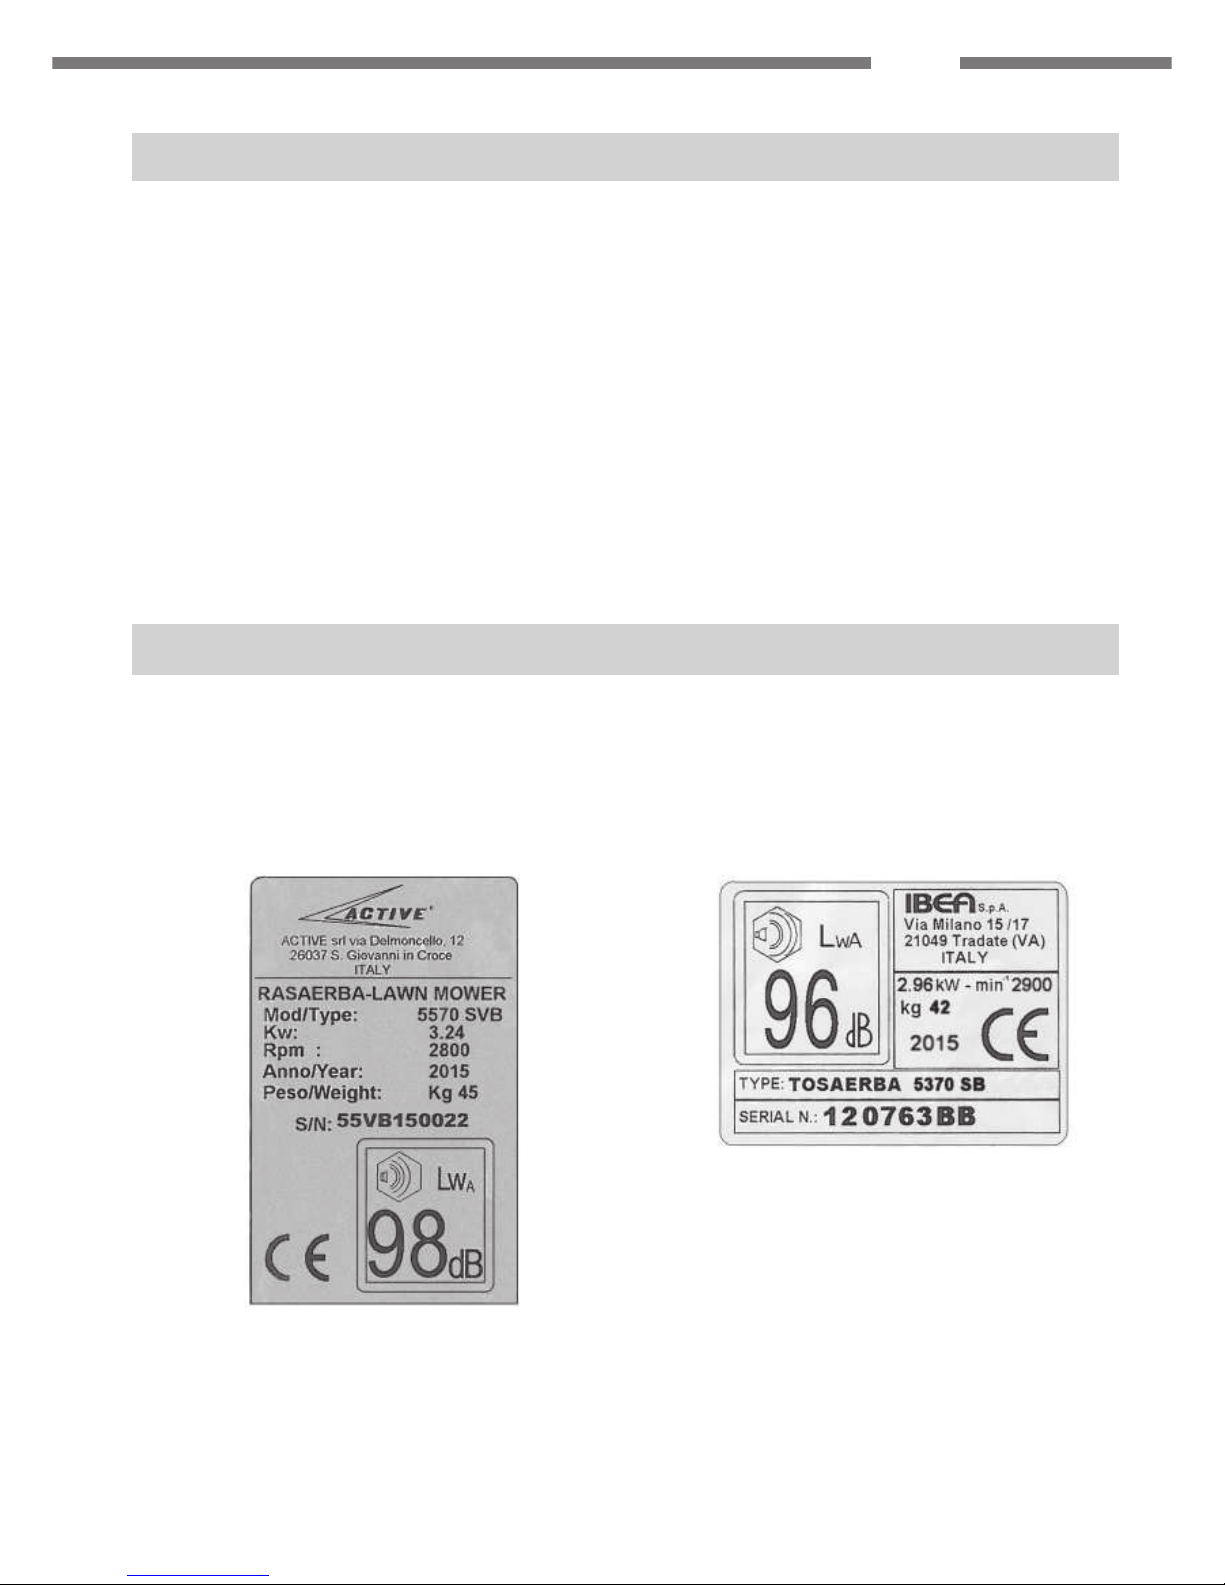
9. Etichetta di riconoscimento..................................................................9
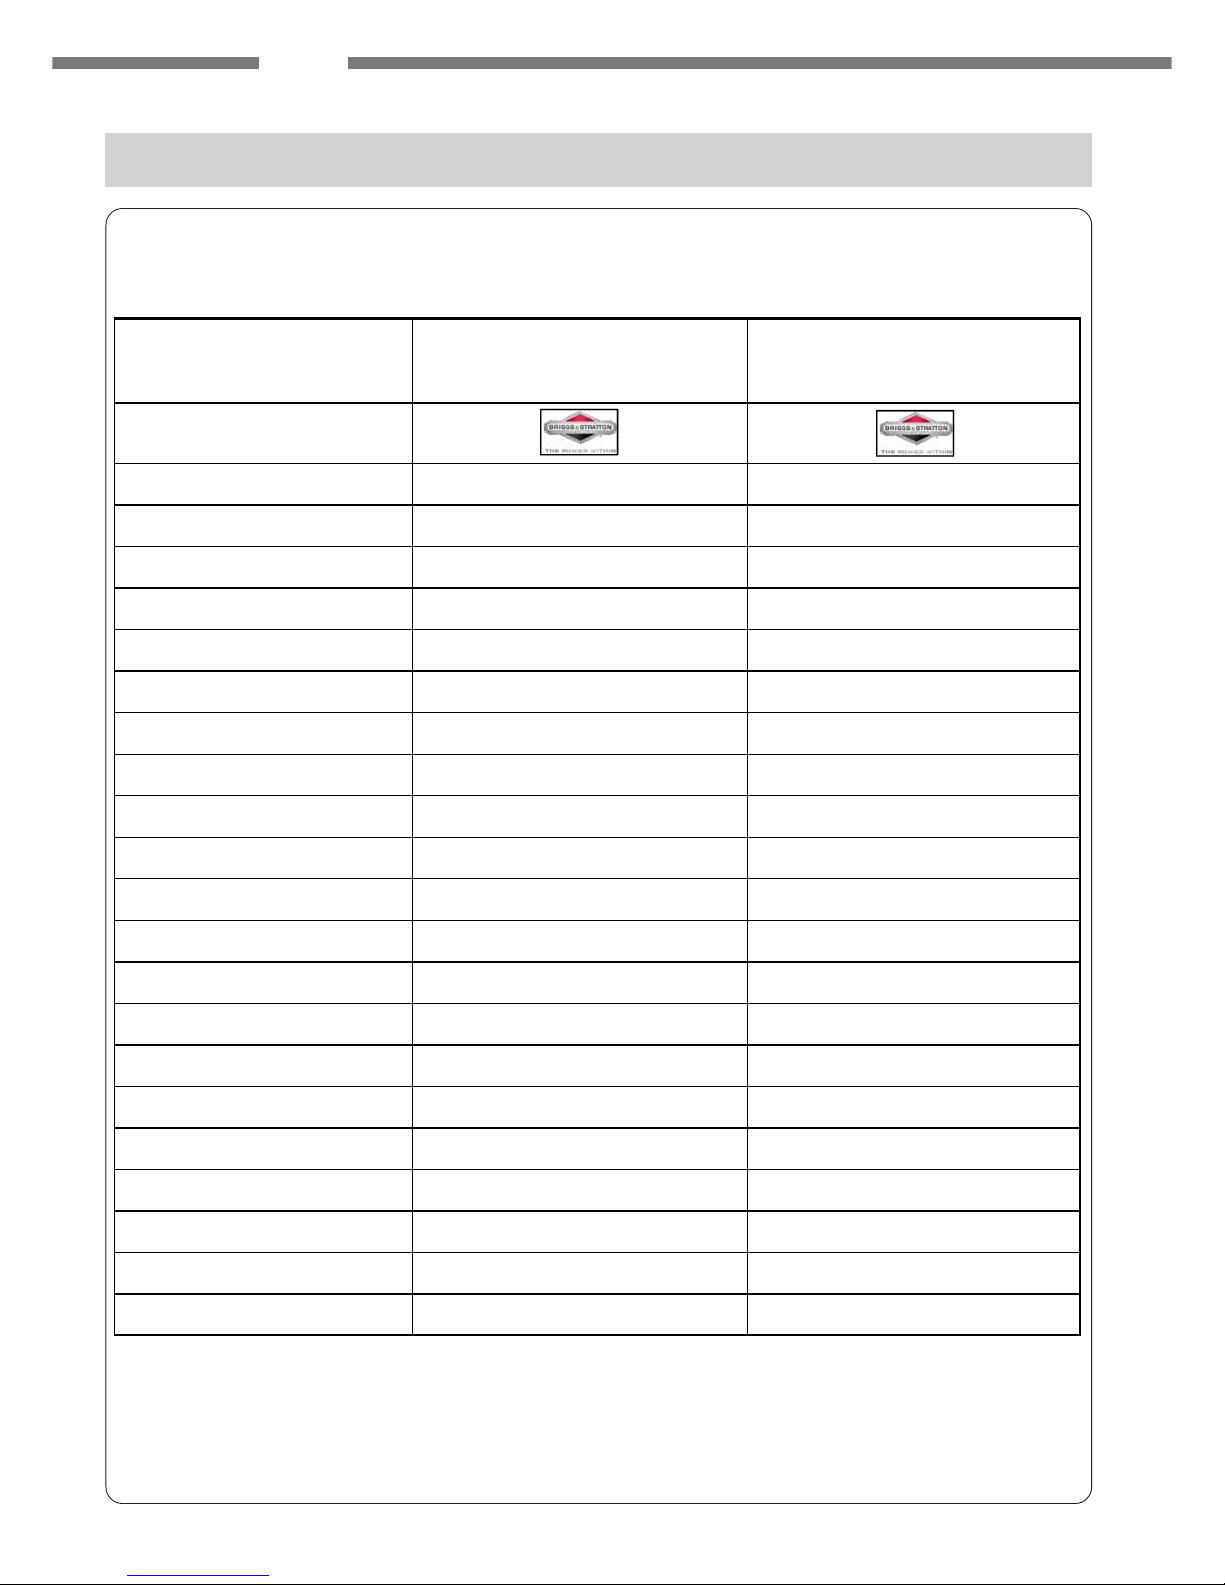
10. Dati tecnici.......................................................................................10
11. Dichiarazione di conformità............................................................11-12
12. Certificato di garanzia........................................................................13
1. SPIEGAZIONE SIMBOLI
Avvertenza,pericoloedattenzione.
Leggereil manuale diusoe manutenzione
prima di utilizzare questa macchina.
2. PER LA VOSTRA SICUREZZA
Mantenere alla distanza di sicurezza le
personeestranee.
Nonfumare duranteil rifornimentodi
carburante.
Utilizzare occhiali di sicurezza.
Perogni intervento di manutenzione,ricor-
datevi di spegnere il motore e di staccare il
connettoredella candela.
8- Nonfate funzionare ilrasaerba in ambientichiusi. I gasdi
scarico emessi dal motore in funzione sono velenosi se re-
spirati, possono essere asfissianti e quindi mortali;
9- Non regolate l’altezza di taglio quando il motore è in fun-
zione;
ATTENZIONE!
10- Quando il motore è acceso, non metter le mani o i piedi
sottoil rasaerba, lalama è inmovimento quando ilmotoreè
infunzione;
11- Tagliate il prato solo quando le condizioni di luce sono
buone;
12-Noncorrete. Nonfateviinfluenzare dallapremuradi finire
illavoro,tenete un’andaturaadattaaltipodi lavorochedove-
tesvolgere;
13-NonUsateilrasaerba quandonon èinbuonecondizioni.
Provvedeteallariparazioneprimadell’uso;
14- Nonpermettere l’usodel vostro rasaerbaad alcunaper-
sonase prima non gli avetefornito delle precise istruzioni e
nongli avetefattoleggere questomanuale;
15-Nonspingetemaiilrasaerbaall’indietro (versol’operato-
re);
16-Quandodovetetagliare suterreniin pendenzaprocedete
ditraverso mai dall’alto versoil basso o viceversa.Prestate
particolare attenzione quando cambiate direzione. Non ta-
gliate su terreni molto scoscesi;
17- Spegnetesempre ilmotorequando non tagliateoquan-
dodoveteattraversareun marciapiede,unvialeounastrada;
18- Nelcaso urtiate unostacolo, arrestateilmotore, stacca-
te il cavo candela e controllate se si sia verificato qualche
danno.Riparatel’eventualedannoprima diusarenuovamen-
teil rasaerba, qualora ildanno fosse grave rivolgetevial più
vicinorivenditoreIBEA.
Leggereattentamentequeste istruzioniedaccertarsi dicom-
prenderle prima di far funzionare I’unità.Attenersi a tutte le
avvertenzeedalleistruzionidi sicurezza.Conservarequesto
manualea titolo difuturo riferimento.
1- Adattate la velocità alle condizioni dell’erba. Regolate la
velocitàdel motoreal massimoquando l’erbaè bassaoppu-
re al minimo quando è alta e fitta ;
2- L’uso del rasaerbaè proibito allepersone con menodi 16
anni;
3-L’operatoreè responsabileversoterzi nellazonadilavoro.
Assicurarsi che non ci siano bambini o animali domestici
nellazona dilavoro;
4-Primadiiniziareillavoroèindispensabileispezionarel’area
chedeveessere lavorataerimuoveretuttiisassi,leeventua-
lilattine od ogni altrooggettoestraneo che si trovain quella
zona. Controllare inoltre dove sono sistemati eventuali
irrigatoriod ogni altroostacolo nascosto chepotrebbe crea-
re situazioni di pericolo durante il taglio;
5- Utilizzate delle robuste scarpe chiuse durante il taglio,
non usare sandali e non tagliate a piedi nudi. Usate scarpe
cheabbiano unabuona aderenza anchequando ilterreno è
bagnato,usate inoltre guanti dalavoro per avere unapresa
più sicura;
6- Assicurarsi prima di iniziare la falciatura che la lama sia
benfissata e le protezionidi sicurezza siano montate.Qua-
loravenganoriscontrati deidifetti, provvedereallasostituzio-
neo alla riparazione;
7- Nonaggiungete carburantequando vitrovatein unlocale
chiuso,quando ilmotoreè ancorain moto oquando ilmoto-
reè ancora caldo.Non fumate durantele operazioni dirifor-
nimentodel carburante;

4
ITALIANO
3. DESCRIZIONE DELLE PARTI
1. Manigliafrenomotore
2. Leva comando gas
3. Motore
4. Manigliasemovenza
5. Leva variatore di velocità
6. Attacco rapido acqua
7. Levasgancio manubrio
8. Telaio
9. Ruota
10. Manigliaregolazionealtezzaditaglio
11. Antivibrante
12. Scocca in acciaio
13. Serbatoio benzina
14. Serbatoio olio
15. Lama
16. Dischi ad alto coefficiente di attrito
17. Cono paracolpi in lamiera
18. Pedaleregolazione altezza di taglio
5570 SVB

ITALIANO
5
5370 SB
1. Manigliafrenomotore
2. Impugnaturaavviamento
3. Motore
4. Manigliasemovenza
5. Antivibrante
6. Levasgancio manubrio
7. Leva regolazione altezza di taglio
8. Ruota
9. Serbatoio benzina
10. Serbatoio olio
11. Scocca in alluminio

6
ITALIANO
4. MESSA IN FUNZIONE
.
.
a -
b -
c -
ATTENZIONE ! La lamaentra in funzionequando si
avviail motore.
ATTENZIONE ! L’interventoper variare lavelocitàdi
avanzamento deve essere eseguita solo a motore
funzionante.
ATTENZIONE ! La lama gireràancoraper max 3
secondi.
Controlli prima dell’avviamento
Prima di ogni accensione controllate i seguenti punti e se
necessarioprovvedete allamanutenzione richiesta.
Controllate il livello dell’olio nel motore, se necessario
provvedeteall’aggiuntafacendoattenzione anonsupera-
reil livello indicato(vedere il librettoistruzioni del motore
stesso);
Controllatel’altezzaditaglioimpostata eregolatela come
desiderato(vedereil capitoloseguente“Regolazionedel-
l’altezza di taglio”.
Avviamento del motore
Effettuatele operazioni di messa apunto, si proceda all’av-
viamentodel motorenelseguente modo:
Azionatelamaniglia frenomotore(1)perpermetterel’av-
viamentodel motore;
Posizionarelaleva acceleratore(2) nellaposizioneMAX
(solo per il modello 5570 SVB);
Mantenere premuta la maniglia freno motore (1) durante il
funzionamento, al rilascio della stessa, il motore si ferma.
Perulteriori chiarimentisiraccomanda laconsultazione del
libretto d’istruzione del motore stesso.
Per innestare la trazione, spingete la maniglia (4) verso il
manubrio;perarrestare l’avanzamentoèsufficiente lasciare
la maniglia stessa. Per il modello 5570 SVB, è possibile
variare la velocità di avanzamento agendo sulla leva(5). Il
rasaerbapuò esserespinto inavanti eindietroanche quan-
do la trazione non è inserita.
Arresto del motore
Ilmotore ela lamasiarrestano rilasciandola manigliafreno
(1).
Impugnarelamaniglia dell’avviamento(3)e tirarelafune
senza sforzo sino ad avvertire la resistenza provocata
dallacompressione, rilasciare lamaniglia stessa edare
quindiuno strappoenergetico.
1
2
3
1
4
5

ITALIANO
7
5. REGOLAZIONE ALTEZZADI TAGLIO
Procedure per il taglio
Adattatela velocità allecondizioni dell’erba. Regolatela ve-
locitàdel motore al massimo quandol’erba è bassa oppure
al minimo quando l’erba è alta e fitta.
Regolazione altezza di taglio
Fermatesempre ilmotore e attendeteche lalama
siacompletamente arrestata.
Mod. 5570 :Altezza di taglio centralizzata con pedale.
Per regolare l’altezza di taglio, premere la maniglia (10) e
tramite il pedale (13) scegliere una delle 5 posizioni predi-
sposte.Se la maniglia (10)viene azionata senza premereil
pedale, si raggiunge subito la MAX altezza di taglio. Posizioni di taglio:
1= 30 mm 4 = 60 mm
2= 40 mm 5= 70 mm
3= 50 mm 6= 80 mm
Consigli per il taglio
I risultati migliori si ottengono quando si taglia non più di un
terzodell’altezza dell’erba.
Quandol’erba è alta,usate la posizioneditaglio più altaper
il primo taglio. Se volete tagliare l’erba più bassa, ripassate
con una posizione di taglio più bassa.
Setagliateadunlivello troppobasso l’erbadovrà impegnare
piùenergiaperlosviluppodinuovefoglieinveced’irrobustirsi,
e sarà più soggetta alla possibilità di bruciare in caso di
siccità.
Al contrario, se lasciate che l’erba cresca troppo, la parte
inferiores’indebolirà eingiallirà.
ATTENZIONE !
Perogni interventodi manutenzione,ricordatevi di
spegnereil motoree distaccare ilconnettoredella
candeladi accensione.
6. MANUTENZIONE
Perquanto riguarda il motoreleggere attentamente il li-
bretto di uso e manutenzione allegato alla macchina;
Perridurre il pericolod’incendio,fate in modoche il mo-
toresia pulito dall’erba,dalle foglieoda eventualegras-
so di olio;
Per il mod.5570, attraverso l’attacco rapido dell’acqua
(6) tenere pulito la scocca interna:
• Collegare il tubo dell’acqua all’attacco rapido (6);
• Accendere il motore;
• Aprire il rubinetto dell’acqua.
d -
Controllateaintervallifrequentila lamae leviti chefissa-
no il motore;
Controllate che tutti i dadi e le viti siano strette in modo
daavereil rasaerbasempre incondizioniottimalidilavo-
ro;
Usate solo parti di ricambio originali.
Nonimmagazzinate ilrasaerbain unluogochiuso conil
serbatoiopieno dibenzina. Lasciate raffreddareil moto-
redopol’uso in un luogo aperto.
a -
b -
c -
e -
f -
6
10
13
Mod. 5370 : Altezza di taglio centralizzata.
Perregolare l’altezzadi taglio,agiresulla manigliacentraliz-
zata e scegliere una delle 6 posizioni predisposte.

8
ITALIANO
ATTENZIONE !
Per ogni intervento di manutenzione, ricordatevi
di spegnere il motore e di staccare il connettore
dellacandela di accensione.
ATTENZIONE ! L’usura eccessivadella lama può
portarealla formazione diprofondecrepe ed aldi-
stacco di alcuni pezzi della stessa che possono
creareseriopericoloall’operatorestesso edai pre-
senti nella zona di lavoro.
ATTENZIONE !
Un eccessivo carico sul cavo può provocare la
rotturadella trasmissione.
OLIO MOBILFLUID 424 / API GL 4
45 ml = 500 h
7. CONTROLLI E REGOLAZIONI
Controllo - Smontaggio e affilatura della lama
Fermate il motore. Staccate il cavo della candela per
evitareavviamentiimprovvisi enon volutidelmotore;
Piegate il rasaerba sul lato opposto al filtro per evitare
problemid’ingolfamento;
Controllo: esaminate con cura il grado di affilatura e di
usuradella lama, specialmente incorrispondenza delle
pieghe;
Poichè la sabbia o altro materiale possono essere cau-
sadi usura,siconsiglia dicontrollarefrequentemente la
lama. Se si notano delle anomalie, si deve provvedere
alla sostituzione della lama.
a -
b -
c -
d -
Controllo: impugnateenergicamenteunterminaledella
lama (per evitare tagli si consiglia d’indossare i guanti),
svitare il bullone (7), togliere la rondella (8) e quindi la
lama(9);
Affilatura: affilate la lama se i taglienti sono deteriorati
e la lama è in buone condizioni. Utilizzate una mola per
l’affilaturae controllate che,dopo questa operazione,la
lamasia ancora bilanciata. Se cosìnon fosse, si avran-
nodelle vibrazionieccessive. Prestateparticolare atten-
zioneperevitare ditagliarvi.Per qualsiasidubbiorivolge-
teviadun centro assistenza IBEA;
Montate la lama (9) centrandola sul supporto, posizio-
natelarondella (8) e stringete il bullone (7).
(Coppiadi serraggio =55 Nm)
e -
f -
g -
Regolazione cavo semovenza
Registareil cavo innesto semovenzaalprimo utilizzo.
In ogni caso, deve essere registrato solo se, con motore in
funzione,azionando la maniglia semovenzaleruote non ri-
spondonoprontamente e dannolasensazione che lafrizio-
ne slitti.
Laregolazione sirealizza sbloccandoi2 dadi(11),ruotando
2giri il dadosuperiore in sensoantiorario e bloccandocon il
controdado.Se l’operazionenon risultasseefficace lasi può
ripetere.
Dopola registrazioneverificare sempreche, amotore spen-
to, tirando la macchina all’indietro senza azionare la mani-
gliasemovenza, leruoteposteriori ruotinoliberamente.
789
Lubrificazione motore
Consultate il libretto di uso e manutenzione del costruttore
delmotore.
Oliotrasmissione
Controllare l’olio trasmissione tramite la vite di scarico
(Mod.5570)e sostituirlo ogni500 ore dilavoro.
11
Ricordateche la benzinaè infiammabile.Tenetela ben-
zinain unatanica metallica lontanodal caloreo da fiam-
melibere;
Faterevisionaredalrivenditore IBEA ilvostrorasaerbaal
terminediognistagione.Questovipermetterà diavere il
vostrorasaerbain perfetta efficienza all’inizio della sta-
gionesuccessiva;
g -
h -
Accertatevi che nelle riparazioni vengano usate parti di
ricambio originali IBEA,questo vi permetterà di mante-
nere la qualità del vostro rasaerba allo stesso livello di
quandolo aveteacquistato.
i -

ITALIANO
9
9. ETICHETTADI RICONOSCIMENTO
8. IMMAGAZZINAMENTO INVERNALE
Procedure per l’immagazzinamento invernale
Seguitele seguenti istruzioniperla preparazione delvostro
rasaerbaper l’immagazzinamento afine stagione.
Perquanto riguarda ilmotore seguite leistruzioni fornite dal
costruttoredel motore.
Perquanto riguardalamacchina seguitele operazioni elen-
cate qui sotto:
Fermate il motore. Staccate il cavo candela e girate il
rasaerbadallaparte oppostaal filtroepulitelaparte infe-
rioredel carter;
• Eliminate ogni accumulo d’erba
• Collegate il tubo dell’acqua all’attacco rapido
• Ricollegate il cavo candela
• Accendete il motore
• Aprite il rubinetto dell’acqua in modo da pulire bene
sotto la scocca
• Lasciate asciugare
a)
b)
c)
d)
Svuotatecompletamenteilserbatoiocarburanteall’aperto
eriporre la benzina inun’appositatanica.
• Svitate la candela;
•Attraversoil forospruzzate unlubrificante protettivonel
cilindroe tirate leggermente lacorda avviamento in
mododa muovereil pistone edistribuire uniformemen-
te il liquido;
•Riavvitate lacandela;
Ristaccateil cavo candela eimmagazzinateil rasaerba
in un luogo asciutto coprendelo con un telo per proteg-
gerlodallapolvere.
e)
5570 SVB 5370 SB

10
ITALIANO
10. DATI TECNICI
5570 SVB 5370 SB
Tipo Motore
Monocilindrico a benzina - OHV
4T - Raffreddamento ad aria
Monocilindrico a benzina - OHV
4T - Raffreddamento ad aria
Marca Motore
Modello Motore 850e SERIES ™ 800e SERIES ™
Capacità serbatoio benzina 1,1 Lt 1,1 Lt
Capacità serbatoio olio 0,6 Lt 0,6 Lt
Cilindrata (cc) 190 175
Avviamento A strappo autoavvolgente A strappo autoavvolgente
Avanzamento Semovente a trazione posteriore Semovente a trazione anteriore
Tipo trasmissione Variatore 1 Velocità
Tipo ruote Alluminio Alluminio
Diametro ruota ant. (mm) 205 203
Diametro ruota post. (mm) 205 203
Attacco rapido acqua SI NO
Scocca LAMIERA ALLUMINIO
Larghezza lama (cm) 53 51
Altezza taglio (mm) 30-70 25-80
Posizioni altezza taglio 5 6
Regolazione altezza di taglio Centralizzata Centralizzata
Paracolpi SI NO
Vibrazione massima (m/s²) 3,6 3,6
Velocità (Km/h) 2,5 ---> 3,8 3,5
Rumorosità (db) 98 98
Peso (kg) 45 42

ITALIANO
11
11. DICHIARAZIONE DI CONFORMITA’5570 SVB
Il sottoscritto, costruttore e
depositario della documentazione
tecnica
ACTIVE s.r.l.
- Via Delmoncello, 12
26037 San Giovanni in Croce (CR)
ITALY
dichiara che la macchina tosaerba:
Genere: motore a scoppio
Marca: IBEA
Tipo:
5570 SVB
Dal n° di serie :
Al n° di serie :
55VB150001
55VB155000
Motore :
Fabbricante motore B & S
Tipo motore 850 Series™
Velocità di rotazione durante la prova
- giri al minuto 2800 +/- 100
è conforme ai requisiti essenziali di
sicurezza delle seguenti direttive CE: 2006/42/CE - 2004/108/CE - 2000/14/CE
in ottemperanza alle seguenti norme: EN 836
Livello sonoro misurato: LWA 97 dB(A)
Livello sonoro garantito: LWA 98 dB(A)
Dispositivo di taglio LAMA
Larghezza lama: 53 cm
Massa 45 Kg
Potenza (2900 gir/min) 3,3 Kw
Esaminato da : Reggio Emilia Innovazione - Via Sicilia,31 - 42100 - Reggio Emilia (Italy)
Active s.r.l.
Fatto a : SanGiovanni inCroce - ITALY
Alberto Griffini - managing director
Data: 02/12/2012
Procedura seguita per la valutazione della conformità:
ALLEGATO VI (I)

12
ITALIANO
11. DICHIARAZIONE DI CONFORMITA’5370 SB

ITALIANO
13
12. CERTIFICATO DI GARANZIA
S.N. n.°
DATA
MOD.
ACQUISTATO DA:
TIMBRO RIVENDITORE
Questa macchina è stata concepita e realizzata attraverso le più moderne tecniche produttive.
LaDitta costruttrice garantisce ipropri prodotti perunperiodo di 24mesidalla data diacquistoad eccezione
deiprodottiperservizio professionale continuo, adibiti a lavori per conto terzi, per i quali lagaranziaè di 12
mesi dalla data di acquisto.
CONDIZIONIDIGARANZIA
1) LaDitta costruttricesostituiscegratuitamente leparti difettose nelmateriale, nellelavorazioni, nella produ-
zione.La garanzia IBEA non contempla lasostituzione della macchina.
2) Il personale tecnico interverrà nei limiti di tempo concessi da esigenze organizzative e in ogni caso il più
prestopossibile. L'eventuale ritardonon potrà determinarerichieste di risarcimentodei danni, nèil prolunga-
mentodel periodo digaranzia.
3) Perrichiedere l'assistenza in garanziaènecessario esibire alpersonaleautorizzato il certificato digaran-
ziatimbrato dal rivenditore, compilato intuttele sue parti ecorredatodi fattura d'acquisto o scontrinofiscale
oaltro documento reso fiscalmenteobbligatorio comprovante ladatadi acquisto.
4) La garanzia decade in caso di:
- Assenza palese di manutenzione;
- Utilizzo non corretto del prodotto o manomissione;
- Utilizzo dei lubrificanti o combustibili non adatti;
- Utilizzo di parti di ricambio o accessori non originali;
- Interventieffettuati da personalenonautorizzato.
5) Non verranno sostituite in garanzia le parti che sono normalmente soggette ad usura (come cinghie,
guarnizioni,lame ecc..), salvoevidenti difetti di produzione.
6) La garanzia IBEA non garantisce i motori a scoppio montati sulle sue macchine perchè gli stessi sono
copertidalla garanzia del loroproduttore,come da documenti allegatiallamacchina.
7) Eventuali danni causati durante il trasporto, devono essere immediatamente segnalati al trasportatore,
penail decaderedellagaranzia.
8) Se guasti o rotture dovessero accadere nel periodo di garanzia o dopo di esso, il cliente non ha diritto di
sospendere il pagamento nè ad alcuno sconto sul prezzo.
9) La ditta costruttrice non risponde di eventuali danni diretti o indiretti, causati a persone o cose da guasti
dellamacchina o conseguenti allaforzata sospensione prolungata nell'usodellastessa.

ITALIANO
14

ENGLISH
15
INDEX
1. Explanation of symbols....................................................................Pg. 15
2. For your safety......................................................................................15
3. Description of parts...........................................................................16-17
4. Start-up................................................................................................18
5. Adjusting cutting height..........................................................................19
6. Maintenance.........................................................................................19
7. Checks and adjustments.......................................................................20
8. Winter storage......................................................................................21
9. ID label.................................................................................................21
10. Technical data......................................................................................22
11. Declaration of conformity...................................................................23-24
12. Certificate of warranty............................................................................25
1. EXPLANATION OF SYMBOLS
Warnings,danger and caution.
Readthe operationand maintenance
manualbefore using thismachine.
2. FOR YOUR SAFETY
Keepunauthorised persons atasafe
distance.
Smokingprohibited whilerefuelling.
Usesafety goggles.
Remember to switch off the motor and
disconnect the spark plug connector when
performingmaintenance.
CAUTION!
10-Donotputhandsorfeet underthemower whilethemotor
isrunning. Theblade isinmotion whenthe motoris running.
11- Cut lawns only in good lighting conditions.
12-Donotrun.Donotbeinfluencedbyeagernesstofinisha
job.Keepatapace suitedtothetypeof worktobeperformed.
13-Donotusethelawnmowerwhenitisnotingoodcondition.
Repairbeforeuse.
14- Do not allow use of your mower by any person unless
you have provided precise instructions and they have read
this manual.
15- Never push the lawn mower backward (towards the
operator).
16-When cuttingon slopes,always proceedcrossways and
neverfrom thetop tothe bottomor viceversa. Payparticular
attentionwhen changing direction.Donot cut onverysteep
land.
17- Always switch off the motor when not cutting or when
crossing a side walk, a street or a road.
18- In the event that you hit an obstacle, stop the motor,
disconnect the spark plug wire and check if there has been
any damage. Repair any damage before restarting and
operating the mower. If damage is severe, contact your
nearestIBEA dealer.
Read these instructions carefully and make sure you
understandthembeforeoperatingtheunit.Followallwarnings
andsafety instructions. Store thisbook for future reference.
1- Adapt your speed to the conditions of the grass. Adjust
motorspeedtomaximumwhen grassis lowand tominimum
when it is higt and thick .
2- Use of the lawn mower is prohibited to persons less than
16yearsofage.
3- The operator is responsible for third parties in the work
area. Make sure there are no children or pets in the work
area.
4- Before starting work, inspect the area to be treated and
removeall stones,anycansorother foreignobjects present.
Alsocheck wherethey anysprinklers areplacedand forany
otherhiddenobstaclesthatcancreatehazardsduringcutting.
5-Usesturdy,closedshoesduringcutting.Donotusesandals
and do not cut with bare feet. Use shoes that have a good
grip even when the ground is wet. Use working gloves for a
firmergrip.
6-Beforemowing,makesure thatthebladeistightly fastened
and that safety guards have been mounted. If defects are
found,replace orrepair.
7- Do not add fuel when you are in an enclosed area, when
the motor is running or when the motor is still warm. Smo-
kingis prohibitedwhenrefuelling.
8- Donotoperate themowerindoors. Exhaustgasesemitted
bythemotorarepoisonousif inhaledandcanbeasphyxiating
and,therefore, fatal.
9-Donotadjustthe cuttingheight whenthemotorisrunning.

ENGLISH
16
3. DESCRIPTION OF PARTS
1. Brakehandle
2. Gascontrollever
3. Engine
4. Transporterhandle
5. Speedregulator lever
6. Quickwaterhitch
7. Handlebarfastening lever
8. Frame
9. Wheel
10. Cuttingheight adjustmenthandle
11. Anti-vibrationbuffer
12. Steel body
13. Fueltank
14. Oiltank
15. Blade
16. High friction coefficient discs
17. Metalsheetbumpercone
18. Cuttingheightadjustment pedal
15
16
17
18
5570 SVB

ENGLISH
17
5370 SB
1. Brakehandle
2. Start-uphandle
3. Engine
4. Transporterhandle
5. Anti-vibrationbuffer
6. Handlebarfastening lever
7. Cuttingheightadjustment handle
8. Wheel
9. Fuel tank
10. Oiltank
11. Aluminiumbody

ENGLISH
18
4. START-UP
.
.
a -
b -
c -
CAUTION!Thebladestartsworkingwhenthemotor
is started up.
CAUTION ! Actions for varying the speed of
advancementmustbeperformedonlywhenthemotor
is running.
CAUTION ! Thebladewillcontinue toturn formax
3 seconds.
Checks prior to start-up
Before each start-up, check the following points and carry
outany required maintenance asnecessary.
Check the oil level in the motor. Top up as necessary,
taking care not to exceed the indicated level (see the
instructions manual of the motor itself).
Check set cutting height and adjust as desired (see the
followingchapter "Adjusting cuttingheight")
Starting up the motor
Carryoutcalibrationoperators,then proceedwithmotorstart-
up as follows:
Pull the brake handle (1) to start up the motor.
Position the accelerator lever (2) in the MAX position.
(mod.5570)
Keepthe handle (1) pressed throughout operation.When it
is released, the motor will stop. For further clarification,
consult the instructions manual of the motor itself.
Toengagetraction,pushthehandle(4)towardthehandlebar.
To stop advancement,simply release thehandle itself.Only
for5570 model, youcanvary speed usingthe lever (5).The
lawnmowercanbepushedforwardandbackwardevenwhen
traction is not engaged.
Stopping the motor
The motor and the blade stop when the brake handle (1) is
released.
Grip the start-up handle (3) and pull the cable without
forcing it until you feel the resistance caused by the
compression. Release the handle and then give a hard
pull.
1
2
3
1
4
5

ENGLISH
19
5. ADJUSTING CUTTING HEIGHT
Cutting procedure
Adaptyourspeed totheconditionsofthe grass.Adjustmotor
speed to maximum when grass is high and thick and to
minimum when it is low.
Adjusting cutting height
Always stop the motor and wait for the blade to
come to a complete stop.
Mod. 5570 : Cutting height with centralised control.
To lowercutting height,press thehandle (10)and, bymeans
ofthepedal (13),choose oneofthe5pre-set positions.Vice-
versatoraisethe cuttingheight:pressandreleasethehandle
(10)and increase by1 position. Ifthehandle (1) iskept held
down, the MAX cutting height is immediately reached. Cutting positions:
1= 30 mm 4 = 60 mm
2= 40 mm 5= 70 mm
3= 50 mm 6= 80 mm
Cuttingtips
Thebestresults areobtained whennomore thanonethirdof
the grass is cut.
When grass is high, use the highest cutting position for the
first cut. If you want to cut the grass lower, pass over again
with a lower cutting position.
Ifyou cutto toolow alevel, thegrass willhaveto utilisemore
energy to create new blades instead of bulking up, and will
thereforebemoresubjectto thepossibility ofburningincase
ofdrought.
Onthe contrary,if you letthegrass grow too high,the lower
partwill weakenand yellow.
CAUTION!
Rememberto switch offthemotor and disconnect
thestart-upsparkplugconnector whenperforming
maintenance.
6. MAINTENANCE
Carefullyread the suppliedmotor useandmaintenance
manual.
To reduce the risk of fire, make sure that the motor is
clean of grass, leaves or any oil grease.
For the 5570 model, use the quick water hitch (6) to
keep the internal body clean:
• Connect the water hose to the quick hitch (6).
• Switch on the motor.
• Open the water tap.
d -
Frequently check the blade and screws securing the
motor.
Check that all nuts and screws have been tightened so
that the lawn mower is always in optimal working
conditions.
Use original spare parts only.
Do not store the mower in an enclosed space with a full
tankof gasoline. Letthe motor cooldown outdoors after
use.
a -
b -
c -
e -
f -
6
10 13
Mod. 5370 : Cutting height with centralised control.
Choose one of the 5 pre-set positions with the handle.

ENGLISH
20
CAUTION!
Rememberto switchoff themotor anddisconnect
thestart-upsparkplug connectorwhenperforming
maintenance.
CAUTION ! Excessive blade wear can cause the
formation of deep cracks and the detachment of
some of its pieces, causing serious danger to the
operatorandany personspresentin theworkarea.
CAUTION!
Excessive pressure on the cable may result in
transmission breakage.
MOBILFLUID 424 / API GL 4 OIL
45 ml = 500 h
7. CHECKS AND ADJUSTMENTS
Check - Removing and sharpening the blade
Stopthe motor.Disconnectthe sparkplugcable toavoid
anysudden and unwantedmotor start-ups.
Foldthe moweron theleft sideor onthe oppositeside to
thespark plug to avoidclogging problems.
Check:carefully examinethedegree ofsharpening and
wearon the blade, especially nearfolds.
Sincesand orothermaterial cancause wear,frequently
check the blade. If abnormalities are detected, replace
theblade.
a -
b -
c -
d -
Check: tightlygrip one end ofthe blade (wear glovesto
preventcutting),unscrewthebolt(7),remove thewasher
(8)and then the blade(9).
Sharpening: sharpen the blade if the cutters are
deteriorated and the blade is in good condition. Use a
grindstone for sharpening and check that the blade is
still balanced after this operation. Excessive vibrations
will be caused if it is not balanced. Be careful not to cut
yourself. Contact an IBEA service centre with any
questions.
Assembletheblade(9)centringiton thesupport.Position
thewasher(8)and tighten the bolt (7).
(Tighteningtorque =55 Nm)
e -
f -
g -
Transporter cable adjustment
Adjustthe transporter engagement cableat first use. Inany
case, this must be adjusted only in the event that, with the
motorrunning,upon transporterhandleoperation thewheels
failtoprovideaprompt responseand itseemsthattheclutch
is slipping.
Adjustmentiscarried outbyloosening the2nuts(11),turning
the upper nut twice in a counter-clockwise direction, and
thenre-tightening itwiththe counter-nut.Thisoperation can
berepeated ifitdoes notprove effective.
After regulation, always check that the rear wheels rotate
freelywith the motor offandwhen pulling backthemachine
withoutoperating thetransporter handle.
789
Motor lubrication
Consult the motor manufacturer use and maintenance
manual.
Transmissionoil
Check transmission oil via the drain plug (Mod.5570) and
changeevery 500working hours.
11
Rememberthat gasolineis flammable.Keep gasolinein
a metal canister away from heat or open flames.
Have your IBEA dealer service your lawn mower at the
endofeachseason.Thiswillensurethatyourlawnmower
is in good working order at the start of the next season.
g -
h -
Make sure that original IBEA spare parts are used for
repairs.This willallow youtomaintain thequality ofyour
lawn mower at the same level as when you bought it.
i -
Table of contents
Languages:
Other IBEA Lawn Mower manuals

IBEA
IBEA 5326BM Operating instructions

IBEA
IBEA IB 642 HD Guide

IBEA
IBEA IB 642 PRO Guide

IBEA
IBEA IDEA42B Operating instructions

IBEA
IBEA Vision IB-VAC15C4H Operating instructions

IBEA
IBEA 5385GPH Operating instructions

IBEA
IBEA 500 Series Operating instructions

IBEA
IBEA 550 Series Operating instructions

IBEA
IBEA 50027B Operating instructions

IBEA
IBEA IB-5385GPK Operating instructions