MANUAL - VENUS600
10
©Copyright LOTRONIC 2023
MODO BLUETOOTH
Mantenga presionado el botón de encendido (21) para encender el altavoz. Aparece “bLUE” en la pantalla (20)
y “BT” parpadea lentamente en la esquina para indicar que el altavoz está activado. Mantenga presionado
el botón de encendido (21) para apagar el altavoz. La pantalla siempre mostrará "BT" cuando el altavoz esté
conectado a un dispositivo Bluetooth.
Active la función Bluetooth en su dispositivo Bluetooth externo y seleccione “VENUS-600” de la lista de disposi-
tivos encontrados. Si se requiere una contraseña, ingrese "0000". Una vez emparejado con éxito, escuchará un
tono.
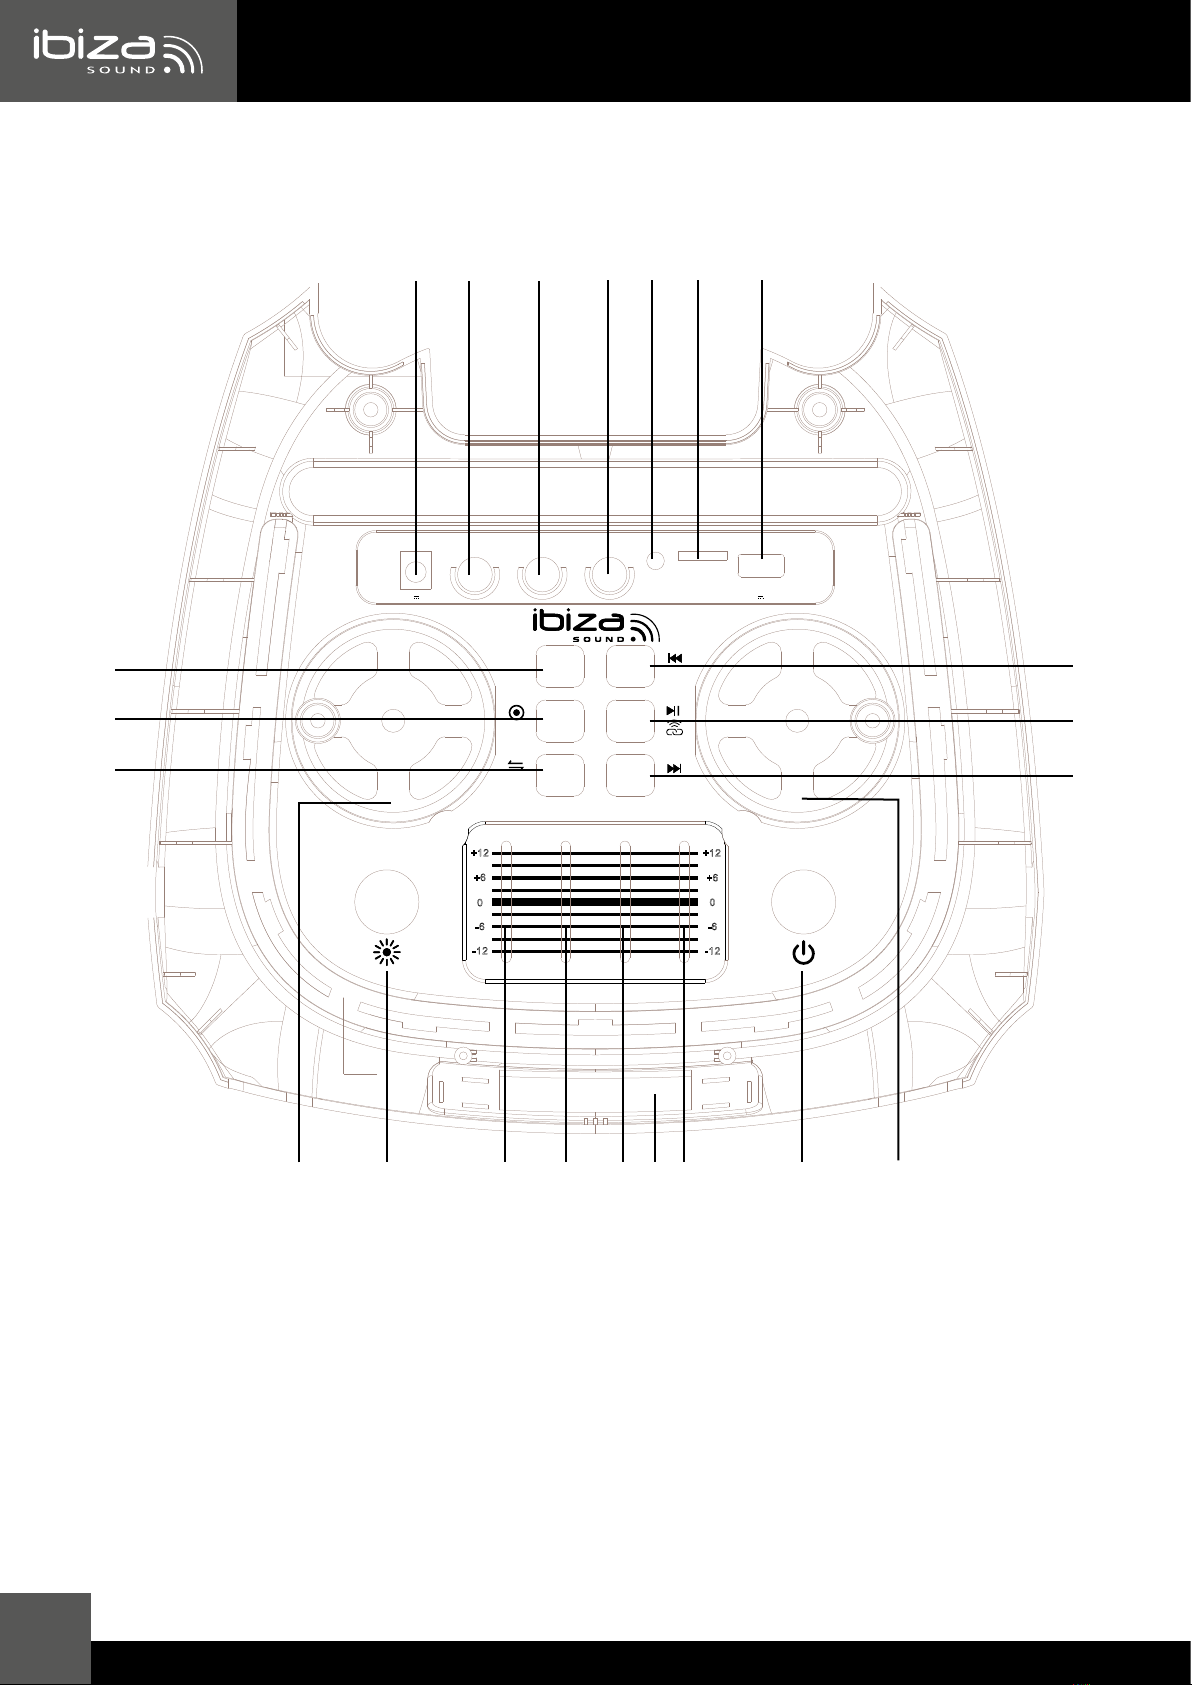
ENTRADA GITARRA
Enchufe un conector Jack estándar en el enchufe (2) en la parte superior del altavoz y ajuste el volumen con la
perilla (19).
ENTRADAS MICRO
ADVERTENCIA: Se recomienda girar el control de volumen del equipo completamente hacia la izquierda para evitar retroali-
mentación o chasquidos al conectar el micrófono.
Inserte un conector de 6,35 mm de un micrófono con cable (incluido) en la toma de entrada del micrófono (3)
y/o (4) en la parte superior del altavoz, use el botón (22) para controlar el volumen del micrófono, use el inte-
rruptor (18 ) para controlar el ECO del micrófono.
MODO AUXILIAR/LÍNEA
Para utilizar el altavoz con una fuente AUX/LINE, enchufe un conector del cable de audio de 3,5 mm en el
enchufe de entrada de audio auxiliar de 3,5 mm (5) del altavoz. Enchufe el otro conector en el conector para
auriculares de su dispositivo de reproducción multimedia. Use el botón MODE (10) para cambiar al modo LINE.
La pantalla mostrará "LÍNEA". La reproducción se controla a través del dispositivo conectado.
MODO USB
Inserte un dispositivo USB en el puerto USB (7) para reproducir música almacenada en el reproductor. La repro-
ducción comienza automáticamente.
MODO MICROSD
Inserte una tarjeta microSD en el puerto TF (6) para reproducir música almacenada en el reproductor. La repro-
ducción comienza automáticamente.
BOTÓN DE MODO (10)
Presione para cambiar entre las fuentes de entrada: BT, AUX, USB, TF
MICRÓFONO PRI (8)
Presione brevemente este botón para activar la función de prioridad del micrófono en modo BT, USB, TF. La
pantalla mostrará "o-ON". Presione nuevamente para cancelar la prioridad del micrófono. La pantalla mostrará
"o-OF". Cuando esta función está habilitada, el volumen de la música baja cuando habla por el micrófono y se
reanuda cuando deja de hablar.
REC (9)
Esta función solo está disponible en el modo USB/TF.
Si el dispositivo USB/microSD conectado no contiene ningún archivo grabado, presione brevemente este botón
para reproducir la música en el dispositivo USB/microSD. Mantenga presionado el botón para grabar el sonido
del micrófono. Se mostrará "rEC". Presione brevemente para detener la grabación. Presione nuevamente para
reproducir el archivo grabado.
Si el dispositivo USB/microSD conectado contiene un archivo grabado, presione brevemente este botón para re-
producir el archivo grabado y luego la otra música en el dispositivo. Mantenga presionado el botón para grabar
el sonido del micrófono.
PRÓXIMO TÍTULO (13)
Presione brevemente el botón (13) para seleccionar el siguiente título de la lista de reproducción en modo BT,
USB y TF. Mantenga presionado para aumentar el volumen.
TÍTULO ANTERIOR (11)
Presione brevemente este botón (11) para volver al título anterior de la lista de reproducción en modo BT, USB
y TF. Mantenga presionado este botón para bajar el volumen.
REPRODUCIR/PAUSAR/REPE/TWS (12)
Presione brevemente este botón para reproducir/pausar música en modo BT, AUX, USB, TF.
En el modo USB y TF, mantenga presionado este botón para ingresar al modo Repetir. Cuando se muestra
"ONE", solo se repite un título. Cuando se muestra "TODO", se repiten todos los títulos.
En el modo BT, mantenga presionado para acceder al modo TWS.