icombi AH20 User manual

1
Bluetooth Stereo Headset
icombiTM AH20
User’sManual

2
▶Caution !! ◀
Before using icombi™headset, please check up the comments below for safety.
1. Do not impact or make a hole with sharpened pins on the product.
2. Do not leave in high temperatures or heating.
3. Do not touch the headset with wet hands.
4. Please turn the headset off where it is prohibited from using.
5. Do not leave the headset or charger near/inside a heater or in a microwave oven.
6. Do not disassemble or repair at a user’s discretion.
7. Please use the charger recommended by the manufacturer.
8. Sound quality may be compromised or the connection can be interrupted when the
headset is used nearby a microwave oven and/or a wireless LAN.
icombi™AH20
【Index 】
1. Product introduction
2. What is included in icombi™AH20 package
3. Headset features
4. Battery charging
5. Headset pairing and ON/OFF
6. Connecting to a Bluetooth phone
7. Connecting to an iPod
8. Connecting to an audio device
9. Connecting to a PC
10. Connecting to both a Bluetooth phone and an audio device
11. Making and answering calls through icombi AH20
12. Making and answering calls while listening to music
13. Features and specification
14. Warranty

3
1.ProductIntroduction
•icombi™(AH20) Bluetooth Stereo Headset will provide you with headset/hands-free
functionality and wireless music. In addition, you can control over many of today’s digital
media and audio devices wirelessly.
•icombi™(AP11 / AP21) iPod Audio Dongle : audio transmitter for Apple iPod
•icombi™(AG12) General Audio Dongle : audio transmitter for all audio devices with a 3.5 mm
audio jack
•icombi™(AU13) USB Stereo Dongle : audio transmitter for PC’s or laptop’s with USB port
iPod Audio
Dongle
(icombi™AP)
USB Stereo
Dongle
(icombi™AU)
General Audio
Dongle
(icombi™AG)
A/V System
MP3 or CD
Player
Laptop / Desktop PC
iPod
icombi™AH20 Bluetooth
Phone
(HSP, HFP
and/or A2DP
supported)

4
2.Whatisincludedinicombi™AH20 package?
AP11 or AP21
(iPod Audio Dongle)
AH20 Stereo headset
USB power cable
AG12
(General Audio Dongle)
AU13
(USB Stereo Dongle)
User’s Manual
AC Adapter
One of the transmitters is available in the package.
Please choose the right one for your audio device.

5
3.HeadsetFeatures
Volume Up / Down Button
Play / Pause
& Track Up/Down
LED Light
Microphone
Talk Button
< Right >
USB or Adapter
Charging port
< Left >
Power Button
(Slide)
Power Button
(Slide)
Button for
ejecting battery
Button for
ejecting battery
Battery

6
4.Batterycharging
1) Use the AC adapter for the wall outlet or USB
power cable for PC’s in order to recharge the
battery.
2) Open the mini-USB port cover of the Headset.
3) Connect the mini-USB plug to the port of the
headset.
4) LED light stays red while charging and turns to
blue when the headset battery is fully charged.
5) Remove the battery charger from the headset
when finished charging.
■Charging and using time
■How to check up the battery status?
>> Press the Volume up and Volume down
buttons at the same time……
When fully charged
LED flash in blue for 2 seconds.
When charging needed
LED flash in red for 2 seconds.
Over 7
hours
Over 10
hours
Over 110
hours
Less than
2 hours
Playing
music
continuously
Talk
Time
Stand-by
Time
Standard using time
Charging
Time
■Before connecting the power adapter
to the wall outlet, please ensure the power
voltage is suitable for power adapter.
Connecting to PC
Button for
ejecting battery
Power Button
(Slide)
1) Please slide off the headset by using
power button (Slide) on the headset,
then the headset will be reset. Or if you
take battery off from the headset, it will
be reset automatically.
2) For changing batteries, please change
the battery as shown in the right picture
of the headset.
■Reset & Changing battery

7
5.Headsetpairing and ON/OFF
Indicator
LED
Beep
Sounds
Power Button
(Slide) &
Talk Button
( )
Blinks in red 3 times
and then turned off.
Blinks rapidly in blue 3 times
within 1~2 seconds and then
blinks in blue at an interval of 3
seconds
Blinks rapidly in blue 3 times
within 1~2 seconds and then
blinks spontaneously in red and
blue.
Descending 2 Step SoundAscending 2 Step SoundAscending 4 Step Sound
When the headset is powered
on or in pairing mode, please
slide off the power.
When the headset is powered off,
please slide on the power.
When the headset is powered off,
please slide on the power while
pressing talk button.
■Headset OFF■Headset ON■Headset pairing
< Left > < Right >
Talk Button
Power Slide
LED Light

8
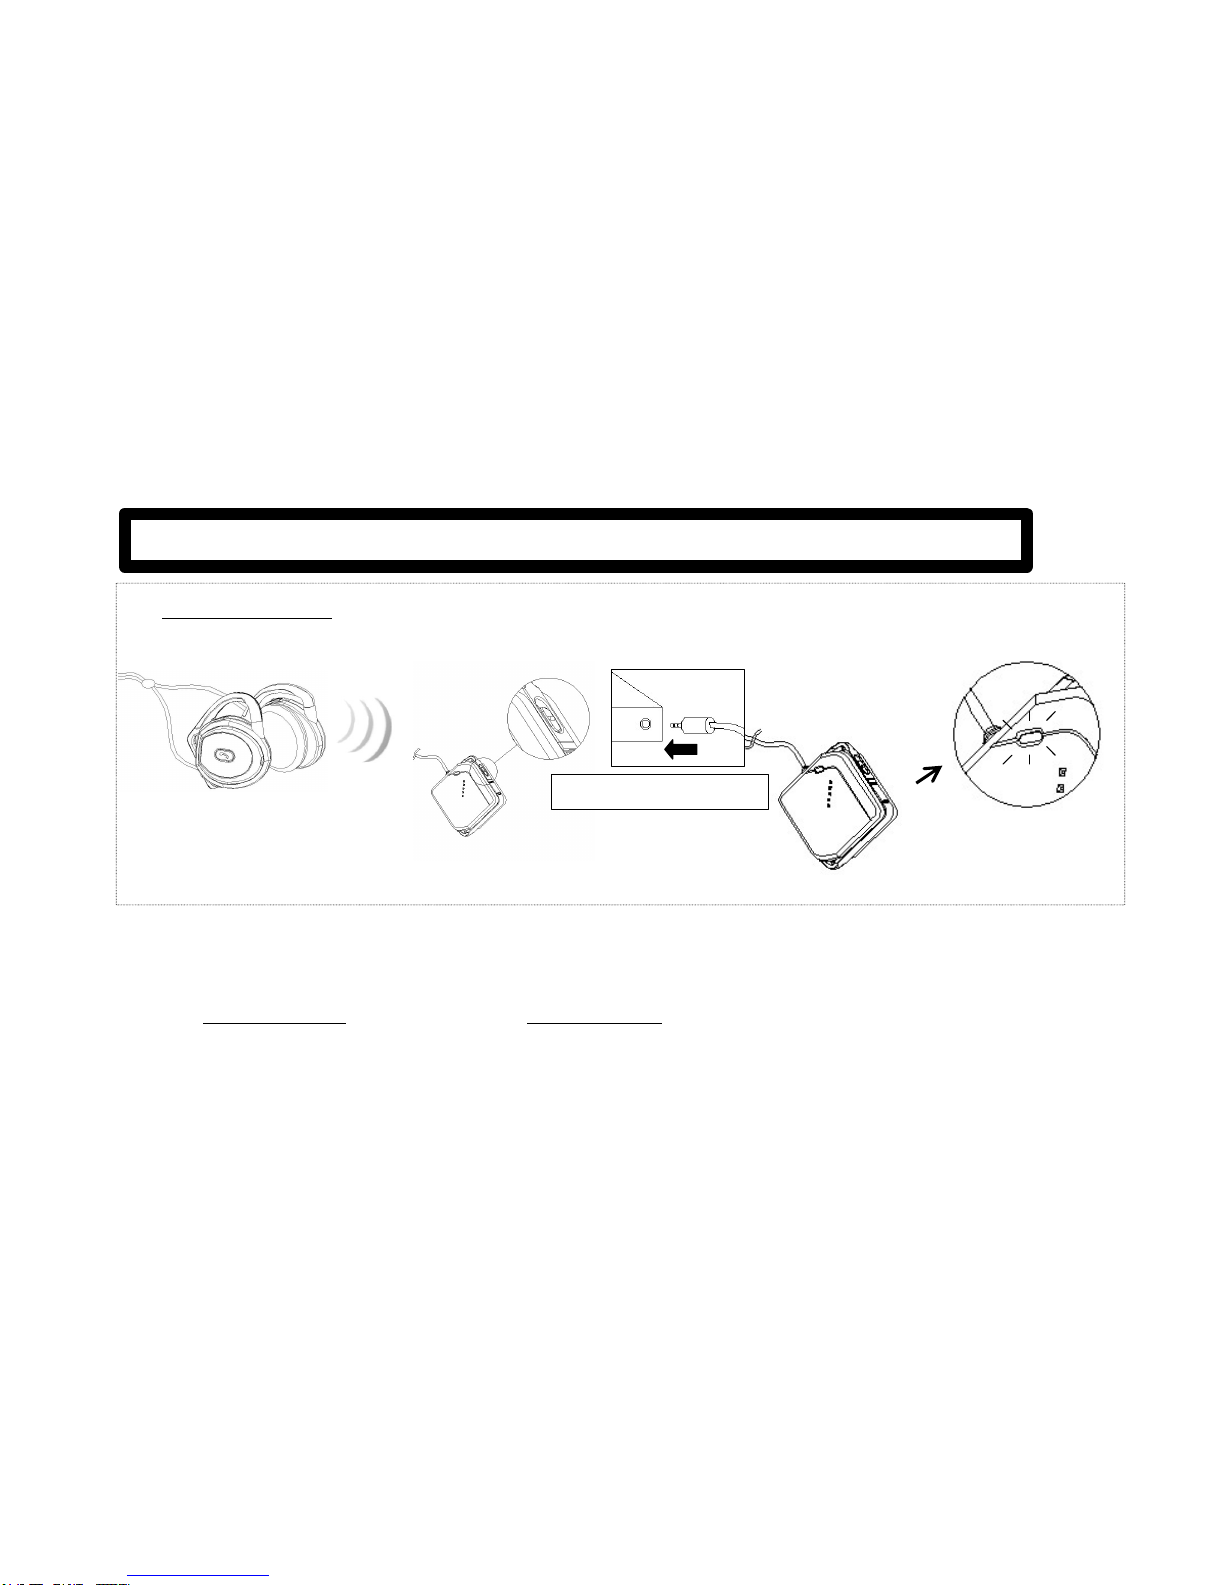
1) Set up the headset for pairing mode (Registration waiting mode).
(Registration waiting mode: When sliding the headset’s power on, the headset LED blinks in both blue and red for 2
min. Please refer to “■Headset pairing”in Chapter 5.)
2) Set up your phone for Bluetooth device search mode.
(Please refer to the user’s manual of the Bluetooth phone that a user is trying to pair with the headset.)
3) Choose ‘icombiAH20’among the searching list on your phone.
(*) According to a mobile phone maker, the user interface on the phone will differ. It is strongly recommended
that a user should refer to the user’s manual of the Bluetooth phone
(*) Headset should be on and in pairing mode.
4) After choosing ‘icombiAH20’, please enter “0000”when asked for a pin code or a password or such like.
5) When connection is successfully made, the headset LED blinks in blue at an interval of 3 seconds.
6) RE-CONNECTING : Do not go through the INITIAL PAIRING again. Simply power on the headset with the Bluetooth
phone powered on. Re-connection will be made automatically to the Bluetooth phone that was once paired with the
icombi™AH20 headset as soon as the user slides the headset’s power on. Please refer to “■Headset ON”in
Chapter 5.
7) Please refer to Chapter 11. Making and answering calls through icombi™AH20.
[note] Stereo function will work only with a stereo-supported Bluetooth mobile phone.
6.Connecting toaBluetoothphone
■How to register (pair/connect) the icombi™(AH20) Bluetooth headset to a Bluetooth phone?
(Bluetooth phone means a phone that contains the Bluetooth function inside)
Searching
device(*) icombi
AH20 Pin Code
“0000”
Registering
and
Connecting
INITIAL PAIRING : Connecting icombi™AH20 to a Bluetooth phone for the first time

9
7.Connecting toaniPod
■Connect to Apple iPod using AP11 / AP21
Insert AP11 to iPod
( or AP21 )
Indicator of AP11 / AP21
1) During the connection process, the headset LED blinks in both red and blue and the LED of AP11 /
AP21 blinks in blue at an interval of 0.5 seconds.
2) Both the LED’s of the headset and the AP11 / AP21 blink in blue slowly at a longer interval of time,
when the wireless audio connection between the two devices is successfully made.
3) RE-CONNECTING :Do not go through the INITIAL PAIRING again. Simply slide on the headset in
order to re-connect with the AP11 / AP21 plugged into the iPod. Re-connection will be made
automatically to the AP11 / AP21, that was paired with a icombi AH20 headset, after a short period
time.
[note] AP11 / AP21 does not have a built-in battery inside. It draws power from the iPod.
Set up headset for
pairing mode
INITIAL PAIRING : Connecting icombi AH20 to AP11 / AP21 for the first time

10
8.Connecting toanaudiodevice
■Connect to all audio devices with a 3.5 mm audio jack using AG12
Power on AG12 and plug it to audio the device
Indicator of AG12
Set up headset for
pairing mode
ON
OFF
INITIAL PAIRING : Connecting icombi™AH20 to icombi AG12 for the first time
1) During the connection process, the headset LED blinks in both red and blue and the LED of AG12 blinks in
blue at an interval of 0.5 seconds.
2) Both the LED’s of the headset and the AG12 blink in blue slowly at a longer interval of time, when the
wireless audio connection between the two devices is successfully made.
3) RE-CONNECTING :Do not go through the INITIAL PAIRING again. Simply slide on the headset in order to
re-connect wirelessly with the AG12 powered on. Re-connection will be made automatically to the AG12,
that was paired with a icombi AH20 headset, after a short period time.
[note] AG12 has a built-in battery inside. It is rechargeable with the power adapter or the USB cable.
Ear jack of Audio device

11
9.Connecting toaPC
■Connect to all kind of PC’s with a USB port supported using AU13
Plug AU13 to PC
Indicator LED of AU13
Set up headset for
pairing mode
USB port in PC
INITIAL PAIRING : Connecting icombi™AH20 to icombi AU13 for the first time
1) During the connection process, the headset LED blinks in both red and blue and the LED of AU13
blinks in blue at an interval of 0.5 seconds.
2) Both the LED’s of the headset and the AU13 blink in blue slowly at a longer interval of time, when the
wireless audio connection between the two devices is successfully made.
3) RE-CONNECTING :Do not go through the INITIAL PAIRING again. Simply slide on the headset in
order to re-connect with the AU13 plugged into a PC. Re-connection will be made automatically to
the AU13, that was paired with a icombi AH20 headset, after a short period time.
[note] AU13 is not compatible with Mac O/S PC.

12
10.Connecting tobothaBluetoothphoneand
anaudiodevice
After the connection is made
with the Bluetooth phone,
the headset will be in a
connection enabled mode
for audio devices with the
audio dongle (transmitter)
or
Connect to a Bluetooth phone according to Chapter 6.
Set up headset for
pairing mode
Plug AP11 /
AP21( ) to iPod
Plug AG12 to
audio device Plug AU13 to PC
or
INITIAL PAIRING : Connect to the Bluetooth phone first and then to an audio device
Searching
device(*) icombi
AH20 Pin Code
“0000”
Registering
and
Connecting
[note] Please make sure the headset must be first Bluetooth-registered (connected) to a Bluetooth phone
and then to an audio device when in INITIAL PAIRING process.

13
11.Making and answering calls
through icombiAH20
■Making calls ■Answering calls
1) Enter a phone number and press the send button of the
user’s Bluetooth (mobile) phone.
2) During or after making a phone call, please press the talk
button( )on the headset for about 2 seconds to route the
audio path to headset in order to talk through the headset.
3) You may re-route the audio path to the Bluetooth phone by
pressing the talk button of the headset for about 2 seconds
again.
[note] When the user make the last number call by pressing
the talk button, The number of times he/she may have
to press the talk button, will differ according to a
different Bluetooth phone
1) Pick up an incoming call by pressing the talk button ( )
quickly when the phone is ringing or if you hear the incoming
call beep sound.
2) Hang up the call by pressing the talk button quickly while or
after answering the call.
3) Reject an incoming call by pressing the power/talk button for
about 2~3 seconds.
1234
5678
■How to make and answer calls through icombi AH20 after the connection is made
according to Chapter 6.?
Enter a phone number
and press the send button
(approx. 2 seconds.)
1234
5678

14
12.Making and answering calls
whilelistening tomusic
■Making and answering calls while listening to music through icombi™headset
1) First, complete a Bluetooth connection to both
phone and audio device. Please refer to “10.
Connecting to both a Bluetooth phone and an
audio device”.
2) Making a call : please follow the same procedure
as “■Making calls”in Chapter 11.
3) Answering a call : please follow the same
procedure as “■Answering calls”in Chapter 11.
4) The incoming calls will be detected while listening
to music and the audio sound or music comes right
back in the icombi AH20 headset when the call
hung up.
(+) Volume
up
(-) Volume
down
Previous
track
Next track
?: Pause
(One Push)
?: Play
(Another
Push)
Selecting
status
(+) , (-)?Button
Volume
control
Track
selecting
PlayFunction
•Please refer above to the control buttons of
the headset and their functionality when
listening to music.

15
13.Features and specification
[note] The above spec. may change in accordance with circumstance situation.
Blue flashing: Power on or Stand by mode
Blue & Red flashing: Pairing mode
Blue : Fully charged
•LED
Indicator
Status
Embedded and Rechargeable battery 3.7V
300mA Li-ion
Charging Time : within 2 hrs
•Battery
65g (battery included)•Weight0dBm to 4dBm•Power Adapter
65mm x 78mm x 60mm•Dimensions
Input : AC 100 ~ 240V
Output : DC 5V, 500mA
•RF Output Power
-20℃~ +50℃
•Operating
Temperature
< 0.1% BER at -80 dBm•Sensitivity
Stand-by Time : Over 110 hrs
Talk Time : Over 10 hrs
Play Time : 7 hrs
(The maximum operating time depends on
the usage frequency and environmental factors.
A long distance wireless connection and high
volume level will increase the power consumption.)
•Use Time
A2DP (Advanced Audio Distribution Profile)
AVRCP (AV Remote Control Profile)
HSP (Headset Profile)
HFP (Hands-Free Profile)
•Bluetooth Profile
Supported
Typical : -47dBm (Noise Canceling)•MIC
Bluetooth Class II
Over 10 meters (in open space)
•Radio Coverage
2.402 ~ 2.480 GHz•General Radio
Diameter: 30mm
Frequency Response: 20Hz ~ 20KHz
SPL (Sound Pressure Level): 120±3dB @ 1KHz
THD (Total Harmonic Distortion): ±5%
Impedance: 32Ω±15% @ 1V, 1KHz
Power Rating: 10mW (Maximum)
•Speaker
Bluetooth 1.2 compliant•Bluetooth Standard

16
14.Warranty
Purchasing amount
Place of purchase
Serial No.
Date of purchase
AH20Model
Bluetooth stereo headsetProduct
Subject to the conditions of this Limited Warranty, the Producer warrants this
product to be free from defects in material and workmanship at the time of its
original purchase by a consumer, and for a subsequent period of one (1) year.
Should your Product need warranty service, please return it to the dealer from
whom it was purchased.
If, during the warranty period, this Product fails to operate under normal use and
service, due to defects in materials or workmanship, our service partners will, at
their option, either repair or replace the Product in accordance with the
conditions stipulated herein.

17
-CONDITIONS -
1.The warranty is valid only if the original receipt issued to the original purchaser by the dealer,
specifying the date of purchase, is presented with the Product to be repaired or replaced. The Producer
reserves the right to refuse warranty service if this information has been removed or changed after the
original purchase of the Product from the dealer.
2. If the Product has been repaired or replaced, the repaired or replaced Product shall be warranted for the
remaining time of the original warranty period or for ninety (90) days from the date of repair, whichever is
longer. Repair or replacement may involve the use of functionally equivalent reconditioned units.
Replaced parts or components will become the property of the Producer.
3. This warranty does not cover any failure of the Product due to normal wear and tear, or due to misuse,
including but not limited to use in other than the normal and customary manner, in accordance with
instructions for use and maintenance of the Product. Nor does this warranty cover any failure of the
product due to accident, modification or adjustment, acts of God or damage resulting from liquid. This
warranty does not cover Product failures due to improper repair installations, modifications or service
performed by any person who is not authorized by Producer. Nor does this warranty cover any failure of
the product due to the life time of a battery built in the product. Tampering with any of the seals on the
Product will void the warranty.
THERE ARE NO EXPRESS WARRANTIES, WHETHER WRITTEN OR ORAL, OTHER THAN THIS PRINTED
LIMITED WARRANTY.
IN NO EVENT SHALL THE PRODUCER BE LIABLE FOR INCIDENTAL OR CONSEQUENTIAL DAMAGES OF
ANY NATURE WHATSOEVER, INCLUDING BUT NOT LIMITED TO LOST PROFITS OR COMMERCIAL LOSS,
TO THE FULL EXTENT THOSE DAMAGES CAN BE DISCLAIMED BY LAW.
The warranty provided does not affect the consumer's statutory rights under applicable national
legislation in force, nor the consumer's rights against the dealer arising from their sales purchase
contract.

-Additional Page -
Caution
Modifications not expressly approved by the party responsible for compliance could void the user’s authority to operate the
equipment.
FCC Compliance Information
This device complies with Part 15 of FCC Rules.
Operation is subject to the following two conditions:
(1) This device may not cause harmful interference, and
(2) This device must accept any interference received.
Including interference that may cause undesired operation.
Information to User
This equipment has been tested and found to comply with the limits for a Class B digital device, pursuant to part 15 of the
FCC Rules. These limits are designed to provide reasonable protection against harmful interference in a residential
installation. This equipment generates, uses and can radiate radio frequency energy and, if not installed and used in
accordance with the instructions, may cause harmful interference to radio communications. However, there is no guarantee
that interference will not occur in a particular installation. If this equipment does cause harmful interference to radio or
television reception, which can be determined by turning the equipment off and on, the user is encouraged to try to correct
the interference by one or more of the following measures:
- Reorient or relocate the receiving antenna.- Increase the separation between the equipment and receiver.
- Connect the equipment into an outlet on a circuit different from that to which the receiver is connected.
- Consult the dealer or an experienced radio/ tv technician for help.
Table of contents