iComfort SAU1220-H User manual

SAU1220-H
INFRARED SAUNA
SAUNA INFRAROUGE
USER MANUAL
MANUEL DE
L’UTILISATEUR


1
Thank you for purchasing this product. Please read this instruction manual carefully
before operating this sauna. Please pay attention to the important safety warnings and
keep this manual for future use.
Note: EBI reserves the right to revise the design and description of this product
without notice.
CONTENTS
1. Safety warnings............................................................................................... 2
2. Environment .................................................................................................... 2
3. Restrictions ..................................................................................................... 2
4. Maintenance ................................................................................................... 3
5. Features and benefits...................................................................................... 3
6. Tips to use your icomfort sauna ....................................................................... 4
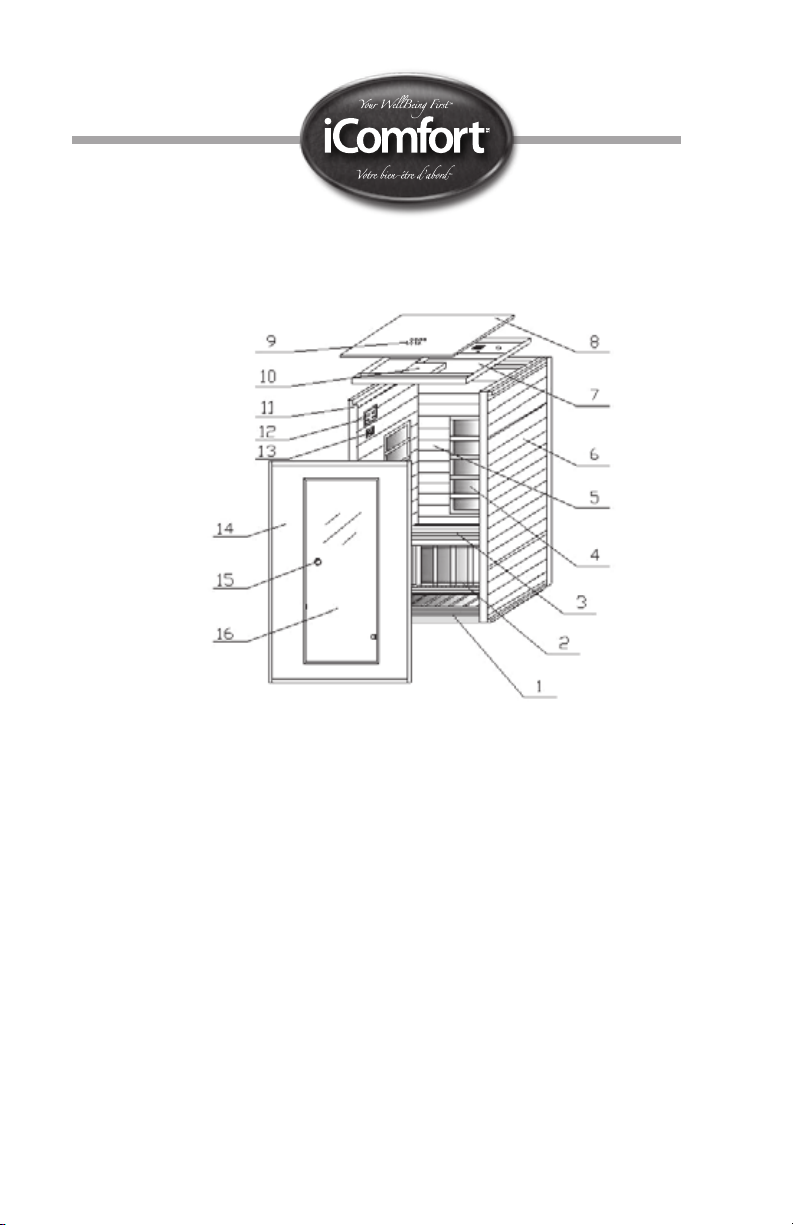
7. Components ................................................................................................... 5
8. Installation ...................................................................................................... 6
8. 1. Bottom (floor) panel ................................................................................ 6
8. 2. Back panel .............................................................................................. 7
8. 3. Left/right panel ........................................................................................ 8
8. 4. Floor, calf heater and bench ................................................................... 10
8. 5. Front panel ............................................................................................ 11
8. 6. Top panel ............................................................................................... 12
8. 7. Radio/cd player installation ................................................................... 12
8. 8. Connecting the cables on the top panel ................................................. 13
8. 9. Put on the top cover on the top panel .................................................... 15
8. 10. Activate and enjoy ................................................................................. 15
9. Operation ...................................................................................................... 16
10. Radio/cd player ............................................................................................ 17
11. Sauna troubleshooting ................................................................................. 18
11. 1. Radio/cd player ..................................................................................... 18
11. 2. Sauna.................................................................................................... 18
11. 3. Control panel ......................................................................................... 18
12. Product specifications ................................................................................... 19
13. Warranty ....................................................................................................... 20
FRANÇAIS ................................................................................................21

2
1. SAFETY WARNINGS
• This product is not recommended for children.
• Please operate this product according to the instructions in this manual.
• Use only accessories recommended by iComfort.
• This product is designed for indoor use only.
• Recommended use time is 60 minutes or less.
• Be careful with what you take inside of the sauna with you. Some metals absorb
infrared rays and can become extremely hot during a sauna session.
• Please avoid use if the sauna is damaged and call your iComfort technician
or dealer.
• Use of this sauna under the influence of drugs or alcohol is not recommended.
• Do not use wet hands to pull the AC cord.
• In the event of a power failure disconnect the sauna.
2. ENVIRONMENT
This sauna should be used indoors in a well ventilated, normally dry
and dust free environment.
This sauna is designed to be used in a room where the temperatures is between 18°C
and 30°C (65°F and 85°F).
3. RESTRICTIONS
People with osteoporosis, heart disease and heart pacemakers, pregnancies, injuries,
implants or any other health related issues should consult their doctor before
using this sauna.
Stop immediately the use of this sauna if you feel unwell and consult your doctor.

3
4. MAINTENANCE
• Your sauna does not require a lot of care. If necessary, you can wipe it down with
water and a clean cloth. Do not use cleaning chemicals as these might release
vapours or gases which could potentially cause you health issues.
• This product should only be maintained by iComfort certified technicians.
Otherwise, EBI reserves the right to void the warranty.
• Disconnect the power cord after use.
• Make sure the wall outlet is in good working order before use.
• We recommend using the iComfort sauna intermittently for no more than 60
minutes at a time.
5. FEATURES AND BENEFITS
Turn any room into a personal oasis with an iComfort infrared carbon film sauna.
Increase your core body temperature with soothing infrared carbon film heat and start
your journey towards a healthier lifestyle.
Sweat your troubles away as you stretch out in its spacious interior while listening to your
favourite soothing music through our FM radio/CD player.
iComfort Saunas are beautiful as well as functional and come in a number of convenient
sizes and shapes. All iComfort far infrared saunas are made with the highest quality
craftsmanship and include the latest carbon film heaters making them the sauna of
choice.
Each model is designed to enhance the look of any room. Their solid construction will
ensure many years of home wellness. iComfort far infrared saunas are ideal for optimal
health and wellbeing. They are beautifully made and specifically designed for the
ultimate in safety, efficiency and comfort. These finely crafted, non-toxic portable saunas
are one of the best investments you can make.

4
6. TIPS TO USE YOUR ICOMFORT SAUNA
It is recommended to wear minimal clothing in the sauna as some clothing materials
absorb the infrared rays and nullify its effectiveness.
After about a 10 minute warm-up period, the sauna is ready to use even if it has not
reached its maximum temperature.. You will feel the heat being generated by the infrared
emitters immediately. The wavelength of this heat will allow the rays to penetrate your
skin and heat your body beneath the skin surface.
Most people tend to sweat after about 20 minutes although this time shortens with
frequent sauna use.
It is recommended that you drink water before, during and after your sauna to make sure
you do not become dehydrated.
1. If you take a hot shower or bath before your sauna session,
you may perspire more.
2. To help regulate the ideal temperature inside the sauna you can use the movable
roof ventilation trap. This will evacuate heat faster.
3. Use one towel folded over several times for added cushioning.
4. To help relieve sore and tense muscles, massage the affected areas while in the
sauna to help heal faster.
5. To treat your ankles and feet more effectively, you can elevate them and move
them close to a heater to achieve a specific deep heating effect.
6. The peaceful and relaxed state rendered by a sauna session will help you to sleep
easier and better.
7. After the session is over, do not jump into the shower immediately. Since your
body was heated during the session it will continue to sweat even after the heaters
are off. Sit in the sauna with the door open and let the body sweat a little more
while it cools off. Once you feel comfortable enough, take a warm (or cool) shower
to rinse the perspiration off your body completely.

5
7. COMPONENTS
1. Floor and heater panel
2. Calf heater panel
3. Bench
4. Back panel carbon heater
5. Back panel
6. Right panel
7. Roof panel
8. Top cover
9. Air ventilation trap
10. Top panel control box
11. Left panel
12. Main control panel
13. Warning text
14. Front panel
15. Door handle
16. Glass door

6
8. INSTALLATION
Make sure all parts are present before installing the unit.
Choose a good location to install the sauna room and assemble the sauna near where it
will be placed.
1. The AC WALL OUTLET must be easily accessible.
2. The location must be dry and levelled.
3. Take all the panels and sauna components out of the boxes.
4. Tools Required: Screwdriver.
A set of screws is also provided:
8. 1. BOTTOM (FLOOR) PANEL
Place the bottom panel on the floor; make sure the bottom panel long side is facing
towards the front of the sauna.

7
8. 2. BACK PANEL
Place the BACK PANEL with the heating elements facing inward on the bottom panel
(Image1). Have someone to hold it.
Image 1

8
8. 3. LEFT/RIGHT PANEL
Place the left panel on top of the bottom panel on its left side (Image 2). Align the left
side panel to the back panel and insert them together. Insert the screws and screw the
panels together. Insert the caps to cover the screws. Place the right panel on top of the
bottom panel on its right side (Image 3). Align the grooves of the right side panel to the
back panel and insert them together. Insert the screws and screw the panels together.
Insert the caps to cover the screws. Make sure the left and right panels are horizontally
aligned with the back panel.
Image 2 Image 3

9
Remove the left side heater panel cover by pulling it out. Remove the right side heater
panel cover by pulling it out. The covers stay in place using high power magnets.
This will allow the insertion of the calf heater and the bench.

10
8. 4. FLOOR, CALF HEATER AND BENCH
1) Floor and calf heater.
Put the floor heater on the sauna base. Slide the largest calf panel heater between the
guides of the front right lateral front panel and the rear right lateral panel until it touches
the floor panel. Make sure the floor heater connection wire goes under the calf heater
panel notch. The heating elements of it should be directed outward (image 4). Screw the
floor panel heater with the provided screws. Use the pre-drilled holes at the four corner
of the panel.
Image 4
2) Connectors
Connect the floor heater panel with the right rear lateral panel connector. Then, connect
the connector of the large calf heater with the second rear right panel connector right to
the left of it.
Make sure the wires are connected tightly; otherwise the heater will not work (image 5).
Image 5

11
3) Bench
Slide the bench panel over the calf heater panel towards the back panel (Image 6).
Screw the bench in place with the provided screws. There are 4 pre-drilled holes at the
corners of the bench.
Image 6
8. 5. FRONT PANEL
Install the door handle by screwing together both handle parts on both sides of the
glass door. Then, place the FRONT PANEL onto the recessed area on the BOTTOM PANEL.
Align the tongues on both sides of the front panel to the grooves of the side panels and
insert them together (you will have to lift slightly the front panel). Make sure the front
and side panels are horizontally aligned (Image 8)
Image 8

12
8. 6. TOP PANEL
1. Place the TOP PANEL so the CONTROL BOX is upside (image 9).
Image 9
NOTE: Be careful of the connector cables of the SIDE PANELS while you place the TOP
PANEL. The connector cables should be inserted in the panels as much as possible. The
front and rear panels should align with the holes of the TOP PANEL in order to pass the
connector cables through to the TOP PANEL. Pass the cables through before lowering
completely the top panel. Failure to do so could damage the cables.
2. Lower the TOP PANEL into place and make sure ail the edges are well in place.
8. 7. RADIO/CD PLAYER INSTALLATION
Take out the screws from the screw bag and fix the CD player box onto the corresponding
battens of the top panel. Use the pre-drilled holes to screw the CD player box.
(image 11 - 12)
Note: Make sure it is seamless between the CD box and the top panel.
Image 11 Image 12

13
8. 8. CONNECTING THE CABLES ON THE TOP PANEL
Connect the AC connectors according to their respective marking. (Image a-d). Connect
the CD player with the connectors coming out of the top panel (image e). Make sure the
radio antenna is well connected at the back of the Radio/CD player on the lower left
corner. Make sure to insert it completely (See the Wiring diagram section).
NOTE: Do not connect the power cord from the TOP COVER in an AC wall outlet before
the installation is completely finished.
Image a
Image c
Image b
Image d

14
Image e
IMPORTANT: Unscrew and remove the 2 screws on top of the drive to unlock. Otherwise,
the CD player will not work.

15
8. 9. PUT ON THE TOP COVER ON THE TOP PANEL
Take out the power cord from the round hole on the TOP COVER and then place the TOP
COVER gently on the TOP PANEL, lower down and screw securely in place. Make sure the
antenna is reachable.(Image 13)
Image 13
8. 10. ACTIVATE AND ENJOY
Connect the sauna to the AC wall outlet and place the sauna where you want it to be.
The quality of radio reception may vary according to Sauna placement within the home.
CONGRATULATIONS, your iComfort sauna is now installed!

16
9. OPERATION
Sauna Control Panel
1. Press the POWER ON/OFF button on the outside or inside of the control panel. The
POWER ON light will go on.
2. Set up the heating time and temperature
Press the TIME ’+’ or ‘-’ button to increase or decrease the heating time of the
iComfort sauna. If you press continuously for more than 2 seconds, the TIME
display setting will change rapidly. Press the TEMPERATURE ’+’ or ‘-’ button to
increase or decrease the desired temperature of the iComfort sauna. If you press
continuously for more than 2 seconds, the TEMPERATURE display setting will
change rapidly.

17
3. Switch between °F and °C
Change the display between “°C” for Celsius and “°F” for Fahrenheit at your
convenience by pressing simultaneously on the TEMPERATURE ‘+’, ‘–‘ and the ‘light’
button
4. To stop heating
Press the ‘ON/OFF’ button. The Sauna and the heating elements will turn off.
5. Reading lamp
Press on the ‘light’ button to open the internal light. Press again to switch off.
Note: When the environmental temperature is low, the heating time will take longer.
It is also possible the sauna temperature display is not able to reach its maximum
temperature. This is normal and does not in any way affect the performance of the
infrared heaters or their health benefits. the sauna temperature sensor only measures
the heat radiated by the heating elements. It does not measure the infrared heaters
penetrating heat and this is where most of the health benefits are.
10. RADIO/CD PLAYER
Please refer to the included RADIO/CD PLAYER manual.

18
11. SAUNA TROUBLESHOOTING
11. 1. RADIO/CD PLAYER
If you press the button “power” button on the RADIO/CD PLAYER
and it does not power on:
• Please check whether the connectors on the top panel are well connected.
• If the RADIO/CD PLAYER still does not power on, please call customer service
at 1-866-967-7333
• If there is still no sound, please call customer service at 1-866-967-7333
If the RADIO/CD PLAYER powers on but there is no sound:
• Press the volume control button “VOL + “to increase the volume.
• Increase the sound volume of your music player to its maximum.
• If there is still no sound, please call customer service at 1-866-967-7333
11. 2. SAUNA
If you press the ‘LIGHT’ button on the control panel and the reading lamp does not open.
1. Disconnect the sauna.
2. Before you check the light, please feel if the light cover is hot,
• Remove the TOP COVER of the sauna.
• Screw off the cooper nuts on the lamp cover.
• Remove the lamp holder.
• Screw off the bulb gently.
• Replace a new bulb with the same voltage and wattage.
• Put the TOP COVER back on and fasten the clamps.
11. 3. CONTROL PANEL
The Control panel does not display anything.
1. Check if the AC connector is properly connected to the wall outlet and that the
POWER switch is turned on.
2. The CONTROL BOX might be damaged. Call customer service at 1-866-967-7333
The Control panel display works, but nothing happens when you press any buttons.
1. Signal cable might be disconnected.
2. Call customer service at 1-866-967-7333
Table of contents
Languages:
Other iComfort Plumbing Product manuals
Popular Plumbing Product manuals by other brands

Whirlpool
Whirlpool JETTED SINK Use & care guide

ZUCCHETTI
ZUCCHETTI Z94250 Instruction for the installation

Sanela
Sanela SLP 70RZ Instructions for use

Hans Grohe
Hans Grohe Cento 04571805 Installation/User Instructions/Warranty

Hans Grohe
Hans Grohe Focus N 71424 1 Series Installation/User Instructions/Warranty

Hans Grohe
Hans Grohe AXOR Citterio M 34315 1 Series Installation/User Instructions/Warranty