iConnectivity PlayAUDIO 1U User manual

User Guide
v2023-0001
1

INTRODUCTION............................................................................................................................................................................................................ 5
Feature List...............................................................................................................................................................................................................5
What’s in the Box?.................................................................................................................................................................................................... 6
System Requirements.............................................................................................................................................................................................. 6
HARDWARE DESCRIPTION......................................................................................................................................................................................... 7
Front Panel............................................................................................................................................................................................................... 7
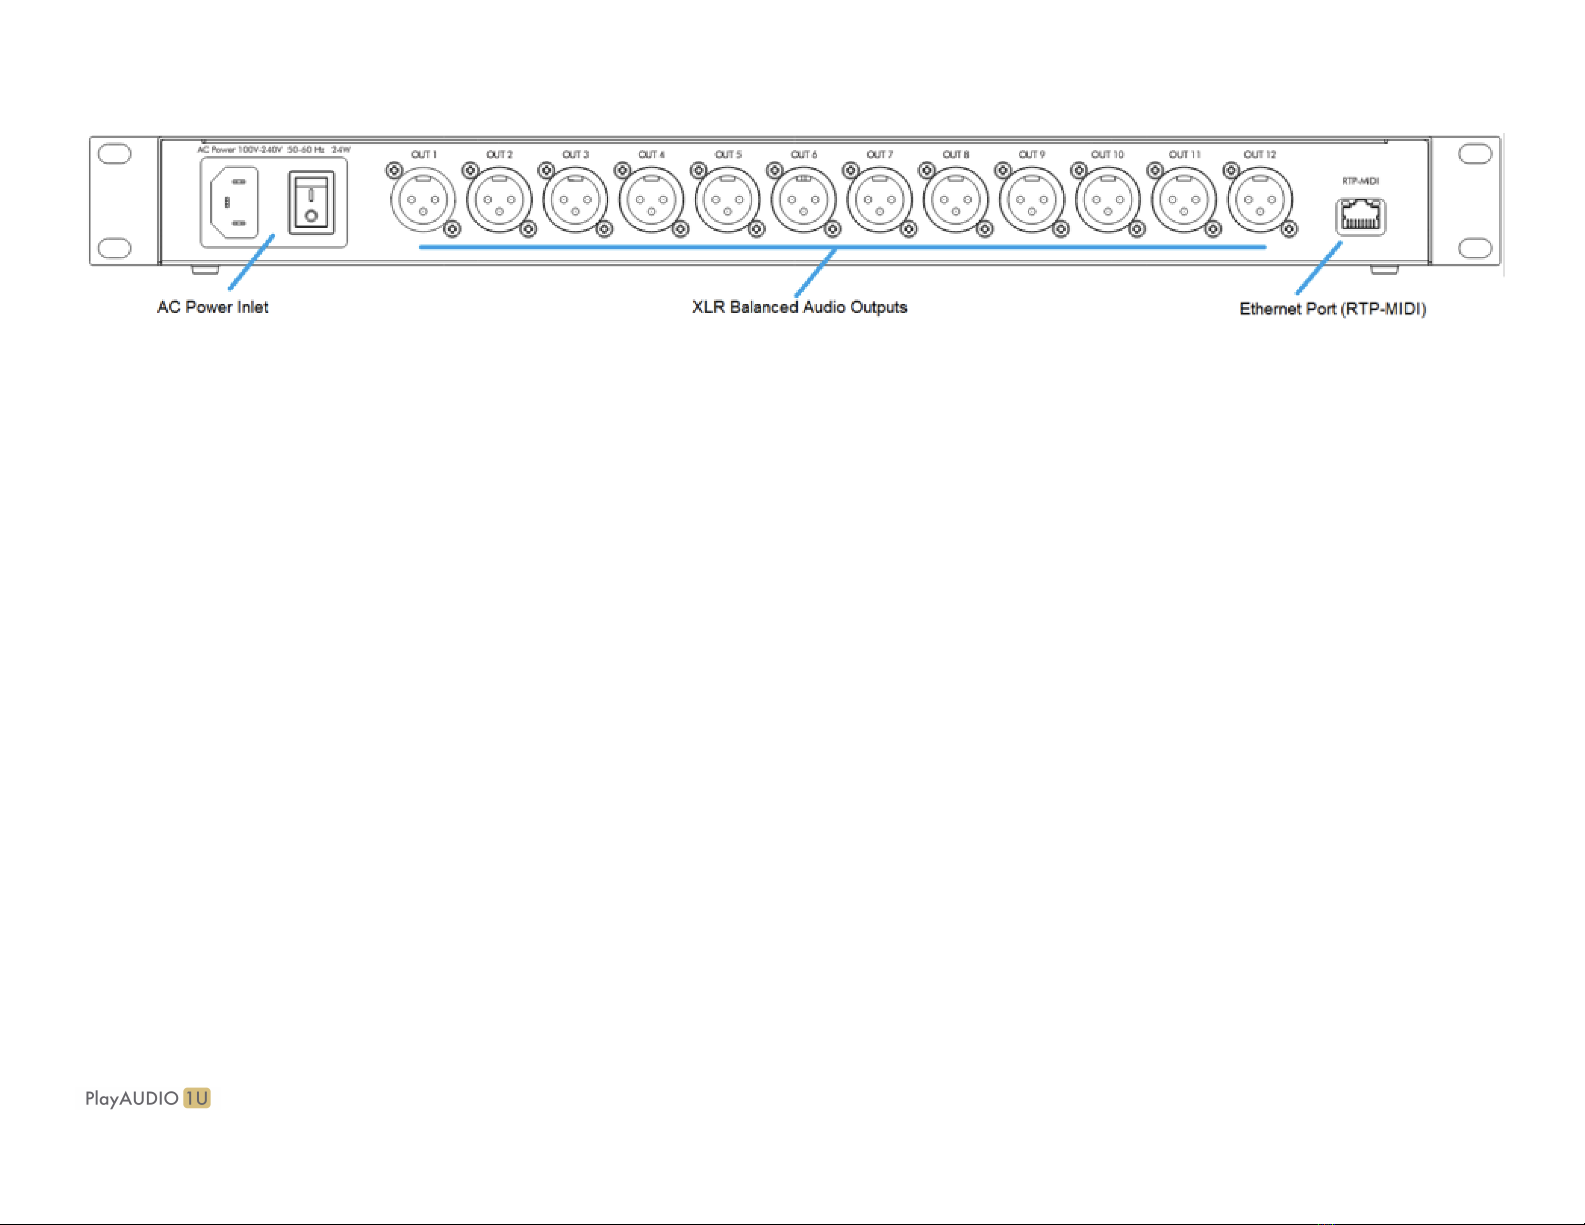
Rear Panel................................................................................................................................................................................................................8
Getting Started..............................................................................................................................................................................................................9
Install iConnectivity Audio Drivers (Windows).......................................................................................................................................................... 9
Install iConnectivity RTP MIDI Driver for Network MIDI (Windows)..........................................................................................................................9
Install Auracle X and upgrade your PlayAUDIO1U Firmware.................................................................................................................................10
PlayAUDIO1U Failover Redundancy......................................................................................................................................................................... 11
How the PlayAUDIO1U's Failover System Works...................................................................................................................................................11
How to Arm the PlayAUDIO1U for Automatic Failover..................................................................................................................................... 11
How to Test Automatic Failover........................................................................................................................................................................ 12
How to Configure the PlayAUDIO1U for Manual Failover................................................................................................................................ 12
Controls....................................................................................................................................................................................................................... 13
Interactive Touch Panel Display..............................................................................................................................................................................13
Using the Touch Panel and Main Rotary Encoder.................................................................................................................................................. 14
Using the Headphone Rotary Encoder................................................................................................................................................................... 16
Using the CONTROL ports..................................................................................................................................................................................... 16
SPECIFICATIONS........................................................................................................................................................................................................17
Audio.......................................................................................................................................................................................................................17
MIDI........................................................................................................................................................................................................................ 17
USB Host Port........................................................................................................................................................................................................ 17
USB-C Ports........................................................................................................................................................................................................... 18
User Guide v2023-001 2

Power......................................................................................................................................................................................................................18
Dimensions and Weights........................................................................................................................................................................................ 18
APPENDIX A: ADVANCED WINDOWS USERS.........................................................................................................................................................19
APPENDIX B: MORE RESOURCES........................................................................................................................................................................... 19
APPENDIX C: COMPLIANCE..................................................................................................................................................................................... 20
User Guide v2023-001 3

For more information about this and other products, please visit the
iConnectivity Knowledge Base on the iConnectivity Support Website.
Product Features, Specifications, and System Requirements may be subject to change.
The iConnectivity warranty policy may be found on our website at Warranty Policy.
Mac, macOS, OS X, and iOS are trademarks of Apple Inc., registered in the United States and/or other countries.
Windows is a registered trademark of Microsoft Corporation in the United States and/or other countries.
Android is a trademark of Google LLC.
iConnectivity and PlayAUDIO1U are trademarks of iKingdom Corp. Features of this product are protected under patent pending. For more details
see iConnectivity Patents.
© iKingdom Corp. 2023
v2023-0001
4

INTRODUCTION
Congratulations on the purchase of your new PlayAUDIO1U USB Audio + MIDI interface!
iConnectivity makes every effort to develop simple and intuitive hardware and companion control software. However, because your PlayAUDIO1U
interface includes so many advanced features, we strongly recommend that you read this manual carefully even if you are an experienced MIDI
user.
Feature List
● Two USB Type C DAW ports – use up to 2 computer devices Mac OS/Windows simultaneously
● Twelve XLR analog audio Line Outputs
● Stereo ¼” headphone output with two independent mixes (summable to one mix)
● DIN-MIDI ports built-in (1-in, 1-out)
● USB Host port (connect up to 8 USB MIDI class-compliant devices with a USB hub)
● Two MIDI mappable CONTROL footswitch ports
● Ethernet RTP-MIDI Network port
● Auracle X software (Mac OS, Windows) configuration and setup
● Use up to 2 Mac OS/Windows/iOS/Android computer devices simultaneously
● High-resolution audio - up to 24-bit/96kHz AD/DA conversion
● High definition OLED display and Capacitive touch user controls
● Endless multifunction rotary encoders
● 19” rack mountable
User Guide v2023-001 5

What’s in the Box?
● The PlayAUDIO1U Audio + MIDI Interface
● One IEC Power Cable - US / North American region
● One IEC Power Cable - EU region
● One IEC Power Cable - UK region
● Two USB Type C to Type C cables (black, white)
● One USB-Adapter: female USB-C to male USB-A
● Four Rubber feet
System Requirements
macOS
macOS X 10.11 (El Capitan) or newer
One free USB port Type-A or Type-C
PC/Windows
Microsoft Windows 10 or Windows 11
One free USB port Type-A or Type-C
iOS
iPad with USB Type-C port, or Lightning-equipped (iOS 9.3.5 or later) devices
via Apple Lightning to USB Camera Adapter (sold separately)
Android
Version 8.0 or newer
User Guide v2023-001 6

HARDWARE DESCRIPTION
Front Panel
●USB HOST port. Directly plug in a class-compliant MIDI device, or plug in up to eight class-compliant MIDI devices via a powered USB hub
(not included).
●CONTROL ports.Plug in up to two foot switches
●MIDI DIN ports. 5 pin DIN connections for MIDI Controllers
●Capacitive(cap) touch buttons & OLED. Manually switch scenes or inspect real time MIDI and audio information
●Rotary Encoder. Multi-function encoder. Double press to save current settings or spin to cycle through pages in the currently selected page
●USB DAW ports. USB C ports for connecting computers or tablets.**
●3.5mm Headphone port. Stereo mix
●Headphone Rotary Encoder. Multi-function encoder. Rotate to increase/decrease the headphone mix output volume; this also temporarily
calls up the headphone volume display. Additionally: Double press to mute all rear outputs; double press again to unmute; press once to call
the headphone volume display, and press again to return to the previous active menu.
** check out this article for more information on tablet connection
User Guide v2023-001 7

Rear Panel
●AC Power inlet.Fused Input jack for included IEC C13 power supply cable.
●Power switch. Turn the PlayAUDIO1U on or off. The switch will illuminate when power is turned on.
●XLR Balanced Audio Outputs. The PlayAUDIO1U's 12analog outputs provide low noise, phantom power-resistant connections
with up to 24-bit/96kHz DA conversion.
●RTP MIDI Port. Make long distance MIDI connections over ethernet.
User Guide v2023-001 8

Getting Started
Install iConnectivity Audio Drivers (Windows)
Before connecting the PlayAUDIO1U to a Windows computer, be sure to install the supplied iConnectivity audio drivers that are part of the Windows
Auracle X installer. Once the driver is successfully installed, you can attach your computer to either USB DAW Port A or B using a USB cable. The
interface should appear as a standard audio output device in Windows. You can route audio from music or video apps directly to the interface to
test.
Note that the headphone output volume is turned down and needs to be turned up before listening. This Quick Start Guide will show you how to get
sound running in and out of your interface as simply as possible.
Install iConnectivity RTP MIDI Driver for Network MIDI (Windows)
Before connecting the PlayAUDIO1U to a Windows computer, navigate to https://www.iconnectivity.com/windows-drivers and download the
RTP-MIDI Driver for Network MIDI. Launch the rtpMIDISetup Application and follow all prompts to install.
By default, your PlayAUDIO1U is pre-configured to work with standard Windows stereo audio. The interface is configured by default to send stereo
audio from the computer attached to USB DAW port A or B to all of the XLR outputs simultaneously and the headphone jack.
User Guide v2023-001 9

Install Auracle X and upgrade your PlayAUDIO1U Firmware
Before you begin using your PlayAUDIO1U, we recommend that you upgrade your unit's firmware to the latest version using iConnectivity's Auracle
for X application. Follow these steps to install the Auracle X software and perform the firmware upgrade:
1. Download the latest version (2.0.0) of the Auracle X software installer.
a. Navigate to https://www.iconnectivity.com/playaudio1u and follow the instructions for downloading the Auracle X software installer
specific to your computer.
b. Connect your to the USB DAW port A on the front panel of your PlayAUDIO1U unit.
2. Launch the iConnectivity Auracle X installer file. Connect your computer to the internet. Then, with your computer connected to the
PlayAUDIO1U, double-click the iConnectivity Auracle X installer.
3. Accept the firmware upgrade if your unit detects that newer firmware is available. The Auracle X software will prompt you to upgrade if a
newer firmware version is available. Verify that your device is connected to USB DAW port A and click Yes to continue with the upgrade. An
Upgrade Complete prompt will appear when the process completes, at which point Auracle X's Device Info page will refresh with your
PlayAUDIO1U's device statistics.
User Guide v2023-001 10

By default, your PlayAUDIO1U is pre-configured to work with Digital Audio Workstation (DAW) software. As a safety precaution, all the audio
output volumes are turned down and need to be raised. This Quick Start Guide will show you how to get sound running out of your interface as
quickly as possible.
PlayAUDIO1U Failover Redundancy
How the PlayAUDIO1U's Failover System Works
Your PlayAUDIO1U unit comes equipped with two independent failover mechanisms: Automatic Failover and Manual Failover. This failover
redundancy is designed to ensure that your backup system can always be engaged instantly and seamlessly, whether via auto-detection or through
manual switching. Taking advantage of both of these failover mechanisms is recommended for all live performance scenarios.
Automatic Failover uses a test tone sent from your DAW to establish an audio-recognition sync lock between your primary playback device and
your PlayAUDIO1U interface on a dedicated internal audio channel. Once armed, the PlayAUDIO1U instantly switches to your secondary device if
any break in the test tone signal is detected, providing a seamless failover to your backup system without audio or MIDI interruption.
Manual Failover allows you to connect a footswitch to either of the PlayAUDIO1U's programmable Control ports and instantly switch between your
primary and backup computers on the fly, enabling you to manually move to your backup system in the event of an emergency, or if you anticipate
an issue with your primary system before it actually occurs. Note that configuration of the control ports is necessary to assign failover switch function
to the control port.
How to Arm the PlayAUDIO1U for Automatic Failover
A tone generator is required to arm the PlayAUDIO1U for Automatic Failover. If a tone generator isn't included with your Digital Audio Workstation,
download and install iConnectivity's LifeSine test tone plugin from https://www.iconnectivity.com/downloads/.
Follow the steps below to arm the PlayAUDIO1U for automatic failover and test your unit's failover capability:
1. Connect Computer A (your primary playback device) to USB DAW Port A.
2. Connect Computer B (your failover playback device) to USB DAW Port B.
User Guide v2023-001 11

3. Verify that the PlayAUDIO1U is set to Scene A. If the LED indicator light below the Scene label is illuminated and red and the OLED display
shows “B” on the main page, touch the Scene LED once to toggle the button state and make Scene A the active scene.
4. On both computers (Computer A and Computer B), open your Digital Audio Workstation and load your playback project.
5. On Computer A (your primary playback device), instantiate your tone plugin on an available track and assign it to the PlayAUDIO1U's audio
output 15 (Control Tone). When your PlayAUDIO1U unit detects the test tone, a blinking shield icon will appear on the main page of the OLED,
indicating that the PlayAUDIO1U is armed for automatic failover. If a blinking shield icon does not appear on the main page of the OLED you may
need to open Auracle for X software and configure Failover settings in the Audio page of the PlayAUDIO1 menu. Refer to Auracle X documentation
for detailed instructions at https://www.iconnectivity.com/playaudio1u.
6. Connect a MIDI external controller to the USB host port. Ensure that both DAWs are configured so that playback can be triggered on both DAWs
simultaneously.
7. With the PlayAUDIO1U armed, use the attached external MIDI controller to trigger simultaneous playback on Computer A and Computer B.
How to Test Automatic Failover
1. Ensure that the PlayaAUDIO1U is armed and playback has been triggered on both computers. To force failover from Computer A to Computer B,
remove the cable from USB DAW port A. The PlayAUDIO1U will instantly switch over to Computer B as Audio and MIDI playback continues
uninterrupted. The Scene indicator LED will change to illuminate in red and the OLED will display “B”, indicating that Scene B is now the active
scene.
How to Configure the PlayAUDIO1U for Manual Failover
Failover can be engaged manually by touching either cap touch button above or below the Scene label on the Interactive Touch Panel Display. The
current scene is indicated as follows:
Scene A: The cap touch button above the Scene label is illuminated in green, and the Touch panel display shows the letter “A”
Scene B: The cap touch button below the Scene label is illuminated in red, and the Touch panel display shows the letter “B”
For information on how to use a footswitch to initiate manual failover, please see the updated Auracle X manual in the Control Ports section.
User Guide v2023-001 12

Controls
Interactive Touch Panel Display
The PlayAUDIO1U's Interactive Touch Panel Display is a capacitive touch panel that provides the following features:
● Eight touch zones for intuitive control over Scene selection, Audio or MIDI menu page selection, and Exit to main menu/Scene page.
● Both upper and lower cap touch buttons can be touched to access the function labeled in between cap touch rows.
● Send MIDI panic by double tapping either top or bottom MIDI cap touch button.
● An OLED display for monitoring current status of active scene and failover protection status, and audio output or MIDI input/output.
On the main screen depicted above, the following displays are active:
A
Current scene selection is scene A
Shield Icon
The shield icon will blink when tone is active and automatic failover is armed
Output Meter
The vertical bars are visual indicators of audio output for respective analog outputs.
MIDI Activity
Monitors general incoming and outgoing MIDI activity
User Guide v2023-001 13

Using the Touch Panel and Main Rotary Encoder
The rotary encoder is continuous and can make fine or coarse adjustments depending on how quickly you rotate the dial. Fine adjustments are
recommended if there is a risk of signal overload.Rotary Encoder Press functions include:
Committing Settings to Memory
Short press the Main Rotary Encoder twice to save settings. A notification will appear on the OLED and all
cap-touch buttons will flash amber twice
Restart unit
Long press for approximately 8 seconds until all cap-touch buttons have turned off after illuminating in amber,
then release.
Enter Bootloader Mode
Shutdown using the rear power switch. Long press the multifunction encoder until all cap-touch buttons
illuminate in amber and release.
View Interface Information
From the Home page, short press once to display your interface’s Serial Number, Firmware version,
Hardware version, and MAC Address
Pressing any of the PlayAUDIO1U touch zones toggles the zone to the next available state. Currently either touch zone above or below a respective
label has an identical effect.
Scene: Each single touch of either cap touch buttons above or below the Scene label toggles the current scene between A and B. The current
scene selection is indicated by a large letter A or B on the OLED display, or the following::
Scene A: Green cap touch button above the Scene label
Scene B:Red cap touch button below the Scene label
User Guide v2023-001 14

Audio: Touch to access the Audio menu page. Once the Audio page is active, use the rotary encoder to:
1. Turn to scroll through audio outputs between all, and 1-12 singularly.
2. Short press to select the highlighted audio output or all-output group.
When a single output or the all-output group is selected, turn to raise or lower the output level.
3. Short press again to exit to the main Audio page.
MIDI: Touch to access the MIDI menu page. Once the MIDI page is active, use the rotary encoder to:
1. Turn to cycle between MIDI port monitor pages: DAW A, DAW B, RTP, USB, DIN.
2. Tap has no function.
Exit: Touch to exit back to the main page.
User Guide v2023-001 15

Using the Headphone Rotary Encoder
Double tap the encoder rapidly to mute all analog outputs on the rear of the PlayAUDIO1U. Double tap again to unmute.
Tap the encoder to select the headphone mix for the currently active Scene.
Turn the encoder slowly to raise or lower the selected headphone mix volume in 0.5 dB increments.
Using the CONTROL ports
Use the PlayAUDIO1U CONTROL ports with compatible footswitch(es) to send CC/PC messages, arm or disarm automatic failover, load
CC / PC,or Toggle scenes
Complete instructions on configuring CONTROL port footswitch actions can be found in our Auracle documentation at
https://www.iconnectivity.com/auracle-x-series
User Guide v2023-001 16

SPECIFICATIONS
Audio
Digital Performance
24-bit resolution
D-A Dynamic Range: 115dB
Supported sample rates: 44.1 kHz, 48 kHz, 88.2 kHz, and 96 kHz
Line Outputs
Maximum Output Level: +16 dBu, 13.8 dBV, 4.9 Vrms
SNR: 115 dB (1kHz, BW: 22Hz-22kHz, A-weighted)
THD+N: -112 dB (1kHz, BW: 22Hz-22kHz, A-weighted)
Headphones
SNR: 110 dB (1kHz, BW: 22Hz-22kHz, A-weighted)
THD+N: -100 dB (1kHz, BW: 22Hz-22kHz, A-weighted)
Power: 100 mW per channel, 32-ohm load
MIDI
5-pin MIDI DIN I/O
Up to 10 MIDI ports (160 channels) per computer device (via powered USB hub, not included)
USB Host Port supports up to eight USB MIDI devices (via powered USB hub, not included)
USB Host Port
Power: +5V DC, 500mA maximum
User Guide v2023-001 17

USB-C Ports
Connect to Windows or macOS computer(s), Android or iPadOS devices (USB only, Apple Lightning not supported).
Power
Input: 100V - 240V AC, 50 - 60 Hz 24W
Fuse: 1A Slow-Blow
Dimensions and Weights
Height: 1U: 1.48” (37.5 mm)
Width: 19” (483 mm)
Depth: 7.81” (200 mm)
Weight: 8.73 lbs (3.96 kg)
User Guide v2023-001 18

APPENDIX A: ADVANCED WINDOWS USERS
PlayAUDIO1U Windows installation is plug-n-play with no requirement for special software drivers. However, iConnectivity also provides its own
Unified Windows Driver which supports multi-client capability (this allows the advanced user to access the PlayAUDIO1U interface from more than
one application simultaneously).
You may download and install the latest version of our Unified Windows Driver free-of-charge from our web site’s Windows Drivers page.
APPENDIX B: MORE RESOURCES
The iConnectivity website and iConnectivity Knowledge Base contain a wealth of helpful written articles and tutorials, as well as
instructional videos. For your convenience, selected hyperlinks into these systems are listed below:
The iConnectivity Knowledge Base main page is located at: iConnectivity Support Website.
Download our latest Unified Windows Driver from the website Windows Drivers page.
Download Auracle X software from the website Auracle X page.
Download the latest firmware from the website Firmware page.
MIDI protocols are explained on our Knowledge Base Intro to MIDI Connections page.
User Guide v2023-001 19

APPENDIX C: COMPLIANCE
Compliance Statement
The PlayAUDIO1U meets the requirements of the following standards and directives:
· FCC Part 15 Class B
· CAN ICES-003 (B) / NMB-003 (B)
· CISPR 32 Class B
· EN61000-4-2 | ESD
· EN61000-4-3 | Radiated Immunity
· EN61000-4-4 | EFT
· EN61000-4-5 | Surge Immunity
· EN61000-4-6 | Conducted Immunity
· EN61000-4-8 | Magnetic Immunity
· EN61000-4-11 | VDI
· EN61000-3-2 | Harmonic
· EN61000-3-3 | Flicker
· IEC/EN-62368-1
Declaration of Conformity
We, iConnectivity, declare that the PlayAUDIO1U complies with Part 15 of the FCC Rules. Operation is subject to the following two conditions: (1)
this device may not cause harmful interference, and (2) this device must accept any interference received, including interference that may cause
undesired operation.
User Guide v2023-001 20
Table of contents
Other iConnectivity Recording Equipment manuals