iCoo Targo User manual

Targo
GEBRAUCHSANWEISUNG
INSTRUCTION FOR USE
MODE D’ EMLOI
GEBRUIKSAANWIJZING
ISTRUZIONI PER L’USO
INSTRUCCTIONESPARAELUSO
D
GB
F
NL
I
E

1a 1b
2
3a
4a
4b
3b
3c

5d 1a
6
5e 5f
5g 5h 5i
7a
5a 1a5b 5c
7b

7c 7d
7e 7f 7g
7h
8b8a
9b9a

10a
10b 10c
10d 10e
10f 10g
10h 11a 11b

12a 12b
12c
12d 12e
13a

13b 13c
14a 14b 15
16a 16b

IM-Targo0612
Inhalt
Garantie ..................................................................................4
Warnhinweise und zu berücksichtigende Punkte ........5
Pflege und Wartung.............................................................6
Anleitung City-Gestell ........................................................6
Aufklappen/Zusammenklappen........................................6
Das Zusammenklappen des Kinderwagens ...................7
Schieberstange .....................................................................7
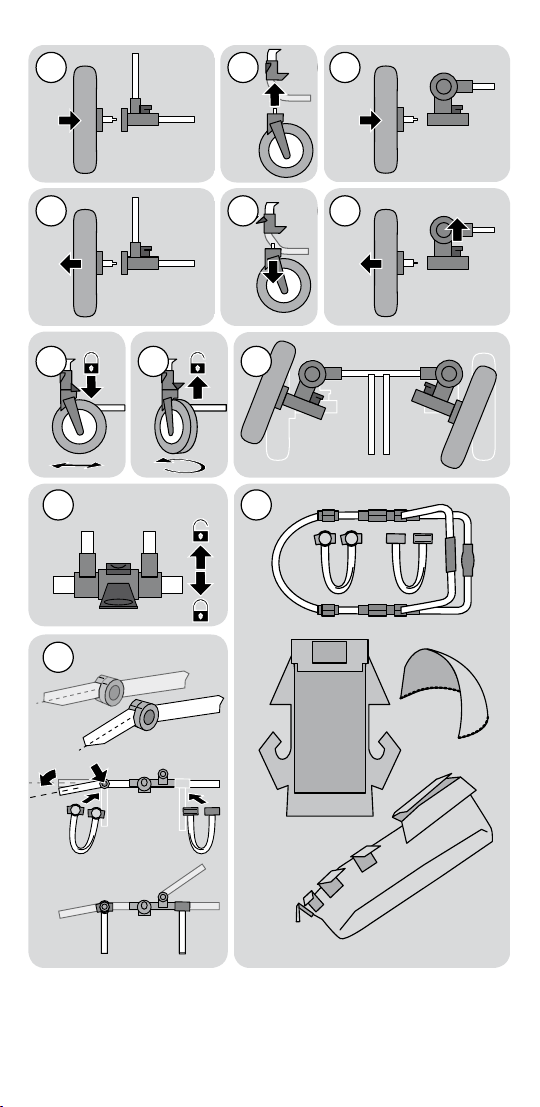
Räder........................................................................................7
Das Abnehmen der Hinterräder........................................7
Das Abnehmen der Vorderräder (Schwenkräder) .......7
Das Arretieren der Schwenkräder....................................7
Bremsen..................................................................................7
Das Einstellen der Sitzhöhe ...............................................7
Anleitung Country-Gestell.................................................8
Aufklappen/Zusammenklappen........................................8
Das Zusammenklappen des Kinderwagens ...................8
Schieberstange .....................................................................8
Räder........................................................................................8
Das Abnehmen der Hinterräder........................................8
Das Abnehmen der Vorderräder.......................................8
Lenken.....................................................................................8
Bremsen..................................................................................8
Das Einstellen der Sitzhöhe ...............................................8
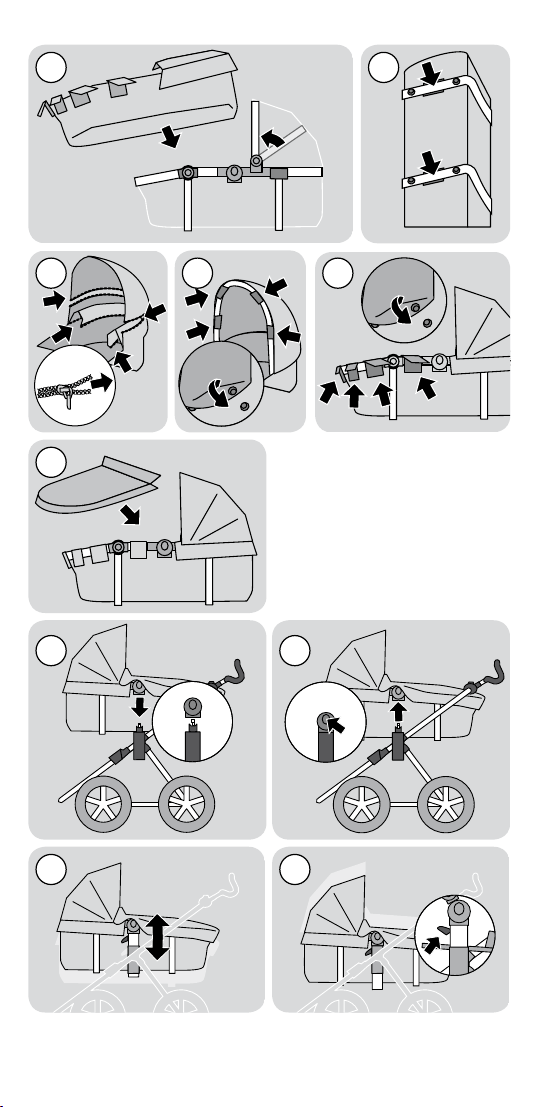
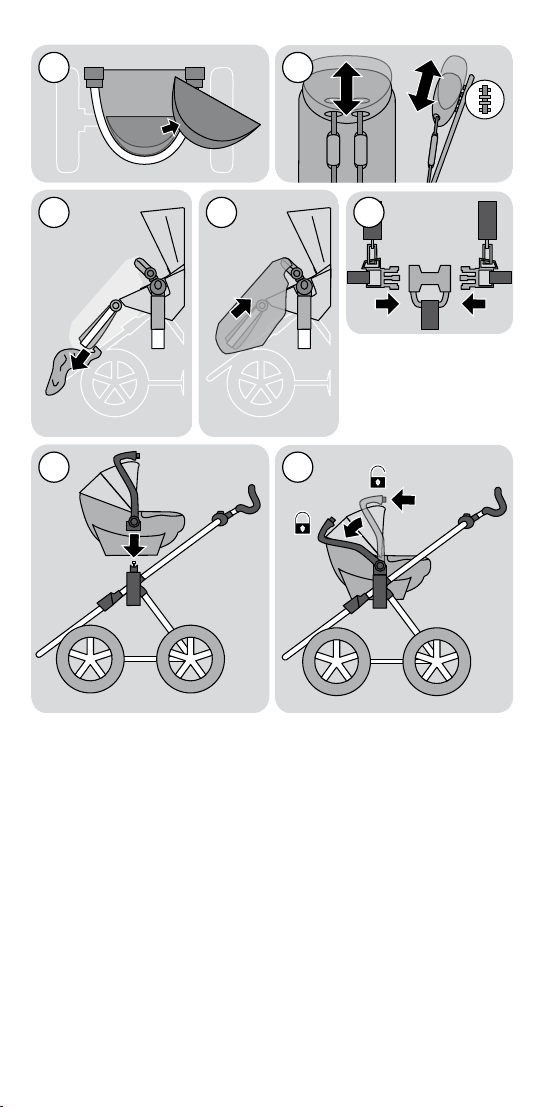
Targo Babywanne .................................................................9
Das Anbringen der targo Babywanne .............................9
Das Abnehmen der Babywanne vom Gestell................9
Das Einstellen der Höhe der Babywanne .......................9
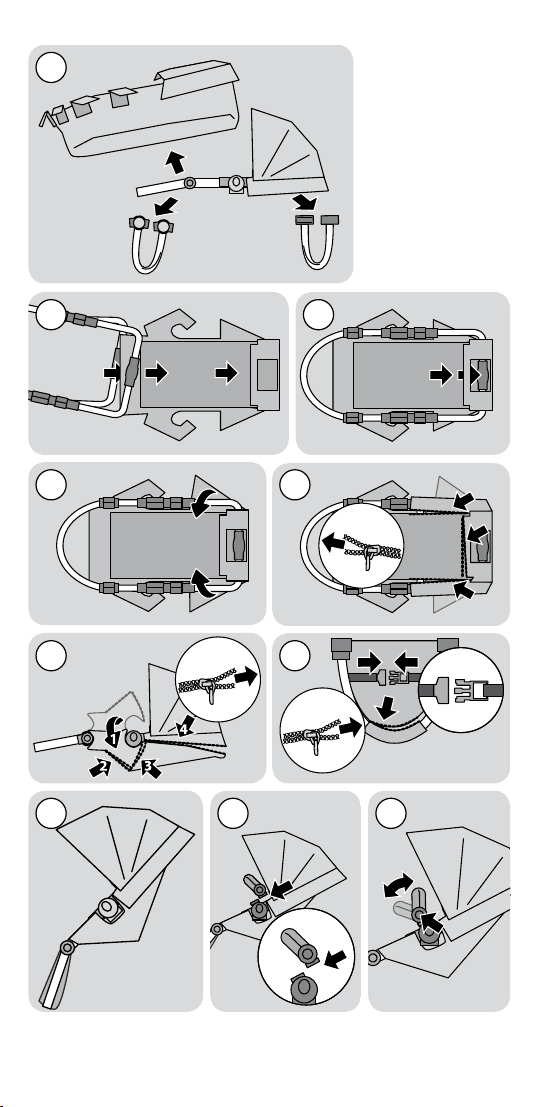
Umbau der Babywanne zum Targo Sitz..........................9
Frontbügel ........................................................................... 10
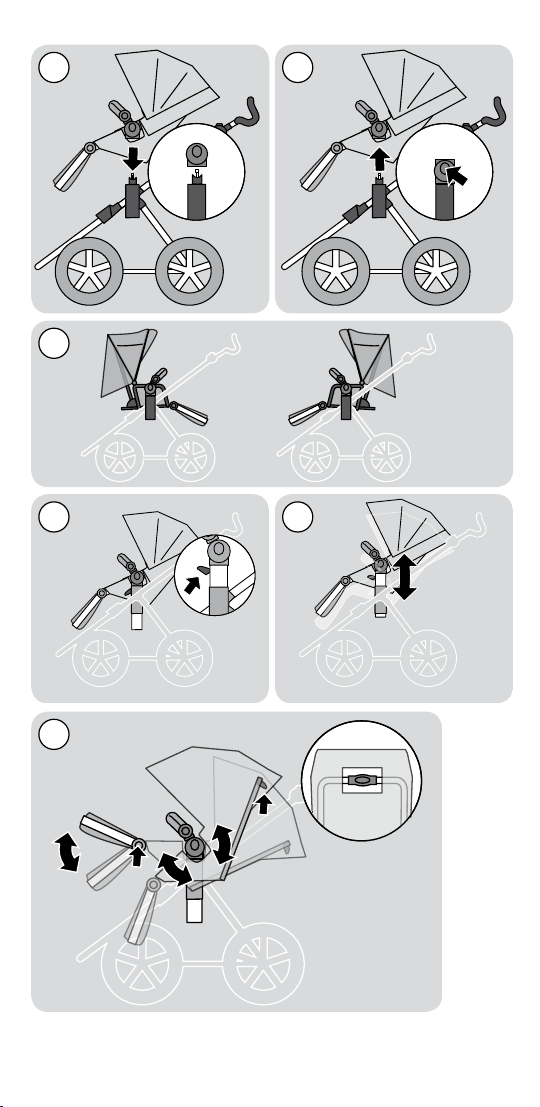
Das Abringen der Targo Sitzeinheit .............................10
Das Abnehmen des Sitzes vom Gestell .......................10
Das Einstellen der Sitzhöhe ............................................ 10
Das Einstellen der Rückenlehne.....................................10
Das Einstellen Füßstütze ................................................. 10
Das Einstellen der Kopfstütze........................................ 10
Regenschutz.......................................................................11
5-Punkt-Sicherheitsgurt................................................ 11
Das Anbringen des Baby-Autositzes............................11
Index
Warranty..............................................................................12
Warnings and points of attention..................................13
Care and maintenance......................................................14
Instruction City-frame..................................................... 14
Unfold/Fold......................................................................... 14
Folding the pushchair ....................................................... 14
Handlebar ............................................................................14
Wheels..................................................................................15
Removing the rear wheels ..............................................15
Removing the front wheels (swivel wheels)..............15
Locking the swivel wheels ..............................................15
Brakes................................................................................... 15
Adjusting the seat height ................................................15
Instruction Country-Frame ............................................ 15
Unfold/Fold......................................................................... 15
Folding the pushchair ....................................................... 15
Handlebar ............................................................................15
Wheels..................................................................................15
Removing the rear wheels ..............................................15
Removing the front wheels ............................................16
Steering................................................................................16
Brakes................................................................................... 16
Adjusting the seat height ................................................16
Targo pram .......................................................................... 16
Placing the Targo pram ...................................................16
Removing the pram from the frame ............................ 16
Adjusting pram height...................................................... 16
Changing the pram to the targo seat...........................16
Frontbar ............................................................................... 17
Placing the Targo seat unit.............................................. 17
Removing the seat from the frame.............................. 17
Adjusting the seat height ................................................17
Adjusting the backrrest....................................................17
Adjusting of the footrest................................................. 17
Adjusting of the headrest................................................ 17
Raincover............................................................................. 17
5-point safety belt ........................................................... 17
Placing the Lifesaver carseat ......................................... 17

CONTENU
garantie ...............................................................................12
avertissements et mises en garde ...............................12
entretient et maintenance .............................................13
généralités .......................................................................13
nettoyage des housses ................................................14
nettoyage du cadre .......................................................14
maintenance des roues ................................................14
première utilisation ..........................................................14
ampleur de la livraison................................................... 14
montage............................................................................14
montage de la nacelle de la poussette...................... 14
montage de la capote.................................................... 14
tendeur de capote.......................................................... 14
montage de l’etrier avant.............................................14
reglage de le l’etrier avant ..........................................15
reglage du dossier ..........................................................15
reglage du repose-pieds............................................... 15
securiser votre enfant...................................................15
reglage de la hauteur de l’anse a une main..............15
freins .................................................................................15
roues .................................................................................15
repliage.............................................................................. 15
INHOUD
garantie ...............................................................................16
waarschuwingsinstructies en aandachtspunten ......17
verzorging en onderhoud ............................................18
algemeen .........................................................................18
reiniging van de overtrekken ......................................18
reiniging van het onderstel .........................................18
instandhouding van de wielen .................................... 19
gebruiksaanwijzing ...........................................................19
leveringsomvang ............................................................19
opstellen............................................................................ 19
montage van het sportwagenelement .....................19
montage van de kap ......................................................19
kapspanner....................................................................... 19
montage van de voorste beugel................................. 19
verstelling van de voorste beugel..............................19
rugverstelling................................................................... 19
regeling van het voetengedeelte................................19
uw kind beveiligen..........................................................20
instelling van de hoogte met de eenhandschuif.....20
remmen.............................................................................20
wielen ................................................................................20
samenvouwen ................................................................20
1

2
INDICE
garanzia ...............................................................................21
avvertenze e punti da osservare ..................................21
cura e manutenzione .......................................................22
in generale ....................................................................... 22
pulizia dei rivestimenti ................................................. 23
pulizia dell’intelaiatura .................................................. 23
manutenzione delle ruote.............................................23
instruzioni per l’uso ..........................................................23
volume della fornitura ................................................... 23
montaggio .......................................................................23
montaggio della sovrastruttura del passeggino .....23
montaggio della capottina............................................23
tendi-capottina...............................................................23
montaggio del manicotto ............................................. 24
regolazione del manicotto............................................24
regolazione dello schienale .......................................... 24
regolazione dell’ appoggiagambe...............................24
fissaggio del bambino.................................................... 24
regolazione dell’altezza del manico ...........................24
freni.................................................................................... 24
ruote ..................................................................................24
chiusura del passeggino................................................ 24
CONTENIDO
garantía ...............................................................................25
instrucciones de aviso y puntos a tener en cuenta .25
mantenimiento y cuidados .............................................26
generalidades ..................................................................26
limpieza de los forros ....................................................27
limpieza del bastidor .....................................................27
mantenimiento de las ruedas ..................................... 27
insrucciones de uso ..........................................................27
volumen de suministro..................................................27
colocación figuras...........................................................27
montaje de la pieza superpuesta del carro deportivo...27
montaje de la cubierta...................................................28
sujeción de la capota ..................................................... 28
montaje del estribo delantero.....................................28
reajuste del estribo delantero...................................... 28
reajuste del respaldo dorsal ........................................28
reajuste del posapiés ....................................................28
asegurar al nino............................................................... 28
reajustedelaalturadela correderaconuna sola mano........28
frenos................................................................................. 28
ruedas................................................................................28
plegar el carro.................................................................. 28

3
GARANTIE
i’coo Produkte werden von der Konzeption bis zur Produktion
mit höchsten Qualitätsansprüchen und unter ständigen
Qualitätskontrollen angefertigt. Wir möchten, dass Sie als
Kunde ein perfektes Produkt von uns erhalten.
Sollte es dennoch Grund zu Beanstandungen geben können Sie
auf unsere Garantieleistungen vertrauen. Wir sind bestrebt,
alle Serviceleistungen zur vollsten Zufriedenheit zu bearbeiten.
Nachfolgend finden Sie unsere Garantiebestimmungen. Für
nähere Einzelheiten wenden Sie sich aber gerne auch an
unseren Kundendienst.
• Die Garantie beginnt mit dem Kaufdatum und gilt für sechs
Monate. Bitte bewahren Sie den Original-Kassenbon mit
Datum für diesen Zeitraum auf. Im Interesse der Sicherheit
Ihres Kindes bitten wir Sie, keine Veränderungen am Pro-
dukt vorzunehmen. In einem solchem Fall können wir keine
Garantie mehr übernehmen. Bitte haben Sie Verständ-
nis dafür, dass die Garantie nur vom ersten Eigentümer in
Anspruch genommen werden kann und nicht übertragbar
ist.
• Sollten Sie einmal Grund zu Beanstandungen haben, wen-
den Sie sich bitte an Ihren Fachhändler. Wenn er das Pro-
blem nicht beheben kann, wird er das Produkt mit einer
eindeutigen Reklamationsbegründung und dem Original-
Kassenbon mit Datum an uns schicken. Es besteht jedoch
kein Anspruch auf Umtausch oder Rücknahme und Repara-
turen führen nicht zu einer Verlängerung der Garantiezeit.
• Als Hersteller haften wir ausschließlich für Schäden an Pro-
dukten, die von uns produziert wurden.
• Natürlicher Verschleiß unterliegt nicht den Garantie.
• Die Garantie ist nicht gegeben, wenn:
- uns das Produkt nicht zusammen mit dem Original-
Kassenbon vorgelegt wird.
- die Defekte durch unsachgemäße Benutzung oder
mangelnde Pflege, die abweichend von den Anweisun-
gen der Gebrauchsanweisung entstanden sind.
- Reparaturen am Produkt von Dritten ausgeführt wur-
den.
- der Defekt durch Vernachlässigung entstanden ist.
- der Defekt durch einen Unfall entstanden ist.
- die vorgenannten Garantiebestimmungen nicht erfüllt
werden.
D

4
D
WARNHINWEISE UND ZU BEACHTENDE PUNKTE
Lesen Sie vor Gebrauch die Anleitung aufmerksam durch und
bewahren Sie diese sorgfältig auf. Bei Außerachtlassen dieser
Anweisungen gefährden Sie unter Umständen die Sicherheit
Ihres Kindes.
• Dieser Wagen ist für 1 Kind ab einem Alter von 0
Monaten und mit einem Gewicht bis 15 kg bestimmt.
Die maximale Beladung des Kinderwagens darf 15 kg
nicht überschreiten.
• WARNUNG: Lassen Sie Ihr Kind nicht unbeaufsichtigt.
• WARNUNG: Halten Sie Plastikverpackungsmaterialien aus
der Reichweite von Kindern, um eine Erstickungsgefahr
zu vermeiden.
• WARNUNG: Vergewissern Sie sich vor Gebrauch, dass alle
Verriegelungen geschlossen sind.
• WARNUNG: Verwenden Sie einen Sicherheitsgurt, sobald
Ihr Kind selbstständig sitzen kann.
• WARNUNG: Verwenden Sie den Schrittgurt immer in
Verbindung mit dem Beckengurt.
• WARNUNG: Die Sitzposition ist für Kinder unter 6
Monaten nicht geeignet.
• WARNUNG: Am Schieber befestigte Lasten
beeinträchtigen die Standfestigkeit des Wagens.
• WARNUNG: Beim Abstellen des Wagens und beim
herausnehmen und hineinsetzen des Kindes immer die
Feststellbremse(n) betätigen.
• WARNUNG: Dieses Erzeugnis ist nicht geeignet zum
Joggen oder Skaten.
• WARNUNG: Befahren Sie mit dem Kinderwagen keine
Rolltreppen, Treppen und Stufen.
• WARNUNG: Denken Sie daran, dass kleine Teile durch
Ihr Kind verschluckt werden und Ersticken verursachen
können.
• WARNUNG: Legen Sein keine zusatzlichen Matratzen in
den Kinderwagen.
• Bitte verwenden Sie nur original i’coo-Zubehör und
original i’coo- Ersatzteile.
• Vermeiden Sie extreme Gebrauchssituationen, die Ihre
Kontrolle über das Kind und den Kinderwagen verringern.
• Benutzen Sie nur den angegeben Platz für Zuladung und
überschreiten Sie nicht das maximal zulässige Gewicht
von 15 kg.
• Der Kinderwagen darf nur für den Transport von einem
Kind verwendet werden.
• Achten Sie darauf, dass die Hände des Kindes nicht in
Faltbereiche geraten und so Gefahr laufen gequetscht
zu werden, wenn Sie den Kinderwagen oder Teile davon
falten, entfalten oder anderweitig verändern.
• Der Korb darf maximal mit 3 kg belastet werden.
• Dieser Wagen ist nur mit der mitgelieferten Sitzeinheit,
Sitzbezug oder Kinderwagenaufsatz kompatibel.
• Überprüfen Sie die Sichere Befestigung.
• Dieser Kinderwagen ist nicht für den sicheren Gebrauch
einer Plattform (Hilfsmittel zum befördern eines Kindes)
geeignet.
DIESER KINDERWAGEN ENTSPRICHT DEM STANDARD
EN 1888:2003-01 + A 1 : 2005 + A 2 : 2005 + A 3
: 2005

5
D
PFLEGE UND WARTUNG
ALLGEMEIN
Bitte überprüfen Sie regelmäßig die Funktionen Ihres
Kinderwagens. Achten Sie auf Stabilität des Rahmens, auf
einen festen Sitz der Schrauben, einen sicheren Verschluss
der Verriegelungen, einen sicheren Halt der Räder sowie
funktionstüchtige Bremsen. Überprüfen Sie von Zeit zu Zeit
die Stoffbezüge auf Festigkeit der Nähte und Plastikteile
auf deren Beschaffenheit. Defekte bzw. abgenutzte
Verschleißteile sollten unbedingt ausgetauscht werden.
Ebenso verfahren Sie mit Bauteilen welche gebrochen,
zerrissen, defekt oder verschlissen sind. Verwenden Sie dabei
bitte nur original i’coo-Ersatzteile.
Setzen Sie Ihren Kinderwagen nicht einer übermäßigen
Sonneneinstrahlung aus. Es kann zum Ausbleichen der
Textilbezüge und Plastikteile kommen.
REINIGUNG DER BEZÜGE
Entfernen Sie den Bezug vom Gestell indem Sie die Laschen,
Druckknöpfe oder Schrauben lösen. Vor dem Waschen
beachten Sie bitte die Hinweise auf dem eingenähten
Waschetikett.
Um den Bezug schonend zu pflegen, reinigen Sie diesen,
indem Sie den Bezug lediglich mit einem feuchten Tuch
gleichmäßig abwischen. Bei
Stoffbezügen mit nicht entfernbaren Einlagen beachten Sie
bei diesem Vorgang dass gesamte Teil nicht zu durchnässen.
Wenn sich am, oder im
Bezug keine Plastikteile, Holzteile oder Metallteile befinden,
können Sie ihn bei 30° in der Waschmaschine waschen und
bei mittlerer Schleuderzahl schleudern. Lassen Sie den Bezug
an der Luft, jedoch nicht in der prallen Sonne trocknen. Den
Bezug bitte nicht in den Wäschetrockner geben, um ein
Schrumpfen zu vermeiden. Bauen Sie die Bezüge erst wieder
ein, wenn Sie völlig trocken sind.
REINIGUNG DES RAHMENS
Um den Rahmen Ihres Kinderwagens zu reinigen, verwenden
Sie nur milde Seifenlauge oder lauwarmes Wasser. Trocknen
Sie den Wagen nach der Reinigung oder
nach der Benutzung bei Regen und Schnee mit einem
weichen Tuch ab.
Kunststoffteile können mit handelsüblichen Reinigern
gesäubert werden.
INSTANDHALTUNG DER RÄDER
Reinigen und warten Sie die Räder regelmäßig. Die
Behandlung mit einem Silikonspray oder Korrosionsspray
schützt vor Rost und Ablagerungen.
Im Winter ist darauf zu achten, dass Streusalzrückstände
umgehend entfernt werden. Entfernen Sie regelmäßig den
Schmutz von den Rädern und Achsen.

6
GEBRAUCHSANWEISUNG
1. LIEFERUMFANG
• Rahmen inklusive 4 Rädern
• Sitz, Verdeck und Vorderbügel
2. AUFSTELLEN BILD 1,2
Beide Transportsicherungen lösen. Wagen nach oben
auseinander klappen, Schieber hochziehen bis beidseitig die
Verriegelungen hör- und sichtbar eingerastet sind.
3.
MONTAGE DES SPORTWAGENAUFSATZES BILD 3,4
Sportwagenaufsatz mit den entsprechenden Führungen an der
Unterseite auf die Aufsatzhalterungen des Fahrgestells aufsetzen.
Beim richtigen Aufsetzen erfolgt die Verriegelung automatisch.
Verriegelung unbedingt überprüfen.
Zum Abnehmen des Sportwagenaufsatzes drücken Sie die
Entriegelungshebel
die in beiden Eingriffen des Aufsatzes integriert sind.
4. VERDECK
BILD 5,6
• Bringen Sie das Verdeck an, indem Sie die Enden des
Verdecks über die Griffe am Sitz schieben, bis Sie auf beiden
Seiten ein Klicken hören (5).
• Sie können das Verdeck entfernen, indem Sie die
Plastikknöpfe an der Innenseite der Griffe gleichzeitig
eindrücken und das Verdeck abziehen.
• Zum Öffnen des Verdecks drücken Sie die Vorderseite des
Verdecks nach vorne und den Verdeckspanner nach unten
(6a).
• Um das Verdeck zu schließen, drücken Sie den
Verdeckspanner nach oben und die Vorderseite des
Verdecks nach hinten (6b).
5. MONTAGE DES VORDERBÜGELS BILD 7
Zum Befestigen des Vorderbügels schieben Sie den
Vorderbügel in Pfeilrichtung in die vorgesehene Halterung bis
sie durch einen leichten Klick einrastet.
6. VERSTELLUNG DES VORDERBÜGELS BILD 8
Drücken Sie beidseitig die Verstellknöpfe, stellen Sie
die gewünschte Position ein. Nach der Fixierung der
gewünschten Position treten die Knöpfe wieder heraus.
7. NACHEINSTELLUNGEN BILD 9
• Die Rückenlehne ist auf 4 Positionen einstellbar.
• Die Rückenlehne kann steiler oder flacher eingestellt werden, indem Sie den
Hebel auf der Rückseite der Lehne (9) anheben und die Rückenlehne in die
gewünschte Position bringen.
ANMERKUNG: Gestatten Sie dem Kind niemals auf der Fußstütze zu sitzen
oder zu stehen.
8. FUSSTEILVERSTELLUNG BILD 10
Durch Drücken der beiden Verstellknöpfe kann das Fußteil auf
die gewünschte Stellung gebracht werden.
9. IHR KIND SICHERN BILD 11
ACHTUNG: Um Verletzungen durch Herausfallen oder Herausgleiten
auszuschließen, sichern Sie Ihr Kind zu jeder Zeit mit dem Sicherheitsgurt.
Bitte beachten Sie auch, wenn Sie Kinder in den Wagen legen, dass der
Wagen möglicherweise kippen kann.
Den Sicherheitsgurt wie folgt anlegen: Schrittgurt zwischen die Beine des
Kindes führen. Danach die beiden Enden des Becken- ind des Schultergurtes
in die Gurtschnalle einstecken. Weite des Gurtes dem Kind anpassen.
10. EINHANDSCHIEBERHÖHENVERSTELLUNG BILD 12
UmdenSchieberinderHöhezuverstellendrückensiedenKnopfander
OberseitedesSchiebers,durchrausziehenbzw.einschiebenkanndievonIhnen
gewünschteHöhefixiertwerden.
D

7
11. BREMSEN BILD 13, 14
Anwenden der Bremse: Treten Sie das Bremspedal mit Ihrem Fuß
nach unten. Die Bremse ist arretiert, wenn der rote Streifen zu
sehen ist.
Lösen der Bremse: Drücken Sie das Pedal nach hinten um die
Bremse zu lösen.
12. RÄDER BILD 15
Durch Drücken der Tasten über den Vorderrädern
fixieren bzw. lösen Sie die Arretierung der Räder, so
dass die Räder frei lenken können.
13. ZUSAMMENLEGEN BILD 16, 17
Lösen Sie den verriegelten Rahmen, indem Sie das mit dem Pfeil
markierte Plastikstück, auf der linken Seite des Schiebers zu sich hin
ziehen, während Sie den Schieber dabei bis nach unten drücken. Jetzt
können Sie den Wagen nach oben umlegen, und dann zusammenlegen.
Drücken Sie dabei ständig den Knopf der Schieberhöhenverstellung.
Beim Transport des Wagens achten Sie darauf das der Schieber über
dem Vorderrad liegt und die Transportsicherung eingerastet ist.
D

8
WARRANTY
Thank you for purchasing a quality i’coo product. This i’coo
warranty is designed to provide you total satisfaction with
your i’coo product purchase. In the event that service
repairs are required with your i’coo product, please read the
following outline to ensure that your product is covered by
our i’coo Manufacturers Warranty:
• The warranty period is effective upon date-of-purchase,
and is valid six months following your purchase. In order
to confirm your warranty coverage please retain the
original sales receipt as proof-of-date on your purchase.
• This warranty is non transferable.
• The warranty is valid solely to the product or products
of that which were purchased by the original purchaser /
owner.
• There are no extended warranties on products; including
repaired products by i’coo.
• Product concerns should be first directed to the product
retailer. If they cannot offer proper assistance or a
solution, the product then can be returned to i’coo
through the assistance of that retailer from where the
product was purchased. Which must include: complete
product, complaint description, as well as the original
sales receipt with proof of date of purchase.
• If any alterations are made to the product, after the
initial purchase, this warranty will be considered void.
• The warranty does not include product defects caused
by:
- product neglect
- improper usage - as outlined in the instructions
manual.
- accidental damage inflicted by the product user.
GB

9
GB
WARNINGS AND POINTS OF ATTENTION
Read these instructions carefully before use and keep them
safe. If you do not follow these instructions, your child’s
safety can be impaired.
• This stroller is meant for 1 child from 0 months upwards,
weighting up to 15kg The maximum load on this stroller
may not exceed 15kg.
• Warning : It may be dangerous to leave your child
unattended.
• WARNING: Keep all plastic packaging materials out of the
reach of children, in order to avoid any risk of suffocation.
• Warning : Ensure that all locking devices are engaged
before use.
• Warning : Use a harness as soon as your child can sit
unaided.
• WARNING: Always use the crotch belt in combination with
the waist belt.
• WARNING: This upright sitting position is not suitable for
child under 6 months.
• WARNING: Any loads attached to the handle restrict the
stroller’s stability.
• WARNING: Always use the parking brake when parking the
stroller and during the loading and unloading of your child.
Ensure that all locking devices are engaged before use.
• WARNING: Remember that small parts can be swallowed
by your child and can cause choking.
• WARNING: Overloading, incorrect folding and use of non-
approved accessories may damage or break this stroller.
• WARNING: It may be unsafe to use accessories, e.g. child
seats, bag hooks, rain covers...etc., unless those approved
by the manufacturer or distributor.
• WARNING: It may be unsafe to use replacement
parts other than those supplied or approved by the
manufacturer or distributor.
• WARNING: Do not lay any additional mattresses on the
stroller
• Please use only original i’coo accessories and original i’coo
spare parts.
• Avoid extreme usage situations that restrict your control
over the child and the stroller.
• Warning : This product is not suitable for running or
skating.
• Do not ride on any escalators or stairs, and be careful
using in the elevator while your child is in the stroller.
• Only use the space allowed for loading and do not exceed
the maximum permitted weight of 15kg.
• This stroller is only designed for transporting 1 child in 1
time.
• This stroller is compatible only with the original seat unit,
seat cover or pram body.
• Please make sure that the child’s hands are nowhere new
the folding area, so as not to risk them from being crashed
if you have to fold up, unfold, or otherwise change the
stroller or parts of it.
• The maximum loading weight of the basket is 3 kg.
• Do not use a platform to transport an additional child
THIS STROLLER COMPLIES WITH STANDARD EN
1888:2003-01 + A 1 : 2005 + A 2 : 2005 + A 3 : 2005

10
GB
CARE AND MAINTENANCE
GENERAL POINTS
Please check the proper functioning of the push-chair
regularly. Ensure that the frame is stable, that the screws
and bolts are secure, that latches and catches are properly
locked, that the wheels are fixed and that the brakes are in
good working order. From time to time, check the strength
of the textile cover seams and that plastic parts are in good
condition. It is essential that defective or worn parts are
replaced immediately. The same applies to components which
are broken, torn, defective or worn. Please replace these only
with original i’coo spare parts.
Do not expose the push-chair to excessive sunshine as this
can cause the textiles covers and plastic parts to fade.
CLEANING THE COVERS
Remove the cover from the frame by undoing the straps,
knobs or screws. Before washing the cover, please read the
washing instructions given on the sewn-in label.
Clean the cover by solely wiping it down evenly with a damp
cloth. If textile covers have inserts which cannot be removed,
ensure that this process does not soak the part through
completely. Providing there are no plastic, wooden or metal
parts attached to or inside the cover, it can be washed in a
washing machine at 30° and spin-dried at medium speed.
Allow the cover dry in the open air, although not in intense
sunshine.
In order to prevent shrinkage, please do not dry the cover in
a heat-tumble drier
Do not re-install covers until they are completely dry.
CLEANING THE FRAME
Only use a mild soap lye or lukewarm water to clean the frame of the
push-chair.
Dry the push-chair with a soft cloth after cleaning or exposure to rain
or snow.
Plastic parts can be cleaned with normal household cleaning agents.
CLEANING THE WHEELS
Clean and service the wheels regularly. Treating them with a silicon
spray or an anti-corrosion spray protects against rust and deposits.
In Winter, ensure that grit and salt from the pavement is wiped away
immediately. Clean dirt away from the wheels and axes on a regular
basis.
CITY-FRAME
The separate parts (1a)
• City-frame
• 2 front wheels
• 2 rear wheels
UNFOLD/FOLD
Unlock the transportation lock on the left side of the stroller (2).
Unfold the pushchair by pulling up the handlebar until the
locking mechanism on both sides audibly and visibly clicks
into place (3a).
FOLDING THE PUSHCHAIR
Press the secondary lock on the right-hand side of the upper
handlebar (3c). With the button held in, pull both handlebar
locks upward. Now the frame lock is released and you can
fold the pushchair down.
HANDLEBAR
Adjust the handlebar by pushing the buttons on both sides
simultaneously (4a) and rotate to the desired height.

11
GB
WHEELS
Fit both rear wheels onto the rear axle until an audible click is
heard and the lock button engages in the groove on the axle
(5a). Check if both wheels are securely fit.
Push swivel wheel pins into the front frame (5b). Make sure
the locking button is engaged and the wheels are securely
fitted.
REMOVING THE REAR WHEELS
Pull unlock button up (5d). Now remove the rear wheel by
pulling the wheel sideways.
REMOVING THE FRONT WHEELS (SWIVEL WHEELS)
Pull unlock button up (5e). Now remove the front wheel by pulling
the wheel downwards.
LOCKING THE SWIVEL WHEELS
To lock the swivel wheels press down the lock button (5g).
The wheels will now lock automatically in forward position. To
free the wheels, pull the lock button up (5h).
BRAKES
Apply the footbrake by pressing down the brake pedal in
the centre of the rear axle (6). A red button will be visible
to indicate that the brake is activated. To release the brake,
push up the brake pedal with your foot. The brake will now
engage automatically. Warning Ð always apply the brake
when parking the pushchair.
ADJUSTING THE SEAT HEIGHT
To adjust the height of the seat or pram, unlock the lock
handles on both sides of the height-adjustment (pram 9a;
seat 12d). Move the seat or pram to the desired position
until the locking mechanism on both sides audibly and visibly
clicks into place (pram 9b; seat 12e). Check that the seat or
pram is securely fit by lifting the seat or pram.
Warning - Do not try to adjust the height when a child is in
the seat or pram.
COUNTRY-FRAME
The separate parts (1b)
• Country-frame
• 4 Wheels
UNFOLD/FOLD
Unlock the transportation lock on the left side of the stroller (2).
Unfold the pushchair by pulling up the handlebar until the
locking mechanism on both sides audibly and visibly clicks
into place (3b).
FOLDING THE PUSHCHAIR
Press the secondary lock on the right-hand side of the upper
handlebar (3c). With the button held in, pull both handlebar locks
upward. Now the frame lock is released and you can fold the
pushchair down.
HANDLEBAR
Adjust the handlebar by pushing the buttons by pushing the
central button (4b) and rotate to the desired height.
WHEELS
Fit both rear wheels onto the rear axle until an audible click is
heard and the lock button engages in the groove on the axle
(5a). Check if both wheels are securely fit.
Fit both front wheels onto the front steer-housing until an
audible click is heard and the lock button engages in the
groove on the axle (5c). Check if both wheels are securely fit.
REMOVING THE REAR WHEELS.
Pull unlock button up (5d). Now remove the rear wheel by

12
TARGO
PARTS
The separate parts (7a).
TARGO PRAM
Take the main seat-frame and adjust the legrest adjustment
to the indicated position on the parts (7b). Place the bracket
over the hinge part on both sides and place the bracket on
the back (7b). Rotate the handle upwards(7c). Place the
fabric of the Pram inside the frame, canopy on the side of the
handle. Click on the plastic clamps on the bottom of the Pram
to the frame (7d). Zip the backside of the pram around the
frame (7e). Take the fabric piece for the canopy and zip on
the hood to the Pram (7e).Connect the press buttons around
the handle (7f). Connect the press buttons around the frame
on the footrest (7g). Place the bootcover and connect the
press buttons (7h).
PLACING THE TARGO PRAM
Take the pram with your hands placed on the central plastic
connector and place the seat to the engaging pins on the frame until
the locking mechanism on both sides audibly and visibly click into
place (8a). Check that the pram is securely fit by lifting the seat.
REMOVING THE PRAM FROM THE FRAME
To remove the pram from the frame you have to push the unlock
buttons on both sides of the central connection part and lift the unit
vertically (8b).
ADJUSTING THE PRAM HEIGHT
See ADJUSTING THE SEAT HEIGHT of Instruction CITY-FRAME or
Instruction Country-FRAME (9a-b).
TARGO SEAT
CHANGING THE PRAM TO THE TARGO SEAT
Remove the fabric of the pram and the 2 clip-on tubes from the
frame. Only the canopy fabric stays on the frame (10a).
Place the backside of the fabric seat on a flat surface like a table.
GB
pulling the wheel sideways.
REMOVING THE FRONT WHEELS
Pull unlock button to the front (5f). Now remove the front
wheel by pulling the wheel sideways.
STEERING
The country frame has front wheel steering. Simply push the
pushchair into the direction you want and the front wheels
will steer into the desired direction. The wheels will go back
to straight position automatically(5i).
BRAKES
Apply the footbrake by pressing down the brake pedal in
the centre of the rear axle (6). A red button will be visible
to indicate that the brake is activated. To release the brake,
push up the brake pedal with your foot. The brake will now
engage automatically. Warning Ð always apply the brake
when parking the pushchair.
ADJUSTING THE SEAT HEIGHT
To adjust the height of the seat or pram, unlock the lock
handles on both sides of the height-adjustment (pram 9a;
seat 12d). Move the seat or pram to the desired position
until the locking mechanism on both sides audibly and visibly
clicks into place (pram 9b; seat 12e). Check that the seat or
pram is securely fit by lifting the seat or pram.
Warning - Do not try to adjust the height when a child is in
the seat or pram.
Table of contents