KX100 ELECTRONIC KEYBOARD
CONTENTS
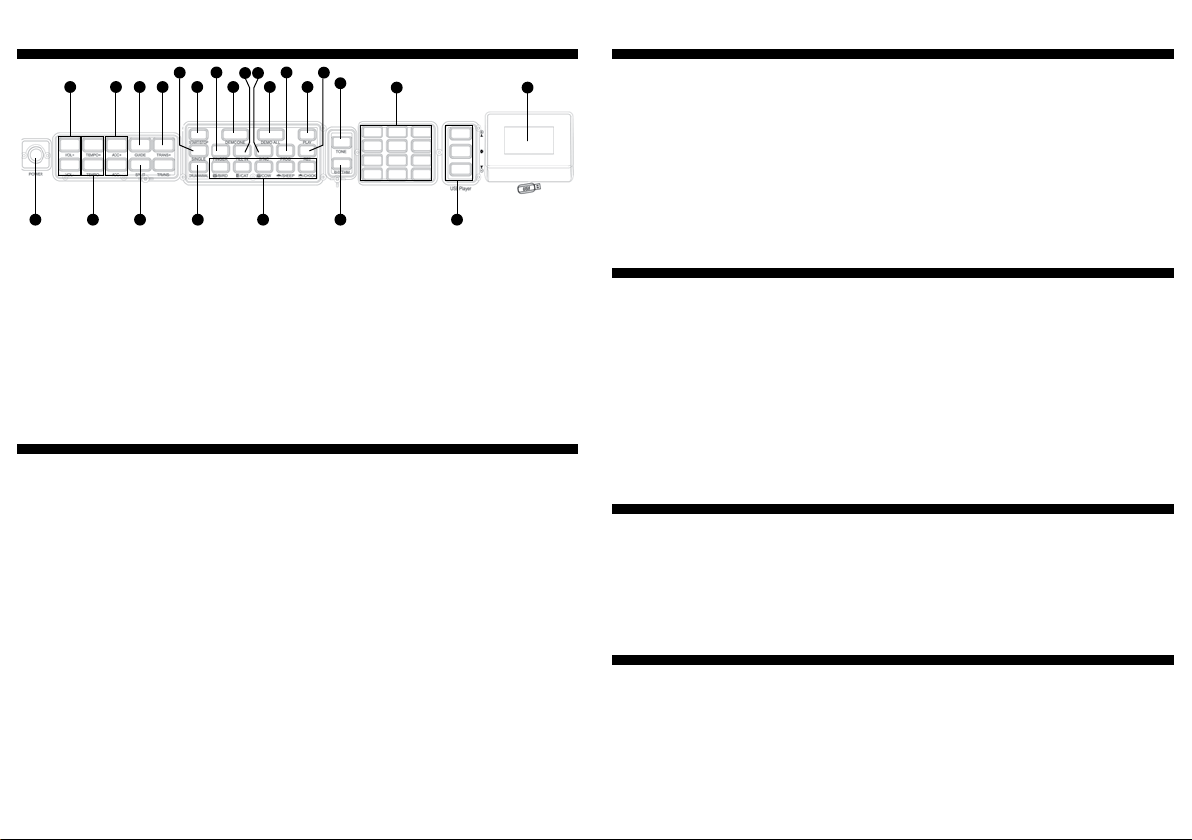
• 54 standard keys
• 100 Rhythms/100 Tones/5 Percussions
• Single chord/Fingers chord/Sync/Program
• Record/Play/DC power jack/Edit/USB Player
• Two digital display
• 10 Demos
• 32 sections of tempo/16 levels of accompany volume
• Integrated circuit/matrix logical circuit
• Microphone Jack/DC power Jack/Output Jack
Specications are subject to be changed for improvement
without notice.
BEFORE VIEW & BACK VIEW
BEFORE PLAYING
BEGIN PLAYING
RHYTHM FUNCTION
CHORD
PLAY DEMOS
RECORD AND PLAY
TEACHING FUNCTION
PROGRAM
CARE INSTRUCTION
P.1
P.1
P.2
P.2
P.2
P.2
P.3
P.3
P.3
P.3
I.
II.
III.
IV.
V.
VI.
VII.
VIII.
IX.
X.
SAFETY PRECAUTIONS
WARNING To reduce the risk of re or electrical shock, Do not expose
this product to rain or moisture
Please read and obey the safety instructions to reduce the possibility of physical injury or damage
to the instrument or other property before you use the electronic keyboard.
The apparatus shall not be exposed to dripping or splashing and no objects lled with liquids, such as vases,
shall be placed on the product. Dry location use only. No naked ame source, such as candles, should be
placed on the product.
Do not open the instrument or attempt to disassemble the internal parts or modify them in any way. The
instrument contains no user-serviceable parts. If it appears to be malfunctioning, discontinue the use immediately
and have it inspected by qualied service personnel.
The instrument shallnot be exposed to dripping or splashing and no objects lled with liquids such as vases,
shall be placed on the product. Do not use this product near water, for example, near a bathtub, kitchen sink, in a
wet basement, or near a swimming pool or the like. Dry location use only.
If the AC adaptor cord or plug becomes frayed or damaged, or if there is sound produced during the use of
the instrument, or if any unusual smells or smoke appears, immediately turn off the power switch, disconnect the
adaptor plug from the outlet, and have the instrument inspected by qualied service personnel.
Use the specied adaptor only. Using the wrong adaptor can result in damage to the instrument or overheating.
Remember to turn off the power, and unplug the AC power adaptor when you are not using the instrument, or
during electrical storms.
Before cleaning the instrument, always remove the electrical plug from the outlet. Never insert or remove a plug
with wet hands. Check the plug periodically and remove any dirt or dust that has accumulated on it.
The product should be located away from heat sources such as heaters, radiators or other products that
produce heat. Do not bend the supply cord excessively or place heavy objects on it, or place it in a position where
anyone could walk, trip, or roll anything over it.
Do not plug the instrument into a socket with multiple appliances plugged into it because it might result in a
deteriorated tone as well as socket overheating.
Before connecting the instrument to other electronic components, turn off the power for all components. Before
turning the power on or off for all components, set all volume levels to minimum.
The product should be located where its location or position does not interfere with its proper ventilation.
Care should be taken so that objects do not fall and liquids are not spilled into the enclosure through opening.
Do not use the instrument near other electrical products such as televisions, radios, or speakers, since this might
cause interference which can affect proper operation of the other products.
Do not place the instrument in an unstable position where it might accidentally fall over.
Use a dry and soft cloth to clean the instrument. Using liquids like paint, organic solvent, or chemical solutions is
strictly forbidden. Besides, putting ethane plastic materials on the piano may also cause the colour of the panel and
the keyboard to fade.
Place heavy objects on the instrument, and do not put excessive force on the buttons, switches, and connectors.
Do not listen to music at very high volumes as this can permanently damage your hearing. Misuse of instrument
may cause hearing loss.
Be sure to switch this unit off after use, and do not switch the unit on and off in quick succession, as this places
an undue load on the electronic components.
Do not short-circuit the supply terminals.
The packaging should be disposed of in an environmentally responsible manner if it is not required for storage
of the product.
Please save this User Manual for future reference.