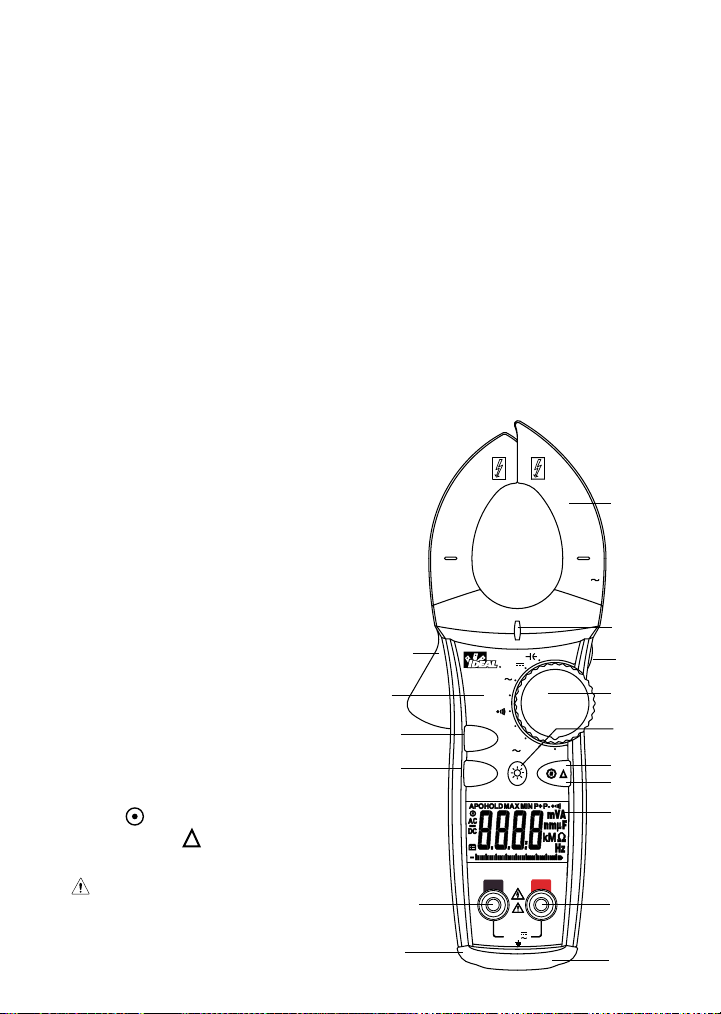
IDEAL 61-764 User manual

#61-764
#61-766
#61-768
600A Clamp Meters
w/TightSight™ Display
Instruction Manual
COM
MIN
MAX
V/Ω
CAT.III 1000V
MAX
750V
1000V
CAT.IV 600V
HOLD
Ω
OFF
V
V
Hz
40
40010 3020
PEAK
CAT.III 1000V
CAT.IV 600V
600A
True RMS
A600
61-766
600V
X
000V
750V
DCAC AMPS
TightSight™ Display
ND 4960-1 61-764/766/768 Ins. 8/30/04 2:52 PM Page 1

Page 2
Read First: Safety Information
Understand and follow operating instructions carefully. Use the meter only as specified in
this manual; otherwise, the protection provided by the meter may be impaired.
WARNING
To avoid possible electric shock, personal injury or death, follow these guidelines:
• Do not use if meter appears damaged. Visually inspect the meter to ensure case is not
cracked and back case is securely in place.
• Inspect and replace leads if insulation is damaged, metal is exposed, or probes are
cracked. Pay particular attention to the insulation surrounding the connectors.
• Do not use meter if it operates abnormally as protection maybe impaired.
• Do not use during electrical storms or in wet weather.
• Do not use around explosive gas, dust, or vapor.
• Do not apply more than the rated voltage to the meter.
• Do not use without the battery and the back case properly installed.
• Remove the test leads from the circuit prior to removing battery cap.
• Do not attempt to repair this unit as it has no user-serviceable parts.
CAUTION
To protect yourself, think "Safety First":
• Voltages exceeding 30VAC or 60VDC pose a shock hazard so use caution.
• Use appropriate personal protective equipment such as safety glasses, face shields,
insulating gloves, insulating boots, and/or insulating mats.
• Before each use:
- Perform a continuity test by touching the test leads together to verify the
functionality of the battery and test leads.
- Use the 3 Point Safety Method. (1) Verify meter operation by measuring a known
voltage. (2) Apply meter to circuit under test. (3) Return to the known live voltage
again to ensure proper operation.
• Never ground yourself when taking electrical measurements.
• Connect the black common lead to ground or neutral before applying the red test lead to
potential voltage. Disconnect the red test lead from the voltage first.
• Always work with a partner.
• When using the probes, keep fingers as far behind the probe tips as possible.
ND 4960-1 61-764/766/768 Ins. 8/30/04 2:52 PM Page 2

COM
MIN
MAX
V/Ω
CAT.III 1000V
MAX
750V
1000V
CAT.IV 600V
HOLD
Ω
OFF
V
V
Hz
40
40010 3020
PEAK
CAT.III 1000V
CAT.IV 600V
600A
True RMS
A600
61-766
Features
1. Tapered jaws w/hook tip
2. Lever
3. Function Dial
4. Main Display (LCD)
5. Volts and resistance (V-Ω)
input terminal
6. Common (COM) input terminal
7. TightSight™ bottom display
8. Protective rubber boot
9. Measuring Functions
10. High Voltage (Hi-V) warning
11. Data Hold
12. Max/min
13. Peak max/min
14. Backlight
15. Range ( )
16. Relative mode ( )
Symbols on the Unit
• Warning - read the
instruction manual
• Cat IV - 600V Safety category
• Cat III - 1000V Safety category Page 3
760 Series Common Features:
• Auto/manual ranging clamp meter • Large numbers and symbols displayed
• TightSight™ bottom display • Peak max/min, max/min, data hold
• Visual and audible indication when • Selectable Auto power off and low
voltage is present even when the meter battery indicator
is set on the wrong function for • Tapered jaws for reaching into tight spaces
enhanced safety • Hook tip for easier wire separation
• Measures 600 AAC Current • Protective rubber boot
• Measures AC/DC Voltage & Resistance • Electronic overload protection on
• Audible continuity all ranges
• Bright, bold backlight • Cat IV-600V/Cat III-1000V
• 61-764 model is averaging sensing, rms calibrated
• 61-766 model is true rms sensing, measures capacitance, frequency and lower currents
with a 40 AAC range for troubleshooting motors and adjustable speed drives
• 61-768 model is true rms sensing and measures DC current
1
10
11
3
15
16
4
5
9
12
13
14
6
87
2
ND 4960-1 61-764/766/768 Ins. 8/30/04 2:52 PM Page 3

Page 4
Main Display Icons
15. 4000 count display
16. AC measurement
17. DC measurement
18. Polarity indicator for DC
19. Range ( )
20. Auto Power Off
(APO)
21. Data Hold
22. Max/min
23. Peak max/min
24. Audible continuity
25. Volts
26. Amps
27. Farads
28. Ohms
29. Hertz
30. Units of measure
31. Analog bar graph
32. Low battery indicator
33. Relative ( )
TightSight™Display Icons
34. 4000 count display
35. Polarity indicator for DC
36. DC measurement
37. AC measurement
38. Amps
APO HOLD MAX MIN P +P -
mVA
nmµF
kMΩ
Hz
AC
DC
DCAC AMPS
15
16
17
33
35
34
18
19
20
36 37 38
3132
21 22 2526
30
27
28
29
23
24
Main Display
TightSight™Bottom Display
61-766
COM
V/
CAT.IV 600V
CAT.III1000V
MAX
1000V
750V
010 20 30 40
APO
AC
A
DCACAMPS
Note: Only AC/DC amps units of measure are displayed in the TightSight™
display since primary use is for viewing current measurements in tight locations.
The display will show numerical values only for other functions. The main
display is to be used to view units of measure for all other functions.
ND 4960-1 61-764/766/768 Ins. 8/30/04 2:52 PM Page 4

OPERATION:
High Voltage Warning (HI-V)
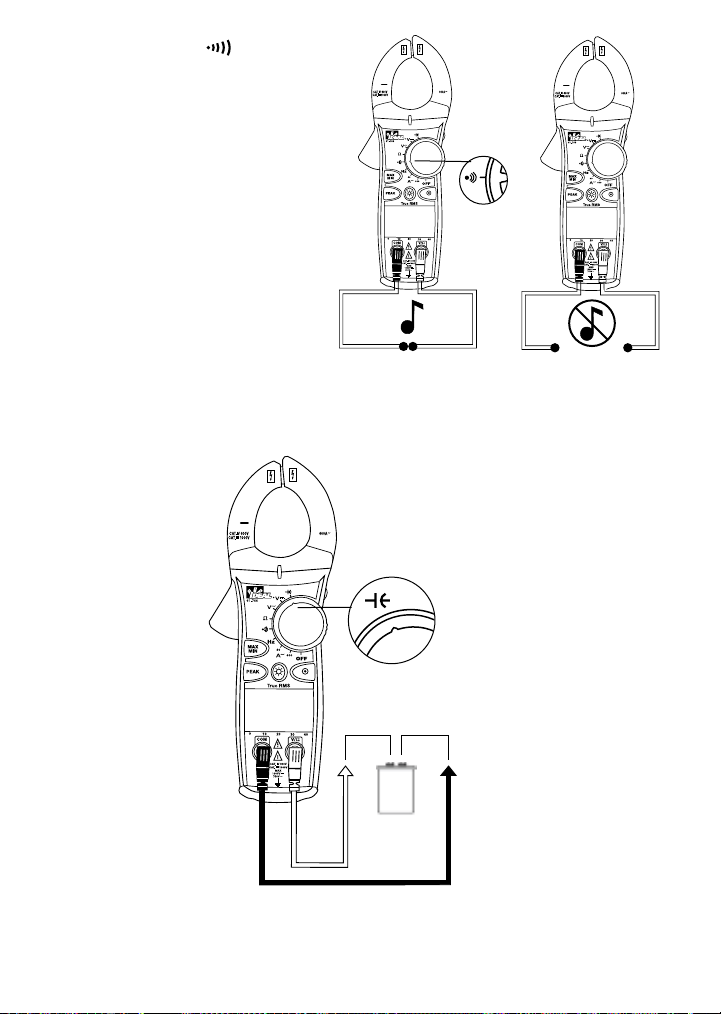
The meter indicates when 30V AC/DC voltage is present by lighting the red LED and beeping.
This voltage warning works on all functions and ranges for enhanced safety. So, even if the
meter is set on the wrong function, the meter alerts the user that dangerous voltage is present.
Auto/Manual Ranging Mode ( )
The meter defaults to autoranging mode when powered on. In this mode, the meter
automatically selects the best range to display the measurement. By pressing the Range ( )
button on the meter, the manual range mode will override the auto-ranging feature of the meter.
A ( ) appears in the upper left side of the display. Continue pressing the Range button until
the desired range is obtained. Use this mode to lock in a specific range for repeated
measurements. To return to the autoranging mode, either depress the Range button for greater
than 1 second or turn the meter off and then back on again.
Peak Max/Min Feature
Peak function captures peak voltage in the VAC function and peak current in the AAC function.
Both P+ and P- are have 1 ms capture time. Set the meter to the desired function, press the
“PEAK” button and apply the setup to the circuit. The P+ will be displayed. Press the “PEAK”
button again to display the P-. Depress the peak button for >2 sec. to exit the peak feature.
Note: If more accurate peak measurement is required, then calibration should be performed.
Depress the Peak button for >2 sec. until “CAL” appears in the display. The meter self-
calibrates to ±3% + 60 digits accuracy. (400m/4VAC/40AAC ranges unspecified)
Max/Min Feature
The Max records the maximum vaue measured over time while Min captures the minimum
value measured over time. Press the Max/Min button to activate this feature and to toggle
between Max, Min and Maxmin. “MAXMIN” displays the real time reading while still capturing
max and min values over time. Depressing the max/min button for >2 sec. exits the mode.
Note: To record max/min values over a time period >30 min, the Auto Power Off (APO) feature
must be defeated.
Data Hold Feature
Press the Hold button on the side of the meter to toggle in and out of the data hold mode.
“HOLD” appears in the upper left of the meter display when data hold is active. Use the data
hold feature to lock a measurement reading on the display. Press the Hold button again to
unlock the display and obtain a real-time reading.
Relative Mode ( ) (61-768 model only)
This mode is used to zero out the display before measuring DC current. Press the “ “button
to subtract out the non-zero number. Then, measure the DC amps. Pressing the “ “ button
again causes the “ “ to flash and the original offset number to be displayed. Depress the
” “ button for >2 sec. to exit this mode. Page 5
ND 4960-1 61-764/766/768 Ins. 8/30/04 2:52 PM Page 5
Other manuals for 61-764
2
This manual suits for next models
2
Table of contents