PCB Piezotronics 357B54 User manual

Model 357B54
Charge Output Accelerometer
Installation and Operating Manual
For assistance with the operation of this product,
contact PCB Piezotronics, Inc.
Toll-free: 800-828-8840
24-hour SensorLine: 716-684-0001
Fax: 716-684-0987
E-mail: [email protected]
Web: www.pcb.com

Manual 21354 Rev E
ECN 50523
Repair and Maintenance
PCB guarantees Total Customer Satisfaction through its
“Lifetime Warranty Plus” on all Platinum Stock Products
sold by PCB and through its limited warranties on all other
PCB Stock, Standard and Special products. Due to the
sophisticated nature of our sensors and associated
instrumentation, field servicing and repair is not
recommended and, if attempted, will void the factory
warranty.
Beyond routine calibration and battery replacements
where applicable, our products require no user
maintenance. Clean electrical connectors, housings, and
mounting surfaces with solutions and techniques that will
not harm the material of construction. Observe caution
when using liquids near devices that are not hermetically
sealed. Such devices should only be wiped with a
dampened cloth—never saturated or submerged.
In the event that equipment becomes damaged or ceases
to operate, our Application Engineers are here to support
your troubleshooting efforts 24 hours a day, 7 days a
week. Call or email with model and serial number as well
as a brief description of the problem.
Calibration
Routine calibration of sensors and associated
instrumentation is necessary to maintain measurement
accuracy. We recommend calibrating on an annual basis,
after exposure to any extreme environmental influence,
or prior to any critical test.
PCB Piezotronics is an ISO-9001 certified company whose
calibration services are accredited by A2LA to ISO/IEC
17025, with full traceability to SI through N.I.S.T. In
addition to our standard calibration services, we also offer
specialized tests, including: sensitivity at elevated or
cryogenic temperatures, phase response, extended high
or low frequency response, extended range, leak testing,
hydrostatic pressure testing, and others. For more
information, contact your local PCB Piezotronics
distributor, sales representative, or factory customer
service representative.
Returning Equipment
If factory repair is required, our representatives will
provide you with a Return Material Authorization (RMA)
number, which we use to reference any information you
have already provided and expedite the repair process.
This number should be clearly marked on the outside of
all returned package(s) and on any packing list(s)
accompanying the shipment.
Contact Information
PCB Piezotronics, Inc.
3425 Walden Ave.
Depew, NY14043 USA
Toll-free: (800) 828-8840
24-hour SensorLine: (716) 684-0001
Repair inquiries: rma@pcb.com
For a complete list of distributors, global offices and sales
representatives, visit our website, www.pcb.com.
Safety Considerations
This product is intended for use by qualified personnel
who recognize shock hazards and are familiar with the
precautions required to avoid injury. While our equipment
is designed with user safety in mind, the protection
provided by the equipment may be impaired if equipment
is used in a manner not specified by this manual.
Discontinue use and contact our 24-Hour Sensorline if:
Assistance is needed to safely operate equipment
Damage is visible or suspected
Equipment fails or malfunctions
For complete equipment ratings, refer to the enclosed
specification sheet for your product.
Definition of Terms and Symbols
The following symbols may be used in this manual:
DANGER
Indicates an immediate hazardous
situation, which, if not avoided, may
result in death or serious injury.

Manual 21354 Rev E
ECN 50523
CAUTION
Refers to hazards that could damage
the instrument.
NOTE
Indicates tips, recommendations and
important information. The notes
simplify processes and contain
additional information on particular
operating steps.
The following symbols may be found on the equipment
described in this manual:
This symbol on the unit indicates that
high voltage may be present. Use
standard safety precautions to avoid
personal contact with this voltage.
This symbol on the unit indicates that
the user should refer to the operating
instructions located in the manual.
This symbol indicates safety, earth
ground.

Manual 21354 Rev E
ECN 50523
PCB工业监视和测量设备 - 中国RoHS2公布表
PCB Industrial Monitoring and Measuring Equipment - China RoHS 2 Disclosure Table
部件名称
有害物质
铅(Pb)
汞
(Hg)
镉
(Cd)
六价铬(Cr(VI))
多溴联苯 (PBB)
多溴二苯醚(PBDE)
住房
O
O
O
O
O
O
PCB板
X
O
O
O
O
O
电气连接器
O
O
O
O
O
O
压电晶体
X
O
O
O
O
O
环氧
O
O
O
O
O
O
铁氟龙
O
O
O
O
O
O
电子
O
O
O
O
O
O
厚膜基板
O
O
X
O
O
O
电线
O
O
O
O
O
O
电缆
X
O
O
O
O
O
塑料
O
O
O
O
O
O
焊接
X
O
O
O
O
O
铜合金/黄铜
X
O
O
O
O
O
本表格依据 SJ/T 11364 的规定编制。
O:表示该有害物质在该部件所有均质材料中的含量均在 GB/T 26572 规定的限量要求以下。
X:表示该有害物质至少在该部件的某一均质材料中的含量超出 GB/T 26572 规定的限量要求。
铅是欧洲RoHS指令2011/65/ EU附件三和附件四目前由于允许的豁免。
CHINA RoHS COMPLIANCE

Manual 21354 Rev E
ECN 50523
Component Name
Hazardous Substances
Lead (Pb)
Mercury (Hg)
Cadmium (Cd)
Chromium VI
Compounds
(Cr(VI))
Polybrominated
Biphenyls (PBB)
Polybrominated
Diphenyl Ethers
(PBDE)
Housing
O
O
O
O
O
O
PCB Board
X
O
O
O
O
O
Electrical Connectors
O
O
O
O
O
O
Piezoelectric Crystals
X
O
O
O
O
O
Epoxy
O
O
O
O
O
O
Teflon
O
O
O
O
O
O
Electronics
O
O
O
O
O
O
Thick Film Substrate
O
O
X
O
O
O
Wires
O
O
O
O
O
O
Cables
X
O
O
O
O
O
Plastic
O
O
O
O
O
O
Solder
X
O
O
O
O
O
Copper Alloy/Brass
X
O
O
O
O
O
This table is prepared in accordance with the provisions of SJ/T 11364.
O: Indicates that said hazardous substance contained in all of the homogeneous materials for this part is below the limit
requirement of GB/T 26572.
X: Indicates that said hazardous substance contained in at least one of the homogeneous materials for this part is above the limit
requirement of GB/T 26572.
Lead is present due to allowed exemption in Annex III or Annex IV of the European RoHS Directive 2011/65/EU.

1
General
OPERATING GUIDE
for use with
PIEZOELECTRIC CHARGE MODE ACCELEROMETERS
SPECIFICATION SHEET, INSTALLATION DRAWING
AND CALIBRATION INFORMATION ENCLOSED
PCB ASSUMES NO RESPONSIBILITY FOR DAMAGE CAUSED TO THIS PRODUCT AS A RESULT OF
PROCEDURES THAT ARE INCONSISTENT WITH THIS OPERATING GUIDE.
1.0 INTRODUCTION
Congratulations on the purchase of a quality PCB charge
mode accelerometer. In order to ensure the highest level
of performance for this product, it is imperative that you
properly familiarize yourself with the correct mounting
and installation techniques before attempting to operate
this device. If, after reading this manual, you have any
additional questions concerning this sensor or its
application, feel free to call an Application Engineer at
716-684-0001 or the closest PCB representative.
2.0 CHARGE MODE ACCELEROMETERS
Ceramic and UHT 12 shear-structured accelerometers
offer high performance for precision vibration
measurements in high-temperature environments. The
use of sensing crystals, operating in the shear mode,
reduces erroneous output due to base strain, thermal
transients, and transverse motion.
Charge mode accelerometers output a strong, high-
impedance charge signal directly from their sensing
element. They do not contain built-in signal
conditioning electronics; the signal is conditioned
externally by either a laboratory-style charge amplifier
or in-line charge converter prior to being analyzed by a
readout or recording device. The absence of built-in
electronics permits operation to elevated temperatures of
500 °F (260 °C) for most ceramic crystal models and
typically 900 °F(482 °C) and extreme application up to
100 °F (650 °C) for UHT-12.
These accelerometers are ideal for structural testing,
machine monitoring, and vehicular shock and vibration
measurement tasks where high temperatures preclude
the use of accelerometers with built-in microelectronics.
Enclosed is a Specification Sheet, which lists the
complete performance characteristics of the particular
accelerometer.
3.0 OPTIONAL FEATURES
In addition to these standard features, a variety of
options are also available. When listed before the model
number, the following prefix letters indicate that the
sensor is manufactured or supplied with optional
features: A option- adhesive mount; Joption- electrical
ground isolation; Moption- metric mounting thread; P
option- positive polarity output (for use with non-
inverting, signal conditioning amplifiers); and Woption-
water-resistant cable connection.
4.0 INSTALLATION OVERVIEW
When choosing a mounting method, consider closely
both the advantages and disadvantages of each
technique. Characteristics like location, ruggedness,
amplitude range, accessibility, temperature, and
portability are extremely critical. However, the most
important and often overlooked consideration is the
effect the mounting technique has on the high-frequency
performance of the accelerometer.
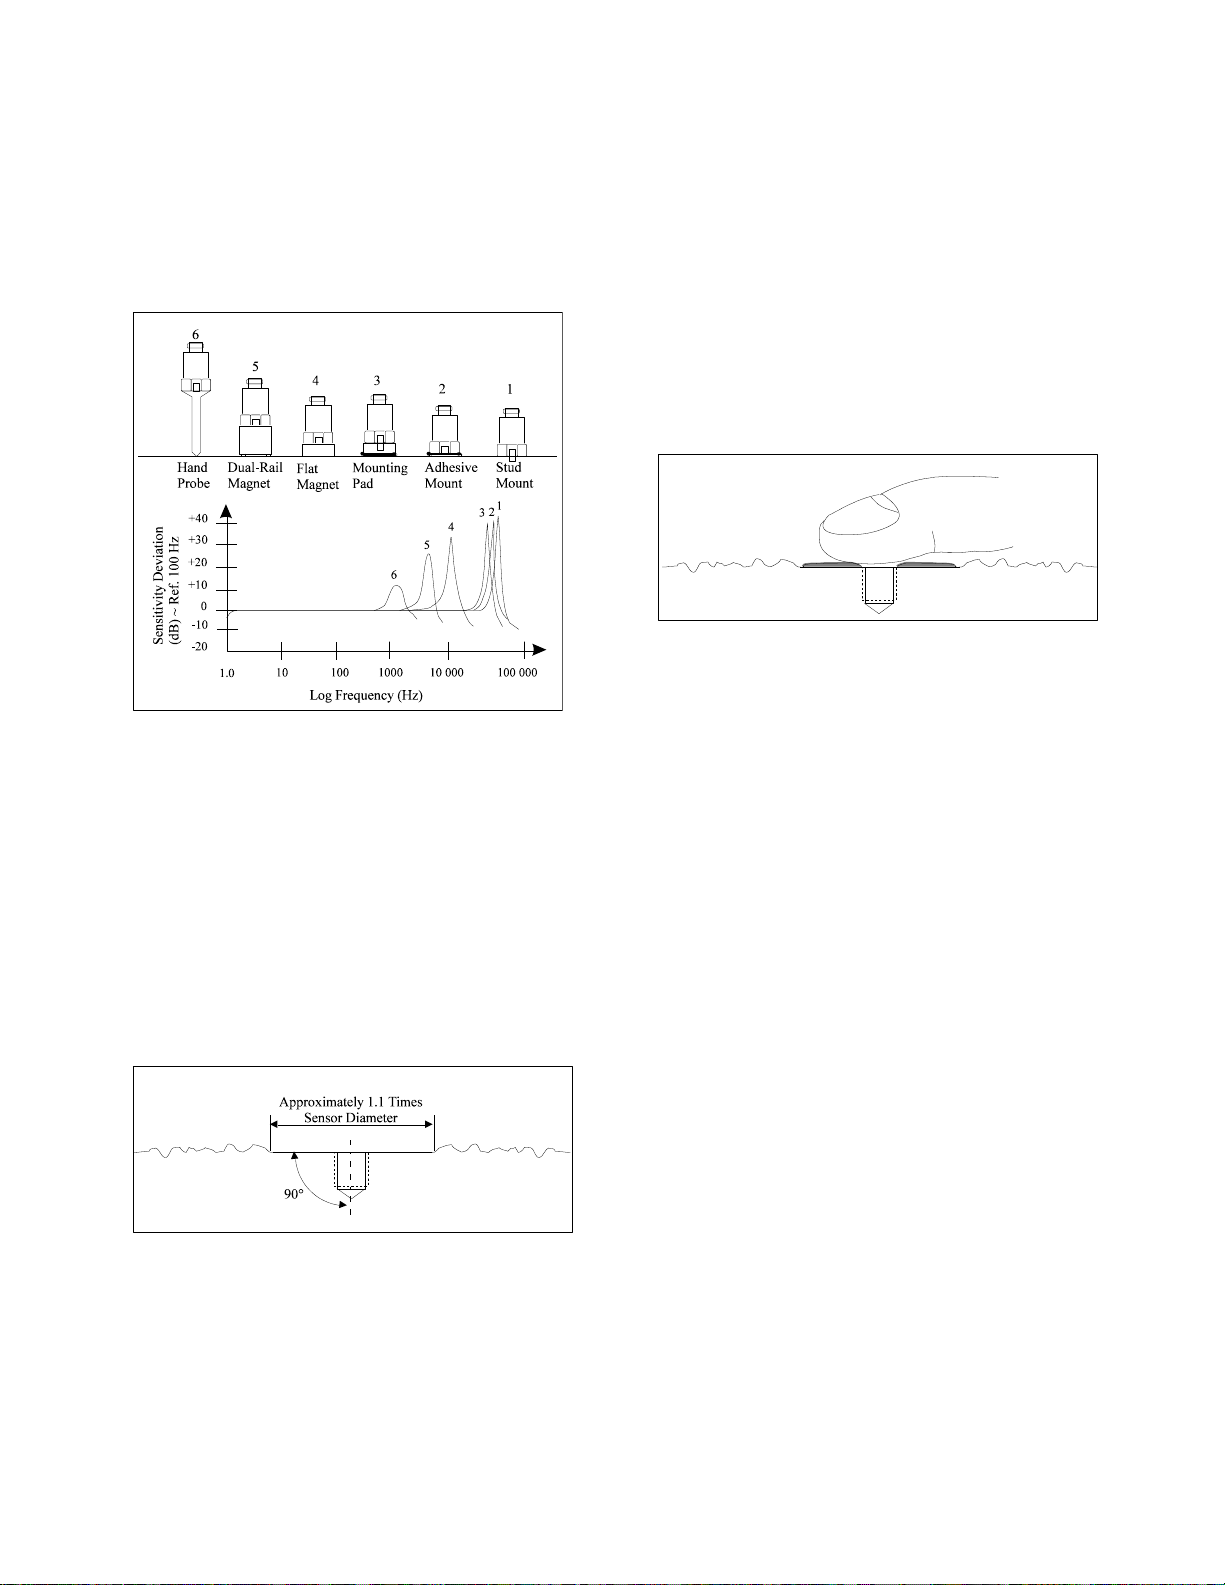
Shown hereafter are six possible mounting techniques
and their effects on the performance of a typical
piezoelectric accelerometer. (Note that not all of the
mounting methods may apply to your particular sensor.)
The mounting configurations and corresponding graph
demonstrate how the high-frequency response of the
accelerometer may be compromised as mass is added to
the system and/or the mounting stiffness is reduced.
Note: The low-frequency response is unaffected by the
mounting technique. Its roll-off behavior is dependent

2
upon the coupling type or time constant of the external
charge amplifying device. This characteristic may be
fixed or adjustable, depending on the charge amplifier.
Please refer to the appropriate charge amplifier
specification sheet for information on low-frequency
characteristics.
Figure 1. Assorted Mounting Configurations and Their
Effects on High Frequency
4.1 STUD MOUNT
This mounting technique requires smooth, flat contact
surfaces for proper operation and is recommended for
permanent and/or secure installations. Stud mounting is
also recommended when testing at high frequencies.
Note: Do NOT attempt mounting on curved, rough, or
uneven surfaces, as the potential for misalignment and
limited contact surface may significantly reduce the
sensor’s upper operating frequency range.
Figure 2. Mounting Surface Preparation
STEP 1: First, prepare a smooth, flat mounting surface,
then drill and tap a mounting hole in the center of this
area as shown in Figure 2 and in accordance with the
Installation Drawing for the specific sensor that is
being mounted.
A precision-machined mounting surface with a
minimum finish of 63 in (0.00016 mm) is
recommended. (If it is not possible to properly prepare
the test structure mounting surface, consider adhesive
mounting as a possible alternative.) Inspect the area,
checking that there are no burrs or other foreign
particles interfering with the contact surface.
STEP 2: Wipe clean the mounting surface and spread
on a light film of grease, oil, or similar coupling fluid
prior to installation.
Figure 3. Mounting Surface Lubrication
Adding a coupling fluid improves vibration
transmissibility by filling small voids in the mounting
surface and increasing the mounting stiffness. For semi-
permanent mounting, substitute epoxy or another type of
adhesive.
STEP 3: Screw the mounting stud into the base of the
accelerometer and hand-tighten. Then, screw the
sensor/stud assembly into the prepared tapped hole and
tighten to the recommended mounting torque as
indicated on the Installation Drawing.
Note: It is important to use a torque wrench during this
step. Under-torquing the sensor may not adequately
couple the device; over-torquing may result in stud
failure.
4.2 ADHESIVE MOUNT
Adhesive mounting is often used for temporary
installation or when the test object surface cannot be
adequately prepared for stud mounting. Adhesives like
hot glue and wax work well for temporary mounts; two-
part epoxies and quick-bonding gels provide a more
permanent mount.
Note: Adhesively mounted sensors often exhibit a
reduction in high-frequency range. Generally, smooth
surfaces and stiff adhesives provide the best frequency
response.

3
METHOD 1 - Adhesive Mounting Base
This method involves attaching a base to the test
structure, then securing the sensor to the base. This
allows for easy removal of the accelerometer. Also,
since the bases are of a “hard-coated” aluminum design,
they provide electrical isolation to eliminate ground
loops and reduce electrical interference that may be
present on the surface of the test object.
STEP 1: Prepare a smooth, flat mounting surface. A
minimum surface finish of 63 in (0.00016 mm)
generally works best.
STEP 2: Stud-mount the sensor to the appropriate
adhesive mounting base according to the guidelines set
forth in STEPS 2 and 3 of the Stud Mount Procedure.
STEP 3: Place a small portion of adhesive on the
underside of the mounting base. Firmly press down on
the assembly to displace any extra adhesive remaining
under the base.
Figure 4. Mounting Base: Adhesive Installation
METHOD 2 - Direct Adhesive Mount
For restrictions of space or for convenience, most
sensors (with the exception of integral stud models) can
be adhesive-mounted directly to the test structure.
STEP 1: Prepare a smooth, flat mounting surface. A
minimum surface finish of 63 in (0.00016 mm)
generally works best.
STEP 2: Place a small portion of adhesive on the
underside of the sensor. Firmly press down on the top
of the assembly to displace any adhesive. Be aware that
excessive amounts of adhesive can make sensor removal
difficult.
Figure 5. Direct Adhesive Mounting
4.3 HANDHELD OR PROBE TIP MOUNT
This method is NOT recommended for most
applications. It is generally used only for machinery
monitoring and other portable trending applications.
Both the accuracy and repeatability at low (<5 Hz) and
high frequency (>1 kHz) ranges are questionable.
5.0 CABLING
Care and attention to installation is essential, as the
reliability and accuracy of your system is no better than
that of the output cable. Charge mode sensors require
the use of low noise cables. Cables and connectors must
be kept clean and dry to maintain high insulation
resistance. In the event that the insulation resistance is
compromised, inspect, clean, and bake cables and
connectors to restore insulation resistance.
STEP 1: Ascertain that you have ordered the correct
cable type. Use only PCB Series 003 Low-Noise Cable
(or equivalent) with charge-output accelerometers.
Some integral-cable units use Series 030 Cable, which is
also low noise. Keep connections clean to maintain
insulation resistance and good low-frequency response.
STEP 2: Connect the cable to the accelerometer. A
small amount of thread-locking compound placed on the
connector prior to attachment helps secure the cable
during testing. In harsh environments, the connection
can be sealed with silicone rubber, O-rings, and flexible
heat-shrink tubing.
TYPE 1: Coaxial Connectors
First, plug the male connector of the cable into the
mating female sensor connector. Then, holding the
sensor stationary, secure the connector in place by
tightening down the attached cable sleeve.
TYPE 2: Pigtail Connections
“Pigtail” connections are convenient for easy field repair
of cable connections. Simply solder the stripped cable
to the exposed pins on the sensor. (Check the
Installation Drawing to determine signal and ground

4
pins.) In many cases, it is also helpful to protect the
solder joint with heat-shrink tubing or epoxy.
Note: If you do not have the experience or resources to
attach pigtail leads, consult PCB to discuss factory
attachment. Damage caused by excessive heat is not
covered by warranty.
STEP 3: Route the cable to the signal conditioner,
making certain to stress-relieve the sensor/cable
connection and minimize motion by clamping the cable
at regular intervals.
Certain precautions should be used to avoid physical
damage and minimize electrical noise. For instance,
avoid routing cables near high-voltage wires. Do not
route cables along floors or walkways where they may
be stepped on or become contaminated. Shielded cables
should have the shield grounded at one end only.
STEP 4: Finally, connect the remaining cable end to the
signal conditioner. To dissipate charge that may have
accumulated in the cable, short the signal lead to the
ground lead prior to attachment.
6.0 POWERING
A conventional method for conditioning the high-
impedance signal generated by a charge output sensor is
to use a laboratory-style charge amplifier. The charge
amplifier converts the high-impedance charge signal
generated by the sensor to a low-impedance voltage
signal that can then be transmitted to a readout or a
recording device for analysis. Before connecting the
low-noise cable from the accelerometer to the charge
amplifier, be sure to ground both the charge amplifier
and the cable. This ensures that an excessive static
charge that may have accumulated across the
accelerometer or cable is harmlessly discharged. Failure
to observe this precaution can result in the destruction of
the input FET of certain amplifiers.
Once each element is connected, allow a few minutes for
the system to thermally stabilize. Place the switch on
the charge amplifier in the OPERATE position and
proceed with the measurement.
It is often convenient to normalize the accelerometer and
charge amplifier system to a precise sensitivity, such as
10.0 or 100.0 mV/g for ease of data analysis. This is
accomplished with most PCB laboratory charge
amplifiers and some miniature in-line units as well.
For fixed sensitivity in-line charge converters, such as
the PCB Series 422, the system sensitivity (mV/g) is
determined as the product of the charge amplifier
sensitivity (mV/pC) and the charge sensitivity of the
accelerometer (pC/g).
Note: When using charge-amplified systems, the noise
floor of the system is dependent on the input
capacitance to the charge amplifier. Since the cable
adds to the capacitance and to minimize the noise
threshold, keep the cable length between the
accelerometer and the charge amplifier to a minimum.
Cable length does not affect the system sensitivity of
charge-amplified systems.
Since charge amplifier operation varies, please contact
the respective signal conditioner manufacturer or check
the product manual for additional information.
7.0 ACCELEROMETER CALIBRATION
Accelerometer calibration provides, with a definable
degree of accuracy, the necessary link between the
physical quantity being measured and the electrical
signal generated by the sensor. In addition, other useful
information concerning operational limits, physical
parameters, electrical characteristics, or environmental
influences may also be determined. Without this link,
analyzing data becomes a nearly impossible task. PCB
provides a calibration record that documents the exact
characteristics of each sensor. (The type and amount of
data varies depending on the sensor type, contractual
regulations, and other special requirements.)
Under normal operating conditions, piezoelectric
sensors are extremely stable, and their calibrated
performance characteristics do not change over time.
However, harsh environments or other unusual
conditions that cause the sensor to experience dynamic
phenomena outside of its specified operating range may
temporarily or permanently affect the sensor. This
change manifests itself in a variety of ways, including a
shift of the sensor resonance due to a cracked crystal, or
a temporary loss of low-frequency measuring capability
due to a drop in insulation resistance.

5
For these reasons, it is recommended that a recalibration
cycle be established for each accelerometer. This
schedule is unique and is based on a variety of factors,
such as extent of use, environmental conditions,
accuracy requirements, trend information obtained from
previous calibration records, contractual regulations,
frequency of “cross-checking” against other equipment,
manufacturer recommendation, and any risk associated
with incorrect readings. International standards, such as
ISO 10012-1, provide insight and suggested methods for
determining recalibration intervals for most measuring
equipment. With the above information in mind and
under “normal” circumstances, PCB conservatively
suggests a 12- to 24-month recalibration cycle for most
piezoelectric accelerometers.
Note: It is good measurement practice to verify the
performance of each accelerometer with a Handheld
Shaker or other calibration device before and after each
measurement. The PCB Model 394C06 Handheld
Shaker operates at a fixed frequency and known
amplitude (1.0 g) to provide a quick check of sensor
sensitivity.
7.1 SENSOR RECALIBRATION
Accelerometer recalibration services are typically
performed by PCB’s internal metrology laboratory.
(Other international and private laboratories are also
available.) The PCB laboratory is certified to ISO 9001,
accredited by A2LA to ISO 17025, complies with ISO
10012-1 (and former MIL-STD-45662A), and uses
equipment directly traceable to N.I.S.T. This assures an
accurate calibration of relevant specifications.
In addition, many companies choose to purchase the
equipment necessary to perform the recalibration
procedure themselves. While this may result in both a
savings of time and money, it has also been attributed to
incorrect readings and costly errors. Therefore, in an
effort to prevent the common mistakes associated with
customer-performed calibration, this document includes
a broad overview of the Back-to-Back Calibration
technique. This technique provides a quick and easy
method for determining the sensitivity of a test
accelerometer over a wide frequency range.
7.2 BACK-TO-BACK CALIBRATION THEORY
Back-to-Back Calibration is perhaps the most common
method for determining the sensitivity of piezoelectric
accelerometers. This method relies on a simple
comparison to a previously calibrated accelerometer,
typically referred to as a reference standard.
Figure 9. Reference Standard Accelerometer
These high-accuracy devices, which are directly
traceable to a recognized standards laboratory, are
designed for stability, as well as configured to accept a
test accelerometer. By mounting a test accelerometer to
the reference standard and then connecting this
combination to a suitable vibration source, it is possible
to vibrate both devices and compare the data as shown
in Figure 10. (Test set-ups may be automated and vary,
depending on the type and number of accelerometers
being calibrated.)
Figure 10. Typical Back-to-Back Calibration System
Because the acceleration is the same on both sensors,
the ratio of their outputs (VT/VR) must also be the ratio
of their sensitivities. With the sensitivity of the
reference standard (SR) known, the exact sensitivity of
the test sensor (ST) is easily calculated by using the
following equation:
ST = SR(VT/VR)
By varying the frequency of the vibration, the sensor
may be calibrated over its entire operating frequency
range. The typical response of an unfiltered
accelerometer is shown in Figure 11.

6
Figure 11. Typical Test Accelerometer Response
7.3 PCB CALIBRATION PROCEDURE
Numerous precautions are taken at PCB to insure
accurate and repeatable results. This section provides a
brief overview of the primary areas of concern.
Since the Back-to-Back Calibration technique relies on
each sensor experiencing an identical acceleration level,
proper mounting of the test sensor to the reference
standard is imperative. Sensors with mounting holes are
attached directly to the reference standard with a stud
tightened to the recommended mounting torque. A
shouldered mounting stud is typically used to prevent
the stud from “bottoming out” in the hole.
Both mounting surfaces are precision-machined and
lapped to provide a smooth, flat interface according to
the manufacturer’s specification. A thin layer of
silicone grease is placed between the mating surfaces to
fill any imperfections and increase the mounting
stiffness. The cables are stress-relieved by first routing
them to the shaker head, securing them with tape or
cable ties, then routing them to a nearby stationary
location. This reduces cable motion, which is especially
important when testing charge output sensors and helps
to prevent extraneous noise or stresses from being
imparted into the system. A typical set-up is shown in
Figure 12.
Figure 12. Typical Calibration Set-Up
Adhesively mounted sensors use similar practices.
However, in this case, a small portion of quick-bonding
gel or similar temporary adhesive is used to attach the
test sensor to a reference standard designed with a
smooth, flat mounting surface.
In addition to mounting, the selection of the proper
equipment is critical. Some of the more important
considerations include: 1) the reference standard must
be specified and previously calibrated over the
frequency and/or amplitude range of interest; 2) the
shaker should be selected to provide minimal transverse
(lateral) motion and minimal distortion; and 3) the
quality of the meters, signal generator, and other devices
should be selected so as to operate within the limits of
permissible error.
7.4 COMMON MISTAKES
Most calibration errors are caused by simply
overlooking some of the fundamental principals of
dynamics. This section attempts to address some of the
more common concerns.
For stud-mount sensors, always mount the accelerometer
directly to the reference standard. Ensure that the
mounting surfaces are smooth, flat, and free of any
burrs. Always use a coupling fluid, such as silicone
grease, in the mounting interface to maintain a high
mounting stiffness. Mount the sensor according to the
manufacturer’s recommended mounting torque. DO
NOT use any intermediate mounting adaptors, as the
mounted resonant frequency may be reduced and
thereby compromise the high-frequency performance. If
necessary, use adaptor studs.

7
Figure 13. Stud Mounting
For adhesive mount sensors, use a thin, stiff layer of
temporary adhesive such as quick-bonding gel or
superglue. DO NOT use excessive amounts of glue or
epoxy, as the mounting stiffness may be reduced and
compromise high-frequency performance. It may also
damage the sensor during removal.
Figure 14. Incorrect Adhesive Mounting
Triaxial accelerometers should always be mounted
directly to the reference standard. Unless absolutely
required, DO NOT use adaptors to re-orient the sensor
along the axis of motion, as the mounting stiffness may
be altered. The vibration at the test sensor sensing
element may differ from the vibration at the reference
standard due to a “cantilever” effect, seen in Figure 15.
Figure 15. Mounting Triaxial Sensors (Incorrect)
Understand Back-to-Back Calibration limitations. Do
not expect the uncertainty of calibration to be any better
than 2%. (In fact, the uncertainty may be as high as
3% or 4% for frequencies <10 Hz or >2 kHz.) Since
large sensors may affect high-frequency accuracy, verify
that the test sensor does not mass load the reference
standard. Validate your calibration system with another
accelerometer prior to each calibration session. Check
with the manufacturer for exact system specifications.
7.5 CONCLUSIONS
Without an adequate understanding of dynamics,
determining what, when, and how to test a sensor is a
difficult task. Therefore, each user must weigh the cost,
time, and risk associated with self-calibration versus the
services of an accredited laboratory.
3425 Walden Avenue, Depew, NY 14043
Toll Free: 888-684-0013 24-hour SensorLineSM: 716-684-0001 FAX: 716-685-3886
File name: VIB-CHGOPGUIDE-0702 Doc. No. 18293 Rev. A

Model Number
357B54 CHARGE OUTPUT ACCELEROMETER Revision: E
ECN #: 46956
Performanc
e
ENGLISH S
I
Sensitivity(± 15 %) 100 pC/g 10.2 pC/(m/s²)
Measurement Range ± 150 g pk ± 1470 m/s² pk
Frequency Range(+5 %) 3 kHz 3 kHz [2]
Frequency Range(+10 %) 3.5 kHz 3.5 kHz [2]
Frequency Range(+3 dB) 5.5 kHz 5.5 kHz [2]
Resonant Frequency ≥12 kHz ≥12 kHz
Non-Linearity ≤1 % ≤1 % [3]
Transverse Sensitivity ≤5 % ≤5 %
Environmental
Overload Limit(Shock) ± 2000 g pk ± 19,600 m/s² pk
Temperature Range -95 to +550 °F -71 to +288 °C
Temperature Response See Graph See Graph [1]
Base Strain Sensitivity 0.0002 g/µε0.002 (m/s²)/µε[1]
Radiation Exposure Limit(Integrated Gamma Flux) ≤108rad ≤108rad
Radiation Exposure Limit(Integrated Neutron Flux) ≤1010 N/cm² ≤1010 N/cm²
Electrica
l
Capacitance 930 pF 930 pF [1]
Insulation Resistance(at 550°F) ≥108Ohm ≥108Ohm [1]
Insulation Resistance(at 70° F [21°C]) ≥101
2
Ohm ≥101
2
Ohm
Output Polarity Negative Negative
Electrical Isolation(Base) ≥108Ohm ≥108Ohm
Physica
l
Sensing Element Ceramic Ceramic
Sensing Geometry Shear Shear
Housing Material Titanium Titanium
Sealing Hermetic Hermetic
Size (Hex x Height) 3/4 in x 1.43 in 3/4 in x 36.3 mm
Weight 1.80 oz 51 gm [1]
Electrical Connector 10-32 Coaxial Jack 10-32 Coaxial Jack
Electrical Connection Position Top Top
Mounting Thread 10-32 Female 10-32 Female
[4]
All specifications are at room temperature unless otherwise specified.
In the interest of constant product improvement, we reserve the right to change specifications without notice.
ICP®is a registered trademark of PCB Group, Inc.
OPTIONAL VERSIONS
Optional versions have identical specifications and accessories as listed for the standard model
except where noted below. More than one option may be used.
NOTES
:
[
1
]
T
yp
ical
.
[2] Low frequency response is determined by external signal conditioning electronics.
[3] Zero-based, least-squares, straight line method.
[4] See PCB Declaration of Conformance PS160 for details.
SUPPLIED ACCESSORIES:
Model 081B05 Mounting Stud (10-32 to 10-32) (1)
Model ACS-1 NIST traceable frequency response (10 Hz to upper 5% point). (1)
Model M081B05 Mounting Stud 10-32 to M6 X 0.75 (1)
Entered: LK Engineer: BAM Sales: WD
C
Approved: BAM Spec Number:
Date: 8/8/2017 Date: 8/8/2017 Date: 8/8/2017 Date: 8/8/2017 30564
3425 Walden Avenue, Depew, NY 14043
Phone: 716-684-0001
Fax: 716-684-0987
E-Mail: [email protected]


MOUNTNG THREAD SEE DRAWING
5-40 A
M3 X 0.50
B
10-32 C
M5 X 0.80 D
1/4-28
E
M6 X 1.00
F
BOLT THREAD SEE DRAWING
10-32 C
M5 X 0.80 D
1/4-28
E
M6 X 1.00
F
M8 X 1.25
F
1
1
2
2
3
3
4
4
A A
B B
CODE
IDENT. NO.
52681
DWG. NO.
SCALE: SHEET
DRAWN CHECKED ENGINEER
TITLE
UNLESS OTHERWISE SPECIFIED TOLERANCES ARE:
DIMENSIONS IN MILLIMETERS
[ IN BRACKETS ]
XX ±0.13
ANGLES 2 DEGREES
3425 WALDEN AVE. DEPEW, NY 14043
(716) 684-0001 E-MAIL: sales@pcb.com
DIMENSIONS IN INCHES
DECIMALS XX ±.01
ANGLES 2 DEGREES
FILLETS AND RADII
.003 - .005
DECIMALS X ± 0.3
FILLETS AND RADII
0.07 - 0.13
INSTALLATION DRAWING 081-XXXX-90
1 OF 1N.T.S.
FOR STANDARD
081 SERIES MOUNTING
XXX ±.005
JDM 3/9/07 ECB 3/9/07 JJD 3/9/07
"A"
5-40
MOUNTING INSTRUCTIONS
(METRIC DIMENSIONS IN BRACKETS)
MOUNTING HOLE PREPARATION:
.101[2.57]
X .20[5.1]MIN.
5-40 UNC-2B
X .15[3.8]MIN.
4.) RECOMMENDED MOUNTING TORQUE,
4-5 INCH POUNDS
[45-55 NEWTON CENTIMETERS].
"B"
M3 X 0.50
MOUNTING INSTRUCTIONS
(ENGLISH DIMENSIONS IN BRACKETS)
MOUNTING HOLE PREPARATION:
2.5[.099]
X 4.6 [1.8]MIN.
M3 X 0.50-6H
X 3.3[.13]MIN.
4.) RECOMMENDED MOUNTING TORQUE,
45-55 NEWTON CENTIMETERS
[4-5 INCH POUNDS].
"C"
10-32
MOUNTING INSTRUCTIONS
(METRIC DIMENSIONS IN BRACKETS)
4.) RECOMMENDED MOUNTING TORQUE,
10-20 INCH POUNDS
[113-225 NEWTON CENTIMETERS].
MOUNTING HOLE PREPARATION:
.159[4.04]
X .23[5.8]MIN.
10-32 UNF-2B
X .15[3.8]MIN.
"D"
M5 X 0.80
MOUNTING INSTRUCTIONS
(ENGLISH DIMENSIONS IN BRACKETS)
4.) RECOMMENDED MOUNTING TORQUE,
113-225 NEWTON CENTIMETERS
[10-20 INCH POUNDS].
MOUNTING HOLE PREPARATION:
4.22[.166]
X 7.62 [.300]MIN.
M5 X 0.8-6H
X 5.08[.200]MIN.
"E"
1/4-28
MOUNTING INSTRUCTIONS
(METRIC DIMENSIONS IN BRACKETS)
4.) RECOMMENDED MOUNTING TORQUE,
2-5 FOOT POUNDS
[3-7 NEWTON METERS].
MOUNTING HOLE PREPARATION:
.218[5.54]
X .300[7.62]MIN.
1/4-28 UNF-2B
X .200[5.08]MIN.
"F"
M6 X 0.75, M6 X 1.00, M8 X 1.25
MOUNTING INSTRUCTIONS
(ENGLISH DIMENSIONS IN BRACKETS)
4.) RECOMMENDED MOUNTING TORQUE,
3-7 NEWTON METERS [2-5 FT POUNDS].
M8 X 1.25
MOUNTING HOLE PREPARATION:
6.75[.266]
X 8.64 [.340]MIN.
M8 X 1.25-6H
X 5.00[.197]MIN.
M6 X 0.75
MOUNTING HOLE PREPARATION:
5.31[.209]
X 7.62 [.300]MIN.
M6 X 0.75-6H
X 5.08[.200]MIN.
M6 X 1.0
MOUNTING HOLE PREPARATION:
5.05[.199]
X 8.10 [.320]MIN.
M6X 1.0-6H
X 6.35[.250]MIN.
"B"
"C"
"G"
MOUNTING INSTRUCTIONS
FOR SPECIAL THREAD LENGTHS
(METRIC DIMENSIONS IN BRACKETS)
THREAD DEPTH : B= X + 1 THREAD PITCH
DRILL DEPTH : C= B + 3 THREAD PITCH
SEE A-F FOR APPROPRIATE DRILL AND TAP
THREAD PITCH= 1/TPI [P]
3.) FOR BEST RESULTS, PLACE A THIN LAYER OF SILICONE GREASE (OR EQUIVALENT) ON INTERFACE PRIOR
TO MOUNTING.
MOUNTING SURFACE SHOULD BE FLAT TO WITHIN .001(0.03) TIR OVER DIM 'A' WITH A OR BETTER FINISH FOR BEST RESULTS.
DRILL PERPENDICULAR TO MOUNTING SURFACE TO WITHIN 1.
SENSOR
SENSOR
"THRU-BOLT"
"THRU-BOLT" STUD MOUNT
INTEGRAL STUD MOUNT
SENSOR
THREAD
MOUNTING
THREAD
SENSOR
THREAD
MOUNTING
THREAD
STANDARD STUD MOUNT
"X"
"X"
SENSOR THREAD
"X"
1111
1
1
1
1
2222
2
2
2
MOUNTING HOLE PREPARATION:
DRILL DIA.
X "C"MIN.
TAP
X "B"MIN.
1
"A"
"A"
"A"
"P"
1 THREAD PITCH
SHOWN
"X"
SENSOR
INTEGRAL
MOUNTING
STUD
63[1.61]
REVISIONS
REV DESCRIPTION DIN
P UPDATE DRAWING 25686
2
1
MOUNTING THREAD SEE DRAWING
5-40 A
M3 X 0.50 B
10-32 C
M5 X 0.80 D
1/4-28 E
M6 X 1.00 F
081-XXXX-90
PCB Piezotronics Inc. claims proprietary rights in
the information disclosed hereon. Neither it nor any
reproduction thereof will be disclosed to others
without the written consent of PCB Piezotronics Inc.
Table of contents
Other PCB Piezotronics Meter manuals