IDW G-77-N23EN User manual

G-Series Cooler
Instruction Manual
Manual is for the following model:
G-77-N23EN
G-77
ELECTRIC IMPULSE COOLER

Innovative DisplayWorks
G-77
Instruction Manual
Manual is for the following model:
G-77-N23EN

Innovative DisplayWorks
G-77
FOR YOUR FUTURE REFERENCE
• This easy-to-use manual will guide you in getting the best use of your cooler.
• Remember to record the model number and the serial number. This information can be found on the
inside of your cooler.
• Keep your receipt with this manual for future warranty service.
Model #:
Serial #:
Date of Purchase:
TABLE OF CONTENTS
Parts and Identication ......................................... 2
Safety Instructions................................................. 3
Preparation........................................................... 4
Location................................................................ 5
Installation and Operation..................................... 5
Clamp Installation................................................. 5
Beverage Storage.................................................. 6
Maintenance......................................................... 6
Changing Graphics................................................ 7
Cleaning ............................................................... 8
Flammable R600a Warnings ................................. 8
Troubleshooting .................................................... 9
Circuit Diagram................................................... 10
1
Instruction Manual
Innovative DisplayWorks
2
Innovative DisplayWorks
ofce909.447.8254•fax909.305.8756•tollfree877.307.2665•www.idw.global
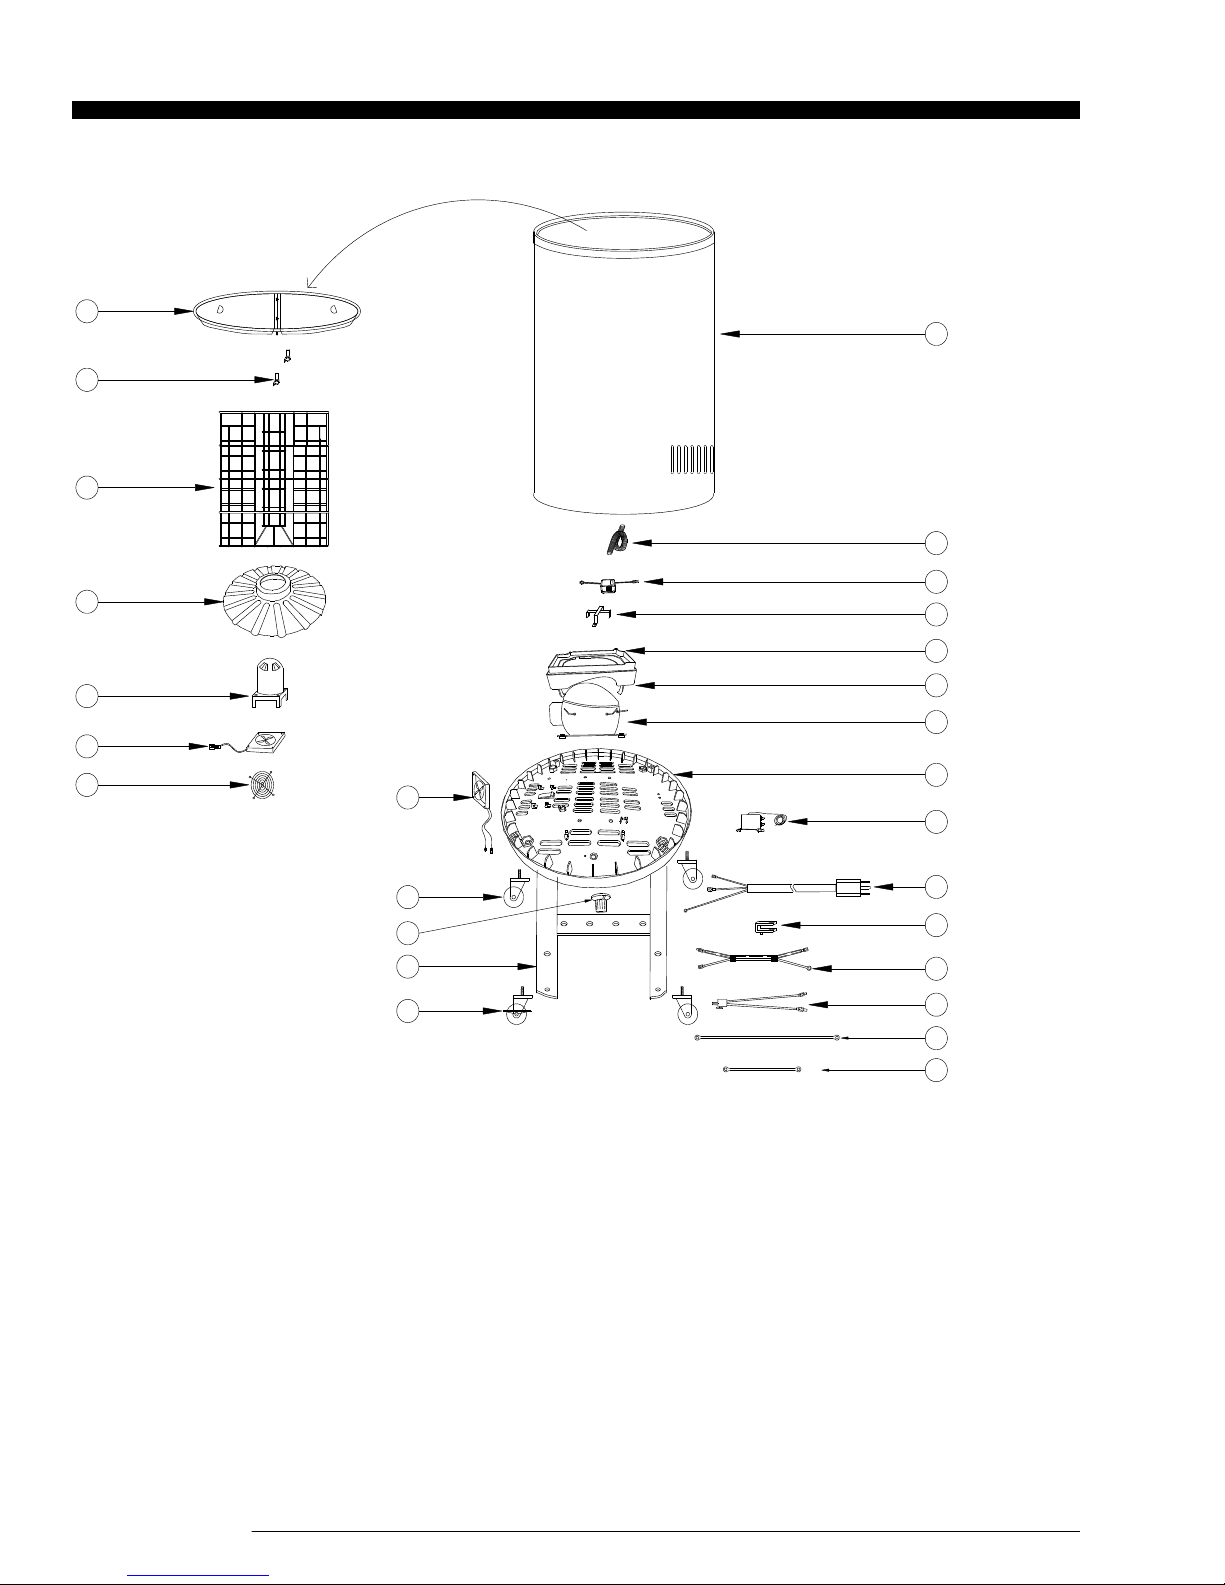
PARTS & IDENTIFICATION
LastRevised:September30,201512:19PM
G-77
1. Cooler Cabinet
2. Outlet Pipe
3. Transformer
4. Transformer Box
5. Drip Pan Cover
6. Drip Pan
7. Compressor
8. Bottom Plate
9. Thermostat
10. Power Cord
11. Power Cord Clip
12. Thermostat Wire
13. Transformer Connecting Line
14. Ground Line
15. Fan Ground Line
16. Condenser Fan
17. Caster (3)
18. Thermostat Knob
19. Base Supporter
20. Caster with Lock
21. Lid (2)
22. Lid Clip(2)
23. Basket
24. Evaporator Baffl e
25. Evaporator Fan Cover
26. Evaporator Fan
27. Evaporator Fan Grill
1
2
3
4
5
7
8
9
10
11
6
12
13
14
15
16
17
18
20
21
22
23
24
25
26
19
27

Innovative DisplayWorks
G-77
3
SAFETY INSTRUCTIONS
When using this appliance, always follow the basic safety precautions:
1. Read the entire Userʼs Manual before operating this appliance.
2. Use this appliance only for its intended purpose as described in this Userʼs Manual.
3. This cooler must be properly installed in accordance with the installation instructions before being used. See grounding
instructions.
4. IDW requires that a dedicated circuit be used for the unit. Failure to do so voids warranty.
5. Never unplug your cooler by pulling on the power cord. Always grasp the plug rmly and pull it straight out from the
outlet.
6. Unplug your cooler before cleaning or making any repairs.
Note: If for any reason this product requires service, we strongly recommend that a certi ed technician perform the service.
7. When disconnecting the power source, wait at least 5 minutes to reconnect the power to avoid damage to the compressor
and the cooling system.
8. Immediately repair or replace all electrical cords that have become frayed or otherwise damaged. Do not use a cord that
shows cracks or abrasion damage along its length, the plug or the connector end.
9. Do not operate or store your cooler near or around explosive fumes, gasoline or other fl ammable vapors and liquids.
10. Do not use fl ammable liquids to clean unit.
11. Setting the temperature control to the 0 position does not remove power to the light circuit, perimeter heaters, or
evaporator fans.
12. Do not adjust the temperature control. The temperature control is factory set between levels 4 and 5 for maximum
performance.
13. To avoid damage to the casters, do not transport the cooler on rough surfaces.
IMPORTANT!
Please Save These Instructions
For Proper Disposal of the Refrigerator!
PRE-CAUTION, NON-OPERATING COOLERS SHOULD HAVE:
1. Door removed
2. Baskets kept in place in order to prevent any small child from climbing inside cooler
FOR PROPER DISPOSAL OF COOLER: Distributors / retailers need to contact a quali ed service technician:
1. To recover all refrigerant from the cooler
2. To remove the compressor or remove the oil from the compressor
Then the distributor / retailer can contact their local metal recycling center to pick up the remaining cabinet, baskets, etc.
By law, disposal of hazardous wastes may be subject to nes and imprisonment under the provisions of the environmental
regulations. For more information please visit: http://www.epa.gov/osw/hazard/index.htm

Instruction Manual
Innovative DisplayWorks
4
INSTALLATION
Installation of the cooler must be done according to applicable local codes or equivalent.
Ambient Environment
• Place cooler on an even surface to reduce vibration and noise.
• To transport, do not tilt the cooler beyond a 45 degree angle.
• Do not place cooler in direct sunlight or near any heat sources.
• Do not place cooler in environment temperatures that exceed 109°F.
• Do not place cooler in below normal temperatures.
• Do not place cooler in extreme humid environments, this may cause components to rust.
• Do not place cooler near constant running or splattering water, this may cause immediate damage to refrigeration system.
• Must allow at least 4” between rear of cooler and wall for proper ventilation and heat dissipation of cooler.
• Do not place furniture or other articles with sharp edges near the cooler in order to prevent damage to the glass door.
• This cooler is for indoor use.
• Place unit in itʼs nal location, making certain there is adequate ventilation in the room.
WARNING: Warranty is void if ventilation is insuf cient.
PREPARATION PRIOR TO OPERATION
Unpacking
• Remove all packaging materials before using cooler. This includes: foam pedestal, adhesive tape (used to x accessories)
and protective gaskets.
• Inspect cooler for concealed damage. Immediately le a claim with the freight carrier if there is damage. IDW is not
responsible for damage incurred during shipping.
• Cooler must remain unplugged in an upright position for 1 hour prior to use.
• Clean the interior surface with a soft cloth and lukewarm water before operation.
• Ensure that drain hose or hoses are positioned in the pan.
• Remove plug and cord from inside the lower rear of the cooler.
• The unit should be placed close enough to the electrical supply so that extension cords are not used.
Electrical Requirements
• This model operates with a 110V/60Hz power supply. Check the electrical outlet for proper voltage.
• Dedicate one outlet for the use of the cooler.
• Do not use an extension cord or any other multiple connectors as this can lead to compressor failure.
• If the cord is damaged, it must be replaced.
• For your safety, plug the unit into a grounded wall outlet. Please check with a certi ed electrician for details.
WARNING: Do not use extension cords.
WARNING: Compressor warranties are void if compressor burns out due to low voltage.
WARNING: Power cord ground pin must NOT be removed!

Innovative DisplayWorks
G-77
5
LEVELING/LOCATION
• Placeunitinawell-ventilatedarea.
• WARNING:Warrantyisvoidifventilationisinsufcient.
• Unitmustbeleveledforproperoperation,thiswillhelppreventcondensation.
• Thecoolershouldbeleveledfronttobackandsidetosidewithaleveler.
INSTALLATION AND OPERATION
• ConnectthePowerSource.After30minutesofoperation,theunitshouldshowsignsofcooling.
• Aftertheemptycoolerhasbeenoperatingforaperiodof5hours,theunitcanbeloadedwithproducts.
CLAMP INSTALLATION
Theclampsecuresthelidassemblytothemainbodyofthecabinet
1 Locatethe(2)notchesontheinteriorofthelid
2 Snapthe(2)boltsintothenotchesofthelid.
3 Screwtheclampsontothe
bolts.
4 Hookthetwoclampsontothecenterbarofthe
basket.

Instruction Manual
Innovative DisplayWorks
6
BEVERAGE STORAGE
• Donotoverloadthecoolerbeyondtheredlimitationline.
• Leaveadequatespacebetweenbeveragecanstoallowair
circulation.
• Thiscoolerisprimarilyforstoringbeveragecansandplasticbottles.
Avoidputtingglasscontainersinthecooler.
• Allbeverageproductsshouldbeproperlysealedtoavoidleakinginto
thecooler.
MAINTENANCE
Accessing Cooler Components:
2 Removethebaferfromcooler.
3 UsingaPhillipsscrewdriver,
unscrewthe(4)screwsatthe
baseofthecooler.
1 Removethebasketfromtheinsideofthecooler.

Innovative DisplayWorks
G-77
Changing Electric Impulse Cooler Graphics:
7
5 Laythebodyofthecooleronitssidetoaccess
components.
6 Tore-assemblethecooler
alignthenotchatbaseofthe
bodywiththecoolercord.
Thenreversesteps1-5.
4 Thebodyofthecoolercannowbeworkedfreefromtheframe.
2 Wedgethegraphicundertheplasticframeofthecooler.
3 Removethecoveringonthe
double-sticktapetoadhere
thegraphicinplace.
1 Placegraphicaroundbarrel,makingsuretoalignthegrillholesinthegraphic
withthegrillholesonthecoolertoallowproperventilationforthecooler.
Instruction Manual
Innovative DisplayWorks
8
MAINTENANCE
Cleaning
• Before cleaning the appliance, always remember to unplug it.
• Unplug the cooler at the electrical outlet; never pull the service cord.
• Do not use sharp or pointed objects for cleaning.
• Clean the inside cabinet of the cooler with a clean damp cloth. Avoid damage by using non-abrasive and non-
fl ammable cleaning products.
• Clean the condenser at least once a month with a vacuum cleaner or a brush to
eliminate the dust accumulation.
Light Replacement
• Unplug the cooler before removing the LED light strip.
• Remove the screws.
• Remove the light cover gently.
• Take out the LED light strip.
• Replace the used strip with new equivalent light strip.
• Install the light cover and tighten the screws.
• Plug in the cooler.
Power Failure
• Please minimize the frequency of opening the door during a power failure.
• If your cooler is unused for an extended period of time, unplug, empty, and clean your cooler and keep the door open
to avoid condensation, formation of mold, or odors.
Moving The Cooler
• Empty the unit.
• Secure all loose parts inside the cooler.
• Tape the door shut.
• During transportation, make sure that the cooler is in an upright position.
Drip pan
• During normal compressor cycle, water will drain into the drain pan and evaporate.
• To clean, gently pull the drain pan towards you and remove. Slowly reinstall it after cleaning.
FEATURES
•Designed with an elegant shape and quick refrigeration speed, this commercial-grade product is an ideal choice for
shopping malls, supermarkets, hotels, etc.
•Transparent glass doors are built with hollow, toughened glass that provides a high level of heat insulation. Clear
doors allow for high product visibility.
•The forced air system allows for fast cooling speeds, which helps maintain a consistent temperature.
•Adjustable shelves allow for a wide variety of products to be stocked.
•A built-in lock offers the ability to secure products.
•The refrigeration unit is designed for easy access, allowing for fast and simple repairs.
•This equipment is intended for storage and display of non-hazardous packaged product.
CAUTION FLAMMABLE REFRIGERANT
• DANGER – Risk Of Fire Or Explosion. Flammable Refrigerant Used. To Be Repaired Only By Trained Service
Personnel. Do Not Puncture Refrigerant Tubing.
• CAUTION – Risk Of Fire Or Explosion. Flammable Refrigerant Used. Consult Repair Manual/Ownerʼs Guide
Before Attempting To Install or Service This Product. All Safety Precautions Must be Followed.
• CAUTION – Risk Of Fire Or Explosion. Dispose Of Properly In Accordance With Federal Or Local Regulations.
Flammable Refrigerant Used.
• CAUTION – Risk Of Fire Or Explosion Due To Puncture Of Refrigerant Tubing; Follow Handling Instructions
Carefully. Flammable Refrigerant Used.
INSTRUCTIONS
Ambient Environment
•Place cooler on an even surface to reduce vibration and noise.
•To transport, do not tilt the cooler beyond a 45 degree angle.
•Do not place cooler in direct sunlight or near any heat sources.
•Do not place cooler in environment temperatures that exceed 109°F.
•Do not place cooler in below normal temperatures.
•Do not place cooler in extreme humid environments, this may cause components to rust.
•Do not place cooler near constant running or splattering water, this may cause immediate damage to refrigeration
system.
•Must allow at least 2” between rear of cooler and wall for proper ventilation and heat dissipation of cooler.
•Do not place furniture or other articles with sharp edges near the cooler in order to prevent damage to the glass door.
DANGER – Risk Of Fire Or Explosion. Flammable Refrigerant Used. To Be
Repaired By Trained Service Personnel Only. Do Not Puncture Refrigerant Tubing.
CAUTION – Risk Of Fire Or Explosion. Flammable Refrigerant Used. Consult
Repair Manual/Owner’s Guide Before Attempting To Service This Product. All
Safety Precautions Must be Followed.
CAUTION – Risk Of Fire Or Explosion. Dispose Of Property In Accordance With
Federal Or Local Regulations. Flammable Refrigerant Used.
CAUTION – Risk Of Fire Or Explosion Due To Puncture Of Refrigerant Tubing;
Follow Handling Instructions Carefully. Flammable Refrigerant Used.
CAUTION FLAMMABLE - R600a Refrigerant
DANGER - Risque d'incendie ou d'explosion. Réfrigérant inflammable utilisé.
Pour être réparé que par un personnel de maintenance qualifié. Ne pas percer
réfrigérant Tubing.
ATTENTION - Risque d'incendie ou d'explosion. Réfrigérant inflammable utilisé.
Consultez manuel / guide de l 'utilisateur de réparation avant de tenter de
réparer ce produit. Toutes les précautions de sécurité doivent être respectées.
ATTENTION - Risque d'incendie ou d'explosion. Aliéner des biens conformé-
ment à la réglementation fédérales ou locales. Réfrigérant inflammable utilisé.
ATTENTION - Risque d'incendie ou une explosion due à la perforation de
tuyaux de réfrigérant; suivre les instructions de manipulation avec précaution.
Réfrigérant inflammable utilisé.
PRUDENCE INFLAMMABLE - R600a Réfrigérant
• CAREFUL - Handling, moving and oporating of the refrigerator or freezer to avoid either damaging the
refrigerant tubing, or increasing the risk of a leak.
• CAUTION - Component parts shall be replaced with like components and that servicing shall be done by
factory authorized service personnel, so as to minimize the risk of possible ignition due to incorrect parts or
improper service.

Innovative DisplayWorks
G-77
9
TROUBLESHOOTING
If your cooler is not working properly:
• Check the electrical outlet for power, and that the plug is properly inserted.
• Check to see if the circuit breaker is tripped or the fuse is blown.
• Check the condenser for proper cleaning.
If your cooler is making noise:
• Check that the cooler is level and on a fl at surface.
If the compressor turns on and off frequently:
• The room temperature is higher than normal.
• The door is not closed completely.
• The door gasket is not sealed well.
• There is insuf cient clearance around the cooler.
• The temperature is not set properly.
• The cycling frequency will reduce when all of the cans reach the set temperature.
The following is not a malfunction:
• It is normal to hear gurgling sounds caused by the fl ow of refrigerant when each cooling cycle ends.
REFRIGERANT
• The cooler utilizes R600a refrigerant.
SPECIFICATIONS
Model:
Power Supply (V/Hz):
Dimension (W x D x H):
Box Dimension (W x D x H):
Maximum Load Per Shelf:
NSF-7 Standard: This equipment is intended for the storage and display of non-potentially
hazardous bottled or canned products only.
G-77 Electric
G-77 Electrical Impulse Cooler
110V/60Hz or 220V/50Hz
22.25” x 22.25” x 33.25”
23” x 23” x 34”
N/A

Instruction Manual
Innovative DisplayWorks
CIRCUIT DIAGRAM
10

Innovative DisplayWorks
G-77

Innovative DisplayWorks, Inc.
To locate the distributor in your area go to: http://www.idw.global/contact/#distributors
G-Series Cooler
Instruction Manual
Table of contents
Other IDW Freezer manuals


