Hussmann HBD/BC-142 User manual

Operating and Installation
Instructions
Sliding Glass Top &Solid Top
Freezer / Cooler Chests
Curved Top (Y), Interior Step &Flat Top, Interior Step
Flat Top (P), Flat Interior &Solid Top(H), Interior Step
Hussmann Corporation
12999 St. Charles Rock Road
Bridgeton, MO 63044
Phone: 314-291-2000

TABLE OF CONTENTS
Page
Introduction 3
Inspection 3
Interior Liner, Insulation 3
Cabinet Dimensions,
Electrical Data, and Case Capacities 4
Refrigerant and Refrigerant Charges 5
Installation and Start Up, Leveling, Casters, Baskets 6
Drain and Power Cord 7
Temperature Control and Defrosting 8
Cleaning Condenser 9
CleaningExterior 9
CleaningInterior 9
Trouble Shooting Chart 9 & 10
Replacement Parts Procedure 11
Replacement Parts List 12
WiringDiagram 13

Page 3
INTRODUCTION :
The HSD/SC and HBD/BC models have been designed to give maximum
performance with minimum energy consumption. They have the versatility in
product temperature range to be used for storage or display of ice cream at sub zero
temperatures (-10f), or for storage or display at “normal” (under +40f) refrigerator
temperatures. All cabinets are UL electrical, UL Canadian, NOM electrical and UL
sanitation listed.
INSPECTION :
Upon receipt of the equipment, carefully examine the crating for damage. If
damage is found make a note on the delivery ticket before signing. Carefully
remove shipping crate and examine cabinet for “concealed” damage. If damage is
found contact the delivering carrier immediately and have his agent prepare an
inspection report for the purpose of filing a claim THIS IS YOUR
RESPONSIBILITY.
SPECIFICATIONS:
INTERIOR LINER
The liner is made of durable pattern aluminum. Copper evaporator tubing
is fastened to the exterior of the liner – It may show a frost pattern on the interior
walls immediately upon starting the equipment. Do not drill or fasten anything to
either the interior or the exterior walls of the equipment. Doing so may puncture a
refrigeration line.
INSULATION –
The shell, and liner assemblies are foamed in place with a ozone friendly
insulation providing outstanding insulating qualities and a solid unitized
construction.

Page 4
CABINET DIMENSIONS, ELECTRICAL DATA, CABINET CAPACITIES
OUTSIDE INSIDE
Cabinet Length Width Height Length Width Height
HSD/SC-190Y 36.5 23.6 34.2 31.26 18.35 24.5
HSD/SC-220Y 40.6 23.6 34.2 35.43 18.35 24.5
HSD/SC-280Y 48.6 23.6 34.2 43.62 18.35 24.5
HSD/SC-320Y 54.4 23.6 34.2 49.21 18.35 24.5
HSD/SC-258 42.5 23.6 33.8 37.5 18.5 25.6
HSD/SC-302 45.7 23.6 33.8 40.5 18.5 25.6
HSD/SC-358 49.7 26.7 34.2 44 20.6 26.6
HSD/SC-408 53.7 26.7 34.2 47.5 20.6 26.6
HSD/SC-518 66.5 26.7 34.2 60.5 20.6 26.6
HSD/SC-132P 31.5 21.3 36.3 26.4 16.1 20.6
HSD/SC-162P 33.9 21.3 36.3 28.7 16.1 20.6
HSD/SC-192P 38.8 21.3 36.3 33.7 16.1 20.6
HSD/SC-218P 42.5 21.3 36.3 37.4 16.1 20.6
HBD/BC-142H 28.9 21.3 33.8 23.8 16.1 25.6
HBD/BC-160H 31.5 21.3 33.8 26.4 16.1 25.6
HBD/BC-180H 33.9 21.3 33.8 28.7 16.1 25.6
HBD/BC-195H 36.4 21.3 33.8 31.3 16.1 25.6
HBD/BC-215H 38.8 21.3 33.8 33.7 16.1 25.6
HBD/BC-258H 42.5 23.6 33.8 37.4 18.5 25.6
HBD/BC-302H 45.7 23.6 33.8 40.6 18.5 25.6
ELECTRICAL CAPACITY
Breaker Ship Cubic
Volts Size Weight Feet
HSD/SC-190Y 115 15 amp 128 6.7
HSD/SC-220Y 115 15 amp 137 7.8
HSD/SC-280Y 115 15 amp 150 9.9
HSD/SC-320Y 115 15 amp 159 11.3
HSD/SC-258 115 15 amp 104 9.1
HSD/SC-302 115 15 amp 110 10.7
HSD/SC-358 115 15 amp 143 12.6
HSD/SC-408 115 15 amp 145 14.4

HSD/SC-518 115 15 amp 172 18.3
Page 5
ELECTRICAL CAPACITY
Breaker Ship Cubic
Volts Size Weight Feet
HSD/SC-132P 115 15 amp 102 4.7
HSD/SC-162P 115 15 amp 106 5.7
HSD/SC-192P 115 15 amp 115 6.8
HSD/SC-218P 115 15 amp 124 7.7
HBD/BC-142H 115 15 amp 75 5.0
HBD/BC-160H 115 15 amp 77 5.6
HBD/BC-180H 115 15 amp 79 6.4
HBD/BC-195H 115 15 amp 86 6.9
HBD/BC-215H 115 15 amp 93 7.6
HBD/BC-258H 115 15 amp 99 9.1
HBD/BC-302H 115 15 amp 106 10.7
Check the unit serial plate location on the rear of the case for the type and amount
of refrigerant used as this is subject to change from time to time:
R-134a
HSD/SC-190Y Curved Glass Top 5.64oz
HSD/SC-220Y Curved Glass Top 6.35oz
HSD/SC-280Y Curved Glass Top 7.05oz
HSD/SC-320Y Curved Glass Top 8.11oz
HSD/SC-258 Flat Top Int. Step 4.59oz
HSD/SC-302 Flat Top Int. Step 4.71oz
HSD/SC-358 Flat Top Int. Step 5.29oz
HSD/SC-408 Flat Top Int. Step 6.00oz
HSD/SC-518 Flat Top Int. Step 7.41oz
HSD/SC-132P Flat Top Flat Int. 3.17oz
HSD/SC-162P Flat Top Flat Int. 3.35oz
HSD/SC-192P Flat Top Flat Int. 3.53oz
HSD/SC-218P Flat Top Flat Int. 4.05oz
HBD/BC-142H Solid Top Int. Step 2.82oz
HBD/BC-160H Solid Top Int. Step 3.17oz
HBD/BC-180H Solid Top Int. Step 3.35oz
HBD/BC-195H Solid Top Int. Step 3.53oz
HBD/BC-215H Solid Top Int. Step 3.70oz
HBD/BC-258H Solid Top Int. Step 4.76oz
HBD/BC-302H Solid Top Int. Step 4.94oz
Page 6
INSTALLATION and START UP
Leveling –
Level case front to back and end to end, shimming where necessary upon
installation to assure proper operation of drains and refrigeration systems.
Casters-
The units are shipped complete with 4 swivel casters attached to each
underside corner of the case. The front two casters have a lock-in-place feature.
To activate the locking mechanism, push down firmly on the plastic flange that
protrudes from the caster. To unlock the caster, pull up on the flange. The casters
are of high quality with sealed bearings and do not require any oiling or
maintenance.
Baskets:
Each HSD/SC and HBD/BC unit is shipped standard with one hanging
basket. Additional baskets may be ordered from your Distributor/Dealer. See the
Literature Brochure for sizes and quantities of baskets for each specific model.

Page 7
Drain –
A 1-inch drain is provided on the cabinet floor which runs to the outside of
the cabinet where it is capped. It is important for proper operating temperatures to
assure that the exterior drain cap is in place when the equipment is refrigerating.
Power Cord –
All models are equipped with three wire grounded service cords. For your
own protection, connection must be made to a 115 volt grounded receptacle and a
power supply with a fifteen ampere rating minimum.
The cabinets are designed to operate on 115 volts, single phase, 60 cycle
current. A separate circuit is recommended to prevent product loss due to
overloading or malfunction of other equipment on the same circuit. Use a 15 amp
time delay fuse. The supply circuit must conform to National and local electrical
codes.
A wiring diagram is provided at the end of this manual.
VOLTAGE, AS MEASURED AT THE COMPRESSOR TERMINAL
DURING OPERATION, MUST NOT VARY MORE THAN 5% FROM CABINET
SERIAL PLATE RATING.
NOTE: DO NOT DRILL ANY HOLES IN SIDE OF CABINET
A space of 5 inches must be left open at the front and back and right hand
end of the cabinet to insure proper air flow over the condensing unit in order to cool
it.
Cabinets should not be installed in direct sunlight or near/under heat ducts
for proper operation.
********* IMPORTANT ***********
Cabinet should be started and allowed to cool down to normal operating
temperature before loading any products.

Page 8
OPERATION and NORMAL MAINTENANCE
TEMPERATURE CONTROL –
The temperature control which senses the cold wall temperature is located at
the side of the case. Adjustment of the control is done by turning the knob clockwise
for colder temperatures and counterclockwise for warmer temperatures.
The control is adjustable for both Freezer and Refrigerator Temperatures.
Towards the Maximum Zone are freezing temperatures and towards the Minimum
Zone are refrigerator temperatures. Due to the case design, once an adjustment is
made some time will lapse before the temperature inside the fixture reacts to the
change.
DEFROSTING – Disconnect Power Supply Before Starting -
Defrosting is accomplished manually by scraping frost from areas where it
has collected on the cabinet interior. Remove excess ice and water. After washing
and drying thoroughly reconnect the power supply.
CONDENSING UNIT –
On Models so equipped, check occasionally to assure that the condenser fan
motor in the compressor area is operating properly. This motor assists in the cooling
process and also keep the compressor cool for longer life.

Page 9
CLEANING CONDENSER –
On Models so equipped, the condenser is designed to require minimum
maintenance. However, to keep the unit at top efficiency, check periodically, and
remove any accumulated dust and debris.
To clean condenser, a soft, nylon brush should be used to loosen dirt and
lint. Then vacuum up the dirt or blow condenser out with a high pressure gas such
as nitrogen. Never use a wire brush to clean condenser tubes.
CLEANING EXTERIOR –
When cleaning the exterior of the cabinet use a soft cloth or sponge with
water and a mild detergent. Rinse and wipe dry.
CLEANING INTERIOR –
For cleaning the interior of the liner storage area, a flush out drain has been
provided on the case floor to assist in getting rid of any water in the bottom of the
case.
Disconnect the electrical power cord and wash using a soft cloth or sponge
and
a mild detergent. DO NOT USE AN ABRASIVE CLEANER OR STEEL WOOL –
THESE WILL MAR THE FINISH.
Wipe dry before restarting the cabinet. Allow the cabinet to cool down to
proper temperature before reloading product.
TROUBLE PROBABLE CAUSE SOLUTION
Compressor will not start, no
noise 1. Power disconnected 1. Check service cord for
proper connection
2. Blown fuse or breaker 2. Replace fuse or reset
breaker
3. Defective or broken
wiring 3. Repair or replace
4. Defective overload 4. Replace
5. Defective temperature
control 5. Replace

Compressor will not cuts out
on overload 1. Low voltage 1. Correct see serial plate
for proper electrical
requirements.
2. Defective compressor 2. Replace
3. Defective relay 3. Replace
4. Restriction pinched cap
tube 4. Repair or replace
TROUBLE SHOOTING
CHART
5. Restriction moisture 5. Leak check replace drier
evacuate and recharge
6. Inadequate air over
condenser 6. Move cabinet so it has 5”
front and back of unit
compartment opening
7. Defective condenser fan
motor 7. Replace
High head pressure 1. Cabinet location too
warm 1. Relocate cabinet remove
air flow restriction
2. Defective condenser fan
motor 2. Replace
3. Air or non condensable
gases in system 3. Leak check-change drier,
evacuate and recharge
Warm storage temperatures 1. Temperature control not
set properly 1. Reset control
2. Short of refrigerant 2. Leak check - change
drier, evacuate and recharge
3. Cabinet location too warm 3. Relocate cabinet
4. Too much refrigerant 4. Change drier evacuate
and recharge
5. Low voltage, compressor
cycling on overload 5. Check voltage supply

Compressor runs
continuously – product too
cold
1. Defective control 1. Replace
2. Control feeler tube not
installed in well 2. Push control feeler tube
into well
3. Short on refrigerant 3. Leak check change drier
and recharge
Compressor runs
continuously – product too
warm
1. Short on refrigerant 1. Leak check – change
dryers evacuate and recharge
2. Inefficient compressor 2. Replace
Please read carefully to assure prompt and accurate service
Ordering Replacement Parts –
Contact your nearest Hussmann Distributor.
Always specify model and serial number of cabinet.
If correct part number is not known, give a clear description of part itself and its
function in the cabinet or remote unit.
Warranty Parts Procedure –
Same as items above
Give original installation date of cabinet and, if possible, forward a copy of the
original invoice or delivery receipt.
All shipments of in-warranty replacement parts will be invoiced from the factory
until such time as the defective part is returned and proved to be defective by
our Quality Control Department.
Contact your Hussmann Distributor for instructions on returning in-warranty
parts.
Warranty parts must be returned to the factory within 30 days of date of failure
to assure proper disposition.
Lack of any of the above information may result in the shipment of the wrong
part, or a delay in shipment.

Part Nos. Description Model(s) Used On
5-HM-1007 Compressor Panasonic DG57C84RAU6 HSD/SC-190Y HSD/SC-220Y
HBD/BC-258H HBD/BC-302H
HSD/SC-218P
5-HM-1008 Compressor Panasonic DG73C12RAU6 HSD/SC-280Y HSD/SC-320Y
HSD/SC-258 HSD/SC-302
HSD/SC-358
5-HM-1009 Compressor Panasonic DG86C15RAU6 HSD/SC-408 HSD/SC-518
5-HM-1006 Compressor LGETR MA53LBCM HSD/SC-132P HSD/SC-162P
HSD/SC-192PHBD/BC-142H
(All above 115-volt, R-134a Refrigerant) HBD/BC-160H HBD/BC-180H
HBD/BC-195H HBD/BC-215H
5HM-2001 Temperature Control WKF27H-102-022 Used on all Models
5-HM-3002 Condenser Fan Motor M4Q045CA2704 Used on all Models (Except –P and –H)
5-HM-8001 Caster – Non Locking (2) Used on all Models
5-HM-8002 Caster – Locking (2) Used on all Models
5-HM-1001 Sliding Glass Door Lower HSD/SC-258
5-HM-1002 Sliding Glass Door Lower HSD/SC-302
5-HM-1003 Sliding Glass Door Lower HSD/SC-358
5-HM-1004 Sliding Glass Door Lower HSD/SC-408
5-HM-1005 Sliding Glass Door Lower HSD/SC-518
5-HM-1006 Sliding Glass Door Lower HSD/SC-190Y
5-HM-1007 Sliding Glass Door Lower HSD/SC-220Y
5-HM-1008 Sliding Glass Door Lower HSD/SC-280Y
5-HM-1009 Sliding Glass Door Lower HSD/SC-320Y
5-HM-1010 Sliding Glass Door Lower HSD/SC-132P
5-HM-1011 Sliding Glass Door Lower HSD/SC-162P
5-HM-1012 Sliding Glass Door Lower HSD/SC-192P
5-HM-1013 Sliding Glass Door Lower HSD/SC-218P
5-HM-1014 Sliding Glass Door Upper HSD/SC-258
5-HM-1015 Sliding Glass Door Upper HSD/SC-302
5-HM-1016 Sliding Glass Door Upper HSD/SC-358
5-HM-1017 Sliding Glass Door Upper HSD/SC-408
5-HM-1018 Sliding Glass Door Upper HSD/SC-518
5-HM-1019 Sliding Glass Door Upper HSD/SC-190Y
5-HM-1020 Sliding Glass Door Upper HSD/SC-220Y
5-HM-1021 Sliding Glass Door Upper HSD/SC-280Y
5-HM-1022 Sliding Glass Door Upper HSD/SC-320Y
5-HM-1023 Sliding Glass Door Upper HSD/SC-132P
5-HM-1024 Sliding Glass Door Upper HSD/SC-162P
5-HM-1025 Sliding Glass Door Upper HSD/SC-192P
5-HM-1026 Sliding Glass Door Upper HSD/SC-218P

Page 13
5-HM-12006 Keys for Lid Lock HSD/SC-258,302,358,408,518
HSD/SC-132P,162P,192P,218P
5-HM-12007 Keyes for Lid Lock HSD/SC-190Y,220Y,280Y,320Y
5-HM-12008 Keyes for Lid Lock HBD/BC-142H,160H,180H,195H
HBD/BC-215H,258H,302H
5-HM-13001 Opt. Light Fuse 2-Amp Curved Glass with Lighted Sign
5-HM-15001 Outside Drain Cap Used on all Models
WIRING DIAGRAMS :
This manual suits for next models
26
Table of contents
Other Hussmann Freezer manuals

Hussmann
Hussmann ARV-650S User guide

Hussmann
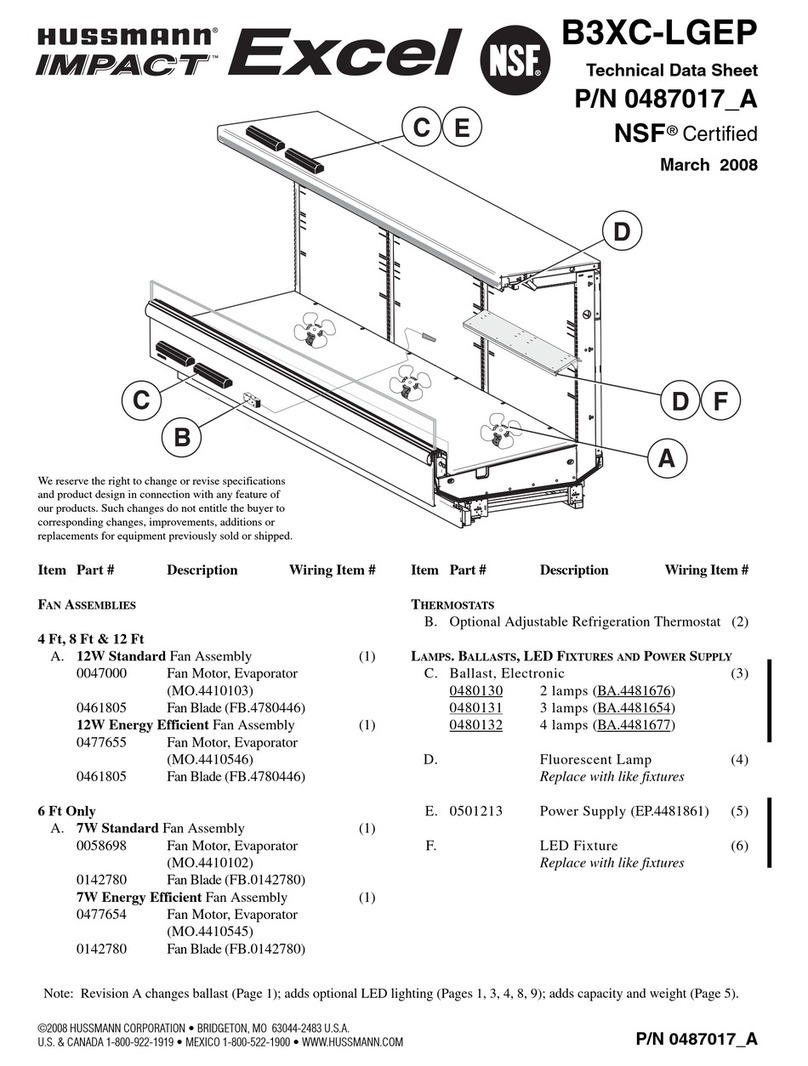
Hussmann impact Excel B3XC-LGEP Instruction Manual

Hussmann
Hussmann impact Excel C2X-XGE Instruction Manual

Hussmann
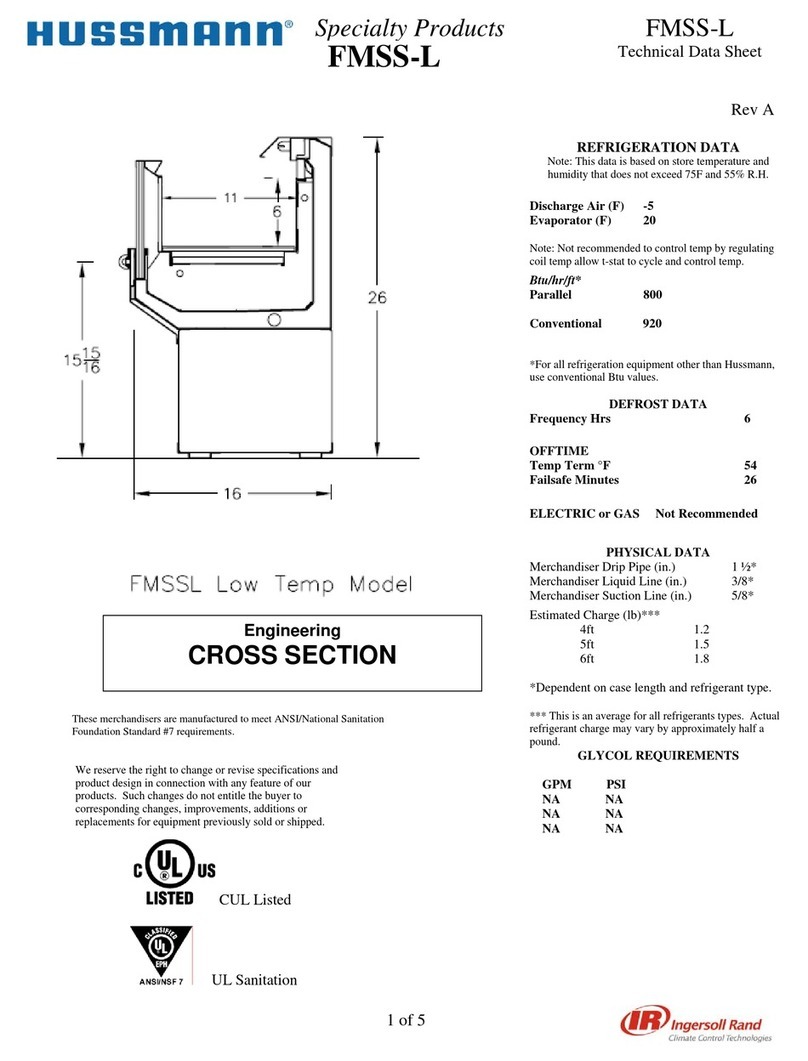
Hussmann FMSS-L Instruction Manual

Hussmann
Hussmann DCCG-8 User manual

Hussmann
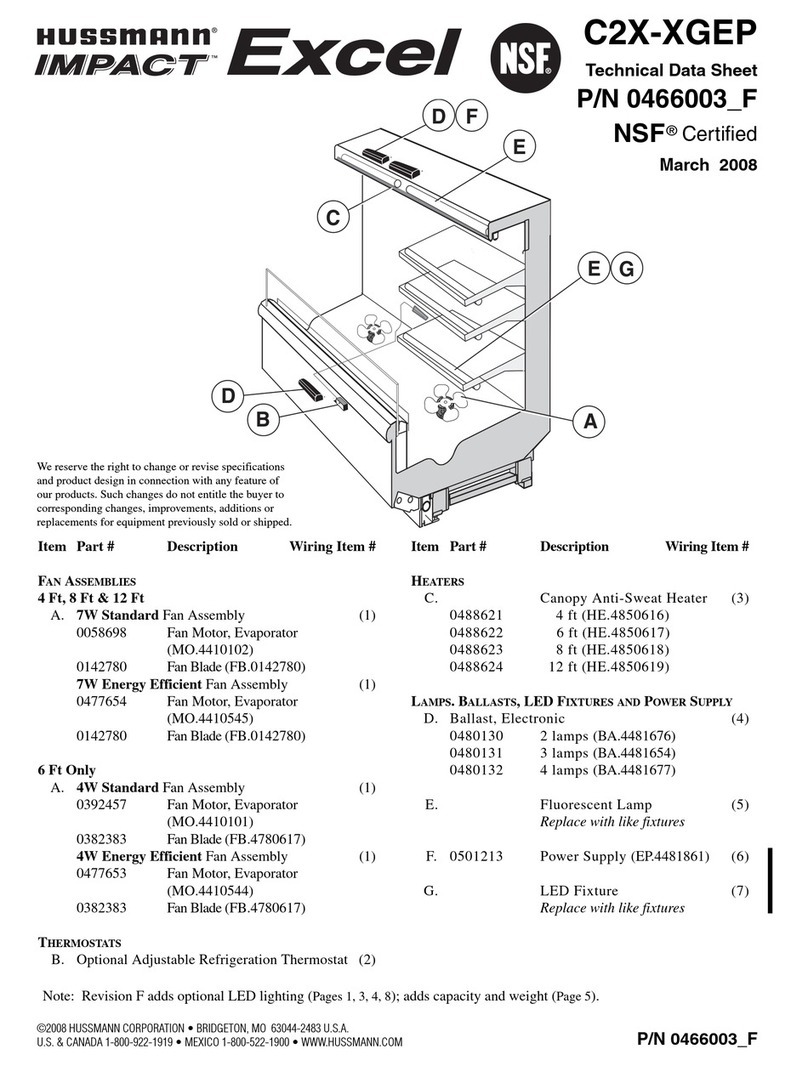
Hussmann impact Excel C2X-XGEP Instruction Manual

Hussmann
Hussmann RL User manual

Hussmann
Hussmann ARV-01050 Operation Quick start guide

Hussmann
Hussmann IMPACT Excel D5XRRIS Instruction Manual

Hussmann
Hussmann SM-110 User manual