iflo 121853 User manual

1 x Anora dual lit LED mirror
cabinet 700 x 500mm
Code: 121853
COMPONENTS
1 x Mirror.
Screws and spacers aached
TOOLS REQUIRED
1 x instrucons Pencil Screw driver
DIMENSIONS:
Height: 700mm
Width: 500mm
Depth: 140mm
Stud detector
IMPORTANT SAFETY
INFORMATION:
Please read these instructions carefully before
attempting to install this product. It is advisable to
keep these instructions in a safe place for
future reference.
We recommend that you consult a qualified
electrician. All electrical installations must be
carried out in accordance with current IEE wiring
regulations (BS7671).
lThis product must not be modified as it may
invalidate the warranty and may render the
product unsafe.
lThis product is only suitable for connecting to a
240V 50Hz supply.
lBefore commencing installation or maintenance,
isolate the main electrical supply for the
appropriate circuit at the fuse board.
lThis product should be used indoors only.
lThis cabinet should be installed on a smooth flat
secure surface.
lThe wall fixings supplied are only suitable for
brick walls. for any other wall substrate please
purchase alternative wall fixings.
lWhen installing please take care to avoid water
pipes, joints and electrical cables.
lDo not exceed or stretch the cable length of
each LED wire.
lThis cabinet contains 159 LED’s, please test that
they are working correctly before hanging.
CARE AND MAINTENANCE:
lEnsure that the power is disconnected prior
to cleaning.
lTo maintain the finish of this product, clean with
a soft cloth periodically.
lDo not use harsh chemical solvents, as this may
discolour or damage the finish.
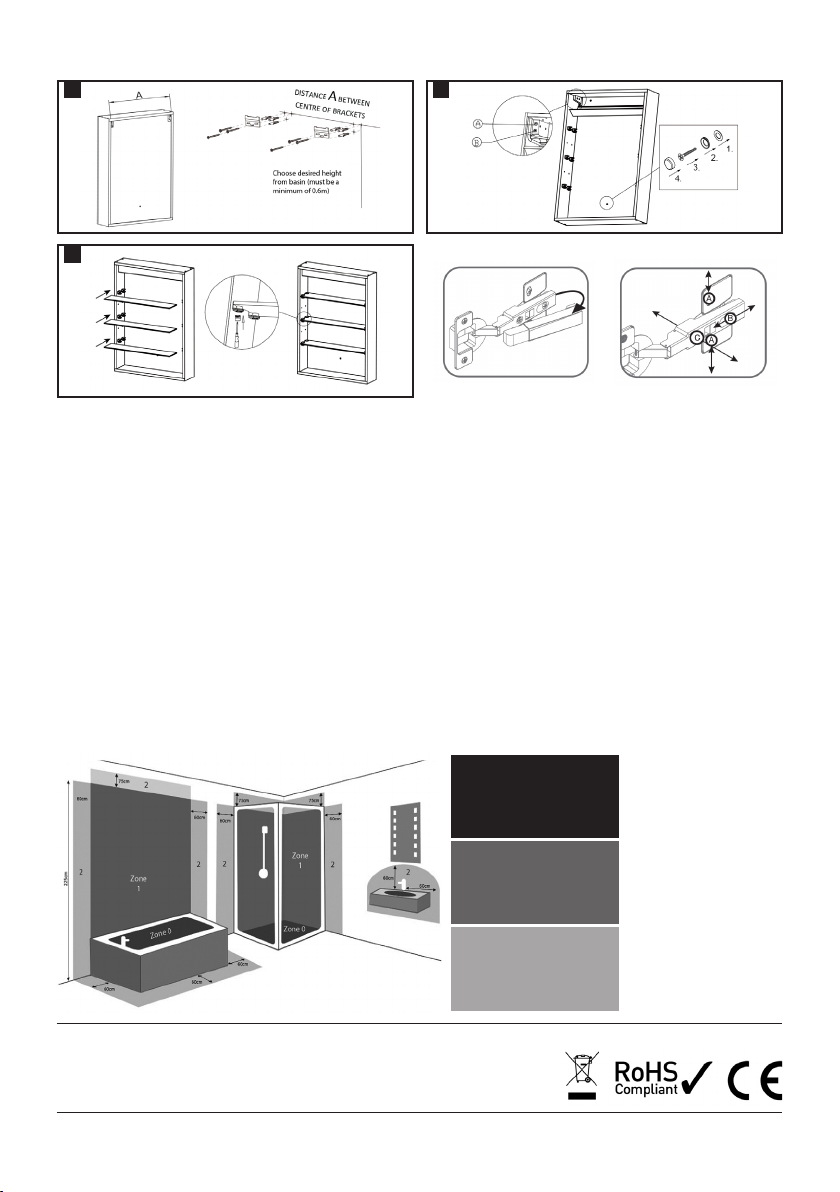
ZONE
0Inside the bath or
shower. Must be
SELV (12V max) due
to water submersion.
225cm above the
bath or shower.
1
The area stretching
to 60cm outside the
bath or shower and
60cm from water
outlet of sink.
2
Technical drawings are for illustration purposes only.
Make sure you check all hole cut outs before work commences.
INSTALLATION
Lift the cabinet from the packaging
and position on a soft flat surface to
avoid scratching the mirror.
The mirror must be installed with
a minimum clearance of 150mm
between the infrared sensor and any
adjacent countertop or obstruction
to ensure correct function of the
sensor. Mark a desired height of the
cabinet and draw a horizontal line on
the wall which corresponds with the
height of the cabinet hangers. Drill
the required holes and insert the wall
plugs using a stud detector to ensure
you avoid any wiring or water pipes.
The wall plugs supplied are only
suitable for solid stone/brick walls.
Screw the brackets to the wall using
the screws provided. Please ensure
they are fully tight.
1
Outside Zones.
Anywhere outside zones
0, 1 & 2. Where water jets
are not used for cleaning
purposes, the general
rules of BS7671 apply.
This mirror is IP44 rated
therefore suitable for
installation in zone 2 and
the outside zones.
Make sure to turn o the electrical
supply at the mains, then connection
must be made in accordance with the
latest IEE regulations. This cabinet is
manufactured to Class I and requires
an earth connection.
Hang the cabinet on the wall bracket.
The claws on the cabinet hangers
must be securely located on the
wall brackets. Use a spirit level to
adjust the angle of the cabinet by
turning screw A with a cross head
screwdriver.
When the angle is properly adjusted,
tighten screw B on both hangers.
Then secure the base of the cabinet
to the wall with the screw and
over-cap.
Close and secure the internal top
electrical cover with the small screws
removed earlier and switch on the
electrical supply at the mains to test
the function of the lamp and the
shaver socket.
Insert the shelf supports in the
desired positions starting with the
top shelf. Insert the glass shelves
and please make sure to tighten
the plastic screw at the bottom of
the shelf support to prevent the
shelves becoming loose. Rubber
plugs provided can be used to cover
unused shelf holes.
If the doors are out of alignment,
please first remove the soft-close
buer (from bottom hinges), then
adjust the screws A, B and C on
hinges for 3 directional adjustment,
see diagram.
3
2
Waste Electrical & Electronic Equipment (WEEE)
The symbol on the product, or on the document accompanying the product, the
crossed out wheelie bin symbol, indicates that this product may not be treated
as household waste. Instead it shall be handed over to the applicable collection
point for the recycling of electrical and electronic waste.
Other iflo Indoor Furnishing manuals


Popular Indoor Furnishing manuals by other brands


SMITH SYSTEM
SMITH SYSTEM UXL Nest and Fold Table Assembly instructions

RiverRidge
RiverRidge 02-146 Assembly instructions

Forte
Forte KFLR811 Assembling Instruction

GALA MEBLE
GALA MEBLE G50K Assembly manual

Cooper Lighting
Cooper Lighting SURE-LITES HR117C specification

CARACOLE CLASSIC
CARACOLE CLASSIC CLA-416-102H/F/R Assembly instructions