iGenix IG9750 User manual

Please read these instructions carefully before use and retain for future reference
Before switching on your appliance,
always check for any damage which may have been caused in transit
IG9750
Batch code:
50 Litre Air Cooler with LED Display
USER MANUAL

2
CONTENTS
Important Safety Instructions...............................................3-4
Specications................................................................................5
Assembly Instructions................................................................5
Operating Instructions...........................................................6-8
Cleaning and Maintenance ........................................................9
Fuse Replacement.......................................................................9
Trouble shooting Guide.......................................................... 10
Disposal Information............................................................... 11
Terms and Conditions and Warranty Information...... 12-13

3
SAFETY INSTRUCTIONS
Carefully read the instructions before operating the unit.
Please retain this manual for future reference.
Important: This product is intended for domestic and light ofce
use ONLY and not for commercial, industrial or outdoor use.
When using electrical appliances, basic safety precautions should
always be followed:
1. All electrical repairs must be carried out by a qualied
electrician. Inadequate repairs may result in a major source of
danger for the user and invalidate the warranty.
2. Do not operate the unit if the plug or cord is damaged, after it
malfunctions or has been dropped or damaged in any way, it
must be repaired by a qualied electrician.
3. Use of an extension cord is not recommended with this product.
4. This unit should only be used by adults.
5. Keep the unit and its cord out of reach of children.
6. Children shall not play with the appliance.
7. Cleaning and user maintenance shall not be made by children.
8. The unit should not be used by persons with reduced physical,
sensory or mental capabilities.
9. It is not recommended to place this appliance in cupboards,
closets, boats, caravans or similar locations.
10. Do not use the unit in a wet room, such as a bathroom or
laundry room or in areas where the unit is likely to get splashed.
11. Do not place the unit directly underneath a wall socket.
12. Always place unit on a dry and stable surface.
13. Keep unit at least 1 metre away from TV’s and Radio’s to
prevent interference.
14. Do not cover or obstruct the unit’s lter or louvres.
15. Do not insert ngers, pencils or any other objects into the air
inlets or outlets of the unit.
16. Do not let chemical substances come into contact with the
appliance.

4
17. It is not recommended to use ammable substances or vapours
such as alcohol, insecticides, petrol, etc. whilst the unit is in use.
18. Do not clean the unit by spraying it or immersing in water.
19. Do not unplug the unit while it is working, this could damage the
electronic circuits.Always use the control panel to start and
stop the unit.
20. Always turn the unit off when not in use by removing the plug
from the wall socket; ensuring to pull the plug top and not
the cord.Always turn off the unit before cleaning, carrying out
maintenance or moving location.
21. Do not pull or place the electrical cable near a source of heat:
always unroll it completely to avoid dangerous overheating.
22. The lter must be used with the product at all times, when
removing it for clearing always turn the unit off and unplug from
the mains wall socket.
23. Always turn off unit, unplug and empty the water tank before
placing into storage for a long period of time.

5
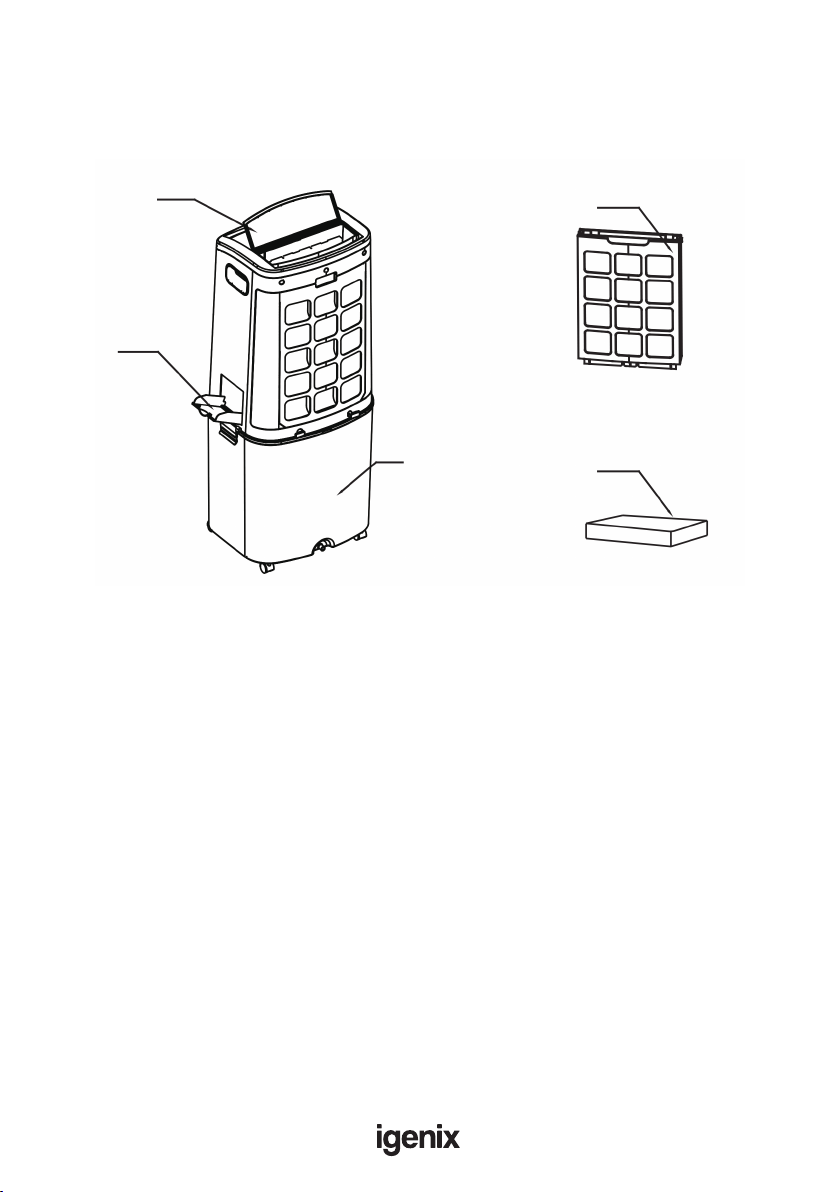
1
2
3
Water Tank Fastener
Water Tank
Ice Box
Take out the
water tank
cover from the
fan body
Fix the cover
on the water
tank Wheel
Control Panel
Air Outlet
Water Window
TECHNICAL SPECIFICATION
ASSEMBLY INSTRUCTIONS
Model IG9750
Supply Voltage: 220-240V, 50Hz
Max Output: 200W
Max Airow Volume: 798m³/h
Water tank: 50 Litres
Net Weight: 15.3kg
Installation of the Water Tank:
Foot-Wheel Installation:
Front Foot-Wheel
Rear Foot-Wheel

6
OPERATING INSTRUCTIONS
Remote Control
Battery Installation
Pull Notch
Locking Latch
IMPORTANT: Install the battery with the positive side facing up.
IMPORTANT: Effective range of remote control: within 5m distance and 30 degree angle from
front of product.
On/Off
Humidication
Timer
Speed
Oscillation
Modes
Humidication (Note: This unit will only operate as a humidier in rooms with a high
ambient temperature. Use water at room temperature. Do not use the ice packs.)
7
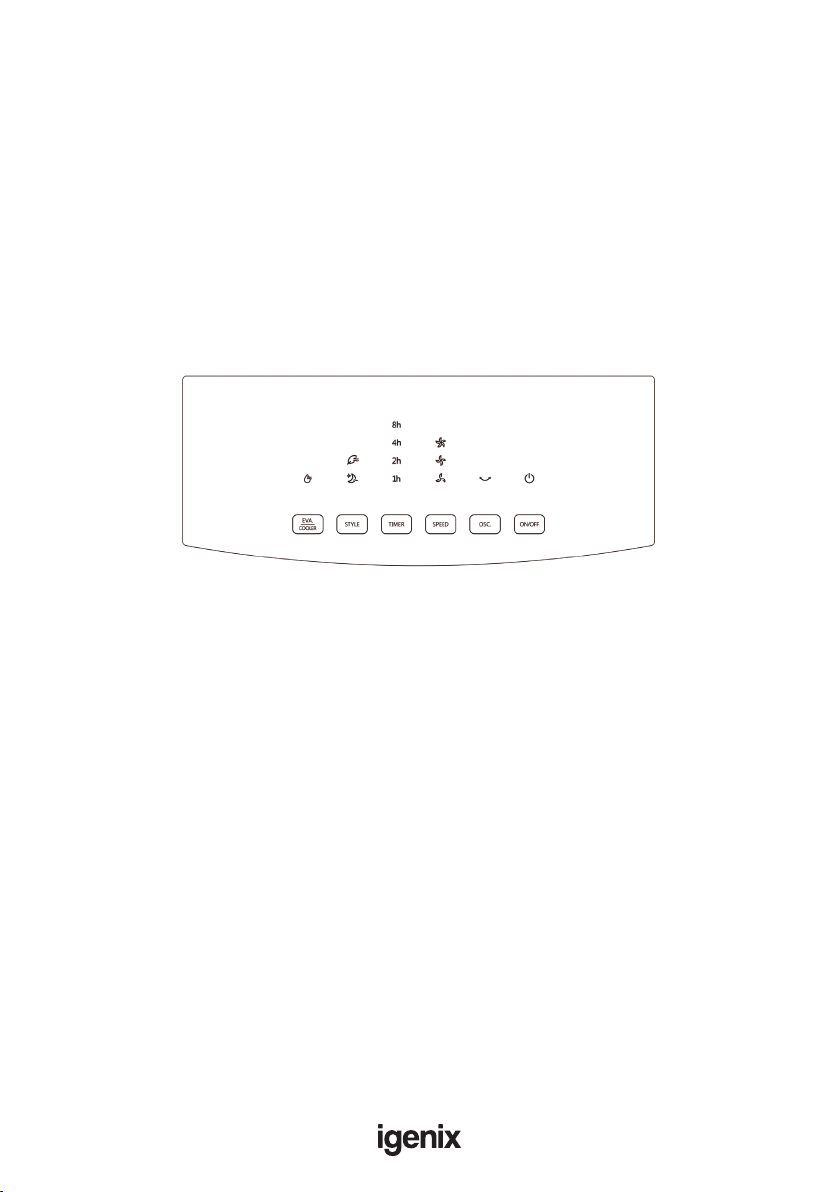
Control Panel
Press a key on the unit to activate a corresponding function. For instance:
• Press [OSC.] key to activate or deactivate Swing Function
Note: Manual horizontal blade allows tilting ow direction
• Press [SPEED] key to adjust 3 speeds of air ow
• Press [STYLE] key to switch between Normal, Natural and Sleep functions
• Press [TIMER] key to set 1-12 hour timer setting
• When [EVA/COOLER] key is pressed, the indicator lights up constantly if the operation is
normal; when the indicator ashes, it denotes a water shortage, please add water immediately
IMPORTANT: Push buttons on the unit may differ based on the actual product model.
Functions
Normal - Normal function.There will be three speed levels.
Natural - The wind will simulate the natural winds found outdoors and offer a unique natural
wind setting
Sleep - The wind will be slumberous.You can chose this mode when you sleep.
8
Add Water
Add water from the top: Rotate Water Tank’s top cover, ll with water
Add water from the side: Rotate Water Tank’s side cover, ll with water
Fill water from
top Water Tank
Fill water from
bottom Water Tank
Put the Ice Box
into Water Tank
Filter Frame
Ice Box
IMPORTANT:
• When humidifying, the water level in the Water Tank must remain under the MAX indication;
replenish water if level drops below the MIN indication
• If the water level in the Water Tank is below the minimum scale marked on Water Display
Window, don’t use the humidication function
• When the water level is lower than the minimum scale, the unit will emit a 3 second warning
sound, after which the water pump will stop running.
• When the water level exceeds the maximum, the unit shall make 10 seconds buzzing warning
sound, to prevent the Water Tank overowing.
Ice Box
The ice box can absorb the heat in the water, which can lower the temperature of the water tank.
It can make the air ow cooler.
1.Take out the ice box and put it into the freezer, until the ice box is totally frozen.
2. Put the frozen ice box into the water tank.

9
CLEANING & MAINTENANCE
The fan requires little maintenance. Do not try to x it by yourself. Refer it to qualied service
personnel if service is needed.
1. Before cleaning and assembling, fan must be unplugged.
2. To ensure sufcient air supply, the honeycomb lter and dust lter should be cleaned regularly.
3. Please wipe the exterior parts with a soft cloth soaking a mild detergent.
4. Do not use any abrasive detergent or solvents to avoid scratching the surface.
Do not use any of the following as a cleaner: gasoline, thinner.
5. Do not allow water or any other liquid into the motor housing or interior parts.
Fuse Replacement (Class II)
Remove the fuse cover with a small at head screw
driver.Take out the fuse and replace with a new fuse of
the same Amp. Replace the fuse cover and push back
into place.
Fuse Cover
MAINS PLUG FUSE REPLACEMENT

10
TROUBLE SHOOTING GUIDE
If you experience difculties with the appliance, please check the suggestions below before contacting
customer services:
Problem Solution
The unit will not switch on • Check Trip Switch / Fuse
• Check if the plug is connected to mains socket correctly
• Check batteries in the remote control
Runs for a short while and then
switches off
The unit has been running for a long
period and then switches off
• The overheat protection has been activated to protect the
motor – turn unit off for a least 10 minutes and then switch
back on
• Check if air outlet is blocked, if so remove obstacle
• Check if Timer function has been activated
Runs without cooling in EVA/COOLER
mode and Empty Tank Indicator
blinking
• The water tank is empty and needs to be re-lled
• Check if the air lter is dirty – if so, clean
• Check if air outlets or inlets are blocked
Water is leaking from unit when
moving
• Drain the water tank – refer to Cleaning and Maintenance
on Page 7
• Ensure rubber drainage plug is securely tted in water tank
Ensure unit is located on a at and even surface
The honeycomb lter is blocked
with dust.
• Remove the foreign matter
• Pull down the honeycomb lter and clean it.
The air inlet is blocked with dust
Table of contents
Other iGenix Air Conditioner manuals

iGenix
iGenix IG9911 User manual

iGenix
iGenix IG9909WIFI User manual

iGenix
iGenix IG9706 User manual

iGenix
iGenix IG9900 User manual

iGenix
iGenix IG9919 User manual

iGenix
iGenix IG9902 User manual

iGenix
iGenix IG9901WIFI User manual

iGenix
iGenix IG9907 User manual

iGenix
iGenix IG9901 User manual

iGenix
iGenix IG9703 User manual


Popular Air Conditioner manuals by other brands


Fujitsu
Fujitsu Inverter ASBA30JFC operating manual

Toshiba
Toshiba RAS-M10SMUV-E installation manual

Daikin
Daikin FXLQ20MAVE Operation manual

Hitachi
Hitachi RAS-E24CAK instruction manual

CIAT
CIAT Magister 2 Series Installation, Operation, Commissioning, Maintenance

Bestron
Bestron AAC6000 instruction manual


