iHome iBT32 User manual

Model: iBT32
instruction manual
iBT32 IB (English)
Size: 153mm x 120mm
Printing color: Black
Jan 15, 2015 P1
Portable SoundFlask
Rechargeable
Bluetooth
Stereo Speaker
CHARGE
BEFORE
USE
Questions? Contact Customer Service at 1-800-288-2792

iBT32
Introduction
1
P2
Thank you for purchasing the iHome iBT32 SoundFlask Portable Bluetooth Speaker. This product is
designed to provide high quality wireless sound for your iPad, iPhone, iPod, computer, PDA or other
Bluetooth audio device.
This instruction booklet explains the basic operation and care of the unit. Please read carefully and keep
for future reference.
Maintenance
• Place the unit on a level surface away from sources of direct sunlight or excessive heat.
• Protect your furniture when placing your unit on a natural wood and lacquered finish. A cloth or other
protective material should be placed between it and the furniture.
• Clean your unit with a soft cloth moistened only with mild soap and water. Stronger cleaning agents,
such as thinner or similar materials can damage the surface of the unit.

iBT32
Table of Contents
2
Included ............................................................................................................................ 3
Meet Your iBT32 ................................................................................................................. 4
Charging the Unit................................................................................................................ 5
Pairing Your Device.............................................................................................................. 6
Pairing with a Different Device ............................................................................................... 7
Playing Audio Via Bluetooth................................................................................................... 7
Speakerphone Operation...................................................................................................... 8
Playing Audio Via Aux In ...................................................................................................... 9
Charging Devices via USB Port ............................................................................................ 10
Internal Rechargeable Lithium-ion Battery................................................................................ 11
Consumer Product Safety Guide........................................................................................... 12
FCC Information................................................................................................................ 13
Troubleshooting................................................................................................................. 14
Warranty......................................................................................................................... 15
P3

iBT32
3
Included
• iBT32 system
• USB adaptor
• Micro USB to USB cable
• Aux audio cable
P4
iBT32 Aux audio cable
micro USB to USB cableUSB Adaptor
Jan 15, 2015

Meet Your iBT32
iBT32
4
Aux-in Jack
Reset port
Pull back splash proof seal on unit
to access bottom ports
Power Button
Microphone
Volume Knob
REV/End Call Button
FWD/Answer Call Button
Play/Pause/Pairing Button
P5
Status Indicator Lights (front of unit)
Micro USB POWER IN Charging Port (charges unit) USB Out Port (to charge devices)
Bottom
Top
Jan 15, 2015
Jan 16, 2015

Charging the Unit
CHARGE UNIT BEFORE USE
1. Connect the micro USB plug on the included charging cable to the micro USB POWER IN charging
port on the bottom of the unit.
NOTE: ONLY use the included charging cable with USB adaptor to charge the iBT32.
2. Connect the standard USB plug end of the charging cable to the included USB adaptor and plug into
a working outlet. For first time use, charge unit for about 8 hours.
3. The Status Indicator Lights on the top front of the unit flash while the unit is charging and turn solid
once the unit is fully charged. See table above for charge status information.
5
Using the iBT32
P6
NOTE: The white Status Indicator Lights on the top front of the unit are
activated when the unit is ON or when connected to a charging source via
the USB cable.
iHome iBT32 USB port
Charge via included USB AC adaptor
USB Adaptor
Battery Charge Status
(unit is ON)
86 -100% charged
Dead, needs charging
16 - 30% charged,
needs charging
31 - 45% charged
61 - 85% charged
46 - 60% charged
Jan 16, 2015
Jan 16, 2015

5. If pairing is successful, a long beep will sound and the status indicator lights will appear solid white,
indicating the iBT32 is ready to play music. There should also be an indication on your device. If no
device is successfully paired within 3 minutes the iBT32 will default to previous mode. Once the iBT32 is
paired to a device, it will attempt to autolink when the device is within range (about 30 feet).
Pairing is the set-up process to introduce your Bluetooth-capable device to the iBT32. Once your device is paired,
the iBT32 can recognize it and you can play your audio through it.
1. Make sure your Bluetooth device is fully charged. Turn on your Bluetooth device and
make it “discoverable” by turning on Bluetooth mode (check in Options or Settings).
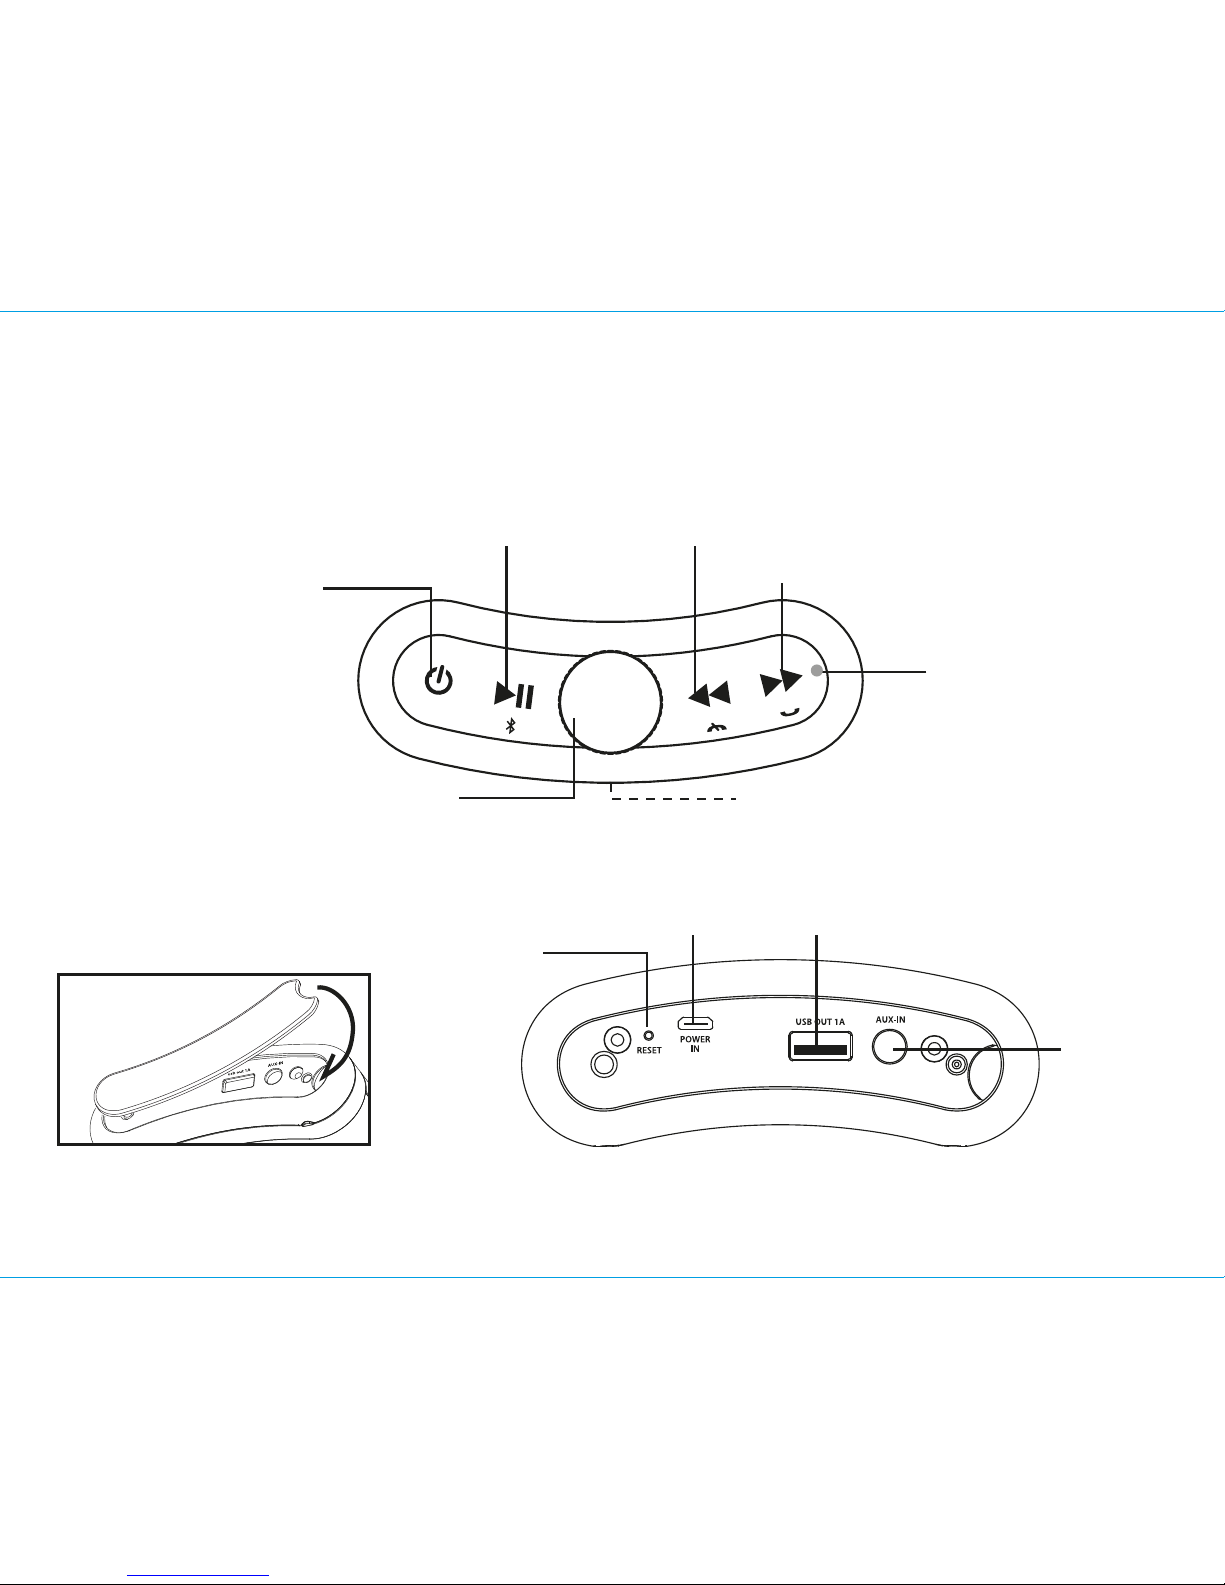
2. Press and hold the Power Button to turn on the iBT32. The first time the unit is
powered on, it will enter auto-pairing mode and attempt to connect to a Bluetooth
device (if so, skip to step 4). Otherwise, follow step 3 to begin pairing.
3. Press and hold the Play/Pause/Pairing Button for 2 seconds. The iBT32 will
beep and the status indicator lights will flash quickly.
4. “iHome SoundFlask” should appear in your device’s Bluetooth menu. If “Not Paired”, “Not Connected” or
similar message appears, select “iHome SoundFlask” to connect it. If prompted for a passcode, enter “1234”
on your device’s keypad.
6
Using the iBT32
P7
Pairing Your Device
For iPhone
iHome Sound... iHome SoundFlask iHome SoundFlask iHome SoundFlask
For other

Pairing with a Different Device
When you power ON the unit, it will automatically link with the previously paired Bluetooth device as long
as that device is still within range (approx. 30 feet). To pair with a different device follow steps 1 - 4 under
”Pairing Your Device” on previous page.
Playing Audio Via Bluetooth
1. Press and hold the Power Button to turn on the unit. The status indicators will flash slowly while
seeking a linked device then glow solid white when a linked device is in range and detected. You
can then listen to audio streamed wirelessly from your paired Bluetooth device.
2. Press the Play/Pause/Pairing Button to play audio from your device. Press again to pause play
and once more to resume play. When Bluetooth audio is active, the status indicator will glow solid
white.
3. Press the Button to go to the beginning of the current track or to a previous track. Press the Button
to go to the next track. Press and hold either to search within the current track. You can also use menu
and track controls on your Bluetooth device to navigate tracks.
4. Turn the Volume Knob
to adjust
the iBT32 volume. You can also adjust volume on your device.
5. When done listening,
press and hold the Power Button
to turn the unit OFF.
7
Using the iBT32
P8

8
P9
Using the iBT32
Speakerphone Operation
NOTE: The unit must be powered on and linked to a Bluetooth phone to receive a call.
1. When a call is received, playing music is muted to hear the ring tone. Press
thexxxxFWD/Answer Call Button to answer the call, or press the REV/End Call Button to
ignore it. For call waiting function, press the xxxFWD/Answer Call Button to place a currently
active call on hold and answer a new call; press the xxxFWD/Answer Call Button to switch
between the calls.
2. When a call is completed, press the REV/End Call Button to end the call and resume
previous function.

9
P10
Using the iBT32
Playing Audio via Aux In
1. Connect one end of the included 3.5mm stereo
audio cable to the Aux-in jack on the bottom of the
unit under the splash seal and connect the other end
to the headphone or line-out jack on your audio
device.
2. Press and hold the Power Button on the unit to
turn it on.
3. Power on the audio device and use the controls on
the device to play or pause audio, and navigate
tracks.
4. Turn the Volume Knob
to adjust the system volume
.
You can also adjust volume on your device.
5. When done listening, press and hold the Power
Button to turn the unit OFF. Remember to turn off your
device, too.
NOTE: Make sure no Bluetooth device is playing or
you will not hear the aux signal. Mobile Phone Game Devices iPod Laptop
PC/Tablet MP3/MP4

Charging Devices via USB Out Port
Note: When operating on internal battery, the unit must be powered ON to charge devices via the USB
Out Port. The iBT32 can charge devices while the iBT32 is charging via the micro USB POWER
IN Port OR when operating on the internal battery (provided the battery has enough charge). To
charge devices via USB Out Port while operating on the internal battery, we recommend that the
unit be fully charged first. The iBT32 will not charge external devices via USB Out Port when
internal rechargeable battery is too low (single indicator is blinking or no indicator). To save battery
power, USB Out charging is limited to 1 hour when no audio is playing.
1. Lift water resistant seal located on the bottom of the unit to expose the USB Out Port.
2. Connect the standard size end of a USB cable (not included) to the USB Out Port and connect the
other end to the charging port on your device.
3. Press and hold the Power Button on the unit to turn it on.
4. Monitor the charging on your device. If your device does not charge, you must charge your device
using the charger that came with it.
10
P11
Using the iBT32
Note: When charging the iBT32, use the supplied 1A USB AC
adaptor and charging cable to ensure external device
charging. External device charging will not be activated when
the iBT32 is being charged at lower power.
.
Jan 16, 2015

11
Internal Rechargeable Lithium-ion Battery
This device uses an internal rechargeable lithium-ion battery that should last the lifetime of the device. If you
suspect your battery may be dead, try charging it several times. If the battery does not recharge, please contact
us for repair information.
WARNING/DISPOSAL OF UNIT
Please do NOT attempt to change the battery yourself. If the battery has died and you do not want us to replace
your battery, you should follow the disposal instructions below:
• Never dispose of used batteries/electronics with ordinary solid wastes, since they contain toxic substances.
• Always dispose of used batteries/electronics in accordance with the prevailing community regulations that apply
to the disposal of batteries/electronics. If there are no local regulations concerning battery/electronics disposal,
please dispose of the device in a waste bin for electronic devices.
• Many electronics retailers now recycle batteries and other electronic components at no charge. Check to see
which ones in your area do so.
CAUTION
The battery used in this device may present a risk of fire, explosion or chemical burn if
mistreated
• Never use or charge the battery if it appears to be leaking, discolored, deformed, or in any way abnormal.
• Never disassemble the unit or attempt to remove battery as that could cause leakage of alkaline solution or other
electrolytic substance.
• Always confirm that the temperature is 5°C – 35° C (41° - 95° Fahrenheit) before you charge the battery.
Leakage or deterioration of the battery may occur if this warning is not heeded.
• Never expose the battery to any liquid.
• Never expose the battery to excessive heat such as direct sunlight or fire. Never use the battery pack in an
unventilated vehicle where excessive internal temperatures may be encountered.
• Always keep the battery out of the reach of infants and small children.
P12

Consumer Product Safety Guide
12
When used in the directed manner, this unit has been designed and manufactured to ensure your personal safety. However, improper use can result
in potential electrical shock or fire hazards. Please read all safety and operating instructions carefully before installation and use, and keep these
instructions handy for future reference. Take special note of all warnings listed in these instructions and on the unit.
1. Water and Moisture – The unit should not be used near water. For example: near a bathtub, washbowl, kitchen sink, laundry tub, swimming
pool or in a wet basement.
2. Ventilation – The unit should be situated so that its location or position does not interfere with its proper ventilation. For example, it should not
be situated on a bed, sofa, rug or similar surface that may block ventilation openings. Also, it should not be placed in a built-in installation,
such as a bookcase or cabinet, which may impede the flow of air through the ventilation openings.
3. Heat – The unit should be situated away from heat sources such as radiators, heat registers, stoves or other appliances (including amplifiers) that
produce heat.
4. Power Sources – The unit should be connected to a power supply only of the type described in the operating instructions or as marked on the
appliance. Only use the AC adapter that came with the unit.
5. Power-Cable Protection – Power supply cables should be routed so that they are not likely to be walked on or pinched by items placed upon
or against them. It is always best to have a clear area from where the cable exits the unit to where it is plugged into an AC socket.
6. Cleaning – The unit should be cleaned only using a warm damp cloth. Do not use solvents, etc.
7. Objects and Liquid Entry – Care should be taken so that objects do not fall and liquids are not spilled into any openings or vents located on
the product.
8. Attachments – Do not use attachments not recommended by the product manufacturer.
9. Lightning and Power Surge Protection – Unplug the unit from the wall socket and disconnect the antenna or cable system during a lightning storm
or when it is left unattended and unused for long periods of time. This will prevent damage to the product due to lightning and power-line surges.
10. Overloading – Do not overload wall sockets, extension cords, or integral convenience receptacles as this can result in a risk of fire or electric shock.
11. Damage Requiring Service – The unit should be serviced by qualified service personnel when:
A. the power supply cable or plug has been damaged.
B. objects have fallen into or liquid has been spilled into the enclosure.
C.the unit has been exposed to rain.
D. the unit has been dropped or the enclosure damaged.
E. the unit exhibits a marked change in performance or does not operate normally.
12. Periods of Nonuse – If the unit is to be left unused for an extended period of time, such as a month or longer, the backup batteries should be
removed from the unit to prevent damage or corrosion.
13. Servicing – The user should not attempt to service the unit beyond those methods described in the user’s operating instructions. Service methods
not covered in the operating instructions should be referred to qualified service personnel.
P13
IMPORTANT SAFETY INSTRUCTIONS

FCC Radiation Exposure Statement
This equipment complies with FCC RF radiation exposure limits set forth for an uncontrolled environment.
This Device complies with RSS-210 of the IC Rules; Operation is subject to the following two conditions:
(1) This device may not cause interference and
(2) This device must accept any interference received, including interference that may cause undesired operation
• Warning: Changes or modifications to this unit not expressly approved by the party responsible for compliance could void the user’s authority to operate
the equipment.
• NOTE: This equipment has been tested and found to comply with the limits for a Class B digital device, pursuant to Part 15 of the FCC Rules.
These limits are designed to provide reasonable protection against harmful interference in a residential installation. This equipment generates, uses and can
radiate radio frequency energy and, if not installed and used in accordance with the instructions, may cause harmful interference to radio communications.
However, there is no guarantee that interference will not occur in a particular installation. If this equipment does cause harmful interference to radio or television
reception, which can be determined by turning the equipment off and on, the user is encouraged to try to correct the interference by one or more of the following
measures:
• Reorient or relocate the receiving antenna.
• Increase the separation between the equipment and receiver.
• Connect the equipment into an outlet on a circuit different from that to which the receiver is connected.
• Consult the dealer or an experienced radio/TV technician for help.
CAN ICES-3 (B)/NMB-3(B)
IC Statement
This device complies with Industry Canada RSS-210. Operation is subject to the following two conditions: (1) this device may not cause interference,
and (2) this device must accept any interference, including interference that may cause undesired operation of the device.
Le présent appareil est conforme aux CNR d'Industrie Canada applicables aux appareils radio RSS-210. L'exploitation est autorisée aux deux
conditions suivantes : (1) l'appareil ne doit pas produire de brouillage, et (2) l'utilisateur de l'appareil doit accepter tout brouillage radioélectrique
subi, même si le brouillage est susceptible d'en compromettre le fonctionnement.
The device meets the exemption from the routine evaluation limits in section 2.5 of RSS 102 and compliance with RSS-102 RF exposure, users can
obtain Canadian information on RF exposure and compliance.
Le dispositif rencontre l'exemption des limites courantes d'évaluation dans la section 2.5 de RSS 102 et la conformité à l'exposition de RSS-102
rf, utilisateurs peut obtenir l'information canadienne sur l'exposition et la conformité de rf.
13
iBT32
FCC Information
This device complies with Part 15 of the FCC Rules, operation is subject to the following two conditions: (1) This device may not cause harmful
interference, and (2) this device must accept any interference received, including interference that may cause undesired operation.
P14
FCC ID:EMOIBT32
IC:986B-IBT32
Declaration ID:D022536

Unit doesn’t respond (no power)
• Make sure unit is completely charged.
• Check that all connections are correct and properly plugged in.
• Make sure your device is properly paired with the iBT32.
• Make sure the unit is ON.
Unit doesn’t respond (locked up/ “frozen”)
If the unit does not respond, try disconnecting it from power source. Insert a paperclip or similar into the
Reset port located on the bottom of the unit for about 10 seconds.
USB Out doesn’t charge devices
If charging an external device while also charging the iBT32, use only the included charging cable and
USB adaptor to charge the iBT32 or the USB Out port may not charge.
Trouble pairing device/computer with iBT32
Bluetooth implementation varies depending on your device’s hardware and operating system. Please see
our website for updates on pairing.
• When you power ON the speaker, it will automatically link with the last previously paired Bluetooth
device if the device is still within range (approx. 30 feet). To pair with a different device you must turn
off Bluetooth capability on the already paired device, or take it out of range.
• If your device does not auto-link when within range, re-pair the device. To do so, first delete the iBT32
from your Bluetooth devices menu.
• Make sure your device is working properly. Check your device’s manual for details on Bluetooth pairing
and linking.
For further information and to see the latest instructions, visit www.ihome.com/support
14
Troubleshooting
P15
Jan 16, 2015

iBT32-150116- B Printed in China
Limited 1 Year Warranty
iHome Products, a division of SDI Technologies Inc. (hereafter referred to as SDI), warrants this product to be free from defects in
workmanship and materials, under normal use and conditions, for a period of one (1) year from the date of original purchase.
Should this product fail to function in a satisfactory manner, it is best to first return it to the store where it was originally purchased.
Should this fail to resolve the matter and service still be required by reason of any defect or malfunction during the warranty period,
SDI will repair or, at its discretion, replace this product without charge. This decision is subject to verification of the defect or
malfunction upon delivery of this product to the Factory Service Center authorized by Customer Service.
If service is required, please call Customer Service at 1-800-288-2792 to obtain a Return Authorization Number and shipping
instructions.
Disclaimer of Warranty
NOTE: This warranty is valid only if the product is used for the purpose for which it was designed. It does not cover (i) products which
have been damaged by negligence or willful actions, misuse or accident, or which have been modified or repaired by unauthorized
persons; (ii) cracked or broken cabinets, or units damaged by excessive heat; (iii) damage to digital media players, CD’s or tape
cassettes (if applicable); (iv) the cost of shipping this product to the Factory Service Center and its return to the owner.
This warranty is valid only in the United States of America and does not extend to owners of the product other than to the original
purchaser. In no event will SDI or any of its affiliates, contractors, resellers, their officers, directors, shareholders, members or agents
be liable to you or any third party for any consequential or incidental damages, any lost profits, actual, exemplary or punitive
damages. (Some states do not allow limitations on implied warranties or exclusion of consequential damages, so these restrictions
may not apply to you.) This warranty gives you specific legal rights, and you may also have other rights which vary from state to state.
Your acknowledgment and agreement to fully and completely abide by the above mentioned disclaimer of warranty is contractually
binding to you upon your transfer of currency (money order, cashier's check, or credit card) for purchase of your SDI product.
© 2015 SDI Technologies, Inc. All rights reserved
Questions? Visit www.ihome.com
or call 1-800-288-2792 Toll Free
P16
Jan 16, 2015
Table of contents
Other iHome Speakers manuals
Popular Speakers manuals by other brands

Alesis
Alesis M1 Active Mk2 Owner reference manual

Creative
Creative GigaWorks HD50 quick start guide

Divine Acoustics
Divine Acoustics PROXIMA owner's manual

DS18
DS18 10OCT500-8 owner's manual

Harman
Harman JBL C Series owner's manual

Shenzhen Xinhuamei Electronics
Shenzhen Xinhuamei Electronics YM-S1 instruction manual

Turbosound
Turbosound TSB-110 quick start guide

Jazz Hipster Corporation
Jazz Hipster Corporation Jazz Speakers JS2302WA operating instructions

Beta Three
Beta Three SB115D user manual

System Sensor
System Sensor SpectrAlert SP2 Series Installation and maintenance instructions

Acoustics
Acoustics E120 user guide

Atlantic Technology
Atlantic Technology System 10 LCR instruction manual