IIT PC Controlled CD Organizer User manual

CD Organizer
Owner’s Manual
Version 2.2.x
PC Controlled CD Organizer Owner’s Manual Version 2.2.x IIT Co., Ltd.

PC Controlled CD Organizer
Owner’ s Manual
Version 2.2.x
Introduction
Congratulations on selecting the world’s first PC Controlled CD Organizer, an intelligent
CD storage system by IIT. This CD Organizer is a PC controlled device that allows you to
store, search, and retrieve your CDs instantly. Connect it to your PC with the provided USB
cable and organize up to 75 DVDs, Computer, Audio, Video, CD-Rs, CD-RWs, and Game
CDs using the user-friendly software. Searching for a certain file or song is hassle-free
because the CD Organizer will remember titles and sub-titles for you. Just type in what you
are looking for and in seconds it is retrieved. Storing and organizing CDs is made fun and
easy with the IIT PC Controlled CD Organizer! This manual covers the CD Organizer’ s
hardware and explains how to install and use the CD Organizer application Version 2.2.x
Enjoy your new IIT PC Controlled CD Organizer!

Table of Contents
1. PC Controlled CD Organizer ..................................................................................................... 4
2. Connecting & installing the CD Organizer ................................................................ 5
3. CD Organizer hardware and software ............................................................................. 6
3.1 Hardware features .................................................................................................................................................. 6
3.2 Software functions ................................................................................................................................................. 6
4. CD Organizer application ............................................................................................................... 7
4.1 Program icon .............................................................................................................................................................. 7
4.2 CD Organizer application functions ...................................................................................................... 12
5. Using the CD Organizer application .............................................................................. 13
5.1 Storing a new disk .............................................................................................................................................. 13
5.2 Returing a disk ....................................................................................................................................................... 18
5.3 Restoring deleted disk information and the disk ......................................................................... 22
5.4 Finding a disk ......................................................................................................................................................... 24
5.5 Deleting disk information and removing the disk ...................................................................... 26
5.6 Lending a disk ........................................................................................................................................................ 27
5.7 Changing trays ....................................................................................................................................................... 29
5.8 Changing disk information ........................................................................................................................... 31
5.9 Management of Tools - by Edit Disk Type ....................................................................................... 32
5.10 Management of Tools - by Printer Setup ......................................................................................... 34
5.11 Management of Tools - by Print ............................................................................................................. 35
5.12 Management of Tools - by Option ........................................................................................................ 35
5.13 Mouse double-click Eject/Restore/New Disk ...............................................................................
36
5.14 Quick Return ......................................................................................................................................................... 39
5.15 Using the CD-ROM Drive’s automatic function ....................................................................... 40
5.16 Removing a disk without CD Organizer application .............................................................. 41
5.17 Backup/Restore Repare database of CD Organizer application .................................... 44
6. FAQ ....................................................................................................................................................................... 48
7. Product Specifications .................................................................................................................. 49
8. FCC Compliance Statement .................................................................................................... 50

4Owner’s Manual
The CD Organizer 2.2.x application included with the Organizer offers provides you with the
tools needed to organize your disks. Once your organizer is connected to your pc and your
software is installed, you can start to use the many ways in which the Organizer can help you
manage the storing, lending and retrieving of your disks. Please follow the instructions
below to install and use the CD Organizer Application and the hardware. To begin, verify
that your PC has met the hardware requirements listed below.
Minimum PC Hardware Requirements
Pentium 166MHz or faster
32MB RAM or more
30MB HDD or More
2X CD-ROM or faster
USB Version 1.0 or higher
Windows 98/Me/2000
Safety Instructions
1. Read and save these instructions.
2. Follow all warnings and instructions marked on the product.
3. Unplug this product from the wall outlet before cleaning. Liquid cleaners or aerosol
cleaners are not needed. Use only a damp cloth for cleaning.
4. Do not use this product near water.
5. Do not place this product on an unstable cart, stand, or table. Caution: Product may fall,
causing serious damage.
6. This product should be operated from the type of power indicated by the marking label. If
you are not sure of the type of power available, consult your dealer or local power company.
7. Do not allow anything to rest on the power cord.
8. Contact IIT Customer Service under the following conditions.
- If the power supply adapter is damaged.
- If liquid has been spilled into the product.
- If the product does not operate normally when the operating instructions are followed.
- If the product has been dropped or the cabinet has been damaged.
1
11
1
11
1
1
11
11
1
11
11
1
1
11
1
111
11PC Controlled CD Organizer

5Owner’s Manual
1. Please make sure that your computer supports USB (Universal Serial Bus) 1.0 or higher.
2. Make sure that your computer’ s Operating System (OS) is Windows 98, Windows 2000,
or Windows Millennium Edition.
3. Carefully unpack your CD Organizer from the box. Save the box and packing materials in
the unlikely event that you need to return your unit. Check to make sure you have all of
the following items: - PC Controlled CD Organizer
- Application Software CD with Owner’ s Manual
- Quick Start Guide
- USB Cable
- Power Adapter
4. Make sure your computer is turned on before proceeding to the next step.
5. First connect the AC adapter to the CD Organizer and then connect it to a power source.
Note: When you connect the CD Organizer to the power source, it will run through a self-
test and initialization stage making a slight motor sound. This operation is perfectly
normal for the CD Organizer.
6. Connecting the USB Cable.
The USB cable has different plugs at each end. Connect the square plug to the back of the
CD Organizer and the rectangular plug to any available USB port on your computer.
7. CD Organizer USB driver installation
When you plug the CD Organizer to your computer using the USB cable, your computer
will automatically detect a new USB device. Follow the instructions shown on your
monitor’ s screen.
8. CD Organizer software setup
a. Insert the CD Organizer software CD into your computer’ s CD-ROM drive
b. Follow the on-screen instructions to complete the installation
c. Reboot your computer once the setup application has finished the installation is no
longer on screen. .
d. The Organizer application should launch on bootup. If you would like to disable this
feature, The application can be launched from the program menu listed your start icon.
*If the software CD does not run automatically, go to the “My Computer” icon located
on your desktop and double click it. Next, locate the CD ROM icon and double click it.
Locate “ Setup.exe”(Computer icon) and double click it.
2
22
2
22
2
2
22
22
2
22
22
2
2
22
2
222
22Connecting & installing the CD Organizer

6Owner’s Manual
3.1 Hardware Features
- Keypad
- Tray
- USB Connector
- AC Adaptor Connector
- Handle
- LED Indicator
3.2 Software Functions
- Retrieve
- Store
- Search
- Tools
- Tray Information
- Minimum Button
- Exit Button
- Tray Icon
3
33
3
33
3
3
33
33
3
33
33
3
3
33
3
333
33 CD Organizer Hardware and Software
7Owner’s Manual
CD Organizer 2.2.x application, is a Windows based program, that will help manage your
stored disks more efficiently. It enables you to classify the contents and the description of the
stored disks. Plus, you can quickly and distinctively find, retrieve and replace the disks you
desire.
4.1 Program icon
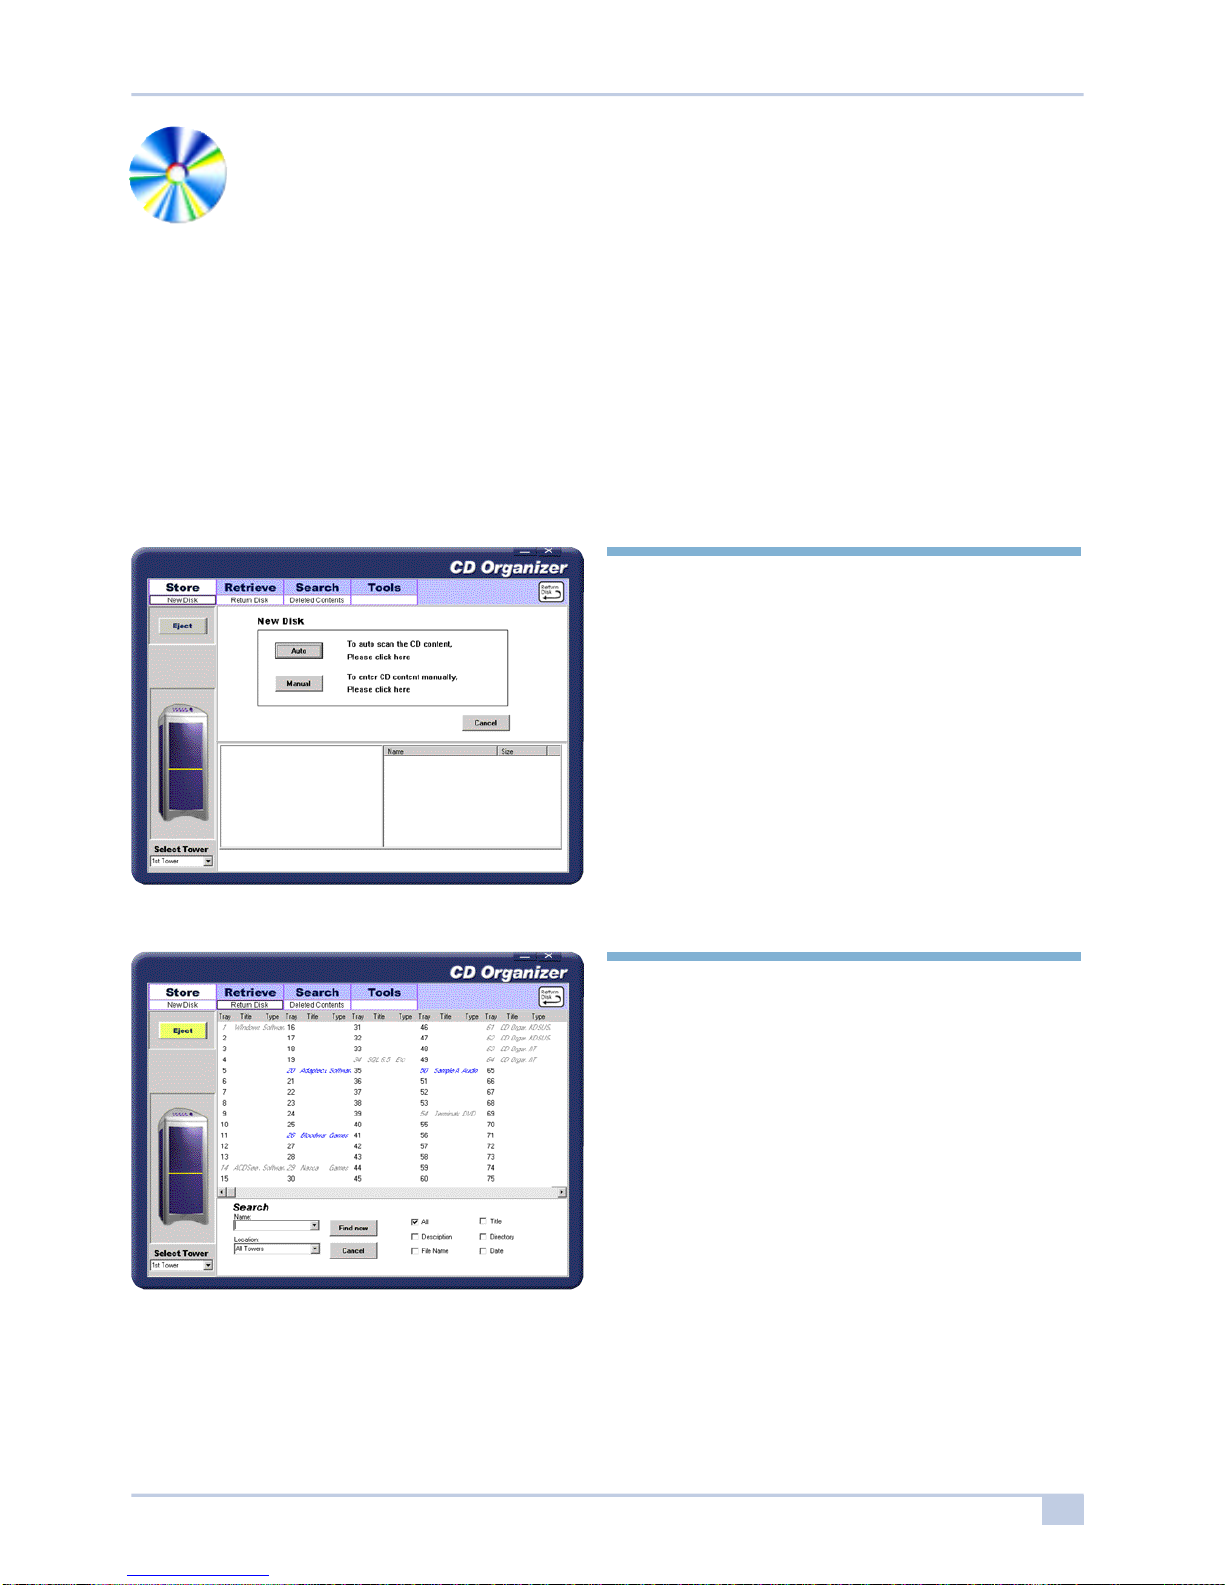
New Disk
The “New Disk” sub-menu the Store menu
enables you to store new disks in the CD
Organizer.
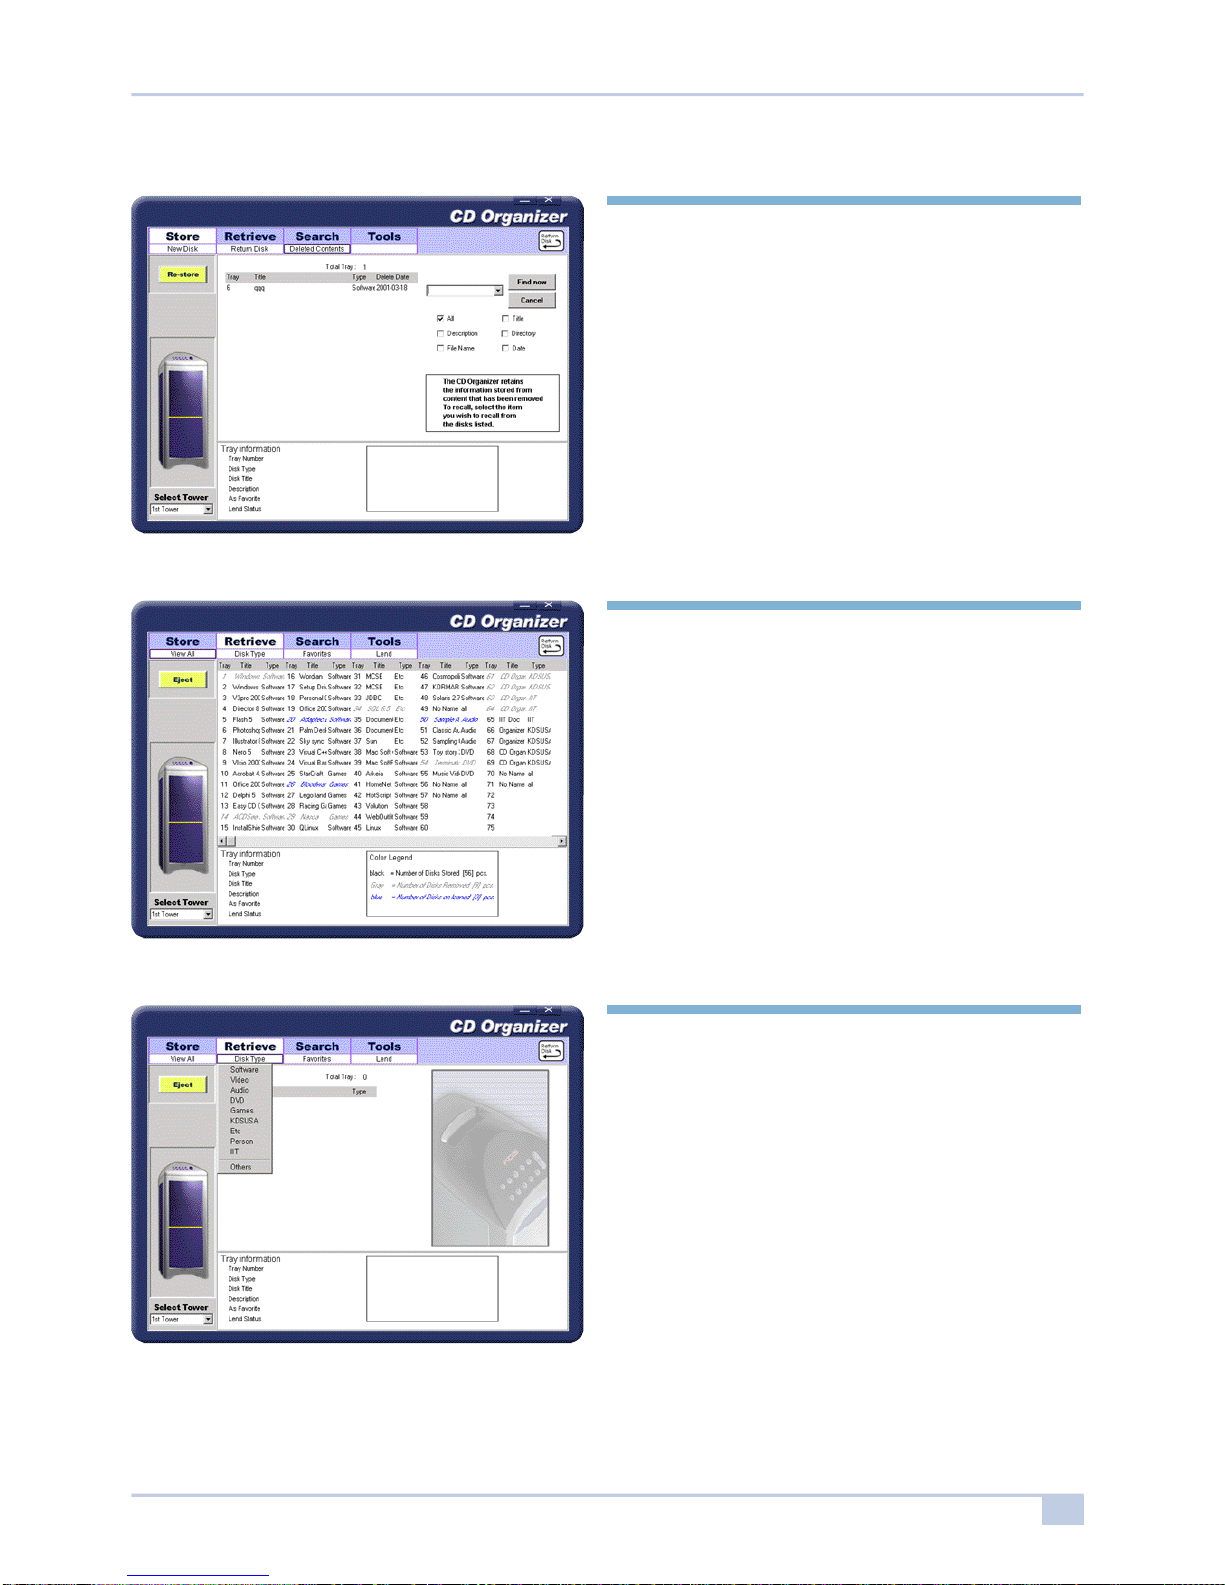
Return Disk
This menu shows you only retrieved trays and
allows you to select a tray to restore.
- Restore by View & Search function
Using the search option (at the bottom of the
window), searching trays by description,
filename, title, directory, and date can be
done more easily.
4
44
4
44
4
4
44
44
4
44
44
4
4
44
4
444
44CD Organizer application
8Owner’s Manual
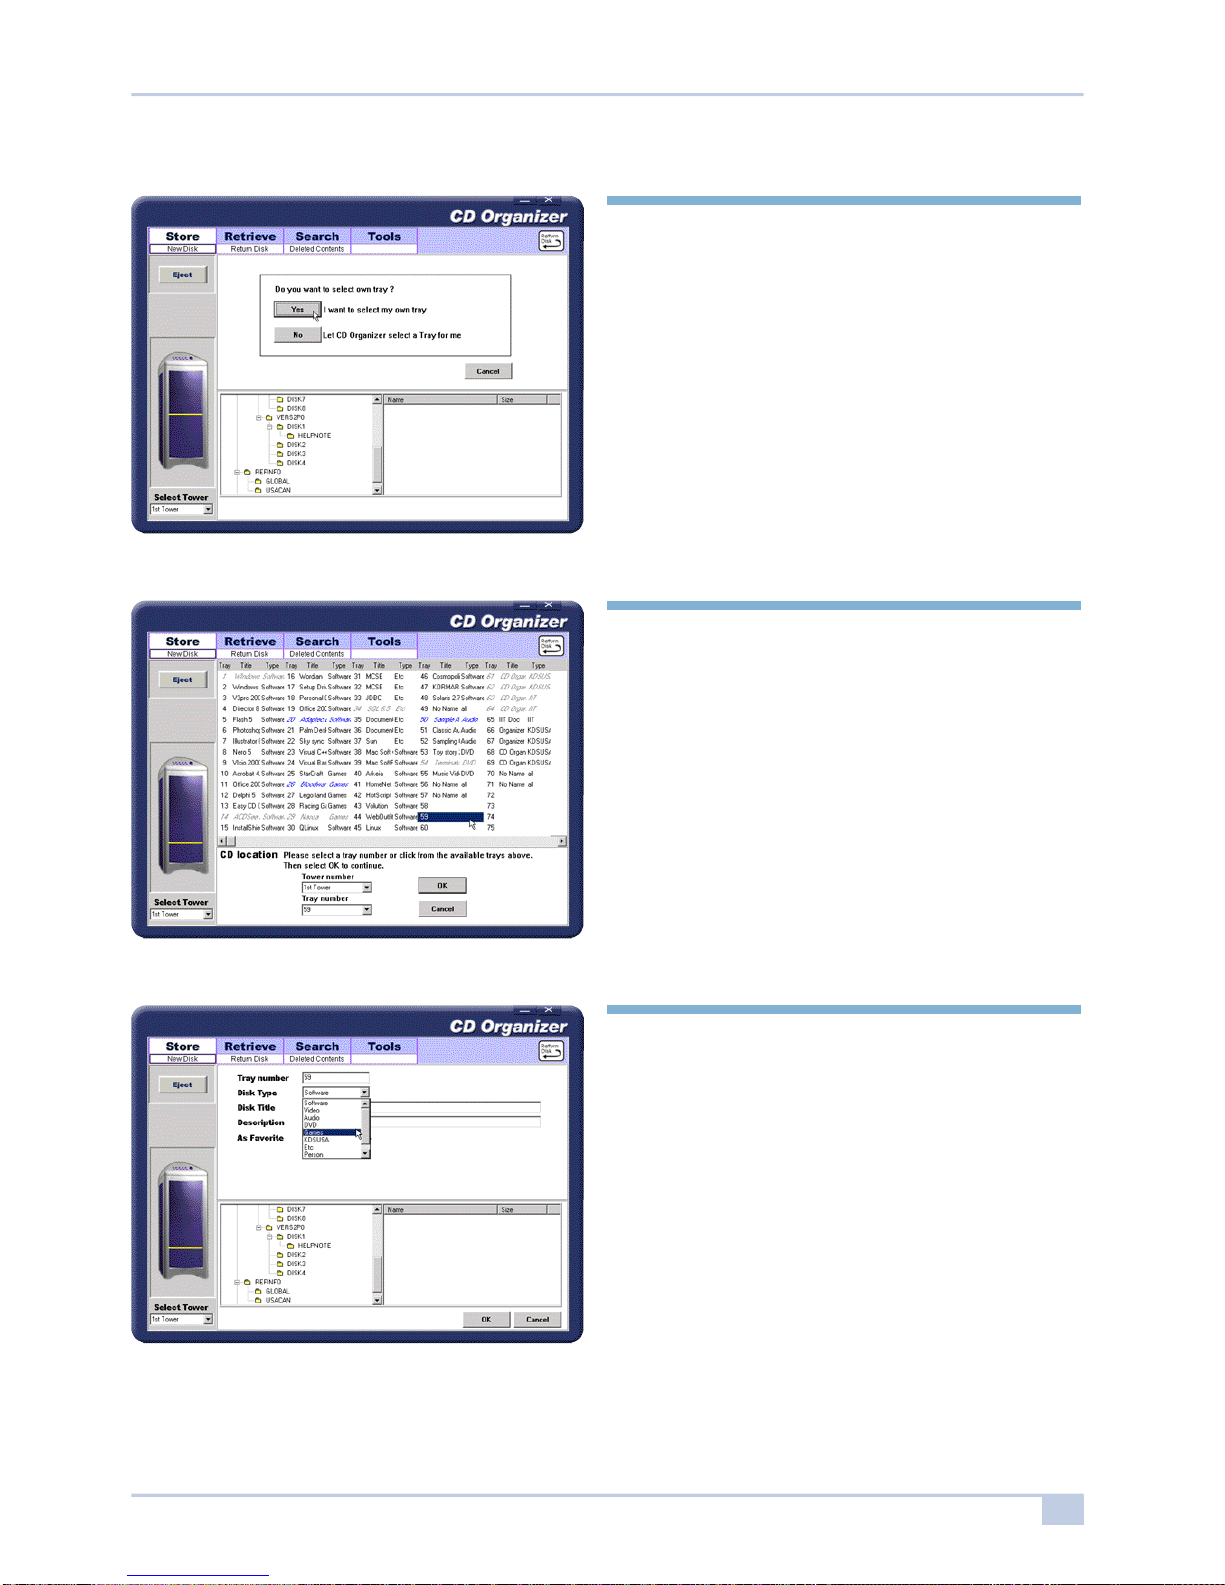
Deleted Contents
The Deleted Contents menu contains the
information from the last 75 disks that have
been deleted.
- Restore by List & Search function
View All
Within the “Retrieve” menu, the default sub-
menu is “view All” This menu display all the
trays whether occupied, unoccupied, or lent
out.
Disk Type
This menu can display the disk information by
category.
- Software
- Video
- Audio
- DVD
- Games
- Others
When selecting “others”, catagories can be
added, edited, and deleted within the sub-menu
“Edit Disk Type” under the “Tools” menu

9Owner’s Manual
Favorites
The menu titled Favorites can display
frequently accessed disk(s) information.
My favorite
- Display the tray that the user has added “As
Farorite” when storing a new disk, a selectable
option is “As Farorite”
Most Ejectd
-Display the 10 most frequently accessed trays
Lend
The Lend feature displays the information of
the disks that have been lent out to other
people.
- Lend Now
This allows your CD Organizer to keep trak or disk(s) which lent out.
The lend information screen displays information on the lent disk.
The screen includes information such as the borrower, return date, lend notes, and when &
how often to remind you of the lent disk.
- List
shows lent disks and allows you to restore.

10Owner’s Manual
Find
Find enables you to search for a title,
description, file, and directory of the stored
disks.
** Option
* All - Select all options Title, Description, Directory, and File name.
* Time - Search by registered date.
* Title - Search by Title.
* Description - Search by Description.
* Directory - Search by Directory.
* File Name -Search by File Name.
Disk Type Edit
This menu can add, edit or delete new disk
types.

11Owner’s Manual
Printer Setup
This menu allows you to set the printer to
desired print capabilities.
Print
The “Print” menu allows you to select which
catagory to print. The selections include all
cotogories or a specific catagory(disk type)
Option
This menu can establish CD Organizer
Application’s environment and extra
functions.
- Select the CD-ROM drive abstraction
reporting service function
- Select CD Organizer hardware keypad lock
function (This feature looks the the use of the
keypad on the CD Organizer)
- Select tray interval time function
(The number of seconds before tray closes)

12Owner’s Manual
4.2 CD Organizer application functions
Automatic Insertion/Abstraction Reporting Function
The CD Organizer application is aware at all times of the CD Organizer’s USB connection to
the computer. Thus, if a new disk is added or a disk is removed while the CD Organizer is
unplugged from the computer, the application will report that information to you and also
process the data.
Disk Storage Function
Store by Application
Select ‘New Disk’ from the ‘Store’ menu to store new disk information. Select “Return Disk”
from the “Store menu to return a disk which was previously stored in the Organizer.
Store by Hardware
You can find empty trays by the unlit LED on the CD Organizer. The Application gives you
an option to select a storage method when you attempt to store a disk in an empty tray.
The two options to store a disk are auto and manual.
When you select ‘Auto’, you can allow the disk to be read and the information to be listed in
If your record of that disk. This becomes helpful if there is a lot of data on the disk.
You select manual’, this will allow you to enter any data information about your application
CD, Audio, DVD, Video, or Games CDs.
Disk Eject Function
Eject by Application
Select the tray you want to Eject and click the lower right ‘Eject’ button to eject the CD.
Eject by Hardware
Enter the number of the tray you wish to open using the keypad on the CD Organizer
followed by the enter button. In this case, the application will display the Ejectd status of the
tray. The message confirm that a disk was removed from the specific tray.
Search Function
The search feature allows you to locate a disk by several different methods such as title,
description, date, and filename
Hardware Keypad Lock Function
You can lock the CD Organizer to prevent access to the Organizer from hardware. When
Locked, the Organizer will be unaccessible from the hardware.
The CD Organizer will still be available thru the application.
Auto-prompt Message Function
This function provides an option to notify you by on screen message when the CD Rom is
opened.
The message that appears asks you if you would like to store the CD in the CD Organizer.
This function can be disable if it is not desired.

13Owner’s Manual
5.1 Storing a new disk
There are two ways to store a new disk in the CD Organizer. The first method offers the
option to allow your disk content to be automatically read by the CD-ROM drive, thus,
providing the CD information without having to type it yourself. The other method is
manually entering the information associated with the disk yourself.
The steps below demonstrate how each method can be performed.
[Auto-read]
Step 1.
Under the Store menu, Select [New Disk].
Step 2.
Select [Auto]
Step 3.
The coumputer will prompt you to insert the
CD. Once inserted into the CD-ROM drive, it
will read the contents df the disk.
Note: If the disk being read by the CD-ROM starts on
application, you may need to cancel the application before
proceeding.
5
55
5
55
5
5
55
55
5
55
55
5
5
55
5
555
55 Using the CD Organizer application
14Owner’s Manual
Step 4.
Select a method that will designate which disk
tray you desire to use.
Select [Yes] if you wish to choose the tray, or
select [No] if you want the CD Organizer to
choose one for you.
If [No] is selected, the CD Organizer will
select the next available(empty) tray to store
the disk.
Step 5
If you select [Yes] from CD location, the
display will show all trays occupied regardless
if the disk is present or not. You can either
select an empty tray from one of the
unoccupied trays and click okay once the tray
is highlighted or click the down arrow beneath
the “Tray Number” from the CD Location
portion of the screen. Once you selected click
“ok”.
Step 6.
Select a disk type. Then review the inserted
disk title, description, provided by from Auto
function, Select As Favorite, if you would to
add if to your favorite list.
If you wish to add notes about this disk, enter
in the space provided below. If you finished,
click [OK].

15Owner’s Manual
Step 7.
When the CD-ROM Drive and CD Organizer
trays open, move the Disk from the CD-ROM
Drive to the CD Organizer tray and click
[OK].
Step 8.
The next screen will ask if you want to add
another disk. If you do, then click [Yes],
otherwise click [No].
If there was a problem accessing the disk
information, or you forgot to insert a disk, the
retry dialog box appears telling you that there
was a problem reading from the current disk.
If you select retry it will attempt to read the
CD again. Otherwise, if you select cancel, it
will cancel the whole storing process.

16Owner’s Manual
Step 1.
Select [New Disk] under the Store menu.
Step 2.
Select [Manual] in the following screen.
Step 3.
Select a method that will designate which disk
tray you desire to use.
Select [Yes] if you wish to designate the tray
yourself, select [No] if you want the CD
Organizer to automatically allocate it for you.
Step 4.
Select a Disk Type from the list. Then fill in
the information for the Title, Description, and
any other information can be listed down
below. In order to add this tray to your list of
favorities, click the “Yes” radio button next to
“As Favorite”.
[Manual input]

17Owner’s Manual
Step 5.
When the CD Organizer tray opens, insert the
Disk into the CD Organizer tray and click
[OK].
Step 6.
The next screen will ask if you want to add
more disks. If you do, click [Yes], otherwise
click [No].
18Owner’s Manual
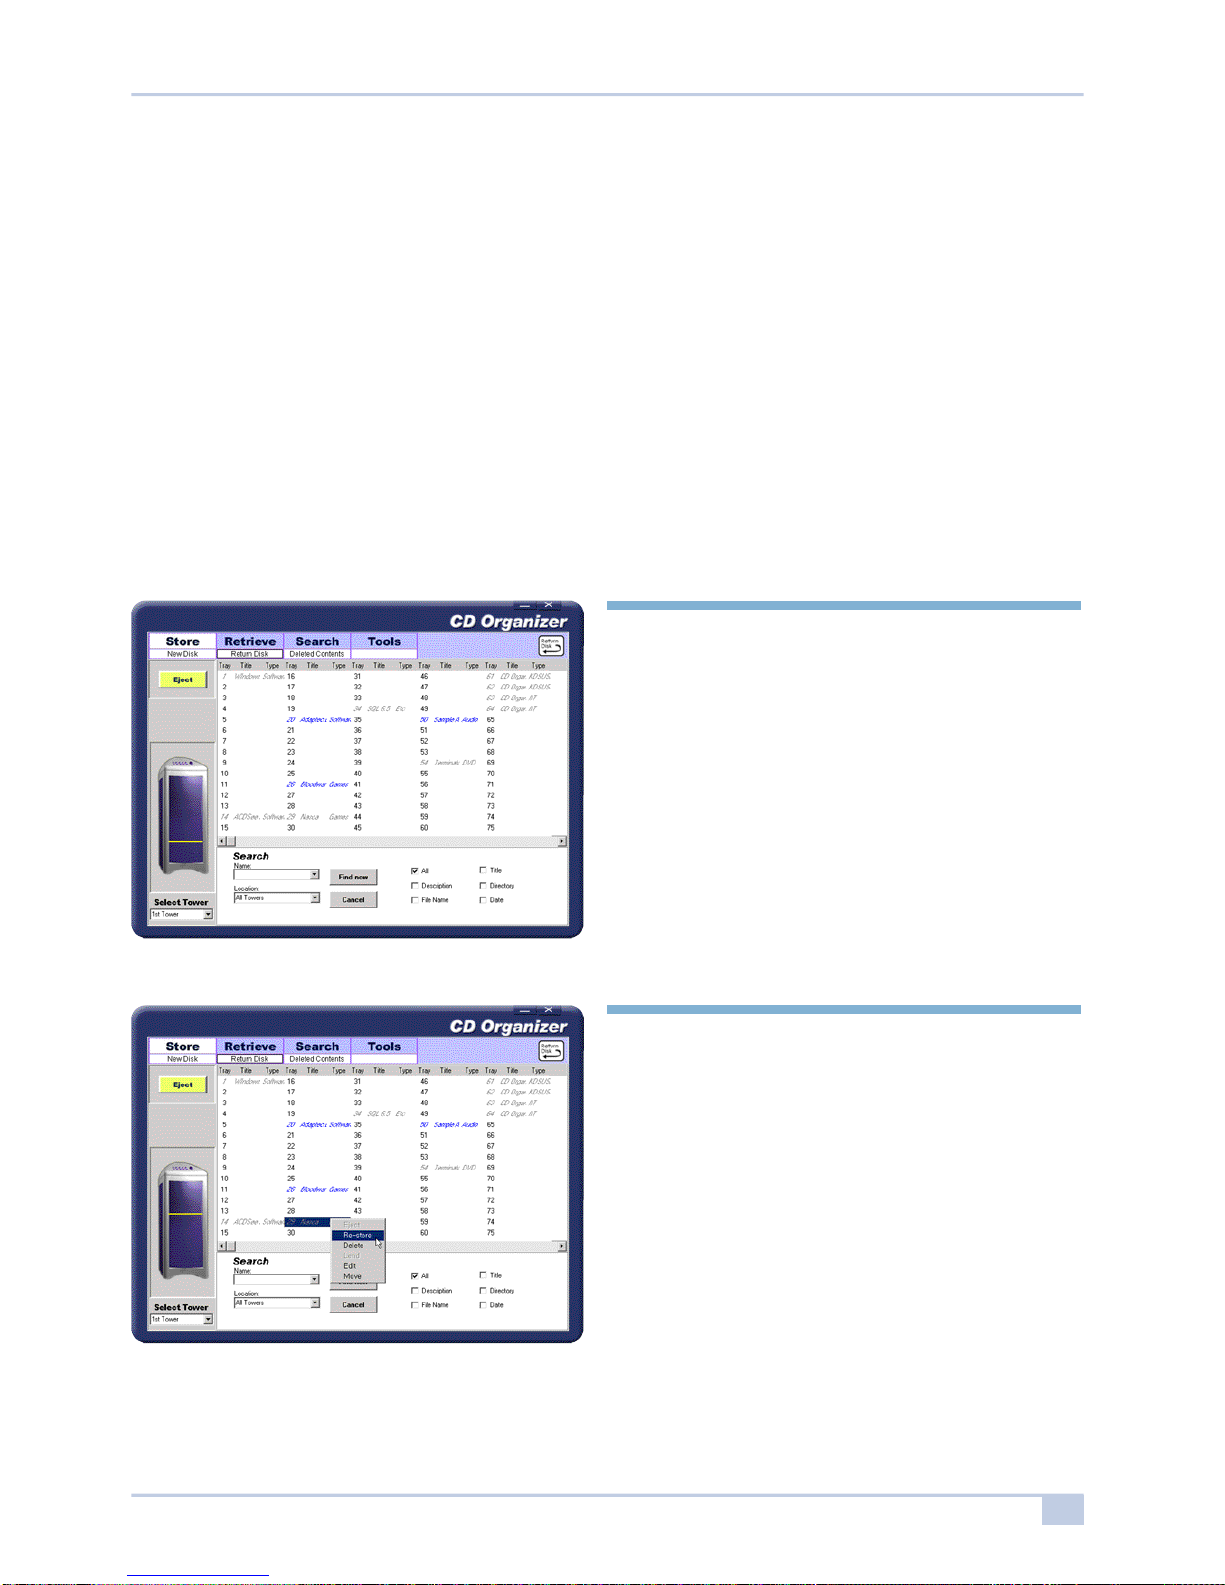
5.2 Returing a Disk
This function return the disk after use or when it is being returned to you if the disk was lent
out.
You can use [Return Disk] from [Store] menu
Other methods that can be used to restore a disk are by using the Re-store function from
[View All] from [Eject] menu, click the right mouse button under the [Re-store] sub menu
under STORE or using the Search function located on the bottom portion in the [Re-store
Disk] from [Store] menu, which allows you to search for disk(s) that are currently present in
the Organizer.
Step 1.
Select [Return Disk] under the Store menu..
Step 2.
The screen will display only the unoccupied
trays where disks information has been
entered. Select a tray that you want to replace
the disk and click [Return]

19Owner’s Manual
Step 3.
The next screen will ask if the disk placed in
this tray has the same contents as the
information stored by the CD Organizer
software for that tray. click [Yes] if this is
correct, otherwise click [No].
Step 4.
If you select [Yes], the CD Organizer tray will
open and display a message to insert the disk.
Insert a disk onto the opened tray and click
[Ok].
Step 5.
The tray will close and the screen will change
to the [View All] screen in the [Eject] menu

20Owner’s Manual
[Return by Search]
If you prefer, you can use the search function to return. This scans the unoccupied trays and
provides you a filtered list based upon the criteria selected from the items checked or it will
scan all if no items are selected.
Step 1.
Under the Return Disk submenu of the
STORE Menu, Use the Search tool located in
the lower portion of the screen by typing in
previous disk information like the Title, Date,
Description, Directory, or File Name then
click [Find now].
Step 2.
From the listed results, highlight the desired
selection and Click [Eject] button in bottom of
the screen.
Step 3.
There will be a reconfirmation screen. If the
tray information is the same as the disk you
want to restore, select [Yes], otherwise select
[No].
Table of contents


