manuals.online logo
Brands
  1. Home
  2. •
  3. Brands
  4. •
  5. Ikan
  6. •
  7. Camera Accessories
  8. •
  9. Ikan PT2000 User manual

Ikan PT2000 User manual

Qu i c k St a r t Gu i d e / PT2000
In t r o d u c t I o n
Please open the box and make sure nothing has been damaged in shipment. If damage is apparent please contact
the ikan customer support department at 713-272-8822, or [email protected].
Thank you for purchasing the ikan PT2000 small form teleprompter kit. We know that you will be extremely pleased
with its versatility and ease of use. If you would like more information on our full line of current and up-coming
products please visit our website at: www.ikancorp.com, or call us at 713-272-8822.
Pa c k a g e c h e c k l I s t
   Metalframewithinstalled30/70teleprompterglass(glasshasplasticlmforprotectionduringshipping),andtwosmallphillipsheadscrews.
Metal frame to tripod/camera plate coupler bracket.
Tripod/Camerareceivingbracket(upperandlower)withfourthumbscrews,tripodquarter/twenty-5/8”holdingnut,twofrontholdingboltswiththumbnuts.
V80008”VGA/videomonitorwithcablesandpowersupply.
Teleprompter Hood with Velcro strips.
Prompter Pro 2.0 PC/Mac teleprompting software.
Quarter/twenty screw and receiving nut for V8000 monitor.
ge t t I n g s t a r t e d
1.Aftercarefullyremovingallthepartsfromthebox,assemblethevariousPT2000componentsaspertheincluded
captionedinstructionalphotoguide(pages2&3).
Tools required: Small to medium ‘Phillips-head’screwdriver, medium to large ‘Flat-head’screwdriver, small to
medium adjustable wrench.
3903 Stoney Brook Dr. Houston Tx, 77063. 1-713-272-8822,suppor[email protected] © 2007 ikan corporation. All rights reserved. www.ikancorp.com
□
□
□
□
□
□
□Checked by
  1.AfterplacingthereceivingnutinthereceivingchanneloftheV8000,securetheV8000monitortotheteleprompterglass
   frame/monitorholdingbracketusingtheincludedquarter/twentyscrew
  2.Removethe2teleprompterglassholdingtabs(securedby4small‘Phillips-head’screws),fromtheteleprompterglass
   frame.Carefullyremovetheteleprompterglassandpeelawaytheprotectiveplasticlm.Carefullyre-installtheteleprompter
glass back into the metal frame.
3903 Stoney Brook Dr. Houston Tx, 77063. 1-713-272-8822,suppor[email protected] © 2007 ikan corporation. All rights reserved. www.ikancorp.com
  3.Attachtheteleprompterglassframeto
the teleprompter glass frame/monitor
holding bracket using the two small
‘Phillips-head’screws.
4. Using a crescent wrench (or an ap
propriately sized open ended or box
 endedwrench),screwthetwobolts
into the lower tripod/camera
receiving bracket.
5.Secureyourtripodplatetothe
bottom channel of the ‘lower’tripod/
camera receiving bracket using the
supplied tripod plate holding nut.
5.Continued
7. Continued
10. Carefully secure the PT2000 without the teleprompter hood on your tripod as per
the diagram. Make sure the tripod is locked down when making adjustments to the
prompter. It works best to remove the lens shade from your camera and place the
camera as close as possible to the teleprompter glass. Since camera size, length, and
weight will vary, it is up to the end-user to determine the proper position and balance
of the camera/teleprompter assembly. You can balance the camera/teleprompter
assembly on your tripod by sliding the tripod plate back and forth along the bottom
channel of the ‘lower’tripod/camera receiving bracket until proper balance is
  achieved.Disassemblyofthecamera/tripodreceivingbracketisrequiredforthis 
procedure.
  AfterinstallationofPrompterPro2.0onyourPC/MaccomputerattachtheVGA 
  cabletotheV8000monitor.ChangeinputtoVGAmodeandreverseimageviathe 
  menu.(Seeprecedinginstructions).Importarich-textleandyouarereadytostart 
your production.
8. Secure the metal frame/monitor
holding bracket using the thumb nuts
 (Donotover-tighten)
9. Completed PT2000 without the
teleprompter hood.
6. Secure your small form video camera
to the ‘upper’tripod/camera receiv-
ing bracket channel using the
 suppliedquarter/twentyscrew.
7.Attachthe‘upper’camera/tripod
receiving bracket to the ‘lower’
camera/tripod receiving bracket using
the 4 supplied thumb screws.
3903 Stoney Brook Dr. Houston Tx, 77063. 1-713-272-8822,suppor[email protected] © 2007 ikan corporation. All rights reserved. www.ikancorp.com
co n d I t I o n s o f Wa r r a n t y se r v I c e
•Freeserviceforoneyearfromthedayofpurchaseiftheproblemiscausedbymanufacturingerrors.
 •Amaintenanceservicefeepluspartswillbechargedifthewarrantyperiodhasexpired.
Free Service will not be Provided in the Following Situations:
 •Damagecausedbyabuseormisuse,dismantling,orchangestotheproductnotmadebythecompany.*
 •Damagecausedbynaturaldisaster,abnormalvoltage,andenvironmentalfactorsetc.*
 *Eveniftheproductisstillwithinthewarrantyperiod.
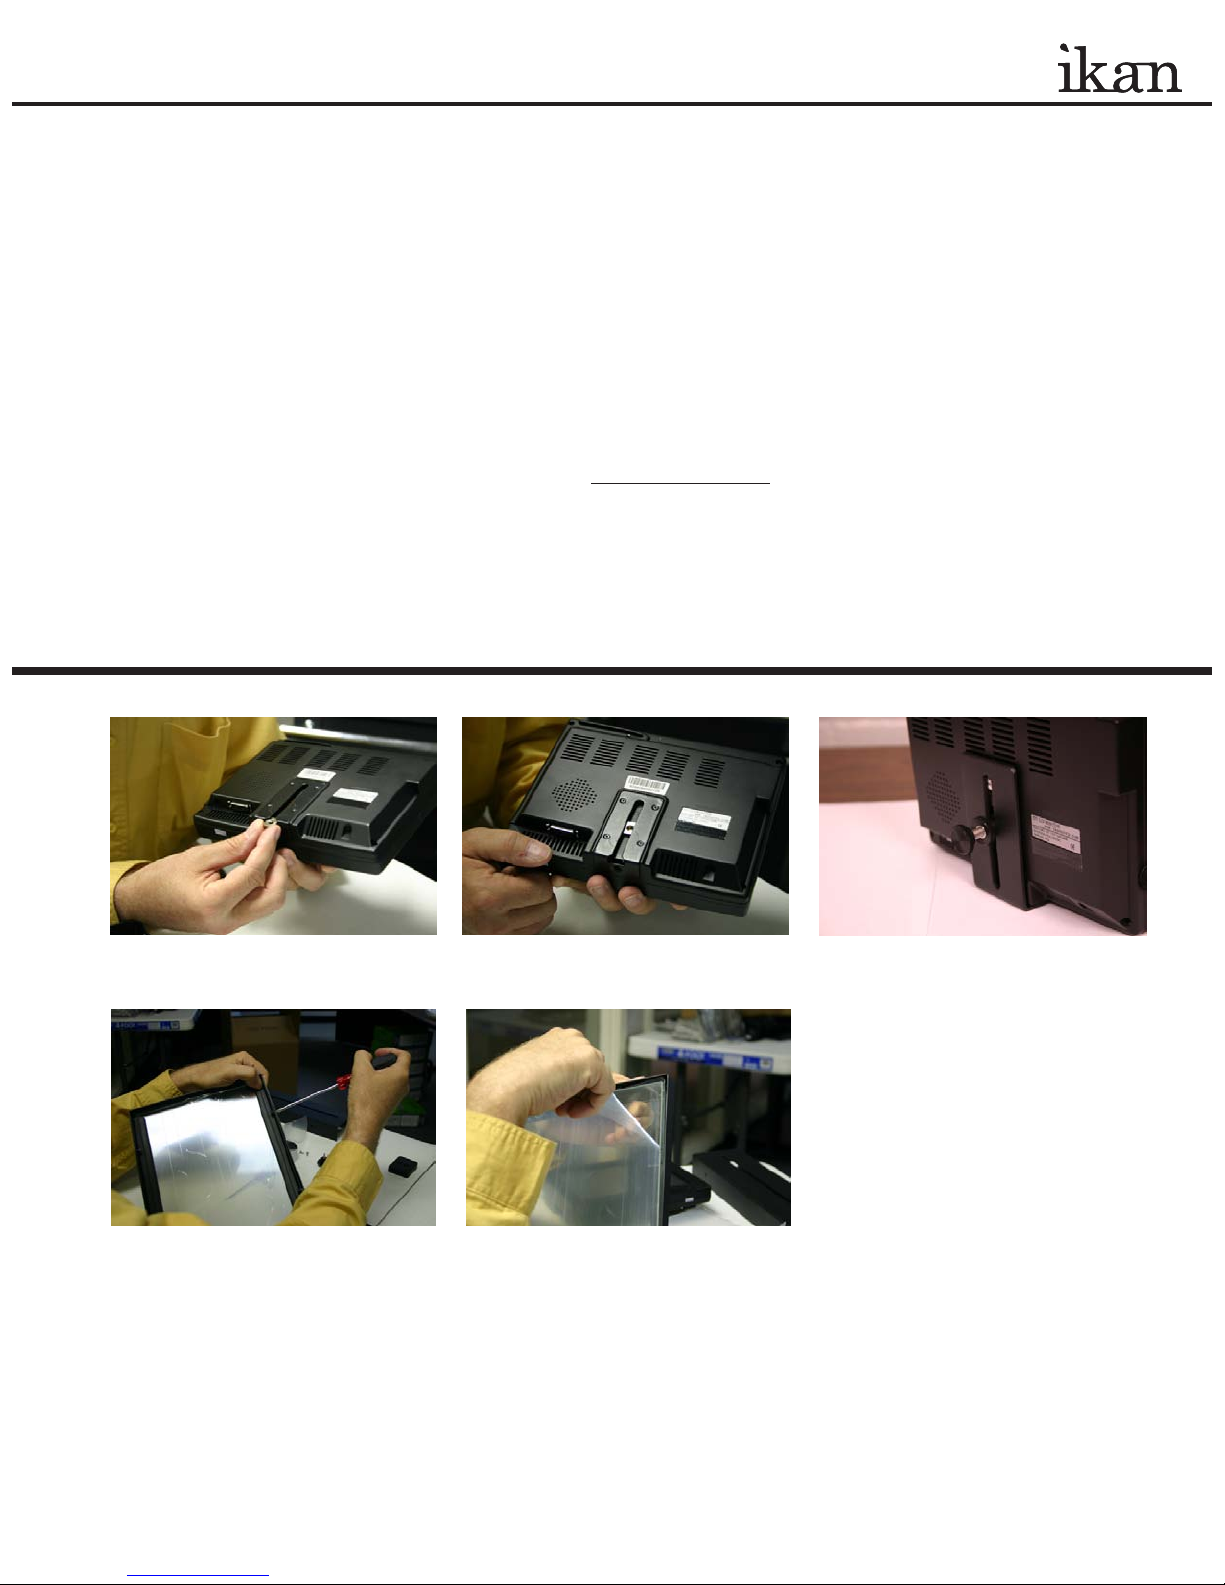
11. Secure the teleprompter hood to the PT2000 using the supplied Velcro. It works best
  tocutsmallsquaresfromtheVelcrostripandsecurethemtothesidesofthemonitor
and/or to the sides of the metal teleprompter glass frame. Place the hood on the frame
  asperthediagramandcarefullyadheresmallsquaresofVelcrotoholdthehoodin 
  place.Adjustthematerialontherearofthehoodaroundthelensofyourcamerato 
block as much ‘back’light as possible. Velcro is pre-sewn into this material.
Prompter Pro V2
Installing Prompter Pro v2.0 on a PC
a. Insert the CD in your CD-ROM on your computer.
  b.Open“MyComputer”fromyourdesktop.
  c.Double-clickon“PrompterPro2.0”CDicon.
  d.Openthe“PrompterProv2.0”folderanddouble-clickonthe“PC”folder.
  e.Double-clickonthe“Setup”icon.
f. Follow the easy installation instructions.
Installing Prompter Pro v2.0 on a MAC
a. Insert the CD in your CD-ROM on your computer.
  b.Double-clickonthe“PrompterProv2.0”icon.
  c.Open“PrompterProv2.0”folderanddoubleclickonthe“MAC”folder.
  d.Dragthefoldernamed“PrompterPro”intoyourapplicationsfolder.
e. You are ready to start Prompting!
Setting up Prompter Pro v2.0
  IfthisisthersttimeinstallinganyversionofPrompterProyouwillbe
prompted to enter a serial number which is provided in the back of the CD case.
  *(PC)Tochangethecolorofthefontsimpleenterthelethatyouwanttoprompt.
   Thenhighlightthewordorletterandrightclickonthemouse(ctrl+clickonMAC)
and a color palette will appear.
  *PrompterProv2.0supportsbothRTFlesandTextles.
  *ForanyadditionalquestionsaboutPrompterProv2.0pleasecallusat713-272-8822.
Keyboard shortcuts:
F5 Stop / Start Scroll Up
F6 Stop / Start Scroll Down
F7 Go to top of prompt
F8 Go to end of prompt
F9/
cmd shift+up Speed Down x10
F10/
cmd shift+dwn Speed Up x10
F11/cmd+up Speed Down
F12/cmd+dwn Speed Up
Ctrl/cmd + O Open File
Ctrl/cmd + S Save File
Ctrl/cmd + H Show / Hide Tool bar
ESC Close Prompt Window
Up/Down
Arrows Speed Up/Down * Scroll Up/Down
Mouse shortcuts:
Left Click/
cmd+click Stop / Start Scroll (Start when tool
bar is hidden)
Right Click/
ctrl+click Show / HideTool bar
Mouse Wheel Speed Up/Down * Scroll Up/Down
Main Menu Options:
Open File Allows you to browse you computer for a file.
Show Prompt Displays the file you are currently working on.
New File Create a new file for prompting.
Save File Save the progress of your file.
Demonstration Puts the software in demonstration mode.
Setup Allows you to toggle the font and BG color.
Exit It will exit from the program.
Qu i c k St a r t Gu i d e / PT2000 (How to set-up your computer for the PT2000)
In t r o d u c t I o n
When using the PT2000 you should set up you computer to be in “Clone Mode” or
“Mirror Mode”. We do this so the talent can see the exact same thing the teleprompter
operator is viewing. In this guide we will go over some of the most common ways of
achieving this. Before you start you should make sure you have the last drivers for your
video card. You should visit the manufactures website the get these. We will go over the
Nvidia , ATI, and Intel way of achieving this as they are what most computers are
equipped with.
1)Fist thing to do is make sure that the monitor of the PT2000 is plugged in powered on and
connected to the VGAport of you computer. (It’s the blue 15 pin connector on the back of
your computer)
2)The easiest way to set up your computer if you are using a laptop is to use the hot keys.
Most laptops have a set of keys you press at the same time to toggle between display
modes. In this particular case the key combination is FN and the F4 key. (see illustation)
You will press these keys until you get the same exact image on the PT2000 that you have
on your laptop. The mode we are looking for is “Clone Mode”. Every laptop manufacturer
seems to have a different key combination so you should check your user’s manual.
nv I d I a (see gure 1)
3)If the above step did not work or you are using a desktop computer then we can do it the
longer method. (Nvidia)
a. Right-Click on your desktop
b. Choose properties
c. Click on the Settings tab
d. Change the resolution of your monitor to 800x600 or 1024x768 and press the
apply button.
e. Now press the advanced button
f. Click on the tab labeled with the word GeForce or the Nvidia logo. (this may look
different depending on your graphics card model.)
g. Click on “Nview Display Settings” on the left side.
h. On the right side choose Clone from the Nview Display Mode drop down box.
i. Click on the apply button.
j. You should be in clone mode now. Close all open windows.
k. You are now ready to start Prompter Pro V2.
atI (see gure 2)
4)If step number 2 did not work or you are using a desktop computer then we can do it the
longer method. (ATI)
a. Right-Click on your desktop
b. Choose properties
c. Click on the Settings tab
d. Change the resolution of your monitor to 800x600 or 1024x768 and press the
apply button.
e. Now press the advanced button
f. Click on the Tab labeled with an ATI logo and the word “Displays”
g. Press the red button to the left of the word monitor. This will “turn on” your second
ary monitor (which is the PT2000)
h. Press the small blue button with two squares overlapping each other. This is the
“Clone Mode” button.
i. Now Press the apply button.
j. Your are now ready to start Prompter Pro V.2
nvIdIa
(gure 1)
atI
(gure 2)
b.
d.
h.
d.
h.
fn
f4
+
b.
atI (see gure 3)
5)If step number 2 did not work and you do not recognize the steps in step 4 but still have an
ATI card and are using a desktop computer then follow these steps:
a. Right-Click on the desktop
b. Click on the “ATI CATALYST Control Center”
c. Click on the Displays Manager option on the left
d. Right-Click on the small grey picture of a monitor under the “Attached displays
currently disabled” section
e. Choose Clone Main with monitor
f. Now click apply
IntEL (see gure 4)
6)If step number 2 did not work or you are using a desktop computer then we can do it the
longer method. (Intel)
a. Make sure you are running at 1024x768 resolution
b. Right-Click on the desktop
c. Roll your mouse over Graphics Options
d. Roll your mouse over Output To
e. Roll your mouse over Intel Dual Display Clone
f. Click on Monitor + Notebook
g. You are now ready to start Prompter Pro V.2
7)There is another way to do it on the Intel graphics card:
a. Right-Click on your desktop
b. Choose properties
c. Click on the Settings tab
d. Change the resolution of your monitor to 800x600 or 1024x768 and press the
apply button.
e. Now press the advanced button
f. Click on the “Intel Graphics Media Accelerator Driver” button
g. Click on the Intel Dual Display Clone button on the left.
h. Click on apply.
i. You are now ready to start Prompter Pro V.2
Qu i c k St a r t Gu i d e / PT2000 (How to set-up your computer for the PT2000)
atI
(gure 3)
d.
b.
I n t E L
(gure 4)
c.
d.
e. f.
d. f.
g.
(For Step 7)
For additional help please call the ikan support team at
713-272-8822 or email us at support@ikancorp.com
Ofce Hours: 9am - 6pm Central Time
IntroductIon
Thank You for purchasing our ikan V8000 LCD monitor. We know you will be satised with our
“V” series monitors. Please visit www.ikancorp for more information on our future products including
our award winning uorescent studio lights and light accessories.
package check lIst
A/V Cable
Remote Control
VGA Cable
AC Adapter
Drivers CD-ROM (V8000T only)
Monitor Bracket
gettIng started
1. Getting power to the monitor.
a. Plug the AC adapter into the power input jack on the bottom right corner on the monitor
or through the break out cable.
2. Connecting the A/V (audio/Video)
a. Plugging up the breakout cable to the bottom of the monitor gives you many modes for video input.
(You can switch from these modes by pressing the “PC/AV” button on the monitor)
for the touchscreen model v8000t
1.When you purchase The ikan V8000T you will receive a CD-ROM with drivers to different operating systems.
2.When you view the contents on the CD-ROM, you will see a folder titled “GL-619-EN”. After, you open that folder
you will see a list of folders with the appropriate operating systems that you need.
3.Once, you have open the folder with your operating system double click on the setup le. This will
take you through the installation.
4.Follow the installation directions. If you need additional help installing drivers there is a folder
in the CD-ROM titled “Manuals”. After, you have opened the “Manual” folder double click on the appropriate
Operating system manual le. If you need additional help please call us at 1-713-272-8822.
5. Plug up the black VGA cable to you computer and plug the USB plug to you computer also.
6. Once all is plugged in open TouchKit software. Now, you can customize the touchscreen to your monitor.
Video Modes Description
Video-1 The yellow AV cable is your Video-1
Video-2 The red AV cable is your Video-2
S-Video This enables you to use an S-Video cable
VGA-Mode Using the VGA cable enables you to use you computer as a video source.
+
-
POW
PC/AV
MENU
Menu Access to all the monitor settings “horizontal shift, color, etc.”
> When left pressed for a few seconds flips the image vertical.Toggles
through menu.
< When left pressed for a few seconds flips the image horizontal.Toggles
through menu.
+ Increases the volume of the monitor.
_Decreases the volume of the monitor.
Power Powers up the monitor.
PC/AV Toggles through the different video modes.
Quick Start Guide / V8000 /T
□
□
□
□
□
□
3903 Stoney Brook Dr. Houston Tx, 77063. 1-713-272-8822,support@ikancorp.com © 2007 ikan corporation. All rights reserved. www.ikancorp.com
Checked by

Other Ikan Camera Accessories manuals

Ikan RECOIL-UGK User manual

Ikan

Ikan RECOIL-UGK User manual

Ikan TRD Beholder MS1 User manual

Ikan

Ikan TRD Beholder MS1 User manual

Ikan beholder EC1 User manual

Ikan

Ikan beholder EC1 User manual

Ikan PT19-SDI-TM User manual

Ikan

Ikan PT19-SDI-TM User manual

Ikan V8PBK-A User manual

Ikan

Ikan V8PBK-A User manual

Ikan iLED-MA User manual

Ikan

Ikan iLED-MA User manual

Ikan PT4500-SDI-P2P User manual

Ikan

Ikan PT4500-SDI-P2P User manual

Ikan Beholder DS2-A User manual

Ikan

Ikan Beholder DS2-A User manual

Ikan CTL-USB01 User manual

Ikan

Ikan CTL-USB01 User manual

Ikan HB160-GC User manual

Ikan

Ikan HB160-GC User manual

Ikan ELE-A7S-C User manual

Ikan

Ikan ELE-A7S-C User manual

Ikan BMC-PWR-BC User manual

Ikan

Ikan BMC-PWR-BC User manual

Ikan MOTUS22 User manual

Ikan

Ikan MOTUS22 User manual

Ikan PBK-A-C User manual

Ikan

Ikan PBK-A-C User manual

Ikan PT4200-CVK User manual

Ikan

Ikan PT4200-CVK User manual

Ikan TRD Beholder MS1 User manual

Ikan

Ikan TRD Beholder MS1 User manual

Ikan GRH User manual

Ikan

Ikan GRH User manual

Ikan PSB5 User manual

Ikan

Ikan PSB5 User manual

Ikan ID 500 User manual

Ikan

Ikan ID 500 User manual

Ikan OYB120 User manual

Ikan

Ikan OYB120 User manual

Ikan beholder EC1 Use and care manual

Ikan

Ikan beholder EC1 Use and care manual

Ikan ELEMENTS DELUXE FLY User manual

Ikan

Ikan ELEMENTS DELUXE FLY User manual

Ikan Saga SX7 User manual

Ikan

Ikan Saga SX7 User manual

Ikan PT2000 User manual

Ikan

Ikan PT2000 User manual

Popular Camera Accessories manuals by other brands

dji RONIN-M quick start guide

dji

dji RONIN-M quick start guide

PROAIM CINEMA Series instruction manual

PROAIM

PROAIM CINEMA Series instruction manual

Zhiyun Z1-Proud instruction manual

Zhiyun

Zhiyun Z1-Proud instruction manual

Ikelite 6171.05 instruction manual

Ikelite

Ikelite 6171.05 instruction manual

Urban Factory BCA3xUF user guide

Urban Factory

Urban Factory BCA3xUF user guide

Axis T91A52 installation guide

Axis

Axis T91A52 installation guide

Manfrotto C350N instructions

Manfrotto

Manfrotto C350N instructions

Ikelite 6871.65 instruction manual

Ikelite

Ikelite 6871.65 instruction manual

Sanyo Twicell HR-AA Specification sheet

Sanyo

Sanyo Twicell HR-AA Specification sheet

Scosche GOBAT 12000 quick start guide

Scosche

Scosche GOBAT 12000 quick start guide

Tamron B008TS owner's manual

Tamron

Tamron B008TS owner's manual

Pentax Grip Strap user guide

Pentax

Pentax Grip Strap user guide

Panasonic PPDW12 Product features

Panasonic

Panasonic PPDW12 Product features

Kodak PHOTO GEAR user guide

Kodak

Kodak PHOTO GEAR user guide

dji Ronin S2 quick start guide

dji

dji Ronin S2 quick start guide

Tether Tools CRUPS110 user manual

Tether Tools

Tether Tools CRUPS110 user manual

LG HBP10H installation manual

LG

LG HBP10H installation manual

Pixapro LECO 500 instruction manual

Pixapro

Pixapro LECO 500 instruction manual

manuals.online logo
manuals.online logoBrands
  • About & Mission
  • Contact us
  • Privacy Policy
  • Terms and Conditions

Copyright 2025 Manuals.Online. All Rights Reserved.