IKEA Sladda User manual

SLADDA


ENGLISH 4
中文 15
繁中 26
한국어 37
日本語 48
BAHASA MALAYSIA 59
70

4
ENGLISH
CONTENTS
1. INTRODUCTION 4
2. LIST OF PARTS 5
3. ASSEMBLE YOUR BICYCLE 6
4. TEST YOUR BICYCLE BEFORE RIDING 13
5. FOR YOUR SAFETY 14
6. CARE AND MAINTENANCE 14
7. TORQUE SETTING 15
1. INTRODUCTION
SLADDA is a sustainable and durable bicycle that
is easy to adapt to your everyday needs and
requires minimal maintenance.
The bicycle uses a belt drive system instead of a
regular chain. The belt is long lasting and easy
to maintain, since it will not rust and it does not
need to be lubricated with oil. That means no
harmful substances for the environment as well
as a cleaner bicycle, which is practical if you
keep your bicycle indoors.
This booklet contains all you need to know
about your bicycle, including how to assemble
it, test it before riding and keep it in good
condition. Should any parts need to be replaced
at any point in the future there is a full list of
components and how to order them.
* This bicycle has a rear wheel coaster brake
and automatic gears, which have been specially
chosen to limit the use of cables. It is important
that you familiarize yourself with the braking
system of the bike. If you are not used to the
back-pedal method of braking, you will nd
instructions in the Test Your Bike Before Riding
section on how to use this technique.

5
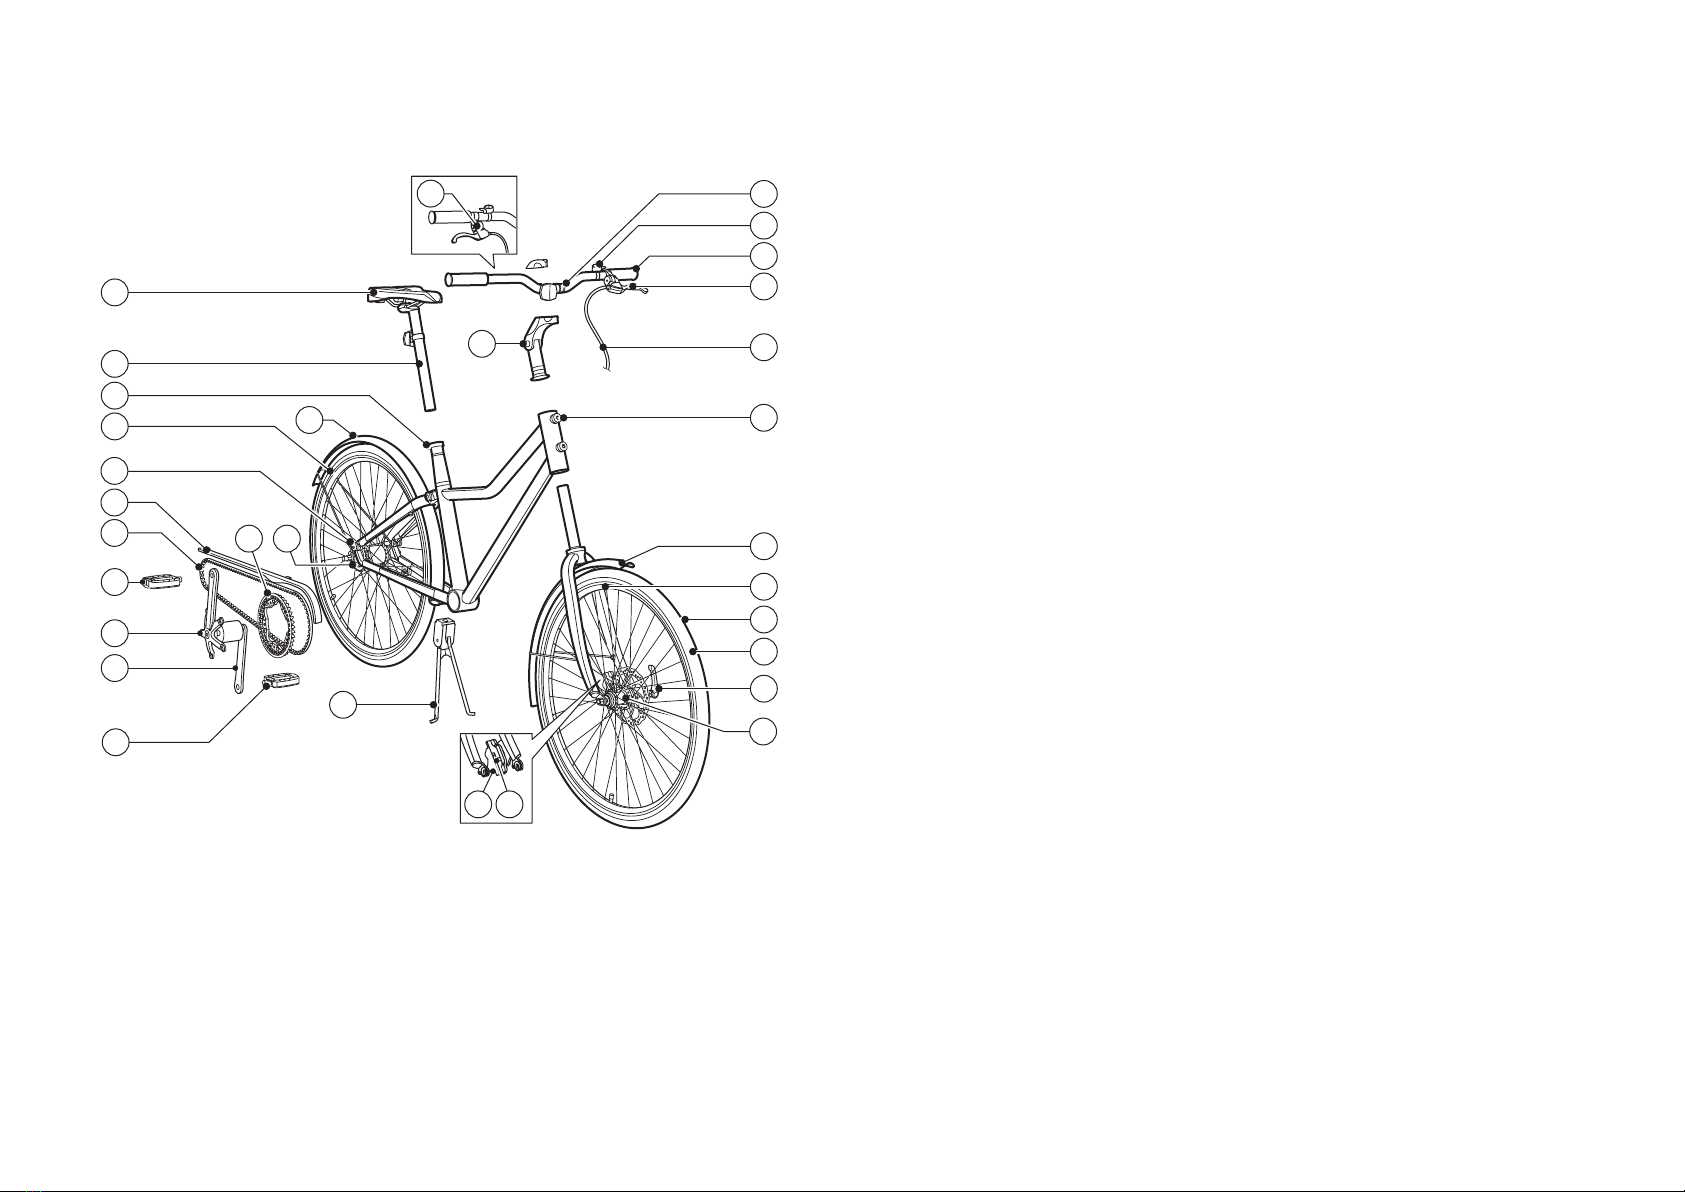
1 ICOMP knob connection and washer short (S:146902, W:146968)
2 ICOMP knob connection and washer long (S:147927, W:146968)
3 Handle bar (naked) (151271)
4 Grip (151278)
5 Handle bar stem with screws (151279)
6 Brake cable, complete (28”:151333, 26”:151340)
7 Left brake lever with bell (screw and adjuster included) (151280)
8 Right brake lever with/without bell (screw and adjuster included) (151281)
9 Bell (151282)
10 Tyre (28”:151343, 26”:151344)
11 Inner tube with valve (28”:151316, 26”:151331)
12 Brake disc with 6 screws (151346)
13 Brake pads, with spring and lock pin (152505)
14 Brake caliper with screws (152504)
15 Saddle (STD:151347, NA:152541)
16 Seat post (28”:151348, 26:151354)
17 Seat post clamp with screw (151355)
18 Front and rear sprockets (28”:151357, 26”:151358)
19 Drive belt (151356)
20 Belt protection (28”:151359, 26:151361)
21 Front wheel, complete. With rim tape. With/without inner-tube, tyre, brake-disc, reectives
(28”:151284, 26”:151317)
22 Rear wheel, complete. With rim tape, nuts. With/without inner-tube, tyre, reectives, sprocket
(28”:152507, 26”:151365)
23 Front mud guard, including screws (28:151366, 26:151368)
24 Kick stand (28:151370 26:151371)
25 Quick release front wheel, complete (152508)
26 Pedal with reector (STD:151364, AU:152506)
27 Crank right (151362)
28 Crank left (151363)
29 Rear mud guard, including screws (28:151367, 26:151369)
2. BIKE PARTS & COMPONENTS
1
11
21
23
12
10
25
2
4
3
9
8
6
7
5
1314
15
16
17
22
18
18
24
19
20
26
26
27
28
29

6
3. ASSEMBLE YOUR BIKE
1x 1x 1x1x
100092
108490
152131
151753

7
100092
152131

8
100092
2x

9
SLADDA

10
108490
108490
108490

11
A low positioned handlebar will give you
more of a “racing” position, which is comfortable
if you are cycling longer distances and makes it
easier to go fast since wind resistance decreas-
es. But it also puts more pressure on your wrists
and limits your ability to see behind you and to
the side.
A high positioned handlebar will give you
more of a “classic” riding posture, where you
have the best visibility of trafc around you. This
posture is also better when riding with a child in
the child seat as it allows better contact between
you. It does however make cycling uphill a little
more difcult.
108490
108490

12
R
151753
L
151753

13
Adjust the saddle to a comfortable height
(see illustration). Test that you have the right
height by sitting on the saddle with your heel
on the lower pedal and your leg fully extended.
Your leg should be almost straight, and if it is
too bent you need to raise the saddle. If it is dif-
cult to reach the lower pedal comfortably you
need to lower the saddle.
Before riding your bicycle you should perform
a safety check on level ground and away from
heavy trafc. It is important that you ensure
all parts are fastened and working properly
and that you are familiar with the controls and
features of your bike, such as the rear wheel
coaster brake and automatic gears. There are
two gears that shift automatically depending on
the speed at which you are cycling.
1. CHECK THE TYRES
Make sure that the tyres are inated to the
recommended pressure limit using a tyre pump
with a gauge. The pressure should not exceed
the recommended limit as stated on the tyre.
It is better to use a hand or foot pump rather
than a service station pump as over ination can
cause the tyre to blow out.
2. CHECK THE SADDLE
Make sure that the saddle is in line with the
centre of the bike and that the handlebar is at
90 degrees to the wheel. Check that it is tight-
ened sufciently so that it will not twist out of
alignment.
3. CHECK THE BRAKES
Check that the front wheel brake is working
properly. Ride the bike at slow speed and apply
the front wheel brake using the hand lever. The
bike should come to an immediate stop. Make
sure you can apply full braking force on the hand
brake without the brake lever touching the han-
dlebar. If not, your brakes may need adjusting.
Do not test the full braking force when riding at
fast speed since it can cause your front wheel to
stop turning and your bike to ip over.
Check that the rear wheel coaster brake is
working properly. Start with the pedal cranks in
an almost horizontal position, and apply pres-
sure downwards on the back pedal. The more
pressure you apply, the greater the braking
force.
Please note that the brake lever on the
handle bar controls the front wheel brake
and the coaster brake controls the rear
wheel brake.
4. CHECK REFLECTORS, LIGHTS AND
ACCESSORIES
Check that reectors are positioned correctly.
Make sure that your front and rear lights and
any other accessories are working properly. Test
the bell on the handlebar.
WARNING: As with all mechanical components,
the bicycle is subjected to wear and high stress.
Different materials and components may react
to wear or stress fatigue in different ways. If the
design life of a component has been exceeded, it
may suddenly fail possibly causing injuries to the
rider. Any form of cracks, scratches or change of
colouring in highly stressed areas indicate that
the life of the component has been reached and
it should be replaced.
4. TEST YOUR BIKE BEFORE RIDING
100092
100092

14
5. FOR YOUR SAFETY
• Always wear a bicycle helmet when riding
your bike to reduce the risk of head injuries
if you are involved in a road accident. Make
sure your bicycle helmet ts you properly
and that it meets the required safety
standards.
•WARNING! This bicycle is intended for
use on roads and bicycle paths and not
for performing stunts, jumps or off-road
use. Riding this bike in a way or in an
environment for which it is not suitable may
put you at risk of injury and may damage
the bicycle.
WARNING
•Observe your national bicycle laws and
regulations regarding bicycle lighting,
riding on pavements/roads or cycle
paths, helmet laws, child carrier laws
and trafc laws. It is your responsibility
to be aware of the laws that are
applicable in your country.
• After you have ridden your bike the rst 20
km (approx 12 miles) we advise that you
once again check that all screws and ttings
are secured, and re-tighten if necessary.
• Increase your visibility by wearing bright
clothing or a reective vest for cycling in
foggy conditions or at night.
• Take extra precautions when you ride in
wet weather since the grip of your tyres are
greatly reduced. Apply your brakes earlier
and more gradually than when riding in dry
conditions.
•WARNING! Reectors are not a substitute
for required lights. Riding in dark conditions
or at times of poor visibility without
adequate lighting and reectors is hazardous
and may result in serious injury or death.
The SLADDA bike is designed to require minimal
maintenance but here are a few tips on how to
keep your bicycle in top condition.
Simply clean your bicycle with water, or with
a mild detergent and a non-abrasive sponge if
very dirty.
To replace parts (e.g. worn brake pads or
broken parts from an accident) please call IKEA
Customer Service or contact your local IKEA
store. Use only genuine original replacement
parts. If you use anything other than geniune
replacement parts you may compromise the
safety of your bicycle. A complete list of parts
and components with article numbers are
included in this manual.
Make sure that all ttings are tightened
regularly. Please contact IKEA or professional
bike store if you need to adjust the belt to the
recommended tension of 100Nm. A complete list
of parts and components with article numbers
are included in this manual.
Note! If you have any questions about the care
and/or maintenance of your bicycle, please
contact IKEA.
6. CARE AND MAINTENANCE
A
B
A + B= Max 60 kg/132 lbs
Max
160 kg
352 lbs

15
7. TORQUE SETTING
17Nm
10Nm
4Nm
5Nm
40Nm 20Nm
13Nm
4Nm
30Nm
6Nm
20Nm

16
中文
目录
1. 简介 16
2. 零件清单 17
3. 组装自行车 18
4. 使用前测试自行车 25
5. 安全注意事项 26
6. 护理与保养 26
7. 扭力设置 27
1. 简介
SLADDA 斯拉达 是一款结实耐用的自行车,可轻松满足
你的日常使用需要,且只需进行简单保养即可。
这款自行车没有采用常规的链条系统,而是使用传送带
驱动系统。传送带不会生锈且无需额外使用润滑油,因
此具有经久耐用且便于维护的优点。这意味着不会向环
境释放有害物质,而且相比之下自行车更加干净了,如
果把自行车停放在室内,这一优点就更加实用了。
这本手册收录了使用这款自行车需要了解的所有内容,
包括如何安装、如何进行使用前的测试,以及如何让自
行车保持良好的运行状态。手册内还有一张完整的组件
清单,并附有相应的订购方式,如果将来需要更换任何
零件,可参考该清单。
为了限制对刹车线的使用,自行车后轮特别设置了脚刹
装置及自动档位。一定要熟悉自行车的刹车系统。如果
不习惯使用脚刹系统,请在“使用前测试自行车”部分
了解这一系统的使用说明。

17
1 ICOMP 旋钮连接件及窄垫圈 (S:146902, W:146968)
2 ICOMP 旋钮连接件及宽垫圈 (S:147927, W:146968)
3 车把(不含配件) (151271)
4 握把 (151278)
5 带螺丝车把竖管 (151279)
6 完整刹车线 (28”:151333, 26”:151340)
7 左制动杆,带车铃(含螺丝及调节器) (151280)
8 右制动杆,带/不带车铃(含螺丝及调节器) (151281)
9 车铃 (151282)
10 车胎 (28”:151343, 26”:151344)
11 带气阀车内胎 (28”:151316, 26”:151331)
12 刹车盘及6个螺丝 (151346)
13 刹车片,带弹簧及锁钉 (152505)
14 刹车钳带螺丝 (152504)
15 车座 (STD:151347, NA:152541)
16 座管 (28”:151348, 26:151354)
17 带螺丝座管夹 (151355)
18 前后链轮齿 (28”:151357, 26”:151358)
19 驱动传送带 (151356)
20 传送带保护装置 (28”:151359, 26:151361)
21 完整前轮。带垫带。带/不带内胎、车胎、刹车盘、反射器 (28”:151284, 26”:151317)
22 完整后轮。带垫带、螺母。带/不带内胎、车胎、反射器、链轮齿 (28”:152507, 26”:151365)
23 完整挡泥板。前部带螺丝 (28:151366, 26:151368)
24 支架 (28:151370 26:151371)
25 完整的前轮速卸装置 (152508)
26 带反射器踏板 (STD:151364, AU:152506)
27 右侧曲柄 (151362)
28 左侧曲柄 (151363)
29 完整挡泥板。后部带螺丝 (28:151367, 26:151369)
2. 自行车零件及组件
1
11
21
23
12
10
25
2
4
3
9
8
6
7
5
1314
15
16
17
22
18
18
24
19
20
26
26
27
28
29

18
3. 组装自行车
1x 1x 1x1x
100092
108490
152131
151753

19
100092
152131

20
100092
2x
Other manuals for Sladda
7
Table of contents
Languages:
Other IKEA Bicycle manuals