IKEA IMH160 User manual

MICROWAVE HOOD COMBINATION
Use and Care Guide
For questions about features, operation/performance, parts, accessories or service, call: 1-866-664-2449.
In Canada, for assistance, installation or service, call: 1-866-664-2449.
For warranty concerns, do not take the appliance back to the store. Please contact us in U.S.A. or Canada at 1-866-664-2449.
This product features a Limited Warranty - See the “Warranty” section for complete details. IKEA®appliances carry a 5-year warranty
(excludes LAGAN family - see warranty for coverage details).
NOTE: Proof of Purchase is required to obtain warranty service.
COMBINACIÓN MICROONDAS CAMPANA
Manual de uso y cuidado
Para consultas respecto a características, operación/desempeño, partes, accesorios o servicio, llame al: 1-866-664-2449.
En Canadá, para asistencia, instalación o servicio llame al: 1-866-664-2449.
Si tiene dudas acerca de la garantía, no devuelva el aparato a la tienda. Póngase en contacto con nosotros en los EE.UU. o en Canadá
al 1-866-664-2449.
Este producto tiene una garantía limitada - Consulte la sección “Garantía” para obtener todos los detalles. Los aparatos IKEA®tienen
una garantía de 5 años (excluyendo los de la familia LAGAN - consulte la garantía para ver los detalles acerca de la cobertura).
NOTA: Se requiere la prueba de compra para obtener servicio bajo la garantía.
ENSEMBLE FOUR À MICRO-ONDES/HOTTE
Guide d’utilisation et d’entretien
Au Canada, pour assistance, installation ou service composez le 1-866-664-2449.
Pour toute question concernant l’application de la garantie, ne pas rapporter l’appareil au magasin. Veuillez nous contacter aux É.-U.
ou au Canada au 1-866-664-2449.
Ce produit est couvert par une garantie limitée – Voir la section “Garantie” pour des détails complets. Les appareils IKEA®sont couverts
par une garantie de 5 ans (hormis les appareils de la série LAGAN - voir la garantie pour des détails concernant les modalités de
garantie).
REMARQUE : Une preuve d’achat est obligatoire pour obtenir l'application de la garantie.
Table of Contents/Índice/Table des matières ............................. 2
Model/Modelo/Modèle IMH160
W10691580A

2
TABLE OF CONTENTS
WARRANTY .................................................................................................3
MICROWAVE HOOD COMBINATION SAFETY ........................................4
Electrical Requirements............................................................................6
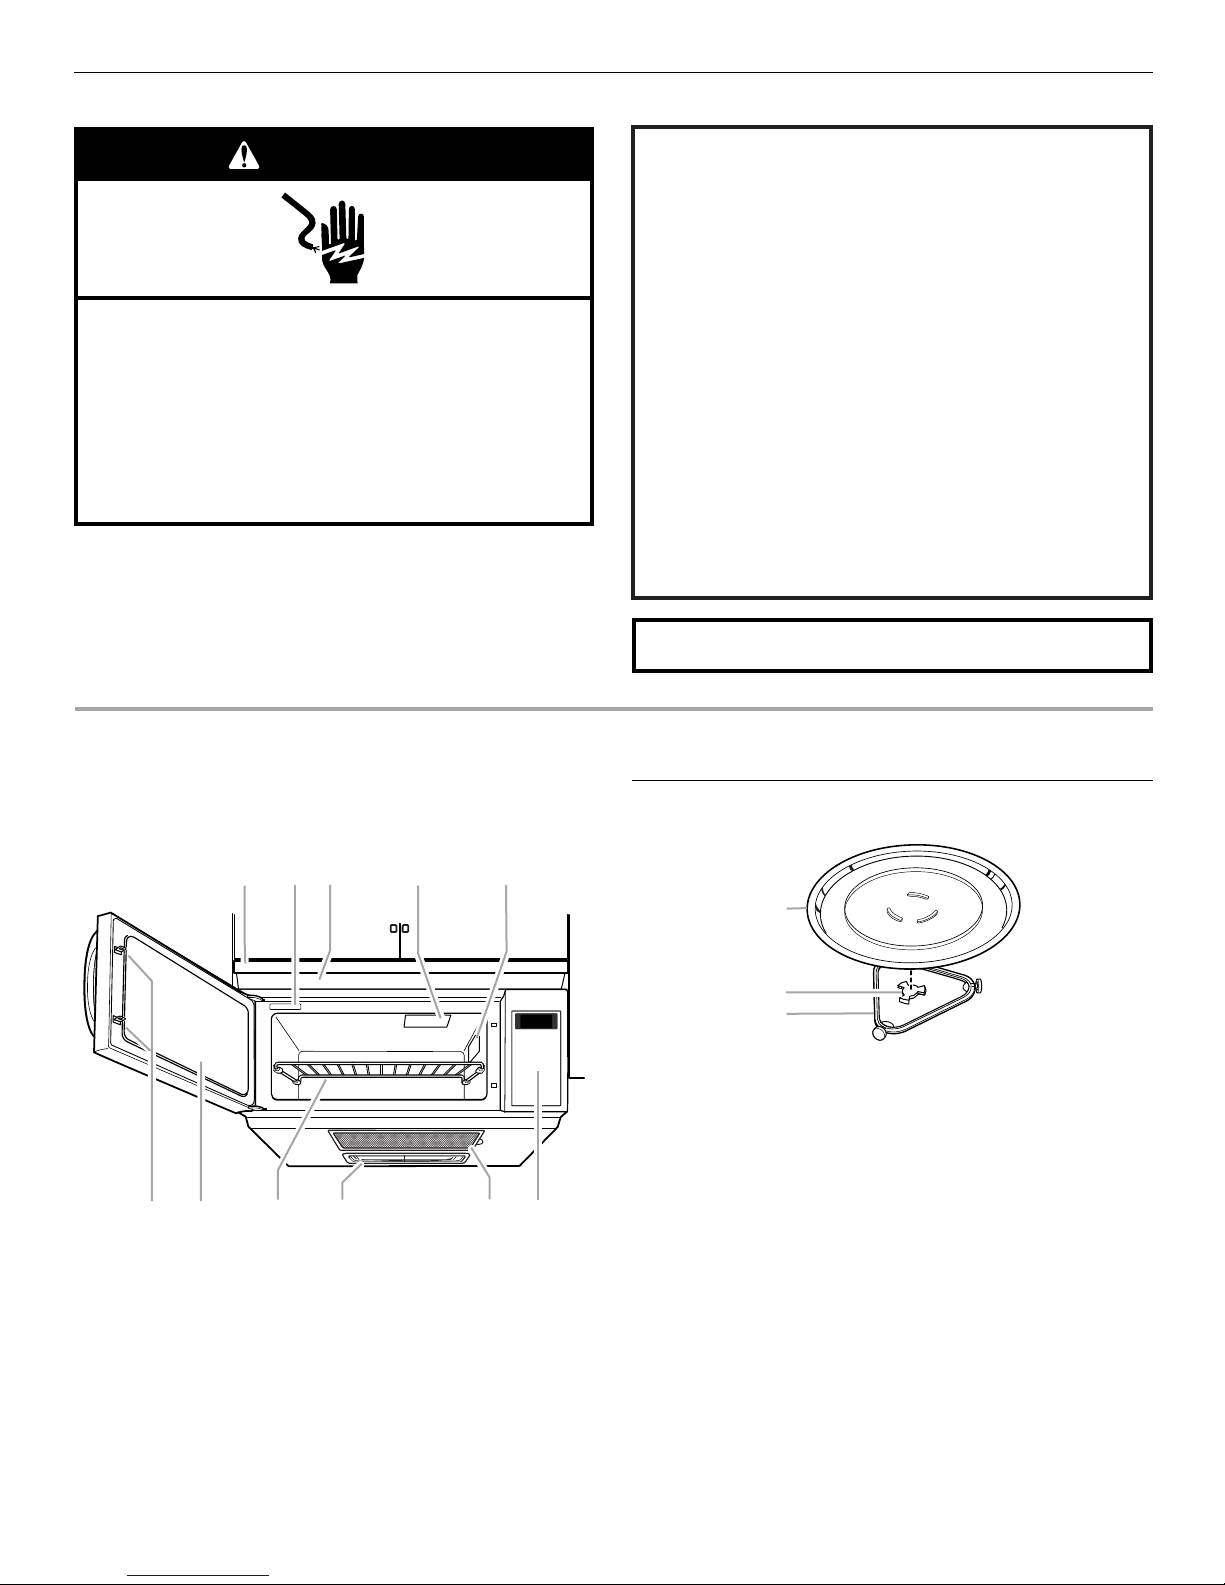
PARTS AND FEATURES.............................................................................6
Turntable ...................................................................................................6
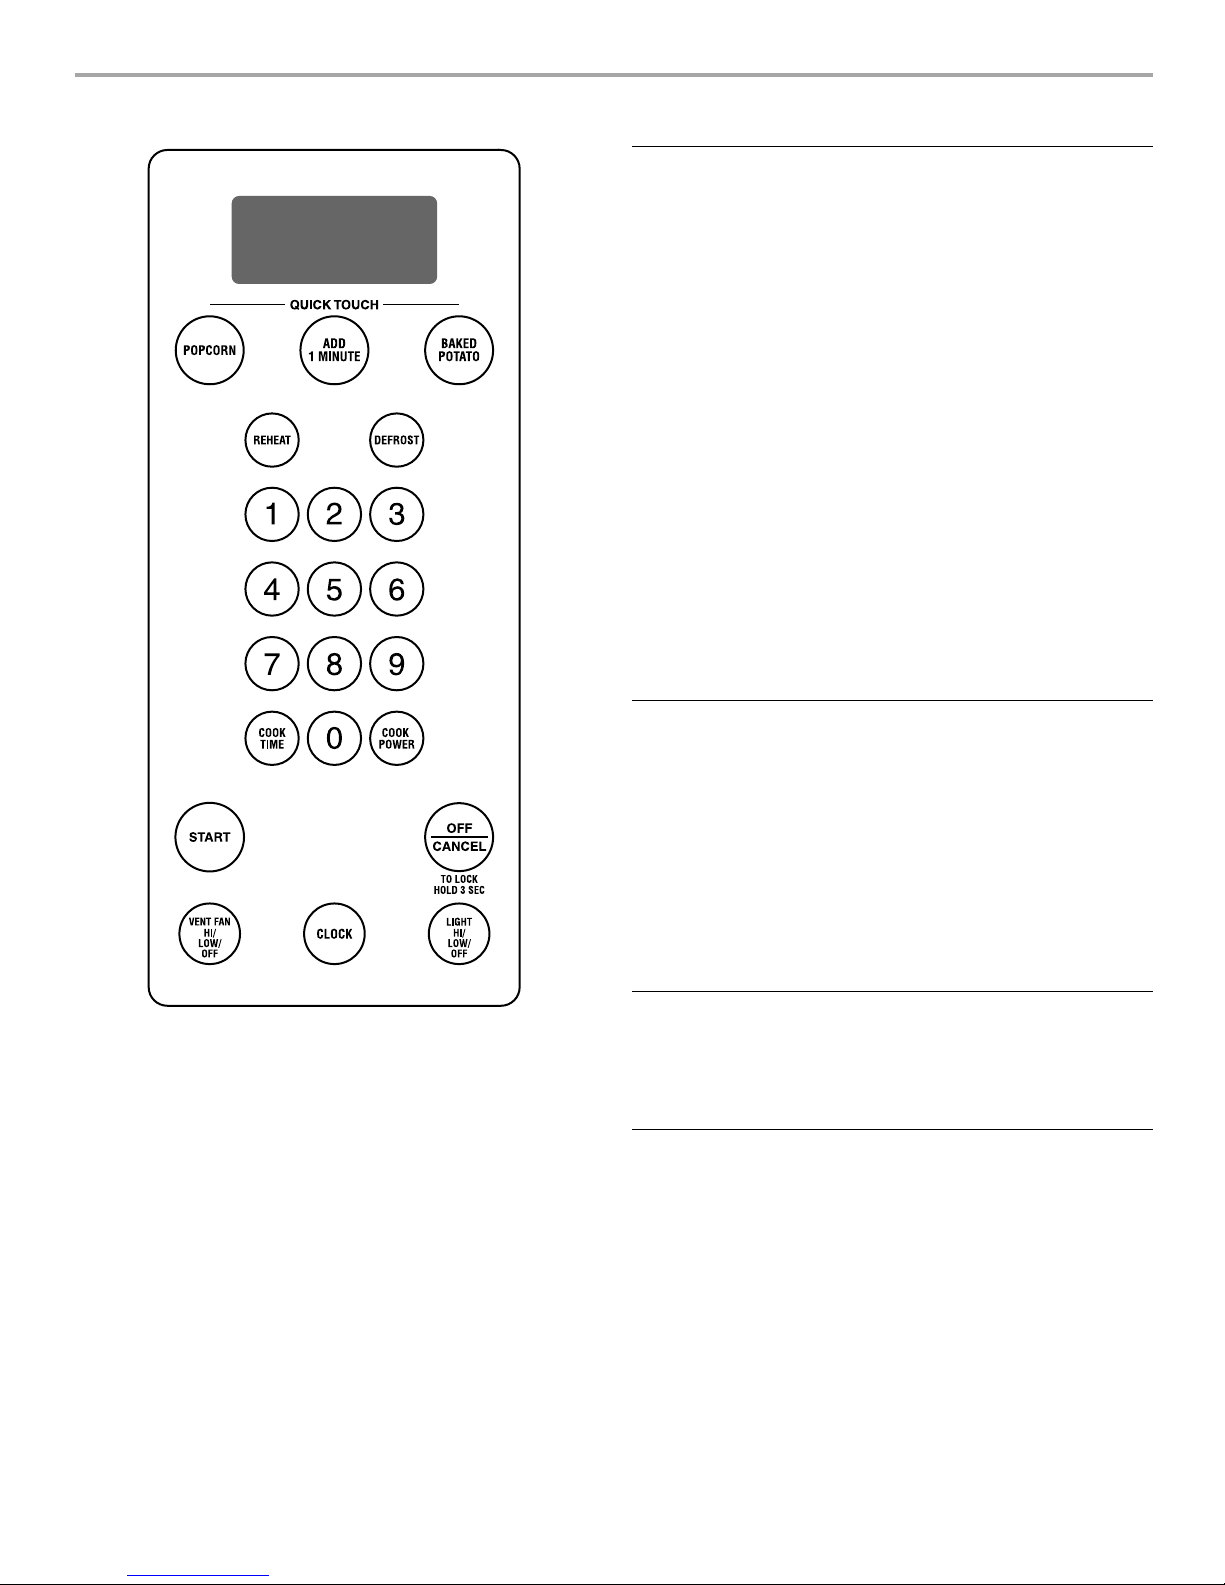
MICROWAVE OVEN CONTROL.................................................................7
Display.......................................................................................................7
Start...........................................................................................................7
Off Cancel .................................................................................................7
Add 1 Minute.............................................................................................7
Clock .........................................................................................................8
Tones ........................................................................................................8
Control Lock .............................................................................................8
Vent Fan....................................................................................................8
Cooktop Light ...........................................................................................8
MICROWAVE OVEN USE............................................................................8
Food Characteristics.................................................................................8
Cooking Guidelines...................................................................................9
Cookware and Dinnerware .......................................................................9
Aluminum Foil and Metal..........................................................................9
Microwave Cooking Power ....................................................................10
Manual Cooking......................................................................................10
Cooking in Stages (or steps) ..................................................................10
Popcorn ..................................................................................................10
Baked Potato..........................................................................................11
Reheating................................................................................................11
Defrosting................................................................................................11
MICROWAVE OVEN CARE.......................................................................12
General Cleaning ....................................................................................12
Replacing Filters .....................................................................................12
Replacing Cooktop Light........................................................................13
Replacing Microwave Oven Light ..........................................................13
TROUBLESHOOTING ...............................................................................14
ASSISTANCE OR SERVICE......................................................................15
In the U.S.A.............................................................................................15
In Canada................................................................................................15
Replacement Parts .................................................................................15
ÍNDICE
GARANTÍA..................................................................................................16
SEGURIDAD DE LA COMBINACIÓN MICROONDAS CAMPANA ........18
Requisitos eléctricos...............................................................................20
PIEZAS Y CARACTERÍSTICAS ................................................................20
Bandeja giratoria.....................................................................................21
CONTROL DEL HORNO DE MICROONDAS ..........................................21
Pantalla ...................................................................................................21
Inicio........................................................................................................22
Apagado/Anulado...................................................................................22
Agregar 1 minuto ....................................................................................22
Reloj ........................................................................................................22
Tonos ......................................................................................................22
Bloqueo de control .................................................................................22
Ventilador ................................................................................................22
Luz de la superficie de cocción..............................................................22
USO DEL HORNO DE MICROONDAS.....................................................23
Características de los alimentos.............................................................23
Pautas para cocinar................................................................................23
Utensilios de cocina y vajilla...................................................................23
Papel de aluminio y metal ......................................................................24
Intensidad de cocción del microondas..................................................24
Cocción manual......................................................................................24
Cocción por etapas (o pasos) ................................................................25
Palomitas de maíz ..................................................................................25
Papa horneada .......................................................................................26
Recalentamiento.....................................................................................26
Descongelación ......................................................................................26
CUIDADO DEL HORNO DE MICROONDAS...........................................27
Limpieza general.....................................................................................27
Cómo reemplazar los filtros....................................................................28
Cómo reemplazar la luz de la superficie de cocción .............................28
Cómo reemplazar la luz del horno de microondas................................29
SOLUCIÓN DE PROBLEMAS...................................................................29
AYUDA O SERVICIO TÉCNICO................................................................31
En los EE.UU...........................................................................................31
Piezas de repuesto .................................................................................31
TABLE DES MATIÈRES
GARANTIE..................................................................................................32
SÉCURITÉ DE L’ENSEMBLE FOUR À MICRO-ONDES/HOTTE...........34
Spécifications électriques.......................................................................36
PIÈCES ET CARACTÉRISTIQUES ...........................................................36
Plateau rotatif..........................................................................................37
TABLEAU DE COMMANDE DU FOUR À MICRO-ONDES ....................37
Affichage .................................................................................................37
Mise en marche ......................................................................................38
Arrêt annulation.......................................................................................38
Ajouter 1 minute......................................................................................38
Horloge....................................................................................................38
Signaux sonores .....................................................................................38
Verrouillage des commandes.................................................................38
Ventilateur d'évacuation .........................................................................38
Lampe de la table de cuisson.................................................................38
UTILISATION DU FOUR À MICRO-ONDES............................................39
Caractéristiques des aliments ................................................................39
Guide de cuisson....................................................................................39
Ustensiles de cuisson et vaisselle..........................................................39
Papier d’aluminium et métal...................................................................40
Puissance de cuisson des micro-ondes ................................................40
Cuisson manuelle ...................................................................................40
Cuisson par étapes.................................................................................41
Maïs éclaté..............................................................................................41
Pomme de terre au four..........................................................................42
Réchauffage............................................................................................42
Décongélation.........................................................................................42
ENTRETIEN DU FOUR À MICRO-ONDES ..............................................43
Nettoyage général ..................................................................................43
Remplacement des filtres.......................................................................44
Remplacement de la lampe de la table de cuisson...............................44
Remplacement de la lampe du four à micro-ondes ..............................45
DÉPANNAGE .............................................................................................45
ASSISTANCE OU SERVICE......................................................................47
Au Canada ..............................................................................................47
Pièces de rechange................................................................................47

3
IKEA MAJOR APPLIANCE WARRANTY
How long is the IKEA limited warranty valid?
This limited warranty is valid for five years from the date of purchase, when this major appliance is operated and maintained according
to instructions attached to or furnished with the product, unless the appliance is named LAGAN in which case this limited warranty is
valid for one year from the date of purchase. This limited warranty is valid only in the United States or Canada and applies only when the
major appliance is used in the country in which it was purchased. Proof of original purchase date is required to obtain service under this
limited warranty.
Which appliances are not covered by the IKEA five (5) year limited warranty?
For major appliances named “LAGAN,” this limited warranty is valid for one year from the date of purchase.
Who will execute the service?
This limited warranty is provided by Whirlpool Corporation or Whirlpool Canada LP (hereafter “Whirlpool”). Service must be provided by
a Whirlpool designated service company.
What does this limited warranty cover?
The limited warranty will pay for factory specified parts and repair labor to correct defects in materials or workmanship that existed
when the major appliance was purchased. The exceptions are specified under the headline “What is not covered under this limited
warranty?”.
What will be done to correct the problem?
The designated service company will examine the product and decide, at its sole discretion, if it is covered under this limited warranty.
If considered covered, the designated service company will then repair the defect. Your sole and exclusive remedy under this limited
warranty shall be product repair as provided herein.
What is not covered under this limited warranty?
■Service calls to correct the installation of your major appliance, to instruct you on how to use your major appliance, to replace or
repair house fuses, or to correct house wiring or plumbing.
■Service calls to repair or replace appliance light bulbs, air filters or water filters. Consumable parts are excluded from warranty
coverage.
■Replacement parts or repair labor if this major appliance is used for other than normal, single-family household use or when it is used
in a manner that is inconsistent to published user or operator instructions and/or installation instructions.
■Damage resulting from accident, alteration, misuse, abuse, fire, flood, acts of God, improper installation, installation not in
accordance with electrical or plumbing codes, or use of consumables or cleaning products not approved for use.
■Cosmetic damage, including scratches, dents, chips or other damage to the finish of your major appliance, unless such damage
results from defects in materials or workmanship and is reported within 30 days from the date of purchase.
■Any food loss or medicine loss due to refrigerator or freezer product failures.
■Pick up and delivery. This major appliance is intended to be repaired in your home.
■Repairs to parts or systems resulting from unauthorized modifications made to the appliance.
■Expenses for travel and transportation for product service if your major appliance is located in a remote area where service by an
authorized servicer is not available.
■The removal and reinstallation of your major appliance if it is installed in an inaccessible location or is not installed in accordance with
published installation instructions.
■Replacement parts or repair labor on major appliances with original model/serial numbers that have been removed, altered or cannot
be easily determined.
The cost of repair or replacement under these excluded circumstances shall be borne by the customer.
Disclaimer of Implied Warranties
IMPLIED WARRANTIES, INCLUDING ANY IMPLIED WARRANTY OF MERCHANTABILITY OR IMPLIED WARRANTY OF FITNESS FOR
A PARTICULAR PURPOSE, ARE LIMITED TO FIVE YEARS (ONE YEAR FOR MAJOR APPLIANCES NAMED “LAGAN”) OR THE
SHORTEST PERIOD ALLOWED BY LAW. Some states and provinces do not allow limitations on the duration of implied warranties of
merchantability or fitness, so this limitation may not apply to you. This warranty gives you specific legal rights, and you also may have
other rights that vary from state to state or province to province.
Limitation of Remedies; Exclusion of Incidental and Consequential Damages
YOUR SOLE AND EXCLUSIVE REMEDY UNDER THIS LIMITED WARRANTY SHALL BE PRODUCT REPAIR AS PROVIDED HEREIN.
WHIRLPOOL SHALL NOT BE LIABLE FOR INCIDENTAL OR CONSEQUENTIAL DAMAGES. Some states and provinces do not allow
the exclusion or limitation of incidental or consequential damages, so these limitations and exclusions may not apply to you. This
warranty gives you specific legal rights, and you also may have other rights that vary from state to state or province to province.
How to reach us if you need our service
If outside the 50 United States and Canada, contact your authorized IKEA retailer to determine if another warranty applies.
If you need service, please read the Installation Instructions and/or the “Troubleshooting” section of the Use & Care Guide before
contacting us. If you need additional help, do not hesitate to contact us in the U.S.A. and Canada at 1-866-664-2449. 2/09

4
Keep this book and your sales slip together for future
reference. You must provide proof of purchase or installation
date for in-warranty service.
Write down the following information about your major appliance
to better help you obtain assistance or service if you ever need it.
You will need to know your complete model number and serial
number. You can find this information on the model and serial
number label located on the product.
Dealer name____________________________________________________
Address ________________________________________________________
Phone number__________________________________________________
Model number __________________________________________________
Serial number __________________________________________________
Purchase date __________________________________________________
MICROWAVE HOOD COMBINATION SAFETY
You can be killed or seriously injured if you don't immediately
You can be killed or seriously injured if you don't follow
All safety messages will tell you what the potential hazard is, tell you how to reduce the chance of injury, and tell you what can
happen if the instructions are not followed.
Your safety and the safety of others are very important.
We have provided many important safety messages in this manual and on your appliance. Always read and obey all safety
messages.
This is the safety alert symbol.
This symbol alerts you to potential hazards that can kill or hurt you and others.
All safety messages will follow the safety alert symbol and either the word “DANGER” or “WARNING.”
These words mean:
follow instructions.
instructions.
DANGER
WARNING
When using electrical appliances basic safety precautions should be followed, including the following:
IMPORTANT SAFETY INSTRUCTIONS
SAVE THESE INSTRUCTIONS
WARNING: To reduce the risk of burns, electric shock,
fire, injury to persons, or exposure to excessive microwave
energy:
■ Read all instructions before using the microwave oven.
■ Read and follow the specific “PRECAUTIONS TO AVOID
POSSIBLE EXPOSURE TO EXCESSIVE MICROWAVE
ENERGY” found in this section.
■ The microwave oven must be grounded. Connect only to
properly grounded outlet. See “GROUNDING
INSTRUCTIONS” found in this section and in the provided
Installation Instructions.
■ Install or locate the microwave oven only in accordance
with the provided Installation Instructions.
■ Some products such as whole eggs in the shell and sealed
containers - for example, closed glass jars - are able to
explode and should not be heated in the microwave oven.
■ Use the microwave oven only for its intended use as
described in the manual. Do not use corrosive chemicals or
vapors in the microwave oven. This type of oven is
specifically designed to heat, cook, or dry food. It is not
designed for industrial or laboratory use.
■ As with any appliance, close supervision is necessary
when used by children.
■ Do not operate the microwave oven if it has a damaged
cord or plug, if it is not working properly, or if it has been
damaged or dropped.
■ The microwave oven should be serviced only by qualified
service personnel. Call an authorized service company for
examination, repair, or adjustment.
■ Do not cover or block any openings on the microwave oven.
■ Do not store this microwave oven outdoors. Do not use the
microwave oven near water - for example, near a kitchen
sink, in a wet basement, near a swimming pool, or similar
locations.
■ Do not immerse cord or plug in water.
■ Keep cord away from heated surfaces.
■ Do not let cord hang over edge of table or counter.
■ See door surface cleaning instructions in the “Microwave
Oven Care” section.
■ To reduce the risk of fire in the oven cavity:
– Do not overcook food. Carefully attend the microwave
oven when paper, plastic, or other combustible materials
are placed inside the oven to facilitate cooking.
– Remove wire twist-ties from paper or plastic bags before
placing bags in oven.
– If materials inside the oven ignite, keep oven door closed,
turn oven off, and disconnect the power cord, or shut off
power at the fuse or circuit breaker panel.
– Do not use the cavity for storage purposes. Do not leave
paper products, cooking utensils, or food in the cavity when
not in use.

5
IMPORTANT SAFETY INSTRUCTIONS
SAVE THESE INSTRUCTIONS
■ Liquids, such as water, coffee, or tea are able to be
overheated beyond the boiling point without appearing to
be boiling. Visible bubbling or boiling when the container is
removed from the microwave oven is not always present.
THIS COULD RESULT IN VERY HOT LIQUIDS
SUDDENLY BOILING OVER WHEN THE CONTAINER IS
DISTURBED OR A SPOON OR OTHER UTENSIL IS
INSERTED INTO THE LIQUID.
To reduce the risk of injury to persons:
– Do not overheat the liquid.
– Stir the liquid both before and halfway through heating it.
– Do not use straight-sided containers with narrow necks.
– After heating, allow the container to stand in the
microwave oven for a short time before removing the
container.
– Use extreme care when inserting a spoon or other
utensil into the container.
■ Do not mount over a sink.
■ Do not store anything directly on top of the microwave oven
when the microwave oven is in operation.
■ Clean Ventilating Hoods Frequently - Grease should not be
allowed to accumulate on hood or filter.
■ When flambéing foods under the hood, turn the fan on.
■ Suitable for use above both gas and electric cooking
equipment.
■ Intended to be used above ranges with maximum width of
36" (91.44 cm).
■ Use care when cleaning the vent-hood filter. Corrosive
cleaning agents, such as lye-based oven cleaners, may
damage the filter.
PRECAUTIONS TO AVOID POSSIBLE EXPOSURE TO
EXCESSIVE MICROWAVE ENERGY
(a) Do not attempt to operate this oven with the door open
since open-door operation can result in harmful exposure
to microwave energy. It is important not to defeat or
tamper with the safety interlocks.
(b) Do not place any object between the oven front face and
the door or allow soil or cleaner residue to accumulate on
sealing surfaces.
(c) Do not operate the oven if it is damaged. It is particularly
important that the oven door close properly and that there
is no damage to the:
(1) Door (bent),
(2) Hinges and latches (broken or loosened),
(3) Door seals and sealing surfaces.
(d) The oven should not be adjusted or repaired by anyone
except properly qualified service personnel.
State of California Proposition 65 Warnings:
WARNING: This product contains one or more chemicals known to the State of California to cause cancer.
WARNING: This product contains one or more chemicals known to the State of California to cause birth defects or other
reproductive harm.

6
Electrical Requirements
Observe all governing codes and ordinances.
Required:
■A 120 volt, 60 Hz, AC only, 15- or 20-amp electrical supply
with a fuse or circuit breaker.
Recommended:
■A time-delay fuse or time-delay circuit breaker.
■A separate circuit serving only this microwave oven.
PARTS AND FEATURES
This manual may cover several different models. The model you
have purchased may have some or all of the features shown here.
The appearance of your particular model may differ slightly from
the illustrations in this manual.
Turntable
The turntable can rotate in either direction to help cook food more
evenly. For best cooking results, do not operate the microwave
oven without having the turntable in place. See “Assistance or
Service” to reorder any of the parts.
To Install:
1. Remove tape from the hub.
2. Place the support on the microwave oven cavity bottom.
3. Place the turntable on the support.
Fit the raised, curved lines in the center of the turntable
bottom between the three spokes of the hub. The rollers on
the support should fit inside the turntable bottom ridge.
Electrical Shock Hazard
Plug into a grounded 3 prong outlet.
Do not remove ground prong.
Do not use an adapter.
Do not use an extension cord.
Failure to follow these instructions can result in death,
fire, or electrical shock.
WARNING
GROUNDING INSTRUCTIONS
SAVETHESE INSTRUCTIONS
■For all cord connected appliances:
The microwave oven must be grounded. In the event of
an electrical short circuit, grounding reduces the risk of
electric shock by providing an escape wire for the electric
current. The microwave oven is equipped with a cord
having a grounding wire with a grounding plug. The plug
must be plugged into an outlet that is properly installed
and grounded.
WARNING: Improper use of the grounding plug can
result in a risk of electric shock. Consult a qualified
electrician or serviceman if the grounding instructions are
not completely understood, or if doubt exists as to whether
the microwave oven is properly grounded.
Do not use an extension cord. If the power supply cord is
too short, have a qualified electrician or serviceman install
an outlet near the microwave oven.
This device complies with Part 18 of the FCC Rules.
A. Vent grille
B. Model and serial number plate
C. Charcoal filter (behind vent grille)
D. Microwave oven light
E. Microwave inlet cover
F. Door lock system
G. Window
H. Cooking rack
I. Cooktop light
J. Grease filter
K. Control panel
Parts and Features not shown
Turntable
A B C D E
F G H I J K
A. Turntable
B. Hub
C. Support
A
B
C

7
MICROWAVE OVEN CONTROL
Display
When power is first supplied to the microwave oven, a “:” will blink
in the display. Touch OFF CANCEL to stop the blinking. If the “:”
blinks in the display at any other time, a power failure has
occurred. Touch OFF CANCEL and reset the clock if needed.
If an invalid value has been entered, the invalid entry tones will
sound, and the input prompt will reappear in the display. Retry
your entry.
When the microwave oven is in use, the display shows cooking
power, quantities, weights and/or prompts. When the microwave
oven is not in use (standby mode), the display shows the time of
day or Timer countdown.
The speed of the scrolling text may be adjusted, if necessary.
To Adjust Scroll Speed:
1. Touch and hold CLOCK for 3 seconds until 2 tones sound.
2. Touch number pad “1” for SLOW, “2” for NORMAL or “3” for
FAST.
3. Touch START to complete the adjustment.
The display language may be changed.
To Change Language:
1. Touch and hold number pad “0” for 3 seconds until 2 tones
sound.
2. Touch number pad “1” for ENGLISH or “2” for FRENCH.
3. Touch START to set the language.
Start
The START pad begins any function. If it is not touched within
5 seconds after touching a pad, “PRESS START” will scroll in
the display as a reminder. If START pad is not touched within
2 minutes after touching a pad, the display will return to the
time of day mode and the programmed function will be canceled.
If cooking is interrupted by opening the door, touching START
will resume the preset cycle.
If the microwave oven has not been in use, and the door has
not been opened in the past 5 minutes, the cooking function
will not start. This happens to avoid unintended starting of the
microwave oven. Open and close the door, then touch START
to start the cooking cycle.
Off Cancel
The OFF CANCEL pad stops most functions except for the
Control Lock.
The microwave oven will also turn off when the door is opened.
Close the door and touch START to resume the cycle.
Add 1 Minute
The ADD 1 MINUTE control automatically starts the microwave
oven at 100% power for 1 minute, and adds 1 minute of cook
time, up to 10 minutes, with each additional touch of the control.
Touching ADD 1 MINUTE during a manual cook cycle will add
1 minute of cook time at the current cook power.
If the microwave oven has not been in use, and the door has
not been opened in the past 5 minutes, the ADD 1 MINUTE
control will not start the cooking cycle. This happens to avoid
unintended starting of the microwave oven. Open and close the
door, then touch ADD 1 MINUTE to start the cooking cycle.

8
Clock
This is a standard 12-hour clock (12:00-11:59) and does not show
a.m. or p.m.
To Set:
The microwave oven and timer must be off.
1. Touch CLOCK.
2. Touch the number pads to set the time of day.
3. Touch CLOCK or START.
To Remove:
1. Touch CLOCK.
2. Touch 0.
3. Touch CLOCK.
The time will disappear, and “:” will appear on the display.
Tones
Tones are audible signals that can be turned off.
To Turn Off/On Valid Entry Tones: With the microwave oven in
standby mode, touch and hold the number pad “1” for 3 seconds
until 2 tones sound. Touch and hold number pad “1” to turn tones
back on.
To Turn Off All Tones (except hidden feature tones): With the
microwave oven in standby mode, touch and hold the number
pad “2” for 3 seconds until 2 tones sound. Touch and hold
number pad “2” to turn tones back on.
These tones indicate the following:
One tone
■Valid entry (short tone)
Two tones
■End of stage in multistage cooking
■Control Lock active
■Hidden feature has been entered or exited
■Reminder, repeat each minute after the end-of-cycle tones
Three tones
■Invalid entry
Four tones
■End of cycle
Control Lock
The Control Lock shuts down the control panel pads to avoid
unintended use of the microwave oven.
When the control is locked, only the Vent Fan and Light pads will
function. If any other control pad is touched, “LOCKED” will
appear in the display and the invalid entry tones will sound.
To Lock/Unlock Control: The microwave oven must be in
standby mode. Touch and hold OFF CANCEL for 3 seconds until
2 tones sound and a padlock icon appears in the display. Repeat
to unlock and remove the padlock icon from display.
Vent Fan
The vent (exhaust) fan has 2 speeds: high and low.
If the temperature from the range or cooktop below the
microwave oven gets too hot, the vent fan will automatically turn
on at high speed. It may stay on for up to 1 hour to cool the
microwave oven. When this occurs, the vent fan cannot be turned
off. If the vent fan pad is touched during automatic fan operation,
“AUTO FAN IS ON, FAN SPEED WILL REMAIN ON UNTIL HEAT
IS NO LONGER SENSED” will scroll in the display as a reminder.
The vent fan is also the cooling fan, and will start at low speed
when any cooking function begins. It will remain on until the
cooking function ends.
To Turn Vent Fan On/Off: Touch VENT FAN pad once for high,
twice for low or 3 times for off.
Cooktop Light
The cooktop light has 3 settings: high, low and off.
To Turn Light On/Off: Touch LIGHT pad once for high, twice for
low or 3 times for off.
MICROWAVE OVEN USE
A magnetron in the microwave oven produces microwaves which
reflect off the metal floor, walls and ceiling and pass through the
turntable and appropriate cookware to the food. Microwaves are
attracted to and absorbed by fat, sugar and water molecules in
the food, causing them to move, producing friction and heat
which cooks the food.
■To avoid damage to the microwave oven, do not lean on or
allow children to swing on the microwave oven door.
■To avoid damage to the microwave oven, do not operate
microwave oven when it is empty.
■Baby bottles and baby food jars should not be heated in
microwave oven.
■Clothes, flowers, fruit, herbs, wood, gourds, paper, including
brown paper bags and newspaper, should not be dried in
microwave oven.
■Paraffin wax will not melt in the microwave oven because it
does not absorb microwaves.
■Use oven mitts or pot holders when removing containers from
microwave oven.
■Do not overcook potatoes. At the end of the recommended
cook time, potatoes should be slightly firm. Let potatoes
stand for 5 minutes. They will finish cooking while standing.
■Do not cook or reheat whole eggs inside the shell. Steam
buildup in whole eggs may cause them to burst, requiring
significant cleanup of microwave oven cavity. Cover poached
eggs and allow a standing time.
Food Characteristics
When microwave cooking, the amount, size and shape, starting
temperature, composition and density of the food affect cooking
results.
Amount of Food
The more food heated at once, the longer the cook time needed.
Check for doneness and add small increments of time if
necessary.
Size and Shape
Smaller pieces of food will cook more quickly than larger pieces,
and uniformly shaped foods cook more evenly than irregularly
shaped food.

9
Starting Temperature
Room temperature foods will heat faster than refrigerated foods,
and refrigerated foods will heat faster than frozen foods.
Composition and Density
Foods high in fat and sugar will reach a higher temperature, and
will heat faster than other foods. Heavy, dense foods, such as
meat and potatoes, require a longer cook time than the same size
of a light, porous food, such as cake.
Cooking Guidelines
Covering
Covering food helps retain moisture, shorten cook time and
reduce spattering. Use the lid supplied with cookware. If a lid is
not available, wax paper, paper towels or plastic wrap approved
for microwave ovens may be used. Plastic wrap should be turned
back at one corner to provide an opening to vent steam.
Condensation on the door and cavity surfaces is normal during
heavy cooking.
Stirring and Turning
Stirring and turning redistribute heat evenly to avoid overcooking
the outer edges of food. Stir from outside to center. If possible,
turn food over from bottom to top.
Arranging
If heating irregularly shaped or different sized foods, arrange the
thinner parts and smaller sized items toward the center. If cooking
several items of the same size and shape, place them in a ring
pattern, leaving the center of the ring empty.
Piercing
Before heating, use a fork or small knife to pierce or prick foods
that have a skin or membrane, such as potatoes, egg yolks,
chicken livers, hot dogs, and sausage. Prick in several places to
allow steam to vent.
Shielding
Use small, flat pieces of aluminum foil to shield the thin pieces of
irregularly shaped foods, bones and foods such as chicken wings,
leg tips and fish tail. See “Aluminum Foil and Metal” first.
Standing Time
Food will continue to cook by the natural conduction of heat even
after the microwave cooking cycle ends. The length of standing
time depends on the volume and density of the food.
Cookware and Dinnerware
Cookware and dinnerware must fit on the turntable. Always use
oven mitts or pot holders when handling because any dish may
become hot from heat transferred from the food. Do not use
cookware and dinnerware with gold or silver trim. Use the
following chart as a guide, then test before using.
To Test Cookware or Dinnerware for Microwave Use:
1. Place cookware or dinnerware in microwave oven with
1 cup (250 mL) of water beside it.
2. Cook at 100% cooking power for 1 minute.
Do not use cookware or dinnerware if it becomes hot and the
water stays cool.
Aluminum Foil and Metal
Always use oven mitts or pot holders when removing dishes from
the microwave oven.
Aluminum foil and some metal can be used in the microwave
oven. If not used properly, arcing (a blue flash of light) can occur
and cause damage to the microwave oven.
OK for Use
Racks and bakeware supplied with the microwave oven (on some
models), aluminum foil for shielding, and approved meat
thermometers may be used with the following guidelines:
■To avoid damage to the microwave oven, do not allow
aluminum foil or metal to touch the inside cavity walls,
ceiling or floor.
■Always use the turntable.
■To avoid damage to the microwave oven, do not allow contact
with another metal object during microwave cooking.
Do Not Use
Metal cookware and bakeware, gold, silver, pewter, non-approved
meat thermometers, skewers, twist ties, foil liners such as
sandwich wrappers, staples and objects with gold or silver trim or
a metallic glaze should not be used in the microwave oven.
MATERIAL RECOMMENDATIONS
Aluminum Foil,
Metal See “Aluminum Foil and Metal” section.
Browning Dish Bottom must be at least 3/16" (5 mm)
above the turntable. Follow manufacturer’s
recommendations.
Ceramic Glass,
Glass Acceptable for use.
China,
Earthenware Follow manufacturer’s recommendations.
Melamine Follow manufacturer’s recommendations.
Paper: Towels,
Dinnerware,
Napkins
Use nonrecycled and those approved by
the manufacturer for microwave oven use.
Plastic: Wraps,
Bags, Covers,
Dinnerware,
Containers
Use those approved by the manufacturer
for microwave oven use.
Pottery and Clay Follow manufacturer’s recommendations.
Silicone Bakeware Follow manufacturer’s recommendations.
Straw, Wicker,
Wooden
Containers
Do not use in microwave oven.
Wax Paper Acceptable for use.
MATERIAL RECOMMENDATIONS

10
Microwave Cooking Power
Many recipes for microwave cooking specify which cooking
power to use by percent or name. For example,
70%=Medium-High.
Use the following chart as a general guide for the suggested
cooking power of specific foods.
Manual Cooking
To Use:
1. Place food on the turntable and close the door.
2. Touch number pads to enter a length of time to cook
or
Touch COOK TIME, then enter a length of time to cook
If cooking with 100% power, skip Step 3.
3. Touch COOK POWER, then enter the desired power level
using the appropriate number pad
or
Touch COOK POWER repeatedly to select the desired power
level. See “Microwave Cooking Power” chart.
4. Touch START.
The display will count down the cook time.
When the cycle ends, “END” will appear in the display, and the
end-of-cycle tones will sound, followed by reminder tones.
5. Touch OFF CANCEL or open the door to clear the display
and/or stop reminder tones.
The cook time and power may be changed after touching START
without interrupting cooking.
To Change Cook Time: Touch COOK TIME. The countdown will
freeze for a few seconds. Enter the new cook time and touch
START or wait a few seconds for the countdown to resume.
To Change Cook Power: Touch COOK POWER repeatedly to
scroll through the cook power levels. Touch START.
Cooking in Stages (or steps)
The microwave oven can be set for manual cooking at different
cooking powers for various lengths of time, up to 2 stages.
To Cook in Stages:
1. Place food on the turntable and close the door.
2. Touch COOK TIME, then enter length of time to cook for the
first stage.
If cooking with 100% power, skip Step 3.
3. Touch COOK POWER, then enter the desired power level for
the first stage. See “Microwave Cooking Power” chart.
4. Repeat steps 2 and 3 for the second stage.
5. Touch START.
The display will count down each of the cook times. The
display will switch briefly to “STEP 1” or “STEP 2” every
30 seconds during their respective stages.
When the cycle ends, “END” will appear in the display, and the
end-of-cycle tones will sound, followed by reminder tones.
6. Touch OFF CANCEL or open the door to clear the display
and/or stop reminder tones.
The cook time and cooking power of the operating stage can be
changed after touching START without interrupting cooking.
To Change Cook Time: Touch COOK TIME. The countdown will
freeze for a few seconds. Enter the new cook time and touch
START or wait a few seconds for the countdown to resume.
To Change Cook Power: Touch COOK POWER repeatedly to
scroll through the cook power levels. Touch START.
Popcorn
Popping time has been preset based on commercially packaged
microwave popcorn. The preset programs are for bag sizes 3.5 oz
(99 g), 3.0 oz (85 g) and 1.75 oz (50 g). For bag sizes not listed in
this section, follow directions on the package.
NOTE: During Popcorn function, as with all microwave cooking
functions, the microwave oven should be attended at all times.
Listen for popping to slow to 1 pop every 1 or 2 seconds, then
stop the cycle.
■To avoid damage to the microwave oven, do not use regular
paper bags or glassware.
■Pop only one package of popcorn at a time.
■Follow manufacturer’s instructions when using a microwave
popcorn popper.
■For best cooking results, do not try to pop unpopped kernels.
■Use fresh bags of popcorn for optimal results.
■Cooking results may vary by brand and fat content.
■If popcorn volume is less than expected, try placing a
microwave-safe dish upside down on the turntable, placing a
fresh popcorn bag on the dish, and then starting the cycle.
NOTE: The Popcorn times are programmed to run 15 seconds
longer than the actual pop time. During this 15-second period, the
magnetron is off, and the microwave oven is cooling. This allows
the microwave oven to pop another bag of popcorn immediately
following the cycle.
To Use POPCORN:
1. Place popcorn bag on the turntable, and close the door.
2. Touch POPCORN.
Bag size selections will scroll across the display.
3. Enter the bag size, in ounces, using the number pads (invalid
numbers will not be accepted)
or
Touch POPCORN repeatedly to scroll through the bag size
selections.
PERCENT/NAME USE
100%, High
(default setting) Quick heating convenience foods and foods
with high water content, such as soups,
beverages and most vegetables.
90% Cooking small, tender pieces of meat,
ground meat, poultry pieces and fish fillets.
Heating cream soups.
80% Heating rice, pasta or stirrable casseroles.
Cooking and heating foods that need a
cook power lower than high. For example,
whole fish and meat loaf.
70%,
Medium-High Reheating a single serving of food.
60% Cooking sensitive foods such as cheese
and egg dishes, pudding and custards.
Cooking non-stirrable casseroles, such as
lasagna.
50%, Medium Cooking ham, whole poultry and pot roasts.
Simmering stews.
40% Melting chocolate.
Heating bread, rolls and pastries.
30%, Medium-
Low, Defrost Defrosting bread, fish, meats, poultry and
precooked foods.
20% Softening butter, cheese, and ice cream.
10%, Low Taking chill out of fruit.

11
4. Touch START.
The display will count down the popping time.
When the popcorn cycle ends, “END” will appear in the
display, and the end-of-cycle tones will sound, followed by
reminder tones.
5. Touch OFF CANCEL or open the door to clear the display
and/or stop reminder tones.
Baked Potato
One to four 10 oz (283 g) potatoes may be baked automatically in
the microwave oven by using the Baked Potato function.
■Pierce each potato several times with a fork before baking.
■Place a single potato on the turntable, off to the side (not
centered). Place 2, 3 or 4 potatoes on the turntable around the
edges, at least 1" (2.5 cm) apart.
■Let potato(es) stand for 5 minutes after baking.
To Bake Potatoes:
1. Place potato(es) on the turntable and close the door.
2. Touch BAKED POTATO.
3. Enter the number of pieces
or
Touch BAKED POTATO repeatedly to select a number.
4. Touch START.
The display will count down the cook time.
When the cycle ends, “END” will appear in the display, and the
end-of-cycle tones will sound, followed by reminder tones.
5. Touch OFF CANCEL or open the door to clear the display
and/or stop reminder tones.
Reheating
Times and cooking power have been preset for reheating specific
food types. Use the following chart as a guide.
*For smaller rolls, 2 rolls may be counted as 1 piece.
To Use Reheat:
1. Place food on the turntable, and close the door.
2. Touch REHEAT.
3. Select food by entering the number from the chart
or
Touch REHEAT repeatedly to scroll through food selections.
4. Enter quantity.
5. Touch START.
The display will count down the reheat time.
When the cycle ends, “END” will appear in the display, and the
end-of-cycle tones will sound, followed by reminder tones.
6. Touch OFF CANCEL or open the door to clear the display
and/or stop reminder tones.
To Reheat Manually: Follow directions in “Manual Cooking”
section, and use 70% cooking power. See “Microwave Cooking
Power” chart.
Defrosting
The Auto Defrost feature can be used or the microwave oven can
be manually set to defrost.
■Unwrap foods and remove lids (for example, from fruit juice
containers) before defrosting.
■Shallow packages will defrost more quickly than deep blocks.
■Separate food pieces as soon as possible during or at the
end of cycle for more even defrosting.
■Use small pieces of aluminum foil to shield parts of food such
as chicken wings, leg tips and fish tails. See “Aluminum Foil
and Metal” first.
The Auto Defrost system has 3 categories: Meat, Poultry and Fish.
It should not be used for food left outside the freezer more than
20 minutes and frozen ready-made food. Use the following chart
as a guide.
To Use Auto Defrost:
1. Unwrap food, place on the turntable, and close the door.
2. Touch DEFROST.
3. Select food by entering 1 for Meat, 2 for Poultry or 3 for Fish
or
Touch DEFROST repeatedly to scroll through food selections.
4. Enter the weight in pounds.
Meats and Poultry can be set from 0.2 to 6.6 lbs (90 g to 3 kg).
Fish can be set from 0.2 to 4.4 lbs (90 g to 2 kg).
FOOD PAD QUANTITY/INSTRUCTIONS
Pizza 1 1-3 slices, 3 oz (85 g) each
(refrigerated)/
Place pizza slice(s) on paper towel
or paper plate.
Casserole 2 1-4 cups (250 mL-1 L)/
Place in microwave-safe container,
and cover with plastic wrap. Stir and
let stand 2-3 minutes after
reheating.
Dinner Plate 3 1 serving (1 plate), 8-10 oz (227-
283 g)/
Place food on plate, cover with
plastic wrap and vent. Let stand
2-3 minutes after reheating.
Soup/Sauce 4 1-4 cups (250 mL-1 L)/
Place in microwave-safe container.
Cover with plastic wrap and vent.
Stir and let stand 2-3 minutes after
reheating.
Baked Goods
(example: medium
muffin or bagel)
5 1-6 pieces, 2 oz (57 g) each*/
Place on paper towel.
MEAT
Beef: ground, steaks, roast,
stew The narrow or fatty areas of
irregular shaped cuts should be
shielded with foil before
defrosting.
Do not defrost less than 1/4 lb
(113 g) or two 4 oz (113 g)
patties.
Place all meats in microwave-
safe baking dish.
Lamb: stew and chops
Pork: chops, ribs, roasts,
sausage
POULTRY
Chicken: whole and cut up Place in microwave-safe
baking dish, chicken breast
side up.
Cornish hens
Turkey: breast
FISH
Fillets, Steaks, Whole, Shellfish Place in microwave-safe
baking dish.

12
5. Touch START.
The display will count down the defrost time.
When the cycle ends, “END” will appear in the display, and the
end-of-cycle tones will sound, followed by reminder tones.
6. Touch OFF CANCEL or open the door to clear the display
and/or stop reminder tones.
To Defrost Manually: Follow directions in “Manual Cooking”
section, and use 30% cooking power. See “Microwave Cooking
Power” chart.
MICROWAVE OVEN CARE
General Cleaning
IMPORTANT: Before cleaning, make sure all controls are off and the microwave oven is cool. Always follow label instructions on
cleaning products.
Soap, water and a soft cloth or sponge are suggested unless otherwise noted.
GREASE FILTERS
Do not use ammonia or corrosive cleaning agents such as lye-
based oven cleaners.
■Hot water and mild detergent:
Soak filters, then scrub and swish to remove embedded dirt
and grease. Rinse well and shake to dry.
■Dishwasher:
Wash separately, not with dirty dishes, because food can be
trapped in the filters.
NOTE: Some discoloration of the filters may occur after
cleaning them in the dishwasher. This is normal, and will not
affect the performance of the grease filters.
MICROWAVE OVEN CAVITY
To avoid damage to the microwave oven cavity, do not use soap-
filled scouring pads, abrasive cleaners, steel-wool pads, gritty
washcloths or some recycled paper towels.
To avoid damage to stainless steel models, rub in direction of
grain.
The area where the microwave oven door and frame touch when
closed should be kept clean.
Average soil
■Mild, nonabrasive soaps and detergents:
Rinse with clean water and dry with soft, lint-free cloth.
Heavy soil
■Mild, nonabrasive soaps and detergents:
Heat 1 cup (250 mL) of water for 2 to 5 minutes in microwave
oven. Steam will soften soil. Rinse with clean water and dry
with soft, lint-free cloth.
Odors
■Lemon juice or vinegar:
Heat 1 cup (250 mL) of water with 1 tbs (15 mL) of either
lemon juice or vinegar for 2 to 5 minutes in microwave oven.
Microwave Inlet Cover
To avoid arcing and microwave oven damage, the microwave inlet
cover (see “Parts and Features”) should be kept clean.
■Wipe with wet cloth.
MICROWAVE OVEN DOOR AND EXTERIOR
The area where the microwave oven door and frame touch when
closed should be kept clean.
■Mild, nonabrasive soaps and detergents:
Rinse with clean water and dry with soft, lint-free cloth.
■Glass cleaner and paper towels or nonabrasive plastic
scrubbing pad:
Apply glass cleaner to towel, not directly to surface.
Stainless Steel (on some models)
To avoid damage to microwave oven door and exterior, do not use
soap-filled scouring pads, abrasive cleaners, steel-wool pads,
gritty washcloths or some paper towels. Rub in direction of grain.
■Stainless steel cleaner (not included):
See “Assistance or Service” section to order.
■Liquid detergent or all-purpose cleaner:
Rinse with clean water and dry with soft, lint-free cloth.
■Vinegar for hard water spots
CONTROL PANEL
■Sponge or soft cloth and water:
Dampen sponge with water and wipe panel. Dry with soft
cloth.
■To avoid damage to the control panel, do not use chemical or
abrasive cleansers.
TURNTABLE
Replace turntable immediately after cleaning. Do not operate the
microwave oven without the turntable in place.
■Mild cleanser and scouring pad
■Dishwasher
Replacing Filters
The grease filter should be removed and cleaned at least once a
month. Do not operate the microwave oven or exhaust fan without
the grease filter in place. The charcoal filter cannot be washed and
should be replaced every 6 to 12 months. See “General Cleaning”
for cleaning instructions. See “Assistance or Service” to reorder
filters.
Filter Status Indicator
As a reminder, approximately every 6 months, the “CLEAN/
CHANGE FILTERS” message will scroll in the display when the
VENT FAN control is touched. After filters are replaced, reset the
filter status. See “Setup Menu” section.
To Remove and Replace Grease Filter:
1. Remove the grease filter by the sliding filter to the left side of
the microwave oven until the right end of the filter drops down,
then pull out the filter.
2. Replace grease filter by inserting one end of the filter into the
left rim of the frame. Swing the right end of the filter up and
slide it into position.

13
To Remove and Replace Charcoal Filter:
1. Remove the 2 vent grille mounting screws and mounting
braces located directly behind the top louver.
2. Tip the vent grille forward and down, then lift to remove.
3. Slide filter back slightly, lift front end, and pull out filter.
4. Install new charcoal filter.
5. Replace vent grille, mounting braces and mounting screws.
Replacing Cooktop Light
The cooktop light is a candelabra base bulb. See “Assistance or
Service” section to reorder.
To Replace:
1. Unplug microwave oven or disconnect power.
2. Remove the bulb cover mounting screw.
A. Mounting screw
3. Replace light. Close bulb cover. Replace mounting screw.
4. Plug in microwave oven or reconnect power.
Replacing Microwave Oven Light
The microwave oven light is a candelabra base bulb. It will
automatically come on when the door is opened and when the
microwave oven is operating. See “Assistance or Service” section
to reorder.
To Replace:
1. Unplug microwave oven or disconnect power.
2. Remove the 2 vent grille mounting screws and mounting
braces located directly behind the top louver.
3. Tip the vent grille forward and down, then lift out to remove.
4. Lift up the bulb cover.
A. Bulb cover
5. Replace light. Close bulb cover.
6. Reattach vent grille. Replace the mounting braces and
mounting screws.
7. Plug in microwave oven or reconnect power.
A. Vent grille
B. Top louver
C. Mounting screws
D. Mounting braces (2)
A
C
D
B
A
A. Vent grille
B. Top louver
C. Mounting screws
D. Mounting braces (2)
A
C
D
B
A

14
TROUBLESHOOTING
Try the solutions suggested here first in order to avoid the cost of an unnecessary service call.
Nothing will operate
■Has a household fuse blown, or has a circuit breaker
tripped?
Replace the fuse or reset the circuit breaker. If the problem
continues, call an electrician.
■Is the microwave oven wired properly?
See Installation Instructions provided with your microwave
oven.
Microwave oven will not operate
■Is the magnetron working properly?
Try to heat 1 cup (250 mL) of cold water for 2 minutes at 100%
cooking power. If water does not heat, try the steps below. If
microwave oven still does not operate, call for service. See
“Assistance or Service” section.
■Is the door completely closed?
Firmly close door.
■Does a message about the door appear in the display?
The door has been closed for 5 minutes or more. Open and
close the door, then touch START to start the cooking cycle.
See “Start” section.
■Is a packaging spacer (on some models) attached to the
inside of the door?
Remove packaging spacer, then firmly close door.
■Is the electronic microwave oven control set correctly?
See “Microwave Oven Control” section.
■On some models, is the Control Lock set?
See “Control Lock” section.
Microwave oven makes humming noise
■This is normal and occurs when the power supply switches
the magnetron on and off.
Microwave oven door looks wavy
■This is normal and will not affect performance.
Turntable will not operate
■Has the tape been removed from turntable hub?
See “Turntable” section.
■Is the turntable properly in place?
Make sure turntable is correct side up and is sitting securely
on the turntable support.
■Is the turntable support operating properly?
Remove turntable. Remove and clean turntable support and
rollers. Replace turntable support. Replace turntable. Place
1 cup (250 mL) of water on the turntable, then restart
microwave oven. If it still is not working, call for service. See
“Assistance or Service” section. Do not operate the
microwave oven without turntable and turntable support
working properly.
Turntable alternates rotation directions
■This is normal and depends on motor rotation at the beginning
of the cycle.
Display shows messages
■Is the display showing “:”?
There has been a power failure, or the clock time has been
turned off. See “Display” section to clear display. See “Clock”
section to reset the clock or to turn it on.
■Is the display showing a letter followed by a number?
See “Display” section to clear. If it reappears, call for service.
See “Assistance or Service” section.
Tones are not sounding
■Are tones turned off?
See “Tones” section.
Steam is coming from the vent grille
■Some steam is normal.
Fan running slower than usual
■Has the microwave oven been stored in a cold area?
The fan will run slower until the microwave oven warms up to
normal room temperature.
Fan running during microwave cooking
■This is normal. The fan comes on at low speed to cool the
microwave oven. See “Vent Fan” section.
Fan comes on during cooktop usage
■This is normal. The fan automatically comes on to cool the
microwave oven if the temperature from the cooktop below
gets too hot. See “Vent Fan” section.
Cooking times seem too long
■Is the cooking power set properly?
See “Microwave Cooking Power” section.
■Are large amounts of food being heated?
Larger amounts of food need longer cooking times.
■Is the incoming voltage less than that specified in
“Microwave Hood Combination Safety?”
Have a qualified electrician check the electrical system in the
home.
Radio, TV or cordless phone interference
■Is the radio or TV receiver near the microwave oven?
Move the receiver away from the microwave oven, or adjust
the radio or TV antenna.
■Are the microwave oven door and sealing surfaces clean?
Make sure these areas are clean.
■Is the cordless phone frequency 2.4 GHz?
Some 2.4 GHz-based cordless phones and home wireless
networks may experience static or noise while the microwave
oven is on. Use a corded phone, a different frequency
cordless phone or avoid using these items during microwave
oven operation.

15
ASSISTANCE OR SERVICE
Before calling for assistance or service, please check
“Troubleshooting.” It may save you the cost of a service call. If you
still need help, follow the instructions below.
When calling, please know the purchase date and the complete
model and serial number of your appliance. This information will
help us to better respond to your request.
If you need replacement parts
If you need to order replacement parts, we recommend that you
use only factory specified parts. Factory specified parts will fit
right and work right because they are made with the same
precision used to build every new IKEA®appliance.
To locate factory specified parts in your area, call us or your
nearest designated service center.
In the U.S.A.
Call the Whirlpool Customer eXperience Center
toll free: 1-866-664-2449.
Our consultants provide assistance with:
■Features and specifications on our full line of appliances.
■Installation information.
■Use and maintenance procedures.
■Accessory and repair parts sales.
■Specialized customer assistance (Spanish speaking, hearing
impaired, limited vision, etc.).
■Referrals to local dealers, repair parts distributors, and service
companies. Whirlpool designated service technicians are
trained to fulfill the product warranty and provide after-
warranty service, anywhere in the United States.
To locate the Whirlpool designated service company in your
area, you can also look in your telephone directory Yellow
Pages.
For further assistance
If you need further assistance, you can write to Whirlpool
Corporation with any questions or concerns at:
IKEA Brand Home Appliances
Customer eXperience Center
553 Benson Road
Benton Harbor, MI 49022-2692
Please include a daytime phone number in your correspondence.
In Canada
Call the Whirlpool Canada LP Customer eXperience Centre toll
free: 1-866-664-2449.
Our consultants provide assistance with:
■Features and specifications on our full line of appliances.
■Use and maintenance procedures.
■Accessory and repair parts sales.
■Referrals to local dealers, repair parts distributors, and service
companies. Whirlpool Canada LP designated service
technicians are trained to fulfill the product warranty and
provide after-warranty service, anywhere in Canada.
For further assistance
If you need further assistance, you can write to Whirlpool
Canada LP with any questions or concerns at:
Customer eXperience Centre
Whirlpool Canada LP
200 – 6750 Century Ave.
Mississauga, Ontario L5N 0B7
Please include a daytime phone number in your correspondence.
Replacement Parts
Cleaning Supplies
Turntable
Part Number W10337131
Turntable Support and Rollers
Part Number W10435114
Turntable Hub
Part Number W10337248
Grease Filter
Part Number W10208631
Charcoal Filter
Part Number 8206230
Cooktop Light Bulb
Part Number 8206232
Microwave Oven Light Bulb
Part Number 4393681
affresh®Kitchen Appliance
Cleaner
Part Number W10355010
affresh®Stainless Steel Cleaner
Part Number W10355016
affresh®Stainless Steel Wipes
Part Number W10355049
Heavy Duty Degreaser
Part Number 31552A

16
GARANTÍA DE LOS ELECTRODOMÉSTICOS PRINCIPALES DE IKEA
¿Durante cuánto tiempo es válida la garantía limitada de IKEA?
Esta garantía limitada es válida durante cinco años a partir de la fecha de compra, siempre y cuando este electrodoméstico principal
haya sido operado y mantenido según las instrucciones adjuntas o provistas con el producto, a menos que sea un aparato de nombre
LAGAN, en cuyo caso la garantía limitada será válida durante un año a partir de la fecha de compra. Esta garantía limitada es válida
solamente en Estados Unidos o en Canadá y se aplica solamente cuando el electrodoméstico principal se use en el país en el que se
ha comprado. Se requiere una prueba de la fecha de compra original para obtener servicio bajo esta garantía limitada.
¿Qué electrodomésticos no están cubiertos bajo la garantía limitada de IKEA de cinco (5) años?
Para los electrodomésticos principales cuyo nombre sea “LAGAN”, esta garantía será válida durante un año a partir de la fecha de
compra.
¿Quién estará a cargo de llevar a cabo el servicio?
Esta garantía limitada es provista por Whirlpool Corporation o Whirlpool Canada LP (en lo sucesivo denominada “Whirlpool”). El
servicio deberá ser suministrado por una compañía de servicio designada por Whirlpool.
¿Qué es lo que cubre esta garantía limitada?
La garantía limitada pagará por piezas especificadas de fábrica y trabajo de reparación, para corregir defectos en los materiales o en la
mano de obra existentes en el momento de la compra del electrodoméstico principal. Las excepciones se especifican bajo el título
“¿Qué es lo que no está cubierto bajo esta garantía limitada?”.
¿Qué se hará para corregir el problema?
La compañía designada de servicio examinará el producto y decidirá, a su exclusiva discreción, si está cubierto bajo esta garantía
limitada. Si considera que está cubierto, la compañía designada de servicio reparará el defecto. Su único y exclusivo recurso según los
términos de esta garantía limitada será el de reparar el producto según se estipula en la presente.
¿Qué es lo que no está cubierto bajo esta garantía limitada?
■Visitas de servicio técnico para corregir la instalación de su electrodoméstico principal, para enseñarle a usar su electrodoméstico
principal, para cambiar o reparar fusibles domésticos o para corregir la instalación eléctrica o de la tubería de la casa.
■Visitas de servicio técnico para reparar o reemplazar focos para electrodomésticos, filtros de aire o filtros de agua. Las piezas de
consumo están excluidas de la cobertura de la garantía.
■Piezas de repuesto o mano de obra si este electrodoméstico principal se usa de un modo diferente al doméstico normal de una
familia, o cuando se use de un modo contrario a las instrucciones publicadas para el usuario u operador y/o las instrucciones de
instalación.
■Daños causados por accidente, alteración, uso indebido, abuso, incendio, inundación, actos fortuitos, instalación incorrecta,
instalación que no esté de acuerdo con los códigos eléctricos o de plomería, o el empleo de artículos de consumo o productos de
limpieza no aprobados para ser usados.
■Daños estéticos, incluyendo rayaduras, abolladuras, desportilladuras u otro daño al acabado de su electrodoméstico principal, a
menos que el mismo sea debido a defectos en los materiales o la mano de obra y se informe en un lapso de 30 días a partir de la
fecha de compra.
■Cualquier pérdida de comida o de medicamentos debida a fallas del refrigerador o del congelador.
■Recogida y entrega. Este electrodoméstico principal se ha destinado para ser reparado en su hogar.
■Reparaciones de piezas o sistemas como resultado de modificaciones no autorizadas que se hayan efectuado en el
electrodoméstico.
■Gastos de viaje y transporte para obtener servicio para el producto, si su electrodoméstico principal está ubicado en un lugar remoto
en el cual no haya disponible un técnico de servicio autorizado.
■La remoción y reinstalación de su electrodoméstico principal, si estuviera instalado en un lugar inaccesible o si no estuviera instalado
de conformidad con las instrucciones de instalación publicadas.
■Piezas de repuesto o mano de obra en electrodomésticos principales con números de modelo/serie originales que se hayan
removido, alterado o que no puedan ser identificados con facilidad.
El costo de la reparación o el reemplazo bajo estas circunstancias excluidas correrá por cuenta del cliente.

17
Exclusión de garantías implícitas
LAS GARANTÍAS IMPLÍCITAS, INCLUYENDO CUALQUIER GARANTÍA IMPLÍCITA DE COMERCIABILIDAD O GARANTÍA IMPLÍCITA DE
CAPACIDAD PARA UN PROPÓSITO PARTICULAR, SERÁN LIMITADAS A CINCO AÑOS (UN AÑO PARA LOS ELECTRODOMÉSTICOS
PRINCIPALES DE NOMBRE “LAGAN”) O AL PERÍODO MÁS CORTO PERMITIDO POR LEY. Algunos estados y provincias no permiten
la limitación de la duración de garantías implícitas de comerciabilidad o capacidad, de modo que la limitación arriba indicada quizás no
le corresponda. Esta garantía le otorga derechos legales específicos, y es posible que usted tenga también otros derechos que varían
de un estado a otro o de una provincia a otra.
Limitación de recursos; exclusión de daños incidentales y consecuentes
SU ÚNICO Y EXCLUSIVO RECURSO SEGÚN LOS TÉRMINOS DE ESTA GARANTÍA LIMITADA SERÁ EL DE REPARAR EL PRODUCTO
SEGÚN SE ESTIPULA EN LA PRESENTE. WHIRLPOOL NO SE RESPONSABILIZARÁ POR DAÑOS INCIDENTALES O
CONSECUENTES. Algunos estados y provincias no permiten la exclusión o limitación de daños incidentales o consecuentes, de modo
que estas limitaciones y exclusiones quizás no le correspondan. Esta garantía le otorga derechos legales específicos, y es posible que
usted tenga también otros derechos que varían de un estado a otro o de una provincia a otra.
Cómo puede ponerse en contacto con nosotros si necesita nuestro servicio
Si usted se encuentra fuera de los cincuenta Estados Unidos y Canadá, póngase en contacto con su vendedor autorizado de IKEA
para determinar si corresponde otra garantía.
Si necesita servicio técnico, sírvase leer las Instrucciones de instalación y/o la sección “Solución de problemas” del Manual de uso y
cuidado antes de ponerse en contacto con nosotros. Si necesita ayuda adicional, no dude en contactarnos en EE.UU. y Canadá al
1-866-664-2449. 2/09
Guarde este libro y su comprobante de compra juntos para
referencia futura. Usted deberá proporcionar el comprobante
de la compra o una fecha de instalación para obtener
servicio bajo la garantía.
Escriba la siguiente información acerca de su electrodoméstico
principal para ayudarle mejor a obtener asistencia o servicio
técnico si alguna vez llegara a necesitarlo. Deberá tener a mano
el número completo del modelo y de la serie. Usted puede
encontrar esta información en la etiqueta con el número de
modelo y de serie ubicada en el producto.
Nombre del distribuidor _________________________________________
Dirección_______________________________________________________
Número de teléfono_____________________________________________
Número de modelo _____________________________________________
Número de serie ________________________________________________
Fecha de compra _______________________________________________

18
SEGURIDAD DE LA COMBINACIÓN MICROONDAS CAMPANA
Si no sigue las instrucciones de inmediato, usted puede
morir o sufrir una lesión grave.
Si no sigue las instrucciones, usted puede morir o sufrir
una lesión grave.
Todos los mensajes de seguridad le dirán el peligro potencial, le dirán cómo reducir las posibilidades de sufrir una lesión y lo que
puede suceder si no se siguen las instrucciones.
Su seguridad y la seguridad de los demás es muy importante.
Hemos incluido muchos mensajes importantes de seguridad en este manual y en su electrodoméstico. Lea y obedezca siempre
todos los mensajes de seguridad.
ADVERTENCIA
PELIGRO
Este es el símbolo de advertencia de seguridad.
Este símbolo le llama la atención sobre peligros potenciales que pueden ocasionar la muerte o una lesión a
usted y a los demás.
Todos los mensajes de seguridad irán a continuación del símbolo de advertencia de seguridad y de la palabra
“PELIGRO” o “ADVERTENCIA”. Estas palabras significan:
Cuando se usan aparatos electrodomésticos, deben tomarse precauciones básicas de seguridad, incluyendo las siguientes:
INSTRUCCIONES IMPORTANTES DE SEGURIDAD
GUARDE ESTAS INSTRUCCIONES
ADVERTENCIA: Para reducir el riesgo de incendio,
quemaduras, choques eléctricos, daños personales o
exposición a energía excesiva de microondas:
■ Lea todas las instrucciones antes de usar el horno de
microondas.
■ Lea y siga las “PRECAUCIONES PARA EVITAR LA
POSIBLE EXPOSICIÓN A ENERGÍA EXCESIVA DE
MICROONDAS” específicas que se encuentran en esta
sección.
■ El horno de microondas debe estar conectado a tierra.
Solamente debe conectarse a un tomacorriente
debidamente conectado a tierra. Vea “INSTRUCCIONES
PARA CONEXIÓN A TIERRA” en esta sección y en las
instrucciones de instalación proporcionadas.
■ Instale o ubique el horno de microondas sólo de acuerdo
a las instrucciones para instalación proporcionadas.
■ Algunos productos tales como huevos enteros con la
cáscara y recipientes herméticos - por ejemplo, frascos de
vidrio cerrados - pueden explotar y no deben calentarse
en el horno de microondas.
■ Use el horno de microondas solamente para lo que ha
sido diseñado y como se describe en este manual. No use
productos químicos o vapores corrosivos en el horno de
microondas. Este tipo de horno está específicamente
diseñado para calentar, cocinar o deshidratar alimentos.
Este horno no está diseñado para uso industrial o de
laboratorio.
■ Lo mismo que con cualquier aparato electrodoméstico, es
necesario supervisar de cerca si lo usan los niños.
■ No opere el horno de microondas si el cable o el enchufe
están dañados, si el horno no funciona correctamente o si
se ha dañado o caído.
■ El horno de microondas debe ser reparado sólo por personal
técnico calificado. Llame a una compañía de servicio
autorizada para el examen, reparación o ajuste.
■ No cubra ni bloquee ninguna abertura en el horno de
microondas.
■ No guarde este horno de microondas a la intemperie. No use
el horno de microondas cerca del agua - por ejemplo, cerca
del fregadero en la cocina, en un sótano húmedo o cerca de
una alberca o lugares similares.
■ No sumerja el cable o el enchufe en agua.
■ Mantenga el cable alejado de superficies calientes.
■ No deje que el cable cuelgue del borde de una mesa o
mostrador.
■ Vea las instrucciones para la limpieza de la superficie de la
puerta en la sección “Cuidado del horno de microondas”.
■ Para reducir el riesgo de incendio en la cavidad del horno:
– No cocine de más los alimentos. Preste cuidadosa atención
al horno cuando use papel, plástico u otro material
combustible dentro del horno para facilitar la cocción.
– Quite las ataduras de alambre de las bolsas de papel o
plástico antes de ponerlas en el horno.
– Si algún elemento se prende fuego dentro del horno,
mantenga la puerta cerrada, apague el horno y
desenchúfelo o corte la corriente en el panel de fusibles o
del cortacircuitos.
– No use la cavidad para guardar cosas. No deje productos
de papel, utensilios de cocina o alimentos en la cavidad
cuando no está en uso.

19
INSTRUCCIONES IMPORTANTES DE SEGURIDAD
GUARDE ESTAS INSTRUCCIONES
■ Los líquidos tales como agua, café o té pueden recalentarse
más allá del punto de hervor, sin que aparenten estar
hirviendo. No siempre se muestran burbujas o hervor visibles
cuando se saca el recipiente del horno de microondas. ESTO
PUEDE OCASIONAR QUE LOS LÍQUIDOS DEMASIADO
CALIENTES SE DESBORDEN CUANDO SE LOS AGITA O
CUANDO SE INSERTA UNA CUCHARA U OTRO
UTENSILIO DENTRO DEL LÍQUIDO.
Para reducir el riesgo de heridas a las personas:
– No caliente el líquido en exceso.
– Revuelva el líquido antes de haberlo calentado y en la mitad
del tiempo de cocción.
– No use recipientes con lados rectos y cuellos angostos.
– Antes de quitar el recipiente del horno de microondas
después de haber calentado el alimento, déjelo reposar en
el horno por un tiempo corto.
– Tenga extremo cuidado cuando inserte una cuchara u otro
utensilio dentro del recipiente.
■ No instale el horno sobre un fregadero.
■ No ponga nada directamente sobre el horno de
microondas cuando éste está funcionando.
■ Limpie con frecuencia las salidas de aire de la campana
extractora - no permita que se acumule grasa en la
campana o en el filtro.
■ Cuando flamee alimentos debajo de la campana,
encienda el ventilador.
■ Se adapta para el uso tanto sobre aparatos de cocina a
gas como eléctricos.
■ Destinado para usarse sobre estufas de una anchura
máxima de 36" (91,44 cm).
■ Tenga cuidado al limpiar el filtro de la campana
extractora. Los agentes de limpieza corrosivos, tales
como productos para limpieza de hornos con lejía,
pueden dañar el filtro.
PRECAUCIONES PARA EVITAR LA POSIBLE
EXPOSICIÓN A ENERGÍA EXCESIVA DE MICROONDAS
(a) No intente operar este horno con la puerta abierta ya que
esto puede resultar en exposición nociva a energía de
microondas. Es importante no forzar o impedir la
operación de las trabas de seguridad.
(b) No ponga ningún objeto entre la cara frontal del horno y
la puerta y no permita que se acumule polvo o residuos
de limpiadores en las superficies de sellado.
(c) No opere el horno si éste está dañado. Es particularmente
importante que la puerta del horno cierre correctamente y
que no haya daño en:
(1) La puerta (torcida),
(2) Bisagras y seguros (rotos o flojos),
(3) Sellos de la puerta y superficies de sellado.
(d) El horno no debe ser ajustado o reparado por nadie,
excepto personal de servicio calificado.
Advertencias de la Proposición 65 del estado de California:
ADVERTENCIA: Este producto contiene una o más sustancias químicas identificadas por el estado de California como
causantes de cáncer.
ADVERTENCIA: Este producto contiene una o más sustancias químicas identificadas por el estado de California como
causantes de defectos congénitos o algún otro tipo de daños en la función reproductora.

20
Requisitos eléctricos
Cumpla con todos los códigos y ordenanzas vigentes.
Se necesita:
■Un suministro eléctrico de 120 voltios, 60 Hz, CA solamente,
de 15 ó 20 amperios protegido con fusible o cortacircuitos.
Se recomienda:
■Un fusible o un cortacircuitos retardador.
■Un circuito separado que preste servicio a este horno de
microondas solamente.
PIEZAS Y CARACTERÍSTICAS
Este manual puede incluir varios modelos diferentes. El modelo que usted adquirió pudiera tener algunas o todas las características
que aparecen a continuación. La apariencia de su modelo en particular pudiera ser ligeramente diferente de las ilustraciones en este
manual
.
ADVERTENCIA
Peligro de Choque Eléctrico
Conecte a un contacto de pared de conexión a tierra de
3 terminales.
No quite la terminal de conexión a tierra.
No use un adaptador.
No use un cable eléctrico de extensión.
No seguir estas instrucciones puede ocasionar
la muerte, incendio o choque eléctrico.
INSTRUCCIONES PARA
LA CONEXIÓN A TIERRA
GUARDE ESTAS
INSTRUCCIONES
■Para todos los aparatos electrodomésticos de
conexión con cable:
El horno de microondas debe estar conectado a tierra. En
caso de que se produzca un cortocircuito, la conexión a
tierra reduce el riesgo de electrocución por medio de un
alambre de escape para la corriente eléctrica. El horno de
microondas está equipado con un cable que tiene un
alambre de conexión a tierra con un enchufe para
conexión a tierra. El enchufe debe estar conectado a un
tomacorriente que está correctamente instalado y
conectado a tierra.
ADVERTENCIA: El uso incorrecto del enchufe
para la conexión a tierra puede resultar en riesgo de
electrocución. Consulte con un electricista o técnico
calificado si las instrucciones para conexión a tierra no se
entienden bien o si hay alguna duda con respecto a la
correcta conexión a tierra del horno de microondas.
No use un cable de extensión. Si el cable de suministro
eléctrico es muy corto, haga que un electricista o técnico
calificado instale un tomacorriente cerca del horno de
microondas.
Este dispositivo cumple con la sección 18 de las reglas de FCC.
A B C D E
F G H I J K
A. Rejilla de ventilación
B. Placa con el número de modelo y de serie
C. Filtro de carbón (detrás de la rejilla de ventilación)
D. Luz del horno de microondas
E. Tapa de entrada de microondas
F. Sistema de cerrojo de la puerta
G. Ventana
H. Parrilla de cocción
I. Luz de la superficie de cocción
J. Filtro para grasa
K. Panel de control
Piezas y características no ilustradas
Bandeja giratoria
Table of contents
Languages:
Other IKEA Microwave Oven manuals

IKEA
IKEA Anratta User manual

IKEA
IKEA MATTRADITION User manual

IKEA
IKEA LAGAN User manual

IKEA
IKEA IMH1205 User manual

IKEA
IKEA FRAMTID MW 3 User manual

IKEA
IKEA FORNEBY 005.569.09 User manual

IKEA
IKEA UPPSEENDE User manual

IKEA
IKEA IMH15XR User manual

IKEA
IKEA IBMS1455WW0 User manual

IKEA
IKEA GRÄNSLÖS User manual