IKEA UPPLEVA User manual

UPPLEVA
Design and Quality
IKEA of Sweden
EN
CN
FI
SV
GR
GB
DK
NO


ENGLISH 4
DEUTSCH 21
FRANÇAIS 38
NEDERLANDS 55
DANSK 72
ÍSLENSKA 89
NORSK 106

ENGLISH 4
Contents
1 Important ����������������������������������������������������������������������������������������������������������5
Safety and important notice����������������������������������������������������������������������������������� 5
Disposal of your old product and batteries ��������������������������������������������������������������� 5
Copyright notice��������������������������������������������������������������������������������������������������� 6
Notice for Trademark �������������������������������������������������������������������������������������������� 6
2 Product overview �����������������������������������������������������������������������������������������������7
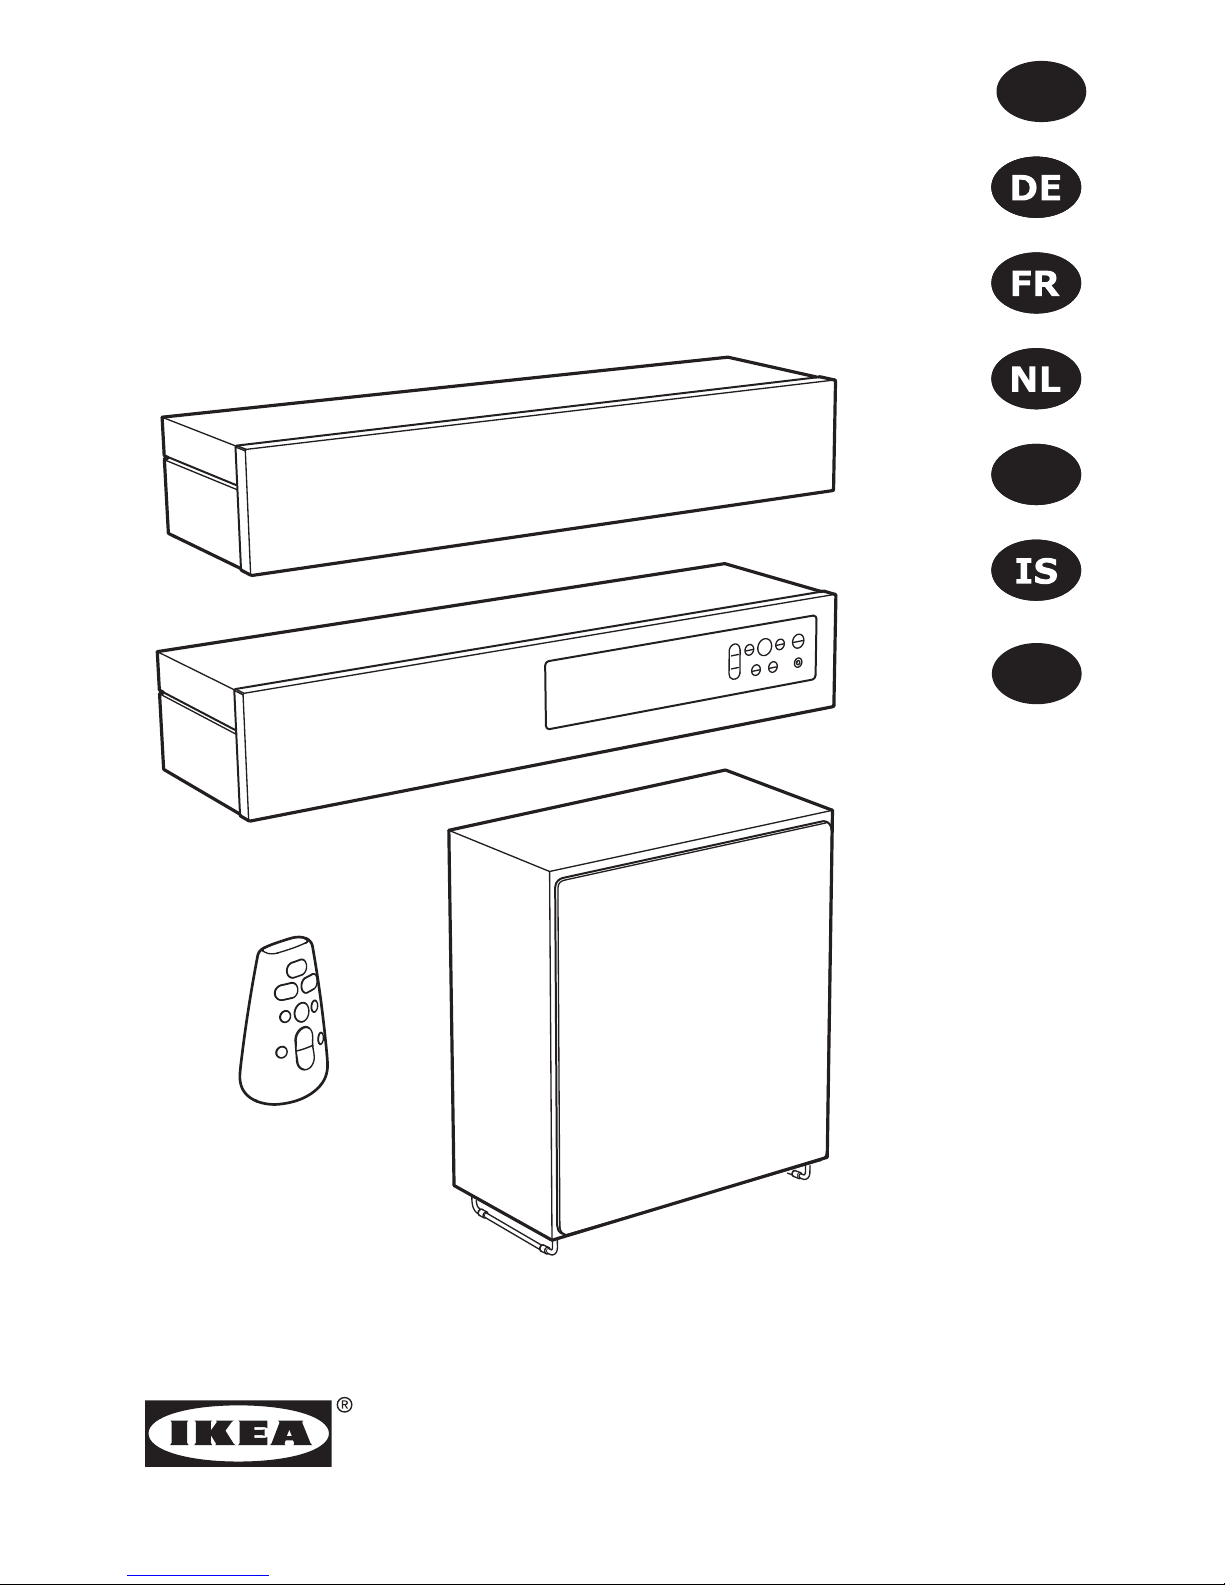
Sound system bar ������������������������������������������������������������������������������������������������ 7
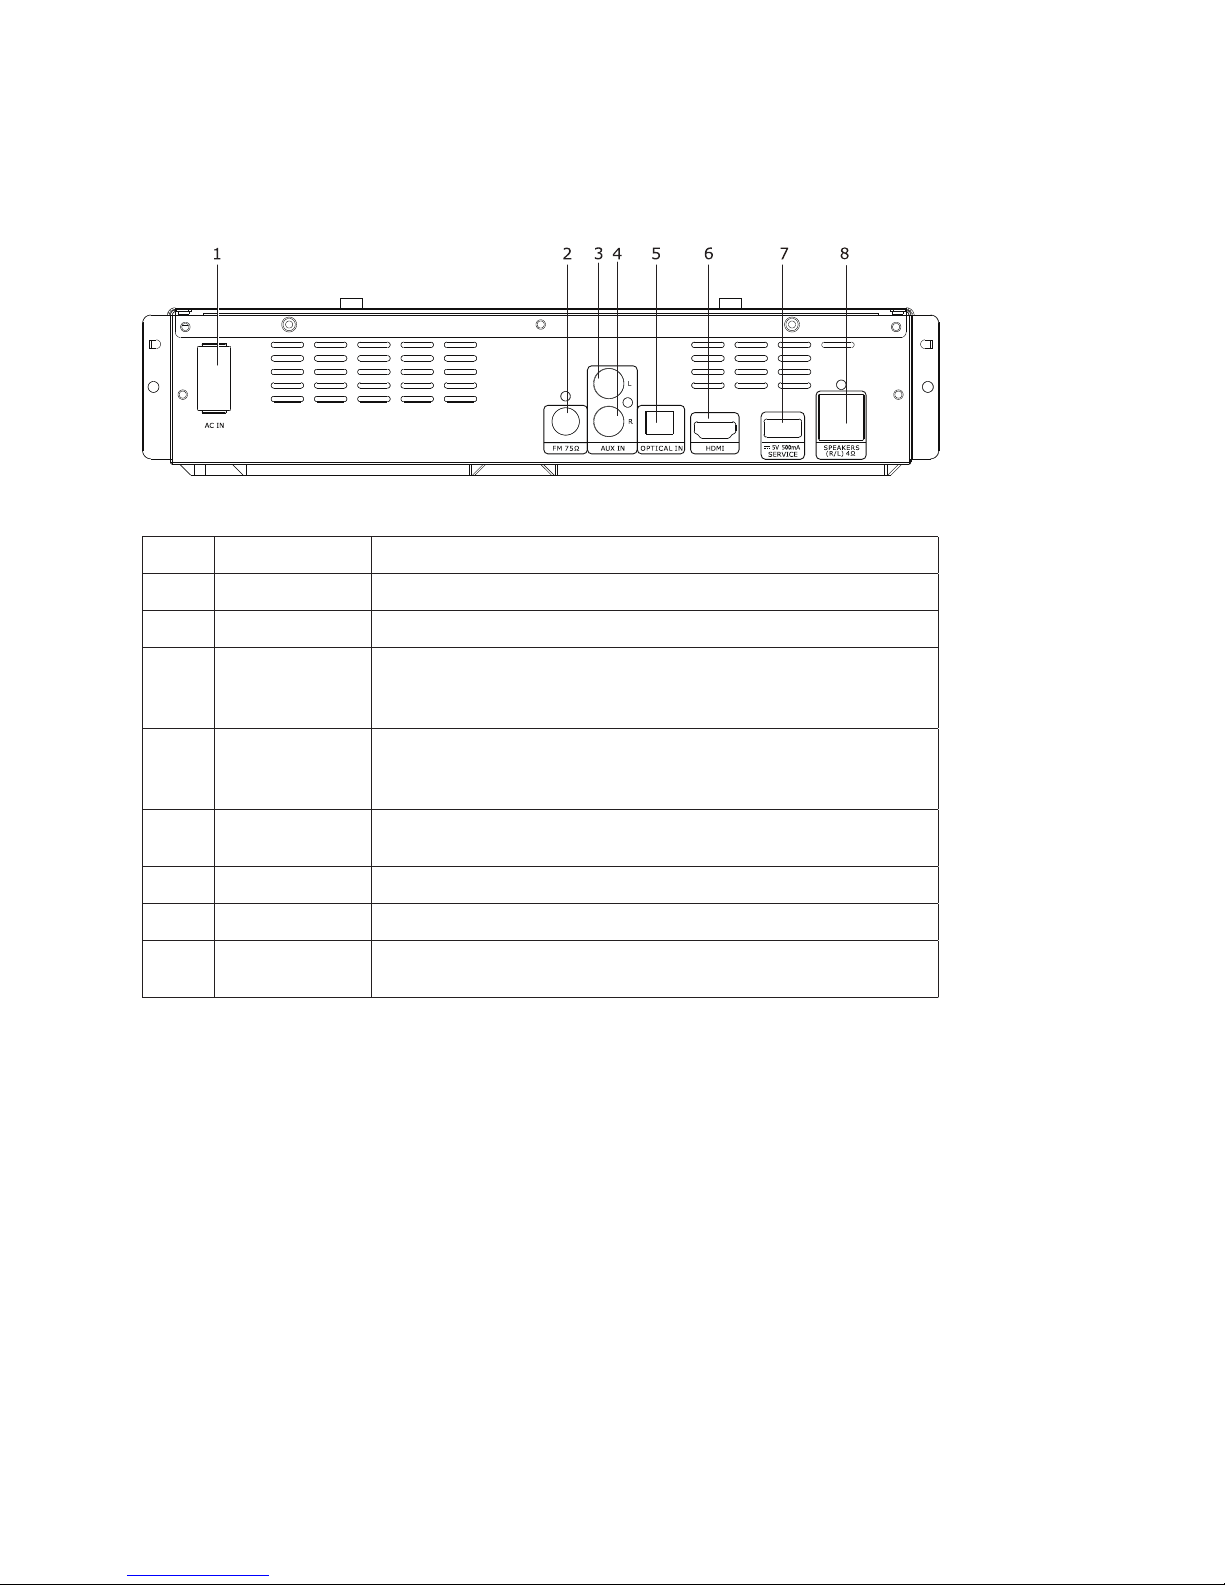
Rear panel����������������������������������������������������������������������������������������������������������� 8
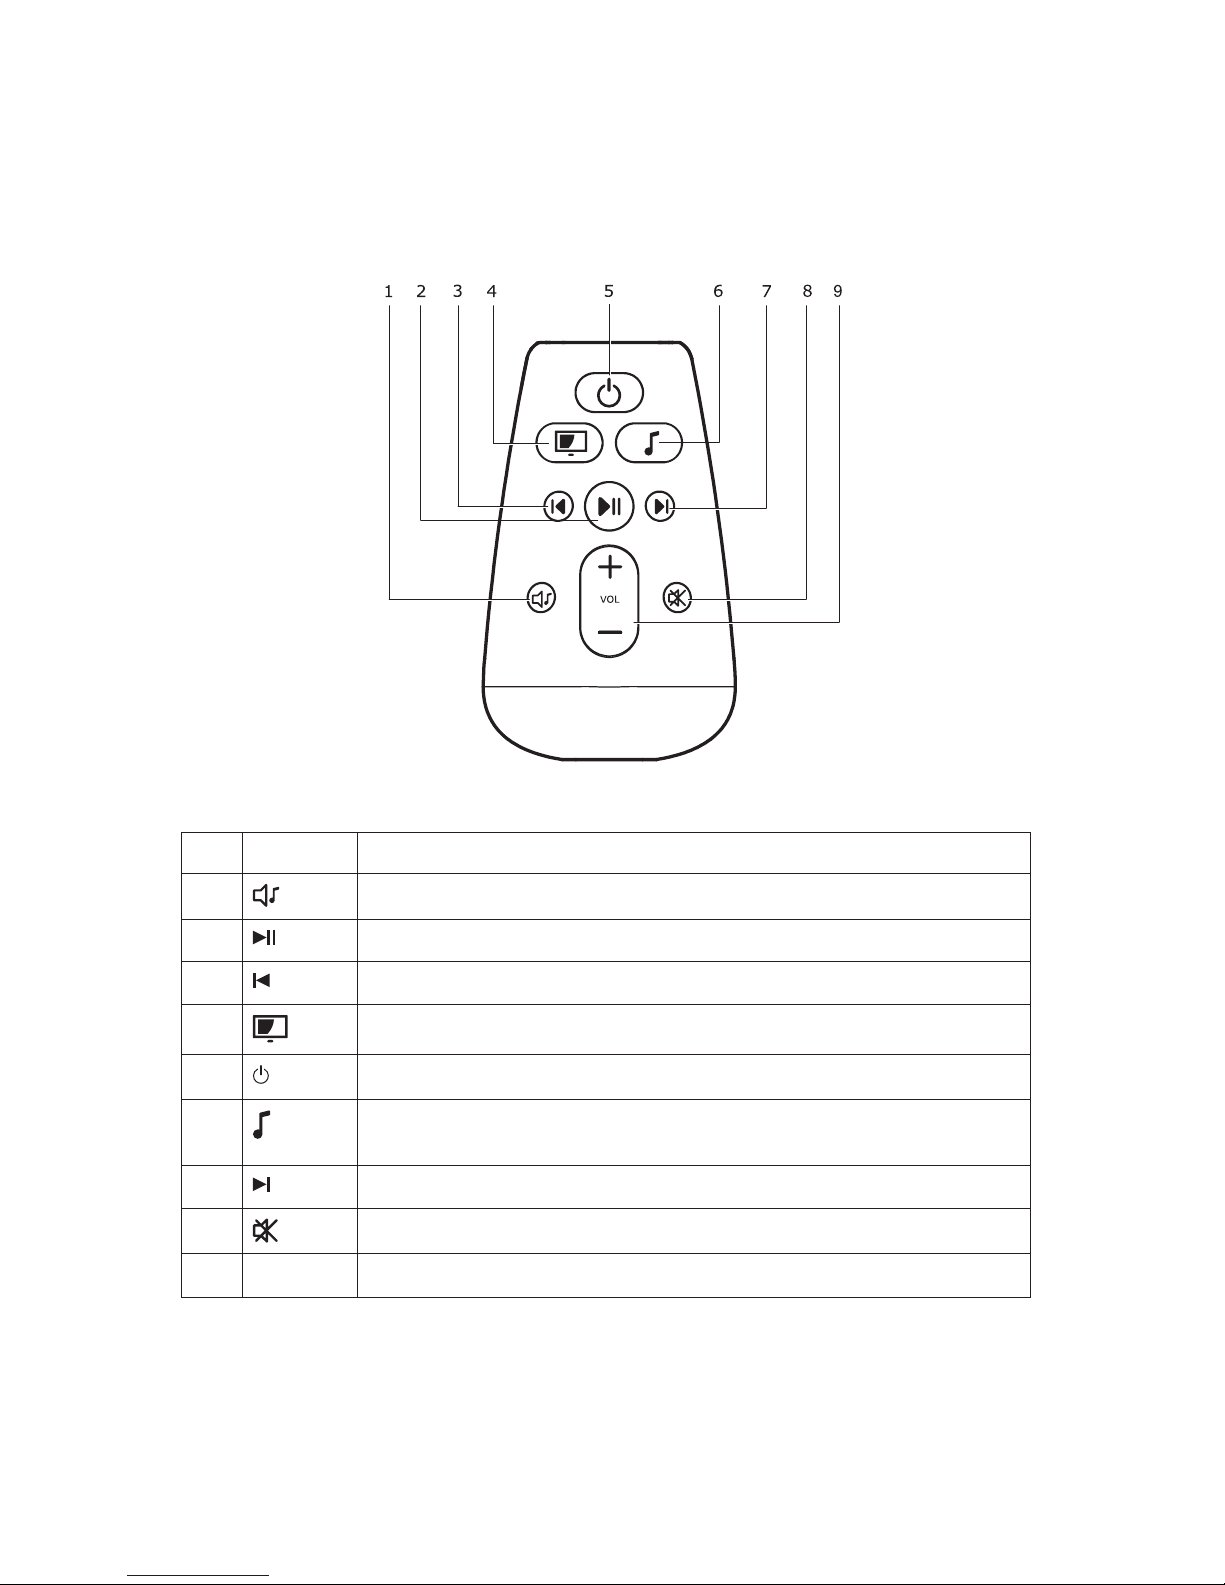
Remote control ���������������������������������������������������������������������������������������������������� 9
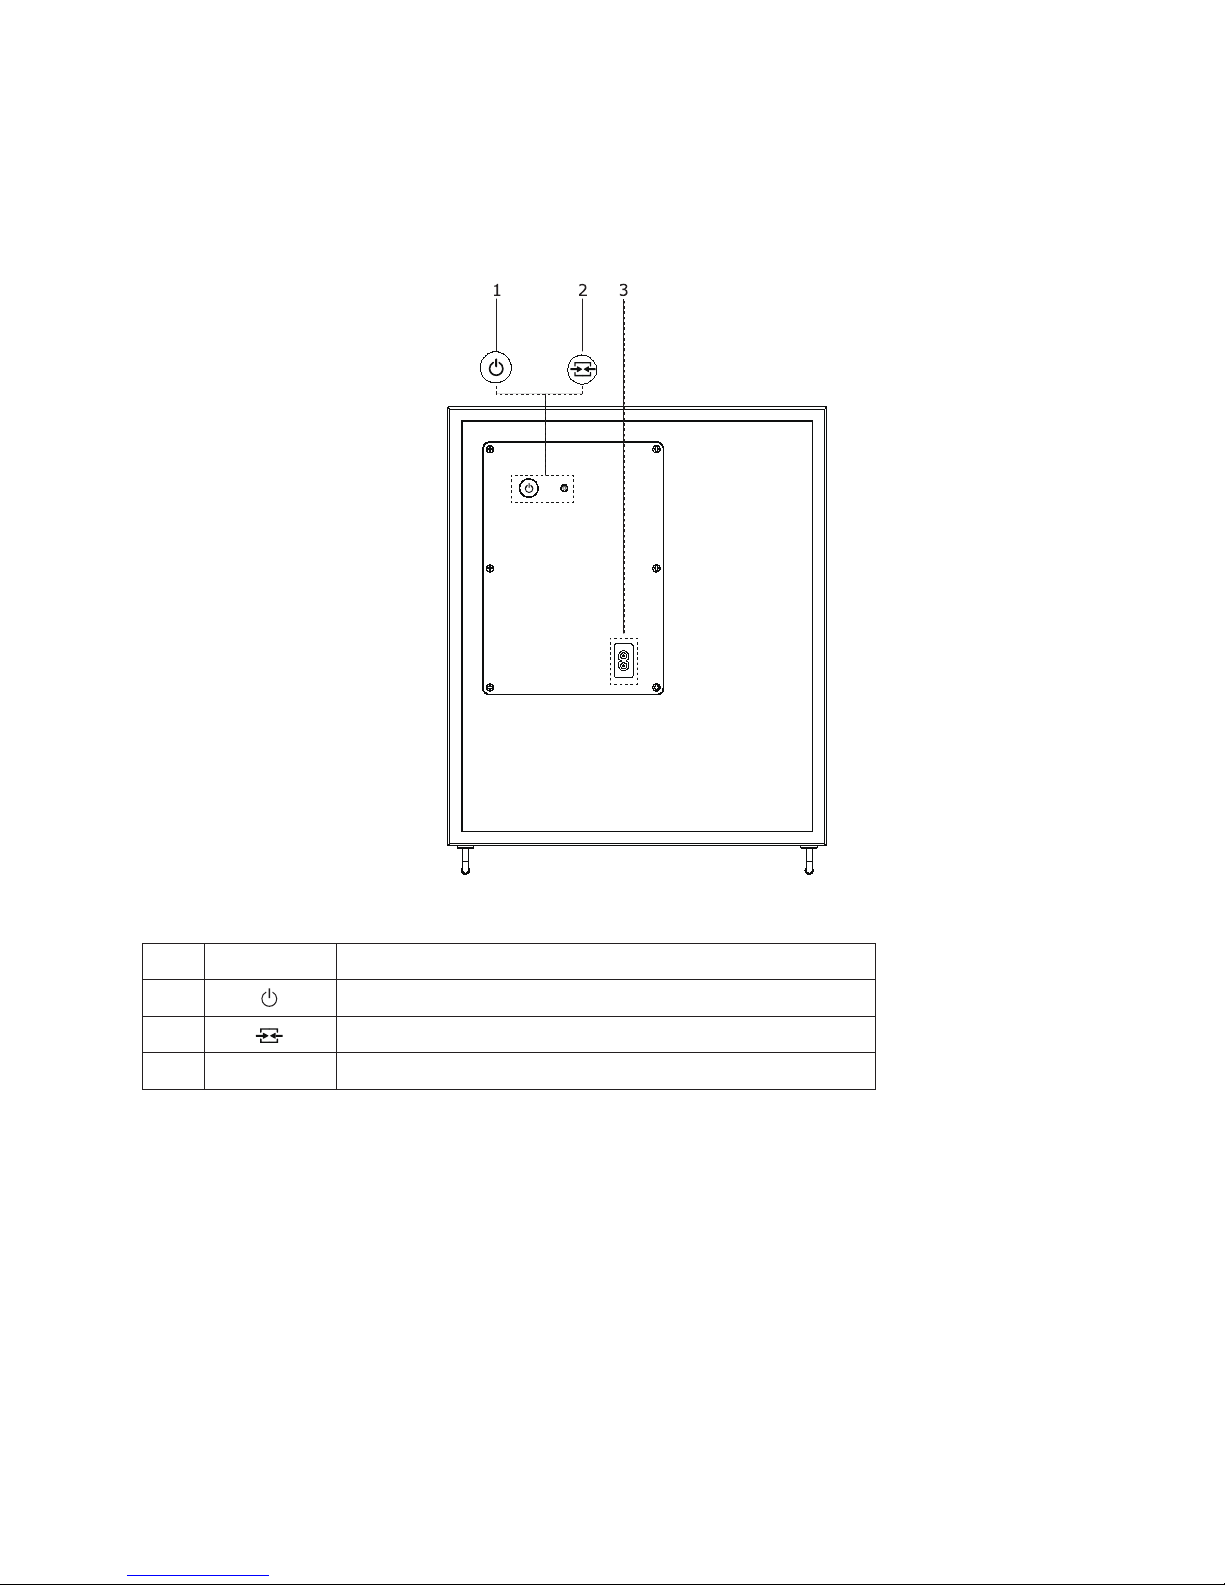
Subwoofer��������������������������������������������������������������������������������������������������������� 10
3 Preparation ������������������������������������������������������������������������������������������������������11
Prepare the remote control���������������������������������������������������������������������������������� 11
4 Connection�������������������������������������������������������������������������������������������������������12
Connecting the right speaker ������������������������������������������������������������������������������� 12
Connecting to a TV ��������������������������������������������������������������������������������������������� 12
Connecting to an analogue output or device����������������������������������������������������������� 12
Connecting to a media device ������������������������������������������������������������������������������ 12
Pairing the subwoofer ����������������������������������������������������������������������������������������� 13
5 Using your sound system ���������������������������������������������������������������������������������14
TV�������������������������������������������������������������������������������������������������������������������� 14
FM radio������������������������������������������������������������������������������������������������������������ 14
Bluetooth ���������������������������������������������������������������������������������������������������������� 14
Choosing sound mode����������������������������������������������������������������������������������������� 15
6 Settings �����������������������������������������������������������������������������������������������������������16
Sound settings��������������������������������������������������������������������������������������������������� 16
Panel display brightness�������������������������������������������������������������������������������������� 16
Change the standby time ������������������������������������������������������������������������������������ 16
UPPLEVA TV ������������������������������������������������������������������������������������������������������ 16
Reset to default settings�������������������������������������������������������������������������������������� 16
7 Specications���������������������������������������������������������������������������������������������������17
8 Troubleshooting�����������������������������������������������������������������������������������������������18
9 Glossary�����������������������������������������������������������������������������������������������������������19
10 Contact IKEA����������������������������������������������������������������������������������������������������19
11 DECLARATION OF CONFORMITY�����������������������������������������������������������������������20

5
1 Important
Safety and important notice
Warning:
• Risk of overheating! Never install the
product in a conned space. Always
leave a space of at least 5 mm around
the product for ventilation� Ensure
curtains or other objects never cover the
ventilation slots on the product�
• Never place the product, remote control
or batteries near naked ames or other
heat sources, including direct sunlight�
• Only use this product indoors� The
apparatus shall not be exposed to
dripping or splashing, no objects lled
with liquids, such as vases, shall be
placed on the apparatus�
• Never place this product on other
electrical equipment�
• The mains plug or an appliance couple
is used as disconnect device, the
disconnect device shall remain readily
operable�
Batteries (battery pack or batteries
installed) shall not be exposed to excessive
heat such as sunshine, re or the like.
This product and the supplied accessories
are marked with "CE" and comply therefore
with the applicable harmonized European
standards: the Low Voltage Directive
2006/95/EC, the EMC Directive 2004/108/
EC, the ErP Directive 2009/125/EC�
Disposal of your old product and
batteries
The crossed-out wheeled bin symbol
indicates that the item should be disposed
of separately from household waste� The
item should be handed in for recycling
in accordance with local environmental
regulations for waste disposal�
By separating a marked item from household
waste, you will help reduce the volume of
waste sent to incinerators or land-ll and
minimize any potential negative impact on
human health and the environment� For
more information, please contact your IKEA
store�

6
Copyright notice
This item incorporates copy protection
technology that is protected by U�S� patents
and other intellectual property rights of
Rovi Corporation� Reverse engineering and
disassembly are prohibited�
Notice for Trademark
HDMI, the HDMI logo and High-Denition
Multimedia Interface are trademarks or
registered trademarks of HDMI Licensing
LLC in the United States and other
countries�
Dolby and the double-D symbol
are registered trademarks of Dolby
Laboratories�
The Bluetooth word mark and logos are
registered trademarks owned by Bluetooth
SIG, Inc� and any use of such marks by
IKEA is under license� Other trademarks and
trade names are those of their respective
owners�

7
2 Product overview
Sound system bar
10
No� Control Function
1 Display panel Shows information about what the sound system is playing�
2IR Sensor Point the remote control at the IR (Infra Red) sensor�
3VOL +
VOL -
Turns up the volume� Press once to turn up the volume one
step� Press and hold to keep turning it up�
Turns down the volume� Press once to turn down the volume
one step� Press and hold to keep turning it down�
4
<
Skip to previous track or FM channel�
Navigate backwards in the Menu�
5
OK
Play/Pause�
Press OK in the Menu�
6
>
Skip to next track or FM channel�
Navigate forwards in the Menu�
7 Press for power on/off�
8AUDIO IN For connecting an audio playback device, for example an MP3
player or CD player�
9SOURCE Press to change Source�
10 MENU Press to enter and exit Menu and Settings�

8
Rear panel
No� Control Function
1 AC IN To connect the power cord for power supply�
2FM 75Ω To connect the antenna for FM radio reception�
3 AUX IN L To connect the left channel of an analogue device,
for example a CD player or media player, to your
UPPLEVA sound system�
4 AUX IN R To connect the right channel of an analogue device,
for example a CD player or media player, to your
UPPLEVA sound system�
5 OPTICAL IN To connect to an optical audio output on the TV or a
digital device�
6 HDMI To connect to the HDMI-ARC input on the TV�
7 SERVICE For service use only�
8 SPEAKERS
(R/L) 4Ω To connect to the right speaker of the UPPLEVA
system�

9
No� Control Function
1 Changes between different sound modes�
2 Play/Pause with connected Bluetooth devices�
3 Skips to previous track/TV channel/FM channel�*
4 Turns your TV on: if the TV is on, this changes the TV source�*
5 Power On or Off� Turns sound system and TV on and off�*
6 Source button� Turns the sound system on� If the sound system
is on, this changes the sound system source�
7 Skips to next track/TV channel/FM channel�*
8 Mutes or unmutes the sound system�
9 + VOL - Turns the volume up or down�
*These functions are only guaranteed to work with these UPPLEVA TVs:
402-565-98, 802-662-13, 202-565-99, 502-662-19, 802-566-00, 102-662-16,
602-566-01, 002-662-12, 002-565-81, 302-662-15, 602-565-78, 902-662-17�
Remote control

10
Subwoofer
No� Control Function
1 Power On or Off� Turns the subwoofer on and off�
2 For pairing the subwoofer with the sound bar�
3 AC IN To connect the power cord for power supply�

11
3 Preparation
Prepare the remote control
Insert two LR03 (AAA) batteries with correct
polarity (+/-) as indicated on the remote
control�
Notes:
— If you are not going to use the remote
control for a long time, remove the
batteries.
— Do not combine old and new or different
types of batteries.
— Keep batteries away from heat, sunshine
or re.

12
4 Connection
Connect your sound system in these ways�
Connecting the right speaker
Connect the red speaker cable from the
right speaker to the red SPEAKERS (R/L) 4Ω
socket on the back of the sound bar�
Connecting to a TV
Connect the sound system to an UPPLEVA
TV using an HDMI cable and the HDMI ARC
socket on the TV� If you want to connect
the sound system to another TV, we
recommend you use HDMI ARC or OPTICAL
sockets�
After connecting, press the SOURCE button
on the remote control to switch to Television
mode�
Connecting to an analogue output or
device
Connect to an analogue audio output on
the TV or other device, or to an analogue
device�
Connect the audio cable from the AUX IN
sockets on the sound system to the AUDIO
OUT sockets on the TV or other device�
After connecting, press the SOURCE button
on the remote control to switch to Aux In
mode�
Connecting to a media device
Connect a portable audio device, for
example an MP3 player or CD player, to the
AUDIO IN socket� After connecting, press
the SOURCE button on the remote control to
switch to Audio In mode�

13
Pairing the subwoofer
The subwoofer is already paired for
automatic wireless connection with the
sound bar when buying the sound system�
The pairing is only needed in the rare
occasion when connection is lost� To pair the
subwoofer with the sound bar follow these
steps�
1� Make sure both the sound bars and
the subwoofer is on� The subwoofer light will
ash slowly.
2� Press the pairing button on the back of
the subwoofer for about 6 seconds� The
indicator light on the front of the subwoofer
starts to ash faster.
3� Enter the MENU of the sound system and
select PAIR� The Display panel on the sound
bar will show the message “Pairing”� When
the pairing is done the indicator light on the
subwoofer will shine continuously�
Press the power button on the subwoofer to
temporary switch it off� The indicator light
on the front of the subwoofer will go out�

14
5 Using your sound system
This chapter helps you use your sound
system to play media from a wide range
of sources� Make sure the necessary
connections are done before you start�
TV
If your TV has an HDMI ARC socket the
sound system can play sound from the TV�
To do this toggle the sound system source
key on the remote control until Television
is chosen�
FM radio
To search and store your favorite radio
stations follow these steps�
1� Install the FM antenna in a suitable
location and connect it to the FM antenna
input� Install the FM antenna in a suitable
location and connect it to the FM antenna
input� Press SOURCE on the sound system
bar, toggle to FM�
2� Press MENU on the sound system bar to
enter the menu options� Use </> to select
FM INSTALL and press OK� The available
stations are automatically stored� Press
MENU on the sound system bar to store
the channels� Use , buttons to switch
between the stations�
To manually tune stations follow these
steps�
1� Press SOURCE on the sound system bar
and toggle to FM�
2� Press MENU on the sound system bar
to enter the menu options� Use </> to
select FM MANUAL TUNE and press OK� Use
</> to ne tune the frequency by steps
of 0�05MHz� Press OK to store the new
frequency� Select a new station number with
</> and press OK�
To delete stored stations follow these steps�
1� Press SOURCE on the sound system bar
and toggle to FM� Use </> to select the
station you want to delete�
2� Press MENU on the sound system bar to
enter the menu options� Use </> to select
FM DELETE and press OK� Press menu to
return to FM�
To choose your favorite display mode on
the sound system panel display follow these
steps�
1� Press SOURCE on the sound system bar
and toggle to FM�
2� Press MENU on the sound system bar to
enter the menu options� Use </> to select
INFO and press OK� Use </> to select your
preferred display mode and press OK to
conrm.
-INFO<FREQ> will display the frequency
channel�
- INFO<RDS> will display the text from
Radio Data System (when available)�
- INFO<RADIO-TEXT> will display the radio
text (when available)�
Bluetooth
All Bluetooth enabled phones, tablets and
other media devices are compatible with
UPPLEVA sound system*� Once your media
device is paired with the sound system it
will automatically connect when BLUETOOTH
is chosen as a source again� The sound
system can be paired with 8 devices but it
will only be visible to the device connected
rstly. Follow these steps to pair, use and
disconnect Bluetooth�
To pair a media device�
1� Press the sound system source
button on the remote control and toggle
to BLUETOOTH� If there is no device
connected, the panel display will show
Bluetooth Wait�
2� Switch on Bluetooth on your media
device� Connect to the sound system by
connecting to “UPPLEVA”� Once connected
the display panel will show Bluetooth Ready�
3� Use , , and <+ VOL -> buttons to
control the music playing�
To choose your favorite display mode on the
panel display�
1� Press SOURCE on the sound system bar
and toggle to BLUETOOTH�
2� Press MENU on the sound system bar to
enter the menu options� Use </> to select
INFO and press OK� Use </> to select your
preferred display mode and press OK to
conrm. Press MENU to nish.
- ID3 will display the Title on the top row
and the Artist and Album on the bottom
row�
- TIME will display the text BLUETOOTH on
the top row and the Time on the bottom
row�

15
*Provided it is compatible with Bluetooth
v2�1+EDR or higher�
To unpair a media device�
1� Press SOURCE on the sound system bar
and toggle to BLUETOOTH�
2� Press MENU on the sound system bar to
enter the menu options� Use </> and the
OK button to select FORCE UNLINK�
Note: force unlink is required if you have
connected the sound system to more than 8
different devices.
To disconnect a media device�
Switch off Bluetooth on your Bluetooth
device or simply unpair with UPPLEVA to
disconnect�
Choosing sound mode
You can choose between different sound
modes to improve the sound experience�
Press on the remote control to choose
between Standard, Music, News, Movies
and Personal mode� The sound mode effect
becomes fully audible after a few seconds�
To set up the personal mode
In the personal mode you can choose
bass and treble levels and the wide mode
according to your own preference� Follow
these steps to set your personal mode�
1� Press on the remote control and
toggle to Personal mode�
2� Bass level: Press MENU on the on the
sound system bar to enter the menu
options� Use </> to select BASS and press
OK� Use </> to choose on a scale from -8 to
8 and press OK to conrm. Press MENU to
nish. The higher level you choose the more
enhanced the bass sounds will be�
3� Treble level: Press MENU on the on
the sound system bar to enter the menu
options� Use </> to select TREBLE and
press OK� Use </> to choose on a scale
from -6 to 6 and press OK to conrm. The
higher level you choose the more enhanced
the treble sounds will be�

16
6 Settings
Sound settings
To get a surround sound effect the WIDE
mode can be turned on:
1� Press MENU on the sound system bar to
enter the menu options� Use </> to select
WIDE and press OK� Use the > button to
switch to On and press OK to conrm. Press
MENU to nish.
The subwoofer bass level can be adjusted to
t your preference.
1� Press MENU on the on the sound system
bar to enter the menu options� Use </>
to select SUB and press OK� Use </> to
choose on a scale from -9 to 0 and press
OK to conrm. Press MENU to nish. The
higher the value, the more the bass will be
enhanced�
Panel display brightness
The panel display brightness can be
adjusted to suit different surroundings or
preferences� Follow these steps to change
the brightness�
1� Press MENU on the sound system bar to
enter the menu options� Use </> to select
BRIGHTNESS and press OK�
2� Use the </> buttons to select Off, Low,
AUTO or High and press OK to conrm.
Press MENU to nish. The High and Low
settings will give a high respectively low
brightness of the panel display while
with the Auto setting the panel display
will dim down after 15 seconds of non-
use� The Off setting will clear the display
of all information for a less distracting
appearance� The volume indicator ring
remains visible� Any operation will show the
display information for 15 seconds�
Change the standby time
To save energy the sound system will enter
standby automatically if there is no sound
playing� Follow these steps to adjust the
time before it enters standby� Select OFF
to prevent the system to enter standby by
itself�
1� Press MENU on the sound system bar to
enter the menu options� Use </> to select
AUTO STANDBY and press OK�
2� Use </> to select your preferred timing
and press OK to conrm. Press menu to nish.
UPPLEVA TV
We recommend you to do the following
setting if you have another TV (not
UPPLEVA*) connected with HDMI to the
UPPLEVA sound system� The setting makes
the TV and the UPPLEVA sound system
function in the best possible way together�
Follow these steps to set it up�
1� Press MENU on the sound system bar,
toggle to UPPLEVA TV and press OK�
2� Select No if you don’t have an UPPLEVA
TV*�
The setting “No” will prevent the sound
system to break in as the active source on
your TV when it is turned on�
The setting “Yes” must be used for UPPLEVA
TV*
You can change the setting back again if you
want to use the UPPLEVA sound system with
an UPPLEVA TV*at a later stage�
Follow these steps to set it up�
1� Press MENU on the sound system bar,
toggle to UPPLEVA TV and press OK�
2� Select Yes if you have an UPPLEVA TV*
*Only valid for these UPPLEVA TVs (stated
in article numbers):
402-565-98, 802-662-13, 202-565-99,
502-662-19, 802-566-00, 102-662-16,
602-566-01, 002-662-12, 002-565-81,
302-662-15, 602-565-78, 902-662-17�
Reset to default settings
Follow these steps to reset the sound
system to default settings�
1� Press MENU on the sound system bar to
enter the menu options� Use </> to select
RESET and press OK� The text Warning will
be shown on the panel display� Press OK�
2� Use </> to select Yes or No� Yes will
reset the sound system to factory settings
and No will jump back to menu options�

17
7Specications
Main Functions
• FM tuner / Bluetooth / Audio in /Aux in /
Optical in /HDMI
• Speaker Type: 2�1 Stereo+subwoofer
• HDMI system control:
• HDMI CEC 1�4, ARC, System Audio
control, Remote Pass Through,
OneTouchStandby, One touch play
• FM functions: RDS, Radio-text (PS, RT)
• Sound modes: 5 presets, bass and
treble
• Surround: Virtual Surround
• Auto Standby
Audio Input Connections
• HDMI + CEC/ARC
• Digital in: Optical
• AUX in L/R: cinch
• Front audio in: 3,5 mm
• FM antenna: 75 ohm
Supported digital audio formats
• Dolby digital / PCM
• Sample rate 32kHz/44�1kHz/48kHz
Bluetooth
• Version compatibility: 2�1+EDR or
higher
• Codec support: SBC, A2DP 1�2, AVRCP
1�4
• Auto pairing: up to 8 devices
• Auto A2DP connect
• ID3 tag display: Title/artist/album
• Player control: Play/pause, Next/
previous, Ffwd/Frew
Service
• The SERVICE USB port is only used to
update the software�
Note:
Do not power outage and pull the USB
device when update software.
Main Unit
• Power supply rating:
220-240V 50/60Hz
• Power consumption in standby mode:
<0�5W
• Rated power consumption of Sound
system bar: 30W
• Rated power consumption of
subwoofer: 20W
• Power consumption of the subwoofer in
standby mode: <0�5W
• Power consumption of the subwoofer in
networked standby mode: <2�0W
• Operating temperature: 5°C to 35°C
• Operating humidity: Less than 80%
(no condensation)
Amplier
• Total output power: 100W RMS
(1% THD)
• Frequency response: 40 Hz-20 kHz
• Input sensitivity:
AUX IN: 2 V
AUDIO IN: 1 V
Radio
• Tuning range:
FM 87�5-108 MHz (50 kHz)
• Signal-to-noise ratio: FM 50 dB

18
8 Troubleshooting
If you experience any of the following difculties while using this unit, check the list below.
If you still experience problems with your UPPLEVA sound system, please contact IKEA
Customer Service at www�IKEA�com�
Problem Tip
No reaction to the remote
control� Make sure the remote control is pointed towards the sound system�
Make sure the batteries are inserted correctly�
Check if the batteries are drained of power and needs to be
changed to new ones�
Poor FM reception Make sure the FM antenna is connected and installed properly�
Alternatively use an outdoor FM antenna, or use a FM cable
connection�
Can not use Bluetooth� Make sure your phone, tablet or other media device supports
Bluetooth�
Make sure to connect to the correct IKEA device named UPPLEVA�
Make sure your phone, tablet or other media device is paired
and that its bluetooth function is turned on�
Make sure no other Bluetooth devices in the room are paired�
If another bluetooth device is paired, turn off the bluetooth
function in that device�
Poor sound quality when
playing via Bluetooth� The Bluetooth reception is poor� Move the device closer to the
sound system or remove any obstacles between the device
and the sound system�
Note: Bluetooth reception will normally operate at a distance
of up to 6-8 meters in unobstructed path� When objects,
furniture or walls are in between, distance will be reduced�
Also when the device is placed in pockets of cloths or in a bag,
distance can be reduced�
No sound from TV� Make sure the sound system is connected to the TV through
the HDMI ARC socket of your TV�
Make sure the T-link function in the UPPLEVA TV is switched on�
No sound from the sound
system� Make sure that the sound system is connected to the
power source�
Make sure the sound system is on�
Make sure the cables are connected and not broken�
Make sure both left and right speakers are connected�
Make sure mute is not activated or the volume is set to 0�
Make sure the correct source is chosen�
TV screen changes its input
source and turns black when
the sound system is turned on�
Make sure you have chosen if you have an UPPLEVA TV* or not
in the UPPLEVA TV setting, see Chapter 6 Settings / UPPLEVA
TV�
*Only valid for these UPPLEVA TVs: 402-565-98, 802-662-13,
202-565-99, 502-662-19, 802-566-00, 102-662-16, 602-
566-01, 002-662-12, 002-565-81, 302-662-15, 602-565-78,
902-662-17�
Note! If the problems you are experiencing are not solved by above tips unplug the
power cord for 1 minute� In rare cases the sound system might need a software
upgrade� Please contact IKEA Customer Service at www�IKEA�com for more
information�

19
9 Glossary
ARC
Audio Return Channel is a technology used in HDMI connections of Televisions and Sound
System devices� ARC will output the sound of the TV image through the HDMI cable to the
sound system� It prevents the need to install an extra audio cable�
Digital Audio
Digital Audio is a sound signal that has been converted into numerical values� Digital sound
can be transmitted through multiple channels� Analogue sound can only be transmitted
through two channels�
Dolby®Digital
The system to compress digital sound developed by Dolby Laboratories� It offers you sound
of stereo (2ch) or multichannel audio�
HDCP
High-bandwidth Digital Content Protection. This is a specication that provides a secure
transmission of digital contents between different devices (to prevent unauthorized
copyright�)
HDMI®
High-Denition Multimedia Interface (HDMI) is a high-speed digital interface that can
transmit uncompressed high denition video and digital multichannel audio. It delivers high
quality picture and sound quality� HDMI is fully backward-compatible with DVI� As required
by the HDMI standard, connecting to HDMI or DVI products without HDCP (High-bandwidth
Digital Content Protection) will result in no Video or Audio output�
HDMI-CEC
The HDMI connection allows the TV and Sound System a unied system control via HDMI
CEC signals� You can use one Remote Control to operate functions in either of the devices�
These include for instance combined volume control, automatic source selection, an
automated power on and off of the TV and the sound system, or change the TV channels�
PCM
Pulse Code Modulation� A digital audio encoding system�
10 Contact IKEA
If you have any questions regarding your new UPPLEVA TV or Sound System or need service
or support, contact IKEA Customer Service at www�IKEA�com�
To be sure we can give you the best possible assistance, please read the manual carefully
before contacting us� And have the article number for your purchase at hand when you call�
You’ll nd this 8-digit article number on your receipt or on the back of your UPPLEVA TV or
Sound System�

20
11 DECLARATION OF CONFORMITY
The product satises the provision for CE-marking according to the following directive(s):
- Low Voltage Directive (LVD) 2006/95/EC
- EMC Directive 2004/108/EC
- RoHS Directive 2011/65/EU
- ErP Directive 2009/125/EC
- R&TTE Directive 1999/5/EC
Type of equipment: Sound System
Brand name or trade mark: IKEA
Type designation: Sound bar: MFE, MFC,
Wireless subwoofer: SFE, SFC
Manufacturer: IKEA of Sweden AB
Address: Box 702, SE-343 81 Älmhult SWEDEN
Telephone No�: +46(0)476-81000
The following harmonised European standards or technical specications, which comply with
good engineering practice in safety matters in force within the EEA, have been applied�
Safety
EN 60065: 2002 (Seventh Edition) + A1: 2006 + A11: 2008 + A2: 2010 + A12: 2011
EMC
EN61000-3-2:2006+A1:2009+A2:2009
EN61000-3-3:2008
EN62479:2010
EN55013:2001+A1:2003+A2:2006
EN55020:2007+A11:2011
R&TTE
ETSI EN300 328 V1�8�1: 2012
ETSI EN300440-1 V1�6�1:2010
ETSI EN300440-2 V1�4�1:2010
ETSI EN301489-1 V1�9�2:2011
ETSI EN301489-17 V2�2�1:2012
ETSI EN301489-3 V1�4�1:2002
ERP
Regulation 1275/2009
Additional information
The product is CE-marked 2014�
We have product surveillance according to IKEA product description�
As the manufacturer/manufacturers authorised representative established within the EEA,
we declare under our sole responsibility that the equipment follows the provisions of the
Directives stated above�
Date 2014-08-18
Business Area Manager
Living room & Workspaces
IKEA of Sweden AB
Other manuals for UPPLEVA
15
Table of contents
Languages:
Other IKEA Stereo System manuals