IKI Corner IKI 6 kW User manual

Instructions for installation and use
Corner IKI and Wall IKI
sauna heaters
with mounted unit
Corner IKI 6 kW / MC10060NA
Wall IKI 6 kW / MW10060NA
Corner IKI 9 kW / MC10090NA
Wall IKI 9 kW / MW10090NA
2/2022

1

2
This instruction manual is intended for the sauna owner or the person in charge of caring for the
operation of the sauna, as well as for the electrician who installs the heater. When the installation
is complete these instructions must be given to the owner or the person caring for the sauna. The
sauna heater is intended for the sole purpose of heating the sauna room to a temperature
appropriate for bathing. Its use for any other purpose is prohibited.
CONTACT INFORMATION
IKI LLC
Address: 5621 Dupont Ave. S.
Minneapolis, MN 55419
Phone: (612) 801 7126
www.ikikiuas.com

3
Contents
WARNINGS ........................................................................................................................................................ 4
PRIOR TO INSTALLATION ................................................................................................................................... 6
Installation of the heater................................................................................................................................... 7
Piling of the stones ............................................................................................................................................ 8
Wiring diagram ................................................................................................................................................ 11
Supply wires..................................................................................................................................................... 12
Safety distances............................................................................................................................................... 12
Model table ..................................................................................................................................................... 13
Requirements for water quality ...................................................................................................................... 13
Operating the heater timer and temperature................................................................................................. 14
High temperature control (reset button) ........................................................................................................ 14
Warning placards............................................................................................................................................. 15
Instructions for use and maintenance............................................................................................................. 15
Troubleshooting .............................................................................................................................................. 16
Warranty.......................................................................................................................................................... 17
Quality guarantee / Freight guarantee............................................................................................................ 18
Ventilation ....................................................................................................................................................... 19
Mechanical ventilation .................................................................................................................................... 19
Gravity ventilation ........................................................................................................................................... 20
The Sauna Room.............................................................................................................................................. 21

4
WARNINGS
• Keep away from the heater when it is hot. The stones and outer surface of the heater may
burn your skin.
• Do not throw too much water on the stones. The evaporating water is boiling hot.
• Do not let young, handicapped or ill people bathe in the sauna on their own.
• This appliance is not intended for use by persons (including children) with reduced physical,
sensory or mental capabilities, or lack of experience and knowledge, unless they have been
given supervision or instruction concerning use of the appliance by a person responsible for
their safety. Children should be supervised to ensure that they do not play with the appliance.
• Consult your doctor about any health-related limitations to bathing.
• Parents should keep children away from the hot heater.
• Consult your child welfare clinic about taking little babies to the sauna.
- age?
- temperature of the sauna?
- time spent in the warm sauna?
• Be very careful when moving in the sauna, as the platform and floors may be slippery.
• Do not smoke, use alcohol, or exercise in the sauna
• Do not exceed 30 min. in the sauna at one time, as excessive exposure can be harmful to
health. The sauna should not be used as testing facility for tolerance.
• Persons with poor health should consult their physicians before using the sauna.
• Do not place any combustible material over the sauna heater (towels, bathing suits, wooden
bucket or ladle)!
-Do not hang clothes to dry in the sauna, as this may cause a risk of fire. Excessive
moisture content may also cause damage to the electrical equipment.
-Do not sleep in the sauna
• Hyperthermia occurs when the internal temperature of the body reaches a level several
degrees above
the normal body temperature of 98,6 ºF. The symptoms of hyperthermia include an increase in
the
internal temperature of the body, dizziness, lethargy, drowsiness, and fainting.
The effects of hyperthermia include:
A. Failure to perceive heat
B. Failure to recognize the need to exit the room
C. Unawareness of impending hazard
D. Fatal damage in pregnant women
E. Physical inability to exit the room
F. Unconsciousness
WARNING – the use of alcohol, drugs, or medication is capable of greatly increasing the risk of
fatal hyperthermia.
Use only clean tap water on the stones – do
not use pool or spa water or sea water with salt,
as chlorine gas can be produced and the heating elements can be
damaged!
• No such objects or devices should be placed

5
inside the heater rock space or near the heater
that could change the amount or direction of
the air flowing through the heater, thus causing
the resistance temperature to rise too high,
which may set the wall surfaces on fire!
Do not operate heater without stones or if the
stones have been piled incorrectly so that the
heating elements are visible. Wrong piling of stones
cause a fire hazard!
Attn! Do no insulate the space
between the heater and the wall.

6
PRIOR TO INSTALLATION
Before you begin installing the heater, pay attention to the following
points in the heater:
•Beware of the sharp edges of the stainless-steel mesh. Use a long-sleeved
shirt and protective gloves during the installation and once taking the heater
out of the cardboard box.
•Read through this installation manual and the separate control unit manual
before you begin the installation of the heater.
•ATTN! This manual must be left with owner, manager or operator of the
Sauna after it is tested/used by electrician.
•The heater volume should be suitable for the sauna room volume. (Page 13:
Model table) shows the recommended sizes for each heater power output.
•A precondition for the given values is that the sauna room is well insulated.
Walls and ceiling are covered with wood panel.
• Check that supply voltage and amperages are available for the heater in
the building and main power supply (Page 12: Supply wiring)
• The breakers and the connection cables conform with valid regulations
and their dimensions are in accordance with regulations
• The location is suitable for the heater (Page 12: Safety distances)
Attn! Do no insulate the space between the heater and the wall.

7
ELECTRICAL INSTALLATION (for certified electrician only)
Beware of the sharp edges of the stainless-steel mesh. Use a long-sleeved shirt
and protective gloves during the installation and once taking the heater out of
the cardboard box. The electric installation may only be administered by a
qualified electrician adhering to current regulations.
Installation of the heater
1. Choose the place for the heater according to the required safety distances. The installation must be
carried out in the place where the heater will be situated. The safety distances for Electric IKI 6 – 9
kW are measured from the heater's mesh frame outwards (Page 12: Safety distances). Negligence
to comply with the safety distances may cause fire hazard.
2. Remove the protective plastic cover from the heater.
3. See applicable wiring diagram for the right heater model to be installed (Page 11), ATTN! Heater
must be permanently installed by using seal tight conduit between the heater and the wall of the
sauna room (plugs are not allowed in the sauna room). All Wiring must be done by a licensed
electrician, who must follow wiring diagram provided and adhere to local regulations. Use proper
AWG rated wire size and use copper wire suitable for 194 °F (90 °C) within sauna walls. Make sure
that the connecting cable will not be exposed to thermal radiation or mechanical strain. If the
rubber cable running inside the wall of the sauna is above 1000 mm from the floor, it needs to
endure temperatures up to 170Celsius /338Fahrenheit. The use of PVC-insulated cable as a
connecting cable is prohibited due to thermal embrittlement. Use grounding terminals provided in
sauna heater and control unit to properly ground the equipment as per NEC and local regulations.
4. Remove the base plate from the underside of the heater by unscrewing the three screws
(Picture 1). Lead the five-pole electric cable to the connection strip inside the element box
according to the Wiring diagram (page 11).
5. Once the heater is fully connected to the house cabling, measure that all the heating elements
function properly. If problems occur, contact the manufacturer's technical support or retailer.
ATTN! When making the final inspection of the installations, a “leakage” might be detected when
measuring insulation resistance. The reason for this is that the insulating material of the heating
elements has absorbed moisture from the air/ transportation. After 2 -3 times moisture will
disappear.
6. Close the base plate (Picture 2).
7. Position the heater in the appropriate place. Check that the safety distances (Page 12)to
inflammable materials are adequate before piling the stones in.

8
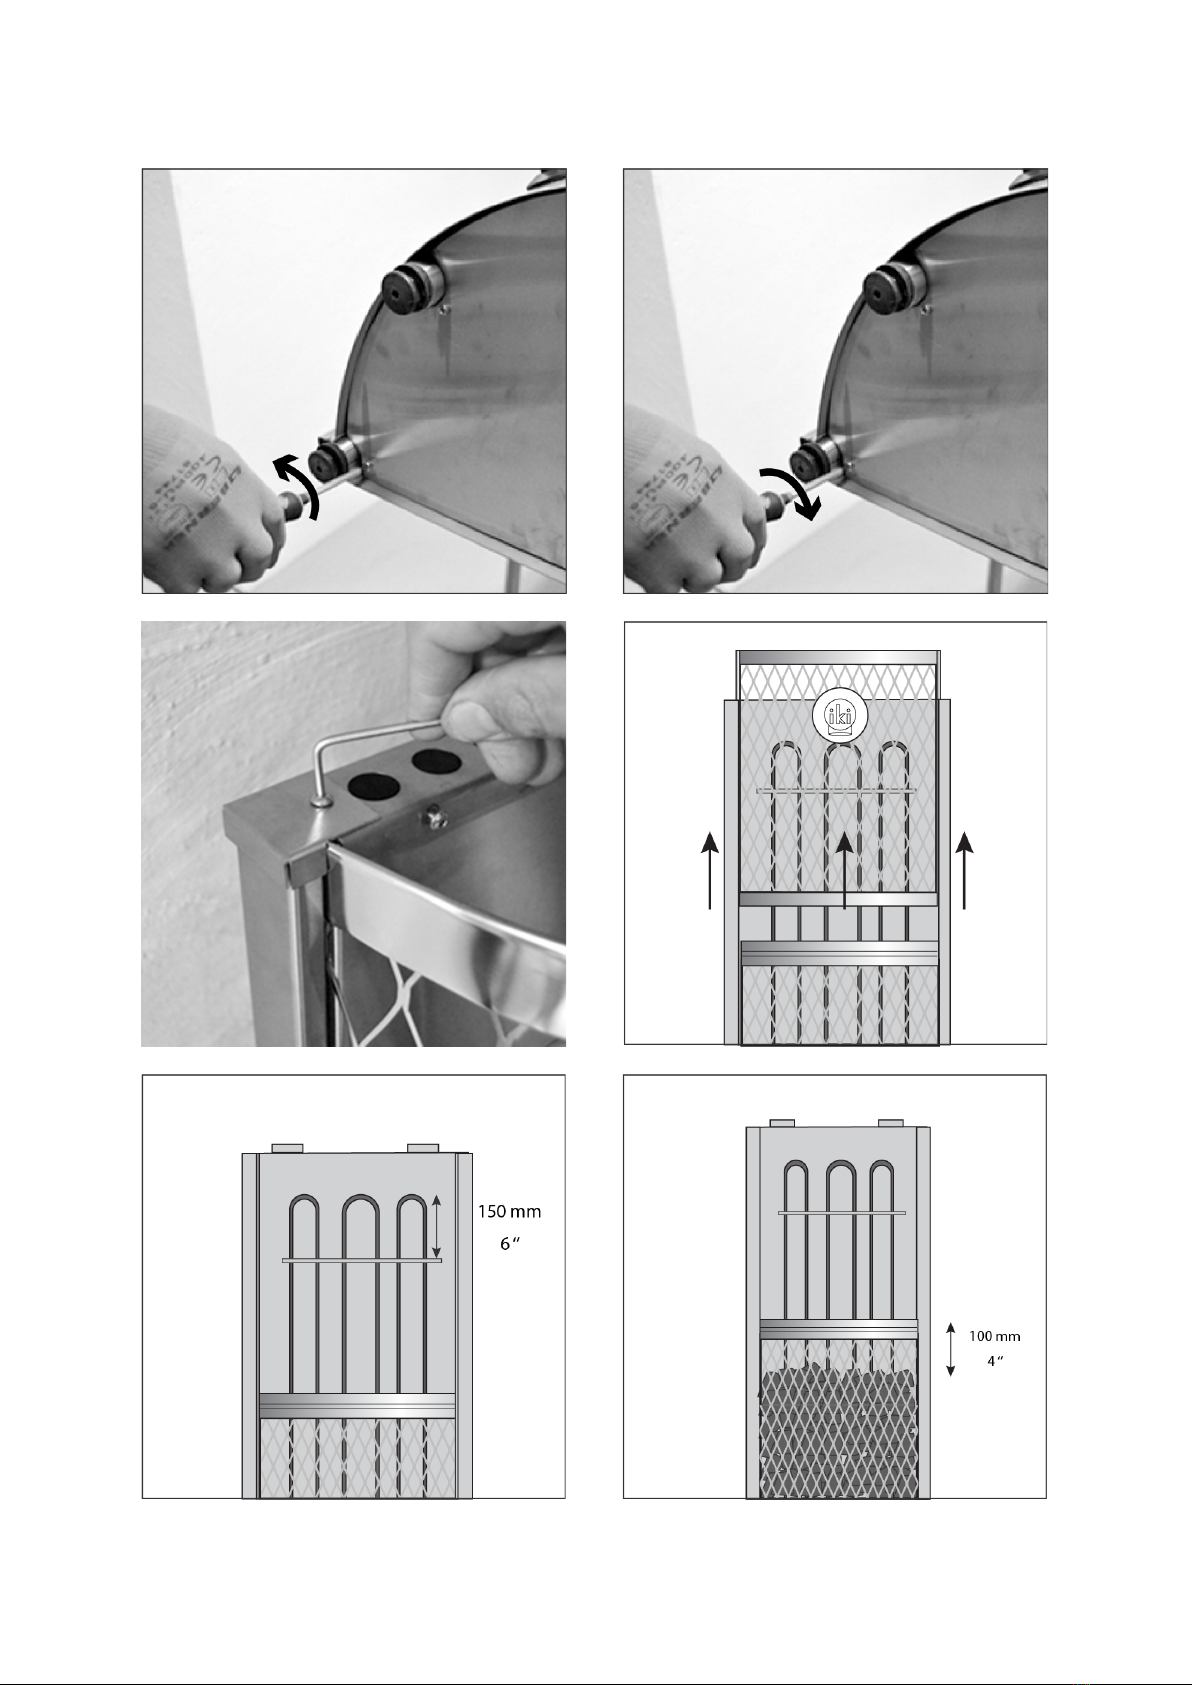
Piling of the stones
Beware of the sharp edges of the stainless-steel mesh. Use a long-sleeved shirt
and protective gloves during the installation and once taking the heater out of the
cardboard box! Wash the stones before piling. Olivine, olivine-diabase, peridotite
or black volcanite stones are recommended stones, in sizes 2-4 inches (5-10 cm) in
diameter.
1. Detach the two stainless steel mesh frames from one another using the key (2,5mm hexagon
socket) (Picture 3 and Picture 4).
2. Check that the guide for the elements is in place at the top of the heater and keeps them upright. It
should position appx. 15cm (6 inches) from the top of the elements (Picture 5).
3. Pile stones to the lower part of the frame until the level reaches 10 cm from the middle part
(Picture 6).This helps install the upper part within the lower frame. Idea is to pile a dense layer of
stones against the stainless-steel mesh frame and rest of the stones loosely inside in the center
part of the heater. Do not drop or throw stones into the heater. The dense layer prevents the direct
heat radiation to the overheating possibly flammable materials around the heater. The loose piling
of stones in the center part lets the air flow through the heater, resulting in a faster heating of
sauna and stones. Assure that elements do not touch each other or the heater mesh frame. Make
sure that the stones support the elements to stay vertically straight.
4. Slide the top part of the mesh back to its position and attach that to the lower part of the
meshframe (Picture 7).
5. Pile stones to the fill the upper part. You may loosen the element guide to make the piling easier
for the time of piling. At that point make sure that the elements remain straight when piling the
stones. A bare heating element can endanger combustible materials even outside the safety
distances. Check that no heating elements can be seen behind the stones!
6. To complete the piling, reattach the guide properly and leave in place. The heating elements should
be carefully covered. Please make sure that elements make NO contact with each other or with the
heater frame (Picture 8).
7. Attach the mesh frames by adding the cap on top of the upper mesh by using the key to tighten the
screw (Picture 9).
8. Affix the heater to the wall using the screws (Picture 10). ATTN! Check that the heater stands
steady and is level before doing this.
9. Connect the “steamguide” to the upper part of the heater (Picture 11).
10. Install the heat/steam deflector directly on top of the heater. Tighten the plate to the ceiling by using
4 screws. That will prevent the ceiling from overheating above the heater (Picture 12.).
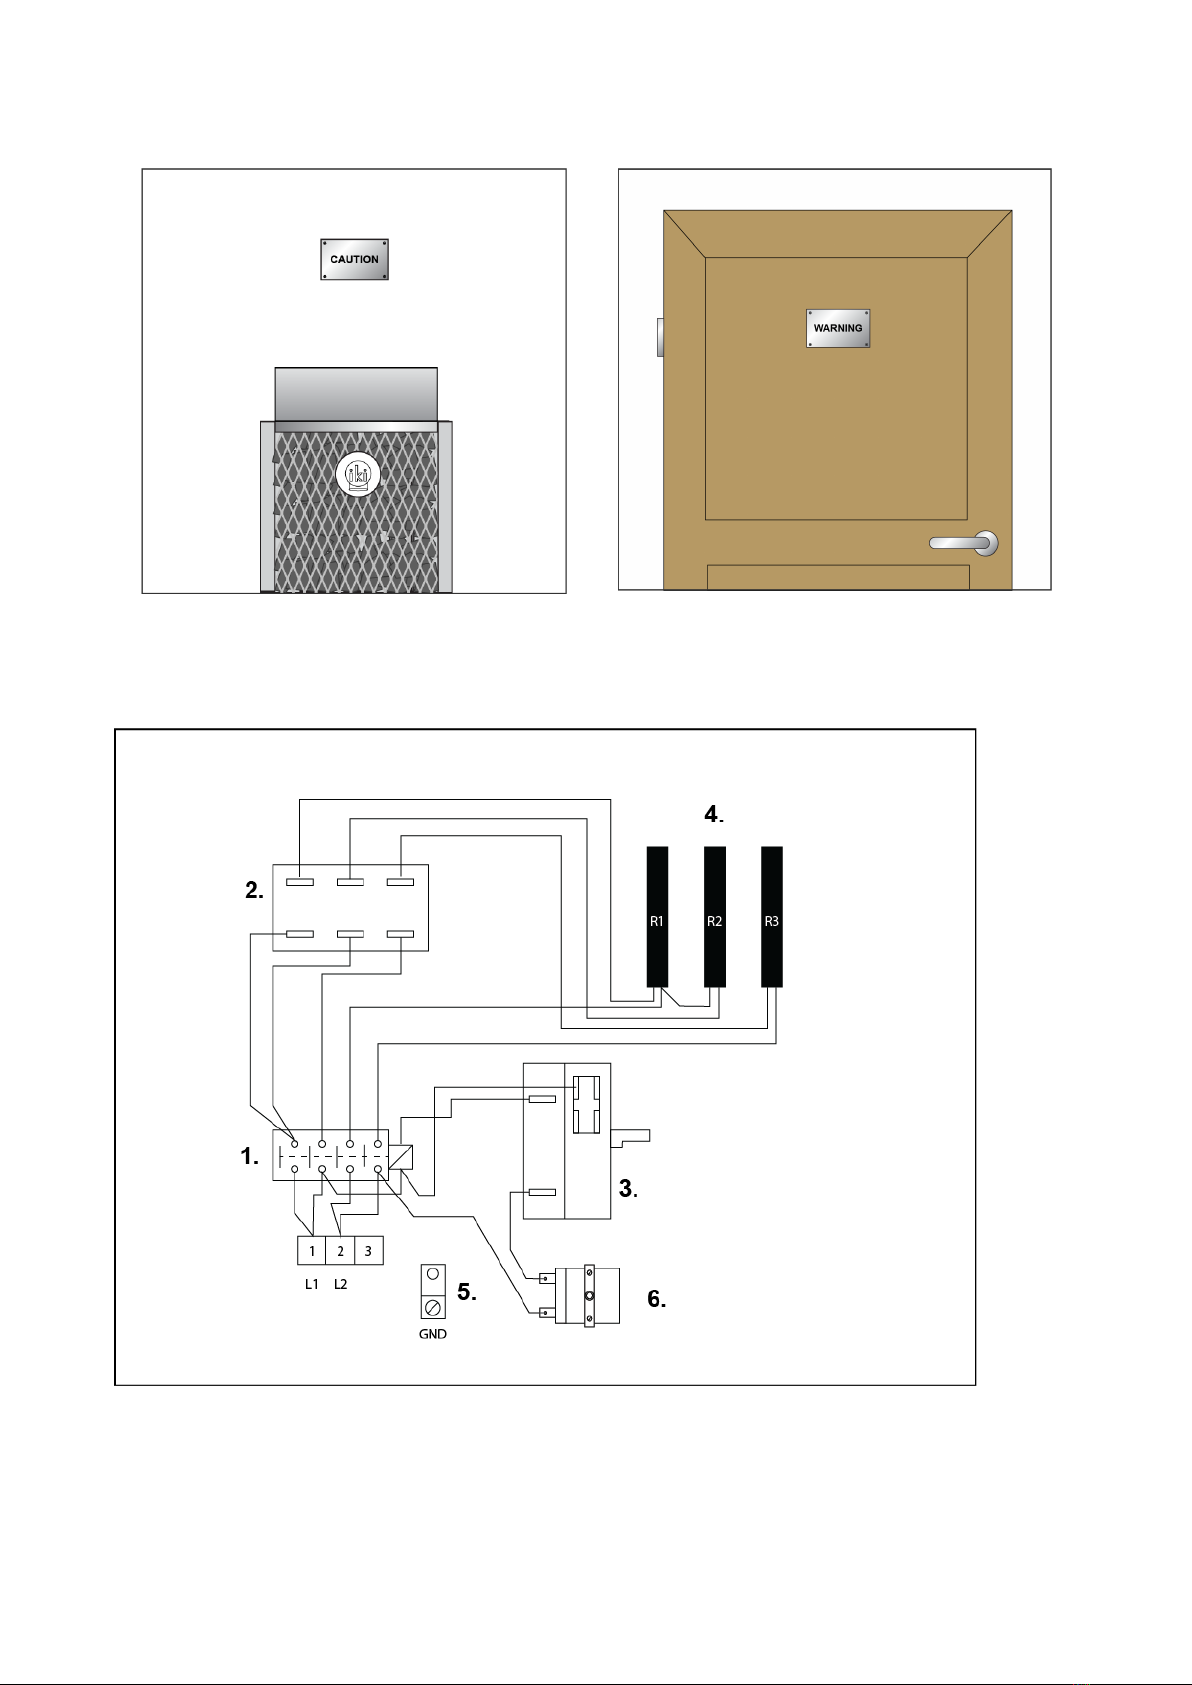
11. Please place the metal “CAUTION” sign on the interior wall of the sauna room directly above the
heater (Picture 13.) in a visible place (screws and nails included). Place the metal “WARNING” sign
outside, on the door of the sauna room (Picture 14.).
12. We recommend the use of safety railings around the heater. However, the stainless-steel mesh
frame does not over-heat the way ordinary steel-cased heaters do.
13. The surface of the stones can settle after the heater is in use. Frequently check that the heating
elements do not become exposed. If this should happen, add more stones. The disintegration of
the stones depends on the type of stones and the frequency of use. The condition of the stones
should be checked yearly, and broken stones must be replaced with new ones.
9
6.5.
4.3.
2.1.

10
12.
11.
10.9.
8.7.
11
Wiring diagram
1= Contactor 2= Thermostat 3=Timer 4=Heating elements 5=Ground 6Overheating limit control
14.13.

12
Supply wires
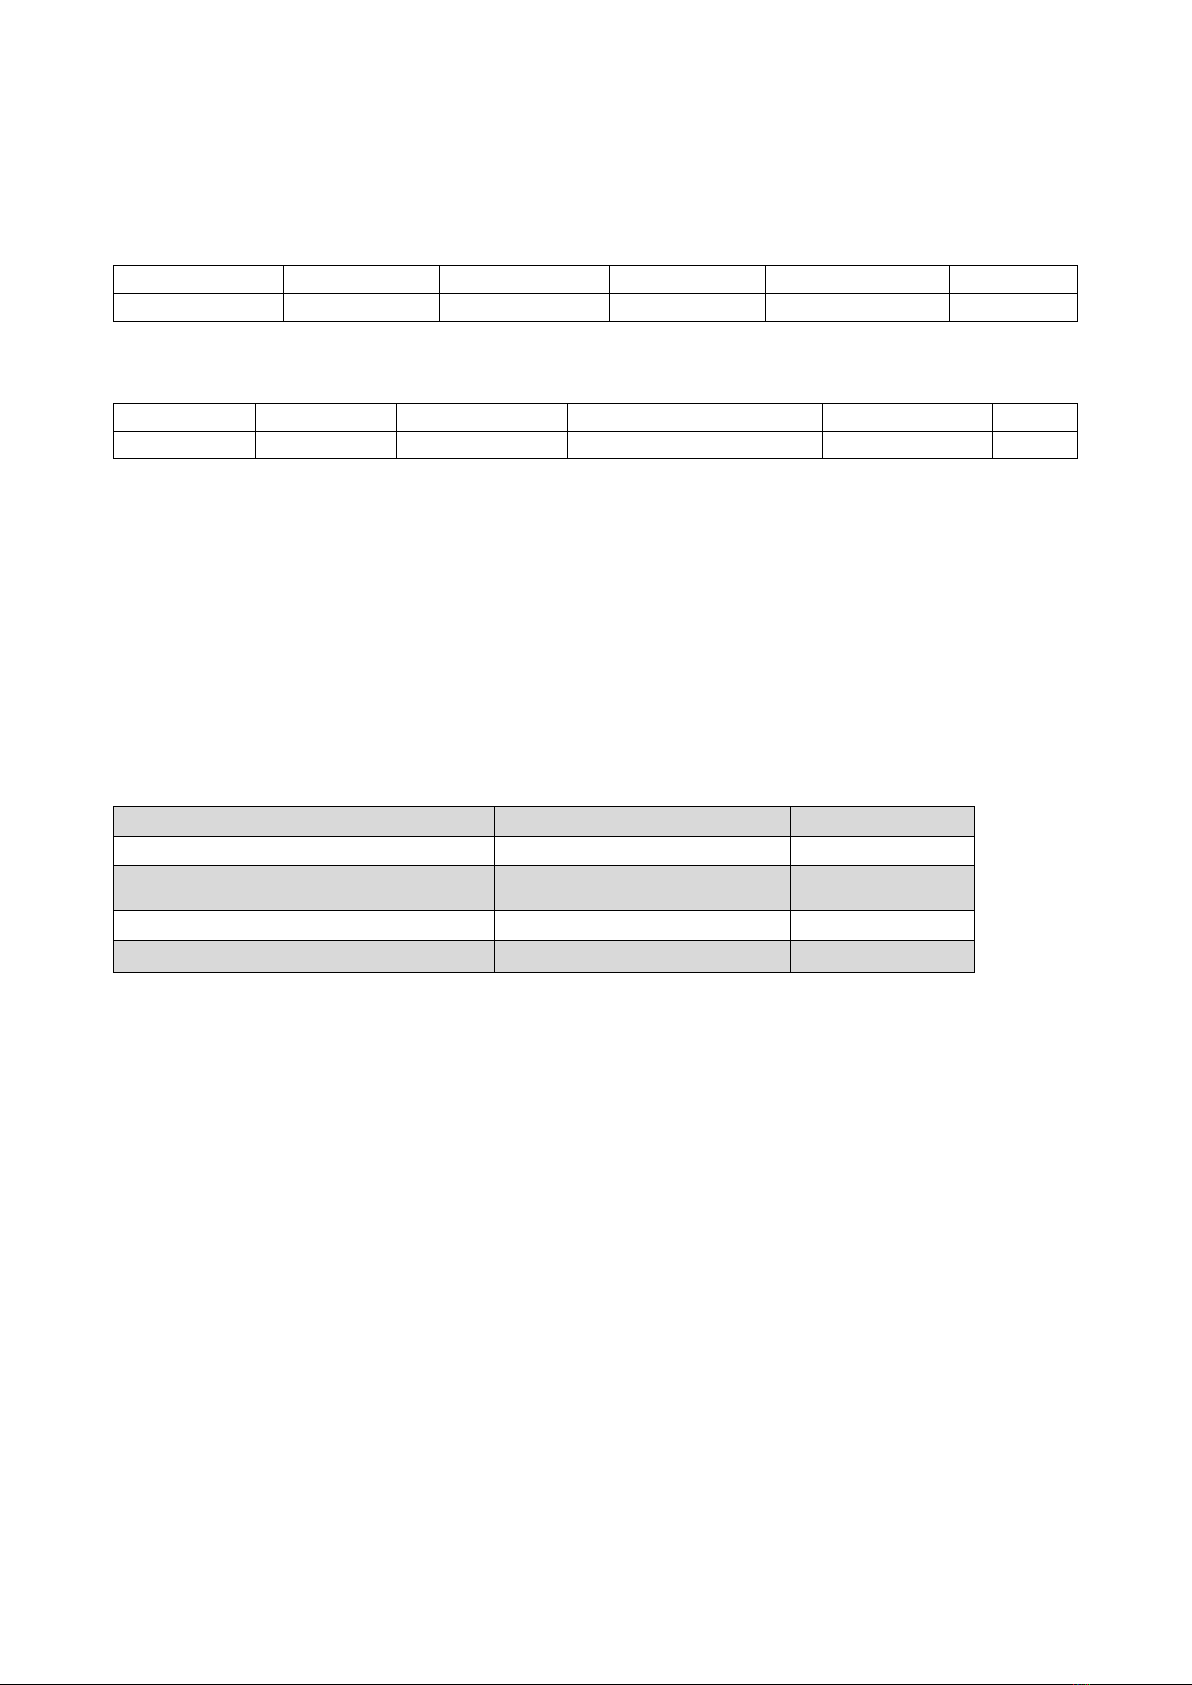
Heater model
Input kW
Voltage
Amps
Circuit breaker A
Wire Size AWG
Corner/Wall IKI 6
6
240
28.75
30
10
Corner/Wall IKI 9
9
240
37.5
40
6
All supply wire to be 90 °C copper.
Safety distances
Corner IKI
A: 4 inches (100 mm)
B (6 kW): 23,6 inches (600 mm)
B (9 kW): 31,5 inches (800 mm)
Wall IKI
A: 4 inches (100 mm)
B (6 kW): 23,6 inches (600 mm)
B (9 kW): 31,5 inches (800 mm)
If the heater is embedded inside the benches, there needs to be a 4 inches (100 mm) distance between the
front and the bench (A). We provide stainless steel embedding flange to complete the installation.
NOTE! Safety distance upwards from the heater is measured from the surface of the stones, not from the
water guide.
13
Model table
Size of
Sauna
Height of heater
Radius of
heater
Max. amount of
stones
Power
Corner IKI 6 kW
176-317 ft³
54,7 ‘’ / 139 cm
11,8 ‘’ / 30 cm
90 kg / 198 lb.
6 kW
Corner IKI 9 kW
282-565 ft³
50,8 ‘’ / 129 cm
14,9 ‘’ / 38 cm
140 kg / 308 lb.
9 kW
Size of
Sauna
Height of heater
Width/depth of heater
Max. amount of
stones
Power
Wall IKI 6 kW
176-317 ft³
54,7 ‘’ / 139 cm
9 / 15,35 ‘’ | 23 / 39 cm
90 kg / 198 lb.
6 kW
Wall IKI 9 kW
282-565 ft³
50,8 ‘’ / 129 cm
10,6 / 18,5 ‘’ | 27 / 47 cm
140 kg / 308 lb.
9 kW
The height of the heater is measured without the steam guide. The guide adds 10 cm to the height.
NOTE!Safety distance is measured upwards from the surface of the stones.
Requirements for water quality
Water type
Effect
Recommendation
Humus concentration
Color, taste, precipitates
<12 mg/l
Iron concentration
Color, smell, taste, precipitates
<0,2 mg/l
Hardness: most important substances are
manganese (Mn) and lime, i.e. calsium (Ca)
Precipitates
Mn: <0,05 mg/l
Ca: <100 mg/l
Chlorinated water
Risk to health
Forbidden
Seawater
Fast corrosion
Forbidden

14
Operating the heater timer and temperature
•The heater is equipped with the thermostat to adjust the sauna
temperature and timer to control when the heating starts and and
stops. it is prohibited to bypass the the timer or the thermostat.
•To set the TEMPERATURE in the sauna higher you can turn the
thermostat knob clockwise (+) and to set the temperature lower turn
the knob counter-clockwise (-).
•To set the TIME To turn the sauna on immediately turn the timer
switch past the first market area 0-1hr. Then turn the dial back until
you hear “click” sound. Then you have the heater turned on to 1hr
operating zone and the heating elements start heating up. Heater
will be then in operation for maximum 1 hr.
•The heater has “8+1hr” timer. That means that you can set the
heater to begin heating after a delay of up to 8hrs. If you tun on the
heater to “1-9hr” zone the heating will start automatically after the
selected delay time has elapsed
High temperature control (reset button)
•The heater has a build-in high limit control, which automatically will turn off the heater if the
temperature rises too high in the sauna. That limit control might also turn off the heater in case the
sauna stones have for some reason moved and exposed the heating elements. The elements should
then be carefully covered with the stones.
•To restart the heater, turn the timer first down to zero and then push the reset button firmly. The
button is located at the bottom part of the heater. If the heater will not start operating or
continues to shut off, contact IKI LLC for further assistance.

15
Warning placards
•There are 2 placards included in the shipment. CAUTION label must be installed visibly directly
above the heater on the wall. WARNING placard has to be attached to the door of the sauna.
Instructions for use and maintenance
•Before bathing for the first time, heat up the heater once to burn off the protective oil solvents
from the heating elements. Be careful to ventilate the sauna during that and afterwards.
•Before switching the heater on always check that there is nothing flammable on top of the heater
or inside the given safety distance
•The heating time is about 60–75 minutes depending on the size of the room and its ventilation.
Recommended bathing temperature for IKI stone pillars is 131- 167F (55–75C). The temperature
should be set to the desired range from the temperature knob in the control unit.
•Pouring water on the heater increases temperature and humidity. You can control the heat and
humidity by pouring the water to different parts of the heater. You can adjust the feel of the heat
and steam from soft to sharp by throwing water either to the side of the heater or by pouring
water on top of the stones at different places.
•Check that the heating elements do not become exposed as the stones shift about due to heat
expansion. The stones settle normally in the first 10-20 times when heater is used.
•Check the condition of the stones at least once a year and replace if necessary. Rearrange the
stones as advised in paragraph (Page 8: Piling the stones) once a year or even more often if the
sauna is in frequent use. Replace any disintegrated stones with new ones. By doing this, the power
output of the heater stays good and the risk of overheating is avoided.
•Do not throw water to the heater when there are people nearby: the steam coming off the heater
is burning hot. This might burn their skin. Do not throw too much water on to the heater. Maximum
amount is 12 ounces (0,5l). It is important to throw water on the heated stones to have a good and
comfortable level of humidity in the sauna.
•The water to be thrown on the heated stones should meet the requirements of clean household
water (Page 13).
•After taking the (Löyly) in the sauna, cool your skin down as necessary and allow your heart rate to
settle back to normal. Have a drink of fresh water or mineral water to help stabilize your fluid
balance.

16
Troubleshooting
If the sauna room does not heat up, check that:
•The power is on and the circuit breakers are in working condition and are the correct size.
•The timer is set to the operating range.
•The temperature is set in a controller to a higher temperature than the temperature in the sauna
room.
•The fuses are intact.
•The temperature restrictor (overheat protector) has not gone off. If temperature restrictor has
gone off, the reason for this must be solved before using heater again.
•The stones are piled correctly, not too tightly packed.
•Check that all heating elements glow when the heater is on.
•Check that the heater output is sufficient (Page 13: Model table)
•Check that the sauna room ventilation has been arranged correctly.
If the sauna heats up but the stones not (= water goes through without generating steam)
• Turn the temperature lower from the controller
• Check that the heater output is not too high (Page 13: Model table)
• Check that the heater output is not too high (Page 13: Model table)
• Check that the sauna room ventilation has been arranged correctly
If the wood panel starts to darken around the heater
Check that the requirements for safety distances (Page 12) are fulfilled.
Too tightly piled stones and the settling of stones or wrong stone type can stop the smooth air flow through
the heater. This might cause the overheating of surrounding materials. Check also that heating elements
cannot be seen through the stones. If heating elements are visible, rearrange the stones immediately
without further using the heater.
Other problems
If the heater makes noise, this can be caused by stones breaking due to heat and the thermal expansion of
heater parts. This noise may be evident when the heater warms up.

17
Warranty
IKI LLC (the manufacturer) assures a warranty to its products as stipulated here, guaranteeing the quality
and functionality of the products during the warranty period. The warranty requires that the buyer follow
the instructions regarding the placement of the heater, its installation, use and maintenance as well as
those regarding the qualities of the stones used in the heater. The length of the warranty period is 24
months from the day of purchase or from the day of purchase for private family use. The warranty period
for spa saunas and other public-use saunas is 6 months or determined according to the frequency of use.
Contact the manufacturer for more details.
The warranty for electric heaters requires that:
1In case of defect or malfunction, the buyer must always contact the manufacturer or
sales agent / retailer before searching for the cause or attempting to repair it. Any
repairs must be agreed upon in writing with the manufacturer.
2In private apartment use, the heater’s stone space needs to be cleaned out and re-piled
at least once a year and weathered stones need to be replaced with new ones.
3In institutional or professional use, the heater’s stones must be re-piled at least annually.
If this is not done, the warranty ceases to apply. In addition, the stones must be changed
to new ones at least once a year. Proof, such as the product’s purchase receipt, must be
presented at request. The use of ceramic heater stones (other than those form kerkes.fi)
is prohibited.
4The warranty does not cover dismantlement or reinstallation on sauna benches, removal
of sauna stones nor re-piling them.
5The warranty for replacement parts is 12 months from the day of purchase. The
replacement for the damaged part will be delivered at manufacturers cost. The
installation of the replacement part must be carried out by an licensed electrician. The
guarantee does not cover the faulty part removal or repair costs on the field. If the
heater is returned to the manufacturer or retailer within 2 years from the date of
purchase, the importer will provide free repair work, but may charge for spare parts if
the warranty period has expired. The guarantee is void if installation and wiring has not
been carried out by a licensed electrician or authorized and licensed service
representative. The electricians or installers signature is needed below. The guarantee is
not valid if the information below is not filled out and returned to the manufacturer or
importer within 15 days of purchase. The warranty is limited to the first installation of
the product and to the original buyer.
6Limitations to warranty: The product owner must take good care of the product. On
receiving the product, the owner is expected to check that it does not show signs of
damage caused during shipping or storage. In case of such damage, they must contact
the sales agent or transport company immediately. The manufacturer is not liable for
any damages caused during shipping, or by inappropriate storage, installation or use
against manufacturer’s instructions, neglect of maintenance, or damage caused by
placement of the heater in a place which does not meet the recommendations made by
the manufacturer. Replacing any parts in the heater does not extend the original
guarantee period.
7Damage notifications: The owner is responsible for notifying the manufacturer, the sales
agent, or manufacturer’s authorized mechanic of any damage or malfunction as soon as
it appears and within 14 days. Any warranty related claims must be submitted within 14
days from the closing date of the product’s warranty period. The manufacturer is not
liable for reimbursing any expenses, business loss or other direct or indirect harm
occurred to the buyer from damages or malfunction.

18
Quality guarantee / Freight guarantee
Guarantee of materials. The manufacturer guarantees the durability of the stainless-steel parts (resistor
platform and frame) in private home use for 10 years. During the warranty period any defects that appear
in the heater's raw materials or are production-based will be repaired free of charge. For example, the use
of seawater on the heater is forbidden. Read through the requirements for water quality in the installations
instructions.
The warranty does not cover colour changes, slipping or hair-line fractures, characteristic to natural stones,
which do not affect the use or the safety of the heater.
Damages occurred during shipping must be recorded in the waybill when the product is received or within
7 days of delivery. Shipping damage must also always be reported to the shipping company’s last contact.
The damaged part needs to be stored for inspection. Insurance compensates for the new part, which will
be delivered by a public transporter. In all issues concerning warranty contact the store from where the
product was purchased.

19
Ventilation
The ventilation in the sauna room needs to be considered. Proper air-flow allows bathers to enjoy
fresh, oxygen-rich air. The air should fully exchange 6 times an hour. The supply air inlet should be
installed on the wall or the ceiling at about 20 inches (500 mm) above the heater. The supply air
inlet vent should be 2-4 inches (50-100 mm) in diameter. The outlet vent should be located as far
away from the heater as possible, close to the floor. The outlet vent should be twice the size of the
inlet vent.
NOTE! The sensor for the thermostat should be located at a minimum of 39 inches (1000 mm) distance
from undirected vent for replacement air, or minimum of 20 inches (500 mm) distance from the air vent
directed away from the sensor.
Mechanical ventilation
This manual suits for next models
7
Table of contents
Other IKI Heater manuals


Popular Heater manuals by other brands

Global
Global SUNPOWER 550 W user manual

FanWorld
FanWorld FW5 User and installation manual

Pro-Elec
Pro-Elec PELL0209 instructions

Heat Storm
Heat Storm Hs-1000-WX Operational manual

VOLTOMAT HEATING
VOLTOMAT HEATING FH-107760.1 instruction manual

Remington
Remington REM-70-SS-O User's manual & operating instructions


