IKOHS Chef BOT COMPACT User manual


INDEX
CHEFBOT COMPACT
Chop
Slowc
ook
St
eam
Progra
m
Time
Temperatur
e
Pulse
Spee
d
EN 6 -18ENGLISH
ESPAÑOL
PORTUGUÊS
FRANÇAIS
ITALIANO
DEUTSCH
19 - 31
32 - 44
45 - 57
58 - 70
71 - 83
ES
PT
FR
IT
DE
NEDERLANDS 84 - 96
NL
POLSKI 97 - 109
PL

EN
6
WELCOME
Thank you for choosing our cooking robot. Before using the appliance, and to ensure the best use, carefully read these
instructions.
The safety precautions enclosed herein reduce the risk of death, injury and electrical shock when correctly adhered
to. Keep the manual in a safe place for future reference, along with the completed warranty card, purchase receipt
and package. If applicable, pass these instructions on to the next owner of the appliance. Always follow basic
safety precautions and accident prevention measures when using an electrical appliance. We assume no liability
for customer failing to comply with these requirements.
ENGLISH
When using any electrical appliance, basic safety precautions should always be observed.
• Switch off the appliance and disconnect from supply before changing accessories or touching any moving parts
while the appliance is in use.
• Keep body parts, jewelry and loose clothing away from moving parts and tted tools/attachments.
• Always remove the blade before pouring contents from the bowl.
• Keep hands and utensils out of the bowl whilst connected to the power supply.
• Never use a damaged appliance. Get it checked or repaired.
• Do not exceed the maximum ll level marked on the inside of the bowl.
• Never let the power unit, cord or plug get wet.
• Be careful when handling or touching any part of the appliance when being used in the cook mode or after cooking.
In particular the bowl, lid and tools as they will remain HOT long after the appliance has been switched off.
• Use the handles to remove and carry the bowl. Use oven mitts when handling the hot bowl and hot tools.
• The bottom of the bowl will remain hot long after the heating has stopped. Use caution when handling, and use a
surface protection mat when placing the bowl on heat sensitive surfaces.
• Be careful of steam escaping from the bowl particularly when removing the lid or ller cap.
• Do not remove the lid or ller cap whilst liquid is boiling.
• Always close the ller cap when using the chopping function.
• Only use the bowl and tools supplied with this appliance. Never use the bowl with any other heat source.
• Never operate the appliance in the cook mode with the bowl empty.
• Do not use the blender lid to operate the processor. This appliance will be damaged and may cause injury if the
interlock mechanism is subjected to excessive force.
• When using this appliance ensure it is positioned on a leveled surface away from the edge. Do not position below
overhanging cupboards.
• For the correct and safe operation ensure that the bowl base and temperature sensors are clean and dry before
cooking.
CAUTION: In order to avoid a hazard due to inadvertent resetting of the thermal cut-out, this appliance must not be
supplied through an external switching device, such as a timer, or connected to a circuit that is regularly switched
on and off by the utility.
• Always ensure food is thoroughly cooked before eating.
• Food should be eaten shortly after cooking or allowed to cool quickly and then refrigerated as soon as possible.
• Misuse of your appliance can result in injury.
SAFETY INSTRUCTIONS

EN
7
• Appliances can be used by persons with reduced physical, sensory or mental capabilities or lack of experience and
knowledge if they have been given supervision or instruction concerning use of the appliance in a safe way and if
they understand the hazards involved.
• Children shall not play with the appliance .
• This appliance shall not be used by children. Keep the appliance and its cord out of reach of children. Never let the
cord hang down where a child could grab it.
Warning: Be careful when handing the sharp cutting blades, emptying the bowl and during cleaning .
• Always disconnect the appliance from the supply when; unattended and before assembly, disassembly or clean-
ing.
• If the supply cable is damaged, it must be replaced with a special cable which is available at the manufacturer or
its service agent in order to avoid a hazard
• Only use the appliance for its intended domestic use. We will not accept any liability as a result of improper use,
or failure to comply with these instructions.
• The maximum capacity for blending is 3.5L.
• Be careful if hot liquid is poured into the food processor or blender as it can be ejected out of the appliance due
to a sudden steaming.
• The appliance is only to be used with the stand provided.
• The appliance is for household and indoor use only.
• Avoid spillage on the connector.
• Do not disassemble the base of the cup (including handle enclosure), it’s not for user maintenance.
• After the motor stop working ( if it was) , the cooling fan will still keep working for another 2mins
• Surfaces are liable to get hot during use .
• For how to clean the surfaces in contact with food please refer the paragraph of Care and Cleaning .
CAUTION: Ensure that the appliance is switched off before removing it from the stand.
• The “Food Processor” lid is only suitable to be used with the grating discs, it is not designed for any other type of
use (cooking, whisking, etc.). It should only be used as a food processor and must be replaced by the main lid to
continue cooking.
Before plugging in
Make sure your electricity supply is the same as the one shown on the bottom of your appliance.
WARNING: THIS APPLIANCE MUST BE EARTHED.
Cooking mode Food processor mode Steamer mode
WARNING: NEVER WASH THE BOWL INTO THE DISHWASHER AS THE ELECTRICAL CONNECTIONS ON THE BASE
WILL BE DAMAGED.
EN
8
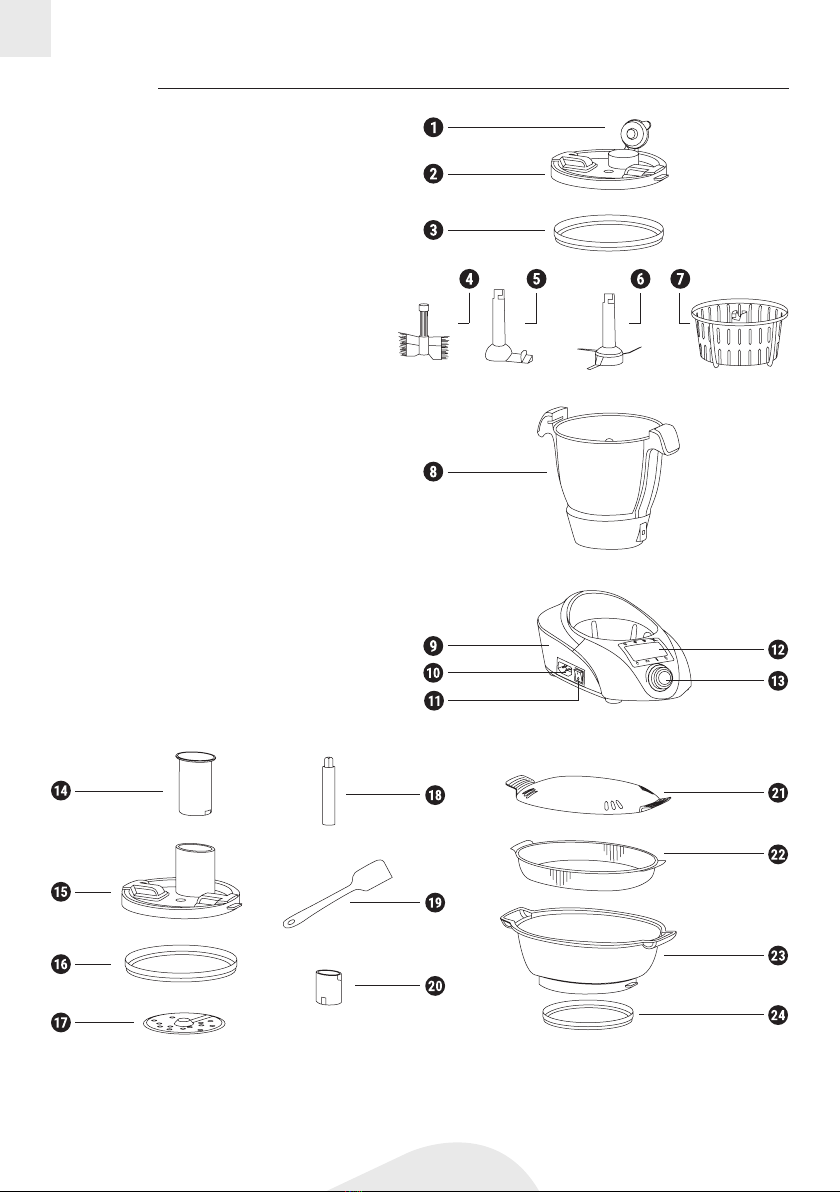
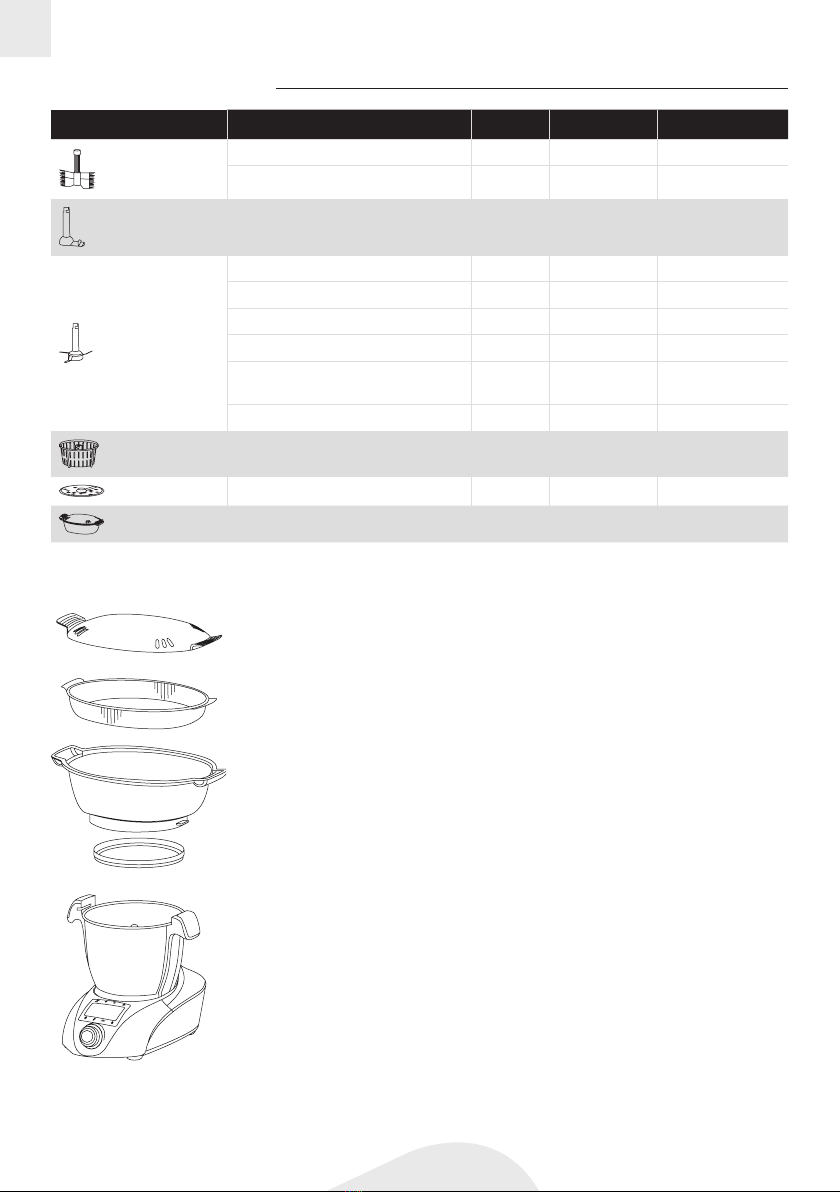
PARTS LIST
1. Steam outlet cap
2. Blender Lid
3. Blender lid seal
4. Whisk
5. Stir paddle
6. Blade
7. Steam basket
8. Blender jug
9. Base unit
10.Power Socket
11.Main switch
12.IMD Display screen
13.Knob
14.Pusher
15.FP lid
16.Seal for FP lid
17.Grating disc
18.Driving shaft
19.Spatula
20.Measuring cup
21.* Lid for steamer basket
22.* Steamer tray
23.* Steamer basket, deep
24.* Seal of deep steamer basket
ChopSlowcookSteam
Program
Time
Temperature
Pulse
Speed
* Accessories sold separately.

EN
9
1. Chop
2. Slow Cook
3. Steam
4. Program
5. Timer
6. Temperature
7. Speed
8. Pulse
9. Control panel
Touch Screen
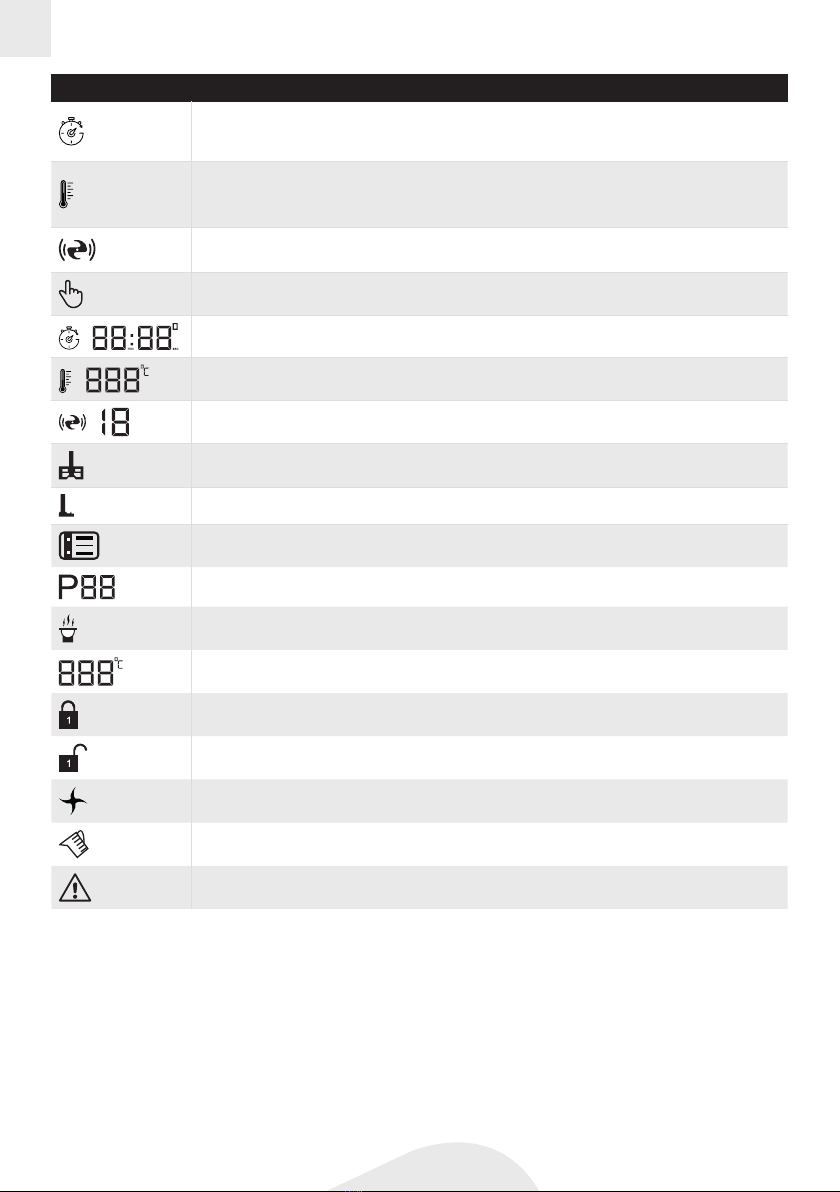
CONTROL PANEL OVERVIEW
ICON FUNCTION
Chop
Chop Button: Press for the Chop program
Time: Default 10s but adjustable from 10s to 4mins
Temperature: Blocked
Speed: Default 6 but adjustable from 1~10
Press the knob to start a cycle after setting.
Slow Cook
Slow Cook Button: Press for the slow cook program
Time: Default time is 60 minutes but adjustable from 20~90
Temp: Default temperature is 100 but could be adjusted from 60 to 100 .
Speed:1 Could be adjustable from 1-3 .
Steam
Steam Button: Press for the Steam Function
Time: Default time is 20 minutes but adjustable from 0~60mins
Temp: Default temperature is120 but could be adjusted from 100~120
Speed: 0 and Blocked
Press knob to start a cycle after you have selected the time.
Program
Program Button: Press to enter the preset programs. Rotate the knob to select auto program from
P01~P30. Each program has a default time, temp and speed. Press the knob for the device to start
Rotary knob
1. Can be used to setting temperature ,time, speed ;or select different Program.
2. Press the knob and the cooker will suspend when cooking .It will continue cooking if your press again.
3. Hold the knob in and the cooker will stop cooking.
4. Press the knob after you finish the sett up and the cooker will start cooking.
5. It will automatically cancel if you hold in the knob when you put in the program.
6. When the program is finished, the IMD panel will show “end” , Press the knob and the cooker will go into
standby mode.
7. Keep the knob pressed to reset the parametres once the robot is in Stand-by mode.
EN
10
ICON FUNCTION
Time
Time Button: Press and set time
Time range: 0-90 minutes, The adjustment takes place via the following steps: Press one time to set
seconds and press again to set minutes.
Temperature
Temperature Button: Press and set temp
Temp range: 37º - 120ºC
First step goes from 37º to 40ºC. Then, every steps in intervals of 5°
Speed
Speed Key: Press and set speed
Speed range: 1 - 10
Pulse
Pulse Button: Long press to activate and unit stop working after finger off button. Pulse button will not be
activated if the temperature inside bowl is over 60°and Warning Icon will show up.
Time display
Temperature display
Speed display
Whisk Icon: Will show up when proper speed is selected for whipping cream, egg white and emulsify
Stir paddle Icon: Will show up when proper speed is selected during all heating process.
Program Icon: Enter into auto program
Program display: Auto program range
Keep warm Icon
Food temperature display
Lock icon : This shows when the lid is geared in correctly. The cooker is in in standby mode and ready
to work .
Open Lock icon :This indicates that the lid is not geared in properly and as a result the cooker will not
work
Blade icon
Add ingredients icon : The cooking will suspend when this icon shows. Remove the lid to add ingre-
dients. When you put the lid on, the and icon will disappear and the cooker will continue cooking
Warning Icon
EN
11
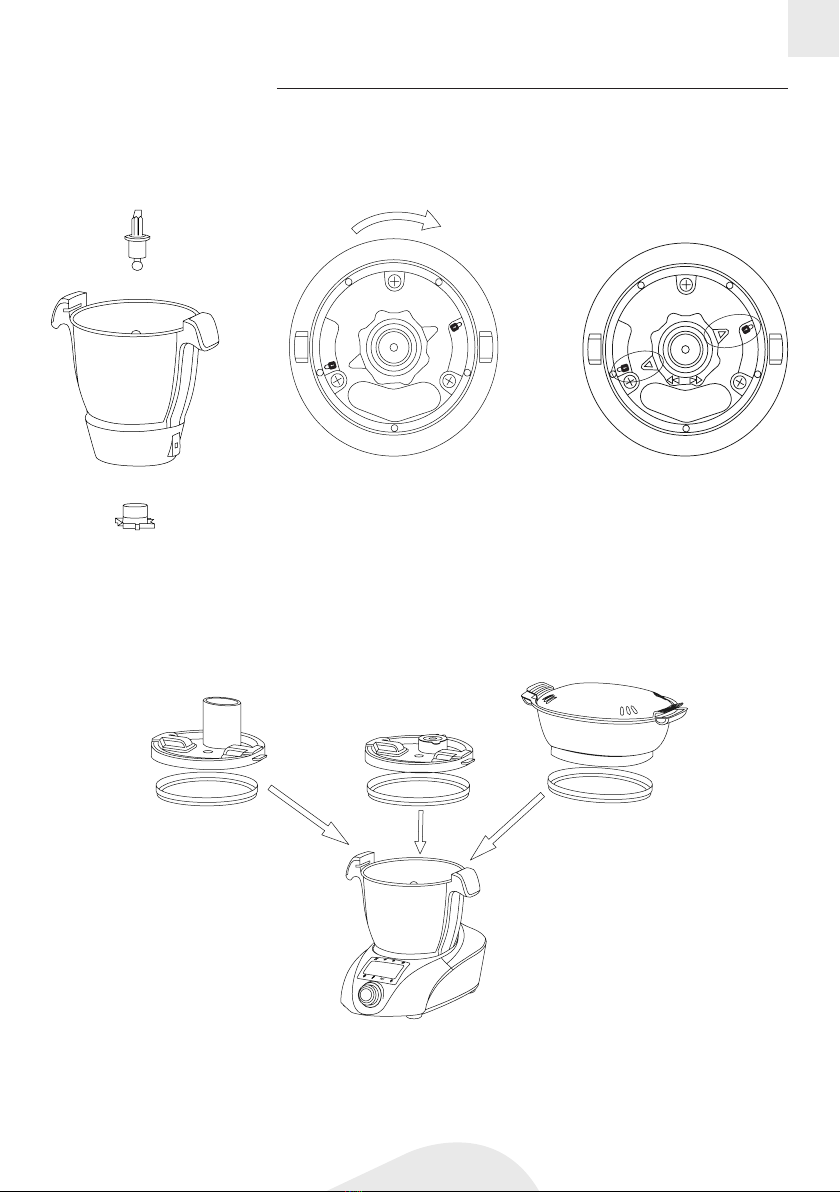
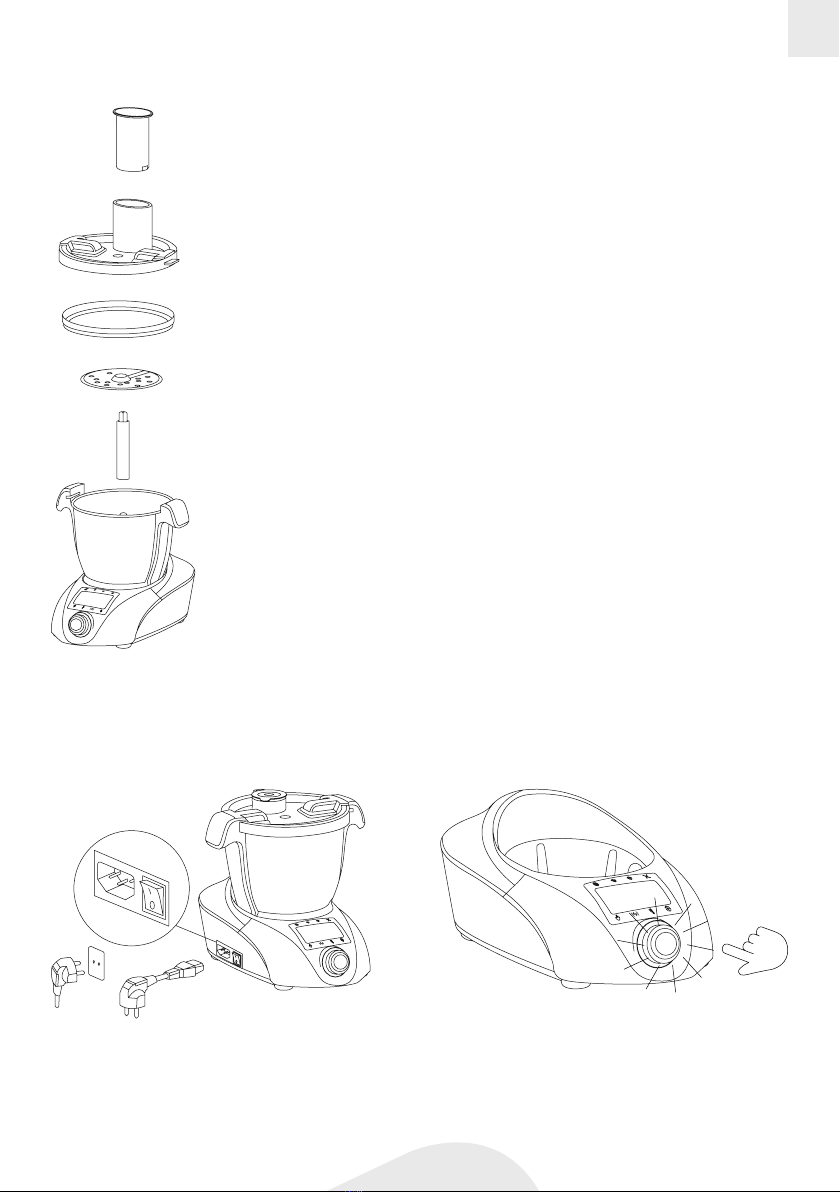
ASSEMBLING THE ROBOT
1. Place the drive shaft correctly locked into the jug.
2. Adjust and turn clockwise to x it.
3. Insert the Jug into the Main Unit .Press down rmly to lock into place.
• There is no need to place the drive shaft or any accessory if you just want to boil or heat food.
Lid attachment
1. Attach the rubber seal to each lid before using.
2. Choose the blending lid, food processor lid or steamer, place and secure it with the jug before starting the unit.
• Bear in mind that the food processor lid is not to be used for cooking. It has to be used with the grating disc.
• Make sure the steam outlet cap is rmly closed before using to avoid splashes.
ChopSlowcookSteam
Program
Time
Temperature
Pulse
Speed
EN
12
ACCESSORIES OVERVIEW
KEY PART FUNCTION SPEED TIME TEMPERATURE ºC
Whisk
Whip Egg white 4 2-4 minutes ---
Whip Cream 3 3-5 minutes ---
Stirring paddle
Soup 1-2 1-90 minutes 100
Other ingredients that need to heat 1-2 As needed As needed
Blade
Meat Chopping 8-10 30-60s ---
Ice Crush Sugar 8-10 10-20s --
Blender 10 1-2 minutes ---
Chopping (Onion, Shallot, Celery etc) 5-7 15-60s ---
Bean, Soybean, nut, peanut, Coffee
bean, Almond
10 2-3 minutes ---
Kneading 1 3-5 minutes ---
Steam basket
Rice etc. --- 20-30 minutes 110
Grating disc Slices and grates 5-6 30-60S --
Steamer Fish --- 10-60 minutes 110-120
Using the steamer
ChopSlowcookSteam
Program
Time
Temperature
Pulse
Speed
1. Add water to the jug. At least 600 ml.
2. Assemble the steamer basket to the jug and lock it by turning it clockwise.
3. The steamer tray is optional.
4. Do not forget to attach the lid.
• Important: Place the ingredients taking into account the steaming outlets at
the bottom of the steamer basket. If they are blocked, the cooking won’t be
as efcient and it will take longer.
• If water is completely evaporated, error E5 will show in the control panel. Add
more water to continue cooking.
EN
13
Using the slicer disc
ChopSlowcookSteam
Program
Time
Temperature
Pulse
Speed
1. Attach the disc axis in the driving shaft.
2. Place the disc on the upper part of the axis.
• The disc is reversible. One side is used for slicing and the other for grating.
3. Hold the disc by the two holes using your thumb and index or middle nger. Be
careful because the edges are very sharp.
4. Close the jug using the food processor lid.
5. Turn it clockwise to lock it before start using it.
Connecting the robot
ChopSlowcookSteam
Program
Time
Temperature
Pulse
Speed
1. Plug your powercord into the main base and a power outlet. Switch on the unit.
2. The touch panel will ash, push the rotary knob to enter into standby mode.
3. Select your needed function as required.
Chop SlowcookSteam
Program
Time
Temperature
Pulse
Speed

EN
14
SETTING
Setting the time
Setting the speed
1. Time range: 0-90
2. Press button: Turn in clockwise to increase time and in anti-clockwise to reduce the time. The time is
shown on display like below.
1. Temperature range: 37-120ºC
2. Press button. Turn in clockwise to increase temperature and in anti-clockwise to reduce the time. The
temperature is shown on display like below.
Setting the temperature
1. Speed range: 0-10
2. Press button, Turn in clockwise to increase speed and in anti-clockwise to reduce the speed. The
speed is shown on display like below. During heating: only speed 1~3 is available.
3. DIY Mode:
• Speed 1-3: ash and remain alight after unit starts working.
• Speed 4: ash and remain alight after unit starts working.
• Speed 5 and above: Only ash and remain alight.

EN
15
1. Once a program has been selected, press the control knob to start it.
2. You can pause the program during the cooking process by pressing the control knob and then resume the course
of your recipe by pressing the same button a second time.
3. To completely stop the program started, press and hold the control knob for several seconds.
4. When a program ends, 3 beeps are emitted. The message “end” also appears on the screen. Turn off the power
before opening the cover.
5. When you open the lid after cooking, the steam from the bowl may burn you. Protect your hands with a cloth or
potholders when you open the lid after cooking.
6. To use the different programs optimally, refer to one of the recipes in the cookbook using this function, and follow
the various recommended steps.
STARTING, PAUSING AND STOPPING THE ROBOT
AUTOMATIC FUNCTIONS
Chop
Time: Default 10s but adjustable from 10s to 4mins
Temperature: Blocked
Speed: Default 6 but adjustable from 1~10
Press the knob to start a cycle after setting.
Slow Cook
Time: Default time is 60 minutes but adjustable from 20~90
Temp: Default temperature is 100 but could be adjusted from 60 to 100 .
Speed:1 Could be adjustable from 1-3 .
Steam
Time: Default time is 20 minutes but adjustable from 0~60mins
Temp: Default temperature is120 but could be adjusted from 100~120
Speed: 0 and Blocked
Press knob to start a cycle after you have selected the time.
Pulse
Pulse Button: Long press to activate and unit stop working after finger off button. Pulse button will not be
activated if the temperature inside bowl is over 60°and Warning Icon will show up.
USAGE SUGGESTIONS
FUNCTION ACCESSORY SPEED TIME
Maximum cooking
ingredients in one
time
Meat Chopping Chopping blade Speed 8-10 30s-60s 500g
Ice Crush Chopping Blade Speed 8-10 10-20s 500g
Blender Chopping Blade Speed 10 1min Maximum Capacity:
2000ml
Chopping (Onion,Shallot,Celery.etc) Chopping Blade Speed 5 15s-30s 500g
Kneading Chopping Blade Speed 1 3-5mins 350g our + 175g wa-
ter + 20g oil
Slices, grates (Carrot, Cucum-
ber,Potato)
Grating disc Speed 5-6 30-60s 500g
Soup Stir paddle Speed 1 Choose Soup function. Or you
can set the right time, speed,
temperature on your own.
Maximum Capacity
2000ml

EN
16
HOW TO RESTART THE TEMPERATURE PROTECTOR
When the bowl is overheated, the temperature protector will automatically disconnect to stop heating and protect the
bowl from burning.
We added a manual reset button at the bottom of the bowl. Please press the white silicone button when the tempera-
ture protector disconnects. Once in position, you can hear a “click” which indicates that the temperature protector is
reset and it can work properly again.
AUTOMATIC PROGRAMS
• Press the Program button on the control panel to set the desired automatic program out of the 30 which are pre-re-
corded. You will see P01 for the rst program, P02 for the second and so on, until P30.
• Turn the rotary knob to select the program.
• For the automatic programs included, an audible signal is emitted at each stage when it is necessary to add ingredi-
ents during the recipe. Please refer to the recipe book.
• To use the pre-recorded automatic programs, refer to the recipe book for 100% successful recipes.
• Here you will nd the list of automatic programs. Refer to the manual attached to learn how they work or go to www.
ikohs.com to download it.
1. Slice and grate
2. Veluté soup
3. Broth
4. Stir fry and brown
5. Quick sauce
6. Stew
7. Tomato sauce
8. Bechamel
9. Pasta
10. Rice
11. Risotto
12. Smooth puree
13. Crushed potatoes
14. Boil
15. Jam and compote
16. Custard/an
17. Crème anglaise and pastry cream
18. Melt
19. Floating Ile
20. Emulsify
21. Sorbet
22. Yogurt
23. Bread and pizza dough
24. Pie dough
25. Crepe dough, pancakes, wafes and fritters
26. Choux pasta
27. Marzipan
28. Smoothie juices and milkshakes
29. Keep warm and heat
30. Autocleaning

EN
17
MOTOR RESTING TIME
If the motor is overloaded, an error will occur to prevent overheating. The display will show E1.
To avoid this, here are some indications of resting time to allow the motor to cool:
• After using a dough program (23-27), leave the appliance to rest for at least for 15 to 20 minutes. These programs
force the engine a lot, resting time is very important.
• After using the Pulse function, allow the motor to stop for 2 or 3 minutes. Especially if it has been used for the max-
imum expected duration of 1 minute.
• After using the Chop function, let the engine rest for 10 to 30 minutes depending on the use intensity. Avoid mixing
more than 1 or 2 minutes in a row at a speed higher than 6.
• Allow about 10 minutes of rest between two soup programs.
MAX
duration 90 min 10 min 2 min 4 min
Motor speed
1√ √ √
2√ √ √
3√ √ √
4√ √
5√ √
6√ √
7√ √
8√
9√
10 √
Speeds used per accessory
For example, error display is shown like below:
ERROR MESSAGES ON THE DISPLAY AND REMEDY
E1 E3 E5 END
MESSAGE • Attention: Motor over-
loaded or damaged.
• Attention: No pot de-
tected. Please put pot
in place.
• Attention: No water
left. Please add water. • End of Program.
SOLUTION
• Un-plug, an let the de-
vice cool down for an
hour. Afterwards, it is
ready for use again.
• Put pot into place.
• Switch off and add wa-
ter into bowl. Switch on
after temperature insi-
de bowl cools down.
• Press knob and return
standby mode.

EN
18
In compliance with Directives: 2012/19/EU and 2015/863/EU on the restriction of the use of dangerous substances in electric and
electronic equipment as well as their waste disposal. The symbol with the crossed dustbin shown on the package indicates that the
product at the end of its service life shall be collected as separate waste. Therefore, any products that have reached the end of their
useful life must be given to waste disposal centres specialising in separate collection of waste electrical and electronic equipment, or
given back to the retailer at the time of purchasing new similar equipment, on a one for one basis. The adequate separate collection for
the subsequent start-up of the equipment sent to be recycled, treated and disposed of in an environmentally compatible way contributes
to preventing possible negative effects on the environment and health and optimises the recycling and reuse of components making up
the apparatus. Abusive disposal of the product by the user involves application of the administrative sanctions according to the laws.
CARE AND CLEANING
MAINTENANCE
1. Always switch off and unplug before cleaning.
2. Remove the lid and tool from the bowl before cleaning,
3. Power unit: Wipe with a damp cloth, then dry. Never use abrasives or immerse in water.
4. When there are burn marks on the bottom of the blender jug, you can put some citric acid or lemons in water, heat
it for 5~7 minutes and use it to remove the burn marks with a cloth
5. Bowl/stirring paddle/blade: Wash the parts, then dry thoroughly. If there is any food stuck or burns present on
the inside of the bowl, remove these as much as possible using a spatula. Fill the bowl with warm soapy water
and allow it to soak. Remove any stubborn deposits using a cleaning brush. Any discoloration of the bowl will not
affect its performance. DO NOT WASH THE BOWL INTO THE DISHWASHER.
6. How to take out steam basket: Put mearsuring cup into steam basket slot and rotate to x. Then, take out.
• Please unplug the power cord before cleaning.
• Please use a dry dishcloth to clean the main unit. Do not wash it with water or put it into the dishwasher.
• DO NOT wash the bowl into the dishwasher because the electrical conections on the base will be damaged.
• Metal brush, nylon brush, household cleaner, diluent, cleaning products will damage the surface of product structure.
• Please use dry and soft cloth to clean power cord.
Note: If you are having a problem with your appliances which cannot be solved by above mentioned , Please call
our helpline.
WARNING: NEVER WASH THE BOWL INTO THE DISHWASHER AS THE ELECTRICAL CONNECTIONS ON THE BASE
WILL BE DAMAGED.

ES
19
ESPAÑOL
BIENVENIDO
Muchas gracias por elegir nuestro robot de cocina. Antes de utilizar el aparato, y para garantizar un uso correcto, lea
atentamente estas instrucciones.
Las precauciones de seguridad incluidas en el presente documento reducen el riesgo de sufrir una descarga eléctrica,
lesiones e incluso la muerte cuando se respetan estrictamente. Guarde este manual en un lugar seguro para consul-
tarlo en el futuro, junto con la tarjeta de garantía del producto debidamente cumplimentada, el embalaje original del
producto y el justicante de compra. Si es posible, entregue estas instrucciones al siguiente propietario del electrodo-
méstico. Respete en todo momento las precauciones de seguridad básicas y las normas de prevención de accidentes
cuando utilice un aparato eléctrico. Declinamos toda responsabilidad derivada del incumplimiento de estas instruc-
ciones por parte del cliente.
Al utilizar cualquier aparato eléctrico, se deberán respetar en todo momento las siguientes medidas de seguridad:
• Apague y desenchufe el aparato antes de cambiar los accesorios o tocar las piezas móviles mientras se esté utili-
zando la unidad.
• Mantenga las extremidades, las joyas y la ropa holgada alejada de las piezas móviles y de los utensilios/accesorios montados.
• Retire siempre la cuchilla antes de verter el contenido del recipiente.
• Mantenga las manos y los utensilios fuera del recipiente mientras el aparato esté conectado a la fuente de alimentación.
• Nunca utilice un aparato estropeado. Llévelo a revisar o reparar.
• No supere la marca de llenado máximo que gura en la parte interior del recipiente.
• No deje que la unidad eléctrica, el cable o el enchufe se mojen.
• Extreme las precauciones al tocar o manipular cualquier pieza del aparato cuando esté en funcionamiento en el
modo de cocinado o después de la cocción, en especial el recipiente, la tapa y los utensilios, ya que pueden perma-
necer CALIENTES mucho tiempo después de que el aparato se haya apagado.
• Utilice las asas para retirar y transportar el recipiente. Utilice guantes de horno para manipular el recipiente y los
utensilios cuando estén calientes.
• La parte inferior del recipiente permanecerá caliente mucho tiempo después de haber apagado la fuente de calor.
Extreme las precauciones al manipular la unidad y utilice un salvamanteles si coloca el recipiente sobre supercies
sensibles al calor.
• Tenga cuidado con el vapor que sale del recipiente, especialmente al retirar la tapa o el tapón de llenado.
• No retire la tapa ni el tapón de llenado mientras el líquido esté en ebullición.
• Cierre siempre el tapón de llenado al utilizar la función de picar.
• Utilice únicamente el recipiente y los utensilios suministrados con este aparato. Nunca utilice el recipiente con
ninguna otra fuente de calor.
• Nunca ponga en marcha el aparato en el modo de cocinado con el recipiente vacío.
• No utilice la tapa de la batidora para el robot de cocina. El aparato se dañará y puede causar lesiones si el mecanis-
mo de enclavamiento se somete a una fuerza excesiva.
• Al utilizar este aparato cerciórese de que se coloca sobre una supercie nivelada y lejos del borde. No coloque la
unidad debajo de armarios colgantes.
• Para conseguir un funcionamiento seguro y correcto, asegúrese de que la base del recipiente y los sensores de
temperatura estén limpios y secos antes de iniciar la cocción.
PRECAUCIÓN: Para evitar el peligro que supone un reinicio involuntario del fusible térmico, este aparato no se debe
conectar a través de un dispositivo externo, como un temporizador o un circuito que se esté conectándose y desco-
nectándose continuamente.
INSTRUCCIONES DE SEGURIDAD

ES
20
• Asegúrese siempre de que los alimentos estén bien cocinados antes de comérselos.
• Los alimentos se deben consumir poco después de nalizar la cocción o dejar que se enfríen rápidamente y, a con-
tinuación, refrigerarlos lo antes posible.
• El mal uso de su aparato puede causar lesiones.
• Este aparato puede ser utilizado por personas con discapacidad física, sensorial o mental, así como por personas
con falta de experiencia y conocimientos, siempre que se encuentren bajo supervisión o hayan recibido instruccio-
nes relacionadas con su uso seguro y entiendan los peligros potenciales asociados.
• Los niños no deben jugar con este aparato.
• Este aparato no debe ser utilizado por niños. Mantenga el aparato y su cable fuera del alcance de los niños. Nunca
deje el cable colgando en un lugar donde los niños puedan alcanzarlo.
Advertencia: Tenga cuidado al manipular las aladas cuchillas, al vaciar el recipiente y durante las tareas de limpieza.
• Desenchufe siempre el aparato de la toma eléctrica si lo deja desatendido y antes de desmontar, montar o limpiar el robot
de cocina.
• Si el cable de alimentación resulta dañado deberá sustituirlo por un cable especial disponible a través del fabricante
o de su servicio ocial para evitar posibles peligros.
• Utilice el aparato únicamente para su uso doméstico previsto. Declinamos toda responsabilidad derivada del uso
inadecuado o el incumplimiento de estas instrucciones.
• La capacidad máxima para mezclas es de 3,5 litros.
• Tenga cuidado si vierte líquido caliente en el robot de cocina o la batidora, ya que puede ser expelido fuera del apa-
rato debido a la salida repentina de vapor.
• El aparato solo debe utilizarse con el soporte proporcionado.
• El aparato está diseñado únicamente para uso doméstico en interiores.
• Evite derrames sobre el conector.
• No desmonte la base del recipiente (incluido el cerramiento con asa), no es para que el usuario realice labores de
mantenimiento.
• Después de que el motor se pare, el ventilador de refrigeración seguirá funcionando durante otros 2 minutos.
• Las supercies pueden calentarse durante el uso.
• Para limpiar las supercies que entran en contacto con los alimentos, consulte el párrafo «Cuidado y limpieza».
PRECAUCIÓN: Asegúrese de que el aparato esté apagado antes de retirarlo del soporte.
• La tapa «Food Processor» solo es apta para utilizarla con los discos ralladores, no está diseñada para cualquier otro
tipo de uso (cocinar, batir, etc.) Se debe de utilizar únicamente como procesador de alimentos y se tiene que cambiar
por la tapa principal para continuar cocinando.
Antes de enchufar el aparato
Compruebe que su suministro eléctrico coincida con el indicado en la parte inferior de su aparato.
ADVERTENCIA: ESTE APARATO DEBE ESTAR CONECTADO A TIERRA.
ADVERTENCIA: NO LAVE EL BOL EN EL LAVAVAJILLAS PORQUE SE DAÑARÁN LAS CONEXIONES ELÉCTRICAS QUE
SE ENCUENTRAN EN LA BASE.
Table of contents
Languages:


