IKUSI HDTR-201 User manual

USER MANUAL
H
HD
DT
TR
R-
-2
20
01
1
H
HI
IG
GH
H
D
DE
EF
FI
IN
NI
IT
TI
IO
ON
N
S
SE
ET
T
T
TO
OP
P
R
RE
EC
CE
EI
IV
VE
ER
R

Content
1.SafetyInformation
2.AccessoriesSupplied
3.Features
4.FrontPanel
5.RearPanel
6.RemoteControlUnit
7.ConnectingtoaTV
8.QuickStartGuide
1. TuningLocalDigitalTV/RadioStation
2. TVScreenSetup
3. Location&TimeOffsetSetUp
4. PerformFactoryReset
9.BasicOperations
1. ChangeTV/RadioChannel
2. ChangeVolumeLevel
3. ChangeTV/RadioOperationMode
4. MutetheSound
5. AudioSelection
6. ElectronicProgramGuide[EPG]
7. TV/RadioChannelinformation
8. Teletext/Subtitle
9. WakeupTimer
10.PowerOn/Off
10. MainMenu
1. TVMenu
a. TVSelect
b. TVGuide
c. TVPreference
d. TVManagement
2. RadioMenu
a.RadioSelect
b.RadioGuide
c.RadioPreference
d.RadioManagement
3. SetupMenu
a.TuningMenu
b.DeleteCarriers
c.TVSetupMenu
d.Time/OSDMenu
e.PasswordSetup
f. ReceiverStatus
11. Specifications
12.TroubleShooting
13.WarrantyInformation
1
2
3
4
5
6
7
8
8
10
12
14
15
15
15
15
15
16
16
17
18
19
19
20
21
21
22
22
23
24
24
25
26
26
27
28
28
29
31
33
33
34
35
36

1. Safety Information
We at IKUSI take a lot of care in putting together this manual. Read it carefully and make
sure you understand the contents fully. For your safety, heed the warnings.
yDo not open the cover. It is dangerous to touch any of the internal parts of the
receiver due to possible electric shock hazard.
yDo not attempt to service this product by yourself. Refer all servicing to qualified
service personnel.
yDisconnect the receiver from the wall outlet before cleaning it. Use only a soft
dry cloth to clean the case of the receiver.
yWhen the receiver is unused for a long time or during a thunder storm, please
unplug the power cord from the wall outlet and disconnect the antenna lead.
yDo not connect or modify cables when the receiver is plugged-in. Power off the
receiver at the wall outlet before connecting or disconnecting any cables.
yDo not use a damaged power cord. Damaged power cords may cause a fire or
an electric shock.
yDo not touch a power cord with wet hands. It may cause an electric shock.
yNever stand the receiver on soft furnishings or carpets.
yThis product is designed for indoor use only.
yDo not use or store the receiver where it is exposed to direct sunlight or near a
heater.
yNever stack other electronic equipment on top of the receiver.
yDo not use any attachments that are not recommended by the manufacturer
as these may cause hazards or damage the equipment.
yDo not expose the receiver to any liquid dripping or splashing.
yDo not place objects filled with liquids, such as vases, on the receiver.
yThe ventilation vents should not be impeded by covering them with items, such
as newspapers, tablecloths, curtains etc.
yEnsure a minimum distance of 5 centimetres (5cm.) around the receiver for
sufficient ventilation.
yNo naked flame sources, such as lit candles, should be placed on the
apparatus.
yDispose of remote control batteries properly in accordance with local, state or
federal regulations.
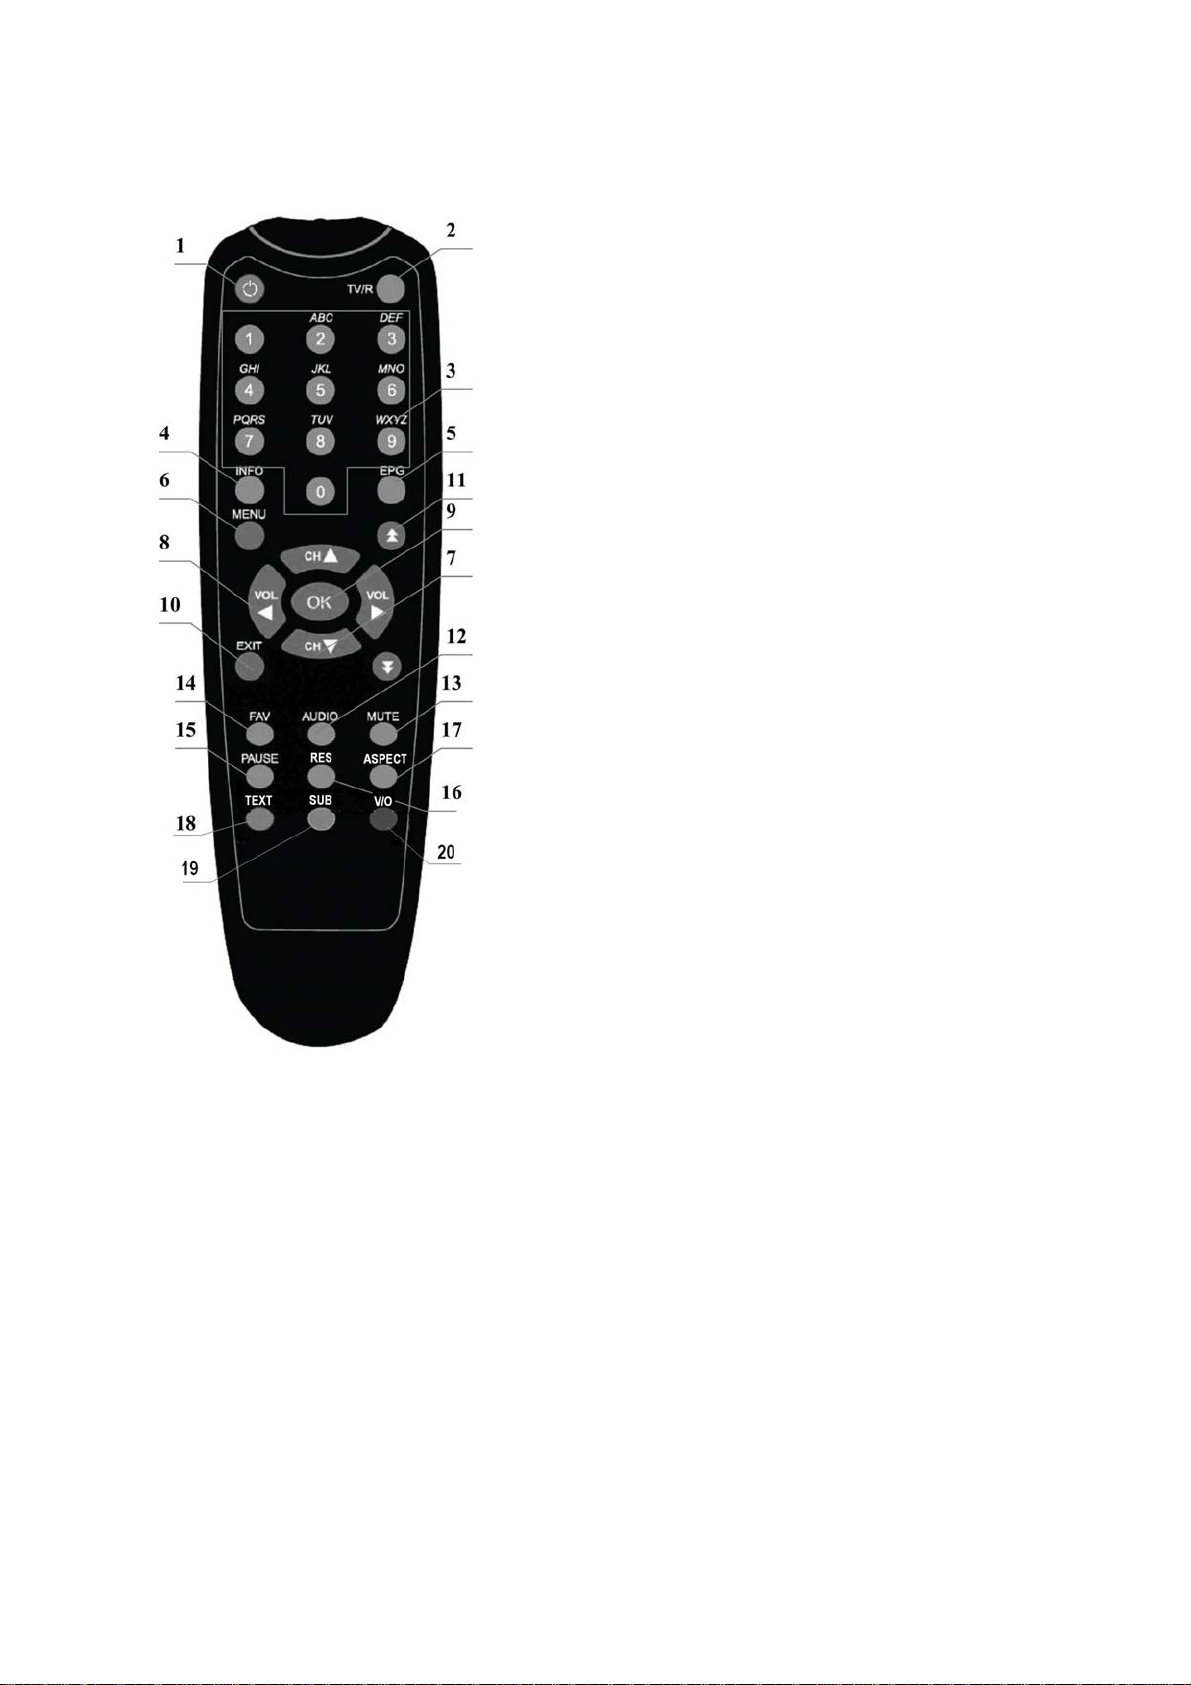
General Information: This manual provides complete instructions for installing and using
the receiver. All functions of the receiver can be carried out using the buttons on the
remote control.
If you have any problems with the operation of your receiver, please refer to the relevant
section of this manual or call your dealer.
1

2. Accessories Supplied
-User Manual
-Remote Control Unit
-Batteries: 2xAAA
-A/V Cable
-Power Cord
2

3. Features
-MPEG-2 & Fully DVB-T Compliant
-MPEG2 Video (MP@HL), MPEG-1 Audio Layer1, 2
-Automatic parameter discovery & update
-User-friendly OSD Menu with Full Function
-256 Colours Graphic User Interface
-OSD Menu Support: English, Chinese Traditional and Chinese Simplified
-Variable Aspect Ratio 4:3 / 16:9
-Advanced 7 days/ 24 Hours EPG (Electronic Program Guide) with “extended’
program information
-Current/Next Event Guide
-Auto Update (PMT/ PAT)
-Customized Channels Memory Data
-Carriers & Frequency Table Editing with Add, Delete, Rename, Modify
-Small Screen Picture on EPG and TV Channel List Graphic
-Supports TELETEXT Decoding or Re-insert into VBI
-Supports Subtitle
-Advanced Automatic Tuning
-Favourites Channel Groups and Parental Lock Function
-Event Timer, 120 minutes Sleep Timer
-Channel Editing with Delete, Rename, Lock, Skip
-Channel Sorting
-Console (RS232) Interface for Software Upgrading via PC directly
-SIGNAL LED Indicator
-S/PDIF (Digital Interface) for digital audio, RCA & Optical Option
-Wide Range Switch Mode Power Supply (SMPS)
-HDMI Output
-YPbPr Component Output
-Video, Audio L, Audio R Output (RCA), SPDIF output
-S-VIDEO Output
-Support output formats: 1080I, 720p, 576p and 576i
3

4. Front Panel
A. Power Button
Change between NORMAL Mode and STANDBY Mode.
B. TV/RADIO Button
Select between TV or Radio operation mode.
C. SIGNAL LED
Lights up with signal locked.
D. TV/RADIO LED
Light up when in TV Mode.
E. Remote SENSOR
Detects infrared signal from Remote Control Unit.
F. POWER LED
Lights up when in STANDBY Mode.
G. CH Up Button
Change channel up.
H. CH Down Button
Change channel down.
4

5.Rear Panel
ANT IN
Connect to external or indoor antenna.
ANT OUT
Connect to the TV set or VCR RF input.
HDMI Output
HDMI output connector.
S/PDIF Out/ OPT OUT
Digital Interface output for digital audio, optical out option.
S-VIDEO Output
S-VIDEO output connector.
YPbPr Output
Progressive Component output connector.
VOUT VIDEO
Composite video output.
AUDIO OUT (L/R)
Left, Right audio output
RS-232 Console
Used for set top box software upgrades.
AC INLET
Connect this to the mains outlet (100-240V-50-60Hz).
5

6. Remote Control Unit
The following details the remote control buttons and their function.
6
1. POWER
Turns the HDTV Box ON/OFF
2. TV/Radio
Switches b/w. TV & Radio mode
3. Numeric Keys(0……9)
Used for Direct number input
4. INFO
Displays the program information window
5. EPG
Displays the Electronic Program Guide
6. MENU
Enters Main Menu or returns to previous Menu
from a Sub-Menu.
7. CH UP/DOWN(¿/À)
Changes Channels while in viewing mode and
moves the cursor while in menu mode.
8. VOL LEFT/RIGHT(½/¾)
Changes the Volume level in viewing mode
and adjusts setting while in menu mode.
9. OK
Confirms the selection with the highlighted
menu item. While watching TV or listening to
radio, press the OK button will enter the
channel list
10. EXIT
Exit from the menu or current mode.
11. PG UP/DOWN
Move to the next or previous list / text page.
12. AUDIO
Cycle between the audio modes
13. MUTE
Mute or un-mute the sound
14. FAV
Enter the Favourite Channel List
15. PAUSE
Freeze the current image on screen
16. RES (Blue button)
Select TV Resolution
17. ASPECT
Selects Aspect Ratio 4:3 , 16:9 , Auto
18. TEXT (Red button)
Activate Teletext function
19. SUB (Yellow button)
To Activate Subtitle
20. V/O (Green button )
Use to select Video output
Note: Coloured buttons used in Teletext mode to
navigate the different menus.

7. Connecting to a TV
There are several types of TV/VCR and other equipment that you can connect to your
Set Top Box. Shown above is the most common method normally used. If you have
problems with your connections and need help, contact your retailer or antenna
installer.
Connecting to the TV via HDMI/ YPbPr
This method is recommended for the best picture quality.
Note: HDMI Cable is not supplied with the Set Top Box. Make sure that both the TV and
the Set Top Box are switched off at the power outlet, before making any connections.
-Connect the antenna to the ANT IN of the Set Top Box.
-Connect the ANT OUT of the Set Top Box to the RF input of the TV (optional if you
want to receive analogue TV services).
-Connect the HDMI or YPbPr and R+L outputs of the Set Top Box to the inputs of the
TV if available.
-Turn on the Set Top Box and the TV.
-Select the HDMI or Component input mode on TV (refer to TV manual) if you want
to utilize this mode of connection
Optional audio connections
Instead of connecting the Left and Right Audio outputs to your TV, they can be
connected to your HIFI stereo for better sound quality. In this case, connect the Left
and Right Audio outputs from the Set Top Box to the Left and Right Audio inputs on your
HIFI Stereo
If you have a home theatre receiver with built in Dolby TM digital decoder, then
connect the SPDIF output (coaxial or optical) of the digital TV Set Top Box to the SPDIF
input of your home theatre receiver.
7

8. Quick Start Guide
Once you have connected the HDTV box to your TV, use the following guide to tune in
the local digital TV / radio stations and define the basic HDTV box setting. If you have
not yet connected your HDTV box to a TV then please refer to the ‘Installation’ section.
Advanced operations are covered in the ‘Main Menu” section.
1. Tuning Local Digital TV / Radio Station
Step1: Power Up
-Switch “ON” your TV
-Select the appropriate input on your TV to view the HDTV box output signal.
-Switch “ON” your HDTV box
-The HDTV box will start to boot up and for the first time start up, the Main Menu will
appear.
Step2: Auto Tuning Start Up
-Press [CH +/-,¿/À]button to select Setup, and press OK
-Tuning selection will be highlighted as shown in Figure 8.1.2.
-Press [OK] to select and the Tuning Menu will appear.
-Press [OK] button to confirm the auto tuning process.
Fig.8.1.2
8

Step3: Auto Channel Detect
-HDTV box searches for the local carrier.
-Wait until the search carrier process is completed
-Once carrier detection completed, a message ‘Scan Completed’ will be shown as
in 8.1.3
-Press [OK] to save setting.
-Press [Exit] button to exit each menu and top start viewing the TV channel.
9

2. TV Screen Setup
The default TV resolution is (1080i) and the screen ratio is (Auto). Change the TV
resolution or screen ratio if your TV is not capable of delivering this resolution.
Step1: TV Set up
yPress [MENU] button to pop up Main Menu
yPress [CH +/-,¿/À] button to move cursor to [Setup]
yPress [OK]
yPress [CH +/-,¿/À] button to move cursor to [TV Setup] as shown in Figure 8.2.1
yPress [OK] to go to next screen
Step2: Choose TV Screen Resolution
yPress [CH +/-,¿/À] button to move cursor to [HD Resolution] as shown in Figure
8.2.2
yPress [VOL +/-,½/¾] button to select [1080i] or [720p] or [576p] or [Native].
Fig 8.2.2
10

Step3: Choose TV Screen Ratio
yPress [CH +/-,¿/À] button to move cursor to {Aspect Ratio} as shown in Figure
8.2.3.
yPress [VOL +/-,½/¾] button to select {4:3 Full Screen} or {4:3 Letterbox} or {16:9 Horz
Stretch} or {16:9 Centered} or {16:9 Half Zoom} or {16:9 Full Zoom} or {Auto}
yPress [OK] button to save setting.
Fig 8.2.3
Step4: Set the Video Output
yPress [CH +/-,¿/À] button to move cursor to [Digital Video]
yPress [VOL +/-,½/¾] button to select between [Auto] or [HDMI Output].
yPress [OK] button to save setting.
Note: You can select {Auto} to initiate hand shaking/ compatibility between your TV
set / Display and the HD Set Top Box Digital output (HDMI socket). In the event of an
incompatibility of no picture or no sound in Auto mode, or if an adapter is being
used, manually select [HDMI] in order to view a High Definition picture on your TV
Set/ Display
11

3. Location & Time Offset Set Up
The HDTV box has 8-event timers and to ensure they work properly the correct Time
information needs to be set. The default region is “Victoria” and time mode is “Auto”. If
your region is different from Victoria, please select your own region. Please set your time
according to your local time zone and Daylight Saving Time On / Off as required.
Step1: Main Menu
yPress [MENU] button to pop up top menu as shown in Figure 8.3.1
yPress [CH +/-,¿/À] button to move cursor to {Setup}
yPress[OK] button
STEP2: Select Time/ OSD
yPress [CH +/-,¿/À] button to move cursor to {Time/OSD} as shown in Figure 8.3.2
yPress [OK] button
12

Step3: Choose Auto Timer Mode & Select Region
yPress [CH +/-,¿/À] button to move cursor to {Timer Mode} as shown in Figure 8.3.3
yPress [VOL +/-,½/¾] button to select {Auto}
yPress [CH +/-,¿/À] button to move cursor to {Region Name} as shown in Figure
8.3.4
yPress [VOL +/-,½/¾] button to your region
yPress [OK] button to save setting.
yPress [Exit] button to exit from Main Menu
13

4. Perform Factory Reset
If you experience a setting problem (or unknown failure) please perform a Factory
Default reset.
-Press [MENU] button to enter Main Menu screen.
-Press [CH +/-,¿/À] button to move cursor to [Setup] as shown in Fig 8.4.1
-Press [OK] button
-Press [CH +/-,¿/À] buttons to move cursor and highlight the selection [Tuning] as
shown in Figure 8.4.2
-Press [OK] to enter.
-Press [CH +/-,¿/À] button to highlight [Search Mode] as shown in Fig 8.4.3
-Press [VOL +/-,½/¾] buttons to cycle to [Factory Default]
-Press [OK] to enter.
Fig 8.4.1
14

9. Basic Operations
This chapter assumes that the HDTV Box has been installed correctly as detailed in the previous
section. If the HDTV box has not been installed or connected properly, please refer to the
chapters on installation & Quick Start Guide.
1. Change TV / Radio Channel
yPress [CH +/-,¿/À] button to change channel up / down,
yor press numeric key [0,1..9] on the remote control directly to input the channel
number,
yor press [CH UP, DOWN] buttons on the front panel to change channel up/ down.
2. Change Volume Level
yPress [VOL +/-,½/¾] button to change volume level up/ down.
3. Change TV/ Radio Operation Mode
yPress [TV/R] button on the remote control or on the front panel to toggle between TV
and Radio operation modes.
yThe TV/RADIO LED on the front panel will be lighted up when switch to TV mode.
4. Mute the Sound
yPress [Mute] buttons to mute the sound (the audio bar becomes red colour ) as
shown in Figure 9.4.1
yPress it again to return normal.
15

5. Audio Selection
yWhile watching TV or listening to radio, user may select different audio segments
such as left/right channels or different language if available.
yPress [AUDIO] button on the remote control to pop up Audio Selection menu as
shown in Fig 9.5.1
yPress [VOL +/-,½/¾& CH+/-,¿/À] to cycle mono-left, mono-right and stereo channel
and other audio track if available.
yPress [OK] to save your setting.
6. Electronic Program Guide [EPG]
yUser may access the 24 hours / 7days electronic program guide (EPG) if available.
yPress [EPG] button to pop up the TV guide or Radio guide as shown in Fig 9.6.1.
yPress [CH +/-,¿/À] buttons to move cursor to desire channel.
yPress [OK] button to select channel. Information should display in the lower half
information window.
yPress [1] button to display current EPG information if available, as shown in the Fig
9.6.1
yPress [2] button to display next program EPG information, if available.
yPress [3] button to display weekly EPG information, if available
yPress [4] button to switch between lower half information window and channel list
when in lower half window, use [CH +/-, ¿/À] button to scroll EPG information.
yPress [EXIT] button to exit from EPG menu.
16

7. TV/ Radio Channel Information
ySometimes user may need additional channel information.
yPress [INFO] button 1st information page will pop up, it includes the channel number
and channel name, program information and current system time as shown in Figure
9.7.1
yPress [INFO] button again, the 2nd information page will pop up, it includes the Carrier,
Network, Service, Frequency, Bandwidth, Modulation, Hierarchy, Signal Level, Signal
Quality, Software Version and other information as shown in Figure 9.7.2.
yPress [Exit] button to exit from information page.
17

8. Teletext / Subtitle
1. Teletext
yThe HDTV box supports Teletext if available.
yPress [TEXT] button to activate the Teletext as shown in Figure 9.8.1.
yPress [0..9] numeric keypad to navigate to specific pages.
y[Red, Yellow, Green, Blue] buttons can be used where indicated in Teletext
screen menu
yPress [EXIT] to close Teletext screen.
Pressing [TEXT] button non Teletext channels will automatically select Subtitles, if
available.
Press [SUB] button to turn subtitling OFF.
2. Subtitle
yThe HDTV box supports subtitles if available.
yPress [SUB] button to activate the Subtitle as shown in Figure 9.8.2.
yPress [VOL +/-,½/¾] button while Subtitle menu is visible to turn [ON] or [OFF]
yPress [EXIT] to exit from Subtitle menu or wait for time out.
Fig 9.8.1
Fig 9.8.2
18
Table of contents
Other IKUSI Receiver manuals