iLive IJMB484B v1439-01 User manual

Before operating this product, please read these instructions.
IJMB484B
LINE IN
MIC 2 VOLECHO
MIC 1 MIC 2
MIC 1 VOL
FUNCTION
LINE INCD
CDG
P
A
I
R
I
N
G

WARNINGS AND PRECAUTIONS
Warning: Changes or modifications to this unit not expressly
approved by the party responsible for compliance could void the
user’s authority to operate the equipment.
NOTE:This equipment has been tested and found to comply with
the limits for a Class B didited device, pursuant to Part 15 of the
FCC Rules.These limits are designed to provide reasonable
protection aginst harmful interference in a residential
installation. This equipment generates, use and can radiate radio
frequency energy and, if not installed and used in accordance
with the instructions, may cause hrmful interference to radio
communications.
However, there is no guarantee that interference will not occur in
a particular installation. If this equipment does cause harmful
interference to radio or television reception, which can be
determined by turning the equipment off and on, the user is
encouraged to try to correct the interference by one or more of the
following measures:
1) Reorient or relocate the receiving antenna.
2) Increase the separation between the equipment and receiver.
3) Connect the equipment into an outlet on a circuit different
from that to which the receiver is connected.
4) Consult the dealer or an experienced radio/TV technician for
help.
This device complies with Part 15 of the FCC Rules. Operation is
subject to the following two conditions: (1) this device may not
cause harmful interference, and (2) this device must accept any
interference received, including interference that may cause
undesired operation.

AC/DC Adaptor
Instruction Manual
C'PlayerSupporWCD+GCDCD-R/RW
5.5´BlackWhitHMonitor
MicrophonH9olumHControls
EchRControl
BalancHControl
$XWRPDWLF9RLFH&RQWURO
3.5mPEarphonHJack
[6.3mPMicrophonHInputs
$udio/9ideRRC$OutpuW
$udiR3.mPJacNInput
Built-iQLouGSpeaker
PowerRequires$ C$dapteU(included
LINE,N
MIC9OLECHO
MIC MIC
MIC9OL
FUNCTION
LINE,NCD
CDG
P
$
I
R
I
N
G

BRIGHT
CONTRAST
VERTICAL HOLD VIDEO OUTPUT JACK
(See page 06)
AUDIO OUTPUT JACK
(R) (See page 08)
AUDIO OUTPUT JACK
(L) (See page 08)
DC POWER INPUT
(See page 06)
Introduction
Front Control
POWER INDICATOR
POWER BUTTON
FUNCTION CONTROL
ECHO CONTROL
BALANCE CONTROL
STOP BUTTON
PROGRAM BUTTON
MIC 1 INPUT
CD DOOR
HEADPHONE JACK
MIC 1 VOLUME
CONTROL
MIC 2 VOLUME
CONTROL
VOLUME CONTROL
PLAY/PAUSE
BUTTON
FAST FORWARD
(SKIP SEARCH)
BUTTON
MIC 2 INPUT
FAST BACKWARD
(SKIP SEARCH)
BUTTON
BLUETOOTH
INDICATOR
PLAY/PAUSE
INDICATOR
REPEAT BUTTON
PROGRAM INDICATOR
REPEAT INDICATOR
LED DISPLAY
Rear Control
AVC
LIN E IN
MIC 2 V OLECHO
MIC 1 M IC 2
MIC 1 V OL
FUNCTION
LINE INCD
CDG
P
A
I
R
I
N
G

Setup
Plug the small end of includedAC power adapter into the unit and the adapter into
the power outlet.
Plug unit in and press POWER button. POWER indicator will light up. Insert disc
or Connect your Smart Device to AUX IN jack.Adjust MASTER VOLUME to
desired sound level.
Wall outlet
AC~120V 60Hz
AC adapter
Connect to a TV/DVD/External Device
Requires an RCAAudio/Video
Cable (included).
1. Plug the yellow end of the
included RCAAudio/Video
Cable:
Unit: Video Output
TV: Video Input
2.Adjust the TV to the correct Input
setting.
3. When playing CD+G disc and set
The karaoke player will output
written lyrics to the connected TV.
the FUNCTION switch to CD+G.
TV(not included)
To Video Input
Connecting For Video

1. Pull the OPEN/CLOSE area to open the CD DOOR.
2. Place a CD+G or CD into the CD compartment.
3. Close the CD DOOR.
1. Load a Disc;
2. Adjust the FUNCTION switch to CD+G or CD.
3. Press the PLAY/PAUSE button to begin playing the loaded disc. The
PLAY/PAUSE indicator will light up.
4. To temporarily stop playing, press the PLAY/PAUSE button once (indicator
light will flash). To resume play, press the PLAY/PAUSE button one more
time.
5. Press SKIP/SEARCH button to skip between next or previous tracks.
6. Hold the SKIP/SEARCH button to fast search through the tracks.
Please note: The fast-forward and fast-rewind functions will not work for
CD+G discs.
7. Press the STOP button to stop playing.
1. Load a Disc.
2. Adjust the FUNCTION switch to CD+G or CD.
3. Press the REPEAT button once (indicator light will flash). The unit will play
the current track repeatedly.
4. Press the REPEAT button twice (indicator light will light up). The unit will
play the entire disc repeatedly.
5. To cancel the REPEAT function: Press the REPEAT button repeatedly
(indicator light will turn off) or press the STOP button twice.
1. Load and Play a Disc.
2. In CD/CD+G STOP mode, press the PROGRAM button and the program
indicator will flash.
3. Press the SKIP/SEARCH buttons to select the track you wish to play first.
4. Press the PROGRAM button to confirm.
5. Repeat steps 3 and 4 to program up to 20 tracks to play in a specified order.
6. Press the PLAY button to start the program playing. The PROGRAM indicator
light will flash.
7. Press the STOP button twice to cancel programming.
Play CD+G or CD’s
Loading a Disc
Playing a Disc
Repeat Function
Programming a Disc

RCAAudio Output
RCAAudio Output and AUX Input
Requires an RCA Audio/Video Cable
(included)
1. Plug the Red & White end of the RCA
Audio/Video Cable into the RCA
AUDIO OUTPUT and an RCA Audio
Input on a TV or Stereo system.
Unit:Audio Output L/R
TV:Audio Input L/R
2.Adjust the TV or stereo system to the
correct input setting.
3. When playing disc, the karaoke player
will output audio to the connected TV
or stereo system.
3.5mmAUX Input(AUDIO IN/LINE IN)
Smart Device
(not included)
TV(not included)
Requires a 3.5mmAUX IN Cable
(included)
1. Connect the AUX IN Cable to the AUX
IN Jack on the back of the unit;
Connect the other end to the AUDIO
OUTPUT Jacks on the ExternalAudio
Source
2.Adjust the FUNCTION switch to LINE
IN/MP3 mode.
3. You will use the External Device to
select music and adjust the volume to
the maximum level. You can now
control the volume with the karaoke
unit.
To
Audio Input
L/R
Automatic Voice Control
The AVC (Automatic Voice Control)
adjusts the volume of the unit
to compensate for varying levels
of volume from the microphone.
Press the AVC switch to ON or OFF to.
which the Automatic Voice Control
compensates for variations in volume.

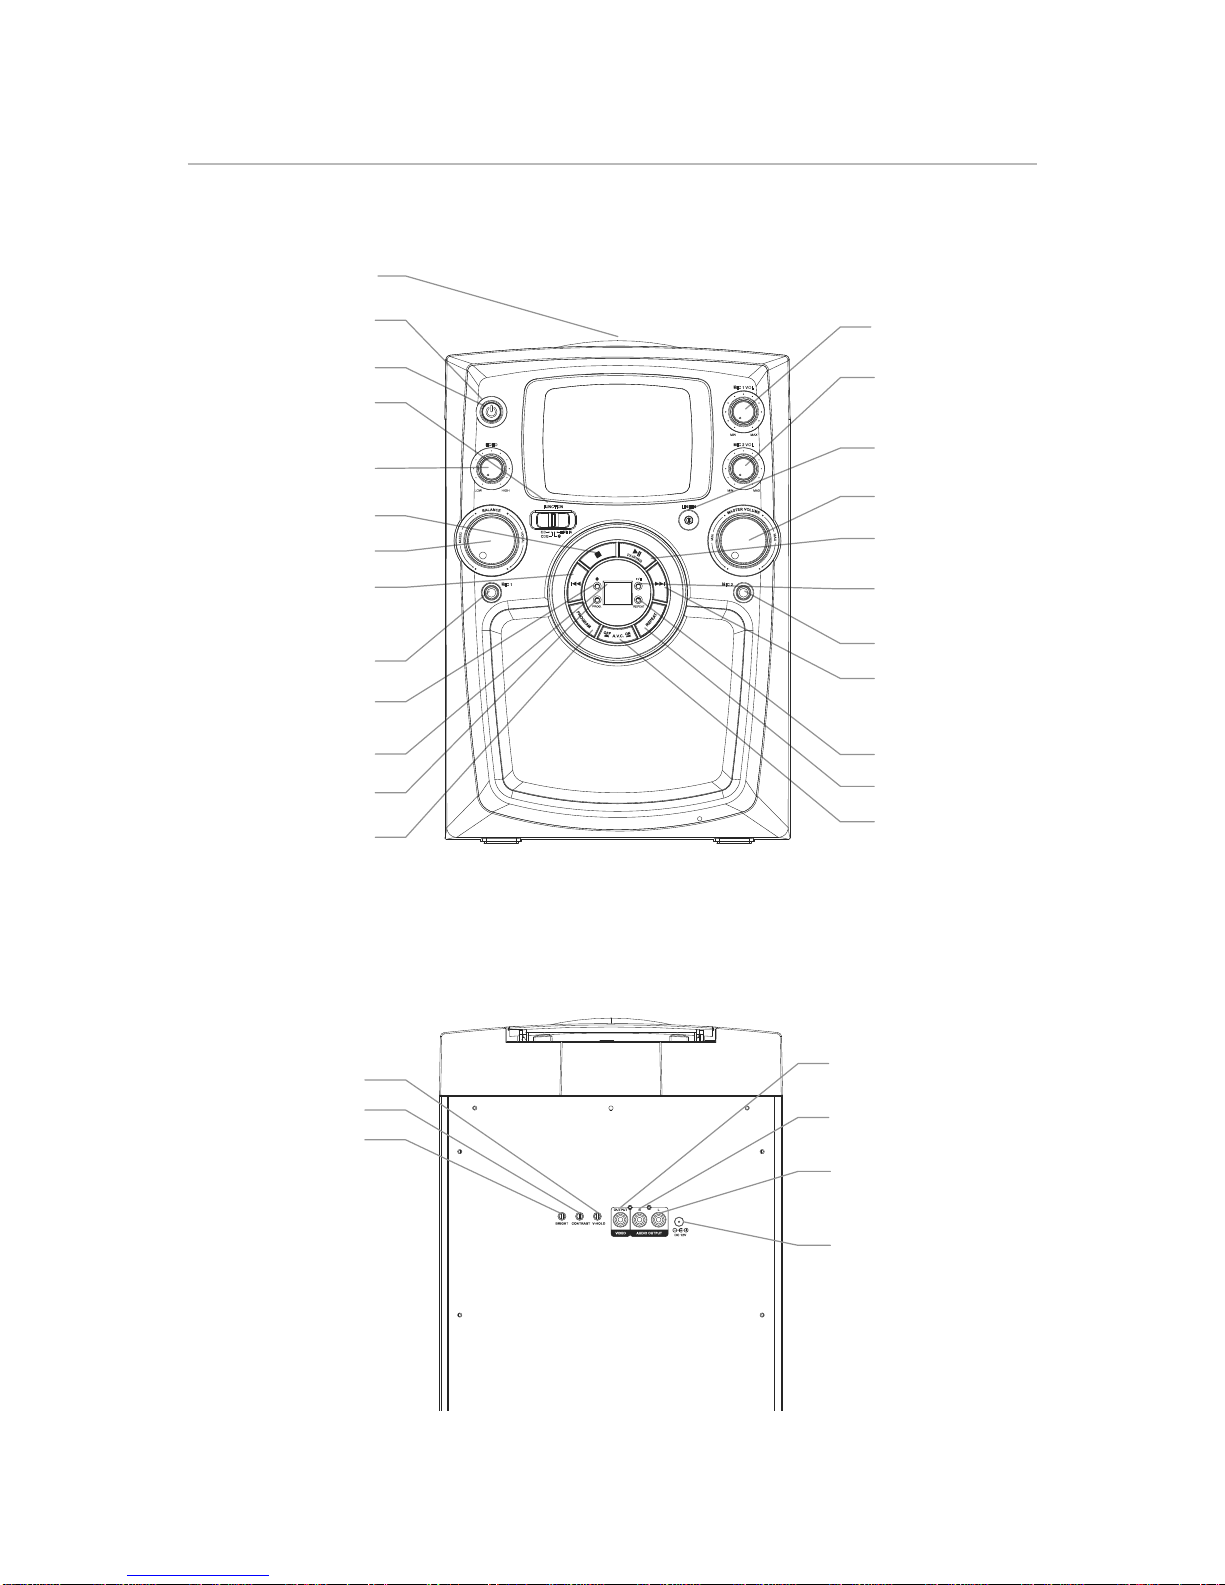
Echo, Balance, Microphone and Bluetooth
Echo
Use the ECHO Control Feature to enhance your voice for a concert hall effect.
Balance
Use the BALANCE Control Feature to switch between the pre-recorded
singer's voice and the music, when using a Multiplex Karaoke Disc.
Connecting a Microphone
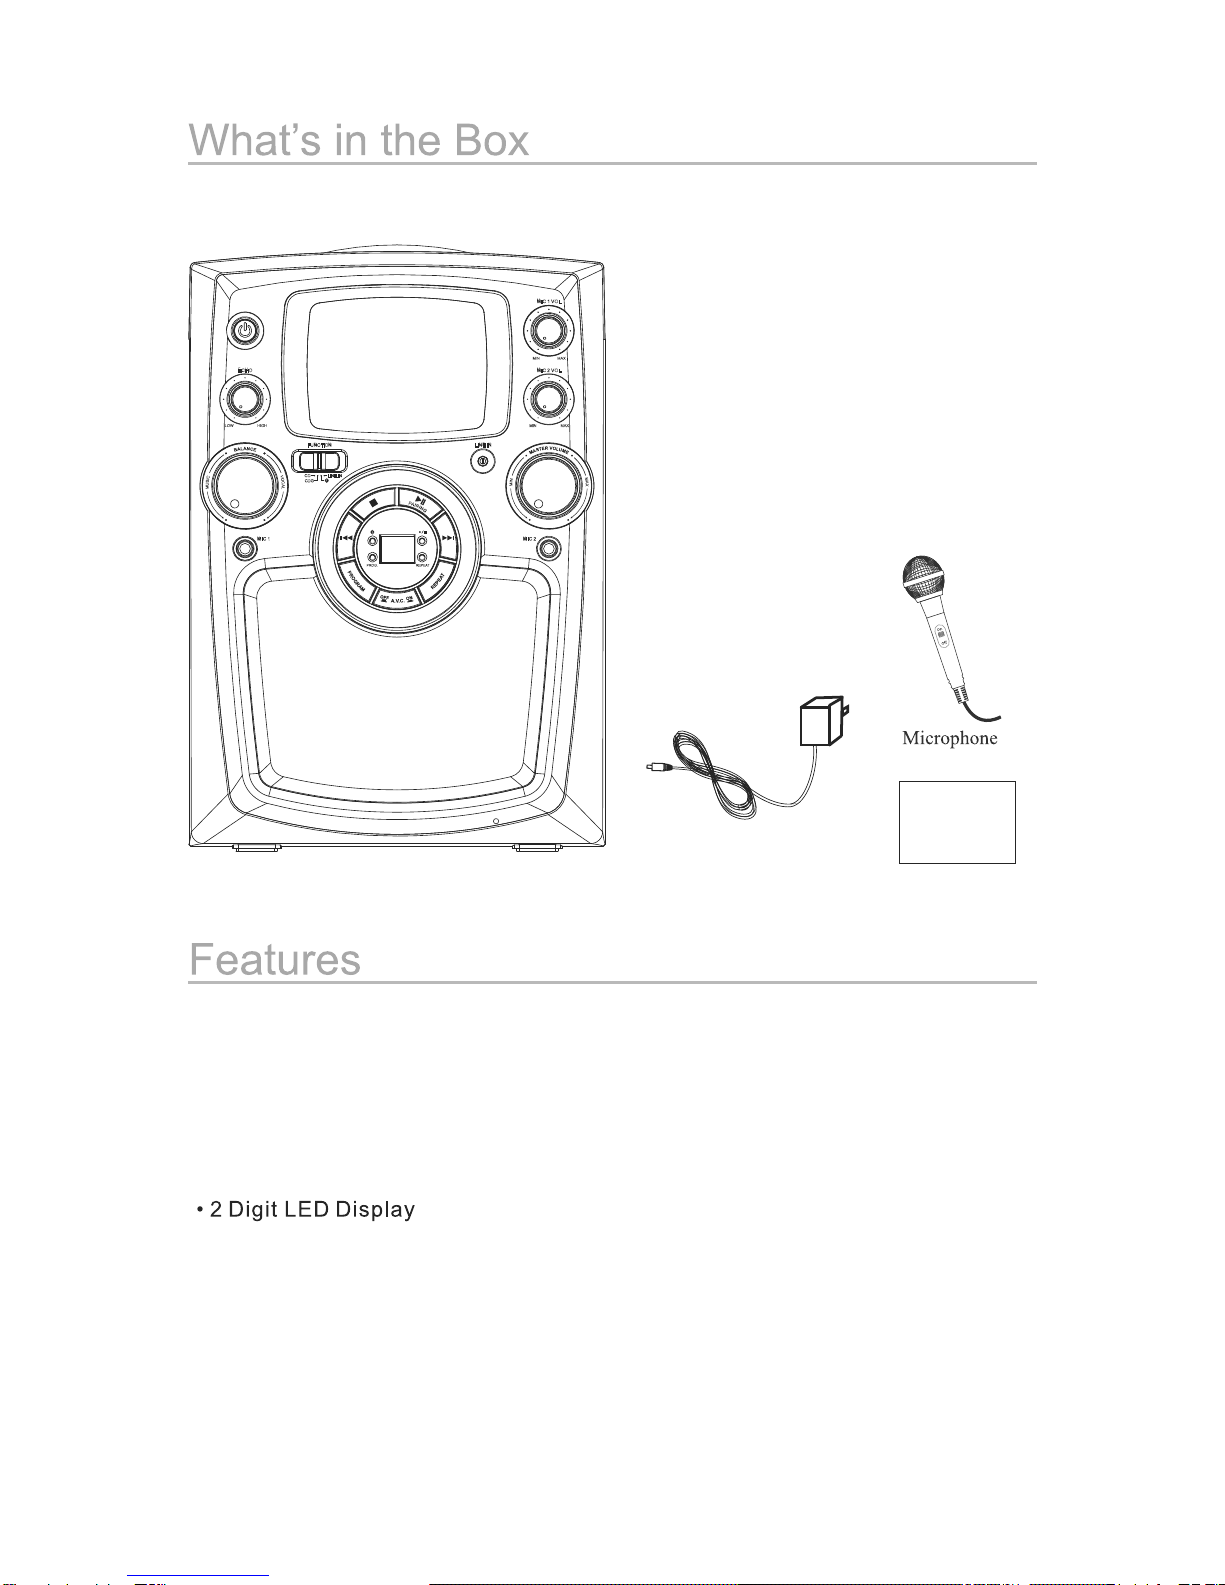
Requires a Microphone (included).
1. Plug the Microphone into the MIC 1 INPUT or MIC 2 INPUT.
2. Use the MICROPHONE VOLUME Control to adjust the volume of audio
amplified from the microphone.
Using Bluetooth
Pairing a Bluetooth Device for the First Time
1. Power on the unit by pressing the Power button.
2. Slide the FUNCTION to switch to ( position ) Bluetooth mode. The Pairing
Indicator will flash slowly.
3. Press the PAIRING button. The Pairing Indicator will flash quickly. When pairing,
remain within 3 feet of the unit.
4. Using the native controls on your Bluetooth device, select the I-0%% in your
Bluetooth settings to pair.
5. If your device requests a password, enter the default password 0000. Refer to
the user’s manual for your specific device for instructions on pairing
6. and connecting Bluetooth devices.
7. When successfully paired and connected, the Pairing Indicator will be solid. After
initial pairing, the unit will stay paired unless unpaired manually by the
8. user or erased due to a reset of the device.
9. If your device should become unpaired or you find it is unable to connect,
repeat the above steps or press the Pair button to start the pairing process
pairing again.
Playing Audio through Bluetooth
1. After successfully pairing to a device, use the native controls on the connected
Bluetooth Device to select a track.
2. To play or pause the selected track, use the native controls on the connected
Bluetooth Device, or the PLAY/PAUSE button on the unit.
3. To skip forward or back on the selected track, use the native controls on
the connected Bluetooth Device, or the SKIP/SEACH buttons on the unit.
4. Audio played through the connected Bluetooth device will now be heard
through the speakers.
Other manuals for IJMB484B v1439-01
1
Table of contents
Other iLive Karaoke System manuals

iLive
iLive IJB384B v1061-01 User manual

iLive
iLive IJ608B User manual

iLive
iLive IJMB587 v1717-01 User manual

iLive
iLive IJMB485B User manual

iLive
iLive IJMB484B v1002-01 User manual

iLive
iLive IJB383B User manual

iLive
iLive IJP382B User manual

iLive
iLive IJMB484B v1439-01 User manual

iLive
iLive IJB585 User manual

iLive
iLive IJ308W User manual