Illusonic IAP2 User manual
Illusonic IAP 2 Owner’s Manual


Illusonic IAP 2 Owner’s Manual 1

2 Illusonic IAP 2
Version 1.0.0
Published by Illusonic GmbH
Illusonic GmbH, registered offices:
Bahnstrasse 23, 8610 Uster, Switzerland
www.illusonic.com
Illusonic is a registered trademark of Illusonic GmbH
Copyright c
Illusonic GmbH, 2011–2014
All rights reserved
Printed in Switzerland

Illusonic IAP 2 3
Important Information
FCC Notice
This equipment has been tested and found to comply with the limits for a
Class B digital device, pursuant to Part 15 of the FCC Rules. These limits
are designed to provide reasonable protection against harmful interference
in a residential installation. This equipment generates, uses, and can radiate
radio frequency energy and, if not installed and used in accordance with
the instructions, may cause harmful interference to radio communications.
However, there is no guarantee that interference will not occur in a particular
installation.
If this equipment does cause harmful interference to radio or television
reception, which can be determined by turning the equipment off and on, the
user is encouraged to try to correct the interference by one or more of the
following measures:
– Adjust or relocate the receiving antenna.
– Increase the separation between the equipment and the receiver.
– Connect the equipment into a mains outlet on a circuit different from that
to which the receiver is connected.
– Consult the dealer or an experienced radio/TV technician for help.
Disposal – Environmental Care
Directive 2002/96/EG of the European Parliament requires
consumer electro-technical appliances to be disposed sepa-
rately and have to be indicated with the symbol on the left.
Should you dispose this component, please do so in confor-
mity with local and global legal and environmental regulations
and according to best practices. We strongly encourage you to
recycle any batteries used with this component.

4 Illusonic IAP 2
Safety Notice
Make sure to respect the following rules:
– Install the Processor on a stable base.
– Do not install the Processor near water.
– Do not expose the Processor to any kind of liquid.
– Do not install the Processor near any heat source
or in direct sun light.
– Do not install the Processor in a confined space and make
sure sufficient air can flow around it.
– Do not operate the Processor under high (>35C) or low (<5C)
ambient temperature. See operating conditions in Chapter 9.1.
– Do not operate the Processor under extremely high humidity.
See operating conditions in Chapter 9.1.
– Do not open the Processor nor try to service it by yourself.
Always refer to a qualified technician for service and maintenance.
Failure to do so will void the warranty.
– Make sure to use 3 terminals (phase, neutral, and earth) power cables
with ground conductor. Make sure your local AC voltage matches
the voltage printed next to the Processor’s AC power connector.

Illusonic IAP 2 5
Contents
Important Information 3
FCC Notice .............................................. 3
Disposal – Environmental Care .............................. 3
Safety Notice ............................................. 4
1 Introduction 7
1.1 Foreword ........................................... 7
1.2 How To Use This Manual .............................. 8
1.3 IAP 2 Overview ...................................... 9
2 Getting Started 13
Step 1: Unpacking ........................................ 13
Step 2: Installing the AC Power Cable ........................ 13
Step 3: Connecting Loudspeakers ........................... 14
Step 4: Connecting Audio/Video Devices ..................... 14
Step 5: Using IAP 2 ....................................... 15
Advanced Setup .......................................... 16
3 Usage 17
3.1 Front Panel and Remote Control ........................ 17
3.2 Back Panel .......................................... 18
3.3 Common Usage ...................................... 21
3.4 Sound Settings (Presets) .............................. 22
3.5 Menu Mode ......................................... 24
3.6 Cleaning ............................................ 26
3.7 Maintenance and Service .............................. 26
4 Menu: Inputs 27
5 Menu: Outputs 29
6 Menu: Equalizer 31
6.1 Introduction ......................................... 31
6.2 Equalizer Menu ...................................... 31
6.3 Equalizer Types and Parameters ......................... 33

6 Illusonic IAP 2
7 Menu: System 35
8 Software Tools 37
8.1 IAP Controller ....................................... 37
8.2 IAP Calibration ....................................... 38
9 Specifications 39
9.1 Technical ........................................... 39
Index 41

Illusonic IAP 2 Chapter 1 Introduction 7
1
Introduction
1.1
Foreword
Conventionally in high end audio, people “mix and match” devices. They
may use a DAC, an analog pre-amplifier, a phono stage, an equalizer, and
a processor.
Illusonic Audio Processors integrate these functionalities - because they be-
long together from a quality, technical, and usage perspective. The number
of signal transmissions and conversions (AD, DA, digital clock sync) are
minimized.
Additionally, IAP 2 can calibrate each of its output channels with gain, delay,
and parametric equalizers, to adapt to the room and loudspeaker positions.
Depth/Immersion adds a new dimension to room adaptation, controlling spa-
ciousness. The following pages give a more detailed overview over IAP 2’s
features.
I hope you’ll enjoy countless hours of quality listening and entertainment!
Yours truly,
Christof Faller
Founder and Owner of Illusonic

8 Illusonic IAP 2 Chapter 1 Introduction
1.2
How To Use This Manual
– The manual is structured to be read through from beginning to end.
– In case you read the manual only punctually, there are many pointers
within the text, referring to related information and chapters. Detailed
contents in the beginning and an index in the end help you find desired
information quickly.
– You will find text and figures with additional information and insights
placed in the info margin.11This text is in the info margin.
This symbol indicates important information.
General knowledge and tutorial information is indicated with this symbol.

Illusonic IAP 2 Chapter 1 Introduction 9
1.3
IAP 2 Overview
Inputs
IAP 2 can connect to a variety of sources. There is usually no need for a
device between the source and IAP 2. In addition to conventional analog
and digital inputs, IAP 2 features a phono stage, USB audio, network media
rendering, and four HDMI inputs.
Analog, Digital Hi Res
HDMI, USB, Network Phono Stage
Outputs
IAP 2 features two symmetric XLR and corresponding two RCA line outputs,
which directly connect to power amplifiers or active loudspeakers. Its HDMI
output connects to a TV or projector, if needed.
Volume Control
In order to be able to connect directly to power amplifiers or active loud-
speakers, IAP 2 features volume control, implemented digitally. Volume con-
trol is applied just before the DACs using 32 bit floating point arithmetic,
followed by a dithering process.

10 Illusonic IAP 2 Chapter 1 Introduction
Room Equalization and Depth/Immersion
Each channel features gain, delay, and fully parametric equalizers. These are
usually used to calibrate the system and for room equalization.
Immersion
Depth
Calibration
Depth/Immersion adds a new dimension to adaptation of the sound system
to the room. The specific room, loudspeakers, and loudspeaker positions
determine how a room reacts to the sound. Depth/Immersion adds free-
dom to modify the perceived spaciousness beyond these traditional physical
parameters.
Tone Control
While room equalization has the goal to mitigate dominant characteristics of
your room, tone control is used to subjectively adjust the level of low and
high frequencies. Not only bass and treble gain can be adjusted, but also the
corresponding frequencies.

Illusonic IAP 2 Chapter 1 Introduction 11
Softwares
The latest versions of IAP Controller and IAP Calibration softwares can be
downloaded from the Illusonic web site. Both, Windows and OS X versions
are available. IAP Controller presents all IAP 2 parameters for comfortable
setup. IAP Calibration makes multi-point room measurement easy and helps
setting up calibration related parameters (channel gain/delay, equalizers).

12 Illusonic IAP 2 Chapter 1 Introduction

Illusonic IAP 2 Chapter 2 Getting Started 13
2
Getting Started
Step 1:
Unpacking
Unpack IAP 2. Store the packaging for future transportation. The package
contains:
– IAP 2 unit
– AC power cable
– Remote control
– This user manual
Step 2:
Installing the AC Power Cable
1
3
2
1. Make sure that the indicated voltage matches your local AC voltage.
2. Make sure that the main power switch on the back is set to off (0).
3. Install the AC power cable.1
1Make sure to use 3 terminals (phase, neutral,
and earth) power cables with ground conductor.

14 Illusonic IAP 2 Chapter 2 Getting Started
Step 3:
Connecting Loudspeakers
Connect your amplifiers/loudspeakers to IAP 2.
Step 4:
Connecting Audio/Video Devices
32 6
7 4
5
1
Connect audio and video devices to any of the above shown connectors:
1. HDMI sources, such as Blu-ray players, game consoles,
and set top boxes.
2. Digital audio sources, such as CD players.
3. A PC or audio server over USB.
4. A network, PC, or audio server via Ethernet.
5. An analog audio source.
6. A turntable.
7. If you want to watch video, connect a TV or projector.11If you use IAP 2 only for enjoying audio, then there is
no need to connect a TV or projector. All necessary
information is shown on the built-in display.

Illusonic IAP 2 Chapter 2 Getting Started 15
Step 5:
Using IAP 2
2
4
3
1
5
1. Push the rotary to switch IAP 2 on.
2. Select an input source, using the <>buttons below the display.
3. Adjust the volume by turning the rotary control on the right.
4. Play sound with the selected input source.
5. Once you are done, push the rotary control for two seconds to put
IAP 2 to standby.1
1When you set the main power switch to off or
disconnect the main AC power, without going
to standby first, IAP 2 does not save its current
settings.
To get more familiar with usage of IAP 2, continue with Chapter 3.
Advanced setup of IAP 2 is outlined on the next page.

16 Illusonic IAP 2 Chapter 2 Getting Started
Advanced Setup
For reaching excellence of sound, it is often necessary to consider room
acoustics and to adapt IAP 2 to the room and loudspeakers:
– If necessary, acoustically treat your room.
– Calibrate the loudspeaker setup for your central listening position by
applying gain and delay trim to the loudspeaker signals (Chapter 5).11When measuring your sound system, you can
reproduce sound over each output channel individually
in the Measurement sub-menu (Chapter 7).
IAP Calibration software greatly facilitates
measurement and calibration of your system
(Chapter 8).
– If desired, apply equalizers (Chapter 6) to the loudspeaker signals to:
– Attenuate overly strong low frequencies from loudspeakers
positioned near walls or corners.
– Attenuate room resonances.
– Adapt the sound to the spectral response of the room.
– Calibrate loudspeakers behind a video screen.
Illusonic IAP 2 Chapter 3 Usage 17
3
Usage
3.1
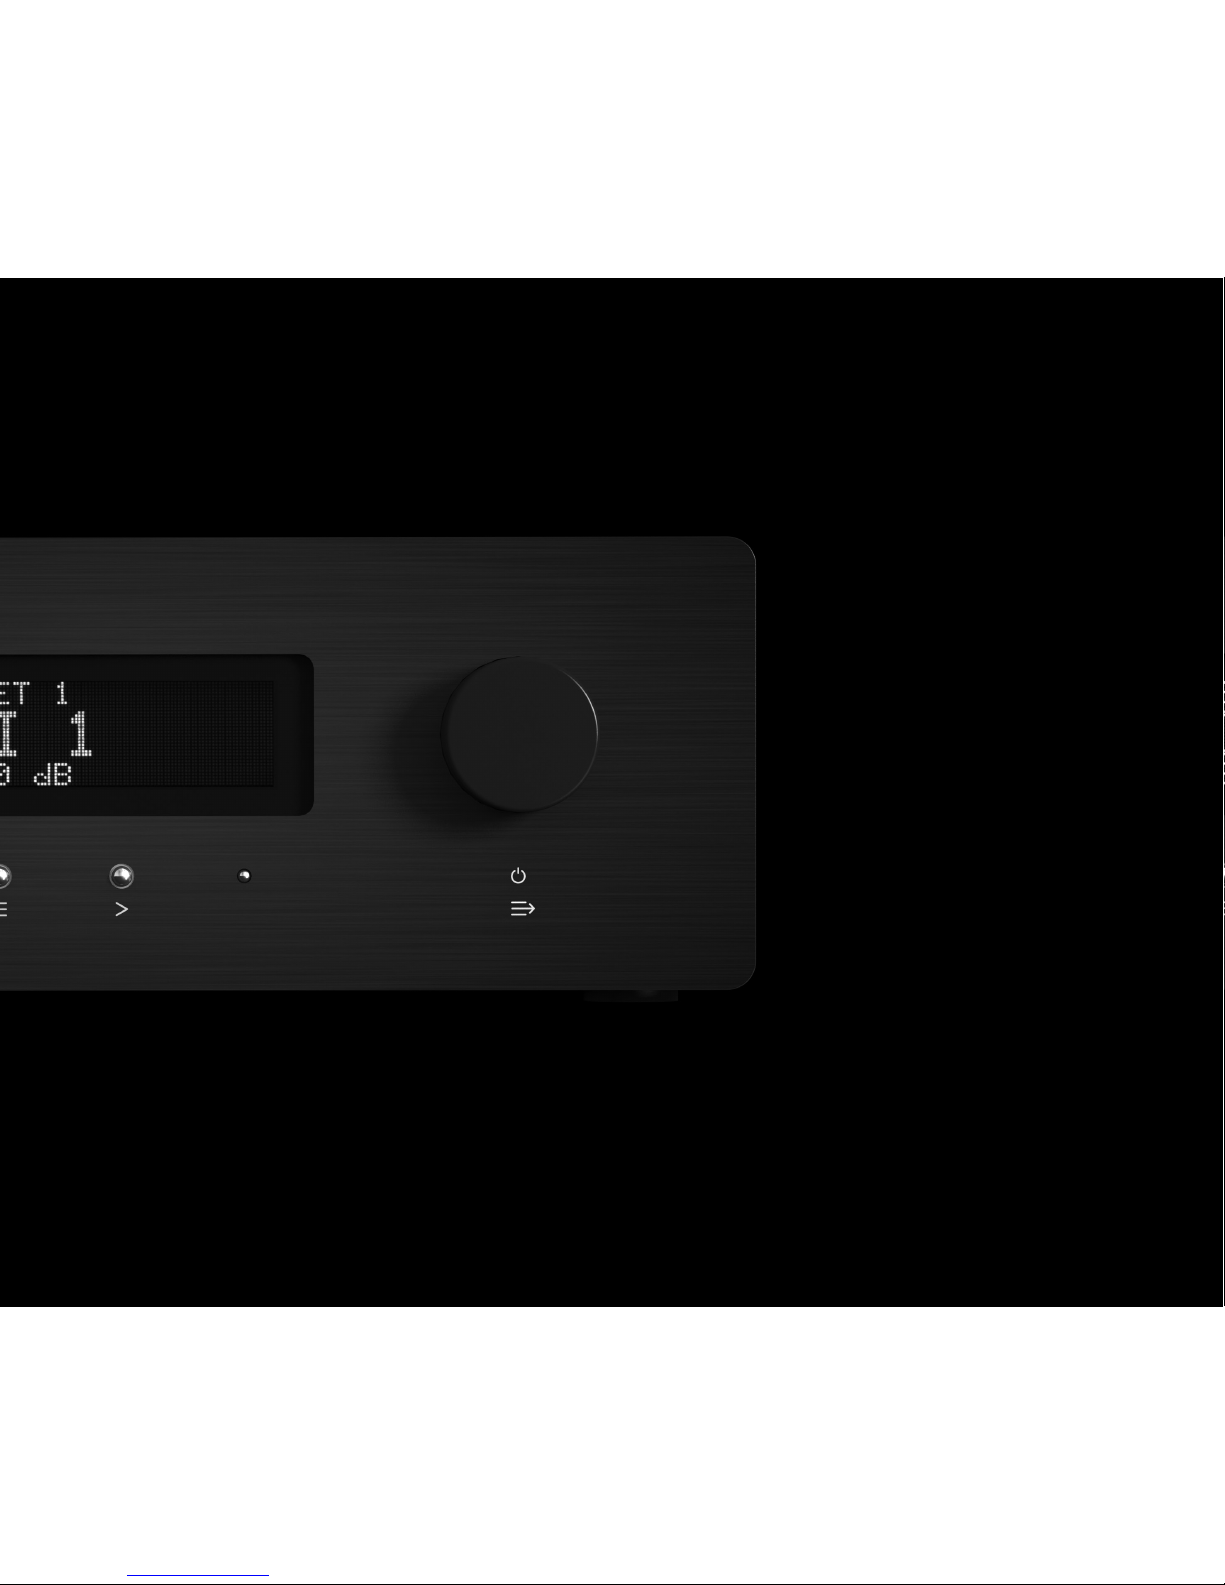
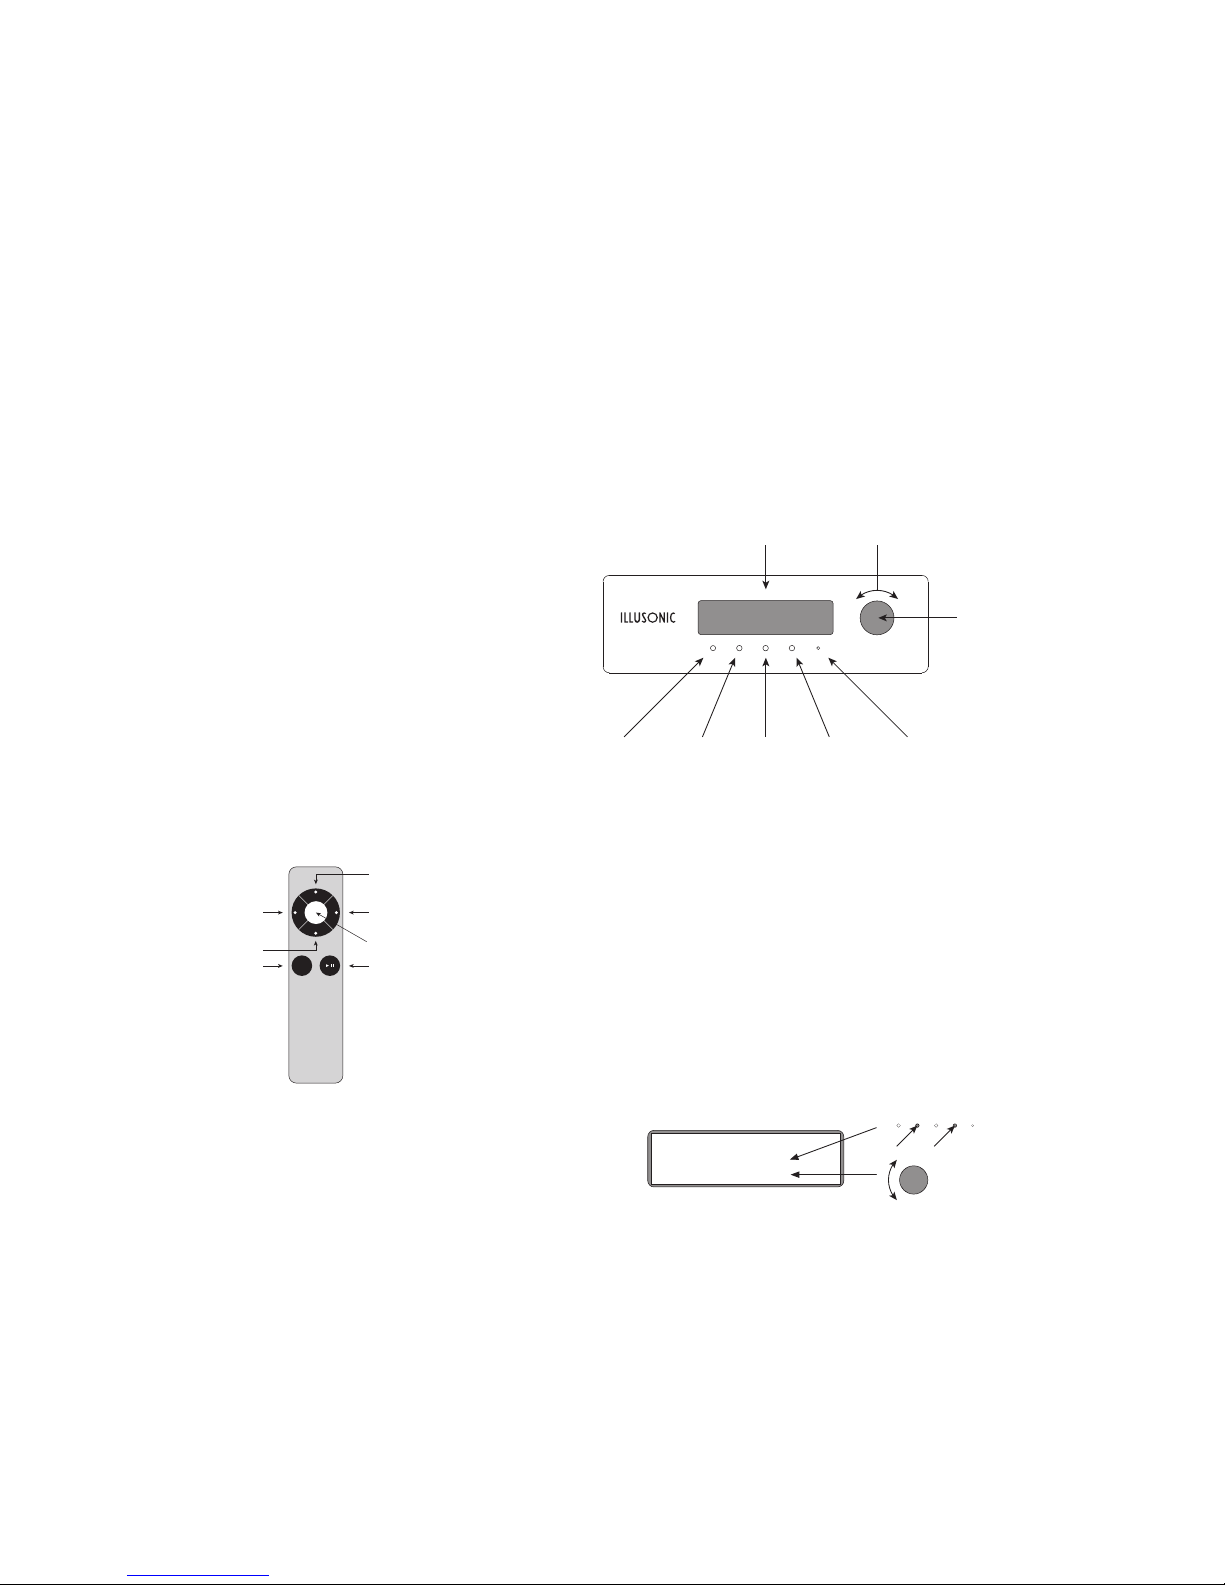
Front Panel and Remote Control
Select
(Rotary Push)
><
Rotary (Turn)
Menu
IR Receiver Standby LED
Display
IAP 2’s front panel has a display, showing the current state of the device,
and a number of controls:1
1The same controls, and a Mute button, are available
on the remote control:
MENU
Select
Rotary (Turn)
Rotary (Turn)
>
Mute
<
Menu
–<>: Input Select, Menu/Value Select.
–Rotary (Turn): Volume, Menu/Value Select.
–Select (Rotary Push): Select, Sound Settings,
On/Standby (long push).
–Menu: Enter Menu mode, exit menus, directly return
to normal operation mode (long push).
Remember this simple rule:
<>always modifies the menu or value in the middle of the display
and Rotary (Turn) modifies the menu or value on the bottom:
PRESET 1
HDMI 1
-40.0 dB
< >
Rotary (Turn)

18 Illusonic IAP 2 Chapter 3 Usage
3.2
Back Panel
Power and Control Connectors
1
34
2
1. AC Power
Before connecting a power cable here, make sure that the indicated
voltage corresponds to your AC power voltage.11Make sure to use 3 terminals (phase, neutral,
and earth) power cables with ground conductor.
2. Power On/Off
If you do not use IAP 2 for a longer period of time, it is recommended
that you turn off the main power switch.22When you set the main power switch to off
or disconnect the main AC power, without going
to standby first, IAP 2 does not save its current
settings.
3. External Control (USB)
With appropriate software, a personal computer can be used to control
IAP 2, read and write parameters, and update its firmware (Chapter 8).
4. External Control (Network)
IAP 2 supports commands for remote control over the network.
Other manuals for IAP2
1
Table of contents


