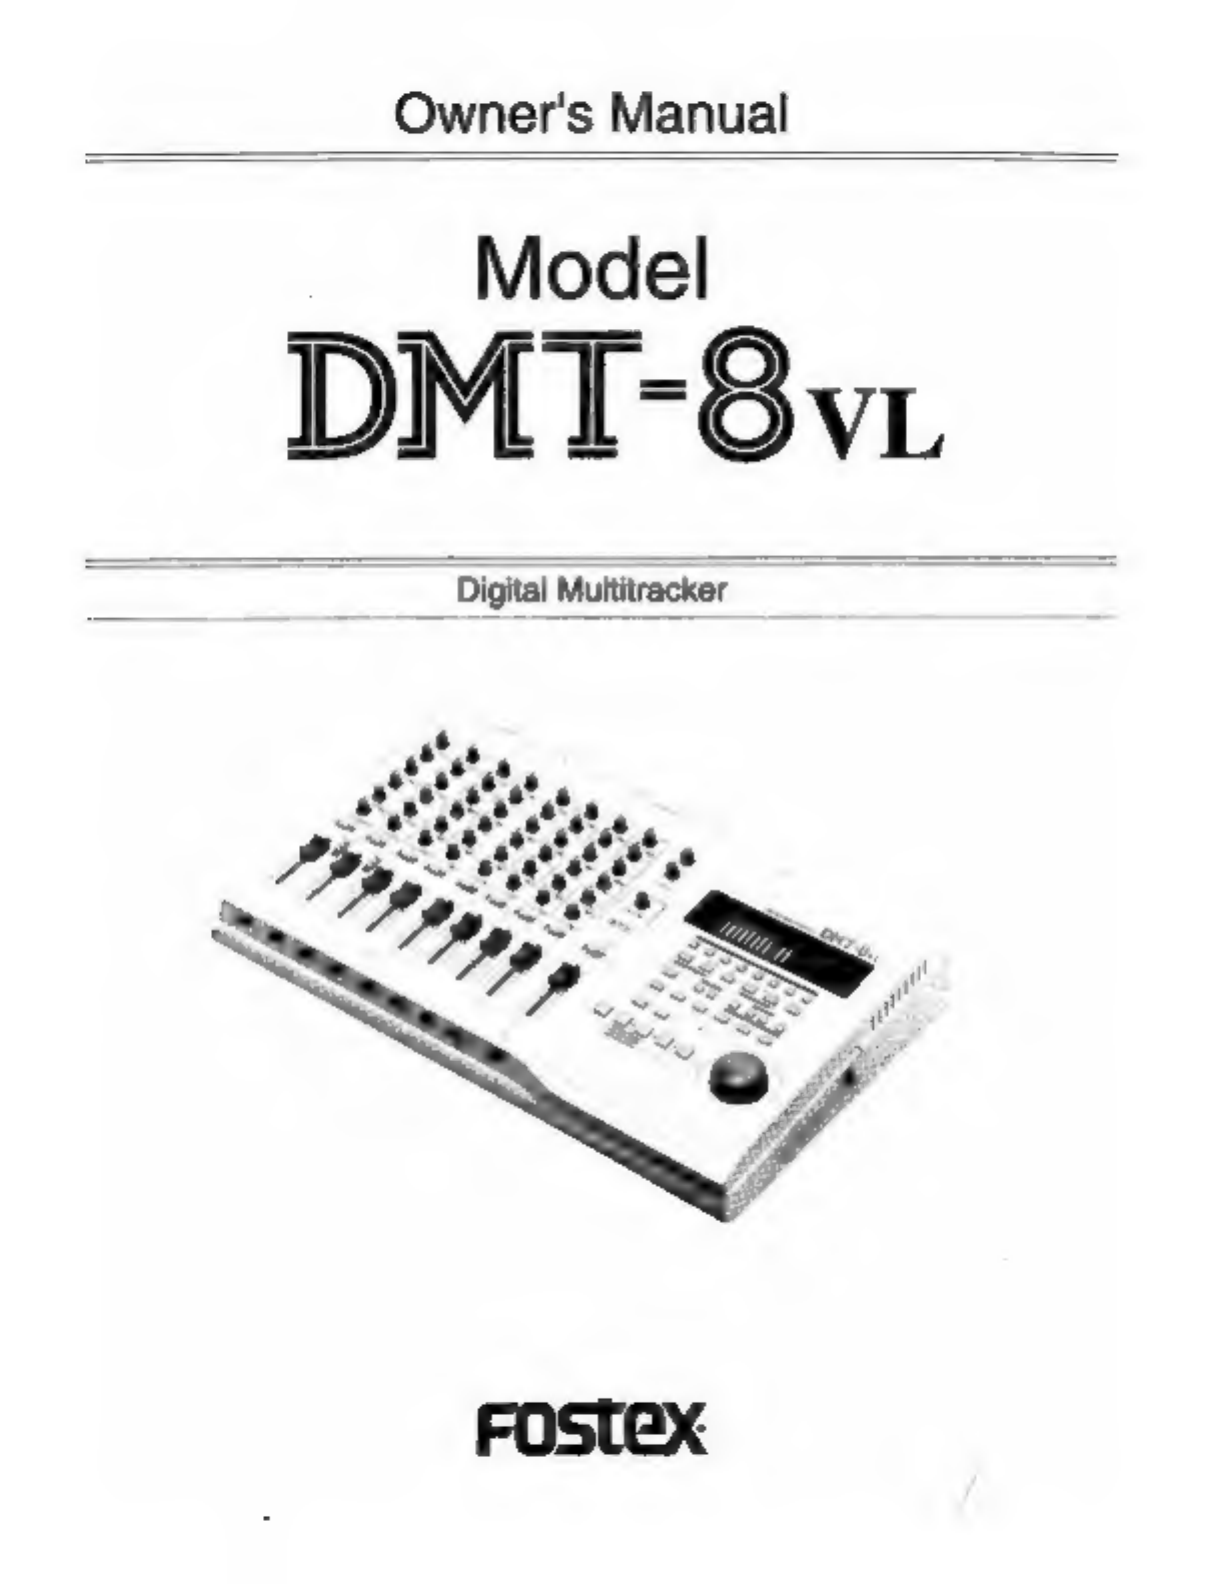
Fostex DMT-8VL User manual
..
Owner's
Manual
Model
DMT8w
.
Digital
Multitracker
Fostex
ITem
ra
age
a
"WARNING"
то
REDUCE
THE
RISK
OF
ге
оя
шестте
нос.
DONOT
ов.
HIS
APPLIANCE
TO
RAN
OR
те“
SAFETY
INSTRUCTIONS
1
Bat
cow:
A
Ve
sy
nt
prr
ranean
2
Res
rr
T
afe
spar
atr
э
Надица.
A
vario
Ра
ples
a
be
peram
noremens
cc
tears
ониро
Mong
vn
recta
t
ниши
ana
мон»
The
gren
а
ата
td
‘et
rexel
төш
eas
attt
V
n
Ry
uh
ma
vai
bananar,
Pear
tom
po
rd
M
Cosa
me:
ha
spar
sou
ew
ony
ма
(or
пага
ru
erede
oy
та
патат
eerte
ance
сонча
makî
te
rt
c
(Qui
op
cta
e
and
rre
ay
a
oe
selene
aicut
roman
ert
T
a
Cei
Moog
Th
place
eb
cts
>
{en
о
ш
recorded
by
т
menace
M
rte
he
aren
re
natn
ao
Fm
ae
p;
Та
аат
те
ats
mo
rt
cd
oa
юты
лш
nese
me
on
ar
тешу
Tê
rake
салто
ATTENTION:
INTRODUIRE
LA
LANE
LA
PLUS
LARGE
DE
LA
DELA
PRSE
ET
POUSSER
SOU
AU
FOND.
A
ER
э
Hed
De
epee
she
ata
me om
hs
‘ce
svn
nen
төн
eg
aor,
ht
ЖАЛТ
evry
ersten
al
ose
at
зо
Powe
Suen:
Te
sn
a
crac
û
ome
nap
er
abe
ype
Snes
ne
prag
‘nora
oo
rah
nape,
Y
Соларна
The
resin
на
shasta
e
жк
e
тете
OOO
o
pment
vem
dan
tt
12
Pome
Cos
Pte
Powe
gp
d
shi
rt
Кюеу
ere
ret
аро
hed
on
o
prened
wy
ens.
рана
а
ри
төл
para
реда
ararnar
ШУШЫ
сатен
pte
tr
potu
Кеин
а
Org.
Te
aparece
sea
can
ae
remite
mus
M
Nene
Poa
Tha
pomer
cort
die
apre
войны
Арыт
ойе
eri
rd
og
pei
95
Ой
кенет
Cu
mase
tno
tuti
orate
iar
re rt
iter
he
ae Pr
€
Gaye
Resin
Serve
-The
mines
tbe
and
ерен
X
esee
ney
ctor
be
pus
s
ben
антара
8
Oprem
av
te
rigid
as
bear
oping
m
пратка
станат
has
been
nese
lo
rar,
or
D
тукт
жт
та
уте
qum
remate
рос
E
поната
hat
tee
oes
oe
core
um
7
экто
Tee
nt
atere
seen
he
чини
teen
et
дина
i
cpa
racio.
pner
ee
vere
t
ue
vaio

3.
Recording
while using
the
Program
Change
function.
(Switching
Programs
1
~
S)

Step
3:
Overdubbing
an
electric
guitar
on
Track
3.
56
Step
4:
Overdubbing
the
vocal
on
Track
4.
Tss
5.
Mixdown..
—
capuc]
6.
Digital
Recording
from
an
External
Digital
Device
tothe
DMT-SVL.
=
7.
Digital
Recording
from
the
ОМТ
Ви
2.
Setting
the
time
signature
("BAR
3.
Tempo
setting
("TEMPO")
4.
Metronome
function
On/Off
"CLICK"
ON/OFF)...
5.
Saving
and
loading
the
recordings
"SAVE",
ТОР")...
6.
Formatting
the
hard
disk
("FORMAT").
4

7.
Setting
the
preroll
time
for
the
locate
operation
("PREROLL
TIME?)...........
в.
Selecting
the
synchronized
signal
output
from
the
MIDI
OUT
connector
("MIDI
SYNC
OUT)...
э.
setting
the
MTC
frame
rate
(FRAME
RATE?
)........—
10,
Setting
MIC
offset
time
("MTC
OFFSET).
13,
Setting
a
digital
output
channel
("dG
ош...
14
Setting
display
resolution
mode
On/Off
СЕО)...
15.
Setting
Slave
mode
On/Off
("SLAVE
nn
16.
Setting
MIDI
device
ID
САЕМ...
17,
Setting
the
Undo
function
range
(Undo)
MIDI
Implementation
Chart.
MMC
command
list.
Inquiry
Message
lisi
Fostex
MIDI
System
Exclusive
Message
Format.
Maintenance.
Specifications..
Block
Diagram.
INDEX...
DMT-8v1
Owner's
Manual
(Introduction)
Introduction
Thank
you for
purchasing
the
Fostex
Model
DMT-8V1!
The
DMT-8vt
is
an
eight
track
digital
multitrack
recorder
with
an
integrated
cight-channel
analog
mixer
and
a
dedicated
EIDE
type
Internal
hard
disk
system.
enables
you
to
achieve
high-quality
recording/playback
using
a
mon-compression
recording
method,
with
a
quantization
of
16
bits
and
а
sampling
rate
of
44.1,
which
is
approximately
equivalent
to
CD
quality.
The
ОМТ
incorporates
many
advanced
functions
thanks
to
the
Inclusion
of
a
hard
disk,
such
as
copy
&
paste,
move
&
paste,
cut,
erase
(sing
time
value
or
MIDI
bar/beat/clock),
and
undo/redo,
‘Once
standard
hard
disk
can
manage
up
to
five
programs
(Program
Change
function),
and
you
can
record,
play
back,
edt
and
archives
(save
and
load)each
Program.
The
DMT-8v1
is
also
equipped
with
а
Jog
wheel
and
a
shuttle
dial
for
speedy
operation,
a
song
data
save/load
function
for
use
with
an
external
DAT
recorder,
and
an
AUTO
function
that
includes
9-polnt
AUTO
locate,
AUTO
return/play,
and
AUTO
punch
in/out
(with
rehearsal
function).
The
unit
can
also
transmit
MIDI
clock
data
and
Song
Position
Pointers
ма
the
internal
programmable
tempo
map,
and
is
compatible
with
MTC,
MMC,
and
Fostex
System
Exclusive
Message.
You
can
also
control
and
synchronize
an
external
MIDI
sequencer
or
sequencing
software
from
the
DMT-8vL-
Please
read this
Owner's
Manual
thoroughly
and
keep
t
in
a
safe
place
so
that
you
will
be
able
to
produce
high-definition,
high
tonal
quality
music.
Precautions
Notes
about
power
supply
Ве
sure
to
connect
the
DMT-8v
to
the
power
supply
specified
in
the
Specifications
section
ofthis
Owner's
Manual.
Do
not
use
an
AC
outlet
of
any
other
voltage.
*
Do
not
connect
the
РМТ-8м
to
the
same
AC
outlet
to
which
devices
that
could
generate
noise
(such
as
a
large
motor
ог
dimmer),
or
the
devices
that
consume
a
large
amount
of
power
(such
as
an
air
conditioning
system
or
а
large
electric
heater)
are
connected.
*
If
you
use
the
unit
in
an
area with
a
different
power
voltage,
first
consult
your
dealer
or
the
nearest
FOSTEX
service
station.
You can
use
the
unit
‘with
a
power
frequency
of
SOHz
or
60Hz.
*
This very
dangerous
to
use
a
power
cord
that
is
frayed
or
damage.
In
such
a
case,
stop
using
the
unit
immediately
and
ask
your
dealer
to
repair
the
cord.
*
то
avoid
possible
electric
shock
and
damage
to
the
DMT-8vL,
avoid
contact
with
water
or
other
liquids,
or do
not
handle
the
power
plug.
While
your
hands
are
wet.
6
DMT-8v1
Owner's
Manual
(Introduction)
+
Toprevent
possible
electric
shock
and
damage
to
the
ОМТ
дна
do
not
remove
the
main
unit
cover
or
reach
the
inside
the
unit.
*
Do
not
let
water
or
other
liquid,
or
metal
objects
such
as
pins,
accidentally
enter
the
inside
of
the
unit
because
this
may
lead
to
electric
‘shock
or
damage.
Should
water enter
the
inside
ofthe
unit,
remove
the
power
plug
from
the
AC
outlet,
and
consult
your
dealer
or
the
nearest.
FOSTEX
service
station.
+
To
prevent
damage
to
the
DMT-BVL,
be
sure
to
power
on
the
connected
devices
first,
then
turn
on
the
power
to
the
DMT-8v..
When
you
remove
or
connect
the
cables
to
the
input/output
connectors
оп
the
DMT-8VL,
make
sure that
the
channel
INPUT
faders
and
volume
‘controls
are
set
to
"0."
Notes
on
handling
the
hard
disk
*
тһе
ОМТ-8
is
equipped
with
а
high-precision
hard
disk.
Do
not
expose
the
unit
to
excessive vibration
at
any
time.
In
particular,
do
not
move
the
unit
or
allow
an
impact
to
the
unit
when
the
power
is
on.
*
Before
you
change
the
location
of
the
DMT-8v1,
pack
the
unit
in
the
shipping
carton
or
an
impact-resistant
case.
Make
sure
that
the
unit
is
kept
free
from
external
vibration
or
impact.
since
the
unit
is
very
sensitive
to
vibration.
you
mano
прасе
me
rct
hars
же
want
hard
dek
пег
"Bore
opening
Pe
OMT
0.
oo
page
ө"
Notes
on
the
setup
location
^
Do
not
instal
the
unit
in
locations
subject
to
the
following:
*
Extremely
high
or
low
temperature,
or
significant
changes
in
temperature
*
Excessive
humidity
ог
dust
+
Excessive
changes
in
power
supply
voltage
+
Unstable
or
significantly
vibrating
or
shaking
surfaces
+
Near
a
strong
magnetic
Пе
(such
as
a
TV
or
speakers)
*
Ifyou
move
the
unit
from
a
place
with
an
excessively
low
temperature.
тоа
warm
place,
ог
you
use
the
unit
а
room
in
which
the
temperature
varies
significantly
during
winter,
condensation
may
occur
on
the
hard
disk
or
other
parts.
In
such
cases,
leave
the
unit
for
about
an
hour
in.
the
new
location
before
you
turn
on
the
power.
7
DMT-8v1
Owner's
Manual
(Introduction)
Notes
on
repair
*
This unit does
not
use
any
parts
that
users
can
repair
easily.
Contact
our
dealer
or
the
nearest
FOSTEX
service
station
to
ask
about
repairs.
*
Use
the
packing
carton
designed
for
the
ОМТ-
Ви.
when
you
transport
the
unit
to
the
dealer
for
repair
or
return.
T
you
have
discarded
the
packing
box,
try
to
pack
the
unit
completely
using
shock
absorbing
materials.
Fostex
is
not
responsible
for
‘malfunction
or
damage
due
to
incomplete
packaging
or
caused
during
transport.
About
copyrights
*
ls
prohibited
by
law
to
use
any
part
of
a
CD
recording
or
vidco
images
‘or
audio
data
for
which
copyright
is
possessed
by
a
third
party
for
commercial
purposes
such
as
contents,
broadcasts,
sales,
or
distribution
=
any
purpose
other
than
for
your
personal
pleasure.
About
damages
*
Fostex
is
not
responsible
for
any
"direct
damage"
ог
"indirect
damage"
Caused
by
using
the ОМТ
Ви-

DMT-8
Owner's
Manual
(Main
features
of
DMT-8v1)
Main
Features
of
DMT-8v.
‘The
DMT-8v1
is
equipped
with
the
following
functions:
«Recorder
Section»
High-quality
sound,
non-compressed,
eight
track
digital
hard
disk
recorder
*
Instead
of
conventional
cassette
tape,
the
DMT-8v:
is
equipped
with
a
dedicated
3.5
inch
EIDE
type
hard
disk
as
the
recording
media,
allowing
for
about
12
minutes
(when
installing
the
540MB
hard
disk
unit)
or
about
30
minutes
(when
installing
the
13GB
hard
disk
unit)
of
recording/
playback.
+
Non
compression
recording
method,
with
16-bit
linear
quantization
and
a
sampling
rate
of
44.
ЛКН,
which
enables
you
to
record
and
playback
high
quality
sounds
that
are
approximately
equivalent
to
CD
quality.
Managing
up to
five
programs
using
the
Program
Change
function
*
Using
the
Program
Change
function
allows
you
to
record,
playback,
and
dit
up
to
five
songs
individually
on
the
hard
disk.
In
this
way,
you
can
utlize
the
hard
disk
to
manage
different
programs
at
any
time,
without
the
necessity
of
archiving
(backing
up)
data
to
an
external
DAT
machine.
(Refer
to
pages
"36"
and
"S0"
for
more
details.)
Versatile
editing
functions
are
made
possible
by
the
hard
disk
*
The
DMT-8vi
allows
you
to
use
non-linear,
non-destructive
audio
editing
functions,
such
as
copy
&
paste,
move
&
paste,
cut,
and
erase.
These
edit
operations
can
refer
not
only
to
time
values
such
as
ABS
and
MIDI
timecode,
but
to
MIDI
bar
/beat/clock
values.
(Refer
to
page
"93"
for
details)
*
You
need
only
one
action
to
monitor
the
copied
audio
data
using
the
Clipboard
Play
function.
(Refer
to
pages
"96"
and
"101"
for
details.)
*
The
Over
Time
Monitor
function
lets
you
know
the
overtime
length
when
you
try
to
copy
&
paste
or
move
&
paste
data
in
excess
of
the
currently
available
disk
space. (Refer
to
page
"31"
for
details.)
Undo/Redo
function
to
support
edit
works
*
The
Undo/Redo
functions
will
cancel
the
latest
edit
and
restore
the
data
obtained
before
the
edit,
or
restore
the
data
obtained
after
the
edit
respectively.
(Refer
to
pages
"82,
98,
103,
106 and
107"
for
details.)
*
The
Can't
Undo
function provides
you
with
an
alarm
indicating
that
the
undo
area
is
insufficient
for
the
Auto
Punch
In/Out
operation.
(Refer
to
page
^31"
for
details.)
‘Song
data
Save/Load
function
*
You
can
save
recordings
(audio
data plus
corresponding
setup
data)
of
each
Program
individually
or
all
Programs
simultaneously
to
an
external
DAT
machine.
You
can
also
load
a
set
of
data
to
a
desired
Program.
DMT-8V.
Owner's
Manual
(Main
features
of
DMT-8v1)
The
Save/Load
function
will
take
about
four
times
as
long
as
recording
(Le.
it
takes
16
minutes
to
save
or
load
a
four
minute
song).
(Refer
to
page
"117"
for
more
details)
Convenient
Disk
Remain
Display
function
*
The
Disk
Remain
function
facilitates
checking
the
available
recording
time.
This
function
is
compatible
with
all
types
of
time
references
-
ABS,
MTC,
MIDI bar,
and
beat.
Three
types
of
time
reference.
*
The
10
digit,
7
segment
display
shows
the
current
time
(position)
of
the
recorder
using
ABS
time,
MIDI
timecode,
or
MIDI
bar/beat..
*
ABS
and MTC
function
with
sub
frame
precision
(1/100
frame),
and
the
MIDI
bar
beat
is
96
clock
precision.
These
are
used
for
data
display
and
the
memory
register.
Various
Auto
functions
*
The
ОМТ-ВУ
is
equipped
with
six
time
memories
that
can
be
edited.
Using
these
memories,
you can
perform
auto
locate,
auto
return
and
auto
play
between
two
points,
and
auto
punch
in/out
(crossfade
time:
10ms)
(Refer
to
pages
"77"
and
"87"
for
more
details.)
*
Auto
locate
to
ABS
O
or
ABS
END
is
also
possible.
In
addition,
the
LOCATE
key
has
ts
own
memory.
This
is
very
useful
for
a
repeated
locate
‘operation.
(Refer
to
page
"87"
for
more
details.)
*
There
are
two
modes
for
Auto
Punch
In/Out
function:
"Take"
mode,
Which
is
used
for
actual
recording,
and
"Rehearsal,"
which
is
used
to
‘witch
the
part
located
between
the
In
and
Out
points
to
the
input
monitor.
(Refer
to
page
"77"
for
more
detalls.)
^
The
Pre-roll
function
is
used
to
"park"
a
specified
time
prior
to
the
locate
point.
Pre-roll
time
can
be
set
in
the
range
of
0
-
10
seconds,
(Refer
to
page
"124"
for
more
details.)
MIDI
function
using
MMC,
MTC,
and
Fostex
System
Exclusive
Message
*
You
can add
an
offset
of
less
than
six
hours
to
the
ABS
time
value
to
‘output
MTC
(MIDI
timecode).
The MTC
frame
rate
is
compatible
with
эй
formats
-
24, 25,
3006,
and
30ND.
(Refer
to
page
"126"
for
setting
the
frame
rate,
and
to
page
"127"
for
setting
the
offset
time.)
*
The
DMT-8vi
responds
to
MMC
(MIDI
Machine
Control)
and
Fostex
‘System
Exclusive
Message
sent
from
external
sequencing
software.
(Refer
to
pages
"67,
70
and
137"
for
more
details)
‘Syncing
multiple
DMT-8v.s
by
the
Stave
Sync
function.
*
The
Slave
Sync
function
allows
you
to
operate
multiple
DMT-8v1s
in
synchronization,
creating
more
than
8
to
24-track
recording
system.
(Refer
to
page
"72"
for
more
details)
10

DMT-8v1
Owner's
Manual
(Main
features
of
DMT-8v1)
Internal
programmable
Tempo
Map
*
The
DMT-80
is
equipped
with
an
internal
programmable
Tempo
Мар
that
allows
the
MIDI
clock
and
Song
Position
Pointer
to
be
transmitted
to
an
external
sequencer
(switchable
to
MTC
output)
for
complete.
synchronization
with
a
hardware
sequencer.
You
can
also
use
Track
8
аз
a
Metronome
playback
track,
which
will
generate
counts
according,
to
a
Tempo
Map.
(Refer
to
pages
"113"
~
"116"
for
more
details.)
*
Eleven
types
of
Tempo
Map
signature
are
available:
1/4, 2/4,
3/4, 4/4,
5/4,
1/8,
3/8, 5/8,
6/8, 7/8,
and
8/8.
Maximum
64
points
of
signature
can
be
set,
*
Up
to 64
points
of
tempo
on
a
Tempo
Map
can
be
set
on
any
point
determined
by
the
signature
settings,
in
the
range
of 30
-
250 per
quarter
note.
(Refer
to
page
"114"
for
more
details.)
‘Setup
Menu
function
*
The
DMT-8v
is
equipped
with
the
following
setup
Menu
functions
for
the
interactive
operation
system.
You
can
use
a
highly
visible
FL
tube
display
and
the
jog/shuttie
dial
to
set
the
parameters.
(Refer
to
page
"108"
for
more
details.)
Main
Setup
Mer
{LOAD
(ead
элде
and
set
data)
ro
page
"117
ordin
AVE
(ovr
mo
эло
se
аш)
Peter
to
page
"117
hr
дна)
FORMAT
Gormaang
Pa
erai
har!
бо)
(Retro
page
"123
for
вим)
PREROLL
(eng
Prec
te)
Pater
o
page
‘1247
for
detain)
мо
SYNC
OUT
(siete
MTC,
MOI
ciach,
or
OFF)
aer
pape
"125"
or
deta)
FRAME
RATE
(etr
Pe
MTC
Fare
rate)
(Pete
o
page
"10
tor
tat.)
MIC
OFFSET
sat
Po
MTC
ойын
value
against
Pe
ABS
time)
(Reter
Io
page
"IT
hr
реј
ВАМВЕАТ
SET
(ong
Ро
пра)
Florio
page
"13
tor
дими)
TEMPO
SET
(st
Ра
mpo) (ete
ораде
“1147
for
ана)
CLICK
ONOFF
(veh
те
Metronome
anon
ONOFF)
ferio
pope
“116°
or
ects)
REC
ENABLE
(ting
Pa
REC
ENABLE
or
REC
DISABLE)
(tr
page
“128°
tae)
2
(acting
бри
eut
channe)
ler
1o
page
29
hr
dotais)
2
out
nct
a
ди ср
hare
(Rete
1o
page
"131
for
dats)
resolu
[etg
Оору
Resco
mode
ONOFF)
(Peter
to
page
3
or
detala)
SLAVE
(seting
Sie
rode
ONOFF)
(Peter
1o
page
135
eas)
МЕНЕ
(atr
a
ене
О)
Peter
o
paga
"1347
or
din)
ndo
(etg
an
fecto
range
э
те
Und
ctor
(Reter
o
page
"135°
tor
datats)
Easy-to-use
jog/shuttle
dial
*
Using
the
shuttle
dial
allows
for
+/-1,
2,
3,
5,
9,
12,
or 20
time
speed
cueing
(fast-forward
while
monitoring
audio).
*
Using
the jog
dial
allows
for
digital
audio
scrubbing.
Using
this
function,
you
can
locate
data
efficiently
while
monitoring
audio
without
any
changes
in
pitch.
*
The
jog/shuttle
dial
is
also
used
to
recall
parameters
and
to
enter
data.
u

DMT-81
Owner's
Manual
(Main
features
of
DMT-8.)
Other
recorder
functions.
*
In
addition
to
30-time
speed
FF/REW,
S-time
speed
cueing
(PLAY+FF/
REW)
is
also
available.
*
Connect
an
optional
foot
switch
Model
8051
to
the
PUNCH
IN/OUT
‘connector
for
punch
in/out
(and
rehearsal)
operation
to
free your
hands.
(Refer
to
page
"83"
for
more
details)
*
A
highly
visible
FLtube
level meter
shows
the
output
level
of
Tracks
1-
and
STEREO
OUT
UR.
*
The
DMT-8vt
can
record
data
digitally
to
and
from
an
external
digital
device.
«Mixer
Section»
A
high-quality
eight-channel
analog
mixer
that
offers
two
microphone
Inputs,
and
mixdown
of
a
maximum
20
channels.
*
The
DMT-8VL
is
equipped
with
a
high-quality
eight
channel
analog
mixer
with
eight
inputs
including
two for
microphones.
*
Channels
1-2
for
microphones
are
equipped
with
a
LEVEL
switch
for
selecting
-104ВУ,
-304BV,
or
-SOdBV,
depending
on
the
connected
sound
sources
and
microphones.
*
The
stereo
input
monitor
section
allows
for
remixing
with
the
main
stereo
[UR
signal,
which
simulates
virtual
16-channel
(maximum
20-channel)
mixing.
(Refer
to
page
"69"
for
more
details.)
*
The
Inline
monitor
section
allows
you
to
select
any
output
for
the
Input.
or
track.
This
powerful
feature
is
very
useful
in
various
applications,
such
as
virtual
mixing
of
MIDI
sound
sources
and
effect
presending.
*
The
stereo
L/R
output
can
be
routed
to
the
РАТА
OUT
connectors
(optical,
S/?
DIF
format).
Flexible
two
AUX
send/return
*
Each
input
channel
has
two
AUX
sends.
Along
with
two
stereo
AUX
returns,
versatile
effects
processing
is
possible.
(Refer
to
page
"39"
for
more
details)
Other
mixer
functions
*
MON
OUT
connector
and
MONITOR
volume
for
audio
monitoring
through.
the
amplifier
or
speakers.
*
The
monitor
section
is
equipped
with
a
selector
that
allows
you
to
monitor
the
stereo
L/R
output
signal
and the
monitor
signal
either
individually
or
simultaneously.
12

DMT-8v:
Owner's
Manual
(Names
and
Functions)
Paar
panel
section
(Rater
to
page
"25"
tor
dta
ёе
T
UUUUUUUU
9
@
$9
9
96
969
9
Front
panel
section
(Fater
to
радо
"25"
tor
deal.
13
DMT-8vı
Owner's
Manual
(Names
and
Functions)
Names
and
Functions
«Top
panel
(Mixer
section)--
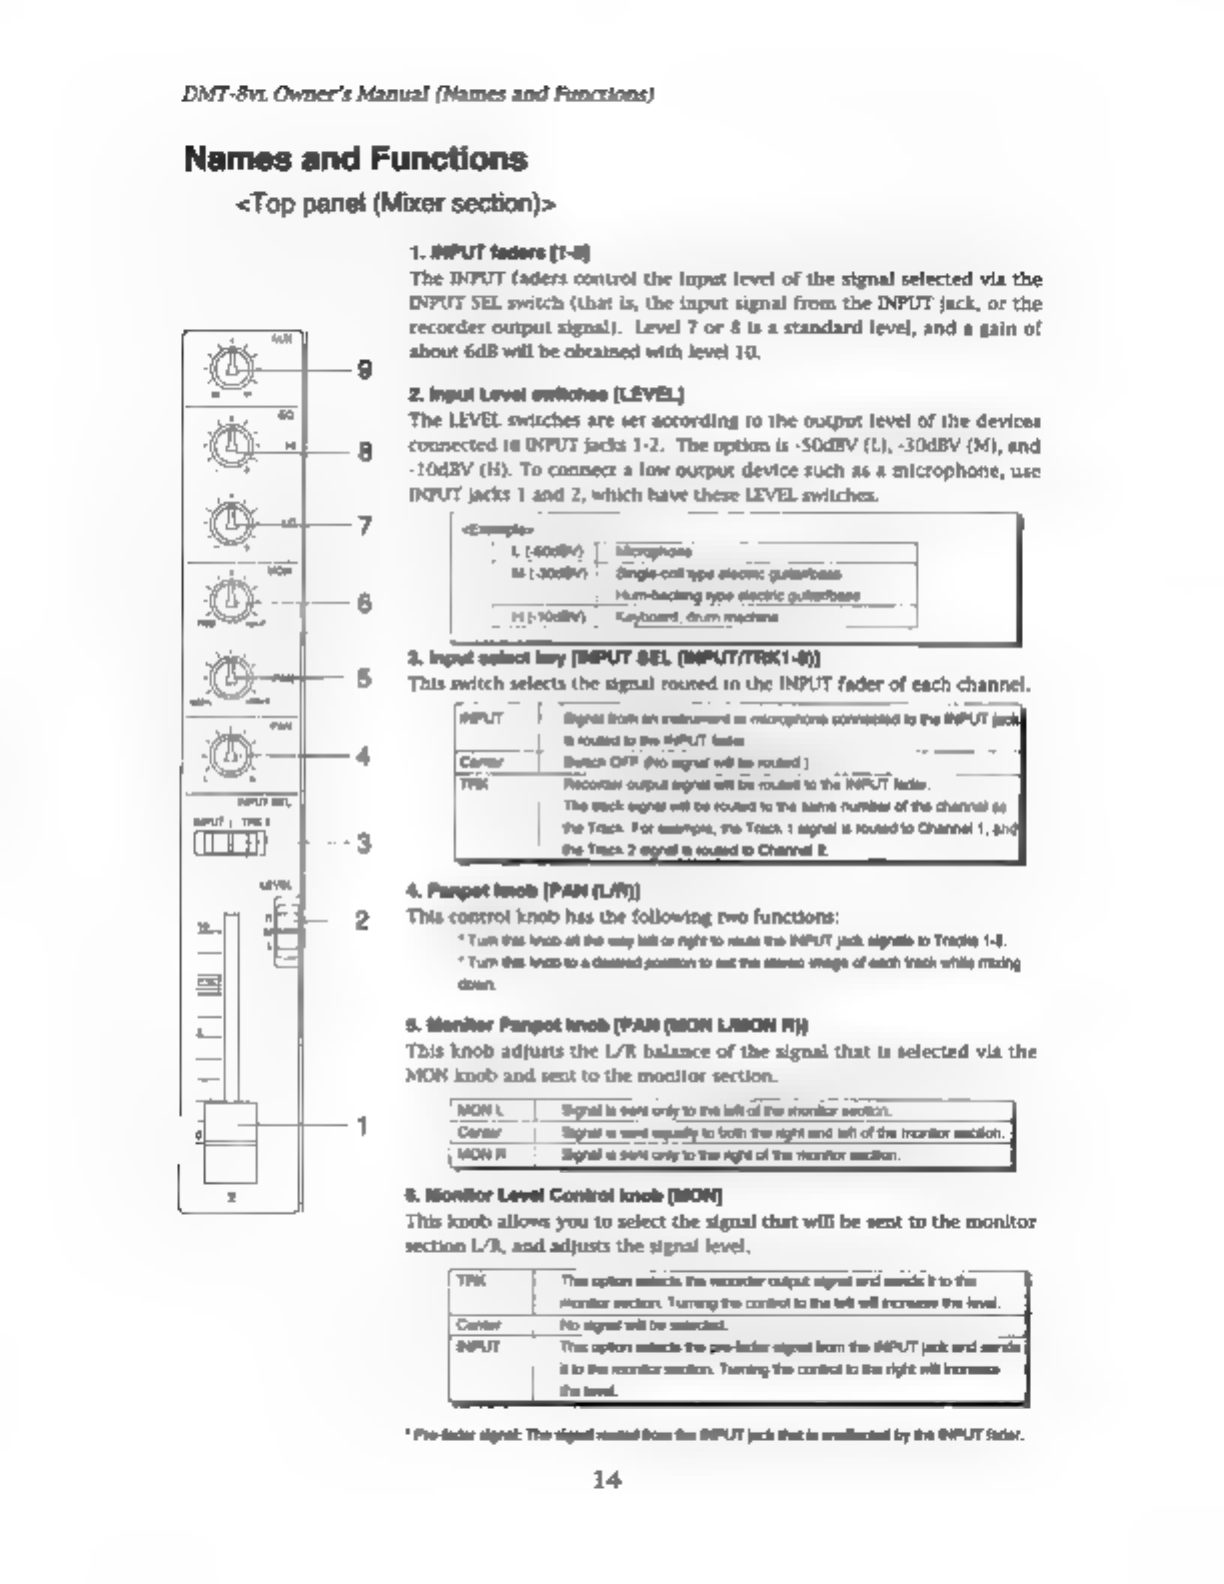
3
INPUT
faders
[а]
The
INPUT
faders
control
the
input
level
of
the
signal
selected
via
the
INPUT
SEL
switch
(that
is,
the
input
signal
from
the
INPUT
jack,
or
the
recorder
output
signal).
Level
7
or
8
is
a
standard
level,
and
a
gain
of
about
dB
wil
be
obtained
with
level
10.
2.
Input
Level
switches
[LEVEL]
"The
LEVEL
switches
are
set
according
to
the
output
level
of
the
devices
‘connected
to
INPUT
jacks
1-2.
The
option
is
-SOBV
(L),
ЗОБУ
(M),
and
ЛОБУ
(Н).
To
connect
а
low
output device
such
as
a
microphone,
use
5.
Monitor
Panpot
knob
[PAN
(MON
LIMON
RJ]
This
knob
adjusts
the
L/R
balance
of
the
signal
that
is
selected
via
the
=
MON
knob
and
sent
to
the
monitor
section.
AOL
Т
Spal
Pact
ааа
1
SE
TEE
et
вагон
зае
Won
|
с=т
раната
cin
D
6.
Monitor
Level
Control
knob
[MON]
This
knob
allows
you
to
select
the
signal
that
wil
be
sent
to
the
monitor
section
L/R,
and
adjusts
the
signal
level.
“Pte
sat
Te
at
эле
tom
тє
төл
eat
ected
by he
NPT
ader
14
DMT-8v1
Owner's
Manual
(Names
and
Functions)
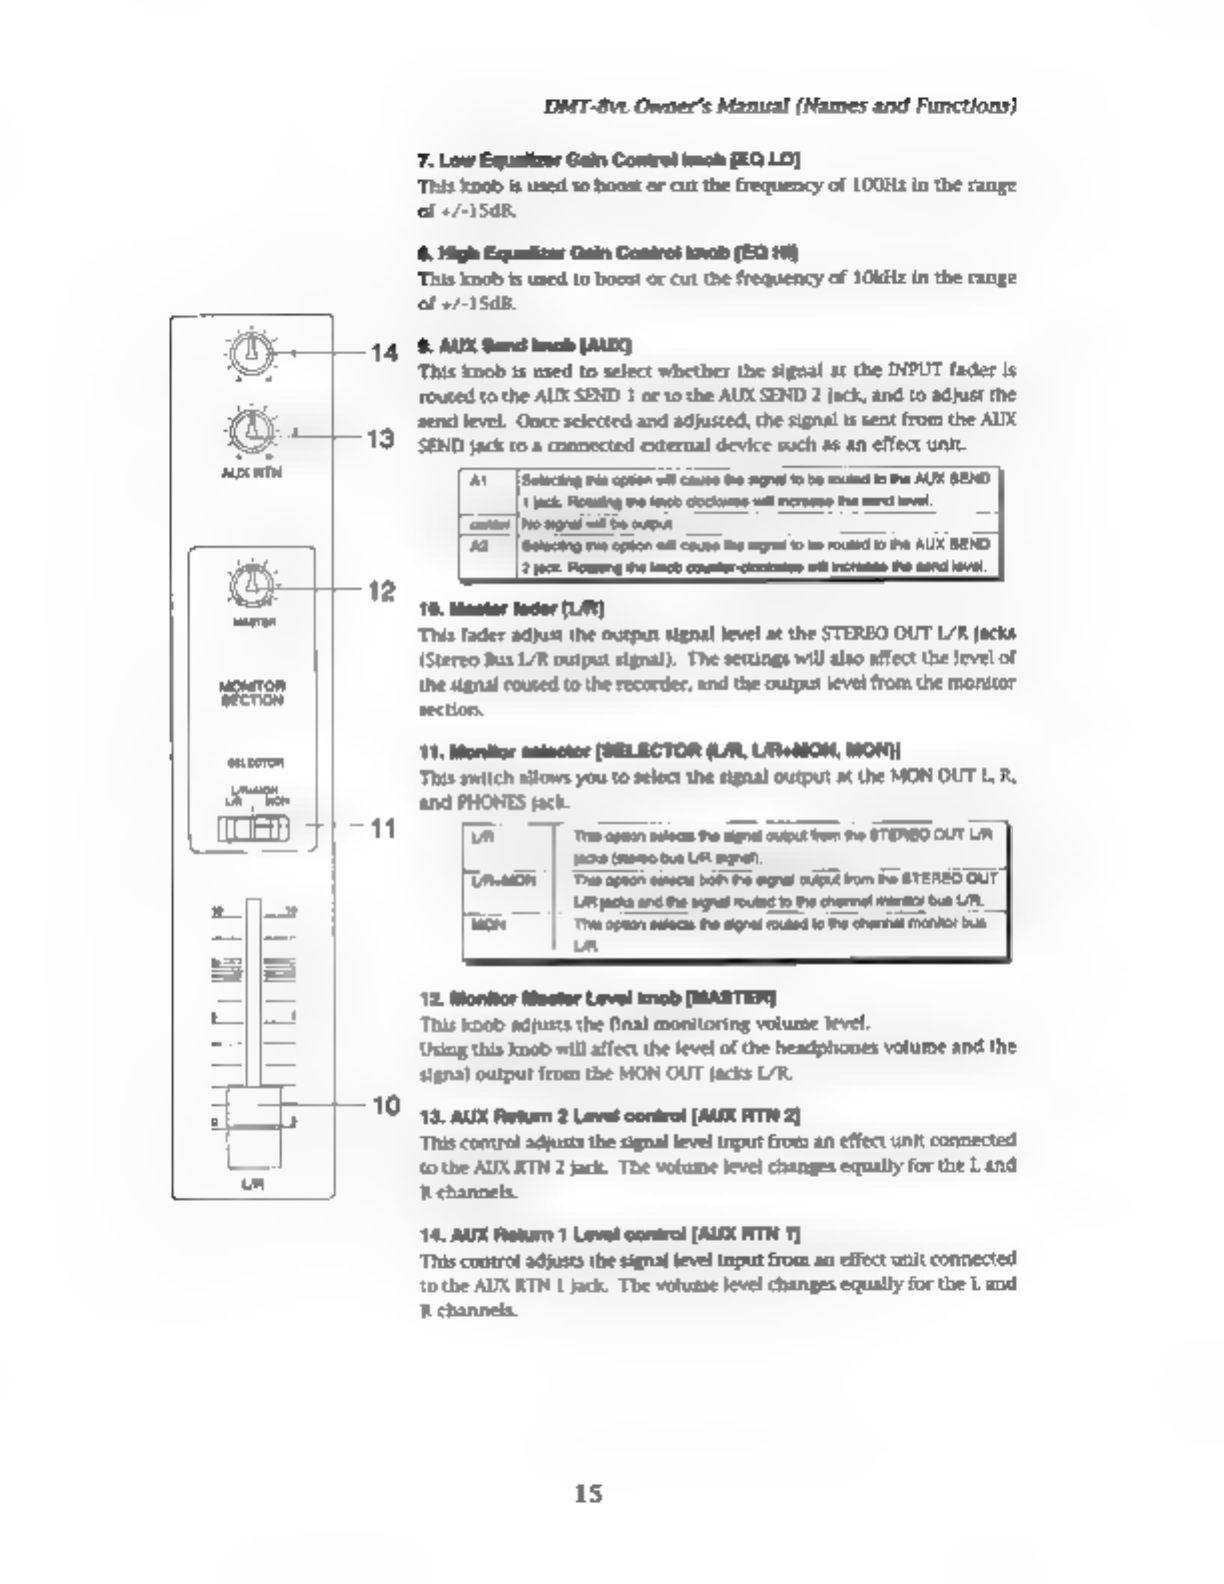
T.
Low
Equalizer
Gain
Control
knob
[EQ
LO}
This
knob
в
used
to
boost
or
ал
the
frequency
of
100Hz
in
the
range
of
+1548.
High
Equalizer
Gain
Control
knob
[EQ HN)
Тыз
knob
is
used
о
boost
or
cut the
frequency
of
1OKH
in
the
range
of
47-1548.
э.
AUX
Send
knob
[AUX]
This
knob
is
used
to
select
whether
the
signal
at
the
INPUT
fader
is
routed
to
the
AUX
SEND
1
or
to
the
AUX
SEND
2
jack,
and
to
adjust
the.
send
level.
Once
selected
and
adjusted,
the
signal
и
ent
from
the
AUX
SEND
jack
toa
connected
external
device
such
as an
effect
unit.
WD
|e
pt
ө
casa
бө
panera
ow
AIKEN
‘ea
Rng
a
ct
cua
mee
Peo
v
‘the
signal
routed
to
the
recorder,
and
the
output
level
from
the
monitor.
section.
1.
Monitor
selector
[SELECTOR
(UR,
ип»
мон,
MONJ)
This
switch
allows
you
to
select
the
signal
output
at
the
MON OUT
L
R,
and
PHONES
jack.
Vi
|
asain
sacs
нуш
sup
Ton
e
STEREO
OUT
UR
paa
pa
n
TURAN”
|
apt
шеи
Ра
жуа
Boni
BTEREO
OUT
(Unaware
crs meu
UR
Te
|
Tapa
lc
ra
муш
red
ene
moror
bur
та.
Monitor
Master
Level
knob
[MASTER
‘Tis
knob
adjusts
the
final
monitoring
volume
level.
‘Using
this
knob
wil
affect
the
level
of
the
headphones
volume
and
the.
signal
output
from
the
MON
OUT
jacks
L/R-
эз.
AUX
Return
2
Level
control
(AUX
RTN
2]
‘This
control
adjusts
the
signal
level
input
from
an
effect
unit
connected
to
the
AUX
RTN
2
jack.
The
volume
level
changes
equally
for the
Land
R
channels.
зас
AUX
Return
1
Level
control
(AUX
RTN
1)
This
control adjusts
the
signal
level
input
from
an
effect
unit
connected
tothe
AUX RTN
1
jack.
The
volume
level
changes
equally
for the
Land
R
channels.
15

DMT-8v
Owner's
Manual
(Names
and
Functions)
«Top
panel
(Recorder
section»
15
Meter
display
This
meter
display
shows
the
signal
level
and
settings.
ч.
Record
Track
Select
key
[RECORD
TRACK]
The
Record
Track
Select
key
selects
"SAFE-READY”
for
the
recording
track.
When
you
press
this
key
once,
the
track
enters
the
READY
status,
and the
rack
indication
on
the
display
wili
blink.
Pressing
it
again
changes
this
status
to
"SAFE"
and
the
track
indication
wil
go
out.
When
you
start
recording,
the
blinking
track
When
you
press
only
the
RECORD
button
while
the
track
is
in
the
READY
status,
"he
track
becomes
an
input
monitor,
allowing
you
to
adjust
the
recording
level.
Pressing
only
the
RECORD
button again,
the
track
become
a
reproduction
monitor:
This
key
is
also
used
to
select
a
track
for the
Copy
&
Paste,
Move
&
Paste,
Erase,
or
other
editing
operation.

DMT-8v1
Owner's
Manual
(Names
and
Functions)
17.
HolDigit
Move
key
[HOLD]
Pressing
this
key
while
the
recorder
transport
is
operating
will
old
the
time
value
(or
Bar/Beat/Clock
value),
display
the
value
оп
the
screen,
and
wil
place
he
unit
into
edit
mode.
(If
you
press
this
key
while
the
recorder
section
is
stopped,
the
DMT-8v
wil
enter
edit
mode.)
Pressing
this
key
repeatedly
allows
you
to
select
the
digit
(column)
to
edit.
То
cancel
edit
mode,
press
the
STOP
burton,
DISP
SEL
key,
or
EXT/NO
key.
Pressing
the
STORE
key
while
holding
down
the
HOLD/>
key
wili
change
a
Program.
[бин
o
page
O. эк ме
эе
а
rre
rao
прет
Ял
1
papa
ч
ку
mor
nema
шол
Peer
Orge
rcr
18,
Store
key
[STORE]
тыз
key
is
used
to
store
а
time
value
(or
Bar/Beat/Clock
value)
to
one
of
the
memory
keys.
Pressing
this
key,
then
one
of
the
following
keys
will
cause
the
data
Shown
on
the
display
to
be
stared
to
the
corresponding
memory
key
you
pressed.
Pressing
the
STORE
key
while
holding
down
the
HOLD/>
key
will
change
a
Program.
a7
FRO
|
aaa
ий
EER
>
TORO
|
Tre
aw
Pins
pte
le
ECA
Noy
>
ATO
PINGHOTT
|
e
ow
Pins
a
cn
ae
DMT-8v1
Owner's
Manual
(Names
and
Functions)
To
edt
edit
mode, press
the
EXT/NO
key,
DISP
SEL
key,
or
STOP
button,
{rate
page"
тот
maton
t
т
ca
арии
и
поз
питал
ом
s
RD
Ou
dg
‘hapa
а
а
то
rto
жол
ало
Rt.
20.
Auto
Return
Start
key
[AUTO
RTN
START]
‘This
key
stores
the
Start
polat
for
Auto
Return
or
Auto
Repeat.
Pressing
the
RECALL
key,
then
this
key (or
pressing
only
this
key)
wil
display
data
currently
Stored
at
this
key,
and
put
the
unit
into Edit
mode.
M
yos
press
the
STORE
key,
then
this
key
after
editing,
the
edited
value
will
be
stored
at
this
key.
Data
stored
at
this
key
can
be
used
as
a
locator.
When
you
turn
ff
the
power
to
the
DMT-8V
the
memory
wil
be
set
to
the
factory
default
value.
да
орди
а
eran
ол Kt
Rt
A
Pere.
21,
Auto
Punch
in
key
[AUTO
PUNCH
IN]
Thi
key
stores
the
Punch
а
point
for
Auto
Punch
In/Out
recording.
Pressing
the
RECALL
key, then
this
key
(or
pressing
only this key)
wil
display
data
currently
stored
at
this
key,
and
will
place
the
unit
in
Edit
mode.
It
you
press
the
STORE
key,
then
this
key
after
editing.
the
edited
value
wil
be
stored
at
this
key.
In
addition
to
storing
a
Punch
a
polat,
thls
key
can
store
the
paste
start
point,
erase
start
point,
and
cut
start
point.
Data
stored
at
this
key
can
ре
шей
as
a
locator.
When
you
turn
off
the
power
to
the
DMT-8v,
the
memory
will
be
set
to
the
factory
default
value.
ча
X
и
арии
а
mr
чао
Ju
P
INO
ein
‘hats
pap
E
me
romeo
ttc
par
жан
ТА
sapi
E
а
or
rato
аса
па
оа
же
Ол
ренот.
22.
Auto
Punch
Out key
[AUTO
PUNCH
OUT]
Thi
ey
stores
the
Punch
Out
peat
for
Auto
Punch
In/Out
recording.
Pressing
the
RECALL
key,
then
this
hey
(or
pressing
only this key)
wil
display
data
currently
stored
at
this
key,
and
will
place
the
unit
in
Edit
mode.
1f
you
pressing
the
STORE
key, then
this
key
after
editing.
the
edited
value
will
be
‘stored
at
this
key.
In
addition
to
storing
a
Punch
Out
point,
this
key
can
store
the
‘erase
end
point.
Data
stored
at
this
key
can
be
used
as
a
locator,
When
you
turn
of
the
power
to
the
DMT-8v,
the
memory
wil
be
set
to
the
factory
default
vale.
эз.
Auto
etum
End
key
[AUTO
RTN
END]
This
key
stores
the
End
peint
for
Auto
Return
or
Auto
Repeat.
Pressing
the
[RECALL
key, then
this
key
(or
pressing
only
this
key)
il
display
data
currently
stored
at
this
key,
and
wil
place
the
unit into Edit
mode.
1f
you
press
the
STORE
key.
then this
key
after
editing,
the
edited
value
will
be
stored
at
this
key.
Data
stored
at
this
key can
be
used
as
a
locator.
Wen
you tur
ofthe
power
to
the
DMT-Bv
the
memory
will
be
set
to
the
factory
default
vale.
n
o
page
эе
ө
mere
riman
жол
Aste
tan
and
Ало
реони
18
DMT-8v.
Owner's
Manual
(Names
and
Functions)
24.
Redo
key
[REDO
Pressing
this
key
after
you
press
the
UNDO
key
lets
you
о
restore
the
status
‘obtained
before
you
undo
recording
or
editing.
This
key
is
activated
only
when
"he
recorder
transport
section
is
stopped.
te
an
s
на
эшк
м
ника
аа
ые
ноты
|
25.
Undo
key
[UNDO]
Afer
using
an
edit
function
such
as
Paste,
Erase,
or
Ct,
or
after
auto
punch
in/out
recording
pressing
this
key
wil
restore
the
previous
status
obtained
before
editing
or
recording.
This
key
is
activated
only
when
the
recorder
transport
section
is
stopped.
'
ele
pages
"2,
98,
103.
108
от
tor
mar
roman
abu
e
Undo
operon.
26.
Erase
key
[ERASE]
This
key
has
two
functions:
the
Erase
function,
which
erases
data
(creates
silence)
within
а
specified
region
on
the
readied
track.
The
other
is
the
Cut
function,
which
Cuts data
from
the
region
beginning
a
the
specified
рони.
Pressing
this
key
when
ЭП
tracks
are
ready
wil
activate
the
Cut
function.
Pressing
this
key
while
one
or
more
tracks
are
safe
will
activate
the
Erase
function.
A
regon
to
be
erased
s
defined
between
the
Auto
Punch
in
point
and the
Auto
Punch
Out
point.
A
region
to
be
cut
is
defined
only
by
the
Auto
Punch
In
point,
This
Cut
operation
requires
only
the
start point
of
the
region
to
be
cut,
that
is,
the
Auto
Punch
In
point.
Specify
the
area
to
be
erased
using
the
Auto
Punch
In/Out
points
and
the
RECORD
TRACK
select
key.
To
use
the
Cut
function,
set
ай
tracks
to
the
ready
condition,
and
det
the
start
point
of
the
data
to
be
cut
as
the
Auto
Punch
In
point.
‘hs
key
is
activated
опу
when
the
recorder transpor
Section
i
stopped.
(ier
pon
ө
ee
oman
eate
taa
pero
)
27.
Jog/Shutte
dial
dog
dt
Gian:
i
you
turn
the
jog
dial
when
the
recorder
is
stopped.
you
can
perform
jog.
forward
and
reverse
digital
audio
scrubbing),
without
altering
the
audio
quality.
In
edit
mode,
turning
the
jog
dil
wiil
increase/decrease
the
value.
Tn
Setup
mode,
using
the jog
dial
allows
you
to
set
the
parameters
Shute
аш
(ote
‘The
shuttle
dial
is
wed
for
the
forward
and
reverse
cueing
at
+/-1,
2, 3,
5,9,
12,
or
20
times
speed.
In
edit
mode,
iis
used
to
move
around
the
digits.
“Rt
ge
TE
ч
чє
ме
эу
more
tes
жө
eg
rey
“haa
peo
төз
ator
st
at
то.
28.
Hard
disk
access
LED
‘This
LED
lights
up or
blinks
when
the
hard disk
is
writing
or
reading
data.
19

DMT-8v1
Owner's
Manual
(Names
and
Functions)
29.
Fast
Forward
button
[F
FWD]
Pressing
this
button
while
the
recorder
section
is
stopped
wil
fast
forward
data
at
30
times
speed.
Pressing
this
button
in
Play
mode
will
cue
data
(you
can
hear
sound
during
the
fast
forward
operation)
at
five
times
speed.
Pressing
this
burton
wile
holding
down
the
STOP
button
wil
initiate
the
"LOCATE.
ARS
END"
operation,
and
immediately
locate
the
end
of
the
recorded
data
on
the
зага
disk (AES
END).
(Refer
to
the
"STOP
button”
section
for
more
information
about
LOCATE
ABS
END.)
30.
Rewind
button
[REWIND]
Pressing
this
button
while
the
recorder
section
is
stopped
wili
rewind
data
at 30
times
speed.
Pressing
this
button
in
Fay
mode
will
cue
data (you
can
hear
sound
While
rewinding)
at
five
times
speed.
Pressing
this
button
whe
holding
down
the
STOP
button
wil
perform
the
"LOCATE
ABS
O"
operation,
and
immediately
locate
the
beginning
of
the
hard
disk
(ABS
TIME:
0OM:00S:00F).
(Refer
to
the
"STOP
button" section
for
more
information
about.
LOCATE
ABS
O)
эт.
Play
button
[PLAY]
Pressing
this
button
wil
start
playback
on
the
recorder
section.
Pressing
the
RECORD
button
while
holding
down
this
button
wil
start
recording.
Pressing
this
button
while
holding
down
the
STOP
button
will
execute
the
Clipboard
May
operation.
(Refer
to
the
STOP
button?
section
for
more
information
about
the.
Сирһоага
Pay
operation.
Pressing
the
this
button
during
recording
wil
stop
recording
(Punch
Out).
за.
Stop
button
[STOP]
Pressing
this
button
wil
stop
playback
of
the
recorder
section.
Pressing
the
PLAY,
REWIND,
or
F
FWD
button
while
holding
down
this
button
execute
the
following
operation:
[orsa
Pec
St
Pay
me
(he
STOP
LED
wl
|
Бекет
TOP
an
сїй
|
мазната
т
STOP
ILI
NAME
I
TIT
T
‘You
can
turn
Rehearsal
mode
on/off
by
pressing
the
foot
switch
while
holding.
down
this
button
for
Panch
In/Out
recording.
^1
CUPBOARD
PLAY
operation
‘Tals
operation
plays
bach
data
copied
oe
moved
to
the
Clipboard,
During
the
operation:
{he
display
wl
show
the
contents
of
ма
(COPY.
for
copy
data,
and
"MOVE
for
move
data)
atd
ime,
ad
heck
indicator
of
he
copy
or
move
source
wil
ak,
making
W
dear
which
data
on
ich
ac
в
the
июне.
“2
Lecting
to
ABS
0
(LOCATE
ABS
OF
‘Te
рм
ма
locate
the
beginning
of
recorded
audio
on
the
hard disk
(ARS
TIME:
омо.
3
Locating
to
ABS END
LOCATE
ABS
ENO}:
The
DMT
Srt
wl
locate
the
end
of
reared
audio
ов
the
hard
did
(the
end
AS
нө
в
sage
oe
нә»
Орка
e
OMT
econ
omen
Тра
ради
yer
rto
шол уу)
пл
тоат
ang
me
ња
ra
20
Other manuals for DMT-8VL
2
Table of contents
Other Fostex Recording Equipment manuals

Fostex
Fostex D-80 User manual

Fostex
Fostex DC-R302 User manual

Fostex
Fostex 80 User manual

Fostex
Fostex D2424LV MKII User manual

Fostex
Fostex FR-2LE User manual

Fostex
Fostex D-90 User manual

Fostex
Fostex FR-2 User manual

Fostex
Fostex VR800 User manual

Fostex
Fostex CR200 User manual

Fostex
Fostex RD-8 User manual

Fostex
Fostex ATC-4 User manual

Fostex
Fostex RD-8 User manual

Fostex
Fostex XR-7 User manual

Fostex
Fostex FR-2 User manual

Fostex
Fostex CR300 User manual

Fostex
Fostex VF-160 User manual

Fostex
Fostex DV-824 Configuration guide

Fostex
Fostex VF-16 User manual

Fostex
Fostex X-34 User manual

Fostex
Fostex XR-3 User manual


