Ilsintech SWIFT K11 User manual
Optical Fiber Arc Fusion Splicer
Read this user manual carefully before running K11
SWIFT K11
SWFIT K11-EN, Rev.A
This device complies with Part 15 of the FCC Rules. Operation is subject to the following two conditions: (1) This device may not cause
harmful interference, and (2) this device must accept any interference received, including interference that may cause undesired
operation.
Device Type
Notification
A Class Device
(Broadcasting and communication device,
commercial use)
Users need to understand that this device(A Class) has obtained
EMI(Electromagnetic compatibility) and been designed to be used in
places other than home.
USER MANUAL
WWW.ILSINTECH.COM

SWIFT K11-EN, Rev.A 2
Contents
1. NOTES FOR USERS 5
2. PRODUCT SPECIFICATIONS AND COMPOSITION 8
2.1 PRODUCT SPECIFICATIONS 8
3. PRODUCT OUTLINE 10
3.1 FUNCTION BUTTONS 10
3.2 COMPONENT’S NAME 11
4. INSTRUCTIONS FOR USE 13
4.1 POWER SUPPLY 13
4.2 HOW TO TURN THE POWER ON/OFF 16
4.3 SLEEVE LOADER ASSEMBLY 17
4.4 INSERTING OPTICAL FIBER TO PROTECTING SLEEVE 18
4.5 OPTICAL FIBER CLEANING AND STRIPPING 18
4.6 OPTICAL FIBER CUTTING 19
4.7 INSTALLING OPTICAL FIBER TO SEALER 20
4.8 OPTICAL FIBER CONNECTING PROCEDURE 21
4.9 K11 SLEEVE-HEATER PART 22
4.10 SEPARATION OF CONNECTED OPTICAL FIBER 24
4.11 HEATING FOR PROTECTING SLEEVE 24
5. MAINTENANCE OF SPLICE QUALITY 25
5.1 CLEANING AND INSPECTION BEFORE SPLICE 25
5.2 REGULAR CLEANING AND INSPECTION 27

SWIFT K11-EN, Rev.A 3
6. MENU 30
6.1 SPLICE 37
6.2 HEATER 44
6.3 SPLICE RESULT 48
6.4 OPTION 49
6.5 CALIBRATION 54
6.6 ELECTRODE 59
6.7 SETTING 63
6.8 INFORMATION 67
7. ERROR MESSAGE 70
7.1 OPTICAL FIBER IS TOO DIRTY. 70
7.2 REPLACE THE OPTICAL FIBER. 70
7.3 OPTICAL FIBER IS TOO LONG. 71
7.4 ERROR ON ANGLE OF OPTICAL FIBER 71
7.5 LOSS IS BIG. 72
7.6 OPTICAL FIBER IS THIN. 72
7.7 OPTICAL FIBER IS THICK. 72
7.8 BUBBLE BEING GENERATED 72
7.9 ERROR ON CUT SURFACE ON LEFT,RIGHT OR BOTH 72
8. SEALING PROBLEM SOLVING 73
8.1 WHEN LOSS IS BIG 73
8.2 ABNORMAL SEALING OPERATION 74
9. PROBLEM OCCURRENCE AND QUESTION 75
9.1 POWER 75
9.2 SPLICE 76
9.3 SLEEVE HEATER 77
9.4 OTHERS 78

SWIFT K11-EN, Rev.A 4
10. WARRANTY AND REPAIR 79
10.1 INFORMATION NECESSARY FOR REPAIR 79
10.2 TRANSPORTATION 80
10.3 REPAIR 80

SWIFT K11-EN, Rev.A 5
1. NOTES FOR USERS
Swift K11 is designed to be conveniently used both indoor and outdoor work sites so its use is easy
and simple but make sure to read this instructions for use to prevent safety accident and
breakdown before using SwiftK11. The instructions for use provide information necessary for safe
splice.
Ilsintech does not take any responsibility for the equipment’s damage and personal or physical
loss incurred due to improper use or alteration.
WARNINGS
When any of the following occurs during use, turn off the power immediately and contact to Ilsintech.
▪Smoke, disgusting smell, noise or abnormal overheating.
▪When a foreign substance or liquid falls into the equipment
▪When the sealer falls down or it is damaged
Regarding AC power cord, use the one provided with Swift K11. If a power cord other than provided is
used, it may incur fire, electrical shock or injury.
Do not touch the electrode when power of Swift K11 is on. High voltage and high temperature generated
from electrode may incur serious chock or burn.
Connect the provided AC power cord to battery. Check whether there is any
foreign substance on the terminal before connecting to AC power socket.
Incomplete splice may incur smoke, electric shock, fire, damage of equipment, serious injury and even
death.
Use proper power.
AC power for the adapter is AC100-240V, 50~60Hz.
Test the AC power before use. When output voltage of AC power is high or abnormal frequency is
generated, the product is damaged and serious injury or even death may be incurred to the user.
AC output voltage should be measured using circuit tester before connecting AC power cable and regular
inspection should also be conducted.
Do not pull the provided AC power cord by force or heat or transform it.
Carry the instructions for use with the product at all times.

SWIFT K11-EN, Rev.A 6
WARNINGS
When a damaged power cord is used, it may incur fire or injury.
Use 3-core AC power cord and do not ever use 2-core power cord, cable or plug.
Do not touch AC plug, AC power cord or sealer with wet hands. It may incur electric shock.
Do not disassemble AC adapter, battery or Swift K11. Deformation may incur fire, electrical shock or
injury.
Refer to the following when using the battery.
▪When an improper battery which is not provided by Ilsintech is used, it may incur smoke,
damage of equipment, burn, injury or even death.
▪Do not dispose the battery into fire or incineration plant.
▪Do not charge the battery next to flame.
▪Do not give an excessive shock to the battery.
▪When the battery is not completely charged in 2 hours or green LED is not turned on, stop
charging immediately and contact to Ilsintech.
▪Do not put anything on AC adapter during charging.
Use the exclusive AC adapter (F1-1). Do not use another AC power cord or battery. Excessive current
may incur equipment damage or injury.
Do not use Swift K11 where there is harmful gas or flammable liquid. Explosion or fire may be incurred
due to electrical discharge.
Do not use compressed air or compressed gas when cleaning Swift K11.
Inspect the case belt before transportation. When transporting case is dropped due to damage on belt,
it may incur equipment damage or injury.
Wear safety goggles when working on making splice. It is very dangerous if a piece of optical fiber gets
in skin or eye.
Do not use Swift K11 around high temperature or flame. It may incur injury
or equipment damage.
CAUTION:
HIGH TEMPERATURES
DO NOT SPRAY FREON GAS
CAUTION:
HIGH VOLTAGE

SWIFT K11-EN, Rev.A 7
CAUTIONS
Do not touch sleeve heater or protec sleeve while sleeve heater is operating or right after heating is
completed. It may incur injury due to high temperature.
Do not put Swift K11 at an unstable place. When the equipment is dropped, it incurs injury or equipment
damage.
Swift K11 should be accurately adjusted and treated in arrayal. Do not give it a strong shock, either.
Use transporting case to carry or to keep Swift K11. The transporting case keeps the equipment from
humidity, vibration and shock during storage and transportation and prevents its damage.
Replace the electrode at the right time by referring to the following.
Designated electrode should only be used.
Place a new electrode at a right position.
Replace the electrode in pairs.
Abnormal discharge is incurred when not following the aforementioned caution.
It may incur equipment damage or deteriorated splice.
Do not use any chemical other than ethyl alcohol (96% or higher) to clean object lens, V-Groove, LCD
monitor and main body.
Using other chemicals may incur deformation, discoloration or deteriorated performance.
Do not keep the equipment in environment with high temperature or high humidity. It may incur
equipment damage.
Technical aspects of Swift K11 should be inspected by a qualified expert.
When ignoring this, it may incur fire or electric shock.
Discuss with Ilsintech to use the service.

SWIFT K11-EN, Rev.A 8
2. Product specifications and composition
2.1 Product specifications
ITEM
DESCRIPTION
Fiber alignment
IPAAS core to core alignment
(Image pattern analysis alignment system)
Applicable type of fibers
0.25mm, 0.9mm, 2.0mm, 3.0mm, 4.0mm, Indoor cable
Fiber count
Single fiber
Applicable fiber dimensions
Cladding diameter: 80~150 ㎛, Coating diameter: 100 ㎛~4mm
Fiber setting and cleaved length
7~16mm
Splicing modes
Splice mode: 300, Heat mode: 100
Typical splice Loss
SM: 0.02dB, MM: 0.01dB, DS: 0.04dB, NZDS: 0.04dB
Return loss
> 60dB (Typical)
Splicing time
Typical 6sec. (Quick Mode)
Sleeve heating time
9sec (IS-45 Sleeve, IS-45 mode),
13sec (IS-60 Sleeve, IS-60 mode)
Applicable protection sleeve
40mm, 60mm, 32mm or 28mm for SOC
Storage of splice result
The last 10,000 results to be stored in the internal
memory.(Image 10,000 results)
Tension test
1.96N ~ 2.25N
Dimension
143(W) x 163(L) x 140(H)mm (Without Bumper)
Weight
With battery 2.25kg
Viewing method and display
Two CMOS cameras and 5.0-inch color touch LCD
Fiber view and magnification
X/Y : 200X, Max 400X
Power supply
DC Lithium polymer battery (DC 14.8V, 4700, 6000mAh-option),
100~240V AC Adapter
No. of splice cycles with battery
Typical 250 cycles/ More than 300 cycles(K11-6000)
Electrode life
More than 3,500 times
Terminals
USB

SWIFT K11-EN, Rev.A 9
2.1.1 Basic components
ITEM
MODEL NAME
QUANTITY
Arc Fusion Splicer
SWIFT K11
1
Battery
K11-4700
1
AC Adapter
WDS060190
1
Instructions for use
-
1
Spare electrode
EI-23
1pair
Transporting Case
Hard Case
1
Cooling Tray
CT-01
1
Wrench
LD-3300
1
USB Cable
-
1
DC Output Cable
-
1
Manual Stripper
CF-02
1
Alchol Dispenser
PP
1
Tool Box
-
1
Sleeve Loader
S312
2
Cleaver
CI-03BT
1
2.1.2 Accessories
ITEM
MODEL NAME
Battery
K11-4700 / K11-6000
Cleaver Blade
BI-07
Electrode
EI-23
Work Belt
-
Sleeve
S-160(60mm), S-140(40mm)
Sleeve Clamp
SC-01
SOC Connector
SC, LC, FC, ST(Refer to FTTx Solution catalogue)
Optical Fiber Holder
HS-250, HS-900, HS-2.5F, HS-IN, HS-SC/FC, HS-ILC, HS-ST, LS-
900(Loose)
External Power
DC 12V Available for car cigar jack
SWIFT K11-EN, Rev.A 10
3. Product outline
3.1 Function buttons
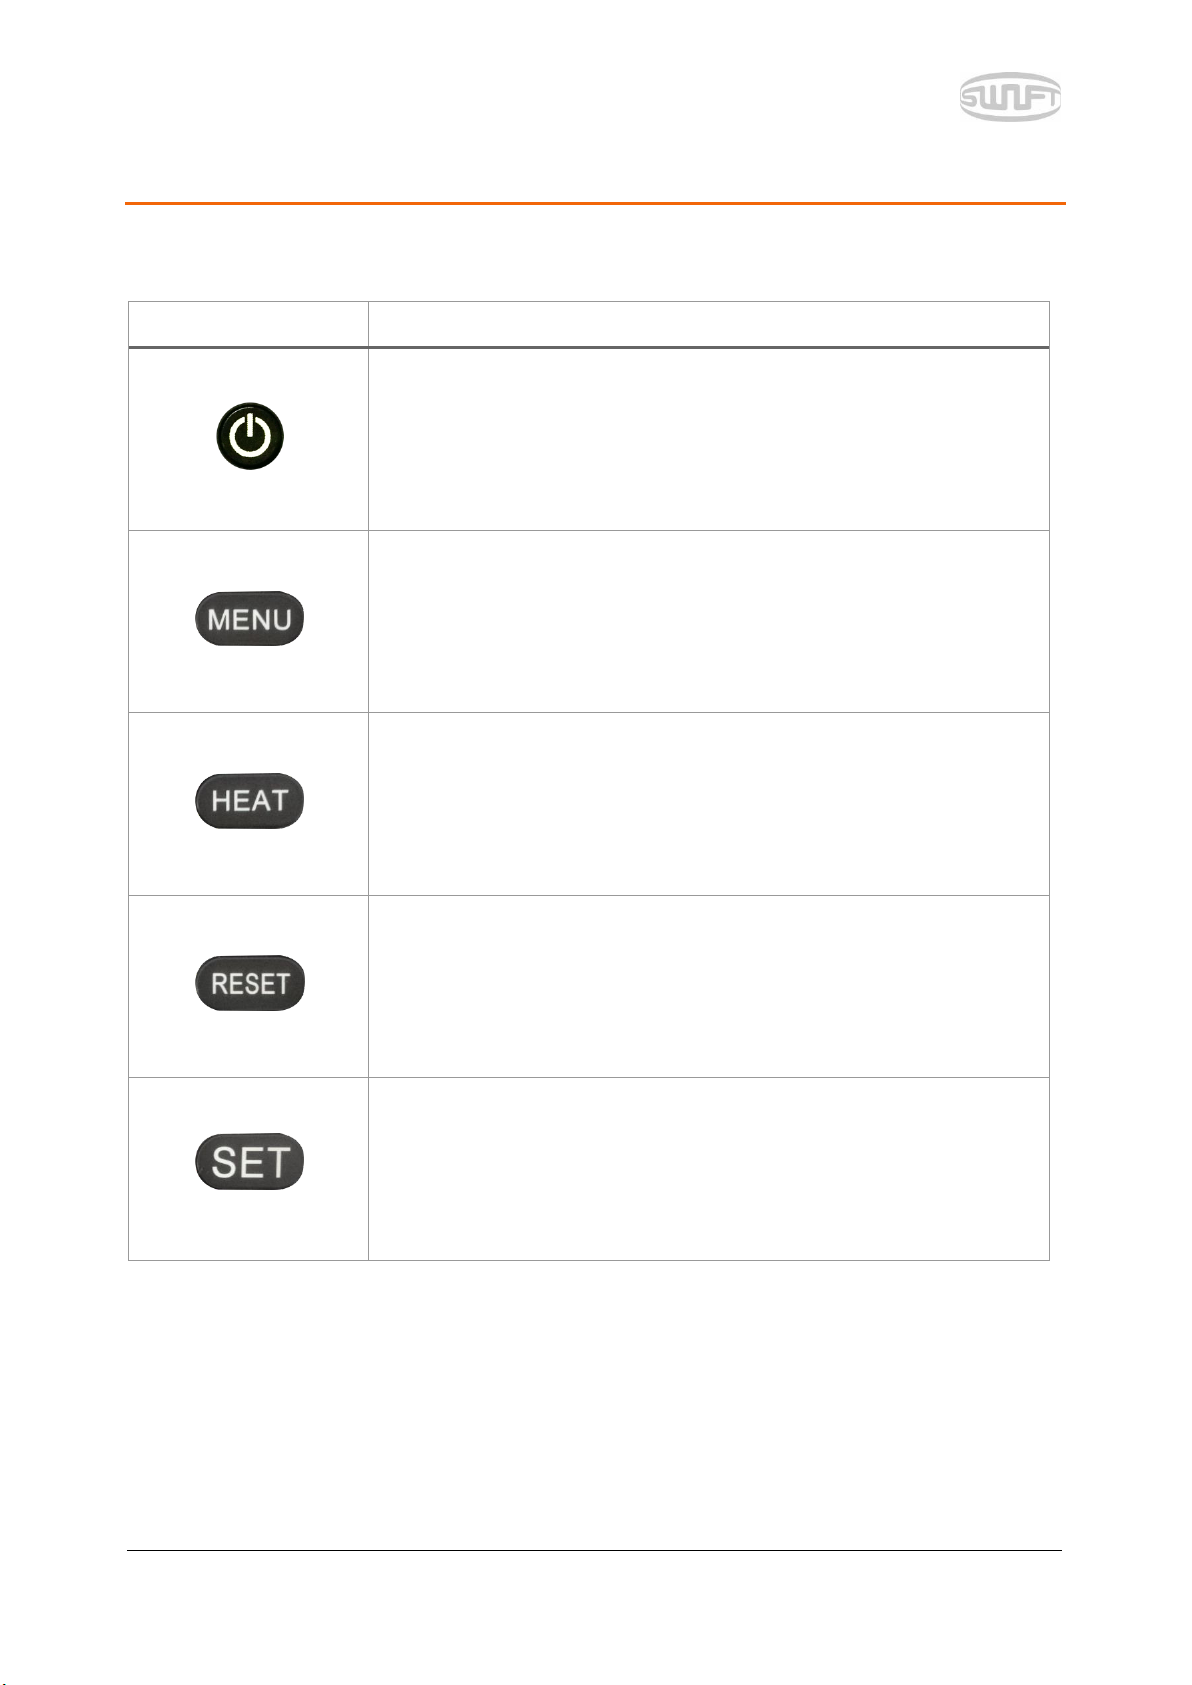
BUTTON
DESCRIPTION
Press about for 1 second to turn the power ON/OFF.
Press about for 1 second when power is on and the LCD monitor is
turned off and so is power after 2~3 seconds.
Key to load menu screen
It switches to splice screen. Every time it is pressed, it switches to X
screen, Y screen and X, Y sync screen.
It operates sleeve heater.
When it is ON, the lamp on the left is turned on red.
Press once more when it is ON and the heater is turned off.
It goes back go initial screen. It initializes splice function.
Key for splice executive command
SWIFT K11-EN, Rev.A 11
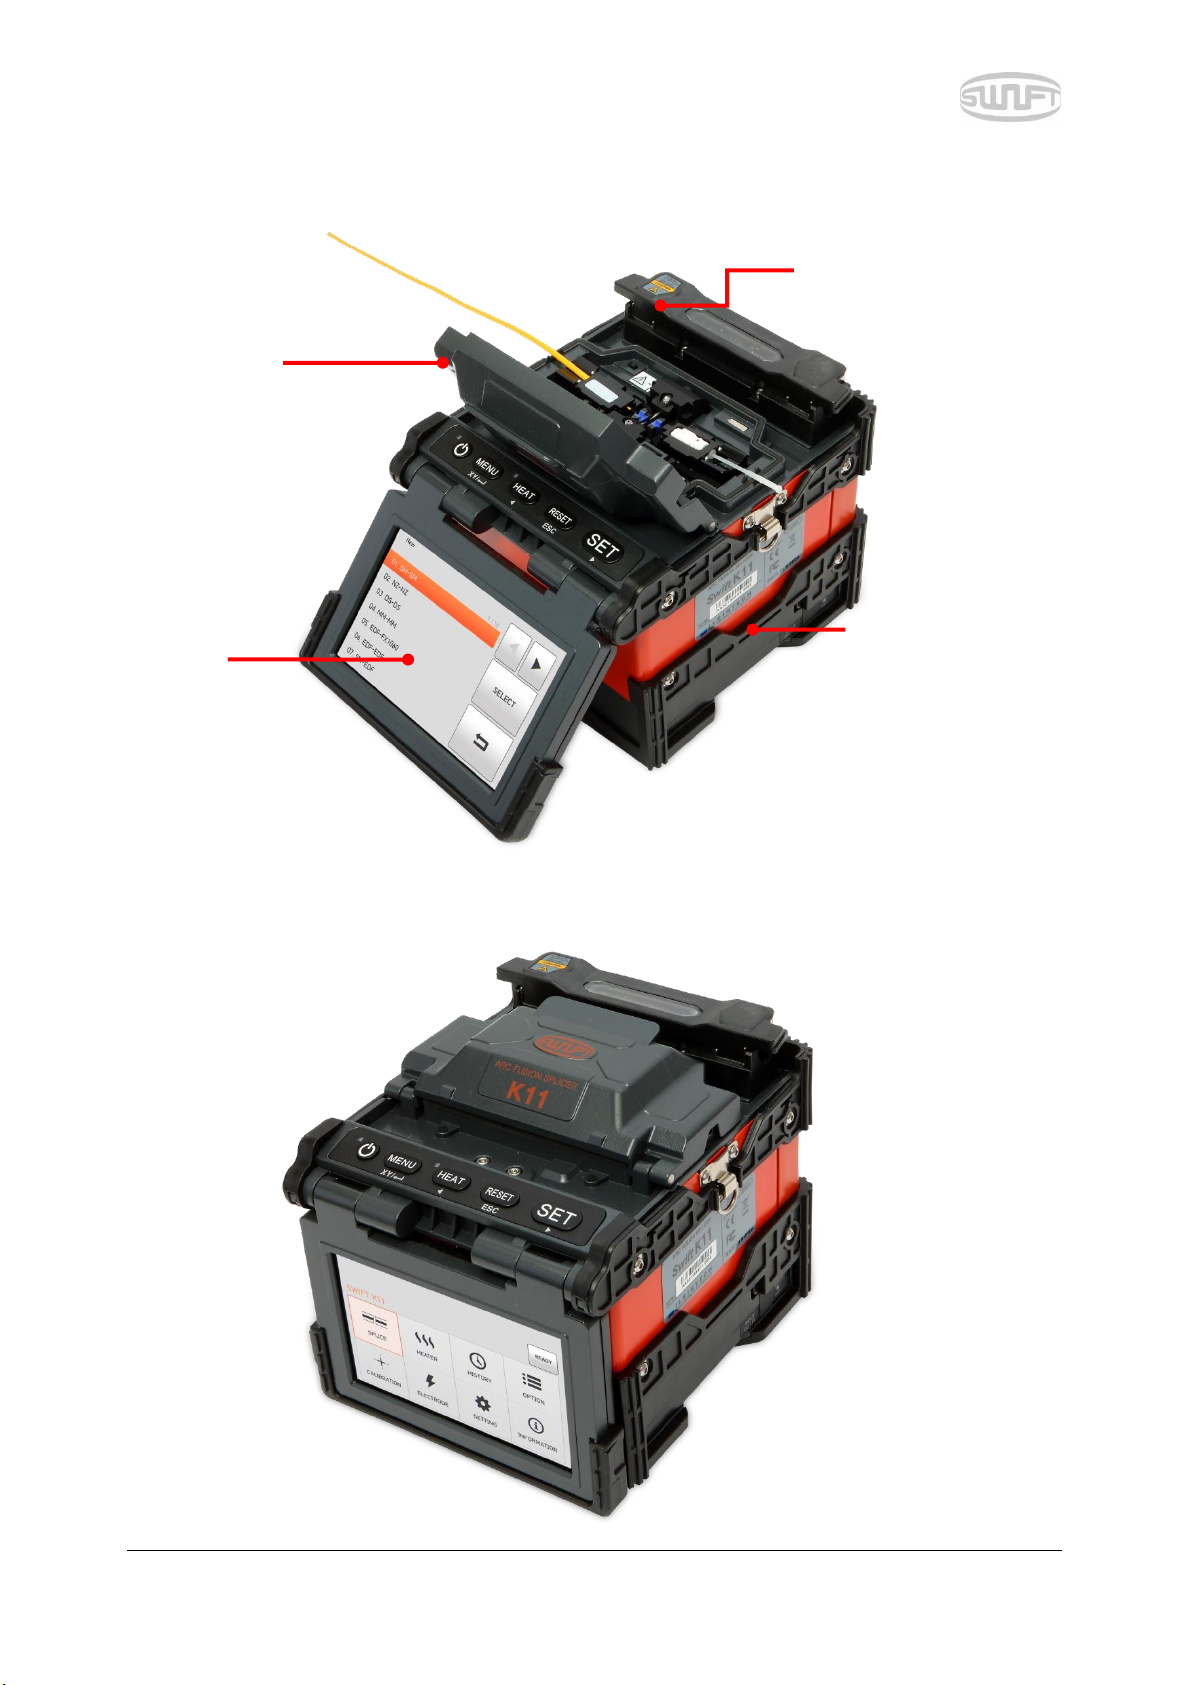
3.2 Component’s name
Windbreak cover
Battery
Monitor
Sleeve heater

SWIFT K11-EN, Rev.A 12
Button to show
remaining battery
Remaining battery indicator
Heater cover
Heater
USB, DC OUT
SWIFT K11-EN, Rev.A 13
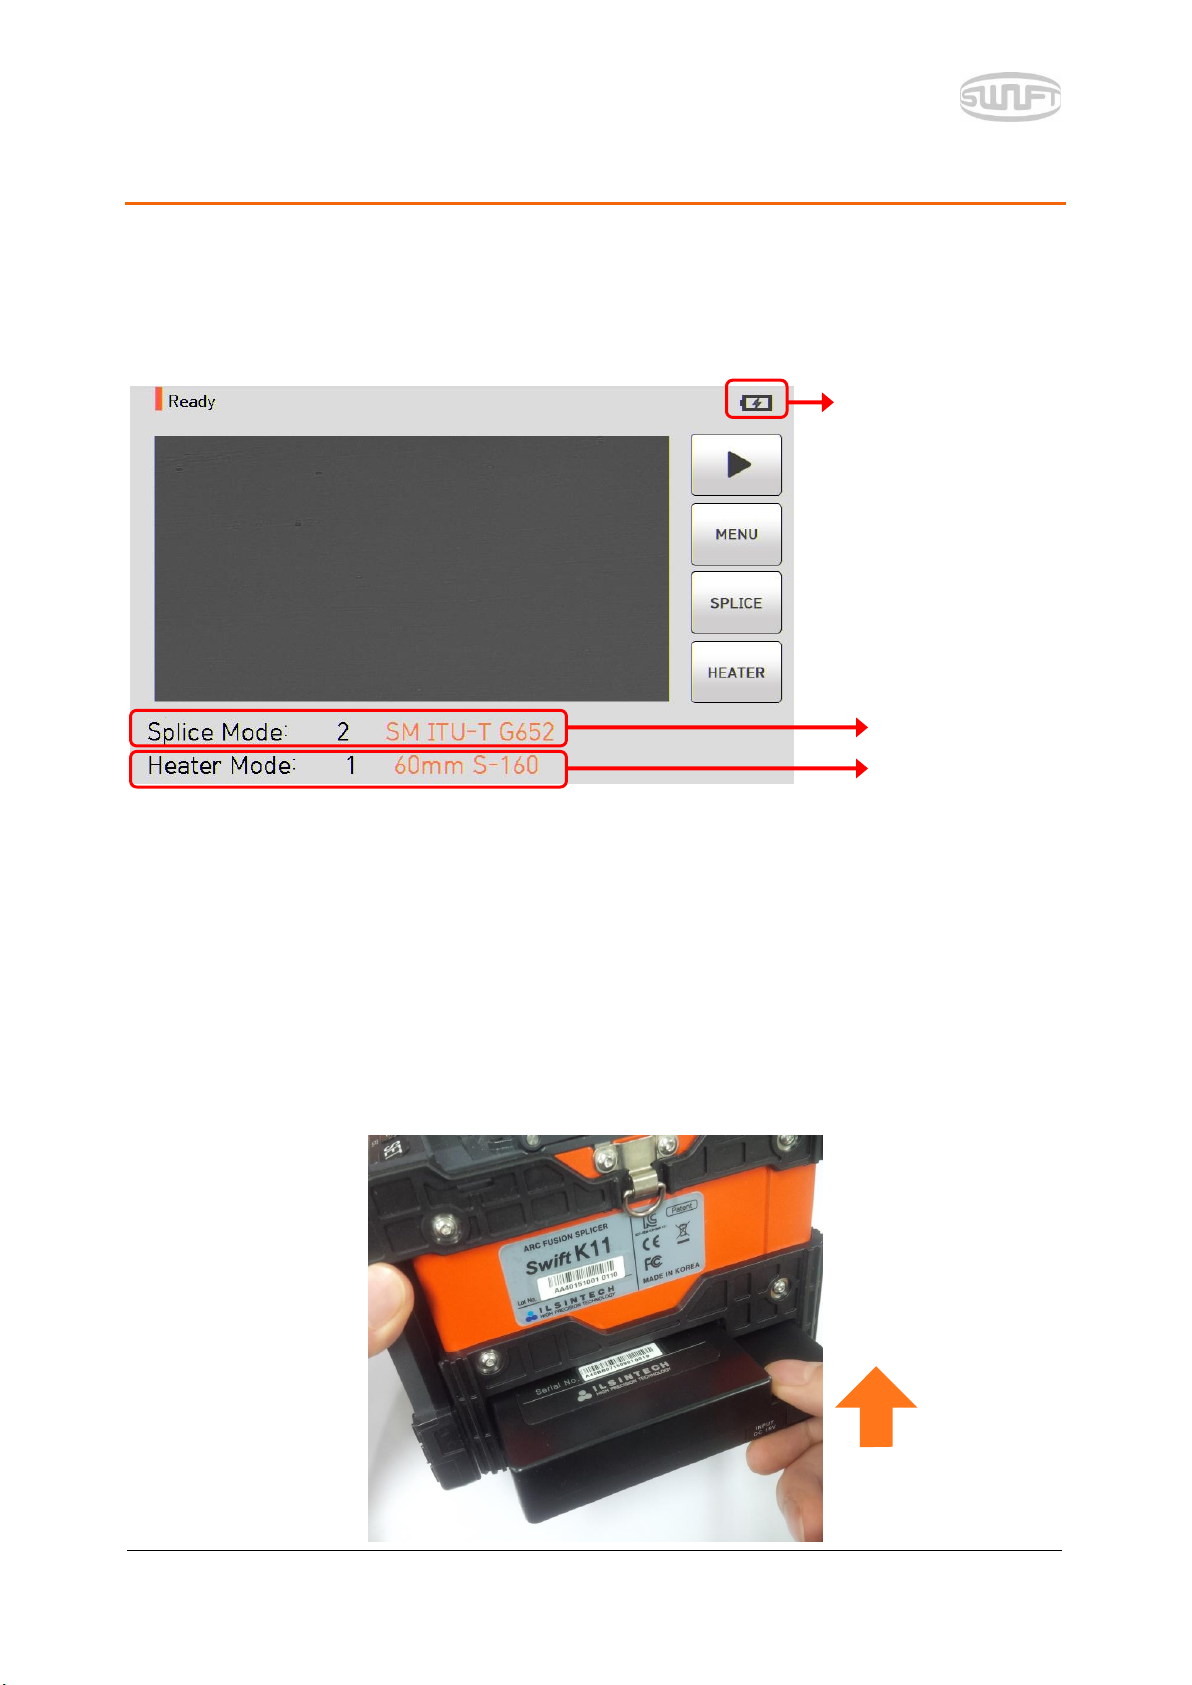
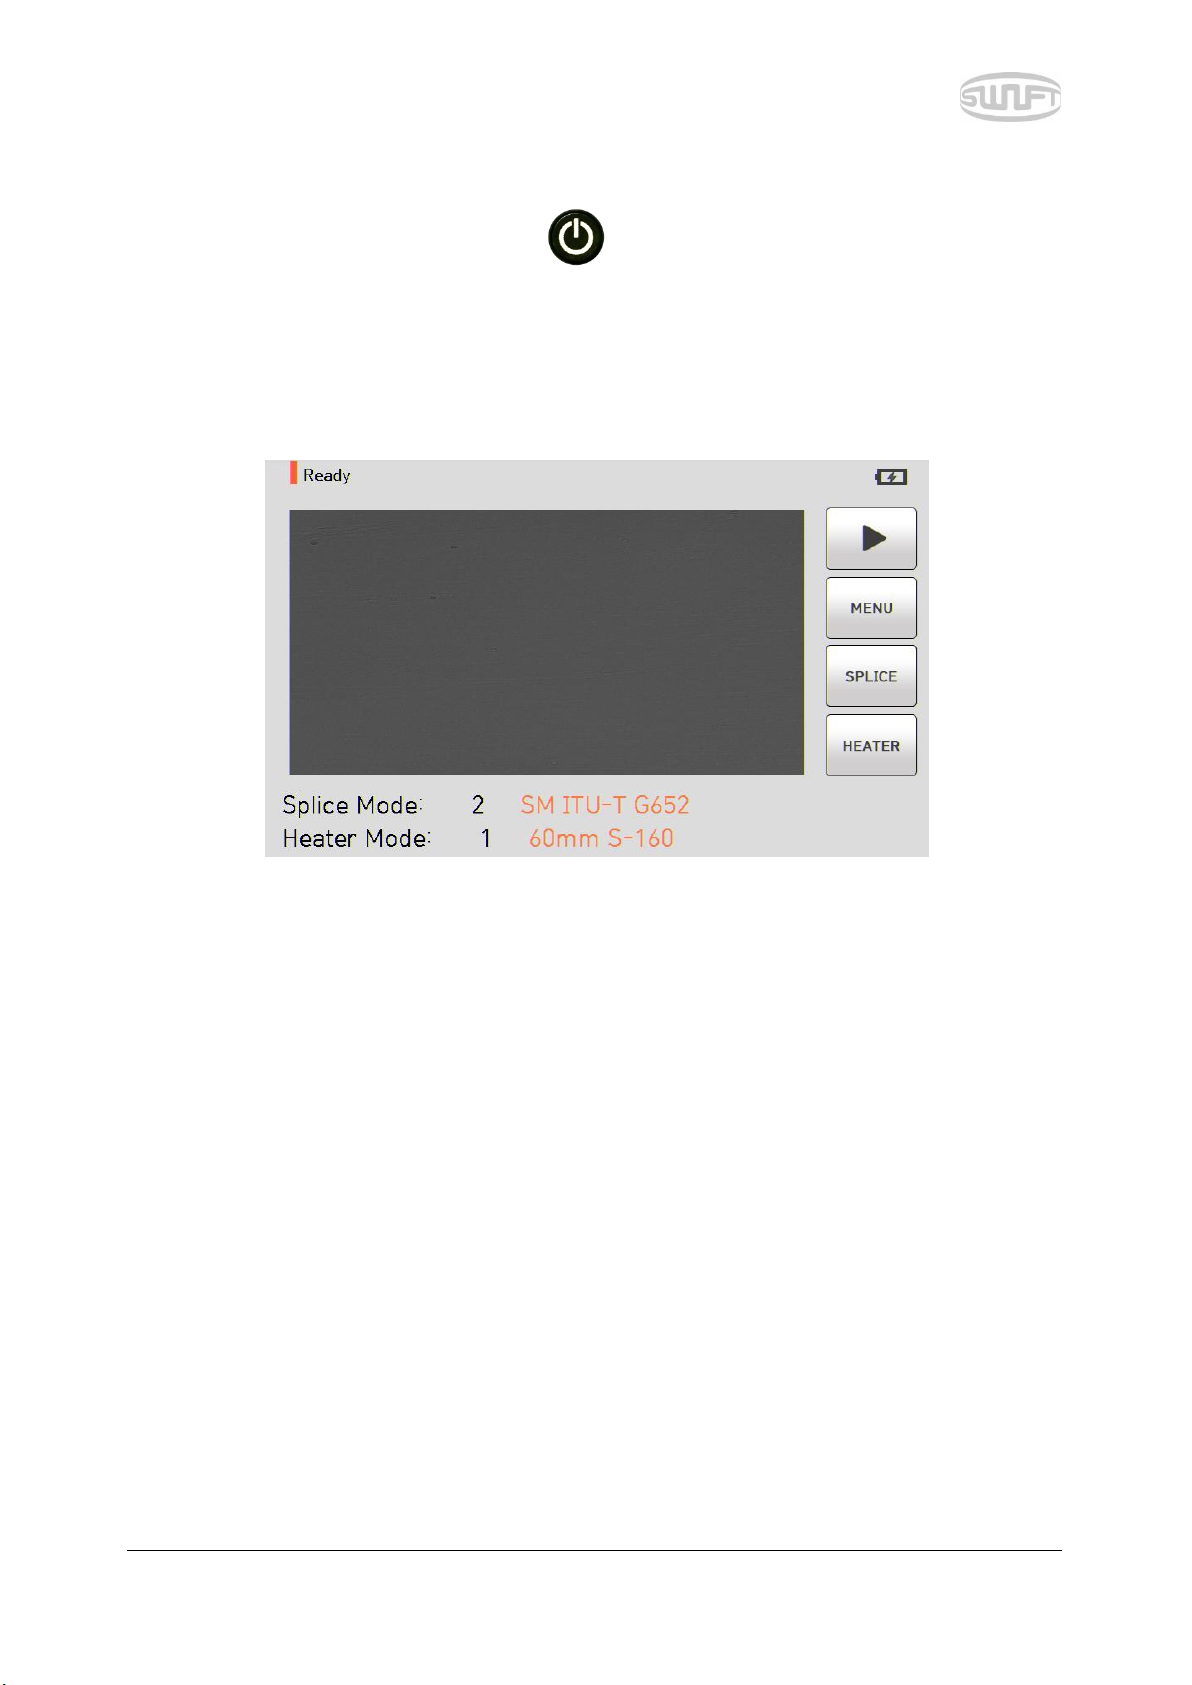
4. Instructions for use
The following is the initial screen of Swift K11. For accurate splice result, splice mode and heater
mode should be properly selected. Basic information on Swift K11 is displayed on the initial screen.
Check whether a proper mode is selected before splice.
4.1 Power supply
Use the AC adapter (WDS060190) and battery provided with the product. Using other products
may incur fire, equipment damage or accident.
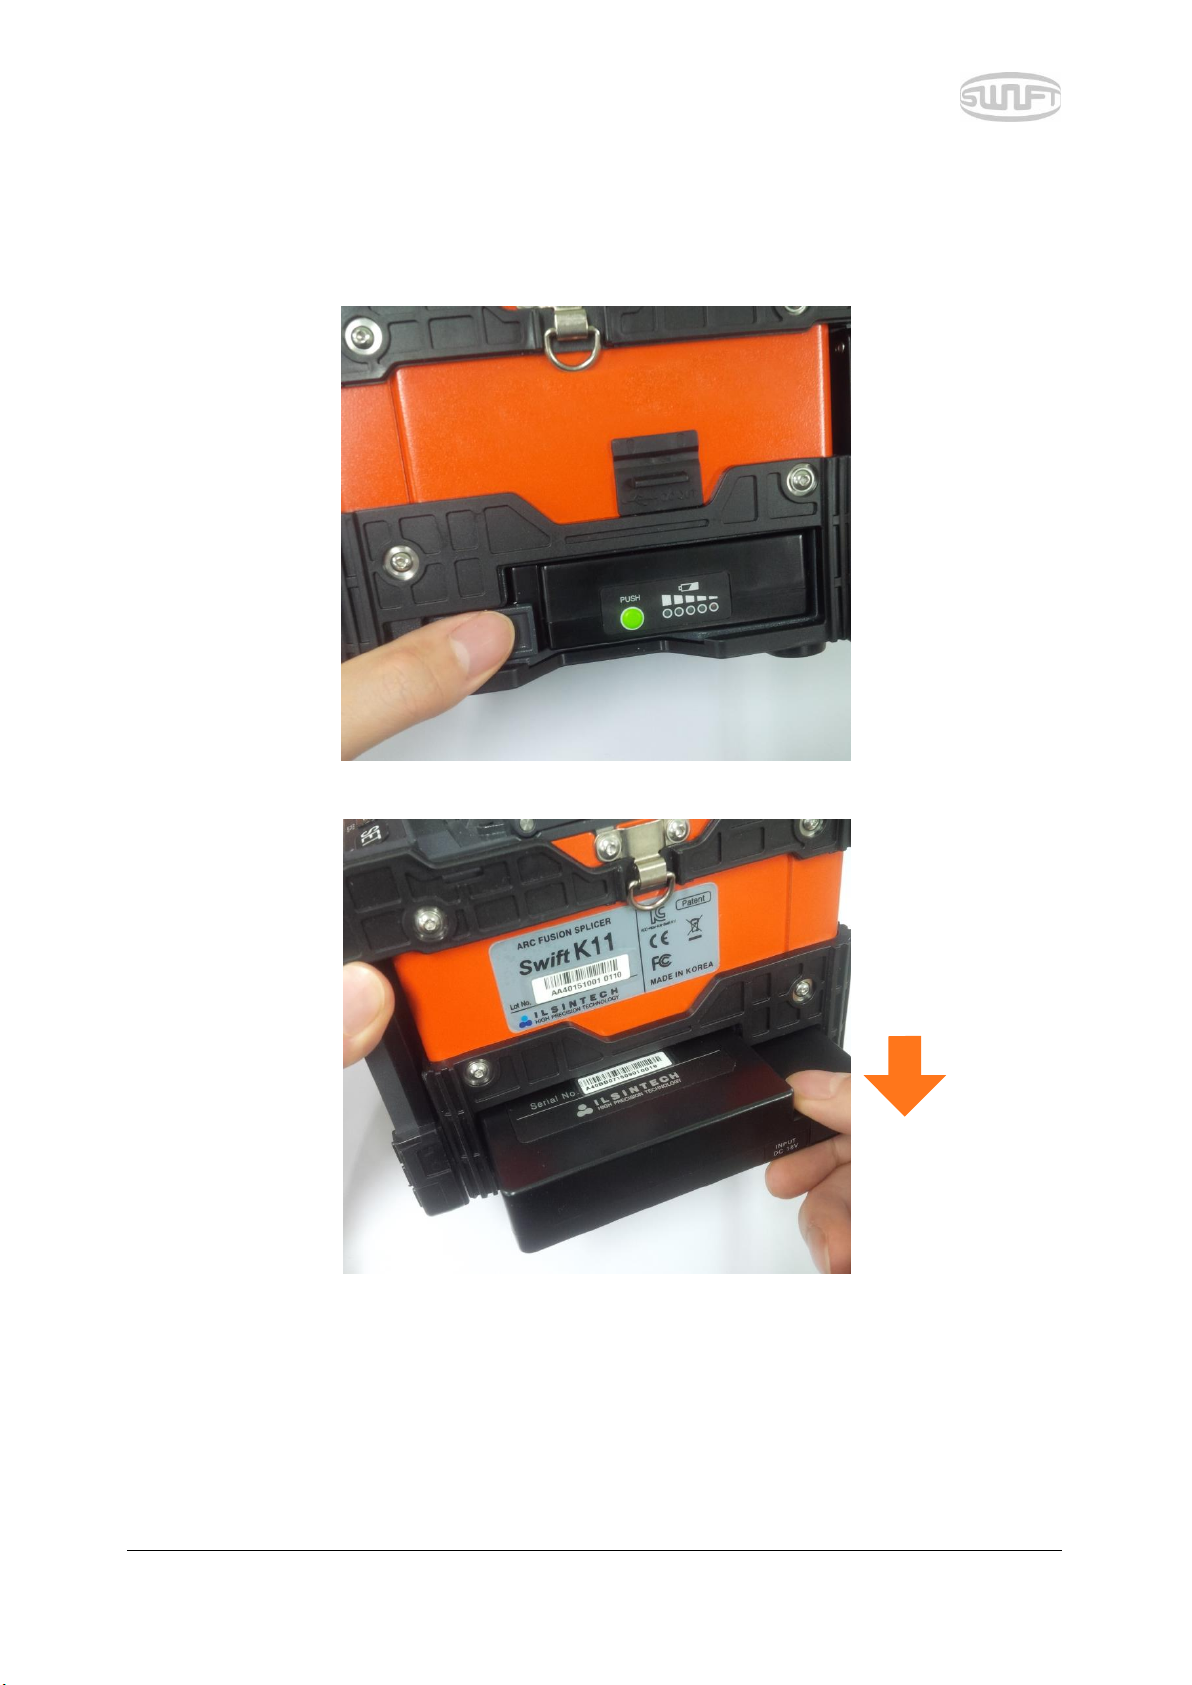
4.1.1 Battery installation
Push the battery in until it is completely installed.
Battery status indicator
Current splice mode
Current heater mode
SWIFT K11-EN, Rev.A 14
Check whether the power is off before removing the battery and press the locking lever to remove
the battery.
4.1.2 Battery charging
Check the voltage and frequency and connect DC jack of battery and DC cable of AC/DC adapter.
When battery is fully charged, its LED turned green and power is disconnected upon protective
action with built-in overdischarge, overcharge and overload protection circuit. In this case, the
power is turned back on and charging resumes when DC cable of adapter is connected to DC jack
of the battery again.
SWIFT K11-EN, Rev.A 15
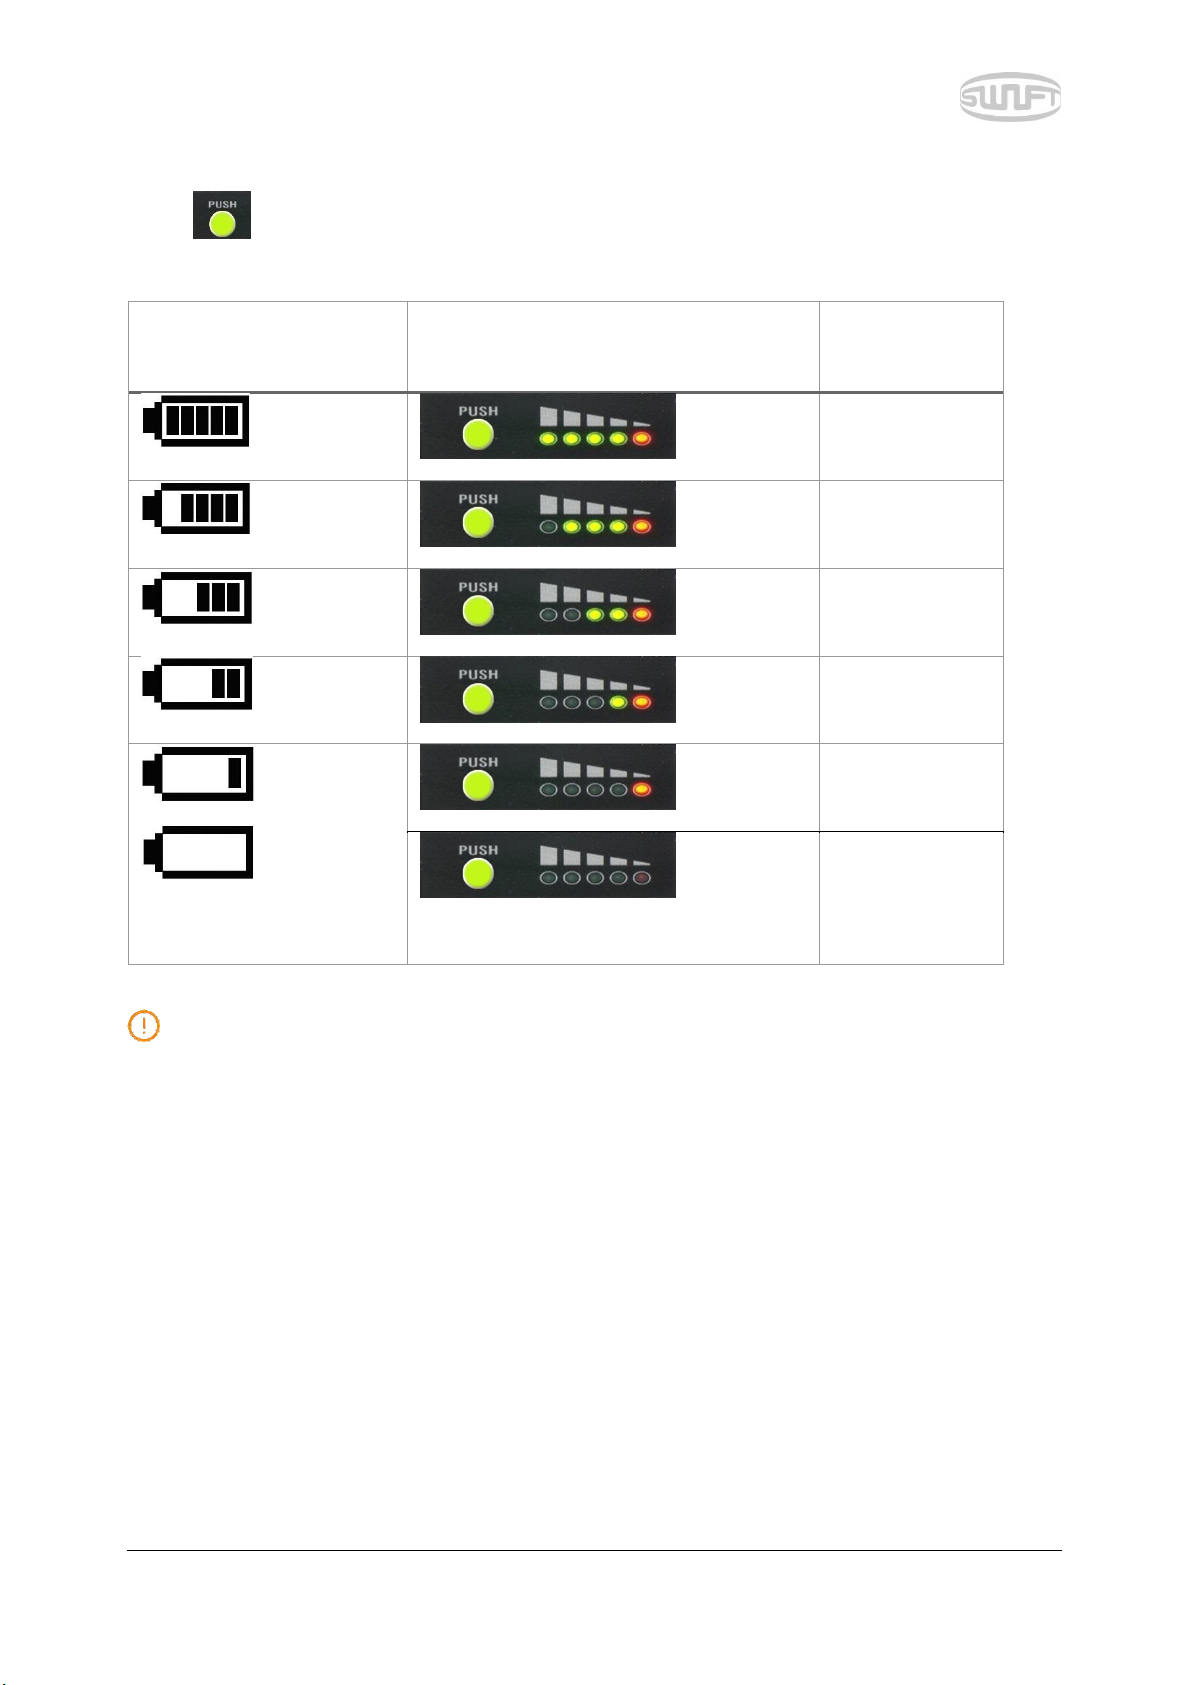
4.1.3 Battery capacity check
Press and the current remaining amount is displayed.
Remaining battery display
(Monitor)
Remaining battery indicator
(Battery LED)
Remaining
battery
(5 bars)
5 LED
80 ~ 100%
(4 bars)
4 LED
60 ~ 80%
(3 bars)
3 LED
40 ~ 60%
(2 bars)
2 LED
20 ~ 40%
(1 bar)
(No bar)
1 LED
10%
0 LED
No display on LED
5% or none
When the remaining battery is indicated 10% or below, charge the product for use. It may
affect splice quality.
SWIFT K11-EN, Rev.A 16
4.2 How to turn the power ON/OFF
To turn on the power of Swift K11, press for about 1 second with the windbreak cover
being closed. After the entire functions including motor are initialized, the initial screen is
subsequently displayed as follows. For accurate splice, splice mode and heater mode should be
properly selected. Current splice mode, stripping mode and heater mode are displayed at the
bottom of the screen.

SWIFT K11-EN, Rev.A 17
4.3 Sleeve loader assembly
Insert the sleeve loader at the left/right grooves as shown in the figure below.

SWIFT K11-EN, Rev.A 18
4.4 Inserting optical fiber to protecting sleeve
Put optical fiber in protecting sleeve.
4.5 Optical fiber cleaning and stripping
Do stripping procedure on about 4cm from the end of optical fiber by using sheath stripper.
And wipe the optical fiber clean with soft cloth or cotton moistened with alcohol.
Use ethyl alcohol with purity of 96% or higher.

SWIFT K11-EN, Rev.A 19
4.6 Optical fiber cutting
i. Install the optical fiber on cutter as shown in the figure below and check optical fiber’s
state and cutting length. When optical fiber is not properly installed, problems may be
incurred on cutting procedure.
ii. Push the cutting lever down and the optical fiber is being cut.
iii. Lift the cutting lever and take the optical fiber out.
iv. Remove the cut pieces of optical fiber and dispose in a proper container.
For the detailed use of cutter, refer to the instructions for cutter use.
SWIFT K11-EN, Rev.A 20
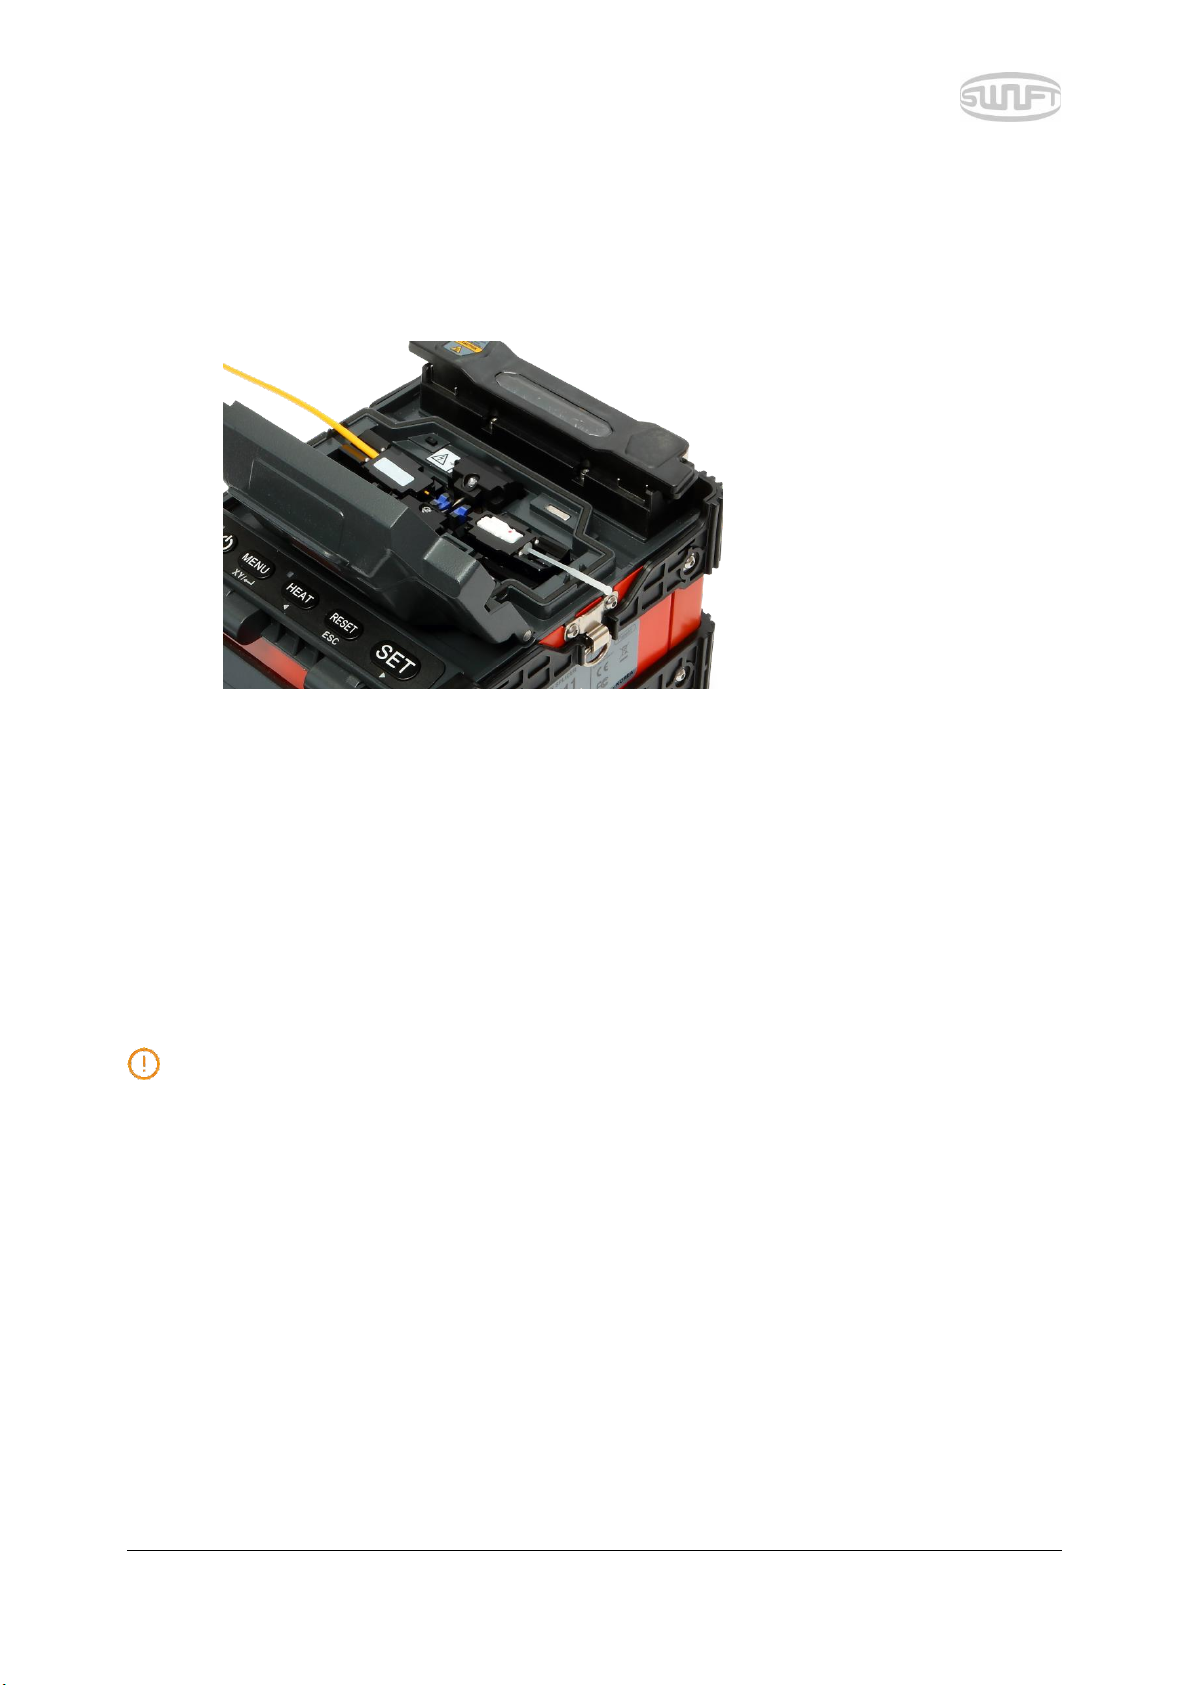
4.7 Installing optical fiber to sealer
i. Open the windbreak cover and optical fiber clamp.
ii. Put optical fiber between V-Groove and electrode. Be careful not to make the tip of
prepared optical fiber bump against other objects.
iii. Fix the optical fiber with hands to prevent its move and close the clamp with care.
iv. Install the optical fiber on the opposite side in the same way.
v. Close the windbreak cover with care.
The better the optical fiber is installed at a proper location, the shorter it takes for arrayal.
Other manuals for SWIFT K11
1
Table of contents


