iLux Chameleon IS-L336A User manual

IS-L336A
User Guide
To prevent any damage to the video light or harm and personal injury, please read the guide before first use and retain for future
reference.
Introduction
The Chameleon IS-L336A can be used as a light source for both video and stills photography. It has infrared remote control of the
brightness and colour temperature which also doubles as a camera shutter remote (for cameras which support this function). Light is
generated by two sets of LED’s, 168 3200k and 168 5500k bulbs, which can be mixed as required to change colour temperature to
match ambient lighting conditions. The bulbs have an average lifespan of approximately 50,000hrs
Features
•Infrared remote control of brightness / colour temperature and camera shutter release
•Powered by lithium ion battery or mains power (optional extra, not supplied)
•LED lamp driver chip for consistent and stable output (93% efficient).
•Illumination angle of 60°.
•Memory function, recalls last power setting on restart.
•Compatible with three third party batteries: Sony NP-F, NP-FM and NP-QM.
•Universal hotshoe mount
•Battery power indicator
Components supplied Specifications
1x Chameleon IS-L336A
1x Remote control
1x Hand grip
1x Battery
1x Travel charger
1x EU pin plug
Product overview
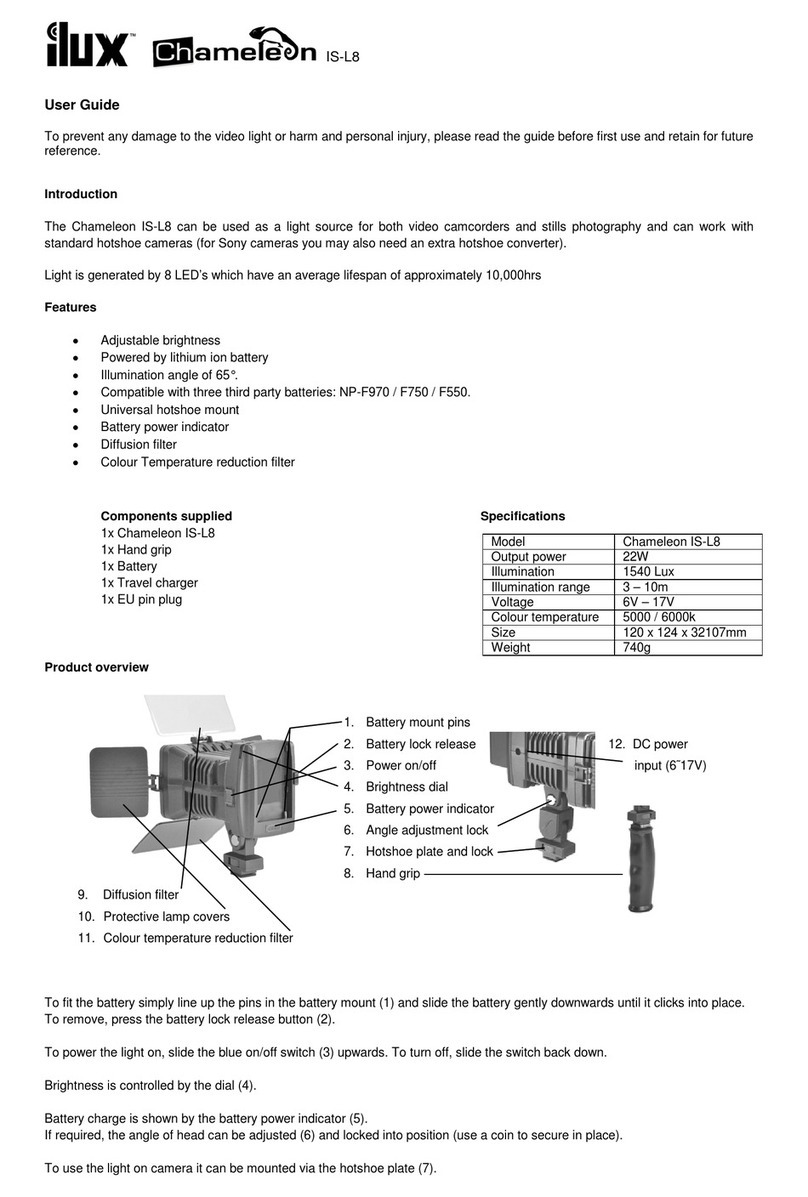
1. Battery mount pins 6. Infrared receiver
2. Battery power indicator 7. Angle adjustment
3. Colour temperature 8. Hotshoe plate and lock
control buttons
9. Hand grip
4. Mode button
5. DC power input
To fit the battery simply line up the pins in the battery mount (1) and slide the battery gently downwards until it clicks into place.
Battery charge is shown by the battery power indicator (2).
Colour temperature buttons (3) mix the light as required.
To power the unit on, press and hold the Mode button (4) down for approx. 3 seconds until the LED battery level indicator starts up and
the light comes on. Pressing the Mode button (4) again also controls the slow strobe function and there are three different settings you
can select from.
(5) DC IN (9˜16.8V) optional power input (lead not supplied)
The infrared receiver (6) accepts commands sent from the remote control.
If required, the angle of head can be adjusted (7) and locked into position (use a coin to secure in place).
To use the light on camera it can be mounted via the hotshoe plate (8).
The optional hand grip (9) also attaches via the hotshoe lock and has a screw thread fitted in the bottom, so the light can be supported
by a tripod or lighting stand.
Model
Chameleon IS-L336A
Output power
20W
Illumination
2180 Lux
Illumination range
3 – 8m
Voltage
6V – 9V
Colour temperature
3200k – 5500k variable
Size
188 x 178 x 32mm
Weight
400g

The function buttons on the back of the light are also found on the MR-6 infrared remote control.
1. Power on / off
2. Colour temperature
control
3. Mode button
4. Shutter release 5. Two second shutter delay
buttons
Canon 6. Wide angle / Telephoto zoom
Nikon
P = Pentax
KM = Konica Minolta
On both the back panel and the remote control the arrow keys control the colour of the light.
The left and right button arrow buttons add and subtract white light brightness and the top and bottom arrow buttons control yellow light
brightness. You can use all four buttons to mix and set the light colour as required.
The MR-6 infra red remote can control all functions of the light, which gives you the freedom to work without having to return to where
the light is set-up. If your camera supports the function, you also have remote shutter control (consult your camera handbook for further
information). Depending on the camera brand and exposure mode selected, pressing the relevant shutter button will focus the camera
and remotely trigger the shutter. You can also select a two second delay of the shutter (2S). Some cameras will also support the Wide
angle / Telephoto zoom function as well.
Battery charging
The battery can be recharged with the supplied travel charger unit.
10. EU pin plug
Fold out the pins from the back of the travel charger and fit the supplied EU pin plug (10).
This plugs into a standard shaver adapter plug and it takes about four hours for the battery to reach capacity with full charge being
indicated by a green light on the travel charger front panel.
You can also recharge the battery on location using the optional extra, in-car charger kit.
SKU: ILCHCAR
Warning: To avoid short circuit, do not operate in damp or wet conditions.
•Do not connect the light with any battery or power source other than original supplied or a third party compatible battery and
always check that the operating voltage matches.
•If the unit emits smoke or an odor is detected, turn the power off and immediately disconnect the battery.
Further use may harm or permanently damage the light.
•Contains no user serviceable parts. Should the light suffer damage in any way, do not attempt repair.
•Always disconnect the battery prior to storage or transportation.
•Keep out of reach of children.
•Handle the batteries with care, as improper use may cause the batteries to leak.
•Always turn the power off when replacing the battery
•Do not expose the battery to flame or excessive heat
•Do not immerse the battery into water
Operational notes
•When the light is on, do not stare directly at the LED bulbs.
•Do not cover the ventilation grille as this may cause the light to overheat.
•When attached to the hotshoe, do not pick up via the light as this may result in damage to the light and camera.
Cleaning
•Use a soft damp cloth with a mild detergent.
•Do not use thinner, gasoline or alcohol which could damage the casing and affect performance.
Photomart is the exclusive world-wide distributer of Lamigraphics & iLux™ products.
© 2014 Wincastle Ltd t/a Photomart. All Rights Reserved.
Unit 14, Waltham Park Way, London, E17 5DU
Company registration number 2725104, VAT number GB609948692
Other iLux Camera Accessories manuals
