IME-DC iDia User manual

TABLE OF CONTENTS
NO CODING
USER GUIDE
BLOOD GLUCOSE MONITORING SYSTEM


TABLE OF CONTENTS
3
TABLE OF CONTENTS
INTRODUCTION���������������������������������������������������������������������������5
DESCRIPTION OF SYSTEM COMPONENTS�������������������������������������7
■User interface
■Light button and data port
■Battery compartment
■Test strips
CONFIGURATION �����������������������������������������������������������������������11
■ Conguration
■Date and time
■Test reminder
SYMBOL DEFINITIONS����������������������������������������������������������������16
■‘Insert test strip’ notication
■Blood sampling notication
■Measurement period
■Test result
■Measurement unit
■‘HI’ notication
■‘LO’ notication
■Memory display
■Test reminder
■Ketone notication
ERROR DEFINITIONS AND RECTIFICATION ���������������������������������22
AVERAGE CALCULATION OF MEASUREMENTS�����������������������������24
CONTROL SOLUTION �����������������������������������������������������������������26
■Using the control solution
■Testing with the control solution

TABLE OF CONTENTS
4
TABLE OF CONTENTS
LANCING DEVICE������������������������������������������������������������������������30
BLOOD LANCET �������������������������������������������������������������������������31
USING THE LANCING DEVICE������������������������������������������������������32
DETERMINATION OF BLOOD GLUCOSE LEVEL�����������������������������34
BLOOD GLUCOSE VALUES FOR ADULTS ��������������������������������������36
SYMPTOMS OF LOW BLOOD SUGAR��������������������������������������������37
SYMPTOMS OF HIGH BLOOD SUGAR�������������������������������������������38
POTENTIAL INFLUENCES ON THE MEASUREMENT READINGS�����39
TECHNICAL SPECIFICATIONS – BLOOD GLUCOSE METER������������42
TECHNICAL SPECIFICATIONS – TEST STRIPS ������������������������������43
DATA TRANSFER ������������������������������������������������������������������������44
LIST OF ITEMS | QUALITY STANDARDS����������������������������������������45
BATTERY REPLACEMENT������������������������������������������������������������46
CLEANING AND MAINTENANCE ��������������������������������������������������48
SAFETY AND DISPOSAL ��������������������������������������������������������������49
■Blood glucose meter
■Used test strips, lancets and alcohol swabs
■Battery
WARRANTY ��������������������������������������������������������������������������������50
EXPLANATION OF SYMBOLS�������������������������������������������������������51
PERSONAL NOTES ���������������������������������������������������������������������52

5
INTRODUCTION
Thank you for your trust!
You have chosen the iDia blood glucose monitoring system, which
can be used together with iDia test strips and related accessories
to easily and conveniently measure your blood glucose levels.
The measurement range of the iDia blood glucose monitoring sys-
tem is between 10 –600 mg/dL or 0.6 –33.3 mmol/L.
Please ask your specialist physician which unit of measurement
you should use for your therapy.
In order to obtain an accurate blood glucose measurement, you
must follow certain important guidelines.
Therefore, please read this user guide carefully before using the
device for the rst time.
You will be amazed at how easy it is to take measurements!
Your blood glucose monitoring system contents:1)
1iDia Blood glucose meter
and following accessories:
10 iDia Blood glucose test strips
1IME-DC Lancing device
10 IME-DC UNIVERSAL Blood lancets
1 Kit-Case
1) The scope of supply of the blood glucose monitoring system (see outer package) can vary depending on state.

6
INTRODUCTION
Before taking your rst measurement, please take note of the
following important information.
■The iDia blood glucose monitoring system is an in vitro diagnos-
tic tool that is suitable for self-testing. It enables people with
diabetes and specialist medical sta to determine blood glucose
values.
■The iDia blood glucose monitoring system is suitable for analys-
ing fresh capillary blood, venous blood, arterial blood or neonatal
blood.
■Only use iDia test strips and iDia control solutions. Using other
test strips can lead to incorrect readings.
■Close the storage container immediately aer removing the test
strip(s).
■Check the expiry dates of the test strips and control solution.
■Use a new lancet for each blood sample.
■Always store the measuring device or test strips according to the
storage requirements, and protect both from moisture, direct sun-
light and other heat sources.
■Keep the measuring device and all accessories away from chil-
dren.
■Clean your iDia blood glucose monitoring system regularly.
■The functioning of the iDia blood glucose monitoring system
can only be guaranteed if it is used correctly and for its intended
purpose.
■Blood glucose monitoring systems must not be used for diabetes
diagnosis.
7
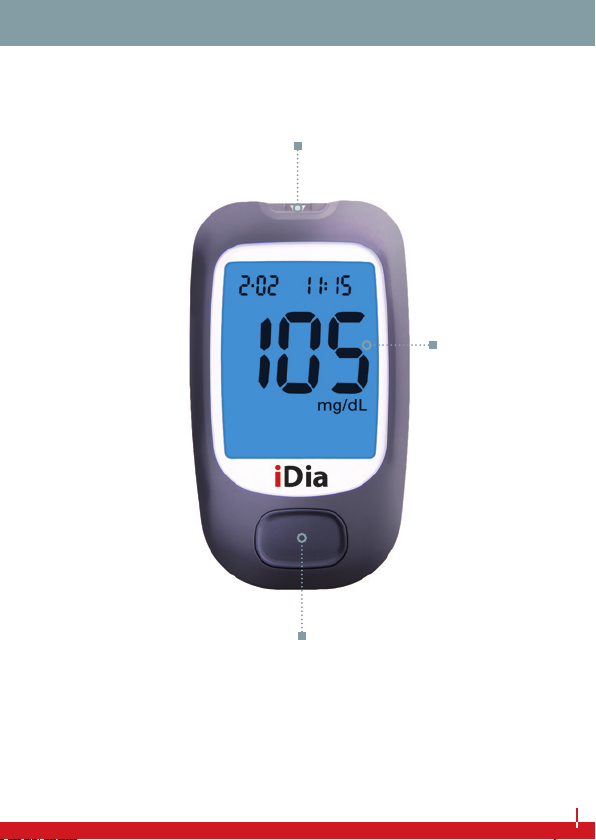
Test strip slot
Main button
Display
DESCRIPTION OF SYSTEM COMPONENTS
USER INTERFACE

8
Data port
Light button
Pressing the light button when the blood glucose monitoring
system is switched on will activate the display's blue background
lighting. This makes it possible to take and read measurements
correctly even in low light conditions.
DESCRIPTION OF SYSTEM COMPONENTS
LIGHT BUTTON AND DATA PORT
9
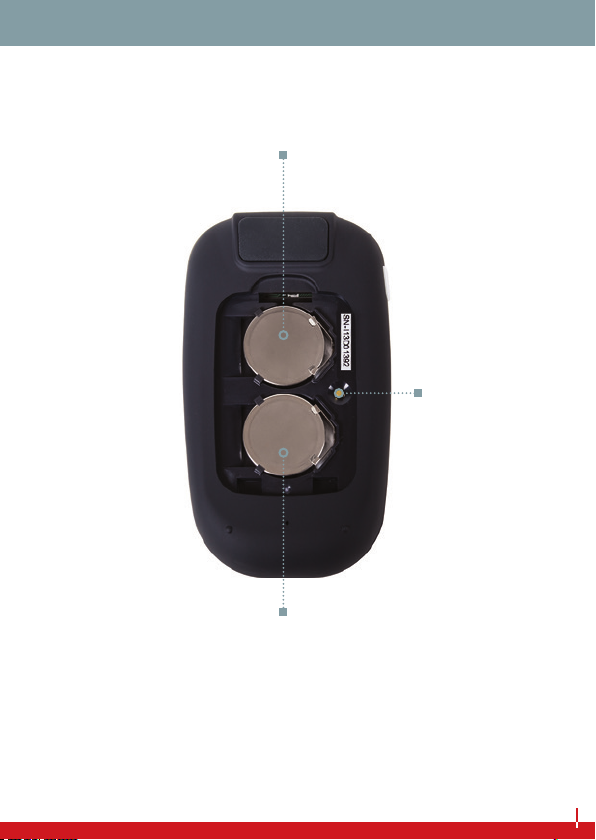
Battery
Battery
Set button
DESCRIPTION OF SYSTEM COMPONENTS
BATTERY COMPARTMENT
10
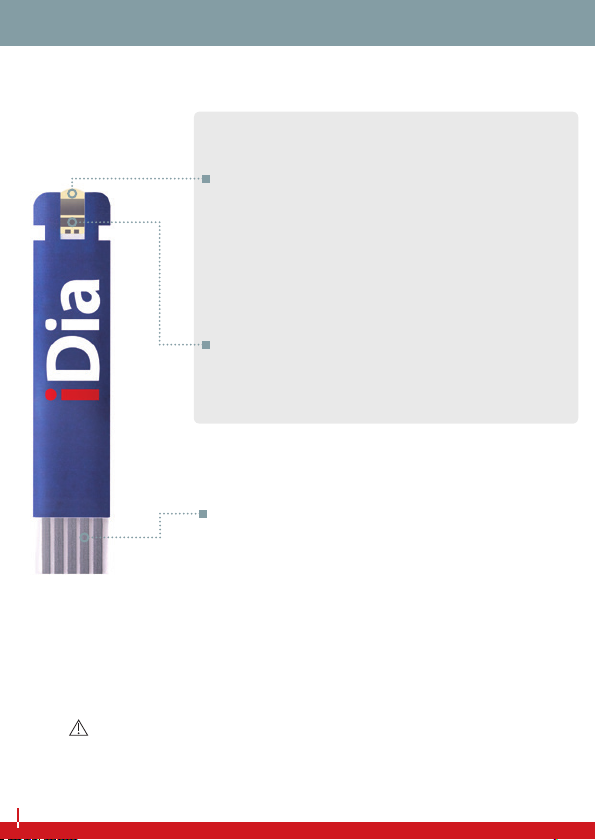
TEST STRIPS
Application area
Touch the drop of blood with the appli-
cation area. The blood will be absorbed
automatically.
Measurement contacts
Insert the test strip into the test strip slot,
with the measurement contacts rst.
Test area
This area must be completely lled with
the blood sample.
MEASUREMENT FIELD
NOTE
You can touch the measurement eld of the iDia test strips freely
with clean, dry hands. The test result will not be aected.
DESCRIPTION OF SYSTEM COMPONENTS
11
CONFIGURATION
Set button
First remove the battery cover and check that the required 3 V lith-
ium batteries (type CR 2032) have been inserted. If this is not the
case, you will need new batteries (see page 46).
Then set the current date and correct time. To do this, press the set
button (using a pen, for example), and then press the main button
(this changes the ashing value on the display).
NOTE
Please be prepared for necessary battery changes by keeping two
spare batteries with you (Type CR 2032).
CONFIGURATION

12
DATE AND TIME
NOTE
The gures needing adjustment ash on and o (shown in white in
the illustrations).
1Set button pressed once: The blood glucose meter switches
itself on. ‘Year’ setting
2Set button pressed second time: ‘Month’ setting
3Set button pressed third time: ‘Day’ setting
4Set button pressed fourth time: ‘Hour’ setting
5Set button pressed h time: ‘Minute’ setting
123
45
CONFIGURATION

13
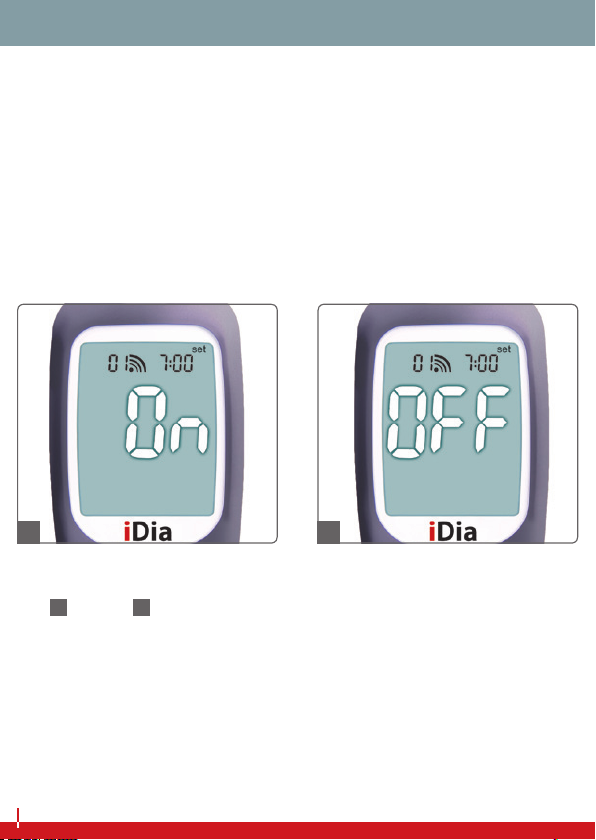
TEST REMINDER
6–10 Set button pressed sixth to tenth times:
‘Test reminder’ setting: up to ve dierent test reminder times
can be set (see page 14).
11 Set button pressed eleventh time: The blood glucose meter
switches itself o.
Finally, place the battery cover on the device.
NOTE
If you change settings using the set button and main button, you
will need to go through all of the settings until the blood glucose
11
678
910
CONFIGURATION
14
CONFIGURATION
meter switches itself o (aer pressing the set button for the last
time).
Your changes will only be saved aer this step.
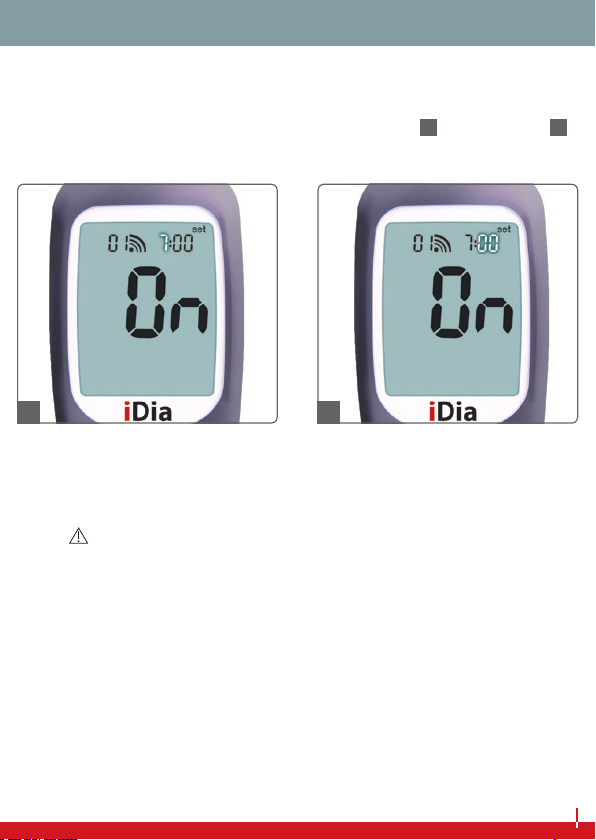
Your iDia blood glucose monitoring system can issue an alarm tone
ve times a day to remind you to check your blood glucose level.
Aer pressing the set button six times (see page 13) you can set
ve dierent times for test reminders.
The main button can be used to turn the test reminder function
on (12) or o (13).
1312
15
CONFIGURATION
When the test reminder function is activated, you will be prompted
to enter the rst of your preferred times. Press the set button and
then use the main button to set the desired hour (14) and minute (15),
and conrm by pressing the set button again.
Aer setting the rst test reminder, it is possible to set four further
test reminders.
NOTE
You will be reminded to take your measurement by an alarm tone.
To complete the process, press the main button for 1 second.
1514
16
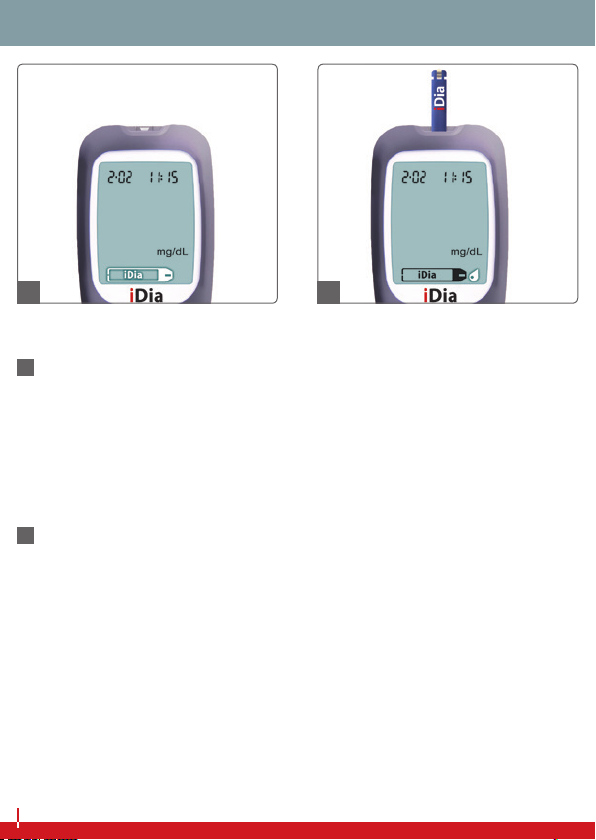
‘INSERT TEST STRIP’ NOTIFICATION
16 Aer the iDia blood glucose monitoring system has been
switched on with the main button, the test strip symbol will
appear in the display. You should now insert the test strip into
the device’s test strip slot. Correct insertion of the test strip will
be conrmed by an audio signal.
BLOOD SAMPLING NOTIFICATION
17 Once the test strip has been inserted into the test strip slot, the
blood intake symbol appears in the display. You now have three
minutes to perform a blood glucose measurement. If no blood
sampling takes place within this time, the iDia blood glucose
meter will switch itself o automatically.
SYMBOL DEFINITIONS
16 17

17
SYMBOL DEFINITIONS
18
MEASUREMENT PERIOD
18 Measurement begins once the test area of the test strip is
suiciently lled with blood, and lasts only 7 seconds. During
the measurement, an hourglass animation is visible on the
display.
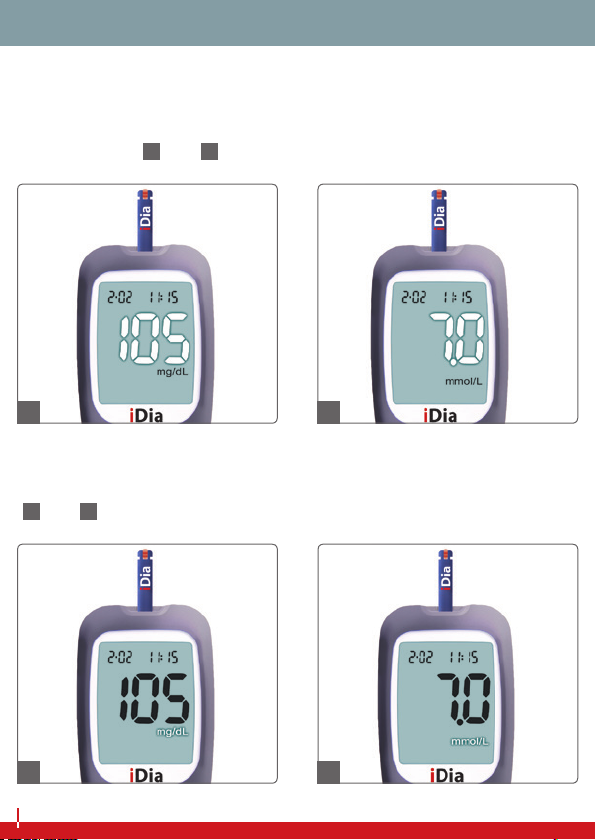
18
TEST RESULT
7 seconds aer the start of the measurement, the blood glucose
value will be displayed and automatically saved, together with the
date and time (19 and 20).
MEASUREMENT UNIT
This will be displayed together with the measurement reading
(21 and 22).
19 20
21 22
SYMBOL DEFINITIONS

19
‘HI’ NOTIFICATION
This will appear if the measured blood glucose value exceeds
600 mg/dL or 33.3 mmol/L (23 and 24).
‘LO’ NOTIFICATION
This will appear if the measured blood glucose value is below
10 mg/dL or 0.6 mmol/L (25 and 26).
NOTE
If you receive a ‘HI‘ or ‘LO‘ notication, repeat the measurement
procedure. If the notication appears again, perform a measure-
ment using the control solution (see page 26 onwards) or contact
your specialist physician.
23 24
25 26
SYMBOL DEFINITIONS
20
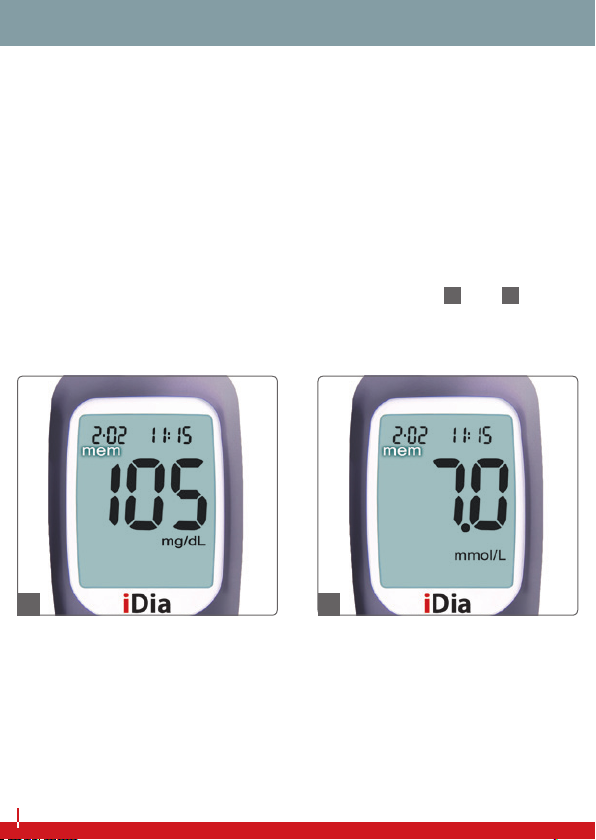
MEMORY DISPLAY
The iDia blood glucose meter can save up to 900 blood glucose
measurements, along with the date and time of each. Blood glu-
cose measurements and control solution measurements are stored
separately. If the user exceeds the memory capacity, each addi-
tional measurement will automatically overwrite the oldest saved
blood glucose value.
Aer switching on the blood glucose monitoring system and then
pressing the main button, the last blood glucose meter taken will
be displayed with its corresponding date and time (27 and 28). By
pressing the main button again, other saved measurement results
can be recalled.
27 28
SYMBOL DEFINITIONS
Other manuals for iDia
1
This manual suits for next models
1
Table of contents
Other IME-DC Blood Glucose Meter manuals

Popular Blood Glucose Meter manuals by other brands

Eced
Eced Libre manual

MyGlucoHealth
MyGlucoHealth EHS-MGEU00001 Operation manual

diabetiker bedarf
diabetiker bedarf adia Instructions for use

EPS Bio Technology
EPS Bio Technology smartLAB sprint nG user manual

Bayer HealthCare
Bayer HealthCare Contour TS user guide

Nipro
Nipro TrueResult Twist 2 user manual


