imes-icore iVAC eco User manual

Attention! Do not use the device without reading the operating manual
Operating Manual
Extraction Unit iVAC eco
imes-icore GmbH
Competence in CNC & DENTAL-Solutions
Im Leibolzgraben 16
D-36132 Eiterfeld

2
1. Table of content
1. Table of content .......................................................................................................................................................................2
2. EC-Declaration of Conformity......................................................................................................................................................2
3. Technical Specifications...........................................................................................................................................................3
4. Delivery, first use......................................................................................................................................................................3
5. Intended use of the extraction unit............................................................................................................................................3
6. General safety information .......................................................................................................................................................3
7. Filter.........................................................................................................................................................................................4
7.1 Air flow, filter arrangement................................................................................................................................................4
7.2 Red indicator light No. 5.................................................................................................................................................... 4
7.3 Synthetic filter: filter saturation, visual inspection, changing .............................................................................................. 4
7.4 Filter cartridge: filter saturation, visual inspection, cleaning, removing and replacing........................................................ 4
8. Warranty ..................................................................................................................................................................................5
9. Disposal...................................................................................................................................................................................5
10. Troubleshooting checklist.......................................................................................................................................................5
11. Key to illustrations 1-9............................................................................................................................................................6
11. Figures...................................................................................................................................................................................7
Fig. 1-9..............................................................................................................................................................................7-14
12. Circuit Diagram ....................................................................................................................................................................12
2. EC - Declaration of Conformity
We, Messrs. imes-icore GmbH Competence in CNC & DENTAL-Solutions
Im Leibolzgraben 16
D-36132 Eiterfeld
declare at our sole descretion that the following machine
Article designation: ECO serial number:
to which this declaration relates, has been designed, constructed and made in accordance with the
Machinery Directive 2006/42/EC
EMC Directive 2004/108/EC
The following harmonised standards have been applied:
•
DIN EN ISO 12100 part 1 und 2 -
2003-
Safety of machinery – Basic concepts, general principles for design
Part1: Basic Terminology, Methodology (ISO 12100-1:2003)
Part2: Technical principles (ISO 12100-2:2003)
•
DIN EN 349 -2008 -
Safety of machinery; minimum gaps to avoid crushing of parts oft he human
body
•
DIN EN 953 -1997-
Safety of machinery – Guards – General requirements for the design and
construction of fixed and movable guards
•
DIN EN 61010-1:2003
Safety requirements for electrical equipment for measurement, control, and
laboratory use - Part 1: General requirements
•
DIN EN 55022 + A1:2006
Information technology equipment - Radio disturbance characteristics - Limits
and methods of measurement
Eiterfeld, den
imes-icore GmbH
Competence in CNC & DENTAL-Solutions

3
3. Technical Specifications iVAC eco
Air intake
32 mm
Power Unit
1 EC blower (brushless turbine)
Rating / protection type
S1 / IP 20
Output
1.3 kW
Mains voltage
230 V
Frequency
50-60 Hz / single phase
Power requirement
5.7 A
Internal fuse (slow-blow type
16 A
Rate of air flow
115 m³/h
Negative pressure, max.
20.500 Pa / electronically controlled limit – 15.000 Pa
Dimensions: width x depth x height, without accessories,
approx.
290 x 485 x 610 mm
Weight
30.2 kg
Filter
N0. 22: upstream paper filter, No. 14: polyester filter cartridge
1,20 m² filter surface, category M
Ambient temperatures
5° < 1< 40°
Noise level according to EN ISO 3744
62-68 db (A)
4. Delivery, first use
The iVACeco extraction unit (referred as below to the eco) is supplied as ready to use. No special installation work is
necessary. The eco must be handled with due care and consideration during transport, setting up and operation. The eco must
be kept dry when put away or stored during normal operation. Please take steps to prevent any improper use:
- The eco is switched on and off at the power switch No.1 ON/OFF:
Position “0” The device is switched off.
Position “0” The device is switched on.
- When the power switch is on (Position “1”), switch No.2 can be used to operate the turbine function:
Position “0” The turbine is switched off.
Position “1” The turbine is switched on (with remote control via SUB9 input).
Position “2” The turbine is switched on (with remote control).
- For normal operation, the ecoshould be set to the medium potentiometer setting (5-7). This corresponds to a maximum rate of
air flow of approx. 100m³/h.
5. Intended use of the eco extraction unit
The eco is intended for the continuous separation by mechanical filtration of dry materials / substances ( particles), which
mainly take the form of milling and drilling dust, flour and powder, chips, granulate and fibres.
The eco is suitable for extracting materials such as metals (not fine aluminium grinding dust or magnesium), plastics, paper,
textiles, leather, glass, acrylic glass and mineral substances /ceramic, cement, stone, etc.). If the eco is correctly installed at the
dust source (e.g. milling, drilling, engraving or grinding system, etc.) and operated in accordance with the instructions and
regulations, then the required performance and quality of extraction and separation are guaranteed.
The basic unit incorporates a main filter (filter cartridge, category M) with an upstream paper filter to collect all chips and most
dust particles.
Any use, other than the intended use, is forbidden!
Unintended or improper use leads to:
hazards for life and health
hazards for the machine
hazards for other property
6. General safety information
When using eco, the following must be observed:
- Ensure that no fire hazards (flying sparks), no explosive substances, liquids, combustible dusts or aggressive gases are drawn
in by the extractor.
- All electrically conductive components of the eco must be continuously earthed.
- Insert the mains plug into an earthed socket protected by a 16 amp slow-blow fuse
- Check the mains lead for splits, aging or any damaged caused by wheels or by crushing.
- Always remove the plug from the socket after use. Before transporting, clean the unit, carry out maintenance, empty the
contents, check the filters, etc.
- Only trained and qualified staff may operate, service or repair the eco.
- Connect the eco to the extraction site at the workplace by means of a fixed pipework or hose.
Regular inspection and maintenance tasks include:
- Daily inspection: Check for visible damage; ensure that the dust collector is not full; check upstream filter No. 22 and seal No.
40. Check level indicator light No. 15.

4
- Monthly inspection: Remove deposits in the upstream area of filter chamber No. 15. Remove any major residues. Clean
residues from filter cartridge. Check that the hose connector bush fits tightly in air intake No 27a.
- Six-monthly maintenance: Change the G4 filter mat No 34. If the filter mat becomes clogged, the turbine can be irreparably
damaged through lack of cool air.
- The eco may only be used for dry extraction and not in the open air. The unit must be, of course, be serviced and repaired as
necessary. See also Section 10 / page 5 “Troubleshooting checklist”.
Prevention of mechanical hazards: All moving parts of the machine (e.g. turbine) which are potential hazards are covered by
means of permanent, fixed, protective covers which can only be removed with the use of tools.
Prevention of electrical hazards: All parts of the machine which carry an electric current are insulated by means of
permanent, fixed protective devices which can only be removed with the use of tools.
Other risks: If the above mentions instructions are not observed, there is acute danger for the operating personnel.
7. Filter
7.1 Air flow, filter arrangement
The extracted particles (e.g. dust, flower, powder, chips, granulate) are drawn via air intake No. 27a into the synthetic filter No.
42. The synthetic filter No. 42 serves to relieve filter cartridge No.14 and absorbs the chips and a large portion of the dust.
However, fine dust passes through the synthetic filter. The air flow carries the fine dust to filter cartridge. Here, it is deposited on
the pleated surface of the filter cartridge (air intake area No. 15).
7.2 Red indicator light No. 5
The red indicator light comes on when the performance of the extractor drops significantly at a medium potentiometer setting (5-
7 on the scale). When the red light comes on, the EC blower cuts out immediately. In order to briefly continue to operate the
turbine until the indicator light comes on again, a RESET can be carried out as follows:
1. Set main switch NO.1 to position “0”
2. Set the changeover switch No. 2 position “0”
3. Set main switch No. 1 to position “1”
4. Set the changeover switch No. 2 to position “1” (with remote control via SUB9 port) or position “2” (without remote
control) depending on the function selected.
- Important: both filters must now be checked (see 7.3 and 7.4), because
•the synthetic filter may be full
•there may be heavy deposits on the filter cartridge
•the synthetic filter may be full and there may be heavy deposits on the filter cartridge
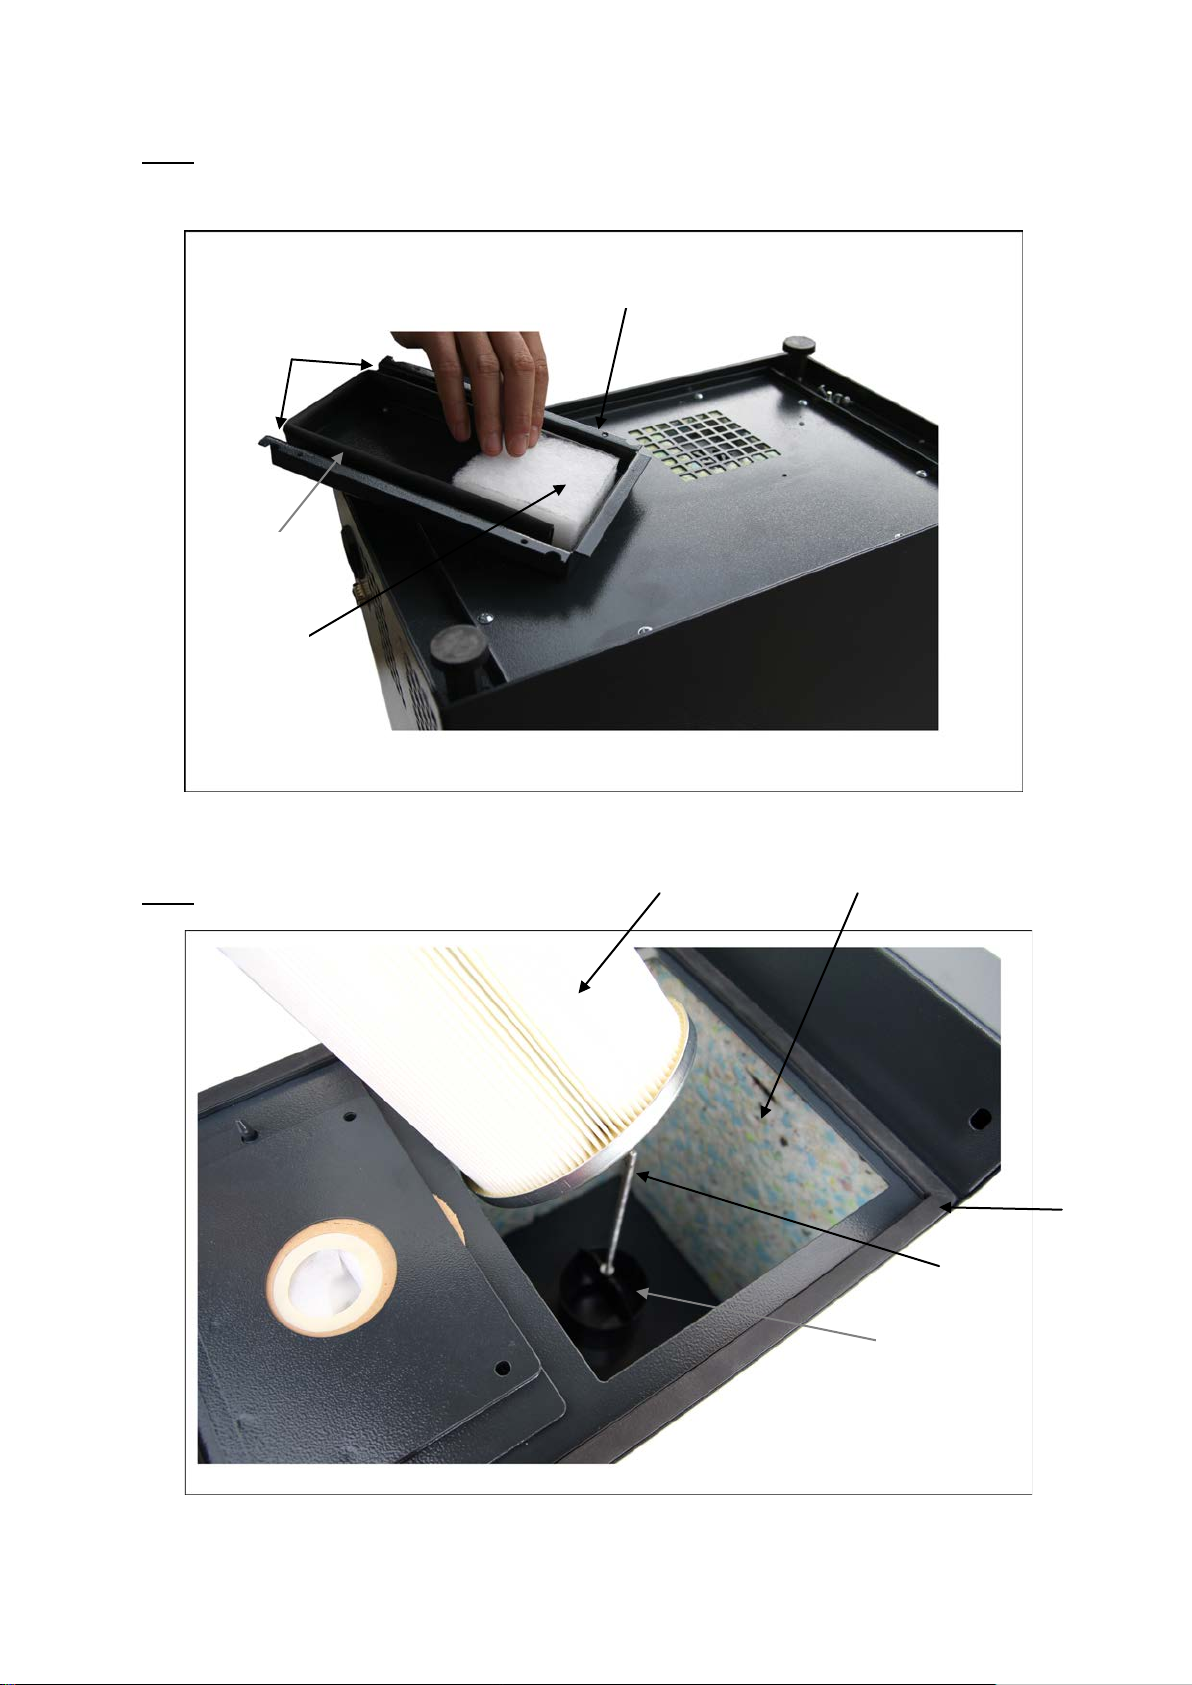
7.3 Synthetic filter: filter saturation, visual inspection, changing
The synthetic filter is a disposable filter and should be changed when it is ¾ full. Depending on the application and the amount
and specification of material to be extracted, it may be necessary to carry this out every day or not for several weeks. The
condition of the synthetic filter can be determined by as follows:
Visual inspection: Release clasp No. 26b, remove filter chamber cover No. 24. The level of the synthetic filter can be seen
through opening No. 35 or feeling by hand. When replacing the filter chamber cover, make sure that both pins No. 23 engage in
holes No. 12 and that both guide lugs No. 25 fit onto pins No.17. Fasten the cover with the clasp. During visual inspection, the
extraction hose must be removed from the air intake.
Changing synthetic filter: Remove the filter chamber cover. Remove Holder of synthetic filter No. 18 complete with synthetic
filter No. 42 from the filter chamber. Pull the synthetic filter out of the slot No. 19 (see also direction of arrow in Fig. 4) and close
synthetic filter with the paper sealing lug No. 44 (turn it down). Insert new synthetic filter Note: tab No. 43 must remain
protruding from slot No. 19 – see Fig. 3). Insert the holder with the synthetic filter. Replace the filter chamber cover as described
under “Visual inspection” and fasten same.
7.4 Filter cartridge: filter saturation, visual inspection, cleaning, removing and replacing
Filter cartridge No. 14 is upstream of the turbine and fastened onto retaining bolt No. 13 by means of nut No. 13b (with silicone
seal and washer). The filter cartridge (category M filter material) is designed for fine dust.
Visual inspection: When the filter level light described in 7.2 comes on, the filter cartridge must be checked. Remove filter
chamber cover (as described in 7.3). The filter cartridge is pleated. Check for dust deposits between the pleats and for dust
accumulation on the floor on the filter chamber. If this is the case, the filter cartridge must be cleaned.
Cleaning/removing and replacing the filter: Use a size 10 open-ended spanner to undo M6 No. 13b. Put a sufficiently large
plastic bag (e.g. 30 or 50 litre rubbish back over the filter cartridge). Pull out the filter cartridge with the plastic bag over the
threaded bar (retaining bolt), No. 13a. Close the plastic bag around the filter cartridge. The fine dust can now be shaken out of
the pleats by shaking the filter cartridge several times. Replace the filter cartridge over the threaded bar and position it over
cantering plate No. 38. Tighten the silicone seal, washer and nut.
Fasten filter chamber cover (as described in 7.3)
The filter cartridge can be re-used several times. After a long service life, the cartridge must be replaced by a new one. This is
because the pores of the filter material gradually seal up over time and can no longer be cleaned by shaking. It is necessary to
replace the (shaken) filter cartridge if the red light comes on again after a fairly short time.

5
N.B. Irrespective of the condition of the filter cartridge, the red indicator light may come on if the synthetic filter is full.
Important
•do not wet clean filter cartridge. Do not blast filter cartridge with compressed air
•when shaking the filter cartridge, be careful not to damage the surface
•in particular, check whether the outside edges of the pleats are roughened. If this is the case, replace the filter
cartridge.
N.B. (referring to 7.3 and 7.4):
- switch the eco off before opening filter chamber cover No. 24. Set main switch No.”1” to position “0” and remove the mains
plug from the socket outlet.
- Dust deposits can build up on the floor of the housing and on the walls in the region of air intake No. 15. Clean off these
deposits before inserting a cleaned or new filter cartridge before changing the synthetic filter.
- If the instructions in this user manual regarding disposal are not allowed (e.g. the use of suitable face masks and adequate
protective clothing) this can lead to dust being inhaled during closing and changing the synthetic filter and the filter cartridge.
Dispose of the synthetic filter to be done properly in accordance to local regulations!
8. Warranty
The unit is covered by guarantee in accordance with statutory regulations. Any defects arising must be reported to the seller
immediately. Claims under guarantee are excluded in respect of any faults or defects attributable to overheating, excessive
external temperature, inclement weather, incorrect or faulty connections, incorrect positioning, operation or maintenance,
unsuitable or improper use, improper modifications or repair work carried out at his or her own risk by the owner or any third
party, in the event of machine overload, etc. Parts subject to wear (e.g. filter inserts, turbine) which in any case have only a
limited useful life, and all service, setting and adjustment work is completely excluded under the terms of the warranty.
9. Disposal
Equipment, devices and machinery which are permanently taken out of use, must be disposed of in accordance with statutory
requirements. In particular, the individual components of such equipment, devices and machinery must be separated according
to their material and substance groups, e.g. metals (aluminium, steel), plastics, rubber, electrical components, and taken to the
appropriate collection depots for recycling.
10. Troubleshooting checklist
Fault
Cause
Remedy
Turbine motor not working
- mains cable not plugged in
- Faulty cable
- Faulty filter cartridge; fine dust
penetrating into the clean air section –
faulty turbine
- Insert plug
- Replace mains cable
- Replace turbine, replace filter cartridge
Red indicator light No. 5 comes on,
turbine motor not working
Check condition on filter, see 7.2 to 7.4
Clean filter, replace filter, see 7.2 to 7.4
Dust penetrating into the clean air
section
Filter cartridge worn or damaged
Replace filter cartridge immediately
Heavy accumulation of dust and/ or
chips on the surface of the filter
cartridge
Synthetic filter leaking or torn
Immediately replace synthetic filter.
Dispose of old one clean filter
cartridge and replace if necessary
Dust escaping in the area of the air
intake/ hose connector or filter chamber
cover
- Leaking caused by loose hose
bushing
- Leaking caused by deposits on seal
No. 40
- Rubber seal damaged, torn or missing
- hose fastening
- clean deposits
- fix / replace rubber seal
Noise level increases
- Component(s) loose
- potentiometer turned up to position
“10” on the scale
- Check that all mechanical parts are
firmly in place
- Reset potentiometer to recommended
operating setting (5-7 on the scale)
Turbine overheating
Inadequate cooling because the outside
of G4 filter mat No. 34 is saturated with
dust deposits
- Replace filter mat. See maintenance
instructions, section 6.0
Problem dust with properties such as
highly adhesive, agglomerating, sticky,
etc.
Filter cartridge becomes very heavily
soiled in a short time can only be
cleaned to a limited extend
Consult service agent for details of
alternative filters

6
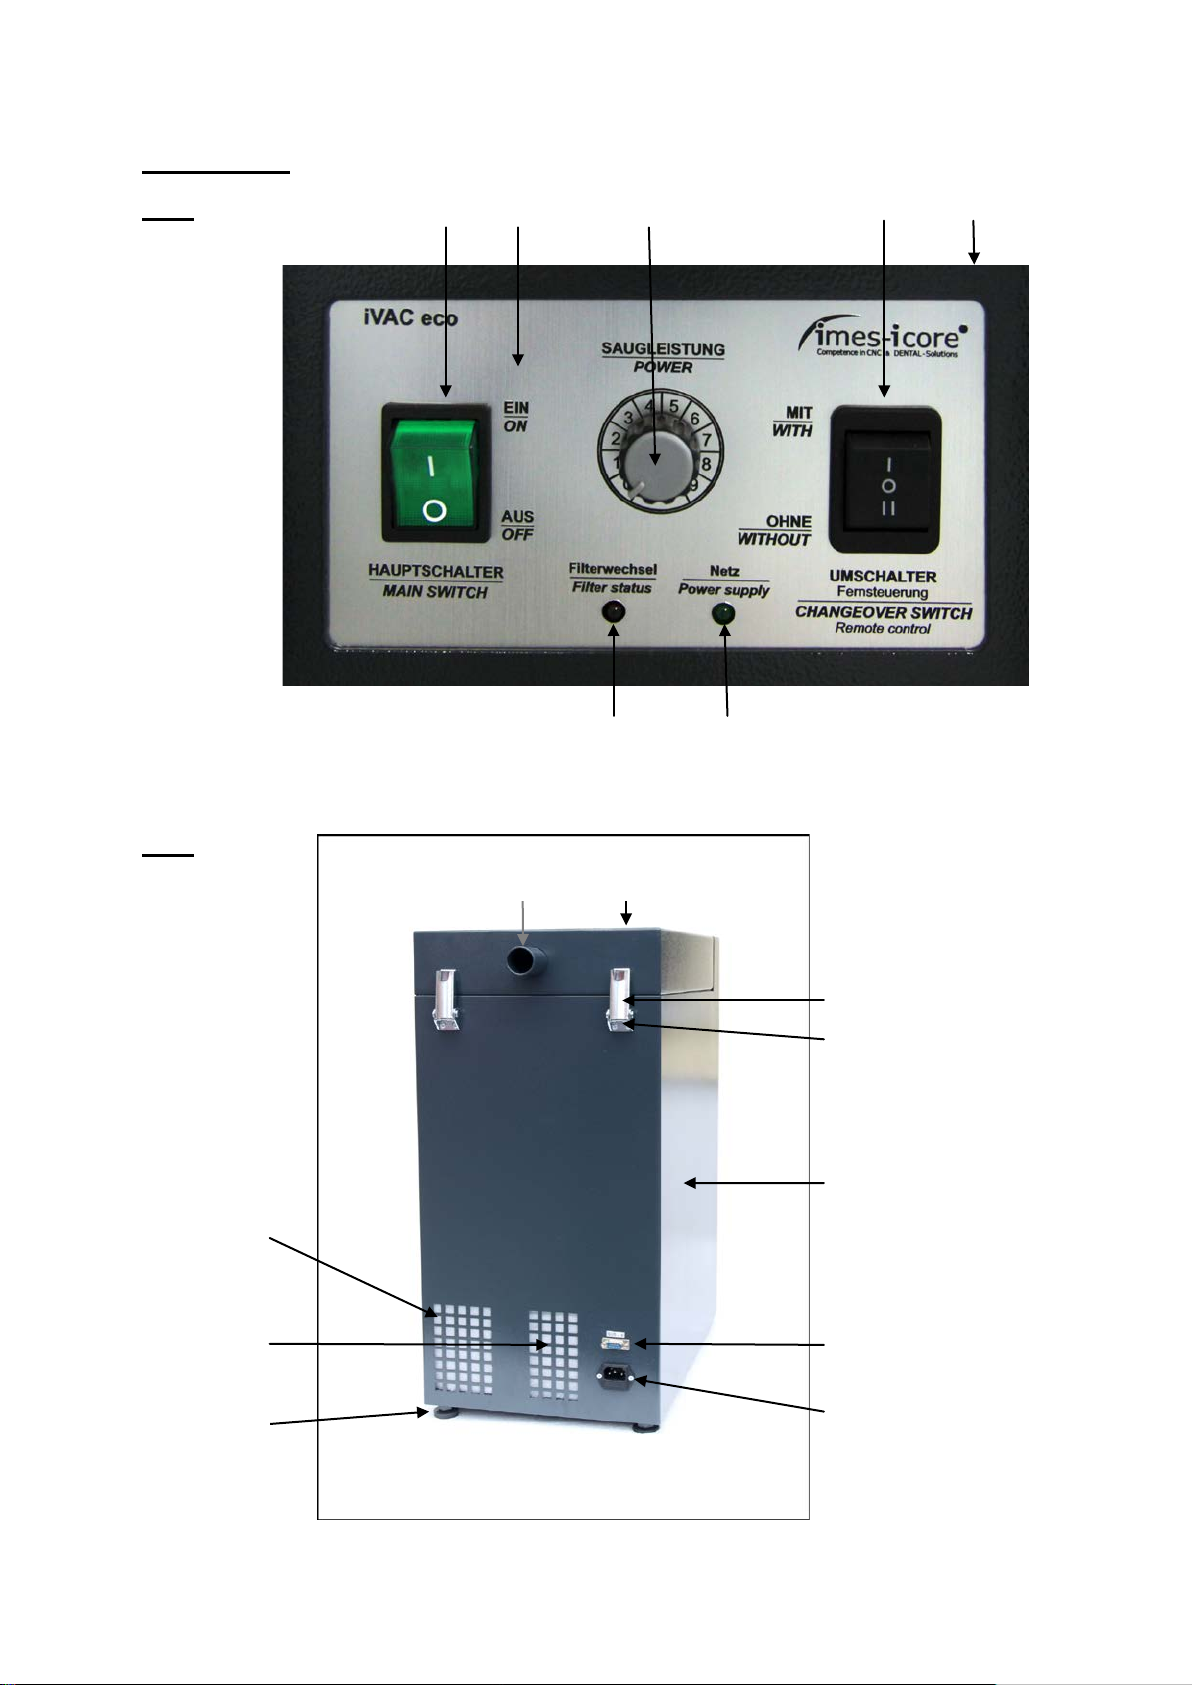
11. Key to illustrations 1-9
No.
Part name, description
Quantity
Illustration
1
Main switch:
- Position “0” ….eco is off
- Position “1” ….eco is on
1
1
2
Changeover switch:
Position “0” turbine off
Position “1” turbine on (remote control via SUB9 port)
Position “2” turbine on (direct control by eco)
1
1
3
Potentiometer
1
1
4
Indicator light, main switch (green)
1
1
5
Indicator light, filter level (red)
1
1
6
Suction unit housing
1
2, 3
7
Handle
2
3
8
SUB9 port
1
2
9
Mains connection 230V
1
2
10
Adjustable foot
4
2, 6
11
Filtered air outlet
1
2
12
Connector for guide pin No. 23 for fixing the filter chamber cover
2
3, 9
13
a) Threaded bar for holding the filter cartridge
b) Nut M6
c) Washer
d) Silicone seal
1
1
1
1
3, 8
3
3
3
14
Filter cartridge
1
3, 8
15
Filter chamber air intake area
1
3
17
Guide pin for fixing the synthetic filter holder
2
3
18
Holder for synthetic filter
1
3, 4
19
Holder guide slot for changing the synthetic filter
1
4
21
Hole for guide pin No. 17
2
4
23
Pin for fixing the chamber filter cover
2
5, 9
24
Filter chamber cover
1
2, 5, 9
25
Filter chamber fixing lug for fitting onto guide pin No. 17
2
5
26
a) Clip for clasp
b) Clasp for filter chamber cover
2
2
2, 3
2
27
a) Air intake adaptor, diameter 32 mm
b) Duct to synthetic filter opening
1
1
2, 5
5
28
screws for front cover
4
-
29
Front cover
1
1
30
Cooling vent for turbine
1
6, 7
31
Display
1
1
32
Turbine compartment cover
1
6
33
Screw M4. 12
4
6
34
G4 filter mat
1
7
35
Synthetic filter opening
1
3
36
Turbine outlet, cool air
1
2
37
Turbine inlet, cool air
1
6, 7
38
Metal ring for fixing the cartridge
1
8
39
Sound insulation
--
5, 8
40
Seal filter chamber cover
1
8, 9
41
Seal Cooling vent No. 30
1
7
42
Synthetic filter
1
4
43
Synthetic filter paper tab
1
4
44
Synthetic filter paper closing lug
1
4
7
11. Figures
Fig. 1
Fig. 2
1
29
2
31
3
4
5
24
11
6
26b
27a
9
8
10
36
26a

8
Fig. 3
Fig. 4
6
17
26a
40
18
17
35
7
15
7
13a – 13d
12
43
44
19
18
21
42
21
14

9
Fig. 5
Fig. 6
27a
27b
10
23
24
39
25
25
32
37
33
30
10
Fig. 7
Fig. 8
37
14
41
34
30
39
13a
40
38

11
Fig. 9
24
23
12
40
12
23

12
12. Circuit Diagram, MINI
M1
EC blower 220V/240V, 5,8 A 50/60 Hz, 1300 W
Type “H”
Ametek
B2
Electronic control unit 250 V / 16A
Urban
S1
Main switch 230 V / 6A
Moeller
S2
Changeover switch 1-0-2, 230V / 15A
Moeller
H1
LED 3V - red
GM
H2
LED 3V - green
GM
R1
Potentiometer
Tesla
B1
RF suppressor 250V / 10A
Domel
Table of contents
Popular Scrubber manuals by other brands


Wetrok
Wetrok Wetrok Sprinter XR 70 operating instructions

Hydro-Force
Hydro-Force Nautilus MX3-1200JP operating manual

Imac
Imac NGS 1000 Installation, operation & maintenance instructions

Tennant
Tennant Alfa Mini LPTB02097 Operator's manual

Ice
Ice i20NBV Operator's & parts manual

Ace
Ace 73-201 Safety & instruction manual