IMG STAGE LINE GAB-66DC User manual

GITARREN-VERSTÄRKER
GUITAR AMPLIFIER
AMPLIFICATEUR GUITARE
AMPLIFICATORE PER CHITARRE
GAB-66DC Best.-Nr. 24.4140
BEDIENUNGSANLEITUNG • INSTRUCTION MANUAL • MODE D’EMPLOI • ISTRUZIONI PER L’USO
GEBRUIKSAANWIJZING • MANUAL DE INSTRUCCIONES • INSTRUKCJA OBSŁUGI
SIKKERHEDSOPLYSNINGER • SÄKERHETSFÖRESKRIFTER • TURVALLISUUDESTA

2
Bevor Sie einschalten ...
Wir wünschen Ihnen viel Spaß mit Ihrem neuen Gerät von
„img Stage Line“. Dabei soll Ihnen diese Bedienungsan-
leitung helfen, alle Funktionsmöglichkeiten kennen zu ler-
nen. Die Beachtung der Anleitung vermeidet außerdem
Fehlbedienungen und schützt Sie und Ihr Gerät vor even-
tuellen Schäden durch unsachgemäßen Gebrauch.
Den deutschen Text finden Sie auf den Seiten 4–5.
Before you switch on ...
We wish you much pleasure with your new “img Stage
Line” unit. With these operating instructions you will be
able to get to know all functions of the unit. By following
these instructions false operations will be avoided, and
possible damage to yourself and your unit due to im-
proper use will be prevented.
You will find the English text on the pages 4–5.
D
A
CH
GB
Przed uruchomieniem ...
Życzymy zadowolenia z nowego produktu “img Stage
Line”. Dzięki tej instrukcji obsługi będą Państwo w
stanie poznać wszystkie funkcje tego urządzenia.
Stosując się do instrukcji unikną Państwo błędów i
ewentualnego uszkodzenia urządzenia na skutek nie-
prawidłowego użytkowania.
Tekst polski zaczyna się na stronie 10.
Voordat u inschakelt ...
Wij wensen u veel plezier met uw nieuw toestel van “img
Stage Line”. Met behulp van bijgaande gebruiksaan-
wijzing zal u alle functiemogelijkheden leren kennen.
Door deze instructies op te volgen zal een slechte wer-
king vermeden worden, en zal een eventueel letsel aan
uzelf en schade aan uw toestel tengevolge van onzorg-
vuldig gebruik worden voorkomen.
U vindt de nederlandstalige tekst op de pagina’s 8–9.
PL
B
NL Antes de cualquier instalación ...
Tenemos de agradecerle el haber adquirido un aparato
“img Stage Line”. y le deseamos un agradable uso. Este
manual quiere ayudarle a conocer las multiples facetas
de este aparato. La observación de las instrucciones evi-
ta operaciones erróneas y protege Vd. y vuestro aparato
contra todo daño posible por cualquier uso inadecuado.
La versión española se encuentra en las páginas 8–9.
Inden De tænder for apparatet ...
Vi ønsker Dem god fornøjelse med Deres nye “img
Stage Line” apparat. Læs oplysningerne for en sikker
brug af apparatet før ibrugtagning. Følg sikkerhedsop-
lysningerne for at undgå forkert betjening og for at be-
skytte Dem og Deres apparat mod skade på grund af for-
kert brug.
Sikkerhedsoplysningerne finder De på side 11.
E
DK
Förskrift
Vi önskar dig mycket nöje med din nya enhet från “img
Stage Line”. Läs gärna säkerhetsinstruktionerna innan
du använder enheten. Genom att följa säkerhetsinstruk-
tionerna kan många problem undvikas, vilket annars kan
skada enheten.
Du finner säkerhetsinstruktionerna på sidan 11.
SFIN
Avant toute mise en service ...
Nous vous remercions d’avoir choisi un appareil “img
Stage Line” et vous souhaitons beaucoup de plaisir à
l’utiliser. Cette notice a pour objectif de vous aider à
mieux connaître les multiples facettes de l’appareil. En
outre, en respectant les conseils donnés, vous éviterez
toute mauvaise manipulation de sorte que vous-même et
votre appareil soient protégés de tout dommage.
La version française se trouve pages 6–7.
Prima di accendere ...
Vi auguriamo buon divertimento con il Vostro nuovo
apparecchio “img Stage Line”. Le istruzioni per l’uso Vi
possono aiutare a conoscere tutte le possibili funzioni. E
rispettando quanto spiegato nelle istruzioni, evitate di
commettere degli errori, e così proteggete Voi stessi, ma
anche l’apparecchio, da eventuali rischi per uso impro-
prio.
Il testo italiano lo potete trovare alle pagine 6–7.
F
B
CH
I
Ennen virran kytkemistä ...
Toivomme, että uusi “img Stage Line”-laitteesi tuo sinulle
paljon iloa ja hyötyä. Ole hyvä ja lue käyttöohjeet ennen
laitteen käyttöönottoa. Luettuasi käyttöohjeet voit käyt-
tää laitetta turvallisesti ja vältyt laitteen väärinkäytöltä.
Käyttöohjeet löydät sivulta 11.
wwwwww..iimmggssttaaggeelliinnee..ccoomm
GAIN
010
VOLUME
010
LOW
010
MIDDLE
010
HIGH
010
LINE
GUITAR
OVER
DRIVE
010
DC AC
POWER
230 V~/ 50 Hz
T0.25 AL
12 V I N
GUITAR AMPLIFIER
GAB-66DC
MIN. 8 Ω
INPUT MIC
PHONES
EQUALIZER
LEVEL
VOLUME
ON
3
16
12345 6 789101112131415
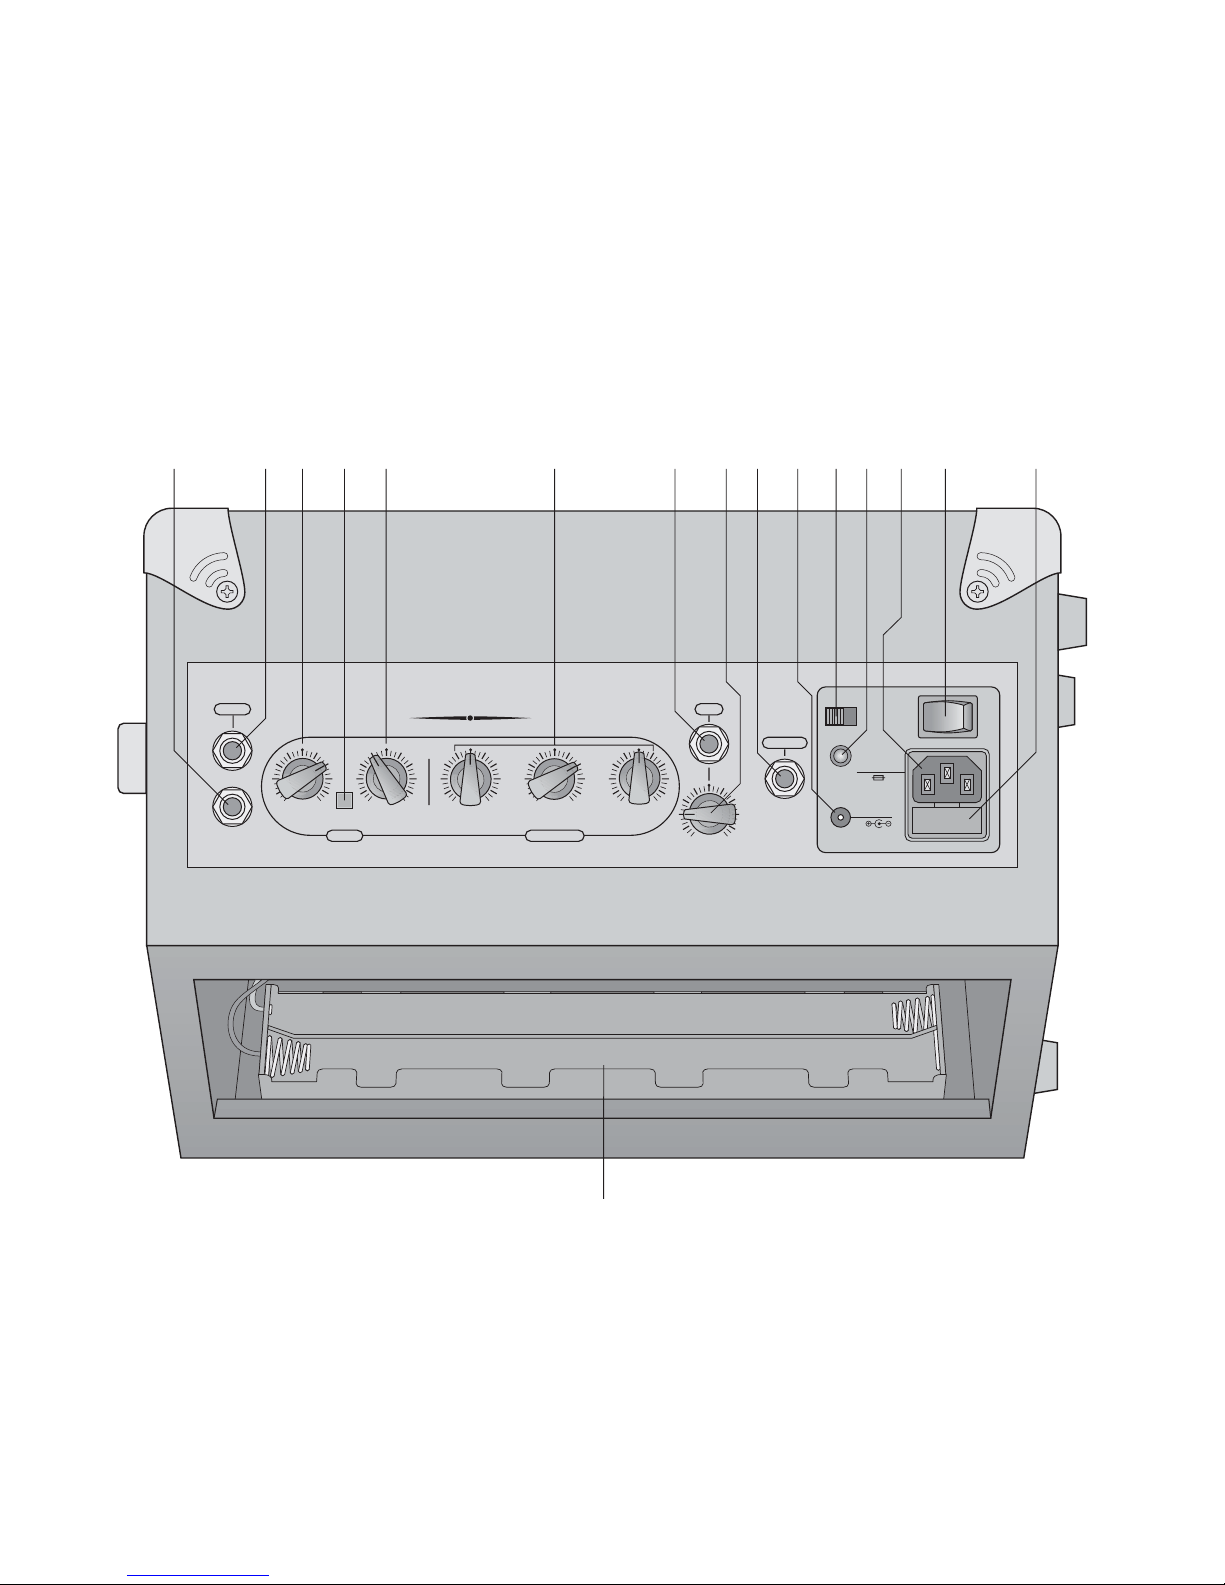
Bitte klappen Sie die Seite 3 heraus. Sie sehen
dann immer die beschriebenen Bedienelemente
und Anschlüsse.
1Übersicht der Bedienelemente und
Anschlüsse
1Eingangsbuchse INPUT LINE (6,3-mm-Klinke)
zum Anschluss eines Gerätes mit Line-Pegel,
wie z.B. Keyboard oder CD-Spieler
2Eingangsbuchse INPUT GUITAR (6,3-mm-
Klinke) zum Anschluss einer E-Gitarre
3Verstärkungsregler GAIN zur Einstellung der
Eingangsverstärkung bzw. des Verzerrungsgra-
des für die Gitarre
4Schalter OVERDRIVE zum Ein- und Ausschal-
ten des Verzerrers für die Gitarre
5Lautstärkeregler VOLUME für die Gitarre und
den Line-Eingang (1)
63-Band-Klangregelung (Equalizer) für Bässe
(LOW), Mitten (MIDDLE) und Höhen (HIGH)
7Eingangsbuchse MIC (6,3-mm-Klinke) zum
Anschluss eines Mikrofons
8Lautstärkeregler VOLUME für das an MIC (7)
angeschlossene Mikrofon
96,3-mm-Klinkenbuchse PHONES zumAnschluss
eines Stereo-Kopfhörers (Impedanz min. 8Ω);
beim Anschluss schaltet der interne Lautspre-
cher ab
10 Anschlussbuchse zur alternativen 12-V-Strom-
versorgung (Autobatterie oder 12-V-Netzgerät);
beimAnschluss an diese Buchse werden die ein-
gesetzten Batterien abgeschaltet;
für den Anschluss wird ein Kleinspannungs-
stecker 5,5/2,1mm (Außen-/Innendurchmes-
ser) benötigt, Mittelkontakt = Minuspol
11 Umschalter DC/AC:
Position DC:
Versorgung über eingesetzte Batterien
Position AC:
Netzbetrieb über Netzanschlussbuchse (13)
12 Betriebsanzeige
13 Netzbuchse zum Anschluss an 230V~/50Hz
14 Ein-/Ausschalter POWER
15 Halterung für die Netzsicherung;
eine durchgebrannte Sicherung nur durch eine
gleichen Typs ersetzen
16 Batteriehalter für acht 1,5-V-Monozellen
2Hinweise für den sicheren Gebrauch
Dieses Gerät entspricht der Richtlinie für elektro-
magnetische Verträglichkeit 89/336/EWG und der
Niederspannungsrichtlinie 73/23/EWG.
Beachten Sie auch unbedingt die folgenden Punkte:
●Das Gerät ist nicht wetterfest. Schützen Sie es vor
Tropf- und Spritzwasser, hoher Luftfeuchtigkeit
und Hitze (zulässiger Einsatztemperaturbereich
0–40°C).
●Stellen Sie keine mit Flüssigkeit gefüllten Gefäße,
z.B. Trinkgläser, auf das Gerät.
●Nehmen Sie das Gerät nicht in Betrieb bzw. zie-
hen Sie sofort den Netzstecker aus der Steck-
dose:
1. wenn sichtbare Schäden am Gerät oder an der
Netzanschlussleitung vorhanden sind,
2. wenn nach einem Sturz oder Ähnlichem der
Verdacht auf einen Defekt besteht,
3. wenn Funktionsstörungen auftreten.
Lassen Sie das Gerät in jedem Fall in einer Fach-
werkstatt reparieren.
●Ziehen Sie den Netzstecker nie am Kabel aus der
Steckdose, fassen Sie immer am Stecker an.
●Verwenden Sie für die Reinigung nur ein trockenes,
weiches Tuch, niemals Wasser oder Chemikalien.
●Werfen Sie verbrauchte Batterien nicht in den
Hausmüll, sondern geben Sie sie nur in den Son-
dermüll (z.B. Sammelbehälter bei Ihrem Einzel-
händler).
●Wird das Gerät zweckentfremdet, nicht richtig an-
geschlossen, falsch bedient oder nicht fachgerecht
repariert, kann keine Haftung für daraus resultie-
rende Sach- oder Personenschäden und keine
Garantie für das Gerät übernommen werden.
3Einsatzmöglichkeiten
und Ausstattung
Der GAB-66DC ist ein handlicher Gitarrenverstärker
für den Einsatz auf kleinen Bühnen, als Übungsver-
stärker oder im mobilen Einsatz auf der Straße.
Seine Vielseitigkeit wird durch die drei Stromversor-
gungsmöglichkeiten (Netzbetrieb, Batteriebetrieb
und 12-V-Versorgung, z.B. aus dem Auto) unter-
stützt. Durch seine abgeschrägte Bauform lässt er
sich senkrecht oder nach oben gewinkelt aufstellen.
Mit den zusätzlichen Eingängen für ein Mikrofon und
ein Gerät mit Line-Ausgang können z.B. eine
Gitarre, Gesang und ein Playback von einer CD
gleichzeitig verstärkt werden. Zum stillen Üben steht
ein Kopfhöreranschluss zur Verfügung.
4Anschlüsse herstellen
Alle Anschlüsse dürfen nur bei ausgeschaltetem
Verstärker vorgenommen werden.
Soll das Gerät endgültig aus dem Be-
trieb genommen werden, übergeben Sie
es zur umweltgerechten Entsorgung ei-
nem örtlichen Recyclingbetrieb.
Achtung! Das Gerät wird mit lebensgefährlicher
Netzspannung (230V~) versorgt. Neh-
men Sie deshalb niemals selbst Ein-
griffe am Gerät vor. Durch unsachge-
mäßes Vorgehen besteht die Gefahr
eines elektrischen Schlages.Außerdem
erlischt beim Öffnen des Gerätes jegli-
cher Garantieanspruch.
Please unfold page 3. Thus you will always
be able to see the operating elements and
connections described.
1Operating Elements and Connections
1Jack INPUT LINE (6.3mm jack) for connection of
a unit with line level, e.g. keyboard or CD player
2Jack INPUT GUITAR (6.3mm jack) for connec-
tion of an electric guitar
3GAIN control for adjusting the input amplification
or the distortion rate for the guitar
4Switch OVERDRIVE for switching on and off the
distorter for the guitar
5VOLUME control for the guitar and the line in-
put (1)
63-band equalizer for the ranges LOW, MIDDLE,
and HIGH
7Input jack MIC (6.3mm jack) for connection of a
microphone
8VOLUME control for the microphone connected
to MIC (7)
96.3mm jack PHONES for connection of stereo
headphones (minimum impedance 8Ω);
when connecting, the internal speaker will be
switched off
10 Connection jack for alternative 12V power sup-
ply (car battery or 12V power supply unit); when
connecting to this jack, the inserted batteries will
be switched off;
for the connection, a low voltage plug 5.5/2.1mm
(outside/inside diameter) is required, centre
contact = negative pole
11 Selector switch DC/AC:
position DC:
supply via the inserted batteries
position AC:
mains operation via the mains jack (13)
12 Power LED
13 Mains jack for connection to 230V~/50Hz
14 POWER switch
15 Support for the mains fuse;
only replace a blown fuse by one of the same type
16 Battery support for eight 1.5V batteries (size D)
2Safety Notes
This unit corresponds to the directive 89/336/EEC
for electromagnetic compatibility and to the low volt-
age directive 73/23/EEC.
It is essential to observe the following items:
●The unit is not weatherproof. Protect it against
dripping water and splash water, high air humidity,
and heat (admissible ambient temperature range
0–40°C).
●Do not place any vessels filled with liquid, e.g.
drinking glasses, on the unit.
●Do not set the unit into operation, or immediately
disconnect the mains plug from the mains socket if
1. there is visible damage to the unit or to the
mains cable,
2. a defect might have occurred after a drop or
similar accident,
3. malfunctions occur.
The unit must in any case be repaired by skilled
personnel.
●Never pull the mains cable to disconnect the
mains plug from the mains socket, always seize
the plug.
●For cleaning only use a dry, soft cloth, by no
means chemicals or water.
●Do not put exhausted batteries into the household
rubbish but take them to a special waste disposal
(e.g. collective container at your retailer).
●No guarantee claims for the unit and no liability for
any resulting personal damage or material
damage will be accepted if the unit is used for
other purposes than originally intended, if it is not
correctly connected, operated, or not repaired in
an expert way.
●Important for U.K. Customers!
The wires in this mains lead are coloured in accor-
dance with the following code:
green/yellow = earth
blue = neutral
brown = live
As the colours of the wires in the mains lead of this
appliance may not correspond with the coloured
markings identifying the terminals in your plug,
proceed as follows:
1. The wire which is coloured green and yellow
must be connected to the terminal in the plug
which is marked with the letter Eor by the earth
symbol , or coloured green or green and
yellow.
2. The wire which is coloured blue must be con-
nected to the terminal which is marked with the
letter Nor coloured black.
3. The wire which is coloured brown must be con-
nected to the terminal which is marked with the
letter Lor coloured red.
Warning
-
This appliance must be earthed.
3Applications and Equipment
The GAB-66DC is a handy guitar amplifier for use
on small stages, as an amplifier for practising, or for
mobile applications on the road. Its versatility is sup-
ported by three power supply facilities (mains opera-
tion, battery operation, and 12V supply, e.g. from
the car). Due to its sloped design it can be set up
vertically or angled upwards. With the additional
If the unit is to be put out of operation
definitively, take it to a local recycling
plant for a disposal which is not harmful
to the environment.
Attention!The unit is supplied with hazardous
mains voltage (230V~). Leave servicing
to skilled personnel only. Inexpert hand-
ling may cause an electric shock hazard.
Furthermore, any guarantee claim will
expire if the unit has been opened.
4
GB
D
A
CH

4.1 Signalquellen
1) Die Gitarre an die Eingangsbuchse INPUT GUI-
TAR (2) anschließen.
2) Ein Gerät mit Line-Pegel (z.B. Keyboard oder
CD-Spieler) an die Buchse INPUT LINE (1)
anschließen.
3) Ein Mikrofon an die Buchse MIC (7) anschließen.
4.2 Kopfhörer
Ein Kopfhörer (Impedanz ≥8Ω) kann an die Buchse
PHONES (9) angeschlossen werden. BeiAnschluss
des Kopfhörers wird der Lautsprecher abgeschaltet.
4.3 Stromversorgung
Bei der Stromversorgung stehen drei Alternativen
zur Auswahl:
1. Die höchste Ausgangsleistung wird bei der Ver-
sorgung mit 230 V~ erreicht. Wenn möglich sollte
deshalb die Stromversorgung über das 230-V-
Netz erfolgen. Dazu die Buchse 230V~ (13) über
das beiliegende Netzverbindungskabel an eine
Steckdose (230V~/50Hz) anschließen. Den
Umschalter (11) für die Versorgungsspannung in
die Position AC schieben.
2. Beim mobilen Einsatz kann die Stromversorgung
auch über eine Autobatterie erfolgen. Dazu die
Buchse 12 V IN (10) über das beiliegende Adap-
terkabel an einen KFZ-Zigarettenanzünder an-
schließen. Sind 1,5-V-Batterien in den Verstärker
eingesetzt, werden diese dabei abgeschaltet.
Der Umschalter (11) hat hier keine Bedeutung.
Vorsicht:
Stellen Sie bei Verwendung eines Kopfhörers die
Lautstärke nie sehr hoch ein. Hohe Lautstärken
können auf Dauer das Gehör schädigen! Das
menschliche Ohr gewöhnt sich an große Laut-
stärken und empfindet sie nach einiger Zeit als nicht
mehr so hoch. Darum eine hohe Lautstärke nach
der Gewöhnung nicht weiter erhöhen.
inputs for a microphone and a unit with line output it
is possible to amplify e.g. a guitar, vocal sound, and
a playback of a CD at the same time. For silent prac-
tising, a headphone connection is available.
4Making the Connections
All connection must only be made with the amplifier
switched off.
4.1 Signal sources
1) Connect the guitar to the jack INPUT GUITAR (2).
2) Connect a unit with line level (e.g. keyboard or
CD player) to the jack INPUT LINE (1).
3) Connect a microphone to the jack MIC (7).
4.2 Headphones
Headphones (impedance ≥8Ω) may be connected
to the jack PHONES (9). When connecting the
headphones, the speaker will be switched off.
4.3 Power supply
For the power supply, three alternatives are available:
1. The highest output power is reached when supply-
ing 230V~. If possible, the power supply should
therefore be made via the 230V mains. For this
purpose connect the jack 230V~ (13) via the sup-
plied mains cable to a socket (230V~/50Hz).
Slide the selector switch (11) for the supply volt-
age to position AC.
2. For mobile applications the power supply can
also be made via a car battery. For this purpose
connect the jack 12V IN (10) via the supplied
adapter cable to the cigarette lighter socket of a
car. If 1.5V batteries are inserted into the ampli-
fier, they will then be switched off. The selector
switch (11) has no importance in this case.
3. However, the amplifier can also be operated with
eight 1.5V batteries (size D). Insert the batteries
into the rear support (16), with the positive pole
and the negative pole as printed in the support.
Slide the selector switch (11) for the supply volt-
age to position DC.
If the unit is not used for a longer period (e.g.
more than a week), the batteries should be re-
moved. Thus, the amplifier remains undamaged
in case the batteries should leak.
5Operation
1) Prior to switching on, the controls VOLUME (5)
and MIC VOLUME (8) should be set to minimum
to prevent loud switching noise. Then switch on
the amplifier with the POWER switch (14).
2) For optimum tuning of the sound adjust the
VOLUME control (5) to average volume for the
time being. Set the three controls EQUALIZER
(6) to mid-position.
3) With the switch OVERDRIVE (4) select whether
the guitar sound is to be distorted (switch
pressed) or not (switch not pressed).
4) Adjust the input amplification with the control
GAIN (3). With activated distorter, it is thus possi-
ble to adjust the distortion rate. If the distorter is
switched off, [switch OVERDRIVE (4) is not
pressed], the input amplification will be limited in
such a way that the amplification can only be
adjusted in the first third part of the control range.
5) Then adjust the desired volume with the control
VOLUME (5). The adjustment also affects the
volume of a unit connected to the jack INPUT
LINE (1).
6) Adjust the desired sound with the 3-band equal-
izer (6). During the sound adjustment readjust
the input amplification GAIN (3) or the VOLUME
(5), if necessary. The sound adjustment mainly
applies to the guitar connected to the jack GUI-
TAR (2), however, it also affects the sound of the
input LINE (1) in the high range.
7) Adjust the volume for a connected microphone
with the control MIC VOLUME (8).
6 Specifications
Output power: . . . . . . . . . . . 6WRMS
Speaker: . . . . . . . . . . . . . . . 16cm (61/2"), 4Ω
Input impedance
GUITAR: . . . . . . . . . . . . . 75kΩ
LINE: . . . . . . . . . . . . . . . 175kΩ
MIC: . . . . . . . . . . . . . . . . 4.5kΩ
Ambient temperature: . . . . . 0–40°C
Power supply
Mains operation: . . . . . . . . . 230V~/50Hz/10VA
Battery operation: . . . . . . . . 8 x 1.5V size D
External 12V supply: . . . . . 12V /425mA
Dimensions: . . . . . . . . . . . . 345 x 280 x 270mm
Weight: . . . . . . . . . . . . . . . . 5.5kg
Subject to technical modification.
Caution:
Never adjust a very high headphone volume. Per-
manent high volumes may damage your hearing!
The human ear will get accustomed to high vol-
umes which do not seem to be that high any more
after some time. Therefore, do not further increase
a high volume after getting used to it.
5
GB
D
A
CH
Diese Bedienungsanleitung ist urheberrechtlich für MONACOR®INTERNATIONAL GmbH & Co. KG
geschützt. Eine Reproduktion für eigene kommerzielle Zwecke – auch auszugsweise – ist untersagt.
3. Der Verstärker kann aber auch mit acht 1,5-V-
Batterien (Monozellen) betrieben werden. Die
Batterien in die rückseitige Halterung (16), mit
dem Plus- und Minuspol wie im Halter aufge-
druckt, einsetzen. Den Umschalter (11) für die
Versorgungsspannung in die Position DC schie-
ben.
Bei längerem Nichtgebrauch (z.B. länger als
eine Woche) sollten die Batterien herausgenom-
men werden. So bleibt der Verstärker bei einem
eventuellen Auslaufen der Batterien unbeschä-
digt.
5Bedienung
1) Vor dem Einschalten sollte der Lautstärkeregler
VOLUME (5) und MIC VOLUME (8) auf Minimum
gestellt werden, um starke Einschaltgeräusche
zu vermeiden. Dann den Verstärker mit dem
Schalter POWER (14) einschalten.
2) Zur optimalen Ausregelung des Klanges zunächst
den Lautstärkeregler VOLUME (5) auf mittlere
Lautstärke einstellen. Die drei Regler zur Klang-
einstellung EQUALIZER (6) auf mittlere Position
drehen.
3) Mit dem Schalter OVERDRIVE (4) wählen, ob
der Gitarrenklang verzerrt werden soll (Schalter
gedrückt) oder nicht (Schalter nicht gedrückt).
4) Mit dem Regler GAIN (3) die Eingangsverstär-
kung einstellen. Bei aktiviertem Verzerrer lässt
sich so der Verzerrungsgrad einstellen. Ist der
Verzerrer ausgeschaltet [Schalter OVERDRIVE
(4) ist nicht gedrückt], wird die Eingangsverstär-
kung soweit begrenzt, dass nur im ersten Drittel
des Regelweges die Verstärkung einstellbar ist.
5) Dann mit dem Regler VOLUME (5) die ge-
wünschte Lautstärke einstellen. Die Einstellung
wirkt sich auch auf die Lautstärke eines an der
Buchse INPUT LINE (1) angeschlossenen Gerä-
tes aus.
6) Mit der 3-Band-Klangregelung (6) den ge-
wünschten Klangcharakter einstellen. Während
der Klangeinstellung ggf. die Eingangsverstär-
kung GAIN (3) oder die Lautstärke VOLUME (5)
korrigieren. Die Klangregelung gilt hauptsächlich
für die an der Buchse GUITAR (2) angeschlos-
sene Gitarre, beeinflusst aber im Höhenbereich
auch den Klang des Eingangs LINE (1).
7) Mit dem Regler MIC VOLUME (8) die Lautstärke
für ein angeschlossenes Mikrofon einstellen.
6Technische Daten
Sinus-Ausgangsleistung: . . 6WRMS
Lautsprecher: . . . . . . . . . . . 16cm (61/2"), 4Ω
Eingangsimpedanz
GUITAR: . . . . . . . . . . . . . 75kΩ
LINE: . . . . . . . . . . . . . . . 175kΩ
MIC: . . . . . . . . . . . . . . . . 4,5kΩ
Einsatztemperatur: . . . . . . . 0–40°C
Stromversorgung
Netzbetrieb: . . . . . . . . . . . . 230V~/50Hz/10VA
Batteriebetrieb: . . . . . . . . . . 8 x 1,5-V-Monozelle
Externe 12-V-Versorgung: . 12V /425mA
Abmessungen: . . . . . . . . . 345x280x270mm
Gewicht: . . . . . . . . . . . . . . . 5,5kg
Änderungen vorbehalten.
All rights reserved by MONACOR®INTERNATIONAL GmbH & Co. KG. No part of this instruction manual
may be reproduced in any form or by any means for any commercial use.

Ouvrez le présent livret page 3 de manière à
visualiser les éléments et branchements.
1Eléments et branchements
1Prise d’entrée INPUT LINE (jack 6,35) pour
brancher un appareil avec niveau Ligne, comme
un clavier ou un lecteur CD
2Prise d’entrée INPUT GUITAR (jack 6,35) pour
brancher une guitare électrique
3Potentiomètre de réglage d’amplification GAIN
pour régler l’amplification d’entrée ou le degré de
distorsion pour la guitare
4Interrupteur OVERDRIVE pour allumer et étein-
dre le système de distorsion pour la guitare
5Potentiomètre de réglage de volume VOLUME
pour la guitare et l’entrée Ligne (1)
6Egaliseur 3 bandes pour les graves (LOW),
médiums (MIDDLE) et aigus (HIGH)
7Prise d’entrée MIC (jack 6,35) pour brancher un
microphone
8Potentiomètre de réglage VOLUME pour le
microphone relié à la prise MIC (7)
9Prise jack 6,35 PHONES pour brancher un cas-
que stéréo (impédance minimale 8Ω);
si elle est branchée, le haut-parleur interne est
déconnecté
10 Prise de connexion pour la tension alternative
12V (batterie véhicule ou alimentation 12V) ; en
cas de branchement à cette prise, les batteries
insérées sont déconnectées.
Pour le branchement, une fiche basse tension
5,5/2,1mm (diamètre extérieur/diamètre intér-
ieur) est nécessaire, contact médian = pôle moins
11 Sélecteur DC/AC :
position DC :
alimentation via les batteries insérées
position AC :
fonctionnement secteur via la prise alimenta-
tion (13)
12 Témoin de fonctionnement
13 Prise secteur à relier au secteur 230V~/50Hz
14 Interrupteur POWER Marche/Arrêt
15 Porte fusible :
tout fusible fondu doit être remplacé uniquement
par un fusible de même type
16 Compartiment batterie pour 8 piles 1,5V de type
R20
2Conseils d’utilisation et de sécurité
Cet appareil répond à la norme 89/336/CEE relative
à la compatibilité électromagnétique et à la norme
73/23/CEE relative aux appareils à basse tension.
Respectez scrupuleusement les points suivants :
●L’appareil n’est pas résistant aux intempéries.
Protégez-le de tout type de projections d’eau, des
éclaboussures, d’une humidité élevée et de la
chaleur (plage de température de fonctionnement
autorisée : 0–40°C).
●En aucun cas, vous ne devez poser d’objet conte-
nant du liquide ou un verre sur l’appareil.
●Ne faites pas fonctionner l’appareil ou débran-
chez-le immédiatement lorsque :
1. le cordon secteur ou l’appareil présente des
dommages
2. après une chute ou accident similaire..., l’ap-
pareil peut présenter un défaut.
3. des dysfonctionnements apparaissent.
Dans tous les cas, faites appel à un technicien
spécialisé pour effectuer les réparations.
●Ne débranchez jamais l’appareil en tirant sur le
cordon secteur, tenez-le toujours par la prise.
●Pour nettoyer l’appareil, utilisez uniquement un
chiffon sec et doux, en aucun cas de produit chi-
mique ou d’eau.
●Ne jetez pas les batteries usagées dans la pou-
belle domestique, déposez-les dans un container
spécifique ou chez votre détaillant.
●Nous déclinons toute responsabilité en cas de
dommages matériels ou corporels résultants si
l’appareil est utilisé dans un but autre que celui
pour lequel il a été conçu, s’il n’est pas correcte-
ment branché, utilisé ou réparé par un technicien
habilité ; en outre, la garantie deviendrait caduque.
3Possibilités de branchements et
équipement
Le GAB-66DC est un amplificateur guitare portatif
pour une utilisation sur de petites scènes, comme
amplificateur d’entraînement ou pour une utilisation
mobile dans la rue. Les trois possibilités d’alimenta-
tion qu’il propose (fonctionnement secteur, batterie
et alimentation 12V, par exemple dans un véhicule)
contribuent à sa diversité d’utilisations. Son design
en biseau permet de le positionner verticalement ou
incliné vers le haut. Avec les entrées supplémentai-
res pour un microphone et un appareil à sortie
Ligne, on peut amplifier simultanément par exemple
une guitare, un chant, ou un play-back depuis un
CD. Pour un entraînement silencieux, une conne-
xion casque est prévue.
4Branchements
Les branchements ne doivent être effectués que
lorsque l’amplificateur guitare est éteint.
Lorsque l’appareil est définitivement
retiré du service, vous devez le déposer
dans une usine de recyclage de proxi-
mité pour contribuer à son élimination
non polluante.
Attention ! L’appareil est alimenté par une tension
230V~, dangereuse. Ne faites jamais
de modification sur l’appareil. En cas
de mauvaise manipulation vous pour-
riez subir une décharge électrique
dangereuse. En outre, l’ouverture de
l’appareil rend tout droit à la garantie
caduque.
Vi preghiamo di aprire completamente la pagina 3.
Così vedrete sempre gli elementi di comando e i
collegamenti descritti.
1Elementi di comando e collegamenti
1Presa d’ingresso INPUT LINE (jack 6,3mm) per
il collegamento di un apparecchio con livello
Line, p.es. keyboard o lettore CD
2Presa d’ingresso INPUT GUITAR (jack 6,3mm)
per il collegamento di una chitarra elettrica
3Regolatore d’amplificazione GAIN per impostare
l’amplificazione all’ingresso o il grado di distor-
sione della chitarra
4Interruttore OVERDRIVE per attivare o disatti-
vare la distorsione per la chitarra
5Regolatore VOLUME per la chitarra e per l’in-
gresso Line (1)
6Regolazione toni a 3 frequenze (equalizer) per
bassi (LOW), medi (MIDDLE) e alti (HIGH)
7Presa d’ingresso MIC (jack 6,3mm) per il colle-
gamento di un microfono
8Regolatore VOLUME per il microfono collegato
con MIC (7)
9Jack 6,3mm PHONES per il collegamento di una
cuffia stereo (impedenza min. 8Ω);
se collegata, l’altoparlante interno viene disatti-
vato
10 Presa per l’alimentazione alternativa 12V (batte-
ria dell’auto o alimentatore 12V); se à attiva tale
presa, le batterie interne vengono staccate;
per il collegamento è richiesta una spina per ali-
mentazione DC 5,5/2,1mm (diametro esterno/
interno), contatto centrale = polo negativo
11 Commutatore DC/AC:
posizione DC:
alimentazione tramite batterie interne
posizione AC:
funzionamento a rete tramite presa rete (13)
12 Spia di funzionamento
13 Presa di rete per il collegamento con 230V~/
50Hz
14 Interruttore on/off POWER
15 Portafusibile;
sostituire un fusibile difettoso sempre con uno
dello stesso tipo
16 Portabatterie per otto batterie 1,5V tipo torcia
2Avvertenze di sicurezza
Quest’apparecchio è conforme alle direttive CE
89/336/CEE sulla compatibilità elettromagnetica e
73/23/CEE per apparecchi a bassa tensione.
Durante l’uso si devono osservare assolutamente i
seguenti punti:
●L’apparecchio non è resistente alle intemperie.
Proteggerlo dall’acqua gocciolante e dagli spruzzi
d’acqua, da alta umidità dell’aria e dal calore (tem-
peratura d’impiego ammessa fra 0 e 40°C).
●Non depositare sull’apparecchio dei contenitori
riempiti di liquidi, p.es. bicchieri.
●Non mettere in funzione l’apparecchio e staccare
subito la spina rete se:
1. l’apparecchio o il cavo rete presentano dei
danni visibili;
2. dopo una caduta o dopo eventi simili sussiste il
sospetto di un difetto;
3. l’apparecchio non funziona correttamente.
Per la riparazione rivolgersi sempre ad un’officina
competente.
●Staccare il cavo rete afferrando la spina, senza ti-
rare il cavo.
●Per la pulizia usare solo un panno morbido,
asciutto; non impiegare in nessun caso prodotti
chimici o acqua.
●Non gettare le batterie scariche nelle immondizie
di casa bensì negli appositi contenitori (p.es.
presso il vostro rivenditore).
●Nel caso d’uso improprio, di collegamenti sba-
gliati, d’impiego scorretto o di riparazione non a
regola d’arte dell’apparecchio, non si assume
nessuna responsabilità per eventuali danni con-
sequenziali a persone o a cose e non si assume
nessuna garanzia per lo strumento.
3Possibilità d’impiego e equipaggia-
mento
Il GAB-66DC è un amplificatore maneggevole per
chitarre per l’impiego in piccoli teatri, per esercita-
zioni oppure per impieghi mobili per la strada. La
sua universalità è aumentata dalle tre possibilità di
alimentazione (rete, batteria e 12V, p.es. dall’auto-
mobile). Il suo piano obliquo permette una sistema-
zione verticale o angolata verso l’alto. Con gli in-
gressi supplementari per un microfono e uno
strumento con uscita Line, è possibile amplificare
contemporaneamente p.es. una chitarra, canto e
playback da un CD. Per le prove senza disturbare è
disponibile il collegamento per una cuffia.
4Effettuare i collegamenti
Tutti i collegamenti si devono eseguire solo con
l’amplificatore spento.
Se si desidera eliminare l’apparecchio
definitivamente, consegnarlo per lo
smaltimento ad un’istituzione locale per
il riciclaggio.
Attenzione! L’apparecchio funziona con perico-
losa tensione di rete (230V~). Non in-
tervenire mai al suo interno. La mani-
polazione scorretta può provocare
delle scariche pericolose. Se l’appa-
recchio viene aperto, cessa ogni
diritto di garanzia.
6
I
F
B
CH

4.1 Sources de signal
1) Reliez la guitare à la prise d’entrée INPUT GUI-
TAR (2).
2) Reliez un appareil à niveau ligne (par exemple
clavier ou lecteur CD) à la prise INPUT LINE (1).
3) Reliez un microphone à la prise MIC (7).
4.2 Casque
Un casque (impédance ≥8Ω) peut être relié à la
prise PHONES (9). Si le casque est branché, le
haut-parleur est déconnecté.
4.3 Alimentation
Trois possibilités s’offrent à vous pour choisir l’ali-
mentation :
1. La puissance de sortie la plus grande est atteinte
avec l’alimentation 230V~. Si cela est possible,
l’alimentation devrait se faire via le secteur
230V~. Reliez la prise 230V~ (13) via le cordon
secteur livré à une prise 230V~/50Hz. Poussez
le sélecteur (11) pour la tension d’alimentation
sur la position AC.
2. Dans le cadre d’une utilisation mobile, l’alimenta-
tion peut également s’effectuer via une batterie
de véhicule. Pour ce faire, reliez la prise 12V IN
(10) via le cordon adaptateur livré, à un allume-
cigares de la voiture. Si des batteries 1,5V sont
placées dans l’amplificateur, elles sont alors
déconnectées. Le sélecteur (11) n’a pas d’utilité.
3. L’amplificateur peut également fonctionner avec
huit batteries 1,5V de type R20. Placez les batte-
ries dans le support arrière (16) en respectant le
pôle plus et le pôle moins comme indiqué dans le
support. Poussez le sélecteur (11) pour la tension
d’alimentation sur la position DC.
En cas de non utilisation prolongée, (p.ex. supé-
rieure à une semaine), il convient de retirer les
batteries, elles pourraient couler et endommager
l’amplificateur.
5Utilisation
1) Avant d’allumer, il convient de mettre les régla-
ges de volume VOLUME (5) et MIC VOLUME (8)
sur le minimum de manière à éviter tout bruit fort
lors de l’allumage.Allumez ensuite l’amplificateur
avec l’interrupteur POWER (14).
2) Pour un réglage optimal du son, réglez tout d’a-
bord le réglage de VOLUME (5) sur le volume
moyen. Tournez les trois réglages de l’égaliseur
EQUALIZER (6) sur la position médiane.
3) Avec l’interrupteur OVERDRIVE (4), sélection-
nez si le son de la guitare doit être distordu (inter-
rupteur enfoncé) ou non (interrupteur non
enfoncé).
4) Avec le réglage GAIN (3), réglez l’amplification
d’entrée. Si l’OVERDRIVE (système de distor-
sion) est activé, on peut régler le degré de distor-
sion. S’il est déconnecté [interrupteur OVER-
DRIVE (4) non enfoncé], l’amplification d’entrée
est limitée de telle sorte que l’amplification ne
puisse être réglée que dans le premier tiers de la
plage de réglage.
5) Réglez ensuite le volume souhaité avec le poten-
tiomètre VOLUME (5). Le réglage agit également
sur le volume d’un appareil relié à la prise INPUT
LINE (1).
6) Avec l’égaliseur 3 bandes (6), réglez le son
voulu. Pendant le réglage de tonalité, corrigez, si
besoin, l’amplification d’entrée GAIN (3) ou le
volume VOLUME (5). Le réglage de tonalité vaut
essentiellement pour la guitare reliée à la prise
GUITAR (2), mais il influence également la tona-
lité de l’entrée LINE (1) dans la plage des aigus.
7) Avec le réglage MIC VOLUME (8), réglez le
volume pour le microphone relié.
6Caractéristiques techniques
Puissance de sortie RMS : . 6WRMS
Haut-parleur : . . . . . . . . . . . 16cm (61/2"), 4Ω
Impédance d’entrée
GUITAR : . . . . . . . . . . . . 75kΩ
LINE : . . . . . . . . . . . . . . . 175kΩ
MIC : . . . . . . . . . . . . . . . . 4,5kΩ
Température fonc. : . . . . . . 0–40°C
Alimentation
Fonctionnement secteur : . . 230V~/50Hz/10VA
Fonctionnement batterie : . . 8 x pile 1,5V, type
R20
Alimentation 12V externe : . 12V /425mA
Dimensions : . . . . . . . . . . . . 345 x 280 x 270mm
Poids : . . . . . . . . . . . . . . . . 5,5kg
Tout droit de modification réservé.
Attention :
Si vous utilisez un casque, ne réglez jamais le
volume de manière très élevée. Un volume trop
élevé peut, à long terme, générer des troubles de
l’audition. L’oreille humaine s’habitue à des volu-
mes élevés et ne les perçoit plus comme tels au
bout d’un certain temps. Nous vous conseillons
donc de régler le volume et de ne plus l’augmenter.
4.1 Sorgenti dei segnali
1) Collegare la chitarra con la presa d’ingresso
INPUT GUITAR (2).
2) Collegare un apparecchio con livello Line (p.es.
keyboard o lettore CD) con la presa INPUT
LINE (1).
3) Collegare un microfono con la presa MIC (7).
4.2 Cuffia
Alla presa PHONES (9) è possibile collegare una
cuffia (impedenza ≥8Ω). Se è collegata la cuffia,
l’altoparlante viene disattivato.
4.3 Alimentazione
Per l’alimentazione sono disponibili tre alternative:
1. La massima potenza d’uscita si ottiene con l’ali-
mentazione a 230V~. È quindi consigliabile
usare tale alimentazione ove possibile, collegan-
do la presa 230V~ (13) con una presa (230V~/
50Hz) servendosi del cavo di collegamento in
dotazione. Portare il commutatore per l’alimenta-
zione (11) in posizione AC.
2. Nell’impiego mobile, l’alimentazione può essere
effettuata anche attraverso la batteria dell’auto.
In tal caso collegare la presa 12V IN (10) con
l’accendisigaro dell’auto servendosi del cavo
adattatore in dotazione. Le batterie 1,5V even-
tualmente inseriti vengono in questo caso disatti-
vate. Il commutatore (11) è privo di importanza in
tal caso.
3. L’amplificatore può essere alimentato anche con
8 batterie 1,5V tipo torcia. Inserire le batterie nel
supporto sul retro (16) rispettando la polarità
come segnata sul porta batterie. Portare il com-
mutatore per l’alimentazione (11) in posizione
DC.
Se l’amplificatore non viene utilizzato per un tem-
po prolungato (p.es. oltre una settimana) con-
viene togliere le batterie per evitare che perdano,
danneggiando l’amplificatore.
5Funzionamento
1) Prima dell’accensione portare i regolatori VOLU-
ME (5) e MIC VOLUME (8) sul minimo per esclu-
dere forti rumori di commutazione. Quindi accen-
dere l’amplificatore con l’interruttore POWER (14).
2) Per una regolazione ottimale del suono, portare
inizialmente il regolatore VOLUME (5) su un
valore medio. Quindi portare anche i tre regola-
tori dei toni EQUALIZER (6) in posizione media.
3) Con l’interruttore OVERDRIVE (4) si può deci-
dere se è preferibile la distorsione del suono
della chitarra (interruttore premuto) o non (inter-
ruttore non premuto).
4) Con il regolatore GAIN (3) si imposta l’amplifica-
zione all’ingresso. Se la distorsione è attiva, si
può, in questo modo, regolare il grado di distor-
sione. Se la distorsione è disattivata [l’interruttore
OVERDRIVE (4) non è premuto], l’amplificazione
all’ingresso viene limitata al punto che una rego-
lazione dell’amplificazione è possibile solo nel
primo terzo della corsa del regolatore.
5) Quindi impostare il volume desiderato con il re-
golatore VOLUME (5). La regolazione ha effetto
anche sul volume di un apparecchio collegato
alla presa INPUT LINE (1).
6) Con la regolazione dei toni a 3 frequenze (6) si im-
posta il carattere sonoro desiderato. Durante la
regolazione del suono occorre eventualmente
correggere l’amplificazione all’ingresso GAIN (3)
o il volume con il regolatore VOLUME (5). La re-
golazione dei toni vale in primo luogo per la chitar-
ra collegata con la presa GUITAR (2), ma influen-
za anche, negli alti, il suono dell’ingresso LINE (1).
7) Impostare il volume di un microfono collegato per
mezzo del regolatore MIC VOLUME (8).
6Dati tecnici
Potenza efficace: . . . . . . . . 6WRMS
Altoparlante: . . . . . . . . . . . . 16cm (61/2"), 4Ω
Impedenza all’ingresso
GUITAR: . . . . . . . . . . . . . 75kΩ
LINE: . . . . . . . . . . . . . . . 175kΩ
MIC: . . . . . . . . . . . . . . . . 4,5kΩ
Temperatura d’esercizio: . . 0–40°C
Alimentazione
Funzionamento a rete: . . . . 230V~/50Hz/10VA
Funzionamento a batterie: . 8 x batterie 1,5V tipo
torcia
Alimentazione esterna 12V: 12V /425mA
Dimensioni: . . . . . . . . . . . . 345 x 280 x 270mm
Peso: . . . . . . . . . . . . . . . . . 5,5kg
Con riserva di modifiche tecniche.
Attenzione:
Mai tenere molto alto il volume nelle cuffie.A lungo
andare, il volume eccessivo può procurare danni
all’udito! L’orecchio si abitua agli alti volumi e dopo
un certo tempo non se ne rende più conto. Non
aumentare il volume successivamente.
7
I
F
B
CH
Notice d’utilisation protégée par le copyright de MONACOR ®INTERNATIONAL GmbH & Co. KG. Toute
reproduction même partielle à des fins commerciales est interdite.
La MONACOR®INTERNATIONAL GmbH & Co. KG si riserva ogni diritto di elaborazione in qualsiasi forma
delle presenti istruzioni per l’uso. La riproduzione–anche parziale–per propri scopi commerciali è vietata.

Vouw bladzijde 3 helemaal open, zodat u steeds
een overzicht hebt van de bedieningselementen
en de aansluitingen.
1Overzicht van de bedieningselemen-
ten en aansluitingen
1Ingangsjack INPUT LINE (6,3mm-jack) voor
aansluiting van een apparaat met lijnniveau, b.v.
een keyboard of cd-speler
2Ingangsjack INPUT GUITAR (6,3mm-jack) voor
aansluiting van een elektrische gitaar
3Versterkingsregelaar GAIN voor het instellen van
de ingangsversterking resp. van de vervormings-
graad voor de gitaar
4Schakelaar OVERDRIVE voor het in- en uitscha-
kelen van de vervormer voor de gitaar
5Volumeregelaar VOLUME voor de gitaar en de
lijningang (1)
63-bandse equalizer voor lage tonen (LOW), mid-
dentonen (MIDDLE) en hoge tonen (HIGH)
7Ingangsjack MIC (6,3mm-jack) voor aansluiting
van een microfoon
8Volumeregelaar VOLUME voor de microfoon
aangesloten op MIC (7)
96,3mm-stekkerbus PHONES voor de aansluit-
ing van een stereohoofdtelefoon (impedantie
min. 8Ω);
bij de aansluiting schakelt de interne luidspreker
uit
10 Aansluitingsjack voor alternatieve voedingsspan-
ning van 12V (autobatterij of netadapter van
12V); bij de aansluiting op deze jack worden de
gebruikte batterijen uitgeschakeld;
voor de aansluiting hebt u een laagspanning-
sstekker 5,5/2,1mm (buiten-/binnendiameter)
nodig, centercontact = negatieve pool
11 Keuzeschakelaar DC/AC:
Stand DC:
Voeding door batterijen die in de betreffende
houder zijn aangebracht.
Stand AC:
Netvoeding via netaansluiting (13)
12 POWER-LED
13 Jack voor aansluiting op de netstroom 230V~/
50Hz
14 POWER-schakelaar
15 Houder voor de netzekering;
ervang een gesmolten zekering uitsluitend door
een zekering van hetzelfde type
16 Batterijhouder voor acht monocellen van 1,5V
2Veiligheidsvoorschriften
Dit apparaat is in overeenstemming met de EU-richt-
lijn 89/336/EWG voor elektromagnetische compati-
biliteit en nr. 73/23/EWG voor toestellen op laag-
spanning.
Let eveneens op het volgende:
●Het apparaat is niet weerbestendig. Vermijd druip-
en spatwater, uitzonderlijk warme plaatsen en
plaatsen met een hoge vochtigheid (toegestaan
omgevingstemperatuurbereik: 0–40°C).
●Plaats geen bekers met vloeistof zoals drinkgla-
zen etc. op het apparaat.
●Schakel het apparaat niet in resp. trek onmiddel-
lijk de stekker uit het stopcontact:
1. wanneer het apparaat of het netsnoer zichtbaar
beschadigd is,
2. wanneer er een defect zou kunnen optreden
nadat het apparaat bijvoorbeeld is gevallen,
3. wanneer het apparaat slecht functioneert.
Het apparaat moet in elk geval hersteld worden
door een gekwalificeerd vakman.
●Trek de stekker nooit met het snoer uit het stop-
contact, maar met de stekker zelf.
●Verwijder het stof met een droge, zachte doek.
Gebruik zeker geen water of chemicaliën.
●Geef lege of defecte batterijen niet met het
gewone huisvuil mee, maar verwijder ze als KGA
(bijvoorbeeld de inzamelbox in de gespeciali-
seerde elektrozaak).
●In geval van ongeoorloofd of verkeerd gebruik,
verkeerde aansluiting, foutieve bediening of van
herstelling door een niet-gekwalificeerd persoon
vervalt de garantie en de verantwoordelijkheid
voor hieruit resulterende materiële of lichamelijke
schade.
3Toepassingen en uitrusting
De GAB-66DC is een handige gitaarversterker voor
gebruik op kleine podia, tijdens oefensessies of voor
mobiel gebruik op straat. Zijn veelzijdigheid wordt
ondersteund door de drie mogelijke manieren van
stroomvoorziening (netvoeding, batterijvoeding en
12V-voeding, b.v. van de auto) Door zijn afge-
schuinde vormgeving kunt u de versterker verticaal
of naar boven gekanteld opstellen. Met de bijko-
mende ingangen voor een microfoon en een appa-
raat met lijnuitgang kunnen b.v. gitaar, zang en play-
back van een cd tegelijk worden versterkt. Voor een
stille oefensessie kunt u gebruik maken van de
hoofdtelefoonaansluiting.
4Het toestel aansluiten
De in- en uitgangen mogen pas worden aangeslo-
ten, als de versterker is uitgeschakeld.
Wanneer het apparaat definitief uit
bedrijf wordt genomen, bezorg het dan
voor milieuvriendelijke verwerking aan
een plaatselijk recyclagebedrijf.
Opgelet! De netspanning (230 V~) van het appa-
raat is levensgevaarlijk. Open het appa-
raat niet, want door onzorgvuldige ingre-
pen loopt u het risico van elektrische
schokken. Bovendien vervalt elke garan-
tie bij het eigenhandig openen van het
apparaat.
Abrir el presente libro página 3 de manera a
visualizar los elementos y las conexiones.
1Elementos conexiones
1Toma de entrada INPUT LINE (jack 6,35) para
conectar un aparato con nivel línea, como un
teclado o un lector CD.
2Toma de entrada INPUT GUITAR (jack 6,35)
para conectar una guitarra eléctrica.
3Potenciómetro de amplificación GAIN para regu-
lar la amplificación de entrada o el grado de
distorsión para la guitarra.
4Interruptor OVERDRIVE para encender y apa-
gar el sistema de distorsión para la guitarra.
5Potenciómetro de volumen VOLUME para la gui-
tarra y la entrada línea (1)
6Ecualizador 3 bandas para los graves (LOW),
medios (MIDDLE) y agudos (HIGH)
7Toma de entrada MIC (jack 6,35) para conectar
un micro.
8Potenciómetro VOLUME para el micro conec-
tado a la toma MIC (7).
9Toma jack 6,35 PHONES para conectar un auri-
cular estéreo (impedancia mínima 8Ω); si está
conectada, el altavoz interno está desconec-
tado.
10 Toma de conexión para la tensión alternativa
12V (batería de coche o alimentación 12V); en
caso de conexión a esta toma, las baterías in-
sertadas están desconectadas.
Para la conexión, una toma de baja tensión
5,5/2,1mm (diámetro exterior/diámetro interior)
es necesario, contacto medio = polo negativo.
11 Selector DC/AC:
Posición DC:alimentación vía las baterías inser-
tadas.
Posición AC: funcionamiento de red vía la toma
alimentación (13).
12 Testigo de funcionamiento.
13 Toma de red a conectar a la red 230V~/50Hz.
14 Interruptor POWER Marcha/Paro.
15 Portafusible:
todo fusible fundido debe cambiarse solamente
por uno de mismo tipo.
16 Compartimiento batería para 8 baterías 1,5V de
tipo R20.
2Consejos de utilización y de seguridad
Este aparato cumple con la normativa europea
89/336/CEE relativa a la compatibilidad electroma-
gnética y con la normativa 73/23/CEE relativa a los
aparatos de baja tensión.
Respecte escrupulosamente los puntos siguientes:
●El aparato no es resistente a las intemperies.
Protéjalo de todo tipo de proyecciones de agua,
de salpicaduras, de una humedad elevada y del
calor (temperatura de funcionamiento autorizada:
0–40°C).
●No deposite en ningún caso objetos que contienen
líquidos o un vaso de agua encima del aparato.
●No deje funcionar el aparato o desconéctelo
inmediatamente de la red cuando:
1. Aparecen daños en el aparato o el cable de
conexión,
2. Después de una caída o caso similar, si el apa-
rato presenta un defecto.
3. Aparecen disfunciones.
En todos los casos los daños deben ser repara-
dos por un técnico especializado.
●No desconecte nunca el aparato tirando directa-
mente del cable de conexión; saque siempre el
cable sujetándolo por la extremidad.
●Para limpiar el aparato, utilice únicamente un
trapo seco y suave, no utilice nunca productos
químicos o agua.
●No tire las baterías usadas en basuras domésti-
cas, deposítelas en un container específico o
devuélvalas a su vendedor.
●Declinamos cualquier responsabilidad en caso de
desperfectos materiales o corporales resultandos
si el aparato es utilizado para otro fin que no sea
por el que ha sido concebido, si no está correcta-
mente conectado, utilizado o reparado por una
persona debidamente habilitada; además
carecería de todo tipo de garantía.
3Posibilidades de conexión e equipa-
miento
El GAB-66DC es un amplificador de guitarra portátil,
se puede utilizar en pequeños escenarios, como
amplificador para efectuar prácticas o para una uti-
lización móvil en la calle. Las tres posibilidades de
alimentación que propone (funcionamiento con red,
batería y alimentación 12V, p.ej. en un coche) con-
tribuyen a su diversidad de utilizaciones. Su diseño
en bisel permite de instalarlo verticalmente o de in-
clinarlo hacia arriba. Con las entradas suplementa-
rias para un micro y un aparato con salida línea,
puede amplificar simultáneamente p.e. una guitarra,
canto, o un play-back desde un CD. Para una prác-
tica silenciosa, está prevista una conexión auricular.
4Conexiones
Las conexiones deben efectuarse únicamente
cuando el amplificador de guitarra está apagado.
Cuando el aparato se retira definitiva-
mente del circuito de distribución, debe
depositarse en una fábrica de reciclaje
adaptada para su eliminación no conta-
minante.
¡Atención! El aparato está alimentado por una
tensión de 230V~, peligrosa. No haga
nunca modificaciones sobre el apa-
rato, podría sufrir una descarga eléc-
trica. Además, la apertura del aparato
carecería de todo tipo de garantía.
8
E
NL
B

4.1 Signaalbronnen
1) Sluit de gitaar aan op de ingangsjack INPUT
GUITAR (2).
2) Sluit een apparaat met lijnniveau (b.v. keyboard
of cd-speler) aan op de jack INPUT LINE (1).
3) Sluit een microfoon aan op de jack MIC (7).
4.2 Hoofdtelefoon
U kunt een hoofdtelefoon (impedantie ≥8Ω) op de
jack PHONES (9) aansluiten. Bij aansluiting van de
hoofdtelefoon wordt de luidspreker uitgeschakeld.
4.3 Voedingsspanning
Voor de voedingsspanning kunt u kiezen uit drie
alternatieven:
1. Het hoogste uitgangsvermogen wordt bereikt bij
de voeding met netstroom van 230V~. Daarom
moet u de versterker indien mogelijk aansluiten
op het stroomnet (230 V). Verbind hiervoor de
jack 230V~ (13) via de bijgeleverde netverbin-
dingskabel met een stopcontact (230V~/50Hz).
Zet de keuzeschakelaar (11) voor de voedings-
spanning in de stand AC.
2. Voor het mobiele gebruik kan de voedingsspan-
ning ook van de autobatterij komen. Sluit hier-
voor de jack 12 V IN (10) via de bijgeleverde
adapterkabel aan op de sigarettenaansteker van
een auto. Eventueel in de versterker aange-
brachte batterijen van 1,5 V worden hierbij uitge-
schakeld. De stand van de keuzeschakelaar (11)
heeft hier geen invloed.
3. De versterker kan echter ook met acht batterijen
van 1,5V (monocellen) worden gevoed. Breng
de batterijen aan in de houder aan de achterzijde
(16) met de positieve en negatieve aansluitingen
zoals in de houder voorgedrukt. Schuif de keuze-
schakelaar (11) voor de voedingsspanning in de
stand DC.
Neem de batterijen uit de versterker, indien u hem
langere tijd niet gebruikt (b.v. langer dan een week).
Zo blijft de versterker onbeschadigd bij eventueel
uitlopen van de batterijen.
5Bediening
1) Plaats de volumeregelaar VOLUME (5) en MIC
VOLUME (8) in de minimumstand, alvorens in te
schakelen. Zo vermijdt u inschakelploppen.
Schakel de versterker vervolgens met de
POWER-schakelaar (14) in.
2) Om klank optimaal af te regelen, moet u eerst de
volumeregelaar VOLUME (5) in de middelste
stand zetten. Draai de drie klankregelaars van de
EQUALIZER (6) in de middelste stand.
3) Selecteer met de schakelaar OVERDRIVE (4) of
het gitaargeluid moet worden vervormd (schake-
laar ingedrukt) of niet (schakelaar niet ingedrukt).
4) Stel met de regelaar GAIN (3) de ingangsversterk-
ing in. Bij ingeschakelde vervormer kunt u de
graad van vervorming instellen. Als de vervormer
is uitgeschakeld [schakelaar OVERDRIVE (4) is
niet ingedrukt], wordt de ingangsversterking in die
mate beperkt dat alleen in het eerste derde van de
regelweg de versterking kan worden ingesteld.
5) Stel dan met de volumeregelaar VOLUME (5) het
gewenste geluidsvolume in. De instelling heeft
ook invloed op het volume van een apparaat dat
op de jack INPUT LINE (1) is aangesloten.
6) Stel met de 3-bandse equalizer (6) het gewenste
klankbeeld in. Tijdens het instellen van de klank
moet u zo nodig de ingangsversterking GAIN (3)
of het geluidsvolume VOLUME (5) corrigeren.
Het regelen van de klank geldt hoofdzakelijk voor
de gitaar die op de jack GUITAR (2) is aangeslo-
ten, maar beïnvloedt in het hogetonenbereik ook
de klank van de ingang LINE (1).
7) Stel met de regelaar MIC VOLUME (8) het ge-
luidsvolume in voor een aangesloten microfoon.
6Technische gegevens
Uitgangsvermogen RMS: . . 6WRMS
Luidspreker: . . . . . . . . . . . . 16cm (61/2"), 4Ω
Ingangsimpedantie
GUITAR: . . . . . . . . . . . . . 75kΩ
LINE: . . . . . . . . . . . . . . . 175kΩ
MIC: . . . . . . . . . . . . . . . . 4,5kΩ
Omgevingstemperatuur: . . . 0–40°C
Voedingsspanning
Netvoeding: . . . . . . . . . . . . 230V~/50Hz/10VA
Batterijvoeding: . . . . . . . . . . 8 monocellen van
1,5V
Externe voeding van 12V: . 12V /425mA
Afmetingen: . . . . . . . . . . . . 345 x 280 x 270mm
Gewicht: . . . . . . . . . . . . . . . 5,5kg
Wijzigingen voorbehouden.
Opgelet:
Stel het volume nooit te hoog in als u een hoofdte-
lefoon gebruikt. Langdurige blootstelling aan hoge
volumes kan het gehoor beschadigen! Het gehoor
raakt aangepast aan hoge volumes die na een
tijdje niet meer zo hoog lijken. Verhoog daarom het
volume niet nog meer, nadat u er gewoon aan bent
geraakt.
4.1 Fuentes de señal
1) Conecte la guitarra a la entrada INPUT GUI-
TAR (2).
2) Conecte un aparato con nivel línea (p.ej. teclado
o lector CD) a la toma INPUT LINE (1).
3) Conecte un micro a la toma MIC (7).
4.2 Auricular
Un auricular (impedancia ≥8Ω) puede conectarse a
la toma PHONES (9). Si el auricular está conectado,
el altavoz está desconectado.
4.3 Alimentación
Tres posibilidades se ofrecen para elegir el tipo de
alimentación:
1. La potencia de salida la más grande se alcanza
con la alimentación 230V~. Si es posible, la ali-
mentación debería hacerse a través de la red
230V~. Conecte la toma 230V~ (13) vía el cable
de conexión entregado a un enchufe 230V~/
50Hz. Pulse el selector (11) para la tensión de
alimentación en la posición AC.
2. En el caso de una utilización móvil, la alimenta-
ción puede también efectuarse vía una batería
de coche. Conecte la toma 12V IN (10) vía el
cable adaptador entregado, a un enciende
cigarro del coche. Si las baterías de 1,5V están
colocadas en el amplificador, están entonces
desconectadas. El selector (11) no tiene utilidad.
3. El amplificador también puede funcionar con
8baterías de 1,5V de tipo R20. Coloque las
baterías en el soporte trasero (16) respetando el
polo positivo y polo negativo como indicado den-
tro del soporte. Pulse el selector (11) para la ten-
sión de alimentación en la posición DC.
En caso de no utilizar el aparato durante un tiempo
prolongado, (p.ej. superior a una semana), con-
viene sacar las baterías, podrían vaciarse y dañar el
amplificador.
5Utilización
1) Antes de conectar, conviene poner los reglajes
de volumen VOLUME (5) y MIC VOLUME (8) en
la posición mínima de manera a evitar todo ruido
fuerte durante la conexión. Encienda después el
amplificador con el interruptor POWER (14).
2) Para un reglaje óptimo del sonido, regule antes
de todo el potenciómetro de volumen (5) sobre el
volumen medio. Gire los tres reglajes del ecua-
lizador EQUALIZER (6) en la posición mediana.
3) Con el interruptor OVERDRIVE (4), seleccione si
el sonido de la guitarra debe distorsionarse (in-
terruptor pulsado) o no (interruptor no pulsado).
4) Con el potenciómetro GAIN (3), regule la amplifi-
cación de entrada. Si el OVERDRIVE está acti-
vado, puede regular el grado de distorsión. Si
está desconectado [interruptor OVERDRIVE (4)
no pulsado], la amplificación de entrada está limi-
tada de manera a que la amplificación pueda
regularse únicamente en el primer tercio de la
zona de reglaje.
5) Regule después el volumen deseado con el
potenciómetro VOLUME (5). El reglaje actúa
también sobre el volumen de un aparato conec-
tado a la toma INPUT LINE (1).
6) Con el ecualizador 3 bandas (6), regule el sonido
deseado. Durante el reglaje de tonalidad, corrija,
si es necesario, la amplificación de entrada GAIN
(3) o el volumen VOLUME (5). El reglaje de tona-
lidad vale esencialmente para la guitarra conec-
tada a la toma GUITAR (2), influye también la
tonalidad de la entrada LINE (1) en la zona de los
agudos.
7) Con el reglaje MIC VOLUME (8), regule el volu-
men para un micro conectado.
6Características técnicas
Potencia de salida RMS: . . 6 WRMS
Altavoz: . . . . . . . . . . . . . . . . 16cm. (61/2"), 4Ω
Impedancia de entrada
GUITAR: . . . . . . . . . . . . . 75kΩ
LINE: . . . . . . . . . . . . . . . 175kΩ
MIC: . . . . . . . . . . . . . . . . 4,5kΩ
Temperatura de
funcionamiento: . . . . . . . . . 0–40°C
Alimentación
Funcionamiento de red: . . . 230V~/50Hz/10VA
Funcionamiento batería: . . . 8 x baterías 1,5V,
tipo R20
Alimentación 12V externa: . 12V / 425mA
Dimensiones: . . . . . . . . . . . 345 x 280 x 270mm
Peso: . . . . . . . . . . . . . . . . . 5,5kg.
Nos reservamos el derecho de modificación.
¡Atención! Si utiliza un auricular, no regule nunca
el volumen de manera muy elevada. Un volumen
demasiado elevado puede, a lo largo del tiempo,
provocar problemas de audición. La oreja humana
se acostumbra a volúmenes elevados y acaba por
no percibirlos como tales al cabo de un tiempo. Le
aconsejamos entonces de regular el volumen y de
no aumentarlo más.
9
E
NL
B
Manual de instrucciones protegido por el copyright de MONACOR®INTERNATIONAL GmbH & Co. KG.
Toda reproducción mismo parcial con fines comerciales está prohibida.
Deze gebruiksaanwijzing is auteursrechterlijk beschermd voor MONACOR®INTERNATIONAL GmbH &
Co. KG. Reproductie voor eigen commerciële doeleinden – ook bij wijze van uitzondering – is niet toegestaan.

Prosimy o otworzenie instrukcji na stronie 3,
gdzie znajdą Państwo opisywane elementy
sterujące i gniazda połączeniowe.
1Elementy i Połączenia
1Gniazdo typu duży jack (6,3 mm) INPUT LINE
do podłączania urządzeń o liniowym poziomie
np. keyboard lub odtwarzacz CD
2Gniazdo typu duży jack (6,3 mm) INPUT GUI-
TAR do podłączenia gitary elektrycznej
3Regulator GAIN do ustawiania wzmocnienia
wejściowego lub stopnia zniekształcenia
4Włącznik OVERDRIVE do włączania i wyłączania
efektu
5Regulator głośności VOLUME dla gitary i
wejścia liniowego (1)
63-Punktowy korektor: LOW, MIDDLE, HIGH
7Gniazdo mikrofonowe MIC (typu jack 6,3 mm)
do podłączania mikrofonu
8Regulator głośności VOLUME dla mikrofonu
podłączanego do wejścia MIC (7)
9Gniazdo PHONES do podłączania słuchawek
stereofonicznych (minimalna impedancja 8 Ω);
podczas podłączania słuchawek wewnętrzny
głośnik wyłączy się
10 Gniazdo dla alternatywnego zasilania 12 V
(akumulator samochodowy lub zasilacz 12 V);
po podłączeniu do tego gniazda, wewnętrzne
zasilanie zostaje wyłączone;
do podłączenia, wymagana jest wtyczka nisko-
napięciowa 5,5/2,1 mm (średnica zewnętrzna/
wewnętrzna) styk wewnętrzny= biegun ujemny
11 Przełącznik prąd stały/zmienny:
pozycja DC/prąd stały:
zasilanie z włożonych baterii
pozycja DC/prąd zmienny:
zasilanie zewnętrzne przez gniazdo (13)
12 Wskaźnik zasilania
13 Gniazdo zasilania 230 V~/50Hz
14 Włącznik główny
15 Obudowa głównego bezpiecznika;
Należy wymieniać tylko na bezpiecznik tego
samego typu
16 Obudowa na osiem baterii 1,5 V (rozmiar D)
2Informacje dotyczące bezpieczeń-
stwa
To urządzenie podlega wytycznym i normom dla
urządzeń zgodnych z 89/336/EEC i spełnia wyma-
gania dla urządzeń niskonapięciowych 73/23/EEC.
Proszę zawsze przestrzegać:
●Urządzenie nie jest wodoodporne. Chroń przed
wodą, wysoką wilgotnością i wysoką tempera-
turą (dopuszczalny zakres temperatury to
0–40°C).
●Na urządzeniu nie stawiać naczyń z płynami np.
szklanek z wodą.
●Nie uruchamiać i natychmiast wyłączyć główną
wtyczkę zasilania z prądu:
1. jeśli istnieje widoczne uszkodzenie urządzenia
lub kabla zasilającego,
2. jeśli uszkodzenie mogło powstać na skutek
upuszczenia urządzenia lub podobnego
wypadku,
3. jeśli urządzenie nie działa prawidłowo.
Naprawy mogą być dokonywane tylko przez
wyszkolony personel.
●Nigdy nie ciągnij za kabel zasilający podczas
odłączania wtyczki z gniazdka, chwytaj zawsze
za wtyczkę.
●Do czyszczenia obudowy używać suchej,
miękkiej ściereczki. Nie stosować wody ani środ-
ków czyszczących.
●Zużyte baterie należy wyrzucać do pojemników
specjalnie do tego przeznaczonych.
●Producent ani dostawca nie ponosi odpowie-
dzialności za wynikłe szkody materialne, jeśli
urządzenie było używane niezgodnie z przezna-
czeniem, zostało zainstalowane lub obsługiwane
niepoprawnie lub poddawane nieautoryzo-
wanym naprawom.
3Zastosowanie i wyposażenie
GAB-66DC jest podręcznym wzmacniaczem gita-
rowym do użytku na małych scenach, jako wzma-
cniacz do ćwiczeń lub zastosowań w trasie. O jego
uniwersalności świadczy możliwość podłączenia
trzech różnych źródeł zasilania (zasilanie sieciowe,
baterie lub zewnętrzne źródło np. akumulator sa-
mochodowy). Ze względu na konstrukcję wzma-
cniacz można ustawić pionowo lub skośnie w górę.
Dzięki dodatkowym wejściom mikrofonowym i wej-
ściom dla urządzeń z wyjściem liniowym istnieje
możliwość wzmocnienia np. gitary, wokalu i od-
twarzanej ścieżki dźwiękowej w tym samym czasie.
Łącze słuchawkowe umożliwia ćwiczenia w ciszy
dla otoczenia.
4Połączenia
Wszystkie połączenia mogą być przeprowadzane
tylko przy wyłączonym wzmacniaczu.
Jeśli urządzenie nie będzie już nigdy
więcej używane, wskazane jest przeka-
zanie go do miejsca utylizacji odpadów,
aby zostało utylizowane bez szkody dla
środowiska.
Uwaga! Urządzenie działa na prąd zmienny
(230 V~). Naprawy mogą być dokony-
wane tylko przez wyszkolony personel.
Nieostrożne obchodzenie się z urządze-
niem może spowodować porażenie prą-
dem. Wszelkie gwarancje wygasają,
jeżeli urządzenie zostanie otworzone.
4.1 Źródła sygnału
1) Podłącz gitarę do gniazda INPUT GUITAR (2).
2) Podłącz urządzenie z poziomem liniowym (np.
keyboard lub odtwarzacz CD) do gniazda INPUT
LINE (1).
3) Podłącz mikrofon do gniazda MIC (7).
4.2 Słuchawki
Słuchawki (impedancja ≥8Ω) mogą być podłą-
czone go gniazda PHONES (9); podczas podłącza-
nia słuchawek wewnętrzny głośnik wyłączy się.
4.3 Zasilanie
Istnieją trzy możliwości podłączenia zasilania:
1. Najwyższą moc wyjściowa uzyskuje się przy
zasilaniu 230 V~. Gdy tylko jest to możliwe
zaleca się stosowanie tego zasilania. W tym celu
za pomocą kabla sieciowego podłącz gniazdo
230 V~(13) z siecią (230 V~/50Hz). Ustaw
przełącznik (11) na zasilanie prądem zmiennym
w pozycji AC.
2. Dla zastosowań w terenie zasilanie można rów-
nież uzyskać z akumulatora samochodowego.
W tym celu za pomocą przejściówki połącz
gniazdo 12 V IN (10) z zapalniczką samocho-
dową. Jeżeli we wzmacniaczu są baterie, zos-
taną one wyłączone. W tym wypadku pozycja
przełącznika (11) nie ma znaczenia.
3. Wzmacniacz może być również obsługiwany
przez baterie 1,5 V (rozmiar D). Włóż baterie we
właściwe miejsca (16) z uwzględnieniem ich
biegunowości. Ustaw przełącznik (11) na zasila-
nie prądem stałym w pozycji DC.
Jeżeli urządzenie nie jest używane przez dłuższy
czas (np. dłużej niż tydzień) baterie powinno się
wyjąć. W ten sposób uniknie się uszkodzenia
wzmacniacza w przypadku ewentualnego
wycieku baterii.
5Działanie
1) Przed włączeniem urządzenia, regulatory głoś-
ności VOLUME (5) i głośności mikrofonu MIC
VOLUME (8) powinny być ustawione na mini-
mum w celu uniknięcia hałasów spowodo-
wanych włączaniem. Włącz urządzenie za po-
mocą przełącznika POWER (14).
2) Aby optymalnie dostroić dźwięk, ustaw głoś-
ność (5) na średnią. Ustaw regulatory korektora
(6) w pozycji środkowej.
3) Za pomocą przełącznika OVERDRIVE (4) ustaw
czy dźwięk gitary ma być zniekształcony
(przełącznik wciśnięty), czy nie (przełącznik
wyciśnięty).
4) Ustaw wzmocnienie wejściowe za pomocą re-
gulatora GAIN (3). Przy włączonym zniekształ-
ceniu, tym regulatorem można ustawić stopień
zniekształcenia. Jeżeli zniekształcenie jest wył-
ączone [przełącznik OVERDRIVE nie jest wciś-
nięty] regulacja wzmocnienia wejściowego
będzie ograniczona tylko do jednej trzeciej
zakresu.
5) Następnie ustaw żądaną głośność za pomocą
regulatora VOLUME (5). Głośność urządzenia
podłączonego do gniazda INPUT LINE (1)
będzie się również zmieniała.
6) Ustaw żądaną barwę dźwięku za pomocą korek-
tora (6). Jeżeli zajdzie potrzeba, dźwięk można
skorygować przez zmianę wzmocnienia wej-
ściowego GAIN (3) lub głośności VOLUME (5).
Ustawienia dźwięku wpływają głównie na gitarę
podłączoną do gniazda GUITAR (2), jednak
mają też wpływ na dźwięk na wejściu liniowym
(1) w górnych rejestrach.
7) Ustaw głośność podłączonego mikrofonu za
pomocą regulatora MIC VOLUME (8).
6Dane techniczne
Moc wyjściowa: . . . . . . . . . 6 Wrms
Głośnik: . . . . . . . . . . . . . . . . 16 cm (61/2"), 4 Ω
Impedancja wejściowa
GUITAR: . . . . . . . . . . . . . 75 kΩ
LINE: . . . . . . . . . . . . . . . . 175 kΩ
MIC: . . . . . . . . . . . . . . . . 4,5 kΩ
Dopuszczalna
temperatura pracy: . . . . . . 0 – 40 °C
Zasilanie
Napięcie zasilające: . . . . . 230 V~/50Hz/10 VA
Zasilanie z baterii: . . . . . . . 8 x 1,5 V rozmiar D
Zasilanie zewnętrzne 12 V: . 12 V /425 mA
Wymiary . . . . . . . . . . . . . . . 345 x 280 x 270 mm
Ciężar: . . . . . . . . . . . . . . . . . 5,5 kg
Może ulec zmianie.
Uwaga:
Nigdy nie ustawiać słuchawek na maksymalną
głośność. Zbyt duże natężenie dźwięku może
uszkodzić słuch! Ucho ludzkie dostosowuje się do
hałasu, który po pewnym czasie nie wydaje się
uciążliwy. Nie wolno zwiększać głośności po przy-
zwyczajeniu się do poprzedniego ustawienia.
10
PL
Instrukcje obsługi są chronione prawem copyright for MONACOR®INTERNATIONAL GmbH & Co. KG.
Przetwarzanie całości lub części instrukcji dla osobistych korzyści finansowych jest zabronione.
11
Guitar forstærker GAB-66DC
Læs nedenstående sikkerhedsoplysninger opmærk-
somt igennem før ibrugtagning af enheden. Bortset
fra sikkerhedsoplysningerne henvises til den engel-
ske tekst.
Vigtige sikkerhedsoplysninger
Enheden overholder EU-direktivet 89/336/EØF ved-
rørende elektromagnetisk kompatibilitet og lavspæn-
dingsdirektivet 73/23/EØF.
Vær altid opmærksom på følgende:
●Enheden er ikke vejrbestandig. Beskyt den mod
vanddråber og -stænk, høj luftfugtighed og varme
(tilladt omgivelsestemperatur 0–40°C).
●Undgå at placere væskefyldte genstande, som
f.eks. glas, ovenpå enheden.
●Tag ikke enheden i brug og tag straks stikket ud af
stikkontakten i følgende tilfælde:
1. hvis der er synlig skade på enheden eller net-
kablet,
2. hvis der kan være opstået skade, efter at enhe-
den er tabt eller lignende,
3. hvis der forekommer fejlfunktion.
Enheden skal altid repareres af autoriseret per-
sonel.
●Tag aldrig netstikket ud af stikkontakten ved at
trække i kablet, tag fat i selve stikket.
●Til rengøring må kun benyttes en tør, blød klud;
der må under ingen omstændigheder benyttes
kemikalier eller vand.
●Brugte batterier hører ikke til i husholdnings affal-
det. Bring dem til et sted hvor de samles til fælles
destruktion, f. eks. din forhandler.
●Hvis enheden benyttes til andre formål, end den
oprindeligt er beregnet til, hvis den ikke er tilsluttet
korrekt, hvis den betjenes forkert, eller hvis den
ikke repareres af autoriseret personel, omfattes
eventuelle skader ikke af garantien.
Hvis enheden skal tages ud af drift for
bestandigt, skal den bringes til en lokal
genbrugsstation for bortskaffelse.
Forsigtig!
Enheden benytter livsfarlig netspænding (230V~).
Overlad servicering til autoriseret personel. Forkert
håndtering kan forårsage fare for elektrisk stød.
Desuden bortfalder enhver reklamationsret, hvis
enheden har været åbnet.
Gitarrförstärkare GAB-66DC
Innan enheten tas i bruk, läs först igenom säkerhets-
föreskrifterna. Om ytterligare information önskas,
läs igenom den engelska texten som medföljer.
Säkerhetsföreskrifter
Enheten uppfyller EG-direktiv 89/336/EWG av-
seende elektromagnetiska störfält samt EG-direktiv
73/23/EWG avseende lågspänningsapplikationer.
Ge ovillkorligen även akt på följande:
●Enheten är inte vattenskyddad. Skydda enheten
mot vätskor, hög luftfuktighet och hög värme (tillå-
ten omgivningstemperatur 0–40°C).
●Placera inte föremål innehållande vätskor, t.ex.
dricksglass, på enheten.
●Använd inte enheten och ta omedelbart kontakten
ur elurtaget om något av följande fel uppstår:
1. Enheten eller elsladden har synliga skador.
2. Enheten är skadad av fall e.d.
3. Enheten har andra felfunktioner.
Enheten skall alltid lagas på verkstad av utbildad
personal.
●Drag aldrig ut kontakten genom att dra i elsladden
utan ta tag i kontaktkroppen.
●Rengör endast med en mjuk och torr trasa, an-
vänd aldrig kemikalier eller vatten vid rengöring.
●Batterierna bör inte betraktas som hushållsavfall.
Förbrukade batterier skall alltid slängas i särskild
behållere för återvinning.
●Om enheten används för andra ändamål än av-
sett, om den kopplas in felaktigt, om den används
på fel sätt eller inte repareras av auktoriserad per-
sonal upphör alla garantier att gälla och inget
ansvar tas heller för uppkommen skada på person
eller materiel.
Om enheten skall kasseras bör de läm-
nas in till återvinning.
OBS!
Enheten använder livsfarligt hög spänning internt
(230V~). For att undvika en elektrisk stöt, öppna
aldrig chassit på egen hand utan överlåt all service
till auktoriserad verkstad. Alla garantier upphör om
enheten har varit öppnad.
Kitaravahvistin GAB-66DC
Ole hyvä ja huomioi aina seuraavat turvallisuutta
koskevat ohjeet ennen laitteen käyttöön ottoa. Katso
käyttöön liittyviä ohjeita Englanninkielisistä ohjeista,
jos tarvitset lisää tietoa laitteen käytöstä.
Turvallisuudesta
Tämä laite vastaa direktiiviä 89/336/EEC sähkömag-
neettisesta yhteensopivuudesta sekä lisäksi matala-
jännite direktiiviä 73/23/EEC.
Huomioi seuraavat seikat:
●Tämä laite soveltuu käytettäväksi ainoastaan
sisätiloissa. Suojele laitetta kosteudelta, vedeltä ja
kuumuudelta (sallittu ympäröivä lämpötila 0–40
Celsius astetta).
●Älä aseta laitteen päälle astioita, joissa on nestet-
tä, esimerkiksi juomalaseja.
●Irrota virtajohto pistorasiasta, äläkä käynnistä lai-
tetta, jos:
1. virtajohdossa on havaittu vaurio,
2. laitteiden putoaminen tai vastaava vahinko on
saattanut aiheuttaa vaurion,
3. laitteissa esiintyy toimintahäiriöitä.
Kaikissa tapauksissa laite tulee toimittaa valtuu-
tettuun huoltoliikkeeseen.
●Älä koskaan irrota virtajohtoa pistorasiasta joh-
dosta vetämällä.
●Käytä puhdistamiseen pelkästään kuivaa, peh-
meää kangasta. Älä käytä puhdistusaineita taikka
vettä puhdistamiseen.
●Kun laite joskus poistetaan lopullisesti käytöstä,
huolehdi että laite hävitetään asianmukaisesti.
●Jos laitetta käytetään muuhun kuin mihin ne ovat
alun perin tarkoitettu, jos sitä käytetään väärin
taikka sitä ei ole huollettu tai korjattu valtuutetussa
huoltoliikkeessä, ei takuu ole voimassa, eikä val-
mistaja, maahantuoja tai myyjä ota vastuuta
aiheutuneesta vahingosta.
Kun laite poistetaan lopullisesti käytöstä,
huolehdi, että laite hävitetään asianmu-
kaisesti jätteenkäsittelylaitoksessa.
Huomio!
Tämä laite toimii hengenvaarallisella jännitteellä
(230V~). Jätä huoltotoimet vain valtuutetulle huol-
toliikkeelle. Asiaa tuntematon käsittely saattaa ai-
heuttaa sähköiskun vaaran. Takuu raukeaa, jos
laite tai virtalähde on avattu.
S
FIN
DK

Copyright©by MONACOR INTERNATIONAL GmbH & Co. KG, Bremen, Germany. All rights reserved. A-0353.99.01.02.2005
®
Table of contents
Other IMG STAGE LINE Musical Instrument Amplifier manuals


Popular Musical Instrument Amplifier manuals by other brands


Peavey
Peavey The Classic owner's manual

Roland
Roland CUBE-80X owner's manual

Peavey
Peavey EVH 5150 II operating guide

Hamstead Soundworks
Hamstead Soundworks Artist 20 user manual

Marshall Amplification
Marshall Amplification as50r owner's manual

Amplified Nation
Amplified Nation Wonderland Overdrive v2 owner's manual


