IMG STAGE LINE GA-1020R User manual

Stage LineR
BEDIENUNGSANLEITUNG • INSTRUCTION MANUAL • MODE D`EMPLOI • ISTRUZIONI PER L´USO
GITARRENVERSTÄRKER
GUITAR AMPLIFIER
AMPLIFICATEUR DE GUITARE
AMPLIFICATORE PER CHITARRE
GA-1020R Best.-Nr. 24.5910
GA-1020 Best.-Nr. 24.5900
GA-820R Best.-Nr. 24.5880
GA-820 Best.-Nr. 24.5870
010
GAIN
010
SHAPE
010
LEVEL
010
LEVEL
010
TREBLE
010 010
BASS
010
REVERB
PHONES POWER
ON
MIDDLE
Stage LineR
INPUT BOOST CHANNEL NORMAL CHANNEL
BLACK
series
BLACK
series
GA-820 R
GUITAR
AMPLIFIER

2
Bevor Sie einschalten ...
Wir wünschen Ihnen viel Spaß mit Ihrem
neuen img Stage Line Gerät. Dabei soll
Ihnen diese Bedienungsanleitung helfen,
alle Funktionsmöglichkeiten kennenzu-
lernen. Die Beachtung der Anleitung ver-
meidet außerdem Fehlbedienungen und
schützt Sie und Ihr Gerät vor eventuellen
Schäden durch unsachgemäßen Ge-
brauch.
Den deutschen Text finden Sie auf den
Seiten 4
-
5.
Before you switch on ...
We wish you much pleasure with your new
img Stage Line unit. With these operating
instructions you will be able to get to know
all functions of the unit. By following these
instructions false operations will be avoid-
ed, and possible damage to you and your
unit due to improper use will be prevented.
You will find the English text on the pages
4
-
5.
Avant toute mise en service ...
Nous vous remercions d’avoir choisi un
appareil img Stage Line et vous souhai-
tons beaucoup de plaisir à l’utiliser. Cette
notice a pour objectif de vous aider à
mieux connaître les multiples facettes de
l’appareil et à vous éviter toute mauvaise
manipulation.
La version française se trouve pages 6
-
7.
Prima di accendere ...
Vi auguriamo buon divertimento con il
Vostro nuovo apparecchio img Stage Line.
Le istruzioni per l’uso Vi possono aiutare a
conoscere tutte le possibili funzioni. E ris-
pettando quanto spiegato nelle istruzioni,
evitate di commettere degli errori, e così
proteggete Voi stessi, ma anche l’appa-
recchio, da eventuali rischi per uso impro-
prio.
Il testo italiano lo potete trovare alle
pagine 6
-
7.
D
A
CH
GB
F
B
CH
I
Stage LineR
3
BOOST CHANNEL
BLACK
series
NORMAL CHANNEL
GA-1020 R
PRO GUITAR
AMPLIFIER
POWER
ON
PHONES
REVERB
010
BASS
010
MIDDLE
010
TREBLE
010
GAIN
010
SHAPE
010
LEVEL
010
INPUT
CHANNEL
SELECT LEVEL
010
Stage Line
R
EXTERNAL SPEAKER
230V/50Hz
20W RMS 4 ΩMIN. LOAD
Stage Line
R
FOOTSWITCHES
REVERB CHANNEL
11 12 13 14
12 3 4 5 6 7 8 9 10
➀
➁
Please unfold page 3. Then you can always see the
operating elements and connections described.
1 Features
The units GA-1020R, GA-1020, GA-820R, and GA-
820 are powerful guitar amplifiers (20 W) with differ-
ent speaker configurations (for this see chapter 6
“Specifications”).
Due to the two switchable channels the musician
can choose between distorted sound (boost chan-
nel) and undistorted sound (normal channel). With
the 3-way equalizer there is an optimum sound
adjustment for both channels. The boost channel is
equipped with the control SHAPE by which an addi-
tional distortion effect can be obtained.
The models GA-1020R and GA-820R are pro-
vided with a spring reverb. Adding of the reverbera-
tion effect is possible for both channels.
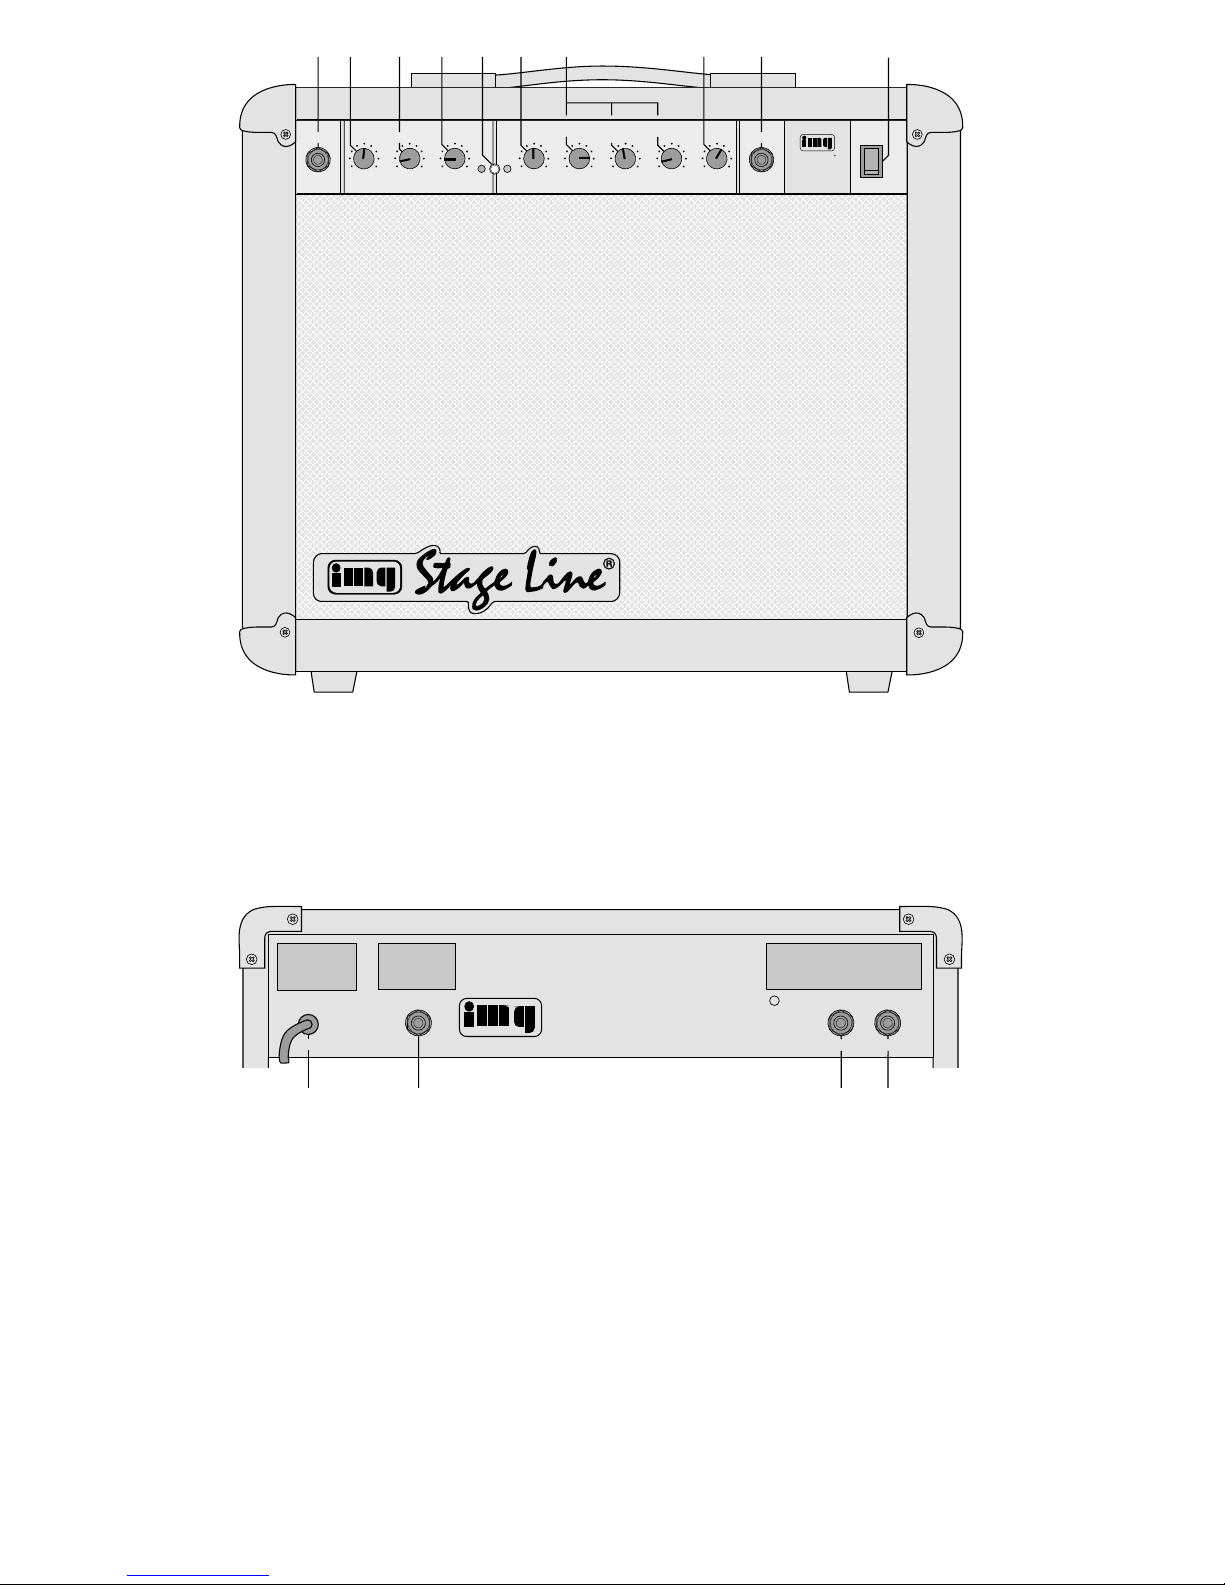
2 Operating Elements and Connections
2.1 Front panel
1Jack INPUT (1/4“) to connect the electric guitar
2Control GAIN for the boost channel to adjust the
degree of distortion
3Control SHAPE for the boost channel to influence
the sound by changing the curve form of the input
signal
4Control LEVEL for the complete signal of the
boost channel
5Selector button CHANNEL SELECT
6Control LEVEL for the complete signal of the nor-
mal channel
73-way equalizer for both channels
8Control REVERB to adjust the reverberation
effect (only with models GA-1020R and GA-
820R)
91/4“ jack PHONES to connect stereo headphones
(impedance ≥8Ω)
10 Switch POWER
2.2 Rear panel
11 Mains cable for the connection to 230V~/50Hz
12 1/4“ jack to connect an external speaker (4
-
8Ω)
13 Jack REVERB (1/4“) for the foot switch to switch
on/off the reverberation effect (only with models
GA-1020R and GA-820R)
14 Jack CHANNEL (1/4“) for the foot switch to select
the channel
3 Safety Notes
This appliance corresponds to the directive for
electromagnetic compatibility 89/336/EEC and the
low voltage directive 73/23/EEC.
This unit uses lethally high voltage (230V~). To
prevent a shock hazard do not open the cabinet.
Leave servicing to authorized skilled personnel
only. Furthermore, any guarantee claim expires if
the unit has been opened.
Always watch the following items regarding the
operation:
•The unit is designed for indoor use only.
•Protect the unit against humidity and heat (permis-
sible operating temperature range 0
-
40°C).
•Do not take the unit into operation and immediately
take the mains plug out of the mains socket if:
1. damage at the unit or mains cable can be seen,
2. a defect might have occurred after a drop or
similar accident,
3. there are malfunctions.
The unit must in any case be repaired by author-
ized skilled personnel.
•A damaged mains cable must only be repaired by
the manufacturer or authorized skilled personnel.
•Never pull the mains plug out of the mains socket
by means of the mains cable.
•If the unit is used for purposes other than originally
intended, if it is operated in the wrong way or not
repaired by authorized skilled personnel, there is
no liability for possible damage.
4
GB
D
A
CH
Bitte klappen Sie die Seite 3 heraus. Sie sehen
dann immer die beschriebenen Bedienelemente
und Anschlüsse.
1 Ausstattung
Die Geräte GA-1020R, GA-1020, GA-820R und GA-
820 sind leistungsstarke Gitarrenverstärker (20W)
mit unterschiedlichen Lautsprecherbestückungen
(siehe dazu Kapitel 6 „Technische Daten“).
Die zwei umschaltbaren Kanäle bieten dem Musi-
ker die Möglichkeit, zwischen verzerrtem Sound
(Boost Channel) und unverzerrtem Sound (Normal
Channel) zu wählen. Der Klang kann für beide
Kanäle mit der 3fachen Klangregelung optimal ein-
gestellt werden. Der Boost Channel ist mit dem Reg-
ler SHAPE ausgestattet, mit dem sich ein zusätzli-
cher Verzerrungseffekt erzielen läßt.
Die Modelle GA-1020R und GA-820R besitzen
eine Hall-Spirale. Die Zumischung des Hall-Effektes
ist für beide Kanäle möglich.
2 Übersicht der Bedienelemente und
Anschlüsse
2.1 Frontseite
1Eingangsbuchse INPUT (6,3-mm-Klinke) zum
Anschluß der E-Gitarre
2Verstärkungsregler GAIN für den Boost Channel
zur Einstellung des Verzerrungsgrades
3Regler SHAPE für den Boost Channel zur
Soundbeeinflussung durch Veränderung der Kur-
venform des Eingangssignals
4Lautstärkeregler LEVEL für das Gesamtsignal
des Boost Channel
5Kanal-Umschalttaste CHANNEL SELECT
6Lautstärkeregler LEVEL für das Gesamtsignal
des Normal Channel
73facheKlangregelung(Equalizer) für beide Kanäle
8Regler REVERB zum Einstellen des Hall-Effek-
tes (nur bei den Modellen GA-1020R und GA-
820R)
96,3-mm-Klinkenbuchse PHONES zum Anschluß
eines Stereo-Kopfhörers (Impedanz ≥8Ω)
10 Ein-/Ausschalter POWER
2.2 Rückseite
11 Netzkabel zum Anschluß an 230V~/50Hz
12 6,3-mm-Klinkenbuchse zum Anschluß eines ex-
ternen Lautsprechers (4
-
8Ω)
13 Fußschalter-Anschlußbuchse REVERB (6,3-mm-
Klinke) zum Ein-/Ausschalten des Hall-Effektes
(nur bei den Modellen GA-1020R und GA-820R)
14 Fußschalter-AnschlußbuchseCHANNEL(6,3-mm-
Klinke) für die Kanalumschaltung
3 Hinweise für den sicheren Gebrauch
Dieses Gerät entspricht der Richtlinie für elektro-
magnetische Verträglichkeit 89/336/EWG und der
Niederspannungsrichtlinie 73/23/EWG.
Das Gerät wird mit lebensgefährlicher Netzspan-
nung (230V~) versorgt. Nehmen Sie deshalb
niemals selbst Eingriffe im Gerät vor. Durch un-
sachgemäßes Vorgehen besteht die Gefahr eines
elektrischen Schlages. Außerdem erlischt beim
Öffnen des Gerätes jeglicher Garantieanspruch.
Beachten Sie für den Betrieb auch unbedingt die fol-
genden Punkte:
•Das Gerät ist nur zur Verwendung in Räumen
geeignet.
•Schützen Sie das Gerät vor Feuchtigkeit und Hitze
(zulässiger Einsatztemperaturbereich 0
-
40°C).
•Das Gerät nicht in Betrieb nehmen und sofort den
Netzstecker ziehen, wenn:
1. sichtbare Schäden am Gerät oder an der Netz-
anschlußleitung vorhanden sind,
2. nach einem Sturz oder ähnlichem der Verdacht
auf einen Defekt besteht,
3. Funktionsstörungen auftreten.
Das Gerät in jedem Fall zur Reparatur in eine
Fachwerkstatt geben.
•Eine beschädigte Netzanschlußleitung darf nur
durch den Hersteller oder eine autorisierte Fach-
werkstatt ersetzt werden.
•Den Netzstecker nie an der Zuleitung aus der
Steckdose ziehen.
•Wird das Gerät zweckentfremdet, falsch bedient
oder nicht fachgerecht repariert, kann für eventu-
elle Schäden keine Haftung übernommen werden.
•Für die Reinigung nur ein trockenes Staubtuch
verwenden, auf keinen Fall Chemikalien oder
Wasser.
4 Inbetriebnahme
Alle Anschlüsse dürfen nur bei ausgeschaltetem
Gerät vorgenommen werden.
1) Die E-Gitarre an die Eingangsbuchse INPUT (1)
anschließen.
2) Soll die Kanalumschaltung über einen Fußschal-
ter erfolgen, diesen an Buchse CHANNEL (14)
auf der Geräterückseite anschließen.
3) Ein externer Lautsprecher (Impedanz 4
-
8Ω)
kann zusätzlich an die Buchse (12) angeschlos-
sen werden.
4) Ein Kopfhörer (Impedanz ≥8Ω) kann an die
Buchse PHONES (9) angeschlossen werden. Bei
Anschluß des Kopfhörers wird der Lautsprecher
abgeschaltet.
ACHTUNG: Stellen Sie bei Verwendung eines
Kopfhörers die Lautstärke nie sehr hoch ein. Hohe
Lautstärken können auf Dauer das Gehör schä-
digen! Das menschliche Ohr gewöhnt sich an
große Lautstärken und empfindet sie nach einiger
Zeit als nicht mehr so hoch. Darum eine hohe
Lautstärke nach der Gewöhnung nicht weiter
erhöhen.
5) Bei den Modellen GA-1020R und GA-820R:
Soll das Ein-/Ausschalten des Hall-Effektes über
einen Fußschalter erfolgen, diesen an Buchse
•Use a dry dust cloth only for cleaning, by no
means chemicals or water.
•Important for U.K. Customers!
The wires in this mains lead are coloured in
accordance with the following code:
green/yellow = earth
blue = neutral
brown = live
As the colours of the wires in the mains lead of
this appliance may not correspond with the
coloured markings identifying the terminals in
your plug, proceed as follows:
1. The wire which is coloured green and yellow
must be connected to the terminal in the plug
which is marked with the letter Eor by the
earth symbol or coloured green or green
and yellow.
2. The wire which is coloured blue must be con-
nected to the terminal which is marked with the
letter Nor coloured black.
3. The wire which is coloured brown must be
connected to the terminal which is marked with
the letter Lor coloured red.
Warning
-
This appliance must be earthed.
4 Setting into Operation
All connections must only be made with the unit
switched off.
1) Connect the electric guitar to the jack INPUT (1).
2) If the channel selection is to be made via a foot
switch, connect this to jack CHANNEL (14) at
the rear panel of the unit.
3) An external speaker (impedance 4
-
8Ω) may
additionally be connected to the jack (12).
4) Headphones (impedance ≥8Ω) may be con-
nected to the jack PHONES (9). If headphones
are connected, the speaker is switched off.
CAUTION: Do not adjust the headphones to a
high volume. Permanent high volumes may dam-
age a person´s hearing! The human ear gets ac-
customed to high volumes which do not seem to
REVERB (13) auf der Geräterückseite anschlie-
ßen.
6) Zum Schluß den Gitarrenverstärker mit dem
Netzstecker an eine Steckdose (230V~/50Hz)
anschließen. Vor dem Einschalten sollten die
Lautstärkeregler LEVEL (4 und 6) auf Minimum
gestellt werden, um starke Einschaltgeräusche zu
vermeiden. Dann den Gitarrenverstärker mit dem
Schalter POWER (10) einschalten.
5 Bedienung
Zuerst mit der Kanal-Umschalttaste CHANNEL SE-
LECT (5) den gewünschten Kanal anwählen:
Bei nicht gedrückter Umschalttaste ist der Normal
Channel (unverzerrter Sound) angewählt. Bei den
Modellen GA-1020R und GA-1020 leuchtet die grü-
ne LED rechts neben der Umschalttaste.
Bei gedrückter Umschalttaste, ist der Boost Channel
(verzerrter Sound) angewählt. Bei den Modellen GA-
1020R und GA-1020 leuchtet die rote LED links ne-
ben der Umschalttaste.
5.1 Normal Channel (unverzerrter Sound)
Zur optimalen Ausregelung des Klanges den Laut-
stärkeregler (6) zunächst auf mittlere Lautstärke ein-
stellen. Mit den drei Klangreglern (7) das Klangbild
einstellen: Die Tiefen (BASS), Mitten (MIDDLE) und
Höhen (TREBLE) lassen sich bis zu 10dB anheben.
Dann mit dem Lautstärkeregler (6) die gewünschte
Lautstärke wählen.
5.2 Boost Channel (verzerrter Sound)
1) Zur optimalen Ausregelung des Sounds den Laut-
stärkeregler (4) auf mittlere Lautstärke einstellen.
2) Mit dem Verstärkungsregler GAIN (2) wird der
Grad der Übersteuerung des Eingangssignals und
damit der Verzerrungsgrad eingestellt. Den Regler
je nach gewünschter Verzerrung aufdrehen.
3) Der SHAPE-Regler (3) ermöglicht eine weitere Be-
einflussung des übersteuerten Eingangssignals:
Bei Aufdrehen des Reglers wird das verstärkte
Eingangssignal in seiner Kurvenform verändert.
Je weiter der SHAPE-Regler aufgedreht wird,
desto stärker wird die Kurvenform des Signals
verändert. Dies bewirkt einen zusätzlichen Ver-
zerrungseffekt, der sich im Sound umso deutli-
cher bemerkbar macht, je höher die Übersteue-
rung durch den GAIN-Regler eingestellt wurde.
4) Das gewünschte Klangbild mit der 3fachen Klang-
regelung (7) einstellen: Durch Aufdrehen der drei
Regler lassen sich die Tiefen (BASS), Mitten
(MIDDLE) und Höhen (TREBLE) bis zu 10dB
anheben.
5) Mit dem Lautstärkeregler (4) die gewünschte
Lautstärke einstellen.
5.3 Zumischung des Hall-Effektes
(nur bei GA-1020R und GA-820R)
Das Zumischen des Hall-Effektes ist für beide Ka-
näle möglich.
Mit dem Regler REVERB (8) den gewünschten Hall-
Anteil einstellen. Steht der Regler auf Minimum wird
dem Signal kein Hall zugemischt, je weiter der Reg-
ler aufgedreht wird, desto stärker wird der Hall-Anteil.
6 Technische Daten
Laut Angaben des Herstellers.
Änderungen vorbehalten.
be that high after some time. Therefore, do not fur-
ther increase a high volume after getting used to it.
5) With models GA-1020R and GA-820R:
If the reverberation effect is to be switched on/off
by a foot switch, connect this to the jack REVERB
(13) at the rear panel of the unit.
6) Finally connect the guitar amplifier with the mains
plug to a socket (230V~/50Hz). Prior to switch-
ing on, the controls LEVEL(4 and 6) should be set
to minimum to avoid strong inrush noises. Then
switch on the guitar amplifier with the switch
POWER (10).
5 Operation
At first select the desired channel with the selector
button CHANNEL SELECT (5):
With the selector button not pressed, the normal
channel (undistorted sound) is selected. With models
GA-1020R and GA-1020 the green LED at the right
next to the selector button is lighting.
With the selector button pressed, the boost channel
(distorted sound) is selected. With models GA-1020R
and GA-1020 the red LED at the left next to the se-
lector button is lighting.
5.1 Normal channel (undistorted sound)
For optimum tuning of the sound adjust the level
control (6) to medium level at first. With the 3-way
equalizer (7) adjust the sound characteristics: The
frequencies BASS, MIDDLE, and TREBLE can be
boosted up to 10dB. Then choose the desired level
with the level control (6).
5.2 Boost channel (distorted sound)
1) For optimum tuning of the sound set the level
control (4) to medium level.
2) With the control GAIN (2) adjust the degree of
overdriving of the input signal and thus the degree
of distortion. Turn up the control according to the
desired distortion.
3) The control SHAPE (3) makes a further influence
of the overdriven input signal possible: With turn-
ing up the control the amplified input signal is
changed in its curve form. The further the control
SHAPE is turned up, the more the curve form of
the signal will be changed. Thus an additional
distortion effect is resulting depending on the
extent of overdriving by the control GAIN.
4) Adjust the desired sound characteristics with the
3-way equalizer (7): By turning up the three con-
trolsthefrequencies BASS, MIDDLE, andTREBLE
can be boosted up to 10dB.
5) Adjust the desired level with the level control (4).
5.3 Adding of the reverberation effect
(only with GA-1020R and GA-820R)
Adding of the reverberation effect is possible for both
channels.
Adjust the desired part of reverberation with the con-
trol REVERB (8). If the control is in minimum posi-
tion, no reverberation is added to the signal. The fur-
ther the control is turned up, the greater the part of
reverberation is.
6 Specifications
According to the manufacturer.
Subject to technical change.
5
GB
D
A
CH
Modelle GA-1020R GA-1020 GA-820R GA-820
Ausgangsleistung 20W 20W 20W 20 W
Frequenzbereich 90
-
8000 Hz 90
-
8000 Hz 90
-
8000Hz 90
-
8000Hz
Lautsprecher 25cm (10“), 40 W, 4Ω25cm (10“), 40W, 4Ω20cm (8“), 20W, 4Ω20cm (8“), 20W, 4Ω
Eingangsimpedanz 1MΩ1MΩ1MΩ1MΩ
Stromversorgung 230V/50 Hz/40VA 230V/50Hz/40VA 230V/50Hz/40VA 230V/50Hz/40VA
Abmessungen (B x H x T) 480 x 390 x 237mm 480 x 390 x 237mm 380 x 340 x 237mm 380 x 340 x 237mm
Gewicht 9,5kg 9,3kg 7,5kg 7,3 kg
Hallspirale ja
-
ja
-
Modelle GA-1020R GA-1020 GA-820R GA-820
Output power 20W 20W 20W 20 W
Frequency range 90
-
8000 Hz 90
-
8000 Hz 90
-
8000 Hz 90
-
8000Hz
Speaker 25cm (10“), 40 W, 4Ω25cm (10“), 40W, 4Ω20cm (8“), 20W, 4Ω20cm (8“), 20W, 4Ω
Input impedance 1MΩ1MΩ1MΩ1MΩ
Spring reverb yes
-
yes
-
Power supply 230V/50Hz/40VA 230V/50Hz/40VA 230V/50Hz/40 VA 230V/50Hz/40VA
Dimensions (W x H x D) 480 x 390 x 237mm 480 x 390 x 237mm 380 x 340 x 237mm 380 x 340 x 237mm
Weight 9.5kg 9.3kg 7.5kg 7.3kg

Ouvrez le présent livret page 3 de manière à vi-
sualiser les éléments et branchements.
1 Caractéristiques
Les GA-1020R, GA-1020, GA-820R et GA-820 sont
des amplificateurs de guitare puissants (20 W) avec
diverses configurations de haut-parleurs (voir para-
graphe 6 “Caractéristiques techniques“).
Les deux canaux commutables permettent au
musicien de choisir entre un son distordu (boost
channel) et un son non distordu (normal channel).
L’amplificateur dispose d’un égaliseur 3 voies pour
un réglage optimal du son; le canal boost a un poten-
tiomètre SHAPE permettant de réaliser d’autres
effets de distorsion.
Les modèles GA-1020R et GA-820R possèdent
une spirale de réverbération. Il est possible de mixer
l’effet réverbération pour les deux canaux.
2 Eléments et branchements
2.1 Face avant
1Prise d’entrée INPUT (jack 6,35): branchement
d’une guitare électrique
2Potentiomètre GAIN pour le canal boost:
réglage du niveau de distorsion
3Potentiomètre SHAPE pour le canal boost:
modification du son par un changement de la
forme de la courbe du signal d’entrée.
4Réglage LEVEL de volume pour le signal global
du canal boost.
5Sélecteur de canaux CHANNEL SELECT
6Réglage LEVEL de volume pour le signal global
du canal normal
7Egaliseur 3 voies pour les deux canaux
8Potentiomètre REVERB:
réglage de l’effet réverbération (uniquement que
les modèles GA-1020R & GA-820R).
9Prise jack 6,35 PHONES: branchement d’un cas-
que stéréo (impédance ≥8 Ω)
10 Interrupteur général POWER marche/arrêt
2.2 Face arrière
11 Cordon secteur 230V~/50Hz
12 Prise jack 6,35 pour brancher un haut-parleur ex-
terne (4
-
8Ω)
13 Prise jack 6,35 pour pédale REVERB:
mise en marche/arrêt de l’effet réverbération
(uniquement sur les modèles GA-1020R et GA-
820R)
14 Prise jack 6,35 pour pédale CHANNEL:
sélection des canaux
3 Conseils d’utilisation
Cet amplificateur répond à la norme européenne
89/336/ CEE relative à la compatibilité électroma-
gnétique et à la norme 73/23/CEE portant sur les
appareils à basse tension.
Il est alimenté par une tension en 230V~. Ne tou-
chez jamais l’intérieur de l’appareil car, en cas de
mauvaise manipulation, vous pourriez subir une
décharge électrique mortelle. Faites plutôt appel à
un spécialiste. En outre, l’ouverture de l’appareil
rend tout droit à la garantie caduque.
Respectez scrupuleusement les points suivants:
•Cet appareil n’est conçu que pour une utilisation
en intérieur.
•Protégez-le de la chaleur et de l’humidité (plage de
temperature autorisée de fonctionnement 0
-
40°C).
•Ne le faites pas fonctionner et débranchez-le im-
médiatement lorsque:
1. des dommages apparaissent sur l’appareil ou le
cordon secteur.
2. après une chute ..., vous avez un doute sur
l’état de l’appareil.
3. des dysfonctionnements apparaissent.
Dans tous les cas, seul un technicien spécialisé
peut effecteur les réparations.
•Tout cordon secteur endommagé ne doit être rem-
placé que par le fabricant ou un technicien habilité.
•Ne débranchez jamais l’appareil en tirant sur le
cordon secteur.
Vi preghiamo di aprire completamente la pagina 3.
Così vedrete sempre gli elementi di comando e i
collegamenti descritti.
1 Equipaggiamento
Gli apparecchi GA-1020R, GA-1020, GA-820R e
GA-820 sono potenti amplificatori per chitarra (20W)
con diversi altoparlanti (vedi capitolo 6 ”Dati tecnici”).
I due canali commutabili offrono al musicista la
possibilità di scegliere fra il suono distorto (boost
channel) e il suono non distorto (normal channel).
Per entrambi i canali il tono può essere regolato in
modo ottimale con 3 frequenze diverse. Il canale
boost ha un regolatore SHAPE con il quale si ottiene
un effetto di distorsione supplementare.
I modelli GA-1020R e GA-820R sono equipag-
giati con una spirale per riverbero. L'effetto riverbero
può essere miscelato in entrambi i canali.
2 Elementi di comando e collegamenti
2.1 Pannello frontale
1Presa d'ingresso INPUT (jack 6,3mm) per il col-
legamento della chitarra
2Regolatore di guadagno GAIN per il canale boost
per impostare il grado di distorsione
3Regolatore SHAPE per il canale boost per influ-
enzare il suono modificando la forma d'onda del
segnale d'ingresso
4Regolatore volume LEVEL per il segnale globale
del canale boost
5Tasto di commutazione canale CHANNEL SE-
LECT
6Regolatore volume LEVEL per il segnale globale
del canale normale
7Regolazione toni a 3 frequenze (equalizzatore)
per i due canali
8Regolatore REVERB per impostare l'effetto di
riverbero (solo nei modelli GA-1020R e GA-820R)
9Presa jack 6,3mm PHONES per collegare una
cuffia stereo (impedenza ≥8 Ω)
10 Interruttore on/off POWER
2.2 Pannello posteriore
11 Cavo rete per 230V~/50Hz
12 Presa jack 6,3mm per collegare un altoparlante
esterno (4
-
8Ω)
13 Presa per interruttore a pedale REVERB (jack
6,3mm) per attivare/disattivare l'effetto di river-
bero (solo nei modelli GA-1020R e GA-820R)
14 Presa per interruttore a pedale CHANNEL (jack
6,3mm) per la commutazione canale
3 Avviso di sicurezza
Questo apparecchio corrisponde alla direttiva CE
89/336/CEE sulla compatibilità elettromagnetica e
73/23/CEE per apparecchi a bassa tensione.
Questo apparecchio funziona con tensione di rete
di 230V~. Non intervenire mai al suo interno; la
manipolazione scorretta può provocare delle scari-
che pericolose. Se l’apparecchio viene aperto,
cessa ogni diritto di garanzia.
Durante l’uso si devono osservare assolutamente i
seguenti punti:
•L’apparecchio è previsto solo per l’uso all’interno
di locali.
•Proteggere l'apparecchio dall'umidità e dal calore
(temperatura d'impiego ammessa 0
-
40°C).
•Non mettere in funzione l’apparecchio e staccare
subito la spina rete se:
1. l’apparecchio o il cavo rete presentano dei dan-
ni visibili;
2. dopo una caduta o dopo eventi simili sussiste il
sospetto di un difetto;
3. l’apparecchio non funziona correttamente.
Per la riparazione rivolgersi sempre ad una officina
competente.
•Il cavo rete, se danneggiato, deve essere sostituito
solo dal costruttore o da un laboratorio autorizzato.
6
I
F
B
CH
•Staccare il cavo rete afferrando la spina, senza ti-
rare il cavo.
•Nel caso di uso improprio, di impiego scorretto o di
riparazione non a regola d’arte non si assume
nessuna responsabilità per eventuali danni.
•Per la pulizia usare solo un panno asciutto; non
impiegare in nessun caso prodotti chimici o
acqua.
4 Messa in funzione
Eseguire tutti i collegamenti solo ad apparecchio
spento.
1) Collegare la chitarra con la presa d'ingresso
INPUT (1).
2) Se è richiesta la commutazione canale tramite
pedale, collegare il pedale con la presa CHAN-
NEL (14) sul retro.
3) La presa (12) serve per collegare eventualmente
un altoparlante esterno supplementare (impe-
denza 4
-
8Ω).
4) La presa PHONES (9) serve per collegare una
cuffia (impedenza ≥8Ω). Se è collegata la cuffia,
l'altoparlante è disattivato.
ATTENZIONE! Mai tenere molto alto il volume
nelle cuffie. A lungo andare, il volume eccessivo
può procurare danni all’udito! L’orecchio si abitua
agli alti volumi e dopo un certo tempo non se ne
rende più conto. Non aumentare il volume succes-
sivamente.
5) Modelli GA-1020R e GA-820R:
Se è richiesta l'attivazione/disattivazione dell'ef-
fetto di riverbero tramite pedale, collegare il pe-
dale con la presa REVERB (13) sul retro.
6) Alla fine collegare l'amplificatore per chitarre con
la presa di rete (230V~/50Hz). Prima dell'ac-
censione posizionare i regolatori del volume
LEVEL (4 e 6) sul minimo per evitare i rumori di
commutazione. Quindi accendere l'apparecchio
con l'interruttore POWER (10).
•Nous déclinons toute responsabilité en cas de
dommages si l’appareil est utilisé dans un but
autre que celui pour lequel il a été conçu, s’il n’est
pas correctement utilisé ou réparé.
•Pour le nettoyer, utilisez un chiffon sec, en aucun
cas de produits chimiques ou d’eau.
4 Utilisation
Tous les branchements ne doivent être effectués
que lorsque l’appareil est débranché.
1) Reliez la guitare électrique à la prise d’entrée
INPUT (1).
2) Si la sélection des canaux doit s’effectuer avec
une pédale, reliez-la à la prise CHANNEL (14)
sur la face arrière.
3) Il est possible de brancher un haut-parleur ex-
terne (impédance 4
-
8Ω) sur la prise (12).
4) Vous pouvez brancher un casque (impédance
≥8Ω) à la prise PHONES (9); le haut-parleur est
alors déconnecté.
ATTENTION: Lorsque vous utilisez un casque, ne
réglez pas le volume trop fort, car cela peut causer
des troubles de l’audition. L’oreille humaine s’ha-
bitue à des volumes élevés, et, après une certaine
période, ne les perçoit plus comme tels. Nous
vous recommandons donc de ne pas augmenter
le volume une fois que votre oreille y est habituée.
5) Pour les modèles GA-1020R et GA-820R:
Si la fonction marche/arrêt de l’effet réverbéra-
tion doit s’effectuer avec une pédale, reliez-la à la
prise REVERB (13) située sur la face arrière.
6) Vous pouvez relier maintenant l’ampli guitare au
secteur 230V~/50Hz. Veillez à mettre les poten-
tiomètres de volume LEVEL (4 et 6) sur le mini-
mum de manière à éviter tout bruit fort lors de la
mise sous tension. Allumez ensuite l’ampli avec
l’interrupteur POWER (10).

5 Fonctionnement
Sélectionnez tout d’abord le canal avec la touche
CHANNEL SELECT (5):
Si elle n’est pas enfoncée, le canal normal (non dis-
tordu) est sélectionné; pour les modèles GA-1020R
et GA-1020, la diode verte à droite de la touche brille.
Si elle est enfoncée, le canal boost (signal distordu)
est sélectionné; pour les modèles GA-1020R et GA-
1020, la diode rouge à gauche de la touche brille.
5.1 Normal Channel (son non distordu)
Pour un réglage optimal, mettez le potentiomètre de
volume (6) sur la position médiane puis utilisez les
potentiomètres (7) pour régler la sonorité: vous pou-
vez augmenter les graves BASS, médiums MIDDLE,
et aigus TREBLE de 10dB maximum.. Réglez main-
tenant le volume souhaité avec le potentiomètre de
volume (6).
5.2 Boost Channel (son distordu)
1) Pour un réglage optimal du son, mettez le poten-
tiomètre de volume (4) sur la position centrale.
2) Avec le potentiomètre GAIN (2), réglez le niveau
d’écrêtage du signal d’entrée et par là-même, le
degré de distorsion. Tournez le potentiomètre
selon la distorsion voulue.
3) Le potentiomètre SHAPE (3) permet de modifier
le signal d’entrée écrêté: en le tournant, la forme
de la courbe du signal d'entrée amplifié est modi-
fiée. Plus vous le tournez, plus la modification est
importante; cela génère un nouvel effet de distor-
sion d'autant plus important que l'écrêtage réglé
par la fonction GAIN est élevé.
4) Utilisez l’égaliseur (7) pour obtenir la sonorité vou-
lue; vous pouvez augmenter les graves (BASS),
médiums (MIDDLE) et aigus (TREBLE) de 10dB
maximum.
5) Réglez ensuite le volume avec le potentiomètre
de volume (4).
5.3 Mixage de l’effet réverbération
(uniquement pour les modèles GA-1020R
et GA-820R)
Vous pouvez mixer l’effet réverbération pour les
deux canaux:
Utilisez le potentiomètre REVERB (8) pour régler l’ef-
fet réverbération voulu; s’il est sur le minimum, aucun
effet ne sera mixé au signal; en revanche, plus il est
tourné, plus la part d’effet dans le signal sera impor-
tante.
6 Caractéristiques techniques
D’après les données du constructeur.
Tout droit de modification réservé.
5 Funzionamento
Selezionare dapprima il canale desiderato con il
tasto CHANNEL SELECT (5).
Se il tasto non è premuto è selezionato il canale nor-
male (suono non distorto). Nei modelli GA-1020R e
GA-1020 si accende il led verde a destra del tasto.
Se il tasto è premuto, è selezionato il canale boost
(suono distorto). Nei modelli GA-1020R e GA-1020
si accende il led rosso a sinistra del tasto.
5.1 Normal Channel (suono non distorto)
Per la regolazione ottimale del suono posizionare il
regolatore del volume (6) nel centro. Regolare i toni
coni tre regolatori (7):i bassi (BASS), imedi (MIDDLE)
e gli alti (TREBLE) possono essere alzati fino a 10dB.
Quindi scegliere il volume con il relativo regolatore (6).
5.2 Boost Channel (suono distorto)
1) Per la regolazione ottimale del suono posizionare
il regolatore del volume (4) nel centro.
2) Con il regolatore GAIN (2) si imposta il grado di
sovrapilotaggio del segnale di ingresso e quindi il
grado di distorsione. Aprire il regolatore secondo
il proprio gusto.
3) Con il regolatore SHAPE (3) è possibile influ-
enzare ancora il segnale d'ingresso sovrapilotato.
Aprendo il regolatore, si modifica la forma d'onda
del segnale d'ingresso amplificato. Più si apre il
regolatore SHAPE, più si modifica la forma d'on-
da del segnale. Tale modifica è tanto più sensibile
quanto più è forte il sovrapilotaggio con GAIN.
4) Impostare il suono desiderato con i regolatori a
tre frequenze (7). Aprendo i tre regolatori, i bassi
(BASS), i medi (MIDDLE) e gli alti (TREBLE) pos-
sono essere alzati fino a 10dB.
5) Quindi scegliere il volume con il regolatore (4).
5.3 Miscelazione di un effetto di riverbero
(solo con GA-1020R e GA-820R).
La miscelazione dell'effetto di riverbero è possibile
per entrambi i canali.
Impostare la parte di riverbero desiderata con il rego-
latore REVERB (8). Se il regolatore si trova sul mini-
mo non c’è nessun riverbero. Più si apre il regola-
tore, più aumenta la parte di riverbero.
6 Dati tecnici
Dati forniti dal costruttore.
Con riserva di modifiche tecniche.
7
I
F
B
CH
Modèles GA-1020R GA-1020 GA-820R GA-820
Puissance de sortie 20W 20W 20W 20 W
Bande passante 90
-
8000Hz 90
-
8000 Hz 90
-
8000Hz 90
-
8000 Hz
Haut-parleur 25cm (10“), 40 W, 4Ω25cm (10“), 40W, 4Ω20cm (8“), 20W, 4Ω20cm (8“), 20W, 4Ω
Impédance d’entrée 1MΩ1MΩ1MΩ1MΩ
Spirale réverbération oui
-
oui
-
Alimentation 230V/50 Hz/40VA 230V/50 Hz/40VA 230V/50Hz/40VA 230V/50Hz/40VA
Dimensions (L x H x P) 480 x 390 x 237mm 480 x 390 x 237mm 380 x 340 x 237mm 380 x 340 x 237mm
Poids 9,5kg 9,3kg 7,5kg 7,3 kg
Modelli GA-1020R GA-1020 GA-820R GA-820
Potenza d’uscita 20W 20W 20W 20 W
Banda passante 90
-
8000 Hz 90
-
8000 Hz 90
-
8000Hz 90
-
8000 Hz
Altoparlante 25cm (10“), 40 W, 4Ω25cm (10“), 40W, 4Ω20cm (8“), 20W, 4Ω20cm (8“), 20W, 4Ω
Impedenza d’ingresso 1MΩ1MΩ1MΩ1MΩ
Spirale di riverbero sì
-
sì
-
Alimentazione 230V/50 Hz/40VA 230V/50Hz/40VA 230V/50Hz/40VA 230V/50Hz/40VA
Dimensioni (L x H x P) 480 x 390 x 237mm 480 x 390 x 237mm 380 x 340 x 237mm 380 x 340 x 237mm
Peso 9,5kg 9,3kg 7,5kg 7,3 kg

Stage LineR
Copyrightby INTER-MERCADOR GMBH & CO. KG, Bremen, Germany. All rights reserved.
03.97.01
This manual suits for next models
3
Table of contents
Other IMG STAGE LINE Musical Instrument Amplifier manuals


