ImmersionRC XuGong User manual

Build GUIDE
Preliminary:v0.321Jan2013

Important Note:
Thisbuildlogiscurrentlyaworkinprogressthatcanreallybenefitfrominputfromanyone
usingit.Pleasesendanysuggestions/updatesto[email protected]andwewillbe
delightedtoincorporatetheminthemanual.
Avideobuildlogisinprogressandwillbereleasedshortly.
Pre-requisites, General
● 2mmHexdriver,forinstallationofthemotormountingscrews,andTNutscrews
● SmallPhillipsscrewdriver(watchmaker’ssize,forHitecselftappingservoscrews)
● Battery,HobbyKingZippyCompact4s4000recommendedformostbuilds.Seethe
section‘BatteryChoices’formoredetails.
● 3MVHB(orsimilar)doublesidedtapeforESCmounting
● M3x8mmscrewsformotormounting(lowprofilehead,2mmorless)
● FlightController,OpenPilot,orDJINazarecommended(seebelowforaDJIspecific
build)
● Twolengthsof~AWG14wire,redandblack,approx.10cmlong(Batteryhookup)
● Twolengthsof~AWG20wire,redandblack,approx.20cmlong(Nazahookup)
● ExtendercablestoconnectthemotorstotheESCs,lengthdependsuponmotorsand
ESCsused.
● XT60,orDeansconnectoraccordingtothebatteryused
● 4mmsinglesidedselfadhesivefoamforcameramounting
● Tiltservo,HS65MGhighlyrecommended
● FPVCamera,FatSharkCMOShighlyrecommended
Pre-requisites, Build using DJI Components
● DJINazaLite,orNazaMV2(smallerBECfromtheLiteispreferredformostbuilds)
● 4xDJI2212/920kVmotors,orsimilar
● 8”DJIPhantomprops(smallarmversion),orDJI1038props(newstyle)forthelongarm
version

The Anatomy of a XuGong
The Foldable Arms, Motor Mounts, and Motors
Thefoldablearms,milledoutofasolidplateof5mmAluminium,allowtheXuGongtocollapseto
asizewhichfitseasilyintotheaverageShoeBox/HandBag/BackPack,etc.
Whetherthelong,orshortarmversionisbuilt,thepivotpointsallowthefourmotorstopivotinto
thecenteroftheframeforstorageandtransport.Whileinthisposition,thepropbladesare
mucheasiertoprotectfromdamagethantheyareonamoretraditionalquadcopter.
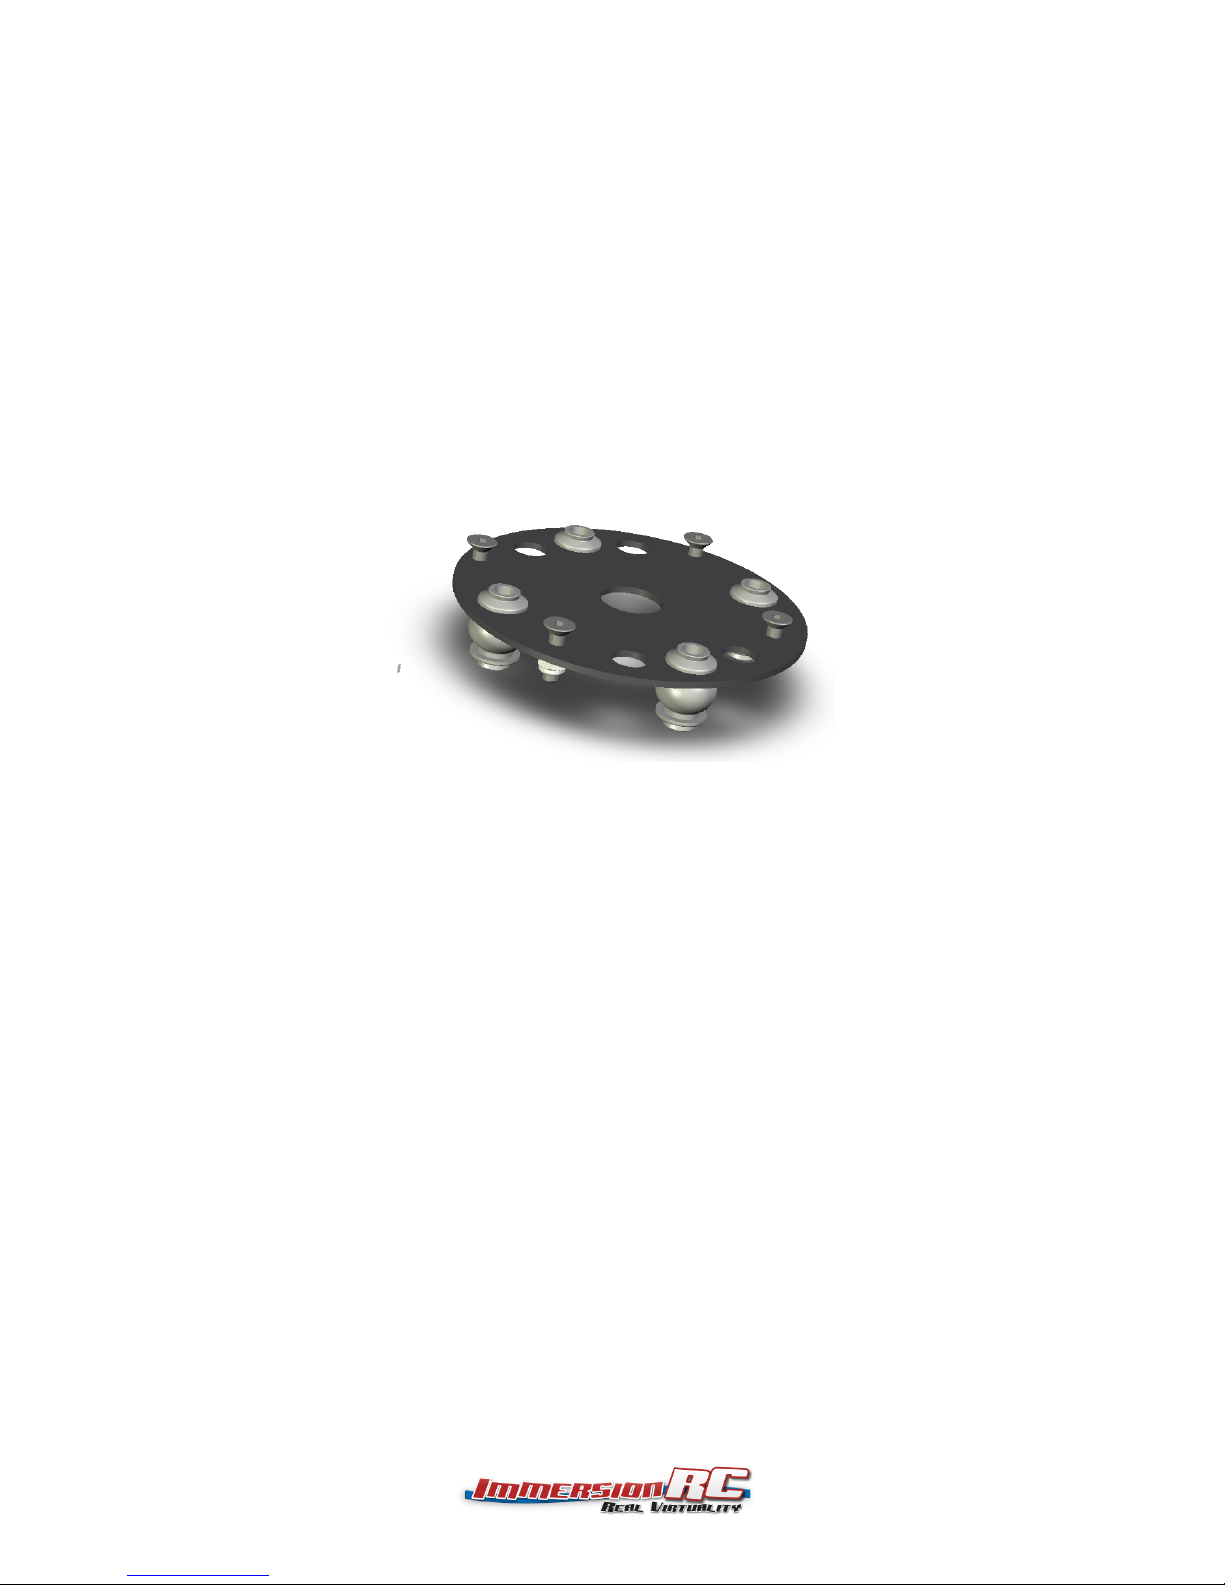
The Anti-Jello Plate
TheAntiJelloplateconsistsofanFR4plate,laidoutwithPCBtraces,whichroutethepower
betweenthebattery,andthefourESCs.
Itincludesaselectionofholesforsiliconedampers,thenumberofwhich,andthedurometer
(hardness)ofwhich,determinethetradeoffbetweenvideoquality,andaerobaticflight
characteristics.
Twokindsofdampersareavailable,theblackonesincludedwiththeproduct,whicharegoodfor
slowflyingphoto/videowork,andsomeharderreddampers,formoreaggressiveflying.
Thereddampershaveaslightlydifferenttooling,toleavemorematerialinthecenter.
The Frame Assembly
TheFrame,constructedmainlyofaverysturdyblackFR4material,holds(andprotects)the
battery,andalloftheelectronics.Theflightcontrollersitsinaprotectedboxinthecenterofthe
frame.TheA/VTx,andUHFRxcanoptionallybeplacedintherecesseseachsideoftheframe,
keepingthemprotectedagainstcrashdamage.
AnalternativeframeassemblywillbemadeavailableinearlyJanuary2014,whichwillbemade
ofcarbonfibre,withlightweightanodizedaluminiumnutsandscrews.
ThisversionworkswellfortwotypesofQuadflyers,thelongrangefanatic,whowantstoshed
everygramfromtheweightofthequad,andtheposer:),whojustwantsaquadtolook
fantastic.

The GoPro Camera Assembly
TheGoProcameraassemblyincludesapaddedsupportforaGoPro3(anyedition),anoptional
supportforanSDcamera(FatSharkCMOS,with‘GoProequivalent’Lens,highlyreommended).
ForthestandardversionoftheXuGong,asimpletiltonlygimbalusingaHitecHS65MGservo
(orsimilar)issupported.Thisisafairlyrobustmechanism,whichworkswellforaquadwhich
willbecrammedintoabackpackduringtravel.
The‘HB’versionofthisservoworksalso,butthegearsareabitfragileforthisapplication.
AbrushlessgimbalisunderdevelopmentfortheXuGong,andwillbeavailableinearly2014.
Several3rdpartybrushlessgimbalshavebeensuccessfullyusedontheXuGong,includingthe
Tarot,whichwithafewsimplemodificationscanbemountedontheXuGong’sfrontbulkhead.
Building the XuGong... Component Selection:
Thereareahugenumberofdifferentcomponentsavailabletobuildmulticoptersthesedays.The

costofthesecomponents,alongwiththeirquality,andcompatibility,varieswidely.
Thecomponentselectionsbelowarebaseduponourexperiencetodate,andwillresultina
successfulfoldablequadcopterbuild.
Flight Controller
MostoftheXuGongprototypesbuiltbytheImmersionRCteamhaveusedvariousversionsof
theDJINazaFlightcontroller.
Thisexperiencewillbereflectedinthisbuildlog,itwillbetheflightcontrollerusedduringthe
build.
TheNazaMLiteis,insomeways,moresuitablethanthenewerV2,duetoitsmuchsmaller
(andthuseasiertomount)LED/Powerunit.
Ofcourse,anyflightcontrollerdesignedtoflyquads,assumingreasonablephysicalsize,willdo
justfineasareplacementfortheNaza.
ForusewiththeOpenPilot,andsimilarFCs,astandardpatternof4holesisprovidedonthe
bottomplateoftheframe.
Motors
Asfortheflightcontroller,mostoftheXuGongprototypeshaveusedthestockDJImotors(DJI
2212/920kV).Thesearegenerallypricedfairlyreasonably,andfittheframearmsnicely.
Theyarealsocompatiblewitheitherthe8”DJIpropsusedonthesmallerversionoftheXuGong,
theXuGong8,andthe10”(1038)propsusedontheXuGong10.
Props
OneofthemostcommoncausesforcrashingduringtheXuGongdevelopmentwasdueto
propsbreakinginflight.Theearlier8”DJIpropsweregenerallytheculprit.
Graupner8”carbonfibrepropsdoworkasreasonablereplacements,butrequireasmall
amountofdrilling/filingtoallowthemtofitontheshaftsofthestockDJImotors.
Forthe10”versionoftheXuGong,thenewer1038propsfromDJIworkverynicely,andareyet
tofailforusinflight.
Tip:EventhoughtheXuGongisdesignedtoreducethetransmissionofvibrationtothe
camera,wellbalancedpropsarestillagoodidea.
Battery
SeveralbatteriesarecompatiblewiththeXuGong,andshouldbeselectedbaseduponthekind
offlightcharacteristicsrequired.Abatterybox30mmheight,with2.4mmrequiredforthe
retainingringoftherubberfeetmeansthata28mmtallbatteryfitscomfortably,butnothingtaller.
Battery
mAh
Height
Width
Length
Weight
Status/Time
NanoTech3.3
2550C
3300
28mm
44mm
135mm
327g
recommended
Lunenier3.3,
4s,35C
3300
27mm
44mm
135mm
330g
Goodcandiate,
tobetested
ZippyCompact
25C,2700
2700
21mm
44mm
138mm
278g
12minuteflight
time
ZippyCompact
4000,25C
PREFERRED
4000
28mm
43mm
145mm
385g
210mAh/minut
eofflight
w/1038props
NanoTech2.2
35870C
2200
33mm
35mm
105mm
246g
tootallfor
betas
Thebatteryboxdimensionsare:30mmHx48mmWx125mmdeep
RememberthatthebatteryplaysabigpartinthedeterminationoftheCenterofGravityofthe
XuGong.Aheaviercamera,orabrushlesscameragimbal,canbecompensatedforbyaheavier
battery.Inaddition,anoseheavyXuGongcanbebalancedbyslidingthebatteryrearwardsin
thebatterybay,andpaddingthefrontofitwithasmallblockoffoam.
Forpureflighttime,theZippyCompact4000,4s,25C,isagoodchoice(HobbyKingPart
NumberZC.4000.4S.25).ThispackisusedonmostoftheImmersionRCprototypeXuGongs.
A/V Transmitter
Thiswillbealittlepredictable,butwedohighlyrecommendanImmersionRCproductfortheA/V
transmitter.Forlicensefreeuse,on5.8GHz,the25mW5.8GHzTxisagoodchoice,andwill
complywithCEstandardsforuseinEurope.
Forlongerranageuse,orwherearadiolicenseisavailable,thepopular600mW5.8GHz
transmitterisalsoaverygoodchoice.
ThetopandbottomframeplatesforthestockXuGongaredesignedtofitthetransmitter
betweenthem,protectingitfromdamagecausedbymost‘hardlangings’.
Asmallpieceof3MVHBtapekeepsthetransmitterfirmlyattachedtothesideofthequad.
A/V Transmitter Antenna
ThebottomplateoftheXuGonghasa‘hook’designedtomountoneofour5.8GHzSpiroNET
omnidirectionalantennas.Thisispositionedsoastokeeptheantennabelowthecraft,inclear
viewofthegroundbasedreceiver,andthecorrectdistancefromtheA/VTxforthestandard
cablelength.
FPV Camera
EventhoughthevideooutputofthegimbalmountedGoPromaybeusedasanFPVcamera,it

isnotreallyrecommended.GoProcamerashavebeenknowntoshutdown,losingtheirvideo
feed,forseveralreasons(toohot,toocold,deadbattery,..justbecauseitisthethirdSundayof
themonth…).
ToavoidthestressofhavingtousetheFlightController’s‘ReturnHome’functiontorecovera
‘blind’quadcoper,asecondaryFPVcameraishighlyrecommended.
ThegimbalwasdesignedforusewiththeFatSharkCMOScamera.Lightweight,andwithvery
goodperformanceindifficultlightingsituations.
AwideanglelenseisrecommendedinordertolettheCMOScameraseethesame(orsimilar)
FPVastheGoPro.ThismakesframingshotswhilefilmingwiththeGoPromucheasier.
Radio Control system
Continuingonthepredictabletheme,wehighlyrecommendtheImmersionRCEzUHFreceivers
foruseinthecontroloftheXuGong.ThesecanbeeasilyprogrammedtoemitaPPMstream
fromoneoftheservooutputs,whichiscompatiblewiththePPMmodeoftheNazacontroller.
Thisgreatlysimplifieswiring,andenableseventhe4channelEzUHFreceivertosupplythe5
channelsrequiredtoflythequad,plusadditionalchannelsforgimbal(andother)control.
AnyoftheEzUHFreceivers,canbeusedwiththeXuGong,thislistcurrentlyincludesthe4
channel,8channel‘lite’,and8channeldiversity.
Attheotherendoftheradiolink,thereareseveralradioscompatiblewiththeEzUHF.Our
currentfavouriteistheFrSKYTaranis,withournewJREzUHFModulepluggedintheback.
WiththeEzUHF,evenwiththe4channelunit,radiocontrolrangewillexceedtherange
achievablebythequaditself.
FortheEzUHFRxAntenna,afull½wavedipoleishighlyrecommendedifrangeofmorethana
fewkilometersisrequired.
Thisantennacanbeconstructedusingthemonopoleantennaswhichareshippedstockwiththe
EzUHFReceivers.Takealengthofthecablecommonlyusedforbicyclebrakecables,the
samelengthasthemonopole,andsolderittothesideofthemonopoleSMAconnector.The
flexiblenatureofthiscablewillallowtheantennatodeformduringtakeoffandlanding,andfold
outtocreateasoliddipoleduringflight.
Mountthereceiveronthebackofthequadcopter,nearthe‘tail’,withthedipolemounted
verticallybehindit.
Building the XuGong... Basic Concepts:
Concept #1: Introducing the IRC T-Nut
TheIRCTNutisauniquedesignwhichallowsverystrongjointsbetweenFR4plates,while
captivatingthenylocnutduringassembly.

Usingtheseiseasy,justinsertthenylocnutintotheplasticpart,andpushthetwointothe
TSlot.ThepartswillberetainedtoallowthesecondFR4platetobemated,andthescrew
inserted.
Tip:ifyouhavedifficultiestoinsertthenylocnutandtheplasticpartintheTSlot,firstsqueeze
thelowerpartinandtwistthetopintheholeinsteadofinsertingitfromtheside

Concept #2: Anti-Jello Dampers

Jello(orratherJellyasitiscalledintheUK),mightbegoodtoeat,butitisnotappreciatedin
aerialvideoproductions.TheXuGongarmassemblyismountedtotheframeusingantivibration
dampers,similartothoseusedontheDJIZenMuse.
Toinstallthem,firstpushonesideofeachofthemintotheholesinthetopoftheframeplate.If
theyresist,agentlerotationgenerallyconvincedthemtodropintoplace.
OncethePCBcontainingtheupperarmassemblyisreadytomount(checkanddoublecheck
thatallsolderinghasbeencompletedbeforemountingit),pressitlightlyagainstthedampers,
andonebyone,teasetheupperpartofthedampersthroughtheholeinthePCB.
Apairoftweezers,liketheonesbelow,workatreatforteasingthesein.Justclosethe
tweezers,sneakthemaroundthebackofthedamper,andusethemtopoketheupperriminto
thehole.
Building the XuGong... Step-by-Step:
Step 1: GoPro mount
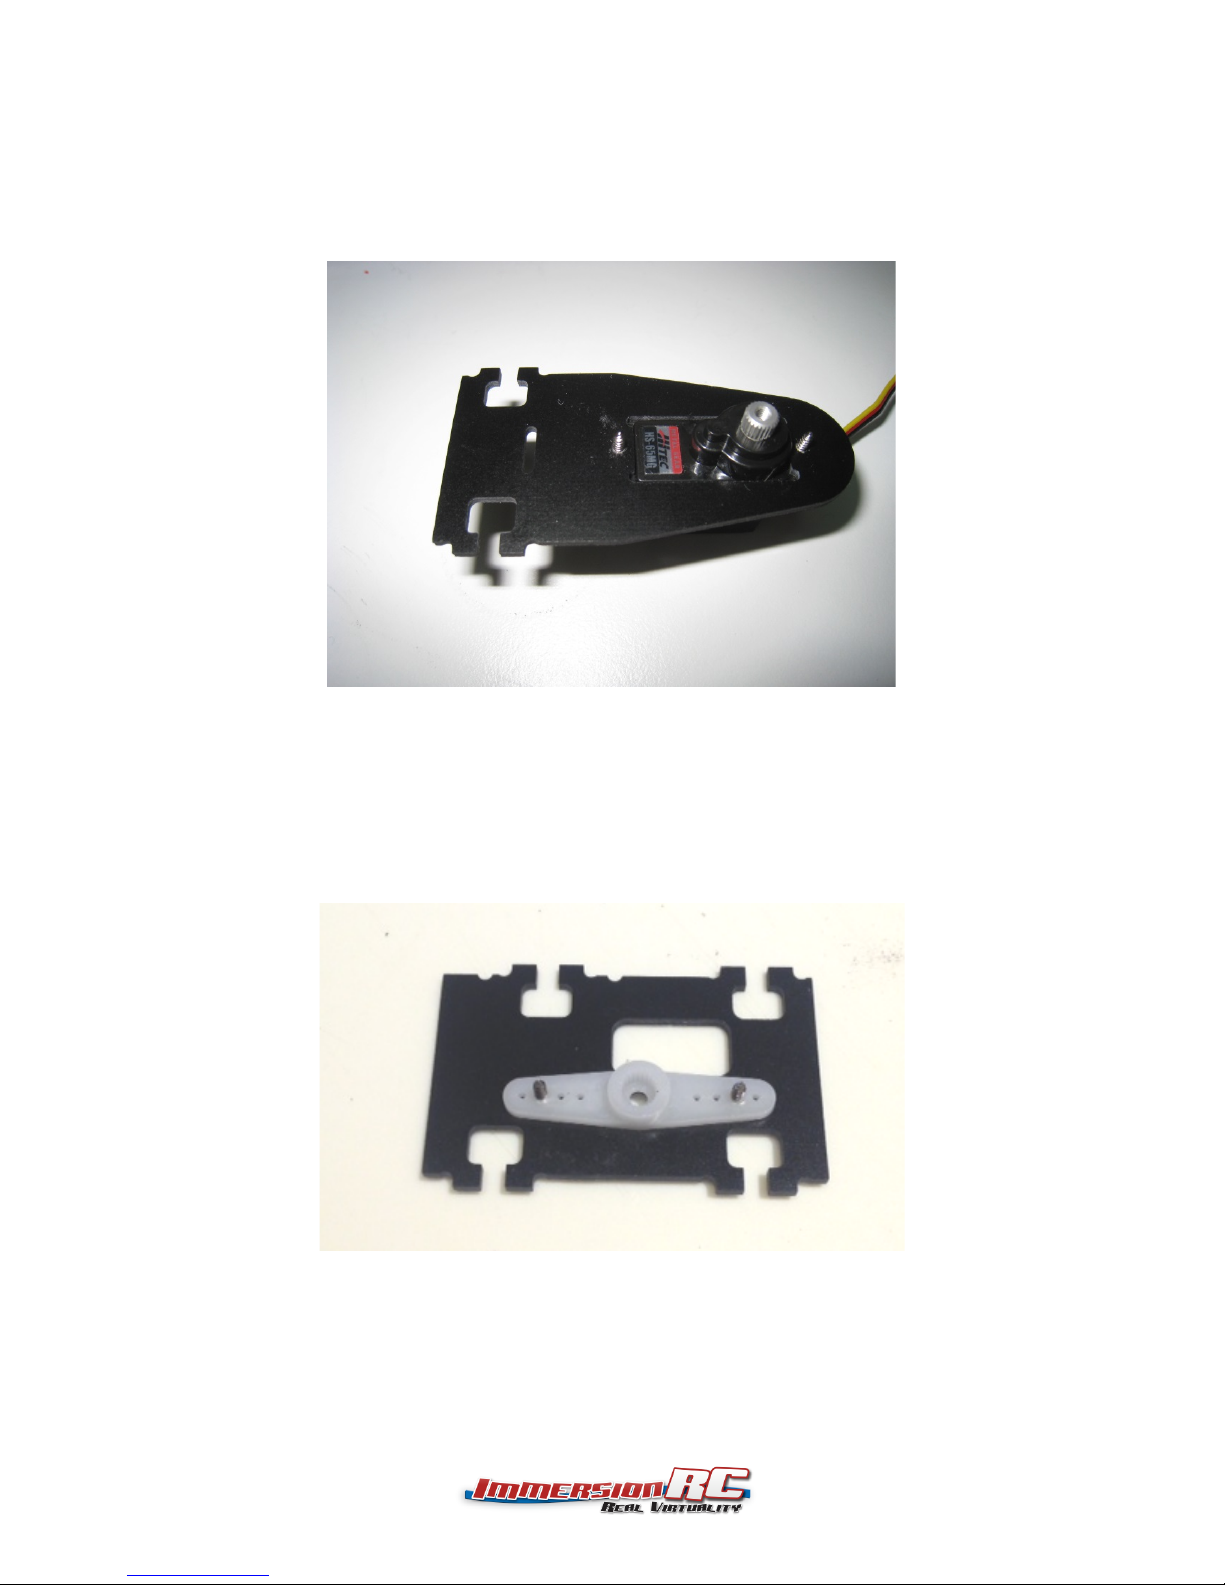
a) Servo mount: HS65MG
UsingtwooftheselftappingscrewssuppliedwiththeHS65MGservo,mounttheservointoone
oftheGoPromountingarms,asshownbelow:
b) Servo Horn
UsingthesecondpairofselftappingscrewssuppliedwiththeHS65HBservo,screwtheservo
hornontotheleftsideGoPromountingplate,asshownbelow:
c) Right-side GoPro bearing
TakeaM3x10mmscrew,andpassitthroughtherightsideGoPromountingplate,sothatthe
headofthescrewsitsinthemilledrecessintheplate.Mounttherightsidemountingbracket,
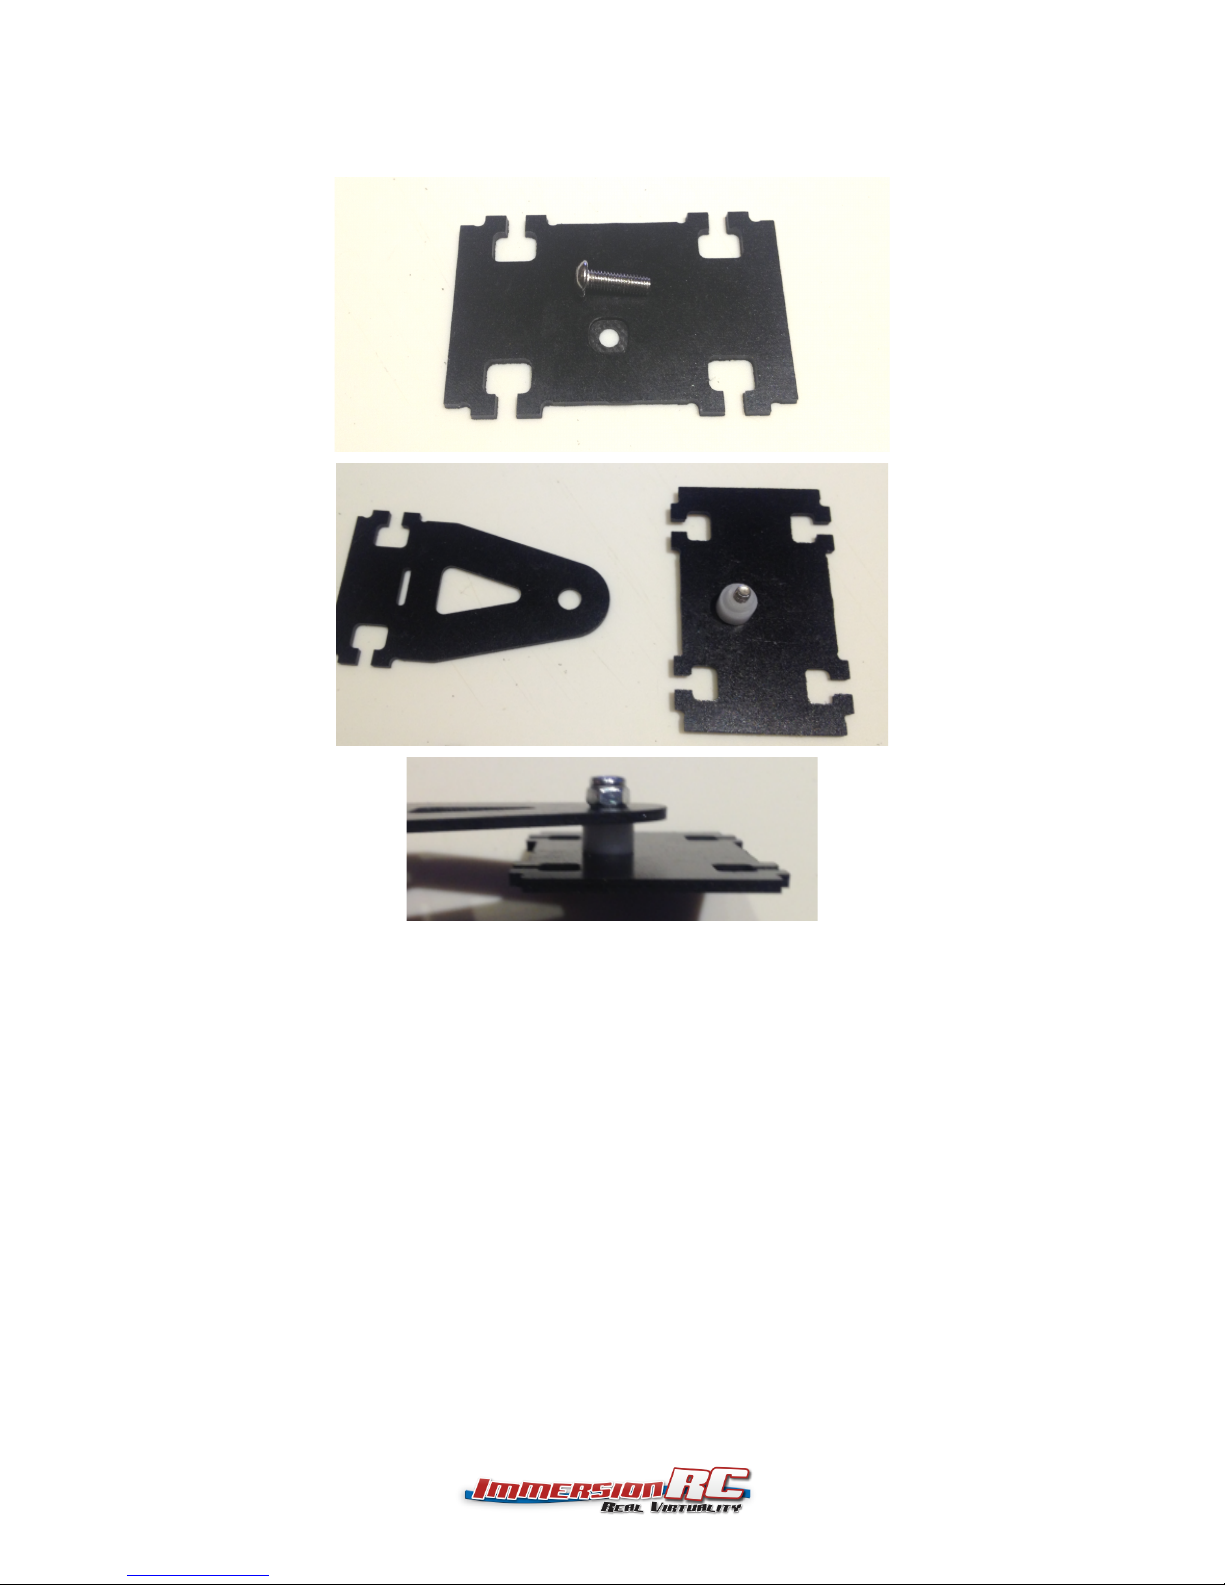
andsecurewithanM3nylocnut.

d) T-Nut installation, Finalize GoPro Assembly
InstalltheplasticnutholdersintothetwoGoProsideplates.
MountthetwoplatestotheGoProfrontplate:
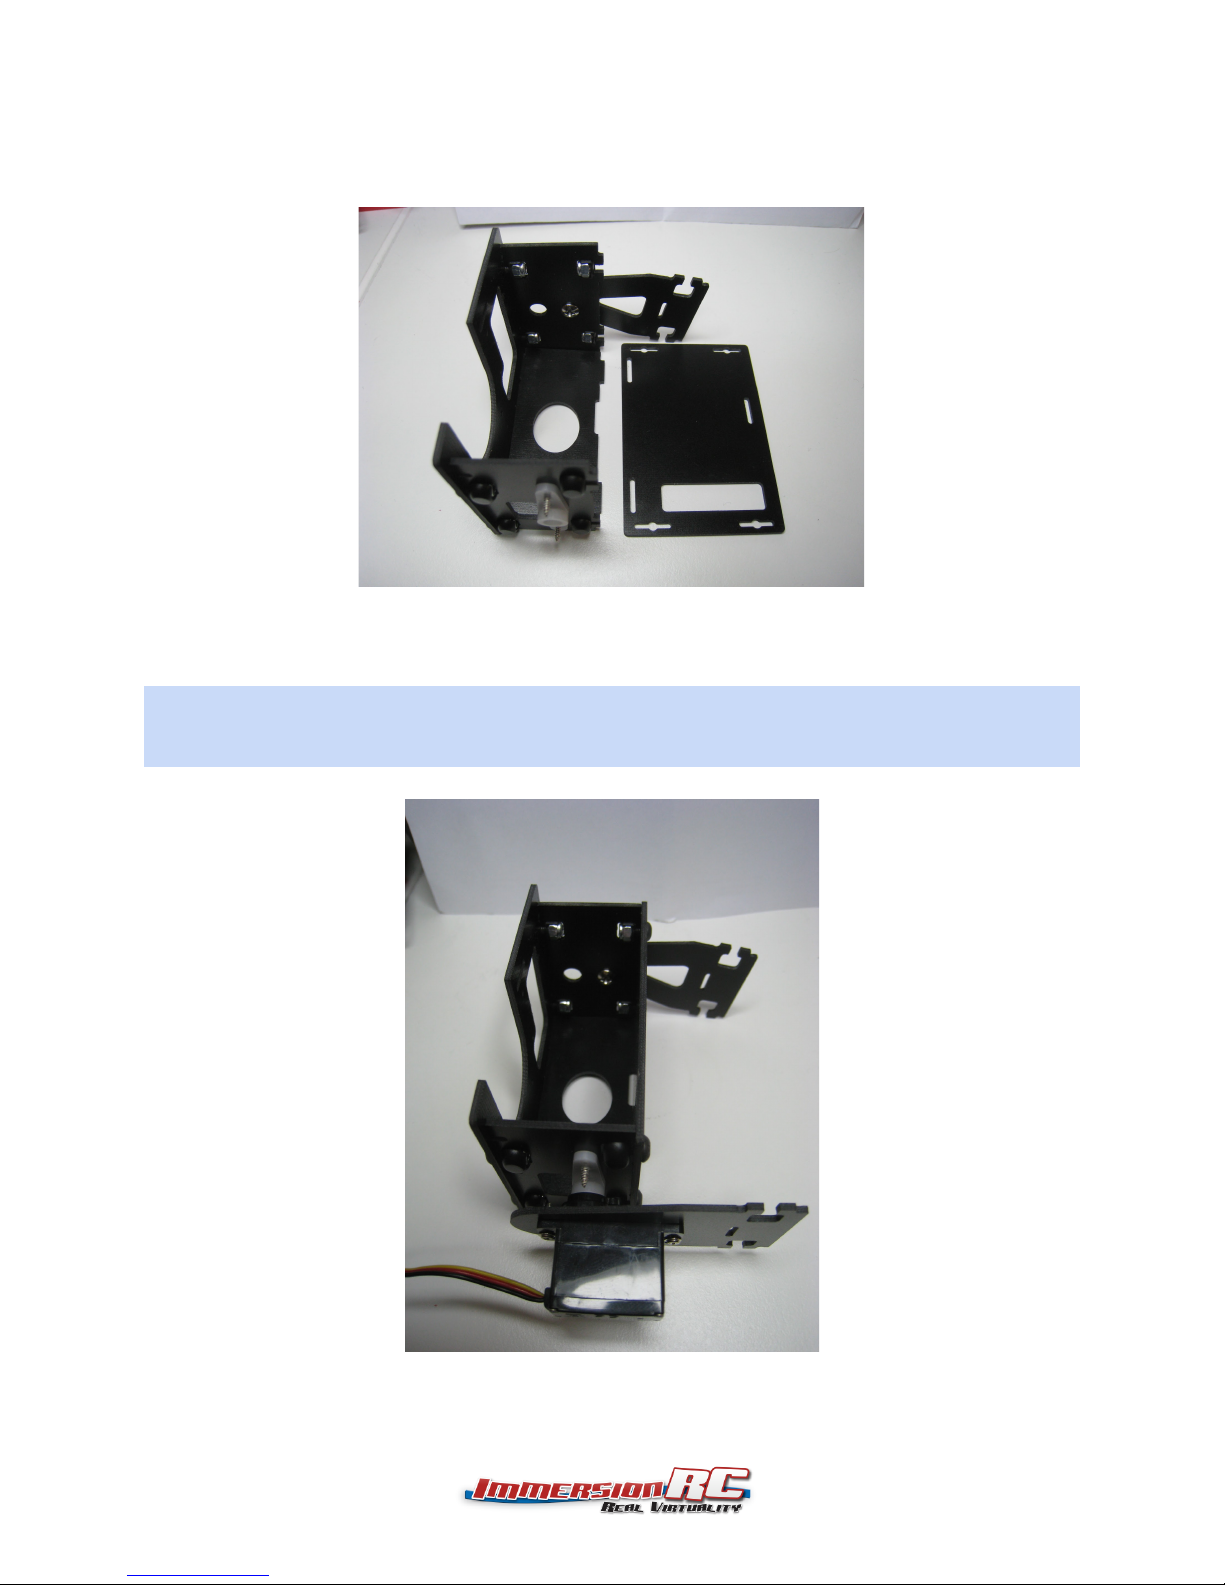
Mountthelowerandbackplates.Notethepositionoftheslotinthebackplate,andthe
correspondingslotinthelowerplate.
Finally,screwtheservohorntotheservo.
Tip:Toavoidbrokenservopinionslaterinthebuild,rotatetheservohornontheservosothat
whenthemountislevel,theservoisatit’smidpoint.

Step 2: The Frame
a) Silicone Feet installation
Firststepinbuildingtheframeistoinstalltherubberfeet.Don’tleavethisuntiltheend,since
theyaredifficulttoinstalloncetheframeisassembled.
Layoutthebottomframeplateasshownbelow,andteasethefeetintoplace.
NOTE:The‘Hook’asithasbeendescribed,inthetopleftofthephotohereisformountingthe
5.8GHzSpiroNetAntenna.Asmallpieceof3MVHBtapeholdstheantennasecurelyonthe
bottomoftheQuad.
b) Anti-Jello Damper installation
Theantijellodampersshouldbeinstallednext,asshownbelow.Again,don’tleavetheseuntil
laterintheinstallationprocedure,sincetheyaredifficulttoinstalllater.

c) Frame Side-plate Install
Nextstepistoinstallthesideplates.Usethepicturesbelowasaguide,toinstalltheTNut
assemblies,andscrewtheframetogether.
Don’tforgettheinner‘firewall’,whichprotectstheflightcontrollerfromarunawaybattery,inthe
eventofaseriouscrash,andthefrontfirewall.
Finallyyoushouldhavesomethingthatlookslikethis,frombelow:
Don’tcloseitjustnow,asyou’llstillneedaccesstotheinsidetofixthecontrollerandtheGPS
mount.
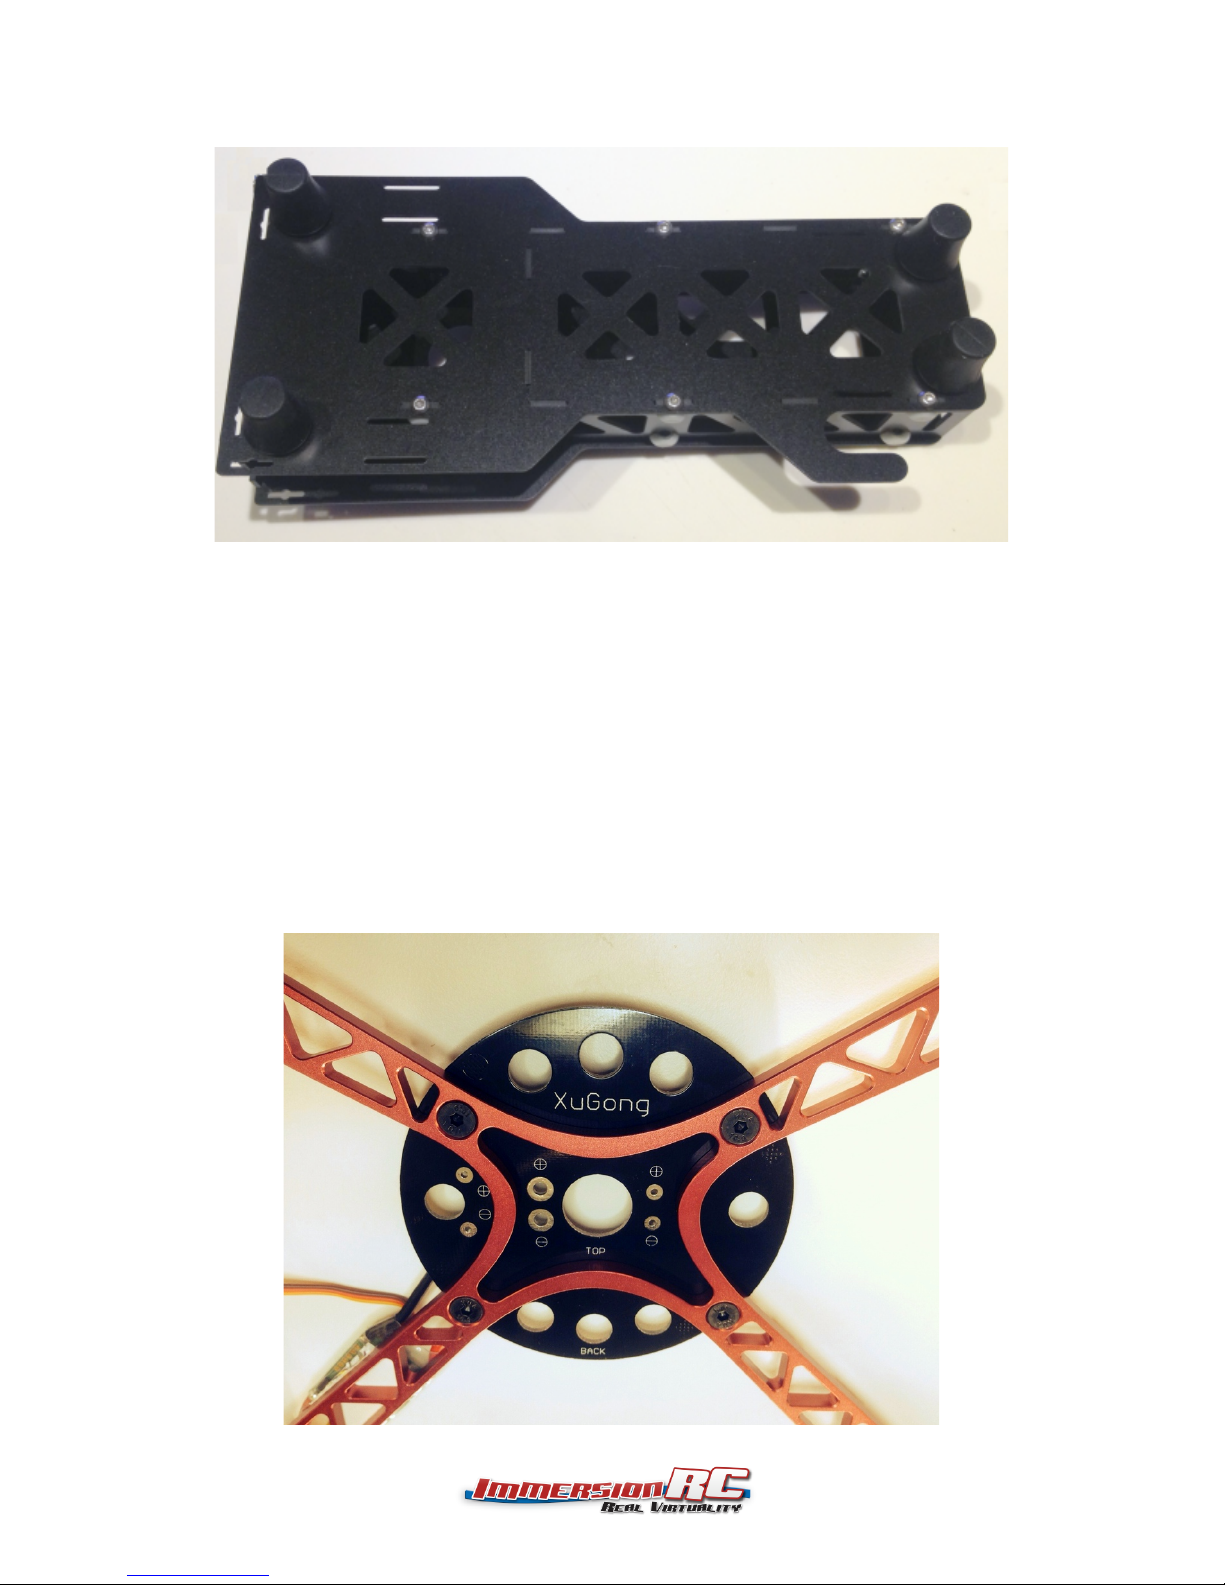
Step 3: The Foldable arms
Power Distribution Plate
FirststeponthefoldablearmsistoattachthemtotheroundpowerdistributionPCB.
DothiswiththesuppliedM4bolts,andnylocscrews.
NotethatthePCBismountedunderthearms,asshownbelow:

ESC Mounting
TheESCssitbelowthecenterspiderasshownbelow.Onbetaunitsthebestwaytomount
themiswithapieceof3MVHBdoublesidedtape.Avoidmountingthemwithtiewraps,or
anythingelsethatwrapsaroundthecenterspider,sincethatwillimpedetheabilitytofoldthe
copter.
Tip:Ifpossible,trytoavoid‘peel&stick’typethickerfoamtapes,theadhesiveonthesewill
lastforashortwhile,buteventuallywillgiveway(thiswasrecommendedinpreviousversions
ofthebuildlog)
Tip:NotethattheESCsshouldnotbemountedtooclosetothecenterplate,orthecapacitor
thatisusuallystickingoutoftheendoftheESCwillbecomeagreatwaytotransmitvibration
betweenthearm,andtheframe.
Soldering Cables to the Power Distribution Plate
NowthattheESCsareinstalled,youcancompleteallofthesolderingtothepowerdistribution
plate.
StartingwiththeESCs,cuttheESCpowerwirestothecorrectlengthtoallowthemtobe
soldereddirectlyontothepadsontheboard.NotethatforDJIESCs,thepositiveandnegative
terminalsarepositionedcorrectlytolineupdirectlywiththepowercables,withoutcrossing
wires.EnsurethatwiththeESCsused,theredESCpowerwireissolderedtothe+terminal,
andtheblackESCpowerwireissolderedtotheterminal.
Warning:Donotgetthesewiresbackwards…ESCsarenotveryforgivingifwiredtoaLiPo
backwards!.Check,anddoublecheck!
Next,soldertwolengthsof14AWG(orsimilar)siliconecoatedwiretothepadsmarketBATT.
Tostartwith,usealengthofapprox10cm,thesecanbecutdowntothecorrectlengthlater
whenthebatteryisselectedandinstalled.
NextstepistosoldertwolengthsofthinnersiliconecoatedwiretothepadsmarkedNAZA.Start
withalengthofabout10cm,andasforthepowercablesabove,thesewillbecutdowntolength
laterinthebuild.Forboththepower,andthesecables,trytousecolorcodedwire,redand
black,toavoidanymagicsmokelaterwhentheyarehookedupbackwards.
FinalsolderingstepistheA/VTxpowercable.Thisshouldbeapprox10cmlong,andbe
solderedontothepadsmarkedNAZA,sincetheyneedtoexitontherightsideofthequad,
nearesttheantennamountonthelowerframeplate.TheframeisdesignedforanImmersionRC
600mWTx,mountedintherecessintherightsideoftheframe,whichprotectsitfromimpact
fromallsides.

Onceallofthecablesaresoldered,toreducespaghettilater,takeacoupleofnylontiewraps
andbundlethe4ESCcablestogetherclosetothepowerplate.
Thisassemblyshouldlookjustlikethephotobelow.Pleasedouble,andtriplecheckthepolarity
ofallofthewiringatthispoint.Theplateisnoteasytoremoveandreinstalllater.
Table of contents
Popular Toy manuals by other brands


Eduard
Eduard SB2U-1 Vindicator Assembly instructions

Hasbro
Hasbro PJ Masks quick start guide

BUSCH
BUSCH 5300 instructions

LeapFrog
LeapFrog Lettersavrus Parent guide & instructions

PLAYTIVE
PLAYTIVE PASSENGER TRAIN Instructions for use

Hasbro
Hasbro Spiderman Origins Spiderman with Leaping Attack... instruction manual


