iMove STADSFIETS FIRST LADY Technical manual
- 1 -
Operation Instruction
Maintenance Manual
Warranty Instruction
Electric Bicycle (Electric Vehicle) | Comply with safety standards
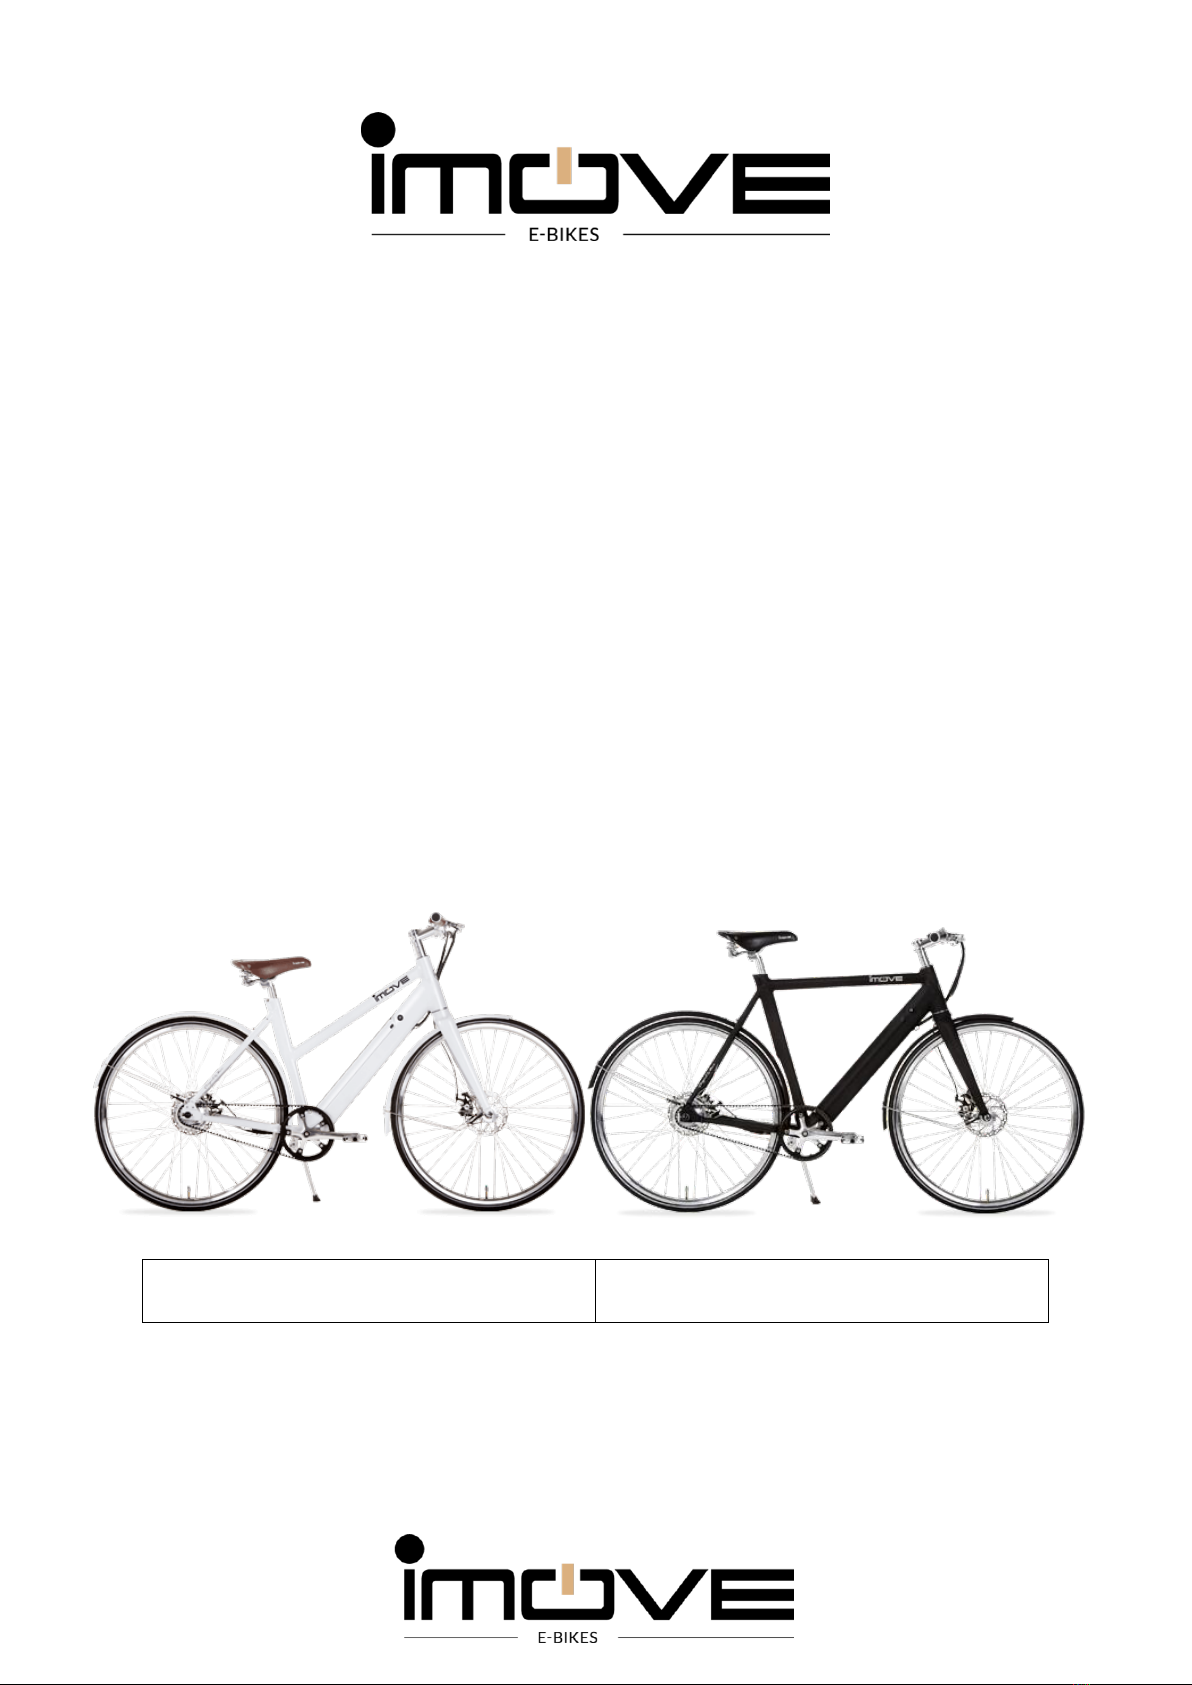
STADSFIETS FIRST LADY
CITYBIKE FIRST LADY
STADSFIETS PRESIDENT
CITYBIKE PRESIDENT

- 2 -
Please Pay Attention:
Our electric bicycle is specially designed for city roads.
Intensive use of the electric bicycle or riding it not on flat roads can cause damage to the
bicycle so that the bicycle will be out of order ahead of time and result in injuries.
Like other machine combination, electric vehicles will also be aging due to high pressure and
wear. Different materials or components have different aging situations. Once surpassing the
expected service life, electric bicycle is likely to be blew out suddenly and cause injuries
during the using process. Under high pressure, cracks, scratches or discoloration can be
occurred to electric vehicles, which indicate that the components have exceeded their using
services and should be replaced.
Therefore, you are advised to regularly check the frame, front fork and rim of your electric
bicycle, especially in the case of intensive use.
You are also advised to read the instruction detailed before using the electric bicycle, which
contains the information of the first adjustment, maintenance and use. Wish you have safety
and commutability when using the electric bicycle and get satisfaction.
In order to guarantee your safety, we suggest wearing a suitable helmet. If the electric
vehicle is used for shuttling children, please make safety measures efficiently and strictly
obey traffic regulations.
You can use the bicycle in rainy conditions as long as you do not wade into water, because
the whole electric system might be shorted out if the motor hub is immersed in water, causing
damage to the electronic components.
In addition, unless with the supervision and guidance of relevant responsible person, please
don’t lend your electric vehicle to those who are not sound on physiology or mentality and
unable to ride it (such as children). Supervise children not riding electric vehicles casually.
Waste batteries must be recycled and be discarded in the specific collection boxes to protect
the environment.
Contents:
1 Battery: extraction, charge, insertion, use and maintenanceFout! Bladwijzer niet
gedefinieerd.
2 Adjust Handlebar Position...........................Fout! Bladwijzer niet gedefinieerd.
3 Tire Inflation ...................................................................................................- 5 -
4 Maximum Load...............................................................................................- 5 -
5 Start ............................................................Fout! Bladwijzer niet gedefinieerd.
6 Maintenance and Adjustment......................Fout! Bladwijzer niet gedefinieerd.
7 Tightening Torque.......................................Fout! Bladwijzer niet gedefinieerd.
8 Accessories..................................................................................................- 12 -
9 Safety Instructions........................................................................................- 12 -
10 Safety Driving Recommendations................................................................- 12 -
11 What to Do If Your Electric Bicycle Breaks Down?Fout! Bladwijzer niet gedefinieerd.
12 Warranty.....................................................Fout! Bladwijzer niet gedefinieerd.
13 Keys............................................................Fout! Bladwijzer niet gedefinieerd.
12 Contact information.....................................Fout! Bladwijzer niet gedefinieerd.

- 3 -
1 Battery: extraction, charge, insertion, use and maintenance
Battery is located on the lower-central beam and it should be fully charged before using. If
you need to take out the battery, please follow the steps below:
1.1 Extract battery: turning the key clockwise to loose
latch. The unlocked battery can be taken extracted (the
key has been turned to the bottom).
1.2 Hold the key with your right hand while reaching for
the handle with your left hand: pull the handle up first
and pull it out leftward.
1.3 Charge: connect the charging plug of the charger to
the battery, and then, plug the charger power plug into
AC socket, finally remove battery separator and turn the
switch on.
The charging time is about 4 hours (initial electric
quantity is zero), and if the battery has parts of electric
quantity, charging time should be shortened. But for fully
charging maintenance, charging time will be extended:
generally the expected additional charging time of
battery is 1-2 hours.
1.4 Reinsert battery: insert the battery into the groove on the lower-central beam (see A) and
push it down to the end until the battery is completely locked (see B).
Images A & B are on the next page.
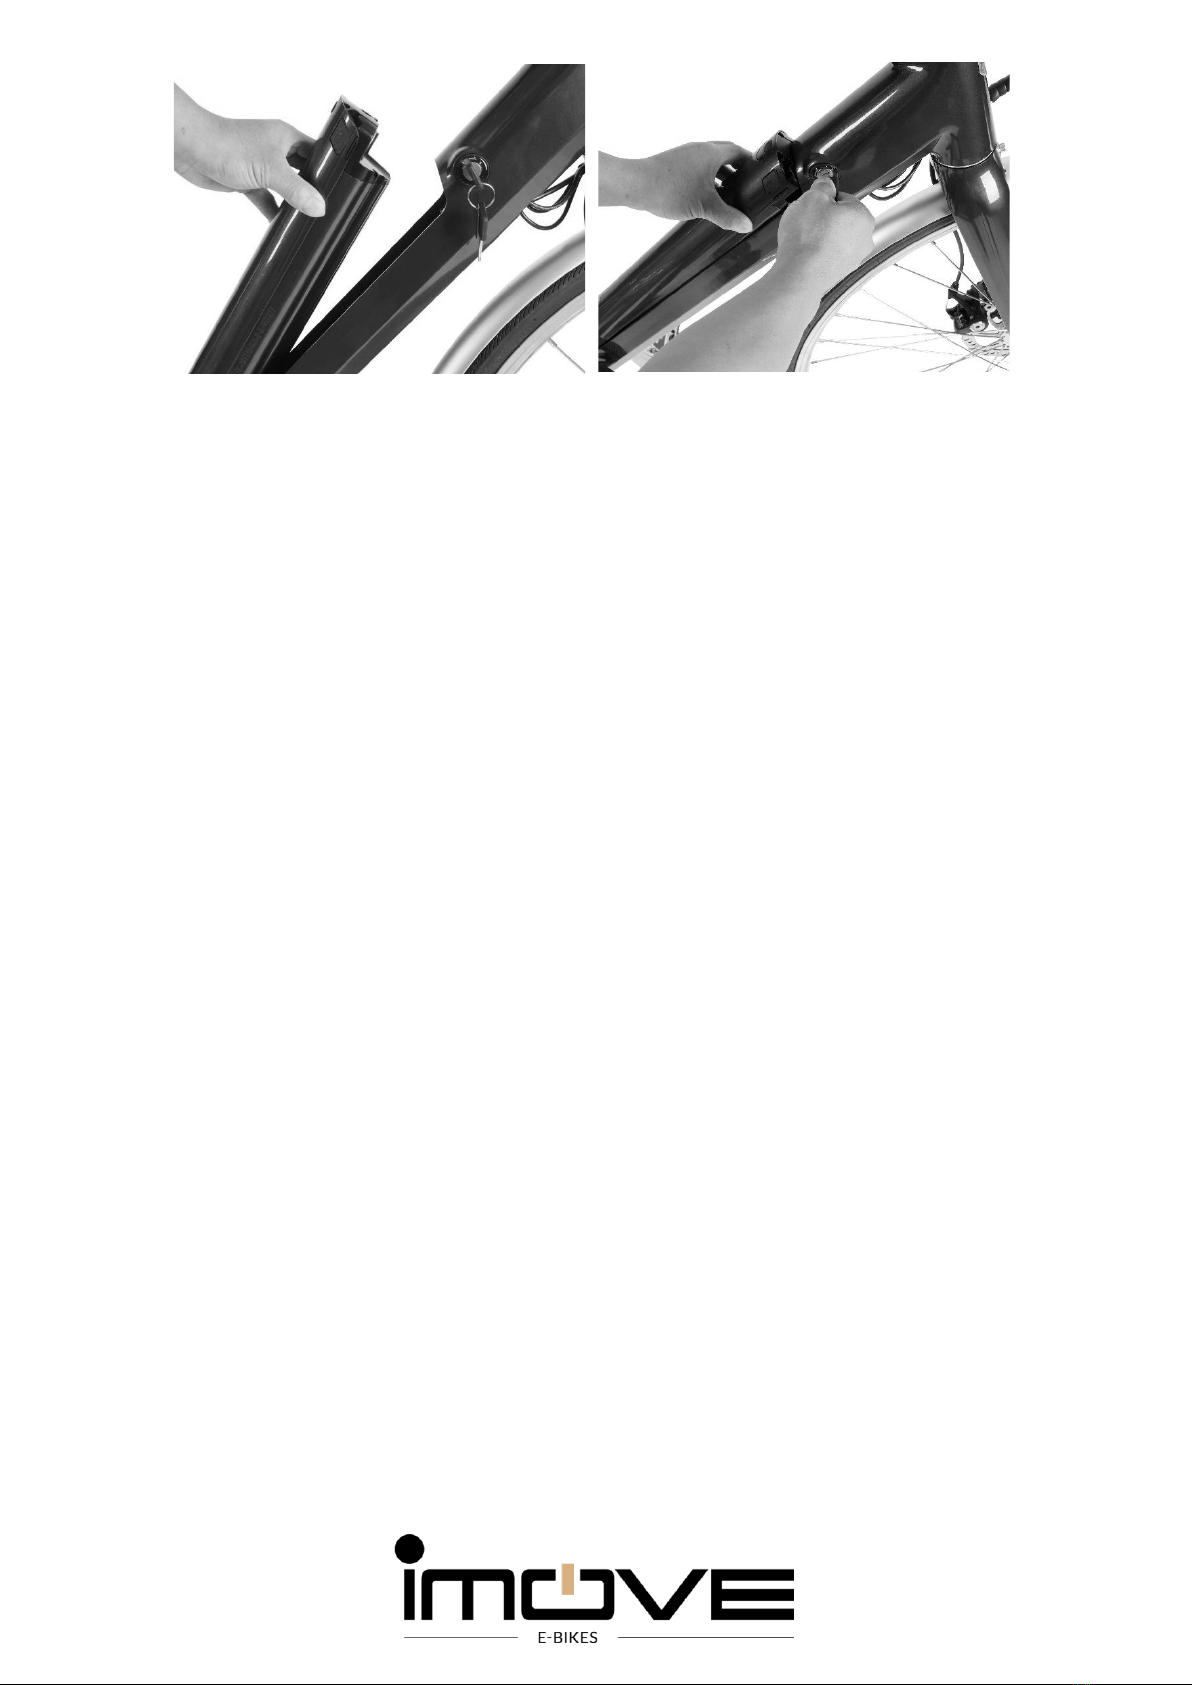
-4 -
AB
1.5 Be sure to lock the battery box tightly against theft.
1.6 Battery debugging period: during the using periods for first 5 to 10 times (fully charging and
discharging in about 2 to 5 times), there will be chemical reaction inside the battery. If the
reaction is inadequate, the battery can’t achieve the best running status, so charge using in
the first time will not exceed 80% of the capacity of electricity.
1.7 Battery has no memory effect. You can charge when the electricity has or has not been
used completely. It is advised that charge timely after each use in case that the electric vehicle
stops operation on the way.
1.8 When fully charged, the indicator light on the top of the charger will turn from red to green.
Considering the service life of the charger, you’d better unplug after finishing charge each time.
1.9 Maintenance obligations: just as muscle movement can keep normal only by adding
sugar regularly, battery needs being recharged regularly. Interval time of charging must not
exceed one month, or the battery will be accelerated aging that can lead to failure. If it’s the
above mentioned reason that causes failure, you can’t enjoy warranty service.
Note: if the electric bicycle is not used for a long time, please charge it monthly.
1.10 Compared with summer, driving range in winter will reduce 10% - 20%.
1.11 The cycle life of an ordinary battery is about 500 times, while that of a SAMSUNG
battery is 700 to 800 times which is equal to 2 to 4 years of use. Good habits of using and
maintenance will prolong the using service of the battery.
2 Adjust Handlebar Position
2.1 Adjust handlebar height
Adjust handlebar height until the appropriate position by fastening it with a 4 or 5mm allen

-5 -
Note: security thread on handlebar should not be exposed.
2.2 Adjust saddle height
Adjust the seat post to the ideal position and quickly tighten.
Note: security thread on handlebar should not be exposed.
3 Tire Inflation
Observe the tire walls and control the tire pressure intensity. Unit: P.S.I.
Check if the tire pressure is normal, for under-inflation could affect the travel speed;
hyperinflation can cause tire burst.
Requirements of inflation: More than 3.4 BAR and Less than 5.1 BAR
In order to avoid tire burst, More than 50 P.S.I. and Less than 85 P.S.I.
4 Maximum Load
The maximum load of the electric bicycle is 100kg (including the rider and his goods)
The maximum load for goods of this electric bicycle is 25kg.
5 Start
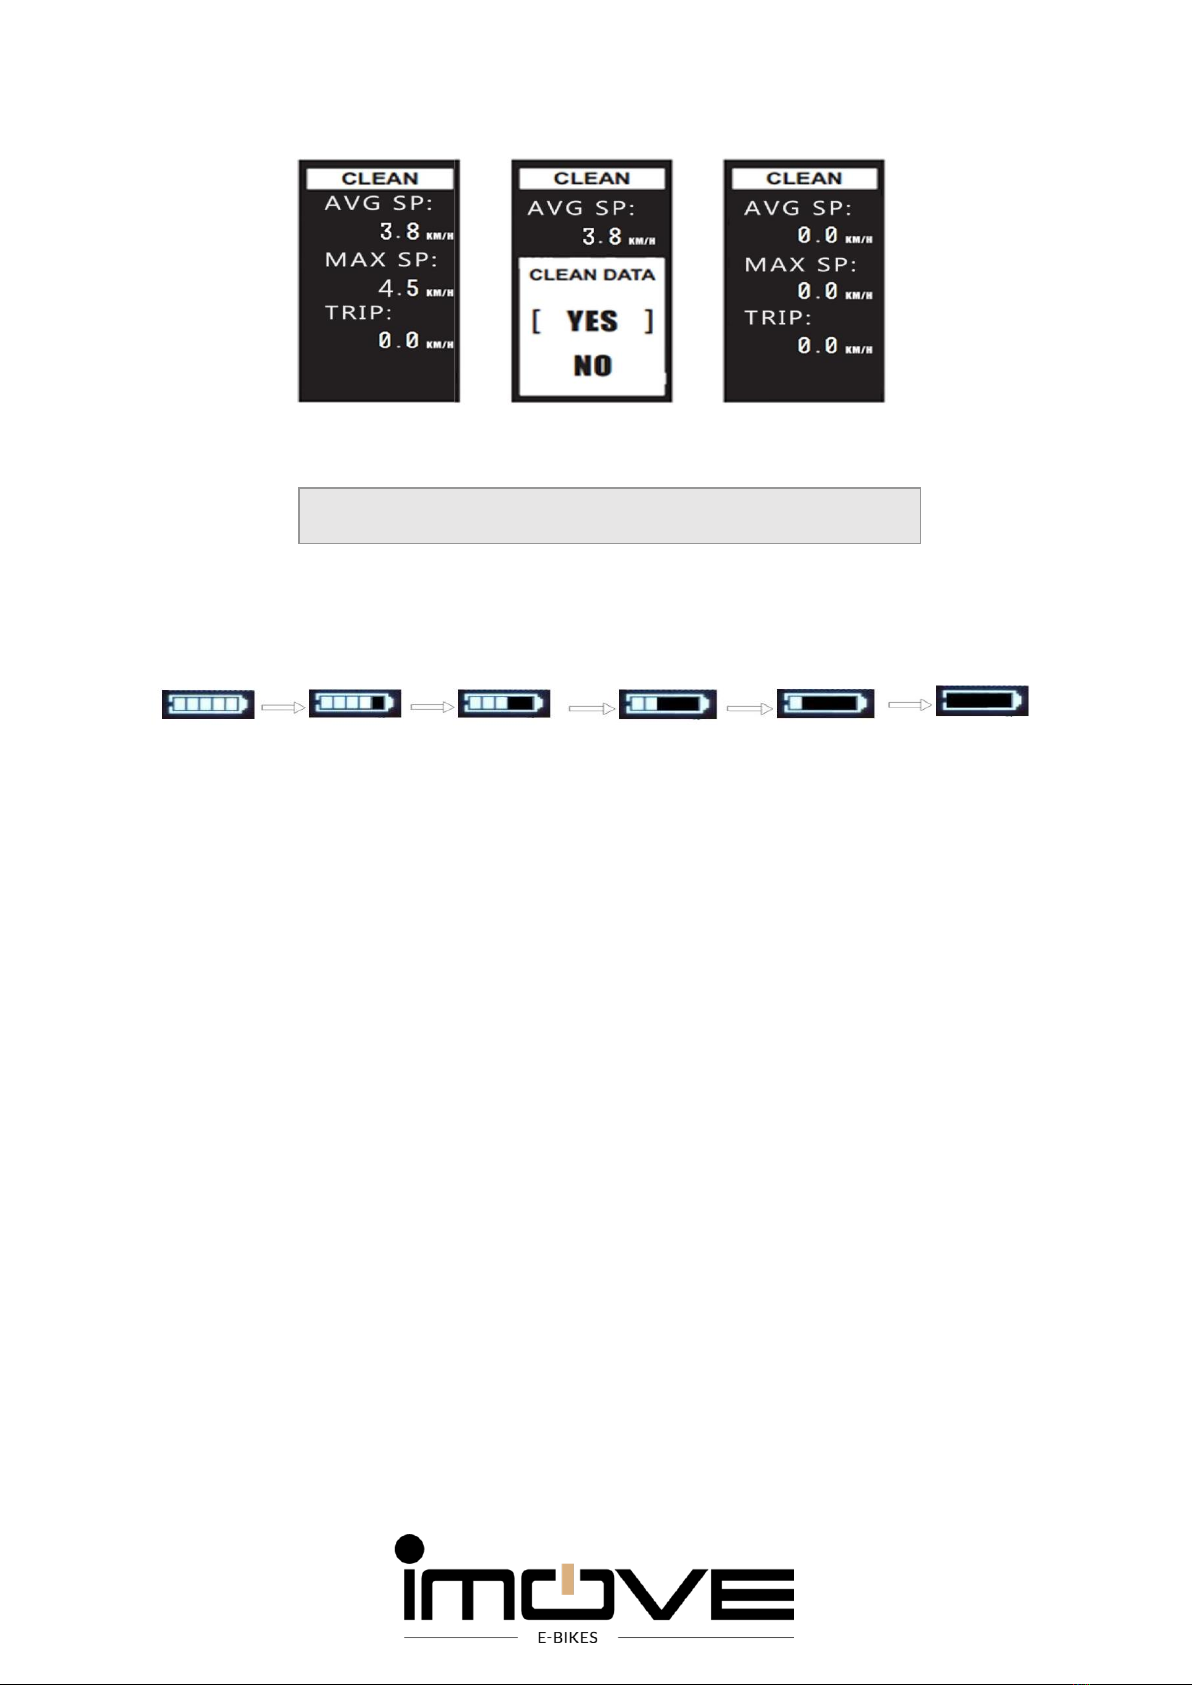
Items shown on the display panel include: battery status, riding mode, riding speed, single-trip
mileage, total mileage, error codes of the electronic control system. The display is shown in
the picture below:

-6 -
power assist level and walk mode: 0-4 files assist level, power from low to high are:
OFF, ECO, TOUR, SPORT, TURBO, OFF means no power assist;
Current speed and unit show the current riding speed;
Subtotal mileage and unit: accurate to one after the decimal point, maximum is
999.9km;
Power indicator show 1-5 level power and under voltage. Then icon blinks when under
voltage;
Headlight show when the headlight is on. [only if mounted on the bike!]
Average speed(AVG) - show the average speed of the riding;
Maximum speed(MAX) - show the maximum speed of the riding;
Total mileage ODO show the mileage of the whole riding, maximum is 9999km. The other
information is the same as basic interface.
The shape and positioning of the buttons are shown in the picture below:
Definition of buttons

-7 -
Turn on/off: ,Function button:M ,Adjust button+ :∧,Adjust button-:∨.
Switch on the battery after making sure that everything is tightly plugged into the controller.
Press and hold “ ” to turn on; while the bicycle is on, press and hold “ ” to turn off.
Change Speed: press “∧” to level up; press “∨” to level down
Long press “∨” button for 2 seconds, bike entered walk assist mode. When is
shown, loose “∨” button to exit walk assist mode .
Warning: Assist by Walking mode is only used when you are pushing the bicycle on foot.
Please do not use the mode when you are riding.
Long press “∧”button for 1 second,the headlight is turned on headlight
icon shows on the interface. Long press “∧”button for 1 second again,
the headlight is turned off. The icon of headlight is off.
[this future works only when installed!]
10 seconds after display turned on, and when speed is 0, long press M (2 seconds) enter the
data clearance interface, short press M pop up the confirmation window, press ∨ / ∧ to choose
item, short press M again to clearance trip mileage(TRIP), riding time(TRIP TIME), average
speed(AVG) and maximum speed(MAX), and return to operation interface.
Normal shutdown and power-down will not clear the above data.
Before you start
Turn on and turn off
Change speed and assist mode
Turn on and turn off the backlight
Reset the single-trip mileage
-8 -
When the battery works normal, the battery power shows 5 levels according to the battery
capacity. When the battery power reaches the under voltage warning value, only frame of the
battery icon is displayed and flash to remind the user to charge immediately. The battery power
is shown as below:
6 Maintenance and Adjustment
6.1 Lubricating Methods
Steel rope and other rotating parts need to use Vaseline lubricating oil, while chain should use
special oil. After cleaning, add oil to such fulcrums as front axle, middle axle, rear axle, flywheel,
front fork, chain, etc. for lubrication.
6.2 Adjustment of chain tightness
The sag is about 10-20mm.
If the chain is too tight, the driving speed will be influenced; if too loose, the chain will be easy
to escape.
You need to adjust chain tightness regularly according to the following method:
Loosen the nuts on the both sides of the rear axle, and move the rear wheel backward slightly
until the chain gets moderate tightness. At the same time, you should pay attention that the
rear wheel should be parallel with the bicycle frame flat, and then fasten the nuts on the both
sides to make tightening torque being 35Nm (front wheel and rear wheel).
Battery status

-9 -
6.3 Adjustment of the Speed Control System
When gently stepping on the pedal, make sure the
belt matches the freewheel. When detecting
connection not well or noise, you can try adjusting
the screws. It is recommended not to pedal hard.
6.4 Adjustment of the Brake System
To adjust the disc brake, you can use a hex key wrench to adjust the clamp screw (A); to adjust
the tightness, you can fine-tune the disc brake and brake handle (B).
A B
Note: use the brake handle correctly for safe braking. In order to avoid brake failure or
injuries, don’t hold the left brake handle suddenly in case of rider’s forward lean and injuries
6.5 Replacement of Brake Steel Wire
Loosen the wire clip of the brake caliper, take out the old steel wire from pipe shroud, embed
new steel wire, thread the hole of brake caliber, and then, insert wire clip, at last, adjust the
tightness.
6.6 Check rim and braking system
Before using the electric vehicle, check the following proceedings:
•The function of left brake lever and right brake lever. If damages (wear) appear on
brake blocks or steel wires, replace them immediately.
•Keep the rim clean and there should be no oil contamination on the surface of braking
device to avoid the danger brought by brake failure.
•Use appropriate degreaser cleaning the surface of braking device regularly.
•Check if the condition of rim is satisfactory by visual.
Note: the braking distance on wet roads is 40% longer than that on dry pavement.
The braking distance on dry pavement is 10m.
The braking distance on wet roads is 14m.

-10 -
6.7 Cleaning and Maintenance of Bicycle
Scrubbing the bicycle with wet cloth and use it until the bicycle is naturally dry. Never wash it
with water to avoid the damage of electronic components. The bicycle should be parked in
dry places to avoid damages caused by bad weather..
7Tightening Torque
For safe riding, it is advised the tightening torque of all parts of the bicycle should meet the
following criteria:
•Handlebars/Stem 15Nm
•Saddle 15Nm
•Saddle Post 10Nm
•Front wheel 35Nm
•Rear wheel 35Nm
•Pedals 40Nm
•Quick Release Post 30Nm

-11 -
Items of Regular Maintenance
Items to Check DAYS:
60
180
360
540
720
1. If components of the handles and steering gear are
tightened and if there is any wear and tear.
T
IL
IL
IL
IL
2. If the hubs and the bead holder are tightened and if there is
any wear and tear
T
IL
IL
IL
IL
3. If the components of the bottom bracket are tightened and
if there is any wear and tear
T
IL
IL
IL
IL
4. If the tires are inflated properly and if there is any wear and
tear.
I
I
R
I
R
5. If there is any wear and tear on the brake block.
I
I
R
I
R
6. If the brake handles are in good working condition.
I
I
I
I
I
7. If the speed control system is in good working condition.
I
IA
I
IA
I
8. If the front fork is deformed and if there is any damage to it.
I
I
I
I
I
9. If the fluted disc and the crank are deformed.
I
I
I
I
I
10. If the pedals are tightened and if there is any wear and
tear.
I
IL
I
IL
I
11. If the rear racket is tightened or deformed
I
I
I
I
I
12. If the splash guard is deformed or damaged.
I
I
I
I
I
13. If the cables are tightened and connected.
I
I
I
I
I
14. If the reflector is damaged and if it is clean.
I
I
I
I
I
15. If the bell works well
I
I
I
I
I
16. If the dynamo-powered lamp works well.
I
I
I
I
I
17. If the rims are in place
I
A
I
A
I
18. If the tightness of the chain is proper
I
A
I
A
I
19. If the width of the grip for the brake levers is proper.
A
A
A
A
A
20. If the height of the handles and the seat is proper
A
A
A
A
A
An explanation of the chart language:
I. Check and adjust or change as necessary; A: Adjust; R. Change; L. Lubricate; T. Tighten

-12 -
8 Accessories
We suggest that you ask professional person to assemble components. If some part are
damaged, please replace them immediately.
9 Safety Instructions
•For safe riding, you’d better obey the following provisions:
•Check carefully if the bicycle is in good condition before departure.
•If you want to wear a helmet, please purchase qualified products.
•Drive on the correct side of the road according to traffic regulations
•Don’t be pulled by other motor vehicles.
•Don’t ride side by side with other driver.
•If you are riding at night, please be sure to open the headlight to guarantee visibility.
•Check if the reflecting mirror/ reflector is in good condition.
Open the front and rear light.
•Wear a reflective coat.
10 Safety Driving Recommendations
Before using the electric vehicle, please check the following contents: if both the left and right
brake levers are functioning well; if the wheel nuts have been tightened; if lighting signal
devices (front and back) are in good condition; if the saddle tube, saddle, and handlebar
stem have been tightened; if the sound device works well; if the vehicle fastening parts are
tight; for more details, please refer to the corresponding section.
11 What to Do If Your Electric Bicycle Breaks Down?
Q: Why can’t I turn the bicycle on?
A:Please check if all wires are well connected between the panel and the controller; or if
the switch of the battery is on.
Q: What to do when the panel displays fault codes.
A: Try to fix the problem in accordance with the information given by the fault code; in cases
when the problem cannot be fixed on your own, please go to a special maintenance center
for help.
When the electronic control system of the bicycle fails, the panel will automatically display
error codes. The definition of the codes is shown in the chart below; the display interface is
shown in the picture below.
Error Codes

-13 -
Error code
Error description
"04" shown at speed
throttle doesn't turn back to zero position (stay on the high position)
"05" shown at speed
throttle failure
"07" shown at speed
overvoltage protection
"08" shown at speed
failure of motor's hall signal wire
"09" shown at speed
failure of motor's phase wire
"10" shown at speed
Motor temperature is too high, and reaches the protection point
"11" shown at speed
failure of the motor's temperature sensor
"12" shown at speed
failure of the current sensor
"13" shown at speed
failure of the temperature of the battery
"14" shown at speed
Controller temperature is too high, and reaches the protection point
"15" shown at speed
failure of the controller's temperature sensor
"21" shown at speed
failure of the speed sensor
"23" shown at speed
failure of the light
"24" shown at speed
failure of the light sensor
"25" shown at speed
torque signal failure of the torque sensor
"26" shown at speed
speed failure of torque sensor
"30" shown at speed
communication failure
Note: You can quit the error codes interface only after fixing the problem. Please turn off the
power when a problem appears, and do not ride the bicycle before fixing the problem.

-14 -
12 Warranty
The warranty takes effect since the electric vehicle has been purchased, and the invoice or
its delivery couplet should have exact purchasing date.
The warranty commitment does not aim to replace the stipulations of laws, regulations or
conventions, exempt the responsibility of sellers, or exempt civic responsibility, professional
responsibility, contractual obligation, or criminal liability of other insurance clauses and
conventions.
The warranty periods of all parts of the bicycle are as follows:
Under normal use (normal use constitutes the regular use of the bicycle by only one person;
the bicycle is not built to carry two or more people), the warranty of the frame is 5 years, and
that of the motor, panel, controller, and battery is 12 months.
The specification of this electric bicycle’s battery is 36V (the capacity is depending on what’s
ordered at iMove B.V., and the discharge rate is constant), and the driving range will be
affected by many external factors (load capacity, grade, wind force, external temperature, tire
inflation degree, air pressure, etc.).
The invoice is proof-of-purchase, please keep it properly.
Users or professional special maintenance centers should provide repair and maintenance to
the electric bicycle.
The warranty scope:
•Check if all parts of the electric bicycle is tight to ensure the safety of the bicycle (front
fork, wheels, etc).
•Lubricate and check the tightness of chains.
•Check inflation situation of tires.
•Check the tightness of brake steel wire.
•Adjust variable speed gear to guarantee that the shift is normal.
•Ensure that there’s no electric leakage on electronic components.
•Check whether the screws of electrical machine box are tight to keep the electrical
machine sealed.
Warranty service does not include:
•Losses caused by third party liability or caused deliberately.
•Losses caused by improper use and safekeeping.
•Consumables (such as tire, pipe, lamp, brake steel wire and brake block, chain, rim,
spokes, bearing and its enclosure and gear) and their replaced r-refill.
•Internal cable of motor is cut off.
•Forget to charge battery once a month.
•Losses caused by the disassembly and assembly of non-special maintenance agenda.
•Original components and parts are replaced.
•Losses caused by natural disasters (fire, lightning, rainstorm, etc.) and factitious
destruction, collision and improper transportation.
•Losses caused by corrosion when parking outdoor.
•Damages of battery or charger caused by improper installation of circuit.
•Losses caused by intensive use (special use or lease).
•Second-hand resell.

- 15 -
•Traffic expense.
•Maintenance operations.
For your safety and to make sure that you can enjoy warranty services, please use original
parts certified by us.
For maintenance services, you can go to customer service. Please remember to take the
invoice for purchases.
Customer Information
NAME:
PHONE:
ADDRESS:
TYPE:
COLOR:
DATE PURCHASE:
FRAME NO:
BATTERY NO:
MOTOR NO:
Warranty Card
Date (__/__/___)
Maintenance log
Name of the person responsible
Note:
① Please carefully complete the Customer Information Form and Warranty Card
② E-mail address for Customer Service:suppo[email protected]m
③ You need to send back within 15 days since the date of purchase the Customer
Information Form, the Receipt of the Warranty Card and a copy of the receipt of your
purchase.
For the daily maintenance of bicycle parts, all special maintenance centers provide services
of maintenance and repair.
However, for the electronic components in motor, battery and power plant, only iMove B.V.
getting our formal authorization and express permission can handle them.

- 16 -
13 Keys
Your electric bicycle is equipped with two keys.
The key can lock the battery on your electric bicycle.
Please don’t lose the key, or you should change the lock and key immediately.
Also inform you insurance company if you have a contract with them.
14 Contact information
iMove B.V.
DARWINSTRAAT 9-H
6718 XR EDE (NL)
PHONE: +31 (0)318 240 303
EMAIL WARRANTY: support@imovebikes.com
This manual suits for next models
3
Table of contents


