Impax IM3500IFG User manual

Always Read Instruction Manual
Retain for Future Reference
IM3500IFG
3600W IN ERTER GENERATOR

2
CERTIFICATE OF GUARANTEE
This product is guaranteed for a period of 1 Year, with effect from the date of purchase and applies
only to the original purchaser. This guarantee only applies to defects arising from, defective materials
and or faulty workmanship that become evident during the guarantee period only and does not
include consumable items. The manufacturer will repair or replace the product at their discretion
subject to the following. That the product has been used in accordance with the guidelines as
detailed in the product manual and that it has not been subjected to misuse, abuse or used for a
purpose for which it was not intended. That it has not been taken apart or tampered with in any way
whatsoever or has been serviced by unauthorised persons or has been used for hire purposes.
Transit damage is excluded from this guarantee, for such damage the transport company is
responsible. Claims made under this guarantee must be made in the first instance, directly to the
retailer within the guarantee period. Only under exceptional circumstances should the product be
returned to the manufacturer. In this case it shall be the consumer’s responsibility to return the
product at their cost ensuring that the product is adequately packed to prevent transit damage and
must be accompanied with a brief description of the fault and a copy of the receipt or other proof of
purchase. The manufacturer shall not be liable for any special, exemplary, direct, indirect, incidental,
or consequential loss or damage under this guarantee. This guarantee is in addition to and does not
affect any rights, which the consumer may have by virtue of the Sale of Goods Act 1973 as
amended 1975 and 1999.
INTRODUCTION
Thankyou for purchasing this product which has passed through our extensive quality assurance
process. Every care has been taken to ensure that it reaches you in perfect condition. owever, in
the unlikely event that you should experience a problem, or if we can offer any assistance or advice
please do not hesitate to contact our customer care department. For details of your nearest
customer care department please refer to the telephone numbers at the back of this manual.
Safety First
Before attempting to operate this product the following basic safety precautions should always be
taken to reduce the risk of fire, electric shock and personal injury. It is important to read the
instruction manual to understand the application, limitations and potential hazards associated with
this product.
HELPLINE & SPARE PARTS
In the unlikely event of a defect occurring please contact our elpline.
Office hours: Monday - Friday 9:00am – 5:00pm.
Telephone Number 0344 264 2485

3
IMPORTANT SAFETY INFORMATION
The purpose of safety rules is to attract your
attention to possible dangers. The safety
symbols and the explanations with them, require
your careful attention and understanding. The
safety warnings do not by themselves eliminate
any danger. The instruction or warnings they
give are not substitutes for proper accident
prevention measures.
SAFETY ALERT SYMB L. Indicates
caution or warning. May be used in
conjunction with other symbols or
pictures.
Failure to obey a safety warning can result in
serious injury to yourself or to others. Always
follow the safety precautions to reduce the risk
of fire, electric shock and personal injury.
Do not attempt to operate this tool until you
have read thoroughly and completely
understood the safety rules, etc. contained in
this manual. Failure to comply can result in
accidents involving fire, electric shock or serious
personal injury. Save this Owners Operating
Manual and review it frequently for continual
safe operation and for instructing
others who may use this tool.
DANGER: CARB N M N XIDE.
Using a generator indoors CAN KILL
YOU IN MINUTES.
Generator exhaust contains high levels of
carbon monoxide (CO), a poisonous gas you
cannot see or smell. If you can smell the
generator exhaust, you are breathing CO. But
even if you cannot smell the exhaust, you could
be breathing CO.
Never use a generator inside homes, garages,
crawlspaces, or other partly enclosed areas.
Deadly levels of carbon monoxide can build up
in these areas. Using a fan or opening windows
and doors does NOT supply enough fresh air.
ONLY use a generator outdoors and far away
from open windows, doors, and vents. These
openings can pull in generator exhaust.
Even when you use a generator correctly, CO
may leak into the home. ALWAYS use a battery
powered or battery-backup CO alarm in the
home.
If you start to feel sick, dizzy, or weak after the
generator has been running, move to fresh air
RIG T AWAY. See a doctor. You could have
carbon monoxide poisoning.
WARNING: Read and understand all
instructions. Failure to follow all
instructions listed below could result in
electrocution, fire, and/or carbon
monoxide poisoning, which can cause
death or serious injury.
WARNING: In some applications,
National Electric Code requires the
generator to be grounded to an
approved earth ground. Before using
the ground terminal, consult a qualified
electrician, electrical inspector, or local
agency having jurisdiction for local
codes or ordinances that apply to the
intended use of the generator.
SAVE THESE INSTRUCTI NS
The generator must be mounted on a firm level
surface.
Do not allow children or untrained individuals to
use this unit.
Keep all bystanders, children, and pets at least
10 feet away.
Wear sturdy and dry shoes or boots. Do not
operate while barefoot.
Do not use E15 or E85 fuel in this product.
It will damage the unit and void your
warranty. Only use unleaded gasoline
containing up to 10% ethanol.
Due to continued product
refinement policy, product features
and specifications can and will
change without notice. Check
current features and specifications
with your retailer.

IMPORTANT SAFETY INFORMATION
Do not operate generator when you are tired or
under the influence of drugs, alcohol, or
medication.
The electrical output load must not exceed the
maximum load stated on the rating plate.
Exceeding the rated load will damage the unit or
shorten its life and will invalidate the guarantee.
The engine must not be run at speeds that
exceed the maximum stated on the rating plate.
Operating an engine at excessive speeds
increases the hazard of personal injury.
Do not tamper with components, which may
increase or decrease the governed speed.
Mains extension leads, mains supply leads, and
all electrical equipment must be in good working
condition.
Never operate electrical equipment with
damaged or defective mains supply leads.
Keep the area around the generator clear of
obstructions at all times. Never locate the
generator against a building or near a canvas or
plastic structure i.e.Tents etc.
Always use the correct fuel mix as stated in the
user manual and on the rating plate.
To reduce the risk of fire and burn injury, handle
fuel with care. It is highly flammable.
Do not smoke while handling fuel.
Store fuel in a container approved for gasoline.
To prevent fire, always stop the engine and allow
to cool for five minutes before refueling and
never over fill the fuel tank.
Loosen fuel cap slowly to release pressure and
to keep fuel from escaping around the cap.
Tighten the fuel cap securely after refueling.
Wipe spilled fuel from the unit.
Never attempt to burn off spilled fuel under any
circumstances.
Always clean up spilt fuel immediately using
sand.
Do not use the generator in or near an explosive
atmosphere.
To prevent an electric shock, never operate the
machine in rain, snow or touch with wet hands.
Check the fuel system periodically for leaks.
Seals and hoses should be checked for signs of
deterioration or chafing. Check for loose or
missing clamps damaged fuel tank or filler cap.
All defects should be corrected before further
use.
Always allow the generator to reach full
operating speed before connecting any
electrical load. Always disconnect the electrical
load before switching the generator off.
To prevent surging that may possibly damage
electrical equipment, do not allow engine to run
out of fuel while electrical loads are connected.
Before transporting the generator in a vehicle,
drain all fuel to prevent spillage.
To prevent an electric shock and fire, never
connect an electrical load with the electrical
output switched on.
Do not connect the generator to any other
electrical source.
Before storing, allow the engine to cool for 30
minutes and drain fuel from the unit.
Do not store the generator in rain, snow, or wet
weather.
Store the generator in a well-ventilated area with
the fuel tank empty. Fuel should not be stored
near the generator.
Empty fuel tank, place the engine switch/fuel
valve/choke lever in the OFF position, and
restrain the unit from moving before transporting
in a vehicle.
Provide a plastic sheet or absorbent pad below
the generator to catch any drips of fuel or
lubricant when transporting.
Generators vibrate in normal use. During and
after the use of the generator, inspect the
generator as well as extension cords and power
supply cords connected to it for damage
resulting from vibration. ave damaged items
repaired or replaced as necessary. Do not use
plugs or cords that show signs of damage such
as broken or cracked insulation or damaged
blades.
4

5
For power outages, permanently installed
stationary generators are better suited for
providing back-up power to the home. Even a
properly connected portable generator can
become overloaded. This may result in
overheating or stressing the generator
components, possibly leading to generator
failure.
Inspect the unit before each use for loose
fasteners, fuel leaks, etc. Replace damaged
parts.
Use only recommended or equivalent
replacement parts and accessories. Use of any
other parts or failure to follow maintenance
instructions may create a risk of shock or injury.
FUEL FILLING SAFETY RULES
DANGER: RISK F FIRE AND
SERI US BURNS. Never remove fuel
cap when unit is running. Shut off
engine and allow the unit to cool at
least five minutes. Remove cap slowly.
WARNING: Select bare ground for
fuelling and move at least 10 feet (3m)
from fuelling spot before starting the
engine.After refuelling, properly tighten
fuel cap; wipe off any spilled fuel and
check for leakage.
WARNING: If fuel gets spilled on
clothes, especially trousers, it is very
important to change clothes
immediately. Do not rely on
evaporation. Flammable quantities of
fuel may remain on clothes after a spill
for longer than expected.
WARNING: Vibrations can cause an
improperly tightened fuel cap to loosen
or come off and spill quantities of fuel.
In order to reduce the risk of fuel
spillage and fire, tighten fuel filler cap
by hand as securely as possible.
Before use always make sure that the
fuel cap has been properly tightened.
Check for fuel leakage while refuelling
and during operation. If a fuel leak is
suspected, do not start or run the
engine until leak is fixed and spilled
fuel has been wiped away.
ADDING FUEL
Turn the generator off and let it cool for at least
five minutes before removing the fuel cap.
Loosen the cap slowly to relieve pressure in the
tank.
Only fill or drain fuel outdoors in a well-
ventilated area.
DO NOT pump gasoline directly into the
generator at the gasoline station. Use an
approved container to transfer the fuel to the
generator.
DO NOT overfill the fuel tank.
Always keep fuel away from sparks, open
flames, pilot lights, heat and other sources of
ignition.
DO NOT light or smoke cigarettes.
WHEN STARTING THE GENERAT R
DO NOT attempt to start a damaged generator.
Make certain that the gas cap, air filter, spark
plug, fuel lines and exhaust system are properly
in place.
Allow spilled fuel to evaporate fully before
attempting to start the engine.
Make certain that the generator is resting firmly
on level ground.
WHEN PERATING THE GENERAT R
DO NOT move or tip the generator during
operation.
DO NOT tip the generator or allow fuel or oil to
spill.
WHEN TRANSP RTING R SERVICING THE
GENERAT R
Make certain that the fuel shutoff valve is in the off
position and the fuel tank is empty.
Disconnect the spark plug wire.
When storing the generator:
Store away from sparks, open flames, pilot lights,
heat and other sources of ignition.
IMPORTANT SAFETY INFORMATION

SPECIFIC SAFETY INFORMATION
WARNING: When this generator is
used to supply a building wiring
system: the generator must be installed
by a qualified electrician and connected to a
transfer switch as a separately derived system in
accordance with UK Wiring Rules. The generator
shall be connected through a transfer switch that
switches all conductors other than the equipment
grounding conductor. Failure to isolate the
generator from power utility can result in death or
injury to electric utility workers.
Exhaust fumes contains poisonous carbon
monoxide, a colourless, odourless gas. Breathing
exhaust fumes can cause loss of consciousness
and can lead to death. If running in a confined or
partially enclosed area, the air may contain a
dangerous amount of carbon monoxide. To keep
exhaust fumes from building up, always provide
adequate ventilation.
Always use a battery-powered carbon monoxide
detector when running the generator. If you begin
to feel sick, dizzy, or weak while using the
generator, shut it off and get to fresh air
immediately. See a doctor.You may have carbon
monoxide poisoning.
Place the generator on a flat, stable surface with
a slope of no more than 4°.
Operate in a well-ventilated, well-lit area isolated
from working areas to avoid noise interference.
Operating the generator in wet conditions could
result in electrocution. Keep the unit dry.
Keep the generator a minimum of 1m away from
all types of combustible material.
Do not operate the generator near hazardous
material.
Do not operate the generator at a petrol station.
Do not touch the muffler or cylinder during or
immediately after use; they are OT and will
cause burn injury.
Do not connect to a building’s electrical system
unless a transfer switch has been properly
installed by a qualified electrician.
Do not allow the generator’s fuel tank to overflow
when filling. Fill to 25mm below the top neck of
the unleaded fuel tank to allow for fuel expansion.
Check the ventilation hole inside the fuel tank cap
for debris. Do not block the vent.
Do not smoke when filling the generator with
unleaded fuel.
Allow the engine to remain in a shut-down
condition for at least five minutes before adding
unleaded fuel or oil.
Do not remove the oil dipstick or the fuel tank
cap when the engine is running.
Pay close attention to all safety labels located on
the generator.
Keep children a minimum of 3m away from the
generator at all times.
The unit operates best in temperatures between
5°C and 40°C with a relative humidity of 30~95%.
Operation of the generator at altitudes above
1,000m may require retuning. Consult a qualified
service technician.
When using extension lines or mobile distribution
networks the total length of lines for a cross
section of 1.5mm2should not exceed 60m; for a
cross section of 2.5mm2this should not exceed
100m.
The generating set must not be connected to
other power sources
Save these instructions. Refer to them frequently
and use them to instruct others who may use this
tool. If you loan someone this tool, loan them
these instructions also.
Rotating parts can entangle hands, feet, hair,
clothing and/or accessories. Keep hands and feet
away from rotating parts. Tie up long hair and
remove jewellery. Operate equipment with guards
in place. DO NOT wear loose-fitting clothing,
dangling drawstrings or items that could become
caught.
Sparks can result in fire or electrical shock.
When servicing the generator: Disconnect the
spark plug wire and place it where it cannot
contact the plug. DO NOT check for spark with
the plug removed. Use onl approved spark plug
testers.
6

7
COMPONENTS
14
7
12
13
8
21
Component List
1. Fuel tank
2. DC circuit breaker
3. Carry handle
4. USB DC 5V 2.1A socket
5. Digital display
6. AC socket (Right side)
7. Ground (earth) terminal
8. AC socket (Left side)
9. Oil filler cap/dipstick
10. AC power output indicator (green)
11. Engine overload indicator (red)
12. Engine On/Stop switch
13. Oil alert indicator (yellow)
14. DC 12V 8A socket
3
10
9
6
5
4
11
3
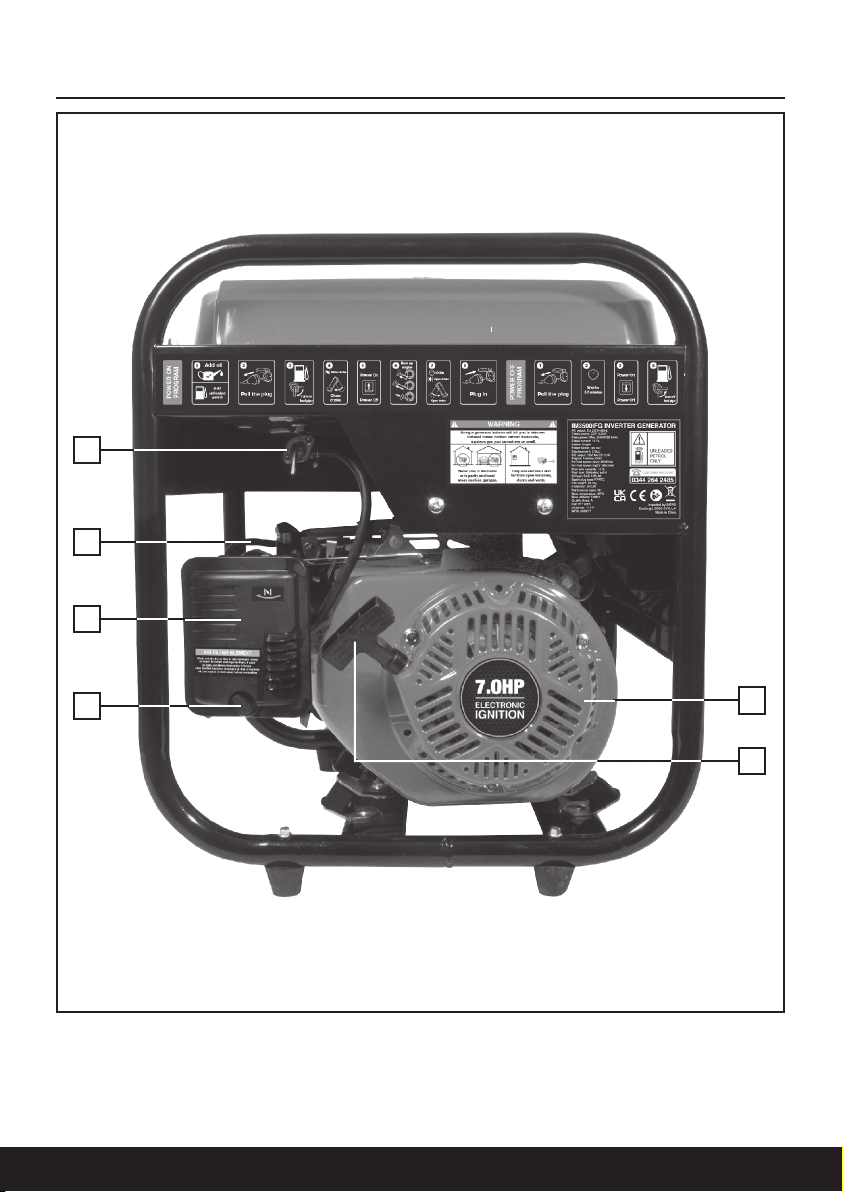
COMPONENTS
8
15
Component List
15. 4 stroke, O V engine
16. Recoil starter grip
17. Air filter cover connection screw
18. Air filter cover
19. Choke lever
20. Fuel valve
17
18
19
20
16

9
COMPONENTS
21
Component List
21. Spark plug 22. Oil filler cap/dipstick
22

COMPONENTS
10
Component List
23. Muffler
23

11
COMPONENTS
25
24
27
26
Component List
24. Fuel gauge
25. Fuel cap
26. Screwdriver
27. Spark plug socket
28. Funnel
29. DC charging leads
AC output: 2 x 230V~50 z
Rated power: COP 3.5kW
Peak power: Max. 3.6kW
S2 5min
Rated current: 11.7A
Phase: Single
Power factor: cosø=1
Displacement: 212cc
DC output: 12V, 8A/
USB output: 5V 2.1A
Engine: 4 stroke, O V
No load speed (low): 2500min-1
No load speed (high): 3600min-1
Continuous operating time: 6hrs (100% load)
Fuel tank capacity: 12.5L
Fuel type: Unleaded petrol
Oil type: SAE 10W-30
Oil capacity: 600ml
Ignition system: T.C.I.
Starting system: Recoil starter
Spark plug type: F7RTC
Net weight: 29.5kg
Protection: IP23M
Performance class: G1
Max. temperature: 40ºC
Max. altitude: 1000m
Quality class: A
Sound power level (7m away): 68dB(A)
TECHNICAL SPECIFICATION
28
29

12
UNPACKING
CAUTI N! This packaging contains
sharp objects. Take care when
unpacking. Remove the machine,
together with the accessories supplied, from the
packaging. Check carefully to ensure that the
machine is in good condition and account for all
the accessories listed in this manual. Also make
sure that all the accessories are complete. If any
parts are found to be missing, the machine and
its accessories should be returned together in
their original packaging to the retailer.
Do not throw the packaging away, keep it safe
throughout the guarantee period, then recycle if
possible, otherwise dispose of it by the proper
means. Do not let children play with empty
plastic bags due to the risk of suffocation.
PRE-OPERATION CHECK
THIS GENERAT R HAS BEEN SHIPPED
WITH UT ENGINE IL. D N T START THE
ENGINE UNTIL IT HAS BEEN FILLED WITH
SUFFICIENT ENGINE IL.
CHECKING THE ENGINE IL
WARNING. Running the generator with
insufficient engine oil can cause
serious engine damage.
Engine oil should be replaced during regular
maintenance or when the oil level is below the
end of the dipstick.
WARNING. Before checking or
replacing oil, make sure the engine is
fully stopped and the generator is
situated on a stable and level surface.
ADDING ENGINE IL
Engine oil has a major influence on engine
performance and service life. For general, all
temperature use, SAE 10W-30 or 10W-40 is
recommended. Always use a 4-stroke motor oil.
Non-detergent or 2-stroke engine oils will
damage the engine and should not be used.
Place the generator on an even surface and
unscrew the oil filler cap/dipstick (Fig.1).
Wipe dipstick clean and re-seat in hole; do not
re-thread. Remove dipstick again and check the
oil level. The oil level should fall within the level
indicator area on the dipstick. If level is low, add
engine oil until the fluid level rises to the upper
portion of the level indicator area on the dipstick
(Fig.2).
Replace and secure the oil cap/dipstick and
return the generator to the stand position.
CHECKING/ADDING FUEL
DANGER! STOP engine before adding
fuel. This engine is certified to operate
on unleaded gasoline. Unleaded
gasoline produces fewer engine and spark plug
deposits and extends exhaust system life.
WARNING! Never use stale or
contaminated gasoline or an
oil/gasoline mixture. Avoid getting dirt
or water in the fuel tank.
Petrol is extremely flammable and explosive
under certain conditions.
Do not smoke or allow flames or sparks where
the generator is refuelled or where Petrol is
stored.
Fig 1
Fig 2

13
PRE-OPERATION CHECK
Remove the fuel cap (Fig.3).
Remove and clean the fuel filter (Fig.4).
Slowly fill the tank with unleaded petrol. The fuel
tank should not be filled above the top of the
fuel filter (Fig.5).
Replace and secure the fuel cap. Never use old,
stale, or contaminated unleaded fuel, and do not
use an oil/fuel mixture. Do not allow dirt or water
into the fuel tank.
Refuel in a well-ventilated area.
Do not let fuel spill over the generator casing. If
there is some fuel spillage, be sure that it has
evaporated before starting the engine.
Avoid touching gasoline or breathing in gasoline
fumes.
Fig 3
Fig 4
Fig 5
LOCATION AND GROUNDING
Before using this generator it must be prepared
correctly before use. Locate the generator on
firm level ground away from buildings or other
structures ensuring that the exhaust is not
obstructed.
WARNING! It is advisable to properly earth-
ground your generator before starting using a
wire and a small earth stake. Note: The wire and
earth stake are not supplied with the unit.
Earth spike and cable can be purchased at your
local camping supplies, or alternatively an earth
spike can be made, and it is suggested you get
advice from a registered electrical trades
person. To make a spike use a copper tube or
copper rod 12mm diameter, a minimum length
of 200mm and with an M6 machine screw one
end. The cable used should be a maximum
length of 1 metre and a minimum of 1.0mm2to
carry a 10amp load. The cable should be
attached to the generator at the earth point
(Fig.6) and to the spike between a flat washer
and the copper with a lock washer under the
head of the M6 Machine screw in a similar
fashion to the earth point screw on the
generator.
When placing the spike into the ground the
generator must not be running and it is
suggested that the spike is pushed into the
ground by at least 100mm so that it is firm and
a litre of water poured around it to ensure good
earth continuity.
Fig 6

UNDERSTANDING THE CONTROL PANEL
14
1. DC socket. This f nction is applicable to 12V
charging only.
2. The DC protector turns to “OFF”
automatically when the electric device being
connected to the generator is operating and
current above the rated output flows. To use
this equipment again, turn on the DC
protector by pressing its button to “ON”.
3. DC socket. This f nction is applicable to 5V
charging only.
4. Digital display. Shows the Voltage (V), Hertz
(Hz) and ho rs (H) remaining.
5. Ground (earth) terminal. (See page 13.)
6. AC sockets which supply rated output.
7. AC power output indicator light (green). It
indicates that the generator is producing
electrical power at the sockets.
8. The Oil alert system is designed to prevent
engine damage caused by an insufficient
amount of oil in the crankcase. Before the oil
level in the crankcase can fall below a safe
limit, the Oil Alert indicator light comes on
and the Oil Alert system automatically will
stop the engine (the engine On/Off switch
will remain in the ON position). If the engine
stops or the Oil Alert indicator light comes
on when you pull the starter grip, check the
engine oil level.
9. Engine switch. When the engine switch is in
the OFF position the engine will not run.
10. If the generator is overloaded (in excess of
3600W), or if there is a short circuit in a
connected appliance, the engine overload
indicator light (red) will go ON. The engine
overload indicator light (red) will stay ON,
and after several seconds, current to the
connected appliance(s) will shut off, and the
indicator light (green) will go OFF.
1
10
4
6
2 3
789
5

15
OPERATING INSTRUCTIONS
STARTING THE GENERAT R
CAUTI N. Always check the oil and
fuel level before starting the engine,
see Page 12 & 13.
Before starting the engine make sure that all the
electrical loads are disconnected from the
generator AC outlet socket.
1. Turn fuel valve to the ON position (Fig.7)
2. Turn the engine switch to the ON (I) position,
(Fig.8).
3. Set the choke lever to the CLOSED position
(Fig.9).
4. old down the generator firmly with one
hand on the frame. With the other hand grip
the recoil starter cord handle (Fig.10) and
pull and return the rope gently 3-4 times to
let the engine breath in the fuel mixture from
the carburetor. Pull the cord sharply.
Continue this procedure until the engine
starts.
CAUTI N. Avoid damaging the plastic
case of the crankshaft while pulling the
rope. Always return the recoil starter
cord handle slowly.
5. When the engine has been successfully
started and is running smoothly return the
choke lever to its original position (Fig.11).
Before connecting any electrical load to the
generator ensure that the load does not exceed
the maximum load as stated on the rating plate.
Ensure that the mains supply lead is long
enough to reach the generator without any
strain.
When the generator engine has been
successfully started and is running smoothly
connect the electrical load to the generators AC
output socket.
Fig 7
Fig 8
Fig 9
Fig 10
Fig 11
N

OPERATING INSTRUCTIONS
16
ST PPINGTHE GENERAT R
WARNING. In case of emergency, the
easiest way to stop the generator is to
directly put engine switch to OFF
position. Avoid doing so in non-emergency
circumstances as it carries the risk of damaging
the generator.
1. Before stopping the engine make sure that
all the electrical loads are disconnected from
the generator AC outlet sockets.
2. Switch off the engine by putting the engine
switch in the STOP position (Fig.12).
3. When the generator engine has stopped and
before storage, turn fuel valve lever to the
OFF position (Fig.13).
NOTE. After disconnecting all loads,
leave the generator running for another
1-2 minutes before shutting it down.
Then switch off the engine switch and the fuel
valve. Switching off the engine with loads
attached may damage the unit and cause
difficulty starting the generator next time it is
used.
DC BATTERY CHARGING FUNCTI N
This function is applicable to 12V battery
charging only.
Disconnect the leads from the battery.
Loosen the vents on the battery.
Make sure the battery fluid level is correct .
Using a hydrometer measure the specific gravity
of the battery fluid and calculate the charging
time in accordance with the table shown, Fig 14.
The specific gravity for the fully charged battery
shall be within 1.26 to 1.28. It is advisable to
check the specific gravity every hour.
Start the generator following the instructions on
page 15, and then connect the generator to the
battery for charging.
Before starting to charge the battery, make sure
that the DC protector is turned on.
Attach the 12v charging leads to the battery
observing correct polarity (Red = + Positive)
(black = - Negative).
Fig 12
Fig 13
Fig 14
FF

17
OPERATING INSTRUCTIONS
Plug the 12V charger lead into the socket on the
generator, Fig 15.
NOTE: The DC protector turns off automatically
if the current goes above the rated output
during battery charging. To restart charging the
battery, turn the DC protector on by pressing its
button to ON, Fig.16. If the DC protector turns
off again, stop charging the battery immediately
and consult your nearest customer care
department.
WARNING. Never smoke or make and
break connections at the battery while
charging. Sparks may ignite the battery
gas.
Battery electrolyte contains sulphuric acid and is
poisonous and can cause severe burns. Avoid
contact with skin, eyes or clothing.
NOTE: You can use DC and AC at the same
time. However, make sure that the power
consumption does not exceed the permissible
total power of the generator.
Fig 15
Fig 16
MAINTENANCE
GENERAL MAINTENANCE
Keep the generator in a clean and dry
environment where it is not exposed to dust,
dirt, moisture, or corrosive vapours.
Do not allow the cooling air slots in the
generator to become clogged with foreign
material such as leaves, snow, etc.
Do not use a garden hose to clean the
generator. Water entering the fuel system or
other internal parts of the unit can cause
problems that will
decrease the life of the generator.
To clean the unit:
1. Use a soft bristle brush and/or vacuum
cleaner to loosen and remove dirt and
debris.
2. Clean air vents with low pressure air that
does not exceed 25 psi.
3. Wipe the exterior surfaces of the generator
with a damp cloth.
ENGINE OIL REPLACEMENT
Avoid draining the engine oil immediately after
stopping the engine. The oil is hot and should be
handled with care to avoid burns.
Initial oil change: After the first 20 hours of
operation.
Thereafter: Every 50 hours of operation.
1. Place the generator on a level surface and
warm up the engine for several minutes.
Stop the engine.
2. Remove the oil filler cap/dipstick.
3. Place a container under the engine. Tilt the
generator to drain the oil completely
4. Refill with oil following the instructions in the
Checking/Adding Oil section (Page 12).
5. Wipe the cover clean, and wipe up any
spilled oil.
6. Reinstall the oil filler cap/dipstick.

18
MAINTENANCE
Used oil should be disposed of at an approved
disposal site. See your local oil retailer for more
information.
CHECKING/CLEANING THE AIR FILTER
For proper performance and long life, keep air
filters clean.
1. Unscrew the air filter connection screw
located at the bottom of the air filter cover.
Remove the cover and set aside (Fig.17).
2. Remove the filter elements (Fig.18).
3. If the filter elements are dirty, clean with
warm, soapy water. Rinse and let dry.
4. Apply a light coat of engine oil to the
elements, then squeeze it out.
5. Replace the elements in the air filter unit.
6. Replace the air filter cover and fasten the
two latches to secure the cover in place.
NOTE: Do not run the generator without the air
filter. Rapid engine wear will result.
SPARK PLUG MAINTENANCE
The spark plug must be properly gapped and
free of deposits in order to ensure proper engine
operation. To check:
1. Remove the spark plug cap (Fig.19 & 20).
2. Clean any dirt from around base of spark
plug.
3. Remove spark plug using wrench provided.
4. Inspect spark plug for damage, and clean
with a wire brush before reinstalling. If
insulator is cracked or chipped, spark plug
should be replaced. Make sure electrode
gap is 0.60mm-0.80mm.
N TE: If replacing, use the following
recommended spark plug: F7RTC.
5. Screw spark plug back by hand, avoid
damaging threads of the cylinder.
6. Put the spark plug back in position and use
the spark plug wrench to tighten it. If spark
plug is new, use 1/2 turn to compress
washer appropriate amount. If reusing old
spark plug, use 1/8 to 1/4 turn for proper
washer compression.
Fig 17
Fig 18
Fig 19
Fig 20

MAINTENANCE
19
7. Replace spark plug cap.
WARNING! Spark plug must be
assembled firmly, or it will become hot
and may damage generator.
A loose spark plug can overheat and damage
the engine.
CLEANING THE EXHAUST P RT & MUFFLER
Depending on the type of fuel used, the type
and amount of oil used, and/or your operating
conditions, the exhaust port and muffler may
become blocked with carbon deposits. If you
notice a power loss with your petrol-powered
tool, you may need to remove these deposits to
restore performance. We highly recommend that
only qualified service technicians perform this
service.
CLEANING THE FUEL TANK FILTER
After every 100 hours of running or every 6
months the fuel tank filter should be removed
and cleaned.
1. Remove fuel cap and filter (Fig.21).
2. Clean the filter, replace if broken.
3. Dry the filter and install back on the
generator.
DRAINING THE FUEL TANK
1. Turn the engine switch to STOP (O).
2. Turn the fuel valve lever to the OFF position.
3. Remove the fuel line from the barb by using
pliers to loosen the tubing clamp and sliding
the fuel line off, Fig.22.
4. Install one end of a drain line over the barb,
and place the other end in a fuel container
large enough to catch the fuel being drained
from the tank.
5. Open fuel valve.
6. When the fuel has drained from the tank,
close the fuel valve and reinstall fuel line on
barb.
If the generator is not to be used or is to be
stored for more than one month the following
storage procedure should be carried out. Drain
all the fuel from the fuel tank and the
carburettor, ensure that all the fuel has been
removed. Remove the spark plug and pour
approximately one tablespoon full of clean
engine oil into the spark plug hole. With the
ignition turned OFF gently pull on the recoil
starter cord several times. Re-fit the spark plug
and continue to pull the recoil starter cord until
the piston is on the compression stroke (when
resistance is felt) then stop puling.
Store the generator in a dry well ventilated place
under a cover to prevent any dust or debris from
accumulating on the generator.
DRAINING THE CARBURETT R
1. Turn off fuel valve, make sure fuel is drained
and the tank is empty. Residual gasoline left
over a long time will cause difficulty when
next starting the engine.
2. Position an approved fuel container under
the carburettor drain screw to catch fuel;
Turn the engine switch ON, and loosen the
carburetor drain screw (Fig.23). Allow fuel to
drain completely into container.
Fig 21
Fig 22

20
MAINTENANCE
3. With the drain screw loosened remove the
spark plug cap, and pull the starter grip 3 to
4 times to drain the gasoline from the fuel
pump.
4. Turn the engine switch to the STOP position,
and tighten the drain screw securely.
5. Reinstall the spark plug cap on the spark
plug securely.
N TE: Immediately wipe off spilled fuel with a
clean, dry, soft cloth, since fuel may deteriorate
painted surfaces or plastic parts.
6. Start the engine (See Page 15) and leave it
to run until it stops. Duration of the running
engine depends on the amount of the fuel
left in the tank.
Consult hazardous waste management
guidelines in your area for the proper way to
dispose of fuel.
CLEANING THE EXHAUST P RT & MUFFLER
Depending on the type of fuel used, the type
and amount of oil used, and/or your operating
conditions, the exhaust port and muffler may
become blocked with carbon deposits. If you
notice a power loss with your petrol-powered
tool, you may need to remove these deposits to
restore performance. We highly recommend that
only qualified service technicians perform this
service.
TRANSP RTING
Place the choke lever in the off position.
Make sure engine and exhaust of unit is cool.
Keep unit level to prevent fuel spillage.
Do not drop or strike unit or place under heavy
objects.
ST RAGE
If the generator is not to be used or is to be
stored for more than one month the following
storage procedure should be carried out. Drain
all the fuel from the fuel tank and the
carburettor, ensure that all the fuel has been
removed. Remove the spark plug and pour
approximately one tablespoon full of clean
engine oil into the spark plug hole. With the
ignition turned OFF gently pull on the recoil
starter cord several times. Re-fit the spark plug
and continue to pull the recoil starter cord until
the piston is on the compression stroke (when
resistance is felt) then stop pulling.
Store the generator in a dry well ventilated place
under a cover to prevent any dust or debris from
accumulating on the generator.
When preparing the generator for storage, follow
the guidelines on page 21.
Fig 23
Table of contents
Other Impax Portable Generator manuals


Popular Portable Generator manuals by other brands

Craftsman
Craftsman CMXGGAS030791 Operator's manual

Briggs & Stratton
Briggs & Stratton 30384 Illustrated parts list

WATTBRICKS
WATTBRICKS MP330 user manual

MULTIQUIP
MULTIQUIP MQ POWER DCA-125SSJU Operation and parts manual

DAYLIFF
DAYLIFF DG 6000D Installation & operating manual

Sealey
Sealey G5501 instruction manual

Champion Global Power Equipment
Champion Global Power Equipment 201175 quick start guide

Generac Power Systems
Generac Power Systems GP Series Diagnostic and repair manual

Stephill
Stephill SSDP120 Handbook

Hyundai
Hyundai FULLPOWER 65213 manual

Briggs & Stratton
Briggs & Stratton 40204 Installation and start-up manual

MQ Power
MQ Power ULTRA-SILENT DCA-25USI Series Operations & parts manual


