IMPETUS IR 500 User manual

USER MANUAL

INTRODUCTION / IMPORTANT INFORMATION
ASSEMBLY INSTRUCTIONS
SEAT ADJUSTMENT
HOW TO ADJUST THE BALANCE OF THE TRAINER
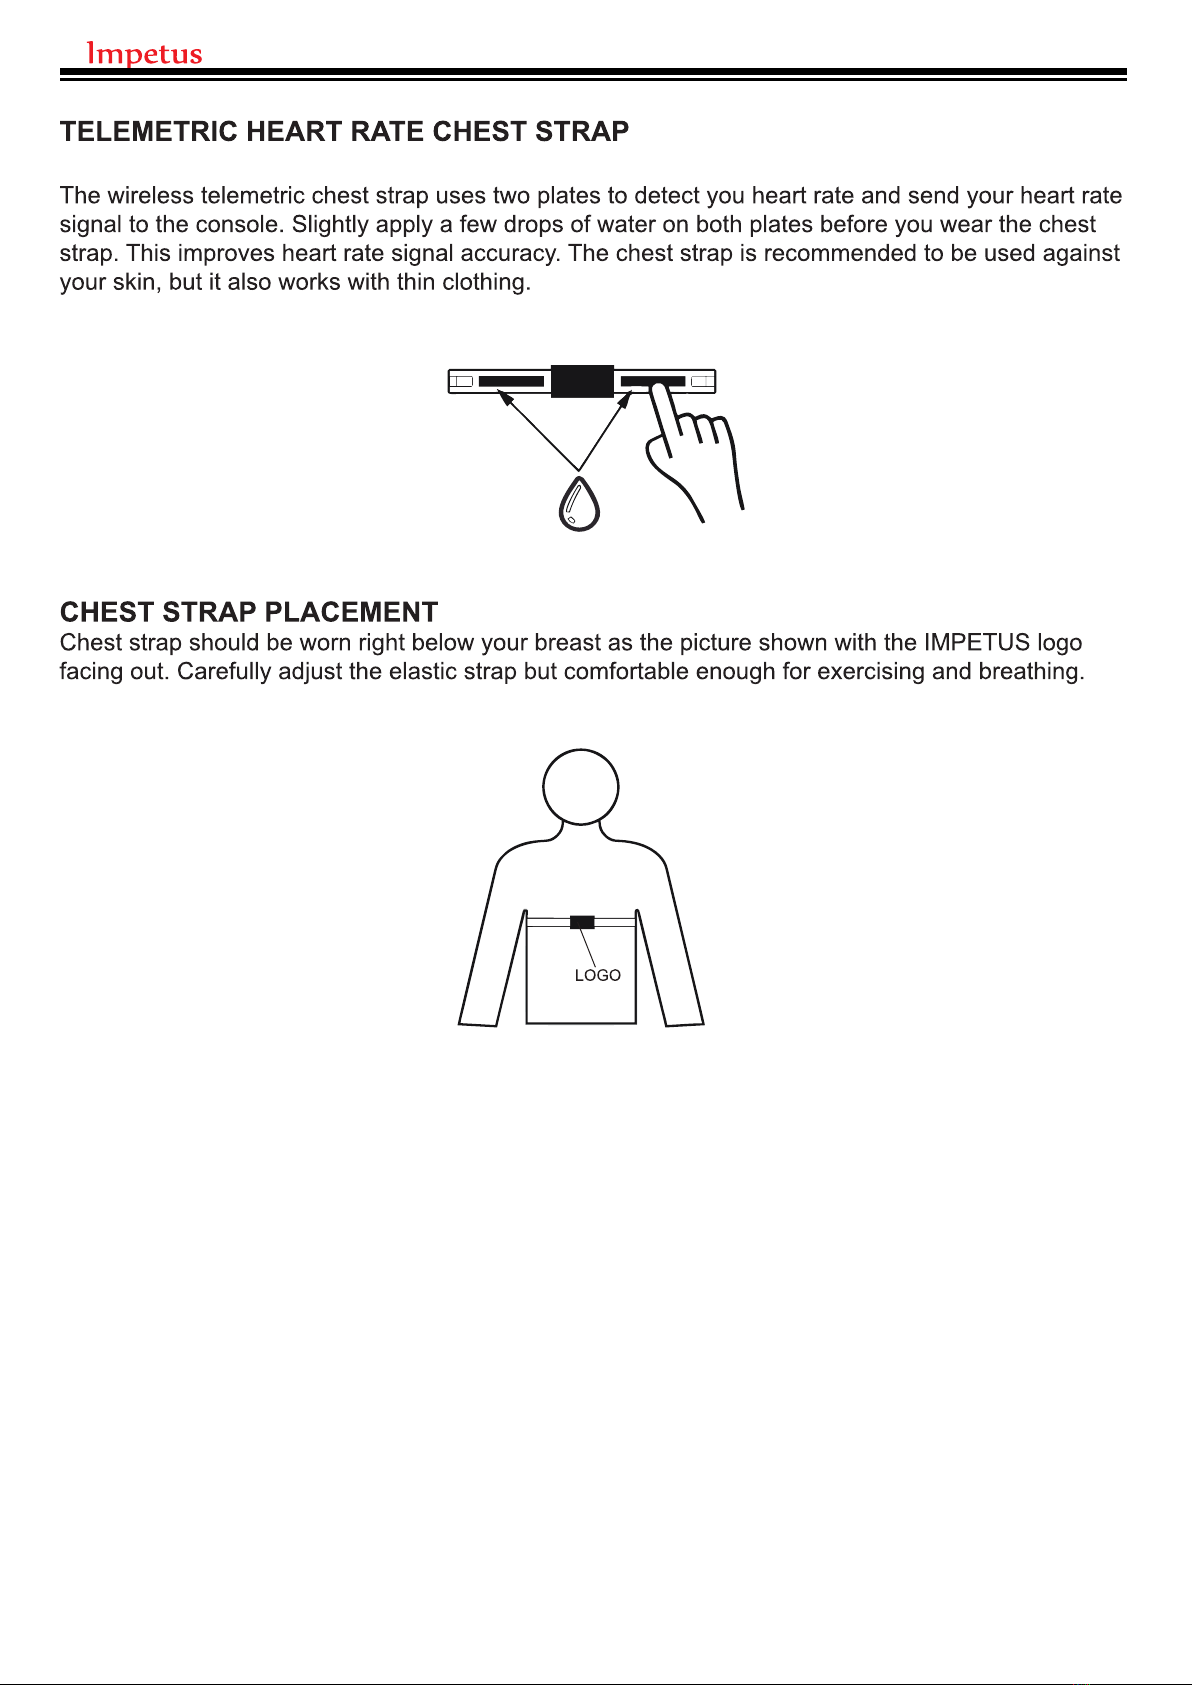
TELEMETRIC HEART RATE CHEST STRAP
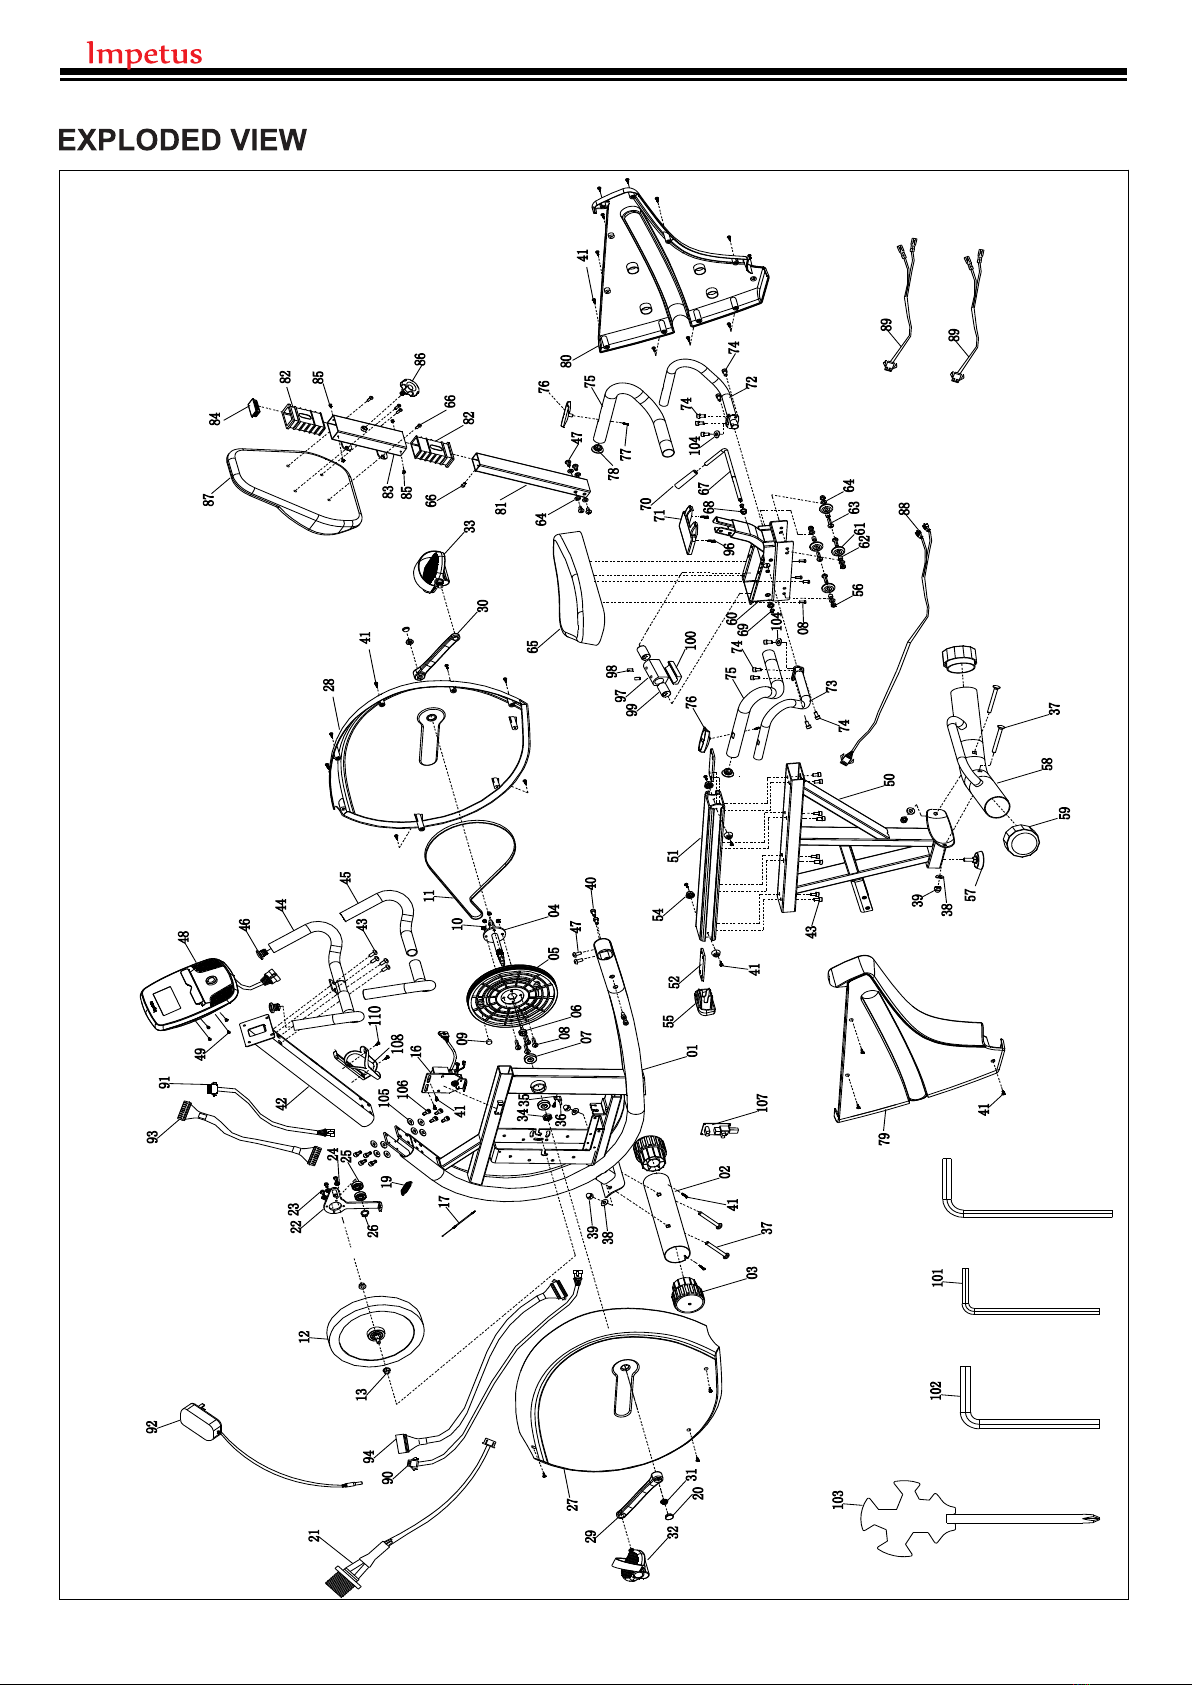
EXPLODED VIEW
PART LIST
WARM-UP / COOL DOWN
CLEANING & MAINTENANCE
3
5
11
12
13
14
15
16
17
2

3
4

ASSEMBLY INSTRUCTIONS
STEP 1
Join the front stabilizer (B) with
main frame (A) by 2 carriage bolt
(37), 2 arc washer (38), 2 dome
nut (39) to secure and then tight
firmly by open wrench (103)
STEP 2
Connect the hand pulse middle
wire (90) in front frame and the
hand pulse lower wire (88) in rear
frame first, then join the front
frame (A) and Rear Frame (C) by
4 Allen screws to secure (2 on
each side) and Then put the Allen
bolts (47) lock into the two holes
on top of the frame,then using
Allen key (102) to tight firmly.
2
1
37
38
39
103
150
40
102
21 56
STEP 3
Join the rear stabilizer (D) with
rear frame (C) by 2 carriage bolts
(37), 2 arc washer (38), 2 dome
nut (39) to secure, then firmly
tight by open wrench (103).
58
37
3938
50
103
5

STEP 4
Attach the Pedal Left (32) to the
left crank (29) by using open
wrench (103) counter clockwise
to firmly tight. Attach the Pedal
right (33) to the right crank (30)
by using open wrench (103)
clockwise to firmly tight
STEP 5
Connect the upper wire (94) from
the front tube (42) to the lower
wire (96) of main frame and also
connect the hand pulse wire (95)
to the hand pulse lower wire (21),
then insert the front tube (42) to
the main frame (A) by 4 flat Allen
bolts (106)&Washer(105) to
secure and then using Allen key
(101) to firmly tight.
32
33
103
29
30
STEP 6
Attach the handlebar (E) on the
top of Front tube by 4 Allen bolts
(47) to secure and firmly tight by
Allen key (102)
44
43
102
6
1
42
95
106
105
96
21

STEP 7
(1) Attach the computer (48) to
the front tube by using Screw
driver (103) to loose the 4
Philip screws (49) on back side
of computer . Be sure only take
out the 2 screws on top the
bottom 2 screws only need half
loose as (Fig. 7-1).
(2) Connect the computer upper
wire (94) and hand pulse wire
(95) with computer (48). Be
sure to have the additional
wire get into the tubing first ,
then follow the (Fig. 7-2)
attach and slide the computer
to the computer fixing plate.
Lock the bottom 2 screws
first, then the top 2 screws.
When moving the computer
on fixing plate, make sure the
bottom 2 screws should get
into the 2 slot on fixing plate.
STEP 7-3
Insert 5 batteries into the
CONSOLE(#A1) as the graph
shown
48
94
103
95
7-1
49
7-2
49
48
7
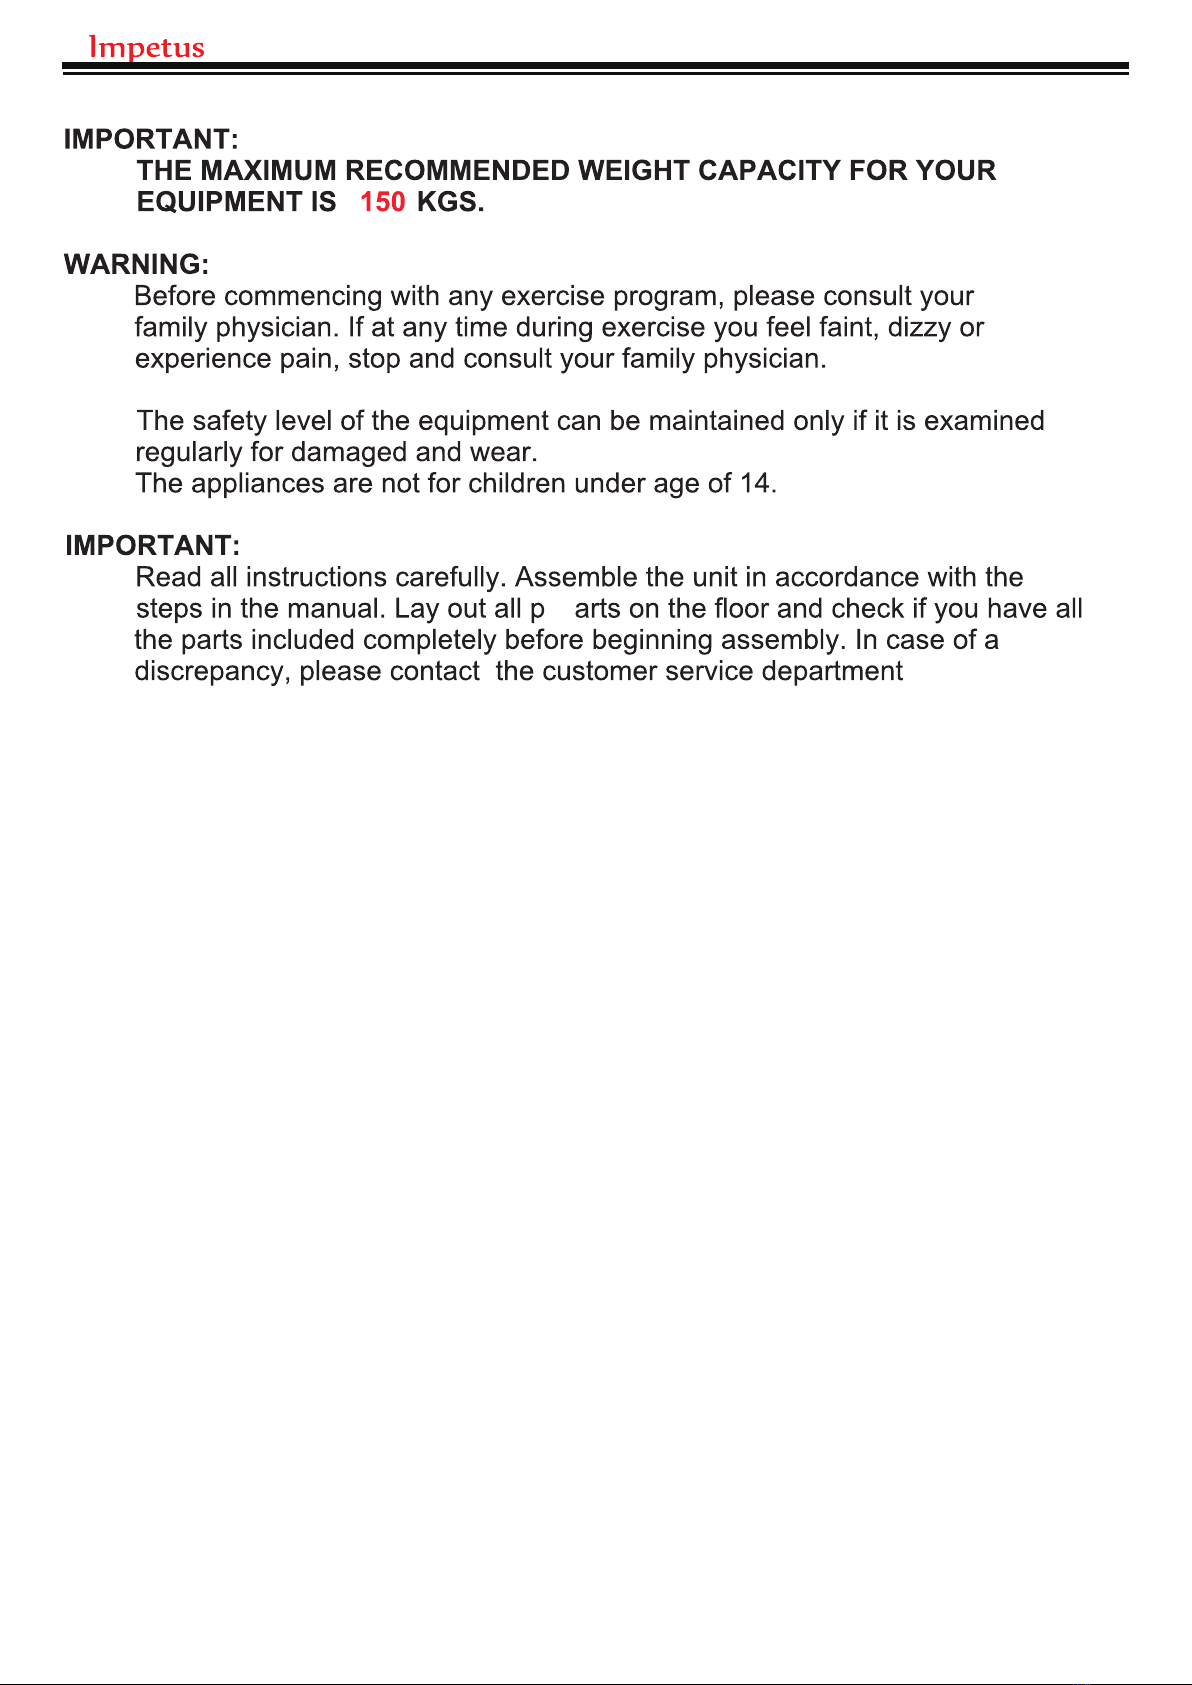
STEP 8
Have the hand pulse wire
connector (89) in the rear fix
handlebar (72 and
73) to go through the hole of
sliding seat support. Then join
the rear handlebar (72 and 73)
onto the sliding seat support
with Allen bolt (74)& Arc Washer
(104) and fasten the screws
with Allen key (102). Connect
the hand pulse wire of the
handlebars (72 and 73) with the
lower wire (88) of hand pulse.
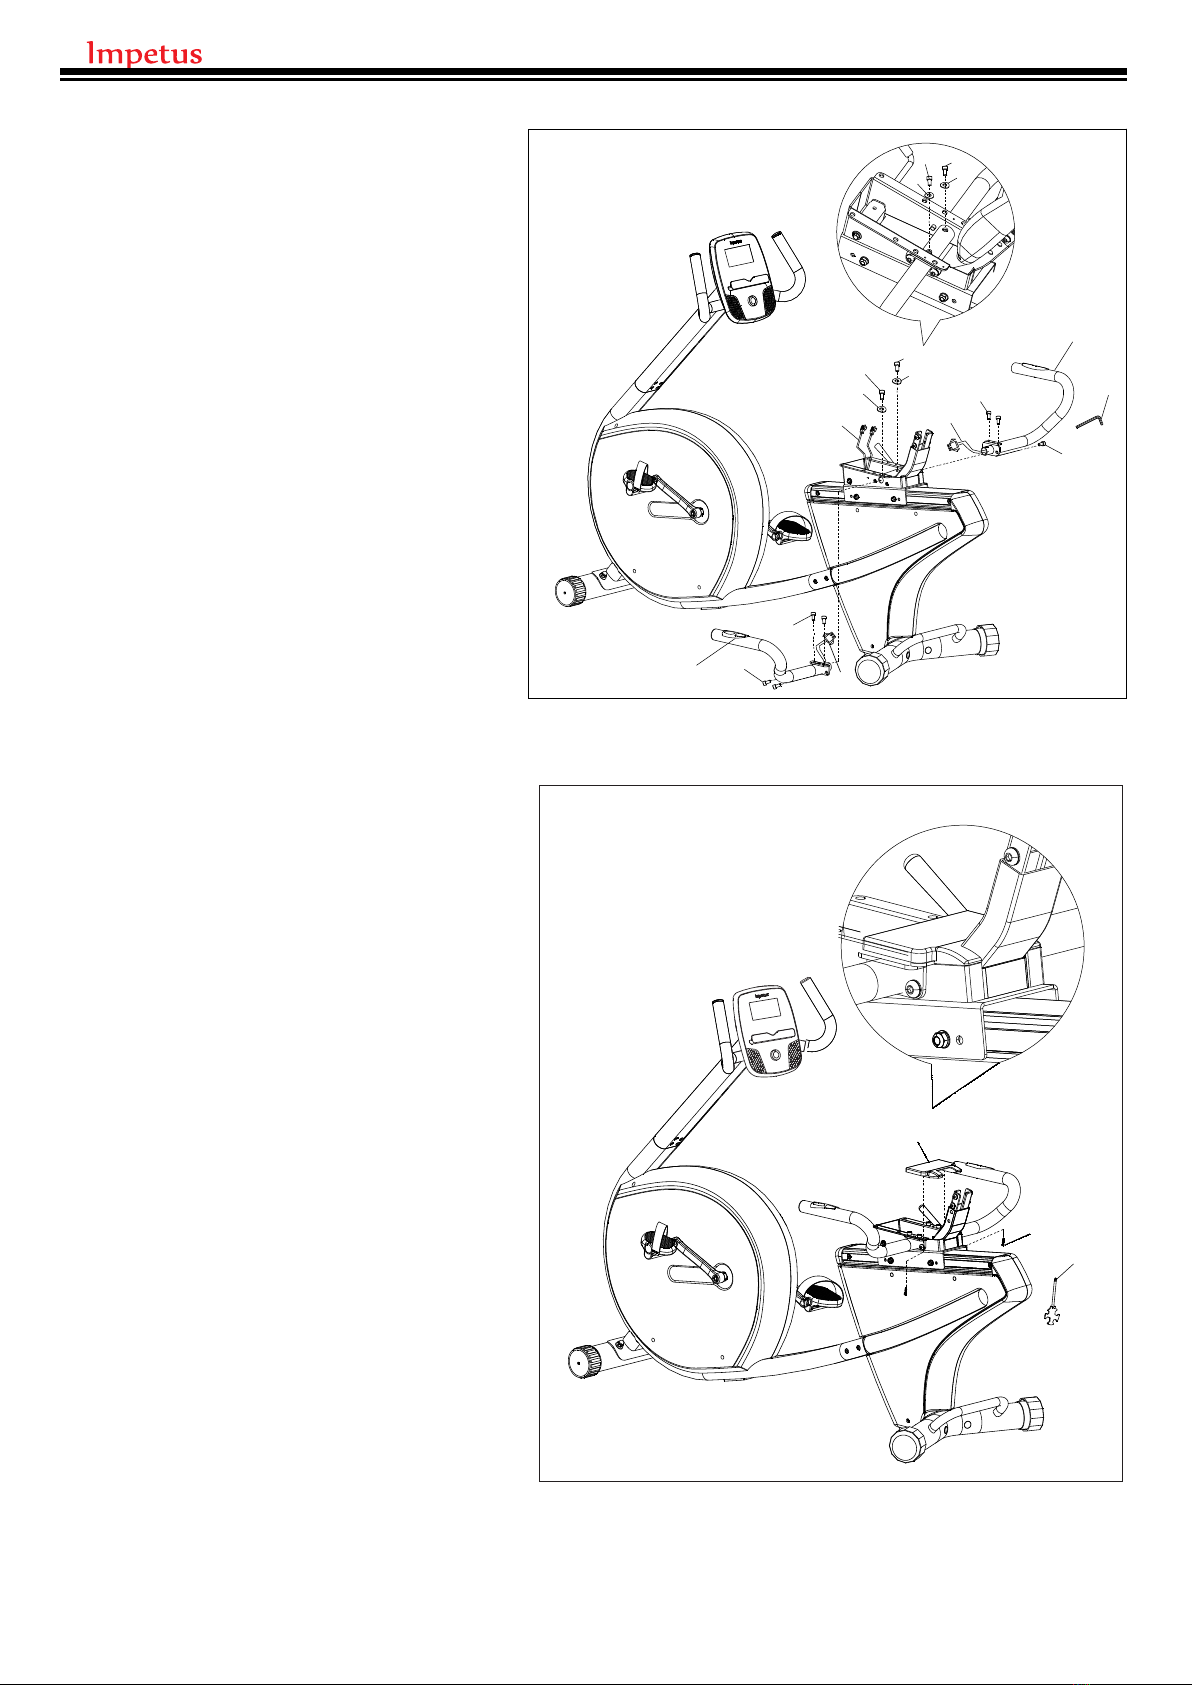
STEP 9
Put the sliding seat support
ornament cover (71) onto the
sliding seat support, firmly fasten
it from bottom to top with two
round screws (96) by open
wrench (103).
71
96 103
8
74
74
104
104
74
74
74
74
74
74
104
104 89
89
72
88
73
102
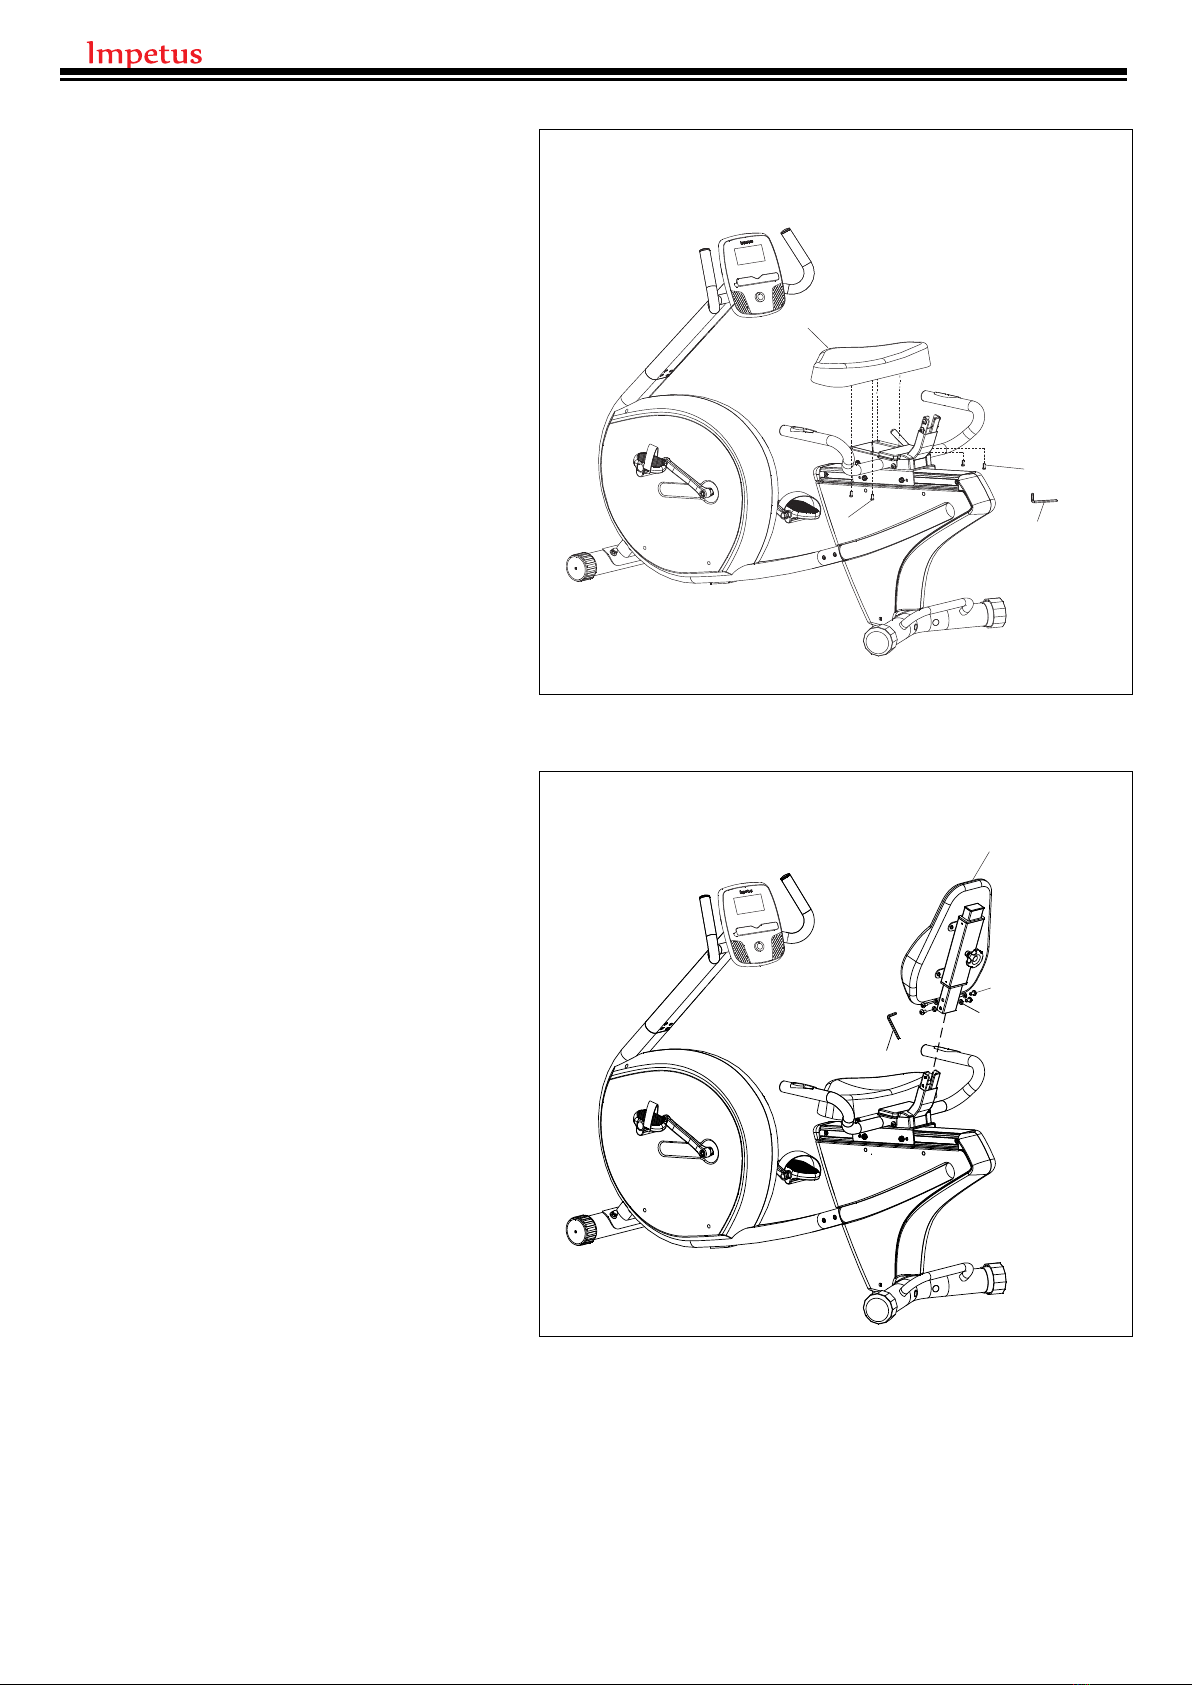
STEP 10
Put the seat (65) on the sliding
seat support of rear frame, then
adjust the hole to be a line and
then by 4 allen bolts (8), Allen key
(102) to firmly tight.
STEP 11
Insert the back rest support (J)
into the connector on Seat
support of rear frame, then by 4
Allen screws(47), 4 flat
washer(64) to secure and then
using Allen key (102) to tight
firmly
81
102
47
64
8
102
65
9
8
10
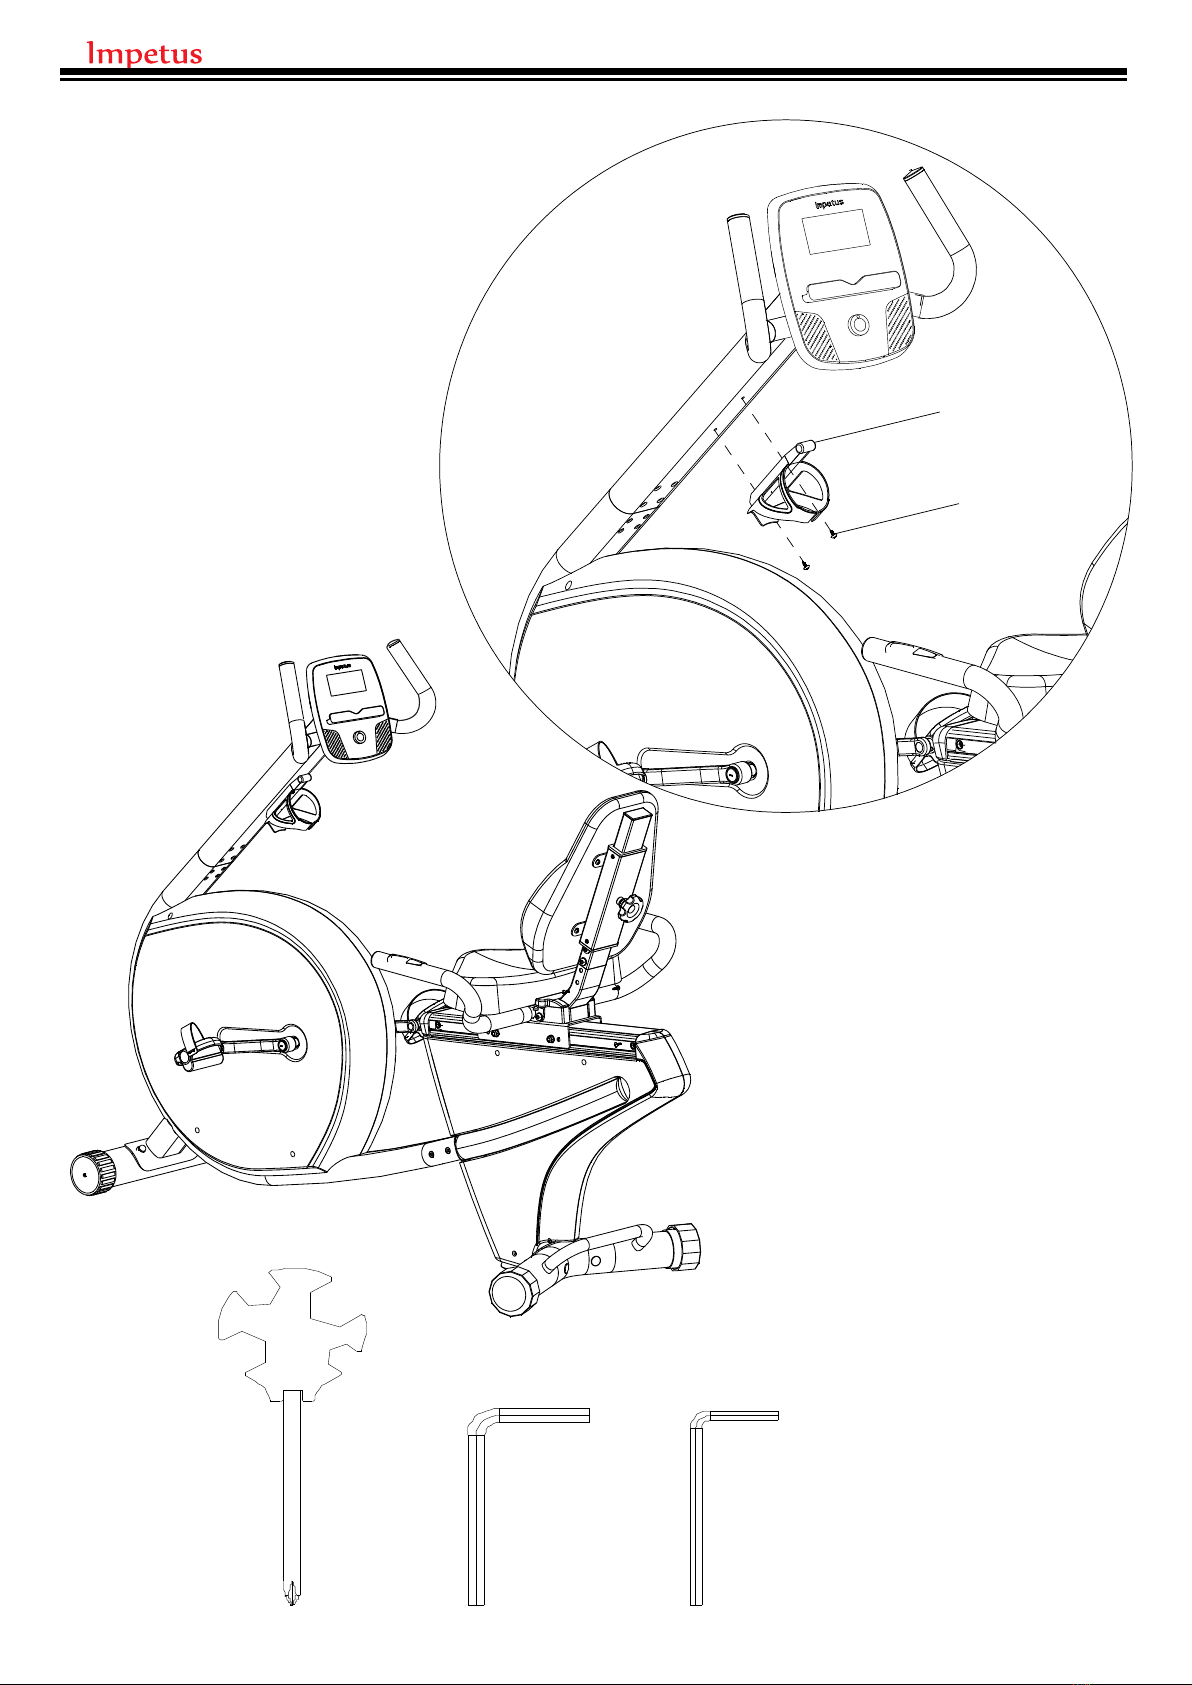
STEP 12:
Fix the water bottle(105) rack onto the
handlebar post with flat head screws
(110)and fasten with open wrench with
screw driver.
Tool:
105
110
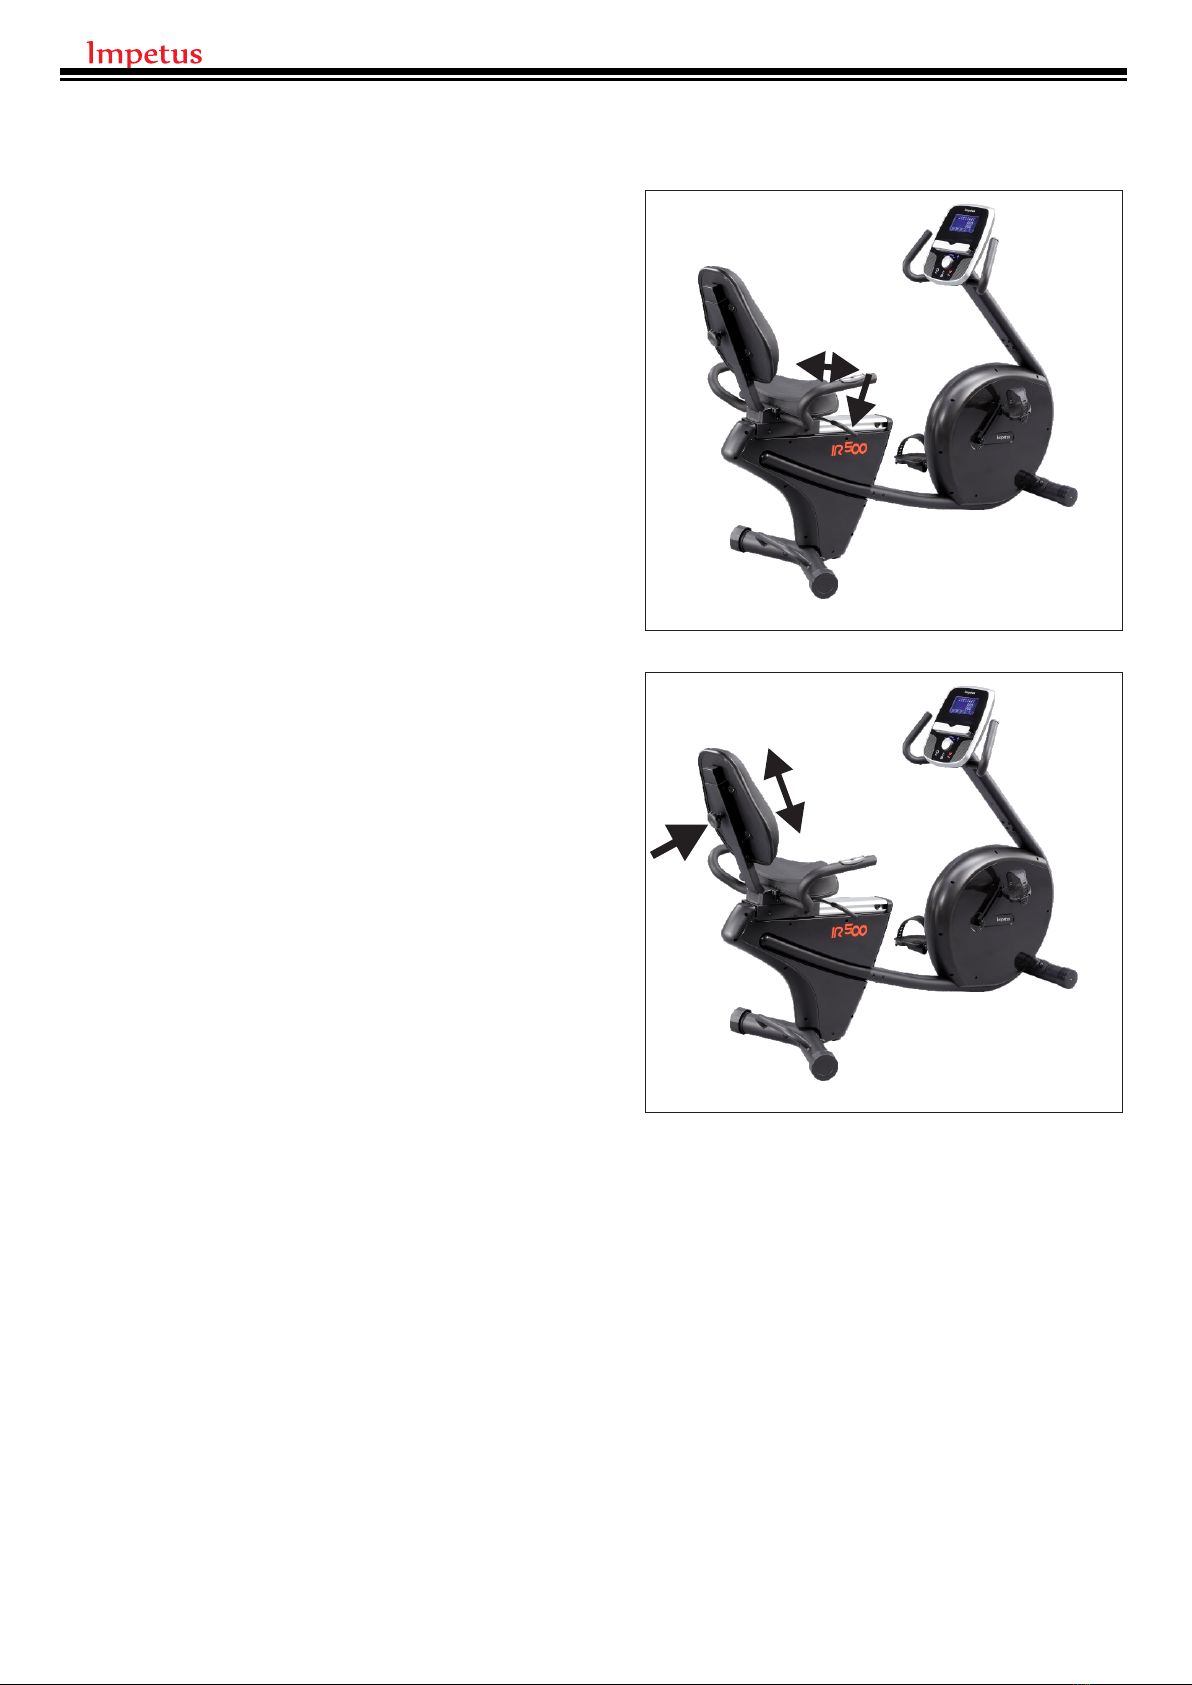
SEAT ADJUSTMENT
SEAT LATERAL POSITION
ADJUSTMENT
For a proper exercise, there should be a slight
bend in your knees when you extend your leg
on the pedal.
To adjust the lateral position of the seat, pull up
the adjustment handle to loosen it. Then, move
the seat forward or backward to the
comfortable position, and firmly push down the
adjustment handle to tighten it.
BACKREST HEIGHT ADJUSTMENT
To adjust the backrest height, loosen the seat
knob a few turns. Then, slide the backrest
upward or downward to the comfortable
position. Lastly, tighten the seat knob
11
AB
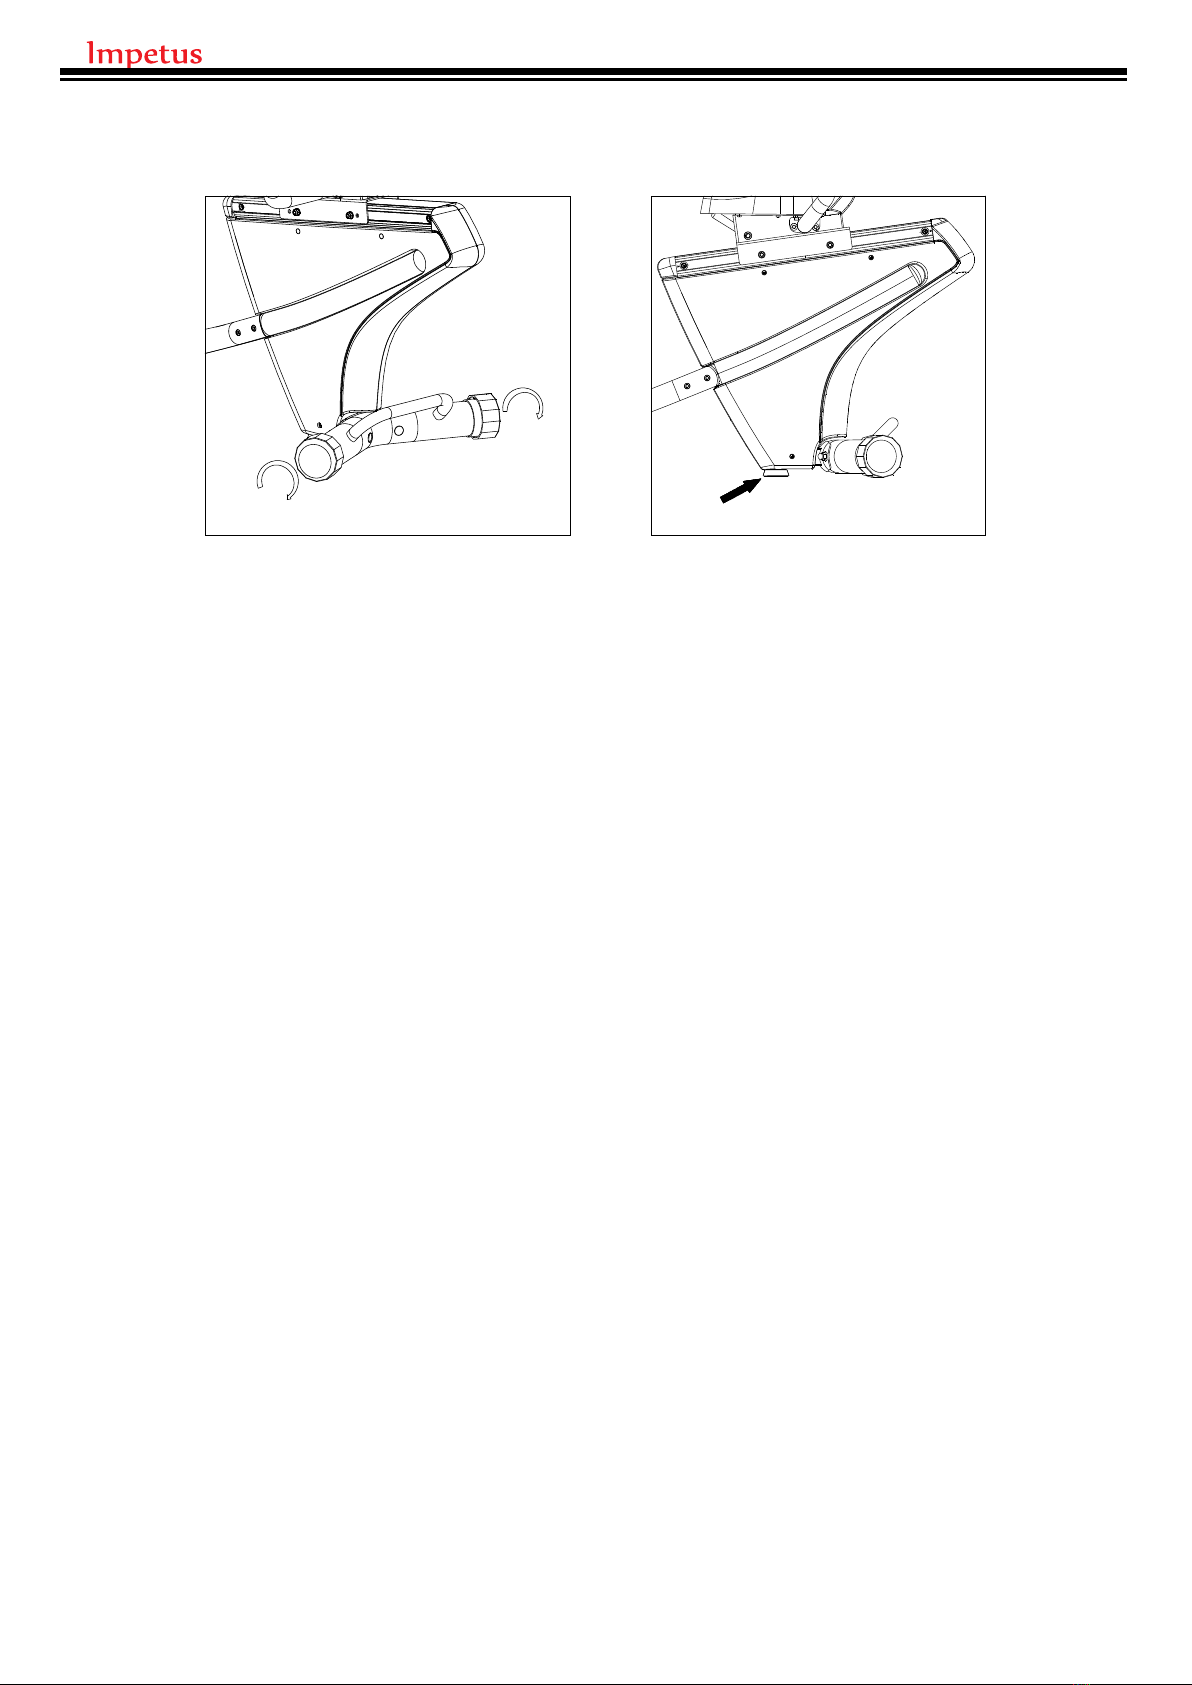
HOW TO ADJUST THE BALANCE OF THE TRAINER
Make sure the trainer is placed on the flat floor, and rotate the leveling foot A & B clockwise
or counter-clockwise, so the leveling foot touches the floor.
12
13
14

15
No. Part Name Qty No. Part Name Qty
1 Main frame 1 58 Rear stabilizer 1
2 Front stabilizer 1 59 end cap 2
3 Moving wheel 2 60 Sliding Seat support 1
4 Crank Axle 1 61 Wheel 4
5 Big Pulley 1 62 Bushing 4
6 Sleeve 1 63 Allen bolt(M8*30) 4
7 Bearing 2 64 Flat washer 10
8 Allen screw (M6*15) 4 65 Seat 1
9 Magnet 1 66 Allen bolt 5
10 Nylon lock Nut 4 67 Quick release level 1
11 Belt 1 68 Sleeve 2
12 Flywheel 1 69 C ring 2
13 Flange nut 2 70 Lever rod 1
16 Small motor 1 71 Sliding seat support top cover 1
17 Tension cable 1 72 Rear handlebar right 1
19 Spring 1 73 Rear handlebar left 1
20 Crank cap 2 74 Allen bolt 8
21 Power wire (lower) 1 75 Rear handlebar grip 2
22 Idle plate 1 76 Hand pulse 2
23 Hexagonal screw (M6 * 12) 3 77 Philip self-tap screw 2
24 Sleeve 3 78 End cap 2
25 Bearing 2 79 Rear frame cover left 1
26 C ring 1 80 Rear frame cover right 1
27 Front chain cover left 1 81 Back rest support 1
28 Front chain cover right 1 82 Plastic sleeve 2
29 Crank ( L ) 1 83 Sliding tube 1
30 Crank ( R ) 1 84 Square cap 1
31 Flange nut ( M10 ) 2 85 Philip Screw 4
32 Pedal ( L ) 1 86 Knob 1
33 Pedal ( R ) 1 87 Back rest 1
34 Hexagonal screw (M17) 1 88 Hand pulse lower wire 1
35 Sensor plate 1 89 Hand pulse wire 2
36 Sensor wire 1 90 Hand pulse middle wire 1
37 Carriage Screw (M10*P1.5*88mm) 4 91 Hand pulse front wire 1
38 Arc Washer 4 92 Transformer 1
39 Dome Nut 4 93 Monitor upper wire 1
40 Allen bolt 4 94 Monitor lower wire 1
41 Philip self- tap screw (M4*16) 34 96 Philip self-tap screw 2
42 Front Tube 1 97 Nylon sleeve 1
43 Allen bolt(M8*16) 18 98 Stop screw 2
44 Handlebar 1 99 Metal sleeve 2
45 Handgrip 2 100 Nylon sleeve small 1
46 Cap of handlebar 2 101 Hexagonal wrench (M4) 1
47 Allen bolt 4 102 Hexagonal wrench (M6) 1
48 Monitor 1 103 Open wrench with screw driver 1
49 Allen screw (M5*14) 4 104 Arcwart 2
50 Rear Frame 1 105 Washer 8
51 Aluminum rail 1 106 Hexagon socket 18
52 Square Nut 2 107 Control board 1
54 Rail stopper 4 108 Water bottle 1
55 End cap 1 109 Hexagonal wrench (M5) 1
56 Nylon lock nut 5 110 Philip Screw 2
57 Adjustable pad 1

16
WARM UP / COOL DOWN
Suggested Stretches
The following stretches provide a good warm-up and cool-down. Move slowly
as you stretch.
Ham String Stretch
Sit with one leg extended. Bring the sole of the
opposite foot toward you, resting it against the
extended leg's inner thigh. Stretch toward your toe as
far as possible, hold for 15 counts, then relax. Repeat
three times for both legs. .
Stretches: Hamstring, Lower Back and Groin
Inner Thigh Stretch
Sit with the soles of your feet together and knees
pointing outward. Pull your feet as close into the groin
area as possible. Hold for 15 counts, then relax. Repeat
three times.
Stretches: Quadriceps and Hip Muscles
Toe Touches
Stand with your knees bend slightly, slowly bend forward
from the hips. Allow your back and shoulders to relax as
you stretch down toward your toes. Go as far as you can
and hold for 15 counts, then relax. Repeat three times.
Stretch: Hamstring, Back of Knees, Back
Quadriceps Stretch
Stand on one foot with one hand hold onto the wall to
balance, raise the other foot behind you, and pull up your
foot as close to your buttocks as possible. Hold for 15
counts, then relax. Repeat three times.
Stretch: Quadriceps muscles, Hip muscle
Calf/Achilles Stretch
Stretch: Lower legs, Achilles tendons, and Ankles
With one leg in front of the other and arms out, lean
against the wall. Keep your back leg straight and back
foot flat on the ground; then bend the front leg and lean
forward by moving your hips toward the wall. Hold, then
repeat on the other side. To cause even further
stretching the Achilles tendons, slightly bend back leg as
well.
17
Table of contents
Other IMPETUS Exercise Bike manuals


