IMPETUS IR 6500am User manual


2
INTRODUCTION / IMPORTANT INFORMATION
PACKING LIST
ASSEMBLY INSTRUCTIONS
HOW TO MOVE THE TRAINER
TELEMETRIC HEART RATE CHEST STRAP
WARM UP / COOL DOWN
CLEANING & MAINTENANCE
RECYCLING INFORMATION
ADDITIONAL INFORMATION
3
5
7
12
14
15
16
16
16

A. Introduction
This user manual contains assembly, operation, maintenance and safety
information.
Please read and retain this manual for future reference.
B. Safety guidelines
a. Read the user manual and all accompanying literature. Follow it carefully
before using your machine.
b. This machine is intended for indoor home or commercial location use only.
c. Inspect your exercise machine prior to exercising to ensure that all parts are
tightened.
d. Make sure the trainer is stable on the floor. Avoid uneven surfaces.
e. Keep children under age of 14 and pets away from the exercise trainer at all
times.
f. Exercise equipment has moving parts. Keep others, especially children, at a
safe distance while exercise.
g. Make sure all devices are fully adjusted before use to avoid injury.
h. Remove all jewelry, including rings, chains and pins before exercising.
i. Always wear suitable clothing and footwear during exercise. Do not wear
loose fitting clothing that could become caught in the moving parts of your
exercise machine.
j. Warm up 5 to 10 minutes before each workout and cool down 5 to 10 minutes
afterward. This allows your heart rate to gradually increase and decrease and
will help prevent muscle strain.
k. Never hold your breath while exercising. You should breathe at a normal rate
in conjunction with the level of exercise being performed.
l. Rest adequately between workouts. Muscles tone and develop during these
rest periods.
INTRODUCTION / IMPORTANT INFORMATION
3

IMPORTANT:
THE MAXIMUM RECOMMENDED WEIGHT CAPACITY FOR YOUR
EQUIPMENT IS KGS.
WARNING:
Before commencing with any exercise program, please consult your
family physician. If at any time during exercise you feel faint, dizzy or
experience pain, stop and consult your family physician.
The safety level of the equipment can be maintained only if it is examined
regularly for damaged and wear.
The appliances are not for children under age of 14.
IMPORTANT:
Read all instructions carefully. Assemble the unit in accordance with the
steps in the manual. Lay out all parts on the floor and check if you have all
the parts included completely before beginning assembly. In case of a
discrepancy, please contact the customer service department
150
4
E1
G1
5
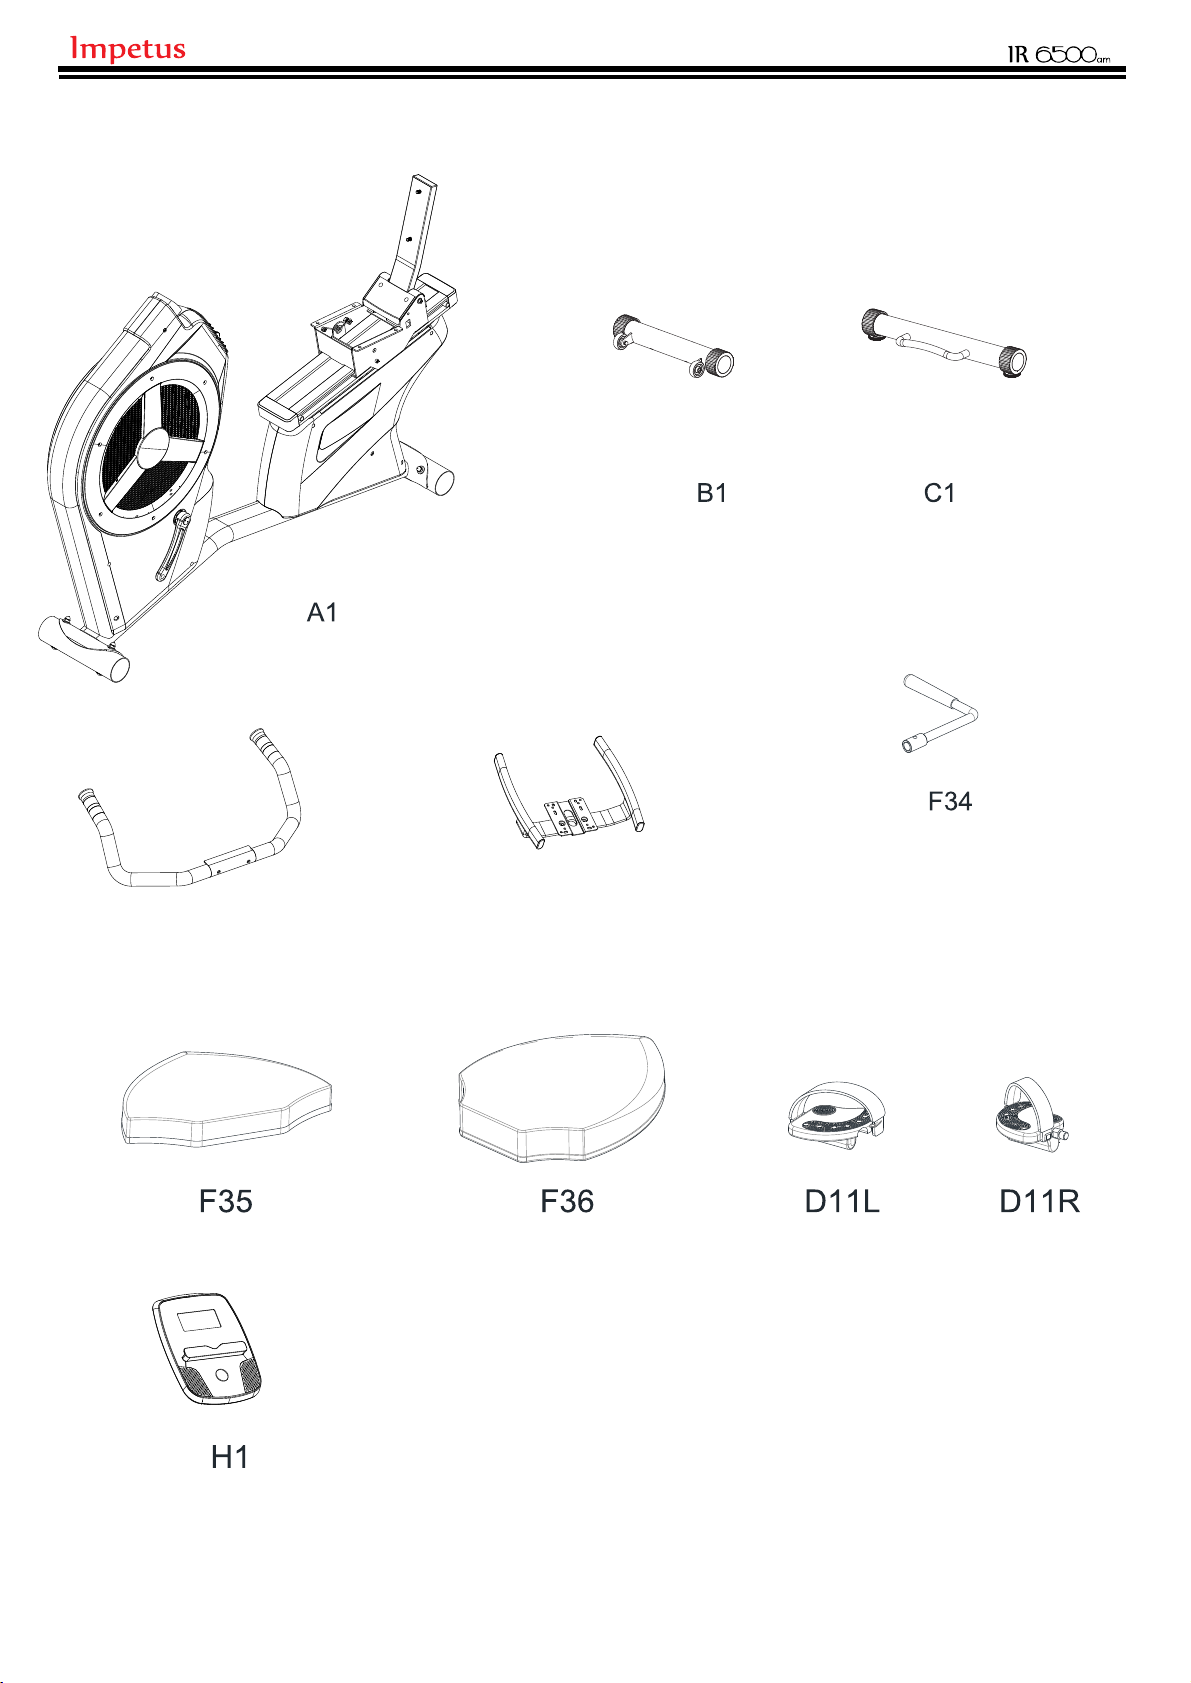
PACKING LIST :

Screw Driver
5mm 6mm
6
E6
screw M8*55mm 2PCS
E7
washer M8*Ø19*1.5T 2PCS
G3
screw M8*20mm 2PCS
screw M8*16mm 8PCS
A12
screw M6*12mm 1PCS
F33
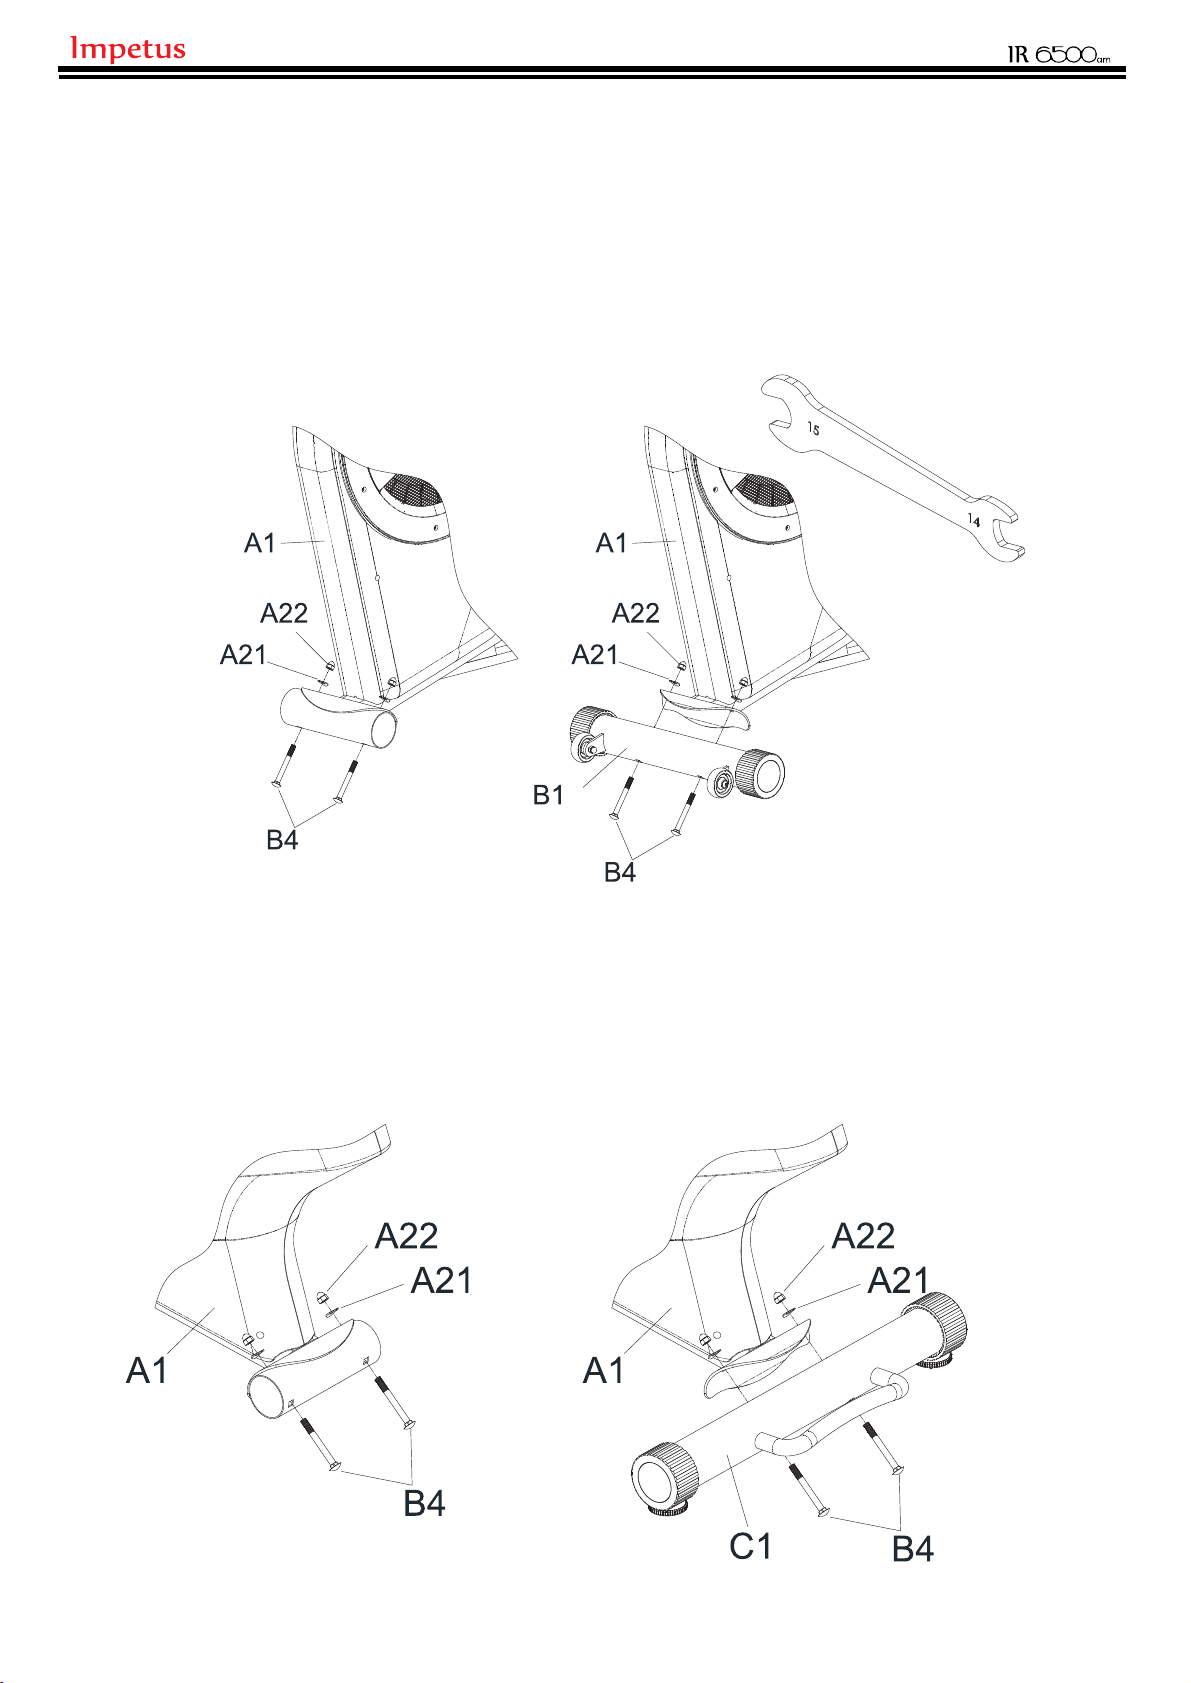
STEP 1
1. Remove two BOLTS (B4), two WASHERS (A21), two NUTS (A22) and a
PACKING TUBE from the MAIN FRAME (A1).
2. Attach the FRONT STABILIZER (B1) to the MAIN FRAME (A1) using two
BOLTS (B4), two WASHERS (A21) and two NUTS (A22) removed earlier.
STEP 2
1. Remove two BOLTS (B4), two WASHERS (A21), two NUTS (A22) and a
PACKING TUBE from the MAIN FRAME (A1).
2. Attach the REAR STABILIZER (C1) to the MAIN FRAME (A1) using two
BOLTS (B4), two WASHERS (A21) and two NUTS (A22) removed earlier.
7
ASSEMBLY INSTRUCTIONS :

STEP 3
Attach the SEAT RAIL ADJUSTMENT BAR (F34) to the SEAT FRAME (F1)
using SCREW (F33).
8
STEP 4
Attach the SEAT (F35) to the SEAT FRAME (F1) using four SCREWS (A12).
A12

9
STEP 5
Attach the BACK CUSHION (F36) to the BACKREST FRAME (F2) using four
SCREWS (A12) .
STEP 6
1. Connect the WIRE (E8) of REAR HANDLEBAR (E1) to the WIRE (F42)
of SEAT FRAME (F1).
2. Attach the REAR HANDLEBAR (E1) to the SEAT FRAME (F1) using two
SCREWS (E6) and two WASHERS (E7).
E1
E8
F1
F42
E7 E6
A12

STEP 8
1. Insert WIRES (A10 & A15) through the FRONT HANDLEBAR (G1).
2. Attach the FRONT HANDLEBAR (G1) to the MAIN FRAME (A1) using two
SCREWS (G3).
3. Remove four SCREWS (H2) from the back of the CONSOLE (H1).
4. Connect WIRES (A15 & A10) to the CONSOLE (H1) and carefully tuck the
wires into the MAIN FRAME (A1).
5. Attach the CONSOLE (H1) to the MAIN FRAME (A1) using four SCREWS
(H2) removed earlier.
H1
H2
G3
G1
A1
A10
A15
A15 A10
5MM
10

1. Attach the RIGHT PEDAL (D3R) to the CRANK (D4R) using the wrench
provided and rotate in the direction as the picture shown.
2. Repeat the above step for the other side.
D4L D4R
D3L
D3R
STET 9
11
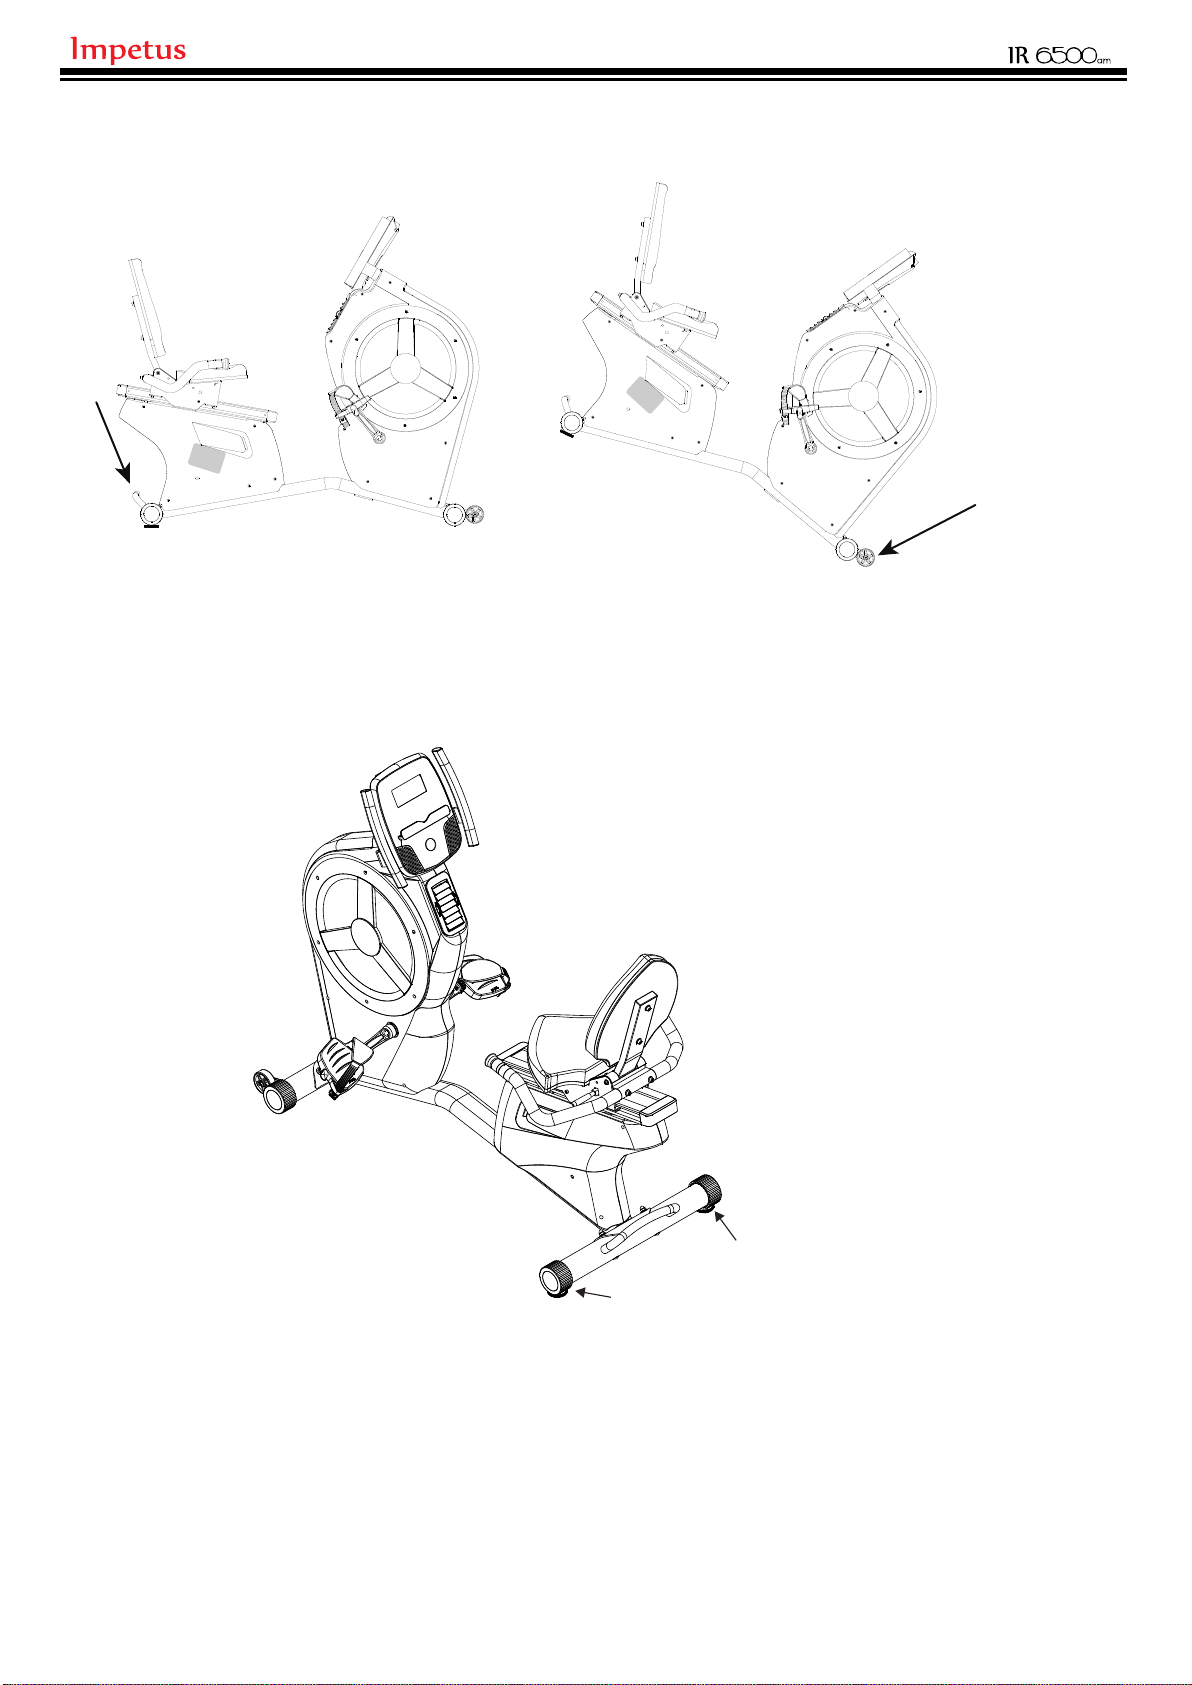
HOW TO MOVE THE TRAINER
1. Hold the handle and lift the trainer up, so the transport wheels touch the floor.
2. Move the trainer to your designated position while lifting the trainer.
3. Carefully let down the trainer.
Make sure the trainer is placed on the flat floor, and rotate the leveling foot clockwise or
counter-clock wise, so the leveling foot touches the floor.
HANDLE
TRANSPORT
WHEEL
12

Adjust the seat angle while pushing down the left seat handle. Let go of the
seat handle when the adjustment is complete.
13
SEAT ADJUSTMENT
SEAT LATERAL POSITION ADJUSTMENT
To adjust the lateral position of the seat, pull up the seat handle. Then, move the
seat forward or backward to the comfortable position, and
firmly tighten the seat handle.
SEAT ANGLE ADJUSTMENT

14
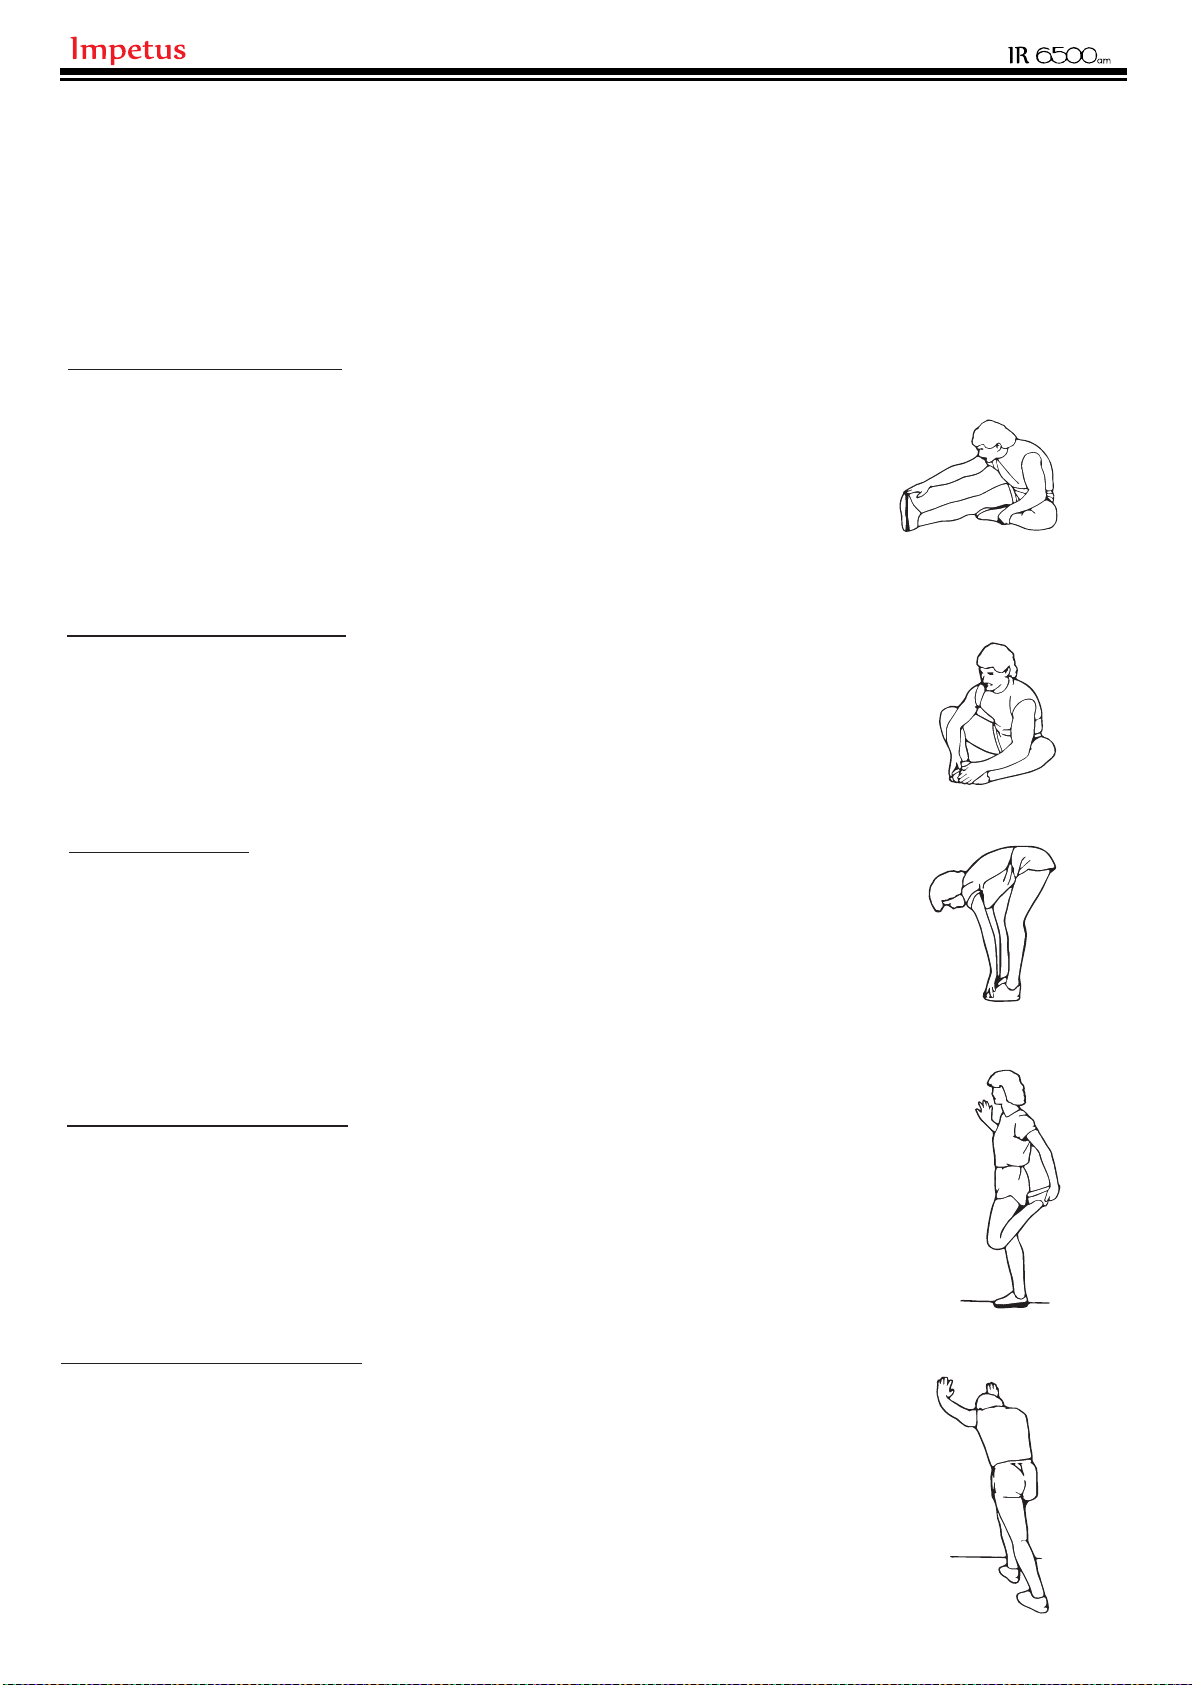
WARM UP / COOL DOWN
Suggested Stretches
The following stretches provide a good warm-up and cool-down. Move slowly
as you stretch.
Ham String Stretch
Sit with one leg extended. Bring the sole of the
opposite foot toward you, resting it against the
extended leg's inner thigh. Stretch toward your toe as
far as possible, hold for 15 counts, then relax. Repeat
three times for both legs. .
Stretches: Hamstring, Lower Back and Groin
Inner Thigh Stretch
Sit with the soles of your feet together and knees
pointing outward. Pull your feet as close into the groin
area as possible. Hold for 15 counts, then relax. Repeat
three times.
Stretches: Quadriceps and Hip Muscles
Toe Touches
Stand with your knees bend slightly, slowly bend forward
from the hips. Allow your back and shoulders to relax as
you stretch down toward your toes. Go as far as you can
and hold for 15 counts, then relax. Repeat three times.
Stretch: Hamstring, Back of Knees, Back
Quadriceps Stretch
Stand on one foot with one hand hold onto the wall to
balance, raise the other foot behind you, and pull up your
foot as close to your buttocks as possible. Hold for 15
counts, then relax. Repeat three times.
Stretch: Quadriceps muscles, Hip muscle
Calf/Achilles Stretch
Stretch: Lower legs, Achilles tendons, and Ankles
With one leg in front of the other and arms out, lean
against the wall. Keep your back leg straight and back
foot flat on the ground; then bend the front leg and lean
forward by moving your hips toward the wall. Hold, then
repeat on the other side. To cause even further
stretching the Achilles tendons, slightly bend back leg as
well.
15

This electronic product must not be disposed of in municipal
waste. To pre-serve the environment, this product must be
recycled after its useful life as required by law.
RECYCLING INFORMATION
Please use recycling facilities that are authorized to collect this type of waste
in your area. In doing so, you will help to conserve natural resources and
improve European standards of environmental protection. If you require more
information about safe and correct disposal methods, please contact your local
city office or the establishment where you purchased this product.
ADDITIONAL INFORMATION
1. The console requires 9V, 1.3A adaptor.
2. After 4 minutes of non use the console enters into power save mode, all
setting and exercise data are stored until a user starts the trainer again.
CLEANING & MAINTENANCE
Inspect and tighten all parts of the exercise trainer regularly. Replace any worn parts
immediately.
To clean the exercise trainer, use damp cloth and a small amount of mild soap.
IMPORTANT: To avoid damage to the console, keep liquids away from the console and
keep the console out of direct sunlight.
CONSOLE TROUBLESHOOTING
Read console troubleshooting section in the console manual for assistance.
16
Table of contents
Other IMPETUS Exercise Bike manuals


