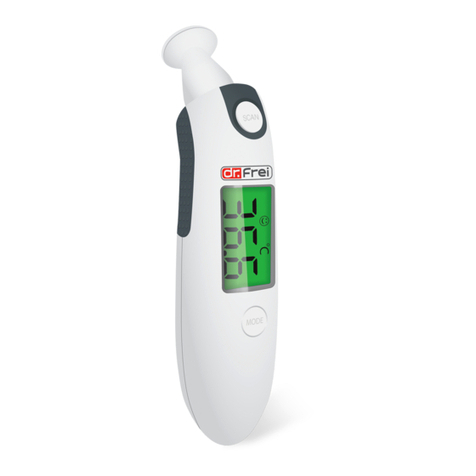
in4 care KI-8180 User manual

12
3
Parts Identification
What are normal temperature
values?
Human body temperature varies from
person to person. One person's body
temperatures are different from time to
time. Therefore, it is very important to
know your normal body temperature
range. Because of this, we
recommend that you measure yourself
when healthy to establish reference
temperatures which will make you feel
more confident of the measured
Information You Should Know Before
Operating the IR Ear Thermometer
Precaution ...................................... 1
Parts Identification........................... 2
Information You Should Know
Before Operating the IR Ear
Thermometer................................... 3
Preparation for Use ........................5
How to Operate the Thermometer...... 6
Memory Mode ................................. 9
Cleaning and Care..........................12
Error Message............................... 13
Limited Warranty ........................... 13
Specifications ............................... 14
Declaration................................... 15
Clock and Ambient Temperature
(AT) Measurement.........................10
Contents
Why IR ear thermometer?
The tympanic membrane (eardrum),
and the hypothalamus, the part of the
brain which controls body temperature,
share a common blood supply, so
tympanic readings rise and fall rapidly
with core temperature (deep-body
temperature). This makes the ear
temperatures one of the best indicators
of internal body (core) temperature.
How to use the IR ear thermometer
correctly?
1.It is useful to try this thermometer on
yourself first to become familiar with
its operations.
2.Please do not take the temperature
immediately after waking up.
Sleeping on the ear may cause the
temperature to be higher than normal.
3.It is common for the readings to be
slightly different between the right
and the left ear. Therefore, we
suggest using the same ear to obtain
temperature.
4.To make the ear canal straight for
measurement:
For Children under 12 months:
Make the ear canal straight by pulling
the ear back.
For Children over 12 months
and Adults:
Make the ear canal straight by
pulling the ear back and up.
5. This IR ear thermometer
automatically converts measured ear
temperature reading to oral
temperature.
Precaution
1.Please consult your physician to
verify your body temperature.
2.DO NOT scrape or scratch the lens
as it will hamper the effectiveness of
the device.
3.The device is intended for
consumer-use only.
4.
two years.
Calibration is recommended every
INSTRUCTION
MANUAL
0197
4-in-1 Infrared Ear Thermometer
(Ear、Forehead、Amb ient Temp
and clock mo de)
Model KI-8180
POWER SOURCE
SIZE AAA (1.5V) x 2
WARRANTY:
ONE YEAR FROM THE DATE OF
PURCHASE.
Probe attachment
(for forehead use)
LCD Display
Power
Button Probe
Battery Cover
Memory
Button
IN4 Technology Corporation
E-mail: service@in4care.com
Web site: www.in4care.com

5
Preparation for Use
4
Why / How to use IR forehead
thermometer correctly?
1.It is useful to try this thermometer on
yourself first to be familiar with it.
2.The thermometer should be in the
room where measurement will be
taken 20-30 minutes prior to
measurement. The person whose
temperature is being taken should be
in the same room at least 20 minutes
before the measurement.
3.Keep the forehead clean from sweat,
make-up, etc.
4.Avoid taking measurement for 30
minutes after physical exercise,
bathing or eating.
5.Body temperature, like blood
pressure, varies from person to
person, and during the day, it may
range from 35.5°C to 37.8°C (95.9°F
to 100.0°F). The forehead
temperature is converted by the
thermometer to the commonly used
oral temperature. For some people it
may show some difference from their
normal oral temperature. It is
recommended to learn and
recognize the forehead temperature
while healthy. For accurate results,
measure the same area on the
forehead each time a temperature is
Taken.
Information You Should Know Before
Operating the IR Ear Thermometer
6
How to Operate the Thermometer
7
How to Operate the Thermometer
Installing/Replacing the Battery
1. Pull the battery cover off in the
direction shown.
2. Install two new "AAA" batteries into
the battery compartment matching
correct polarities.
3.Replace and fasten the battery cover
securely.
123
Warning:
Do not put used batteries in trash .
Recycle or manage as hazardous waste.
Never dispose of batteries in fire.
Dispose in recycling trash only. Do not
recharge, put in backwards or
disassemble. This may cause explosion,
leakage and injury.
Caution:
When replacing batteries, do not mix old
ones an new ones. Do not mix alkaline,
standard(carbon-zinc) or
rechargeable(nickel-cadmium) batteries.
1. Press and release the On/Off button
to turn on the unit. The display will
show the last memory(Figure1) . A
beep is heard. After about 2
seconds, the display shows that the
unit is ready for measurement.
(Figure2)
2. Place the probe into the ear canal
then press and release the On/Off
button to start measurement. (You
will hear a beep.)
3. While it is measuring, the display
will show as (Figure3).
4. A "beep-beep"sound is heard when
the measurement is completed.
(Figure4)
5. If the temperature reading is above
38°C, eight consecutive beeps will
be heard to indicate fever alarm.
6. Wait the hourglass disappear, the
display will show the ready for
measurement (Figure2), now you
can start a new measurement by
press On/Off button again.
Forehead mode
7. Press the M botton for 2 seconds, it
will switch from "Ear" mode to
"Forehead" mode(Figure5). You
need to apply the probe attachment.
8. Place the probe attachment on the
probe of the thermometer then place
it on the middle of the forehead.
Ensure proper contact between
forehead and probe.
(Figure3)
(Figure6) (Figure7)
(Figure2)
M
ON
(Figure4)
(Figure8) (F i gur e 5)
(Figure1)
9. Press the On/Off button to start
measurement with moving the probe
across the left or right side of the
forehead to the temporal artery for at
least three seconds(Figure6),during
the measurement the display shows
as (Figure 7) then release the On/Off
button.
10. You will hear a "beep-beep"sound
with the measuring value showed
as (Figure8)
11. Turn off the unit :It will auto power
off in 1 minute.

8
How to Operate the Thermometer
Operational Hints:
1. Between each measurement, please
allow a 5-second interval in order to
obtain the most accurate result.
2. Ensure that the probe lens is clean
before each measurement. Dirty
probe lens may cause inaccurate
measurement.
3. Because the thermometer is a very
sensitive device, it must be at room
temperature (approx. 16~40°C) for
at least 30 minutes before using to
avoid any incorrect measurements.
Warning : Performance of the
device may be degraded if the
device is operated or stored outside
the stated temperature and humidity
range or if the patient's temperature
is below ambient (room)
temperature.
9
Memory Mode
Recalling Memory:
1. Turn on the power first .
2. Press M button.
3. For models with 10 memories
Press the M button repeatedly will
take you to each recorded
temperature in the memory. you may
toggle the button to see the
recorded temperatures.
4. You can start a new measurement by
press On/Off button again or it will
power off automatically in 1 minute.
Memory Mode
10
Mode Selection
There are four display modes with this
unit: Ear/Forehead/Ambient
Temperature(AT)/clock
1.Please press and hold the M button
for 2 seconds to enter selection mode
when the unit is ready for
measurement.
2.Press and release the M button to
switch from Ear→Forehead
Ambient Temperature(AT)→
clock Mode.
→
3.You can press and hold the ON button
for 2 seconds to turn off the unit in
the AT or Clock Mode.
4.You can set the clock when the unit in
the Clock Mode. The detail please
refer to "Setting the Clock".
11
Setting the Clock
1. Wait the hourglass
disappear, the display will
show the clock.
2.Press and release the M
button to see the hour. The
display will show a
blinking hour.
3.Press and release the ON button to
adjust the hour when it is blinking.
4.Then press and release
M button to set minute. The
display will show a blinking
minute.
5.Press and release the ON button to
adjust the minute when it is blinking.
6.Press and release the M button to
validate the clock setting.
7.You can press and hold the ON
button for 2 seconds to turn off the
unit.
or
For Centigrade and Fahrenheit
Switchable Models:
The Centigrade or Fahrenheit mode
can be switched when the unit is ready
for a measurement. First ,pressing the
M button then immediately press the
On/Off button. The display will show
"F" or"C". Then it will back to Memory
mode display (also see memory mode).

or
No display
Message Corre cti on
The temperature
measured was higher
than the specified
measuring range. Please
measure again.
The temperature
measured was lower
than the specified
measuring range. Please
measure again.
The am bi ent (room )
temper atur e was out side
the oper ating range. Keep
it at roo m temperat ure
(app rox. 16 °C~40 °C) for
30 minu tes befor e usi ng .
Replace the two
"AAA" batteries
Error Message
This thermometer is guaranteed for
one year from the date of purchase
against manufacturer's defect under
normal, household use . Following the
instruction closely will ensure years of
dependable operation.
If the thermometer does not function
properly, first check the batteries (see
battery replacement instruction) and
replace them if necessary.
Limited Warranty
14
Failed self-diagnostic test.
Reinstall batteries and try
again.
12
13
Please do not
modify or disassemble
the unit.
Please use a cotton
swab with alcohol to
gently clean the surface
of the lens. Before next
measurement, wait at
least 40 minutes for the
unit to dry.
Cleaning and Care
Please avoid thinner
and benzene or other
harsh cleaners.
Please remo ve the
batteries if the unit will
not be used for a long
time .
Please keep the unit in a
suitable place avoiding
high temperature, direct
sunlight, high moisture,
and dust. The unit is not
water proof.
Please do not drop the
unit. It is not shock-proof.
Warning: following
mechanical shock, the
unit should not be used
before re-calibration.
Z
Z
Z
Power Source
Two "AAA" (1.5Vx2) batteries
Measuring Range
Ear Mode: 0.0 ~100.0 (32 ~212 )
Forehead Mode:
32.2 ~43.3 (90 ~109.9 )
Ambient Mode : 10.0~40.0 ,(50~104 )
Resolution
0.1 ( )
Accuracy
0.2 (0.4 ) for blackbody temperature
range 35.5-42.0 (95.9-107.6 ) ; Other
ranges ±2%
Memory
10 sets
Low Battery
Replace the batteries if the low battery
indicator appears.
Auto Power Off
Auto shut off after one minute of non-use
Battery Life
Approximately 1000 measurements.
Operating Environment
16.0~40.0 (60.8~104.0 , < 95% RH
Storage Environment
-25.0~55.0 , (-13~131 ),< 95% RH
103x51x40mm
Weight
°C °C °C °F
°C °C °F °F
°C °F
°C °F
°C °F
°C °F
°C °F)
°C °F
Approximately 62g (including batteries)
Dimensions
Guarantee of Quality
Certification ISO 13485
Conformity EN 12470-5 & IEC 60601-1
ASTM E 1965-98
Specifications
This infrared thermometer meets
requirements established in ASTM standard
(E 1965-98). Full responsibility for the
conformance of this product to the standard
is assumed by K-jump .
Other in4 care Thermometer manuals

